

I don’t write on my quilts. I have yet to find a pen or pencil that I trust enough, so I just avoid it as much as possible. I use a Clover Hera Marker* for marking straight lines, which is fabulous since it creases the fabric without actually leaving a mark. (*Affiliate link) But when it comes to complex designs or words, I either have to eye it or just wing it.
When I thought of the idea to write baby Reagan’s name in the heart speech bubble of her Pinkalicious Hazel Hedgehog quilt, I knew there must be a way to get her name to show up accurately but subtly among the matchstick quilting I had planned within the heart. Enter: Freezer Paper. I’ve had freezer paper in my sewing space for over a year, since Grammy June told me it was a must have for paper piecing back when I was first learning. Since I really enjoy foundation paper piecing using plain old copy paper, I have yet to touch the freezer paper. Until today.

Here’s a quick little tutorial on how I used freezer paper to help quilt words in negative space.
Relief Quilting Words in Negative Space
Step 1
 Gather your materials. You will need:
- Freezer Paper (I’ve read high quality brands like Reynolds work better than Costo-type brands)
- Pencil
- Scissors
- Iron
- Thread for quilting (I used 50wt Aurifil variegated thread)
- Your quilt!
- Optional: printer paper and printer
Step 2
 Print a sample of the word you want to quilt, scaled to fit in the proper space. Trace onto the dull side of the freezer paper (shiny side away from you). Alternately, you could just draw the letters onto the dull side of the freezer paper–entirely up to your desired look.
Step 3:
 Cut out the letters carefully, using paper-cutting scissors (not your special fabric ones!)
 Arrange on your quilt as desired.
Step 4
 (Note: before ironing your letters to your actual quilt, always test the freezer paper on a scrap of the same fabric. The freezer paper should stick to the fabric, and after cooling should be easily peeled off without leaving any mark or residue.) Iron your letters to your quilt. The shiny side of the freezer paper will stick to the fabric.
Step 5
 Matchstick quilt around the letters. I used Aurifil 50wt variegated Bubblegum-3660 to match the background fabric, since I wanted the name to be subtle. Use contrasting thread to make the name stand out more.
 Here is a *rough* sketch of the path I took while quilting. I used my walking foot to matchstick quilt the entire background, stitching two stitches in the ditch along the outsides of the heart to travel from line to line, rather than having a *million* thread ends to bury. I actually stitched every other line backwards, holding down the “sew in reverse” button for the entire line of quilting. This was easier to me than maneuvering my entire quilt back and forth, and worked just as effectively.
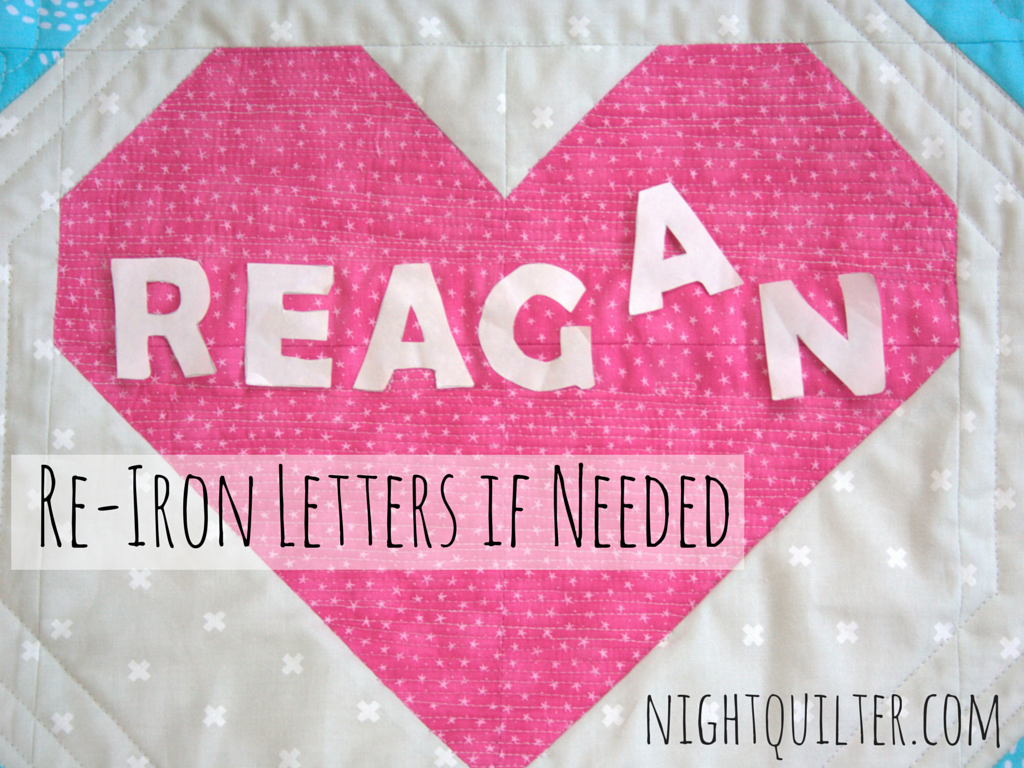 Note: After using your walking foot to matchstick quilt the background (around the periphery of the letters), some of the freezer paper letters may have come unstuck.
 Iron them on again, using the little indents (if your letters had any) as a guide.
 Next, free motion quilt the matchstick quilting within and between the letters, since the space is so small and back and forth quilting is much easier free motion style (you don’t have to twist and turn your entire quilt like you would using a walking foot!). Be sure not to quilt onto the freezer paper.
Step 6
 Peel off the freezer paper letters. Bury any threads.
Step 7
 Admire your relief quilted name!
I’m linking up with Late Night Quilter’s Tips & Tutorials Tuesday. I hope you found this helpful, and let me know if you try it!

Great idea — thanks for sharing it. I see a lot of people mention burying their thread ends. What advantage is there for this, as compared to simply backstitching and trimming off? Thanks.
LikeLike
Hi Melanie! Burying thread ends is a neater, more traditional quilting method that makes the final outcome look cleaner (since you don’t see the backstitches and little thread tails popping up.) To be honest, I use both methods—especially when FMQing, I do use the backstitch and trim method a lot more often. When straight line quilting, or when making a quilt I know will be inspected, either as a gift to another quilter or to submit to a show, I knot and bury thread ends. I think it’s a matter of preference. My Grammy’s traditional quilting “rules” have rubbed off on me, so I have that little voice saying “bury your threads!” even though backstitching and trimming is faster.
LikeLike
Thanks so much for the complete answer. I haven’t done show quilts, but I can imagine there would be advantages to both ways otherwise.
LikeLiked by 1 person
It turned out beautifully, Kitty! I love the extra puff of the letter, and a great tutorial on your method to boot!
LikeLiked by 1 person
I just LOVE it!!! I will let you know how it turns out. Might just try it on something small to start. This one goes in the favorite file for sure.
LikeLiked by 1 person
Kitty, I sure wished you lived closer. I love this. Your creativity is just my style.
LikeLiked by 1 person
Kitty, This is AWESOME!!! I absolutely love the effect and will pin for future reference. I can’t wait to incorporate this into a project. As for quilting in reverse…. Yikes!! Go Kitty! I keep thinking of you and that new baby that is soon to come. Hope you are feeling well. Bet your littles are getting excited to meet their new sibling. 🙂
LikeLiked by 1 person
Really well-done tutorial. I read these things even if I have no immediate use for them — just to see how the writer does tutorials generally. Yours was really well-done, and you’ll get a tiny bit of $ from Amazon bc I bought the tool you recommended, clicking through!
LikeLiked by 1 person
This is really cool! I have some small square with a center heart pieced and this would be a great idea to just do matchstick quilting with “LOVE”. Thanks so much for the idea. This is the first time I have heard about this type of machine quilting.
Elaine McKee Filos elmf53@hotmail.com 305.323.4257 cell
Date: Tue, 19 May 2015 13:28:03 +0000 To: elmf53@hotmail.com
LikeLiked by 1 person
This is terrific Kitty! Your idea of going in reverse totally solve the problem I was having when doing this type of lettering. The stitching diagram was very helpful. Thanks for the great tips!
LikeLiked by 1 person
Very clear tutorial and elegant effect on the quilt. I’ll do it someday. Meanwhile. I thought my freezer paper had gotten too old because it wasn’t sticking. Then I read to use dry iron. (I’ d been using steam.) It then stuck well. (I use freezer paper for piecing circles–haven’t branched beyond yet.)
Like others, I bury knots on “good” quilts but don’t on more utilitarian ones. I just found SpiralEye needles which makes burying easier. http://www.spiraleyeneedles.com/
LikeLike
Shut up! You just blew my mind. This is such a neat way to add a little something personal without having to center the design of a quilt around that personalized touch.
To prevent the letters from shifting you could always just block that space with painter’s tape then add the letters when you come back to FMQ. It’d be a bit fussier with the notch in the “A” but might be a good solution for other names and phrases!
LikeLiked by 1 person
This is so clever, thanks for sharing!!
LikeLike
Oh, now your talking my language with freezer paper… my medium of choice next to fabrics! I think I could freezer paper just about anything that doesn’t move! I really use it a lot with applique projects because it gives such a nice, clean finished edge… I will do just about ANYTHING to avoid zig-zig finishing an applique.
Great tutorial! Congrats on your finish!
LikeLike
Very cool tutorial, I am going to have to try this. Thanks for sharing.
LikeLike
What a nice, clear tutorial! That’s a great way to use the freezer paper and avoid the risk of markings that make not go away permanently. I’ve used the forward/backward walking foot and free-motion combination to get around the spikes on my Visions of Acoma quilt (http://www.sewmamasew.com/2014/08/visions-of-acoma-paper-pieced-quilt/), but you actually explained it so others can successfully employ the tactic, which is super awesome.
LikeLike
Now I’m going to have to think of a project I can make to try this out for myself! Thanks for sharing!
LikeLike
Thank you so much for your tutorial! The stitching path was especially helpful. About the issue of the letters falling off, I was thinking you could have sewed along the edges of the paper, outlining the letters, before your matchstick and then you wouldn’t have to worry about running into the paper.
LikeLike
Great tutorial. I will definitely try this. I use freezer paper often in my quilting, but I hadn’t thought of this. Thank you.
LikeLike
Ohhh, I love it! I saw this type of relief quilting for the first time on a Craftsy class and its been on my “to-try” list for a while. Using Freezer paper is a brilliant idea!
LikeLike
Very clever idea. I’ve used Press’n Seal before to write on top of my quilt and then quilt directly through it to outline letters or a design but I think I like this idea better.
LikeLike
I’ve always wanted to try that – thanks for such a clear post on how to do it!
LikeLike