
This year I’ve dedicated myself to focusing on nurture–nurture of my children, my family, myself, and well… my sewing know-how! With a big project finally wrapped up (I’ll share more about that a bit later), I allowed myself to stretch WAY out of my comfort zone a bit and begin to work on fine-tuning two big aspects of quilting into which I haven’t yet delved too deeply: improv and curves.

For the past week or so, I’ve been playing and experimenting with improv in response to the Bee Sewcial theme for March, which was suggested by Hillary from Entropy Always Wins. For those of you who are not yet familiar with Bee Sewcial, it’s a sewing bee with a bunch of super talented improv quilters, where each member suggests a general theme/prompt and color scheme each month and the bee members have free reign to sew their interpretations of the prompt. I’ve been blown away and inspired by the blocks these uber talented women create, and I’ve been meaning to play along using their prompts as inspiration.
 This month, Hillary invited her Bee Mates (and others playing along with #inspiredbybeesewcial) to “explor[e] the idea of layers (components that appear to be in the foreground and components that appear to be in the background) in your block design using the colors of this peeling paint image by Richman as a guide.” She asked that we bring at least two “layers” to our designs but said that we may add more. She requested specific Kona colors consistent with the Richman image. I encourage you to read her post for more details, here. I was immediately smitten.

I ordered the suggested colored fabrics, reviewed an impromptu lesson on the six-minute circle style form of improv curve sewing that Stephanie from Spontaneous Threads was kind enough to walk me through a month or so ago on Instagram, and began plotting.
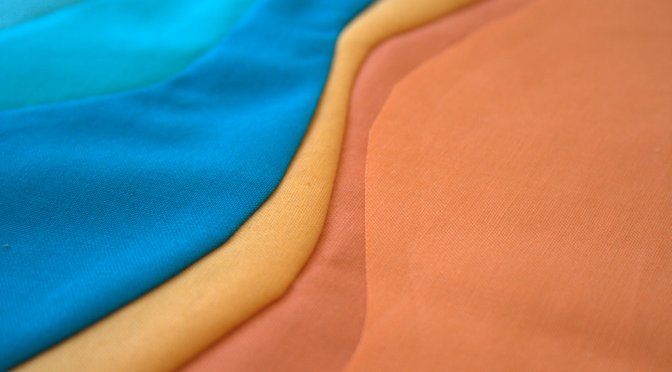
 I added two already-stashed Kona oranges (orange and persimmon) to add a bit more depth to the foreground and got started. I began with the lightest robin egg blue and built out from there.
 A really fun aspect of being active on Instagram is the immediate feedback and visible spread of inspiration. While I was working on this creation, I posted updates along the way, as is my style, and a number of people expressed interest in trying it themselves (a couple have even sewn up a block already!). Since this is my very first time trying this method in earnest, I gave the best basic directions I could and directed them to the “six minute circle” technique. I applied the six minute circle basics of cutting the shape plus seam allowance, clipping curves, pressing the seam allowance with an iron, glue basting down, and then sewing along that pressed seam (from underneath the top fabric, so the stitches are hidden).
Note that in the photo above, I pressed the seam allowance on the orange piece and sewed it that way. In hindsight, because of the sharp curve of that mountain on the right, I should have done the reverse and cut and pressed the seam allowance on the layered piece and sewn down to the orange. This may seem clear as mud, but I’m hoping that as I practice this method and get more well versed in what consistently works, I will be better able to show you how to do it!
 To solve my steep mountain, tight sewing space problem, I decided to hand-stitch the steep part of the mountain down. The sewing machine foot (I used the zipper foot since it’s skinny!) didn’t want to fit up in that curve without sewing over bunches of fabric, so rather than make a mountain out of a molehill, I just hand stitched. Granted it’s wonky as anything, but it’s sewn down! No rules, right?!
 I’ve finished my base, but plan to build one more layer with needle-turn appliqué. I think I did a fairly good job of eliciting “layers” with this block, so I technically could stop here and call it a win. But, as is often the case, my initial vision included one more layer. Hillary mentioned depth of field in photos as a potential inspiration source, and so an image of looking through a field with a sun glare behind came to mind. This block looks a bit like a martian landscape at the moment, but with a little needle-turn appliqué that will soon change.
 I want to try to play once more with a more modern take on layers, since as hard as I try, the natural gorgeousness of real life works its way into my quilting more often than not. Don’t get me wrong–there is nothing wrong with realism in quilting; but if I’m wanting to stretch into a different world of quilting for a bit, I may need to leave the tangible objects behind and play purely with geometry, color, and shape.
I’m really happy and excited with the outcome of this block so far, and feel like it opens up a whole new world of textile creation. I’m already plotting projects that incorporate this technique, and I’m thinking I’m getting really close to being ready to finally finish my Dropcloth Sampler Rainbow Color Wheel project.
What new techniques are you itching to try? What’s holding you back? This week, I encourage you to jump in and try it! No fears, no worries, no expectations. Just play. You just might be pleasantly surprised!
I’m linking up with Let’s Bee Social at Sew Fresh Quilts.

Kitty I’ve been following along on Instagram admiring your progress on this project. I think I’m drawn in by the pallet and the soft organic shapes. Do the blocks get sent to members of the bee or are they just meant to be pure exercises in creativity?
LikeLike
Thank you! I love the palette too–that paired with the prompt of playing with layers and depth of field hooked me from the start. To answer your question, the actual members of the Bee Sewcial sewing bee send their blocks to the person. Those of us “outsiders” who are just taking inspiration from their prompts keep our blocks and use them as exercises in creativity (as far as I know–I may ask Hillary to be sure, but my take on it is that we are simply encouraged to play and share our experimentation with their prompts). I probably will make my blocks into mini quilts. ❤
LikeLiked by 1 person
This looks like so much fun, and a great way to get started on improv. I really like the colors and what you’ve done with your block!
LikeLike
Your colors work so well together and are perfect for the scene you are creating.
LikeLike
Very attractive color combination and design. Experimenting is fun, isn’t it?
LikeLike
Wonderful colours and design! That looks like a lot of fun!
-Soma
LikeLike
I am really intrigued by what you are doing here. I see so many people doing improv, but I don’t really trust myself to dive in… curves – yes. improv – ??? This somehow stretchs my creativity in a way that it does not want to be stretched… but I love seeing it! With projects like this, you could easily slip into the improv world.
LikeLike
These colors are gorgeous! I’m loving this.
LikeLike
How fun, and such yummy Kona colors! I love the layered look, such an interesting challenge. I’m excited to see what the next layer you add brings to this piece. 🙂
LikeLike
Love these curves! You did a great job of taming them, too! Sherri Lynn Wood has some great techniques for taming curves in her book, in case you delve further in.
LikeLike
The usual way of cutting/sewing curves (place fabrics, overlap, cut, sew) only works so far. It’s best with slivers of fabric or very gentle curves.
To do a curved seam properly it is necessary to add 1/4 in. to each seam. This takes work and you can’t cut the curve first.
The layer/cut/sew method doesn’t work because it isn’t precise. That’s why most of these improv curves get bumpy even after they’ve been ironed to death.
Rachel at Stitched in Color explains this with illustrations (much better than I am doing).
LikeLike
I didn’t use the layer cut sew method here. I cut one of the curves, clipped and pressed its seam allowance, glue basted it onto an uncut solid rectangle, sewed the seam, and then trimmed the seam allowance for the bottom fabric. A while back I tried the overlap cut and sew method, had really wonky unpredictable results (because it really doesn’t logistically work–I’ll check out Rachel’s explanation too, but I’m pretty sure I know what you mean), and gave up improv for a while. This six minute circle-esque method works nearly flawlessly. Thank you for the tips!
LikeLike
This is amazing. And I love the colours. You did a great job…pat on the back.
LikeLike
Piecing curves has long been on my list of techniques I want to try. Really inspiring to see what you’ve made, I love the depth and movement in your piece.
LikeLike
The colors you have chosen remind me of a sunny beach day-the sand, sky and water all coming together with that shimmery feeling !~! Beautiful work, Kitty. You inspire me to give curves a try, thank you.
LikeLike
Oooh… this one looks tricky. Elbow bump to you for taking on something like this. I find it more than challenging to explore new techniques these days. It’s kind of like there’s only so much space in my brain… and it’s taken up with other things. I did a class on improv curves a while back and haven’t done much with the skills… maybe one day!
LikeLike
this is coming along quite lovely. I just discovered you on facebook and came to check you out here. funny parallel, I have been looking at photos of a rainbow coloured spring at Yellowstone and just posted it on my blog as inspiration. it would be a perfect use of your curve tips.thanks
LikeLike
I love your block. The colours are amazing. I tried three times to watch the six minute circle video, all I got each time was thirty seconds of ads.
LikeLike