
I am so excited to finally share this technique with you, since it makes sewing curves SO simple. I especially love that it can be used on both improv and exact curves, even circles. Mastering curves was on the top of my list this year in terms of quilting goals, and I’ve been working hard at it! While my traditional curve sewing still needs about 900 hours to hit the 10,000 hours that will result in mastery, I’ve found that this method results in perfect curves in five (that’s right–5!) easy steps.
 I first saw this method being used by Hillary from Entropy Always Wins, Stephanie from Spontaneous Threads, and the other #beesewcial-ites, and was intrigued by the way they created such flat-laying, wildly curving improv pieces again and again and again. With some extra guidance from Stephanie, I was able to figure out the technique and have been using it on most of my sewn curves since. You can see where I’ve used it here, here, and here. This technique is derived from the six-minute circle method, but can be applied to any curve. I love using the technique, and so I thought I would share it with you.
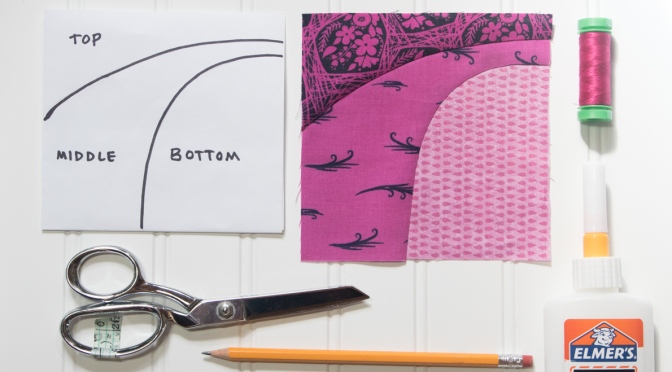
 So let’s get started! First, gather your supplies. You will need:
- your fabric pieces (I used three approx 5″ square pieces of fabric to help demonstrate the stacking of the layers, but you can use any scrap that fits the shape you’re trying to sew!)
- fabric scissors
- washable school glue – Elmer’s works great
- fine glue tip (optional but helpful!)
- zipper foot for your sewing machine (optional but makes sewing the curve much easier)
- iron and pressing surface
- pencil or other fabric marking tool for drawing your line
- paper on which to draw your desired curves (only needed if you are sewing an exact curve–you can free draw or cut improv curves, too)
 Before you begin, decide generally how you want your curves to look. I like to sketch mine out on paper more for a visual than for an exact plan. Think of your fabrics in terms of layers: the bottom is the inside of the curve, moving upward and outward. Keep in mind that if you want to have a convex curve next to a concave curve, simply switch the way you view your “top” and “bottom” layers. The inside of the curve is always the bottom, and work from the bottom up.
Once you have an idea of generally (or exactly) how you want your curves to look, it’s time to get started. Five easy steps, I promise! Ready?!
Step 1:
Draw desired curve on the wrong side of top fabric piece.
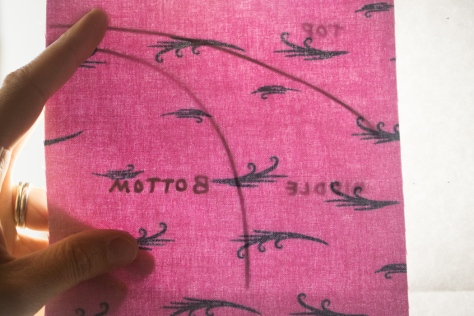 Draw your curve on the wrong side of your top (or in this case, middle) fabric with a pencil or other light fabric marking pen. If you want your curve to be exact, you can trace the line from your paper sketch by holding the fabric and paper up to a window or other light source. Be sure that the right sides of both the paper and fabric are facing away from you, since you want the line drawn on the wrong side of your fabric, but also want the curve to go in the proper direction.
Step 2:
Cut 1/4″ away from the inside edge of your drawn line.
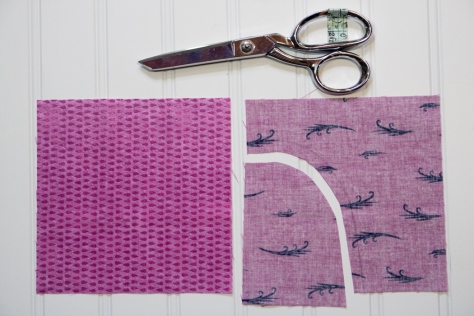 Next, cut between 1/4″ and 3/8″ away from the inside edge of your drawn line. This is your seam allowance.
 Clip your curves to help make your curve smooth. Be sure to cut only halfway to the drawn line, not all the way to the drawn line.
Step 3:
Press seam allowance.
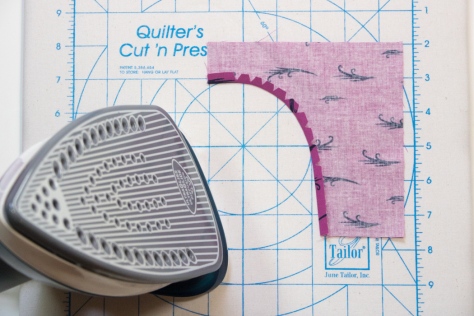 Next, carefully press the seam allowance along your drawn line. Take your time here to make sure your curve is pressed smoothly and exactly along your drawn curve.
Step 4:
Glue baste to bottom layer.
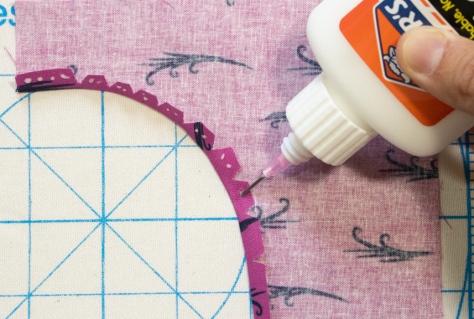 Now it’s time to glue baste this curve onto your bottom layer. Using a fine glue tip and washable school glue, create a small beaded line of glue along the seam allowance. Carefully lining up the outer corners of your squares, layer the middle fabric (with right side facing up and your cut, pressed, and glued seam allowance tucked under) on top of the bottom piece of fabric. This step is why I like to begin with three squares that are the same size. It makes positioning my curves as easy as pie!
 Press with your fingers, making sure the seam allowance is in the right spot and fully folded under. Press with a hot iron to set the glue. Admire your perfect curve… but it’s not sewn yet! Just one more step.
Step 5:
Sew along drawn line.
 Once the glue has been set and fabric cooled off, carefully lift up the top layer of fabric to expose the seam allowance. I use my zipper foot with my needle moved all the way to the left, since the narrow foot helps ease around tight turns. Carefully and slowly sew along your drawn line.
 As you sew around the curves, carefully move the top fabric out of the way, being sure not to allow folds or puckers to form under the needle. Backstitch a bit at the beginning and end of your sewn line to secure the stitches.
 Viola! Press again and you have a perfectly sewn curve!
 Trim away the bottom fabric that extends beyond the seam allowance, and save for your next scrappy project.
 Repeat those five easy steps for your other layers: Draw, Cut, Press, Glue Baste, Sew.
 There you have it. Smooth curves, either traced and perfect, or free cut and improv.
I hope you find this tutorial helpful! I know I can’t stop sewing crazy curves now that I know I can sew them like this. Next week I’ll be sharing a block tutorial for the Cloud9 New Block Hop, and *hint hint* part of it will use this method! Get your practice in now!
I’m linking up with Let’s Bee Social, and will link up with Tips & Tutorials Tuesday when Stephanie & Yvonne get it started again in a couple weeks!

I have been so afraid to try curved pieces, but I am going to jump in and make a few pieces to practice. Thank you for the great tutorial.
LikeLike
Do you have any statistics/experience with wear and tear/washing longevity of the seams?
LikeLike
Hi Dave! Since this is fully sewn with a sewing machine, I can’t see it being any less durable than traditional curved piecing. The glue, since washable, will wash out with the first wash, leaving the sewn seam with seam allowance clipped just like any other sewn curve. I don’t have much experience with longevity yet, but perhaps I could sew a few sample pieces and wash them with every load of laundry I do for my family of 5 in the next month. LOL That would be an experiment!
LikeLike
I’ll have to try this! I get smooth curves, but I’m over the pinned to death approach I’ve used in the past.
LikeLike
O-M-G… I love it!?! I am so totally going to try this when the dust settles around here?!? Short an sweet, but enough said already!
LikeLike
Thank you! So perfect and just what I need. My challenge for this year is also curves even i haven’t done very much yet. I’m starting exciting project and now I just have to find right glue. x Teje
LikeLike
This is awesome, Kitty! I will definitely be giving this a try. And I’m so excited you’ll be linking up next month. I can’t wait to get Tips and Tutorials Tuesday going again. 🙂
LikeLike
Thanks for the clear instructions. Can’t wait to try it!
LikeLike
This is a great technique. I just learned it recently and am hoping to give it a try.
LikeLike
Thank you! You make it sound so simple! I can’t wait to try it this weekend.
LikeLike
PERFECT!!! So trying this the next time I’m in the sewing room!!!! Thank you. 🙂
LikeLike
This is awesome! I am going to have to try this. 🙂
LikeLike
What a great technique! No wonder the curves pieces lie so flat. Definitely need to try this on my next curved project. This is somewhat similar to how I’ve done my applique curves, the only difference is that instead of flipping the fabric over and sewing on the drawn line, I would top stitch the piece down. Thanks for sharing.
LikeLike
Great tutorial, Kitty! My Cloud9 block has inset circles using the 6-minute circle technique. It was kind of a revelation how easy it actually is!
LikeLike
So clearly explained, Kitty! I haven’t tried this method, but I can see how it really would work well.
With this, I wonder if I can again try to machine piece the Clambake cushion. I had thought I was going to have to hand sew the little bits …
LikeLike
This is genius! I can’t wait to try this technique, Kitty. Great tutorial – very clear. Thanks so much for doing this!
LikeLike
No conocía tu blog y creo que me será de gran ayuda con tan buenos tutoriales, un saludo
LikeLike