

Recently Hillary from Entropy Always Wins and I had the opportunity to meet in person after following each other’s work online for years. Both loving embroidery, repurposing textiles, creativity and the sewing community in general we plotted a tutorial that would allow us to play off each other’s creative personality and engage the greater sewing community as a whole.
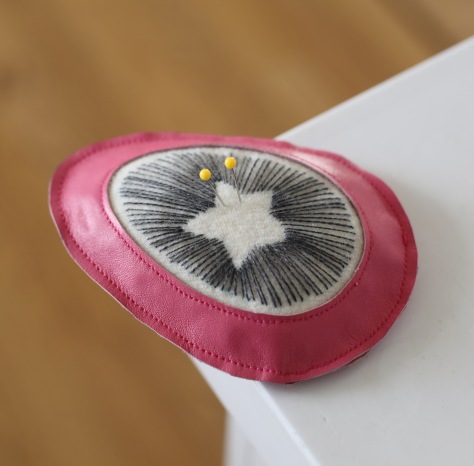
A year ago Hillary made an Easter Egg shaped pincushion out of velvet and repurposed leather. We expanded on this idea and invite anyone who wants to participate to make a similar pincushion and, if interested, incorporate repurposed leather (Earth Day is coming up after all, and repurposed leather is typically thin enough to easily sew on a domestic sewing machine.) Be bold. Be brave. Let’s sew leather!

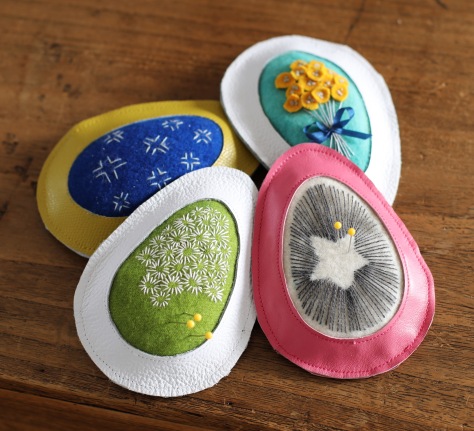 In this tutorial we give everyone some guidelines but the emphasis is on PLAY and MAKING THIS PROJECT YOUR OWN. Don’t celebrate Easter? No biggie, make a similar pincushion in another shape. We will be following on Instagram so please tag your makes #eastereggpincushion (as well as tagging @nightquilter and @entropyalwayswins) so we can all enjoy. To celebrate this group project we will both randomly be giving participants some of our own pincushions as well as supplies to make them. All you need to do to be eligible is to play along, tag us, and tag #eastereggpincushion so that we can find you!
Suggested Supplies
- Thin leather (~6×12 inches)
- Wool felt, velvet, jeans or any other material for the inner portion of the pincushion (~6×6 inches)
- Embroidery hoop (a 4” hoop will *just* fit the inner egg)
- Embroidery Egg Template (click to download-Note updated 3/20)
- Embroidery thread (embroidery floss, perle cotton, or 12wt thread works. Use what you have!)
- Embroidery or other needle (I use Tulip size 3 milliners)
- Double sided fabric tape or fabric glue (optional)
- Sewing machine with a walking foot
- Leather sewing machine needle
- Thread (We both used Aurifil 40wt )
- Chalk or other removable marker (or a willingness to live on the wild side and stitch without marking)
- Muslin or other scrap fabric (6×12 inches)
- Craft clips (both Clover wonder clips or Evergreen Art Supply magic clips work great)
- Small Funnel
- Crushed Walnut shell or other favored pincushion fill
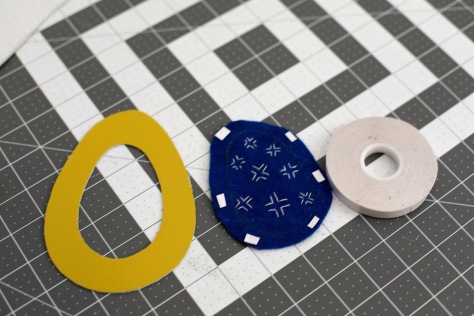
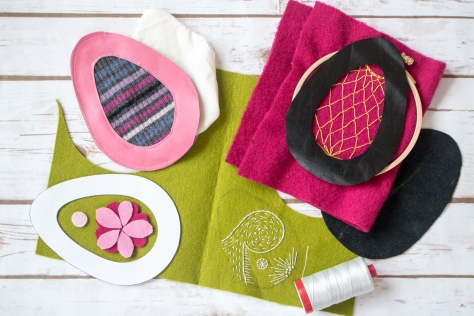
Step 1: Templates and Leather
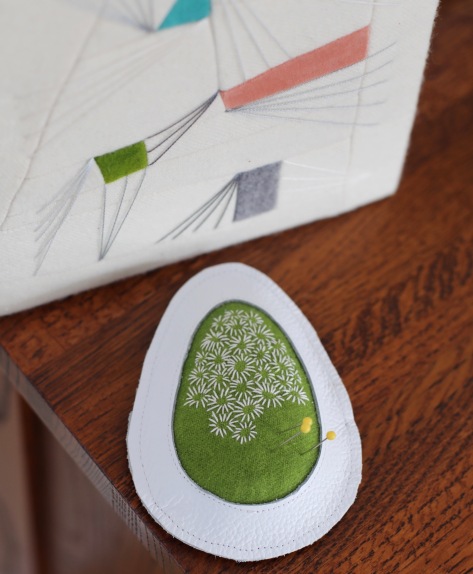
 Print the Embroidery Egg Template and cut along both inner and outer egg outlines.
 Trace the template onto the wrong side of the leather, marking out two eggs–one with only the outline and one with both the inner and outer lines drawn.
 Carefully cut along the marked lines, remembering to cut one piece along only the outer egg outline and cut the other piece along both the inner and outer egg outlines.
 Set your leather pieces aside.
Step 2: Embroidery
 Using chalk or water soluble marker, trace the inner egg outline onto your embroidery surface (felt, velvet, jeans, etc) so you will know the limitations of your embroidery design.
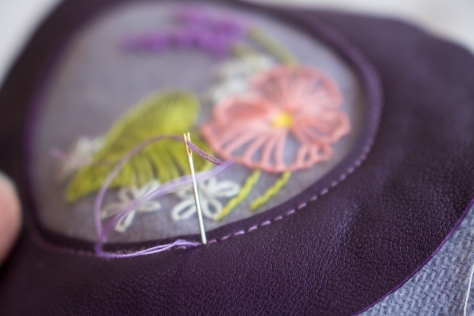
 Adorn at your heart’s desire with embroidery, applique, etc. You are welcome to copy our experiments but please feel free to try your own ideas.
Step 3: Attach the Embroidery to the Leather Upper
 Align your embroidered material so that the embellishments fit within the window of your leather upper (the egg with the hole cut out of the middle).
 Secure the right side of your embroidery to the wrong side of your leather upper with double sided tape, glue, clips, or other method.

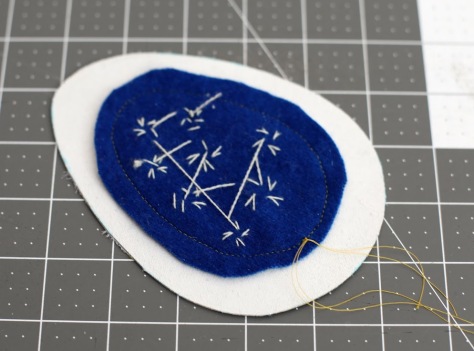
 Then, using a ¼ or ⅛ inch seam allowance, top stitch the two together along the inner egg as shown.
Thread the top threads to the back of the piece, tie all loose ends together and trim.

 Finally, if possible, trim the seam allowance of your embroidered material carefully about ½” away from the stitched line so that it remains easily inside the outer margins of the egg.
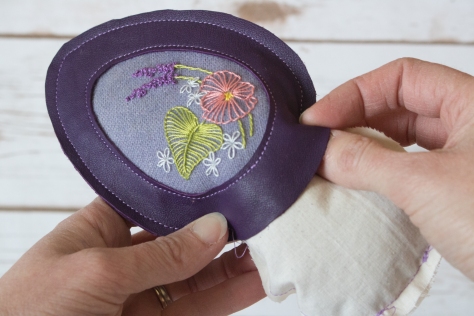
Step 4: Make an inner pincushion
 Using only the outer margin of your Egg Template, trace and cut two pieces of muslin. Sew the two pieces together using a ¼ inch seam allowance, leaving a small opening to use for filling.


Fill with crushed walnut shell (a funnel can be helpful for this). One half cup of crushed walnut shell for this project seems to be the right amount. Use a little more if you want a more rounded pincushion. Sew the opening of the inner pincushion completely closed.
Step 5: Finishing your pincushion


 Place the two leather egg pieces wrong sides together and secure with clips. (Note that pinning will create visible holes in the leather–use clips!) Sew around the outer margin of the egg using a ¼ seam allowance, leaving an opening at least 3 inches long unsewn.
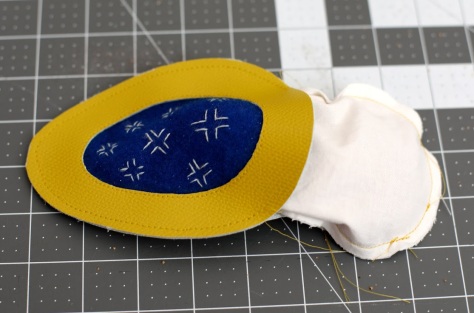 Stuff your filled and fully closed inner pincushion through this opening. Ensuring the inner pincushion remains entirely inside, top stitch the remaining way around the outer edge of the egg.

 Thread the top threads to the back of the piece, tie all loose ends together and trim or bury.
Step 6: Share your creation with us!
Tag your pincushion on Instagram #eastereggpincushion as well as tagging @nightquilter and @entropyalwayswins, or link to a blog post about your finished pincushions in the comments below.

We can’t wait to see what you create! Enjoy!!
I’m linking up with Crazy Mom Quilts Finish it up Friday and TGIFF! Everyone loves a quick finish!

This is so cute.
LikeLike
These pin cushions are sweet — they would make great springtime gifts for quilty friends. A question out of curiosity … Do you sketch out your designs, on paper or the felt, before embroidering, or do you just see where your needle and thread take you? : )
LikeLiked by 1 person
Thank you!! They sure would make great gifts!! I know many people draw out designs first, but I’m a little wild–I just stitch! I usually have a general idea of what area I want to fill, and with this one I kept my paper egg template handy so that I could be sure I was staying within the limits of the center egg, but I just stitched wherever the needle and thread took me. Great question!
LikeLike
Great idea! Thank you!
LikeLike
These egg pincushions are adorable. Where do you find ‘repurposed leather’? I’d love to make a few. thanks!
LikeLike
These are so pretty – thank you for the tutorial. I know they take a long time to put together, and this is a really lovely project!
LikeLike
I’d love to have a go at a few of these but not sure where to get repurposed leather in the UK. I’ll have to google it
LikeLike
I’ve managed to source some beautiful soft coloured leather and ordered some silk velvet and a leather needle. I can’t wait for it all to be delivered as I plan to make 3 in different colours for my quilting friends for Easter. It’s a great tutorial Kitty
LikeLike
Totally adorable. Thanks for the tutorial.
LikeLike
I have never tried working with leather but these lovely pincushions would certainly encourage me to give it a go!
LikeLike
I’ve enjoyed seeing these come together on IG so thank you for the tutorial. Printed out updated .pdf last night and plan to make some ….. before Easter!!
LikeLike