
 When I was invited to join the Fabri-Quilt New Block Blog Hop with the challenge of creating a new 12″ finished quilt block and sharing a tutorial, I immediately thought of transparency. I’ve been seeing fellow quilters play with transparency a lot lately (Yvonne’s Triangle Transparency quilt and the Transparency Bee Blocks by Hilary of Entropy Always Wins Blog and Leanne at She Can Quilt stand out in my mind most), and have yet to give it a go.

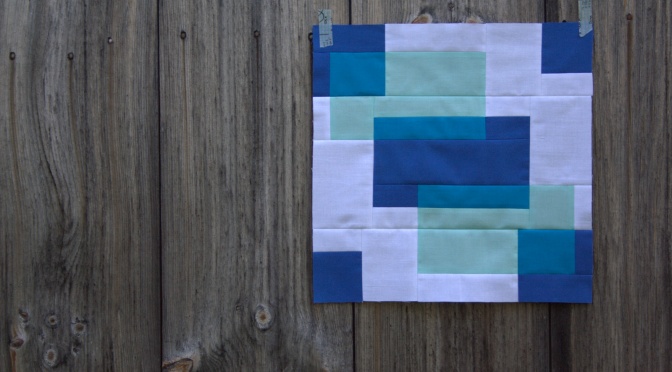
As soon as I saw the color palette chosen, I knew that transparency it was (I’ll save the chartreuse and coral for an actual watermelon project)! I had fun creating a block that both looks cool on its own, but also can result in many fun layouts when replicated for a quilt. I call it Transparent Play (original, huh?!)
Today I’m going to share a tutorial for how to make the new block Transparent Play that I created using fat eighths provided by Fabri-Quilt. While I’m not typically a prewasher, I would definitely recommend prewashing the Fabri-Quilt solids with a color catcher or two.
 Note that part of the challenge for creating this block was to make it out of only fat eighths of fabric, so cutting instructions assume a fat eighth is being used. Fat eighths typically measure 9″x21″.
General Notes
All seams are sewn with 1/4″ seam allowance unless otherwise noted. I like to press seams open since it helps the block lay flat and helps me better match seams. Do what works best for you.
Fabric Requirements & Selection
For this block, you will need a fat eighth of each of the following fabrics:
- a neutral background (I used white)
- a dark (I used lapis blue)
- a light (I used aqua)
- a blend or medium (I used turquoise)
Since the block is designed for playing with transparency, try to choose fabrics that give the impression of transparency. The blend fabric should be a color that could result from the dark and the light fabrics being overlapped. Note that while I made my block mostly monochromatic (one color), this block could be made with color blends, too. For example red as your dark, yellow as your light, and orange as your blend.
Cutting Instructions
Again, this tutorial is assuming a fat eighth of fabric is being used for each color. Strips should be cut along the long edge of the fat eighth (usually 20-21″ long and called length of fabric (LOF) in this tutorial). Note that many sections of the block will be strip pieced, so the initial cutting keeps this in mind.
 Be sure to label your pieces with the coordinating letters so that piecing is a breeze!
From white:
Cut 1 strip 1 1/2″ x LOF and subcut (1) 1 1/2″x10″ strip (A); and (2) 1 1/2″x5″ rectangles (B).
Cut 1 strip 3″ x LOF and subcut (2) 3″x3 1/2″ rectangles (C); (2) 3″x4 1/2″ rectangles (D); and (1) 1″x5″ strip (E).
From lapis blue (dark):
Cut 1 strip 2 1/2″ x LOF and subcut (1) 2 1/2″x5″ rectangle (F); (1) 1 1/2″x5″ rectangle (G); (1) 1″x5″ rectangle (H–note, this fits next to G in the strip); and (2) 1 1/2″x3 1/2″ rectangles (I).
Cut (1) 2 1/2″x7 1/2″ rectangle (J).
From aqua (light):
Cut (1) 1 1/2″x11″ strip (M).
Cut (1) 2 1/2″xLOF and subcut (1) 2 1/2″x5″ (N); and (1) 2 1/2″x10″ (O).
From turquoise (medium):
Cut (1) 3 1/2″xLOF and subcut (1) 3″x5″ rectangle (K); and (1) 1 1/2″x11″ strip (L).
Piecing Instructions
Making the Top and Bottom Panels
 Sew H to K along the 5″ side. Cut into two equal 3 1/2″x2 1/2″ rectangles as shown above. These are the HK units.
 Sew I to the top of each HK unit, ensuring that the dark lapis blue H strip is on the left. You will have (2) 3 1/2″ squares (above). These are the IHK units. Set aside.
 Sew A to O along the 10″ side. Cut into two equal 5″x3 1/2″ rectangles as shown above. Set aside.
 Sew F to one of the B pieces along the 5″ side. Cut into two equal 2 1/2″x3 1/2″ rectangles as shown above. These are the FB units.
 With F on top, sew C pieces to the left side of the FB units along the 3 1/2″ edge. These are the 3 1/2″x5″ CFB units.
 Assemble the top and bottom panels as shown above. Note that they can be assembled identically, but we will rotate one of them 180 degrees as the bottom panel before final assembly of the block.
*Accuracy Tip*
 When matching seams, line up the full length of the seams to be matched (not just at the raw edge) and then pin directly after the seam (about 1/16th “). This will ensure your seams stay in position without the pin skewing the fabric alignment when sewing. It will often result in perfectly matched seams.
Making the Center Panel
 Sew M to L along 11″ side. Cut into two equal 2 1/2″x5 1/2″ rectangles as shown above. These are the ML units. Set aside.
 Sew B to G along 5″ side. Cut into two equal 2 1/2″x2 1/2″ rectangles as shown above. These are the BG units. Set aside.
 Sew ML units to BG units as shown above. These are the MLBG units.
 Sew MLBG units to long sides of J as shown. Note that the bottom MLBG unit has been rotated 180 degrees. Pay close attention to the position of the colors to ensure the MLBG units are mirroring each other. Set aside.
 Sew E to N along 5″ side. Cut into two equal 3″x 2 1/2″ rectangles as shown above. These are your EN units.
 Sew D to the bottom of each EN unit, ensuring that the background white E strip is on the left. You will have (2) 3″x6 1/2″ rectangles (above). These are the END units.
 Assemble the center panel as shown above. Note that the right END unit has been rotated 180 degrees. Pay close attention to the position of the colors before sewing. The center panel should measure 12 1/2″ x 6 1/2″ at this point.
 Sew top and bottom panels to center panel to complete the quilt block as shown above. Note that the bottom panel has been rotated 180 degrees.

Congratulations! You just made your first Transparent Play block. It wasn’t nearly as tricky as it first looked, was it? Strip piecing is awesome.
This block is fun to play with when it comes to layout, since by simply rotating the blocks, you can create a number of different visual layout effects. Here are just a few:
Layout 1: All blocks in line

-
Layout 2: Bull’s Eye
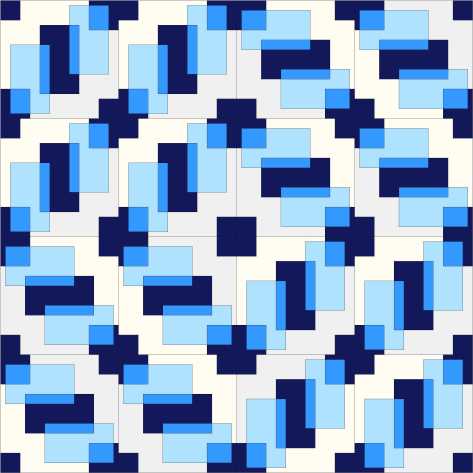

Layout 3: Braid

I also couldn’t let a post go without including a peek at a rainbow, so here’s a sample block using color gradient transparency instead of monochromatic transparency.
 and a resulting layout:

I hope you’ve had fun making your Transparent Play block, and please tag me @nightquilter on social media if you make it–I would love to see!
There are many other wonderful free block tutorials (60+!) posted in this Fabri-Quilt New Block Blog Hop. Here are the others posted today:
Host – Stephanie @Late Night Quilter
Hannah @Modern Magnolia Studio
Cindy @Stitchin At Home
Abby @Hashtag Quilt
Lisa @Sunlight in Winter Quilts
Carrie @Chopping Block Quilts
Brianna @The Iron and Needle
Tish @Tish’s Adventures in Wonderland
Jan @The Colorful Fabriholic
Sarah @Smiles Too Loudly
Beth @Cooking Up Quilts
Leanne @Devoted Quilter
Liz @LizzyClips Design
Kim @Leland Ave Studios
Also be sure to visit the others hosts’ pages (Yvonne @Quilting Jetgirl, Cheryl @Meadow Mist Designs, and Terri Ann @Childlike Fascination) for links to all of the blocks posted Monday through Thursday of this week. All of these blocks are being mailed to a host, who is assembling them into charity quilts.

I made an inchworm friend while photographing this block. He was testing out my seams for good measure! (get it!? LOL) Have fun inching your way through the rest of the blog hop!
I’m linking up with Tips & Tutorials Tuesday at Late Night Quilter.

Love your block! I also love the letter pins. Where did you pick thosevup?
LikeLike
Hi Margaret,
Thank you!! The pins are Marilee’s Numbered Pins (https://quiltingpins.com/product/q-pins/), which my husband bought for me for Christmas. I just used a sharpie to write letters on the backsides. You could use any flat-ish pin head (probably the Clover flower head pins, even–http://www.amazon.com/Clover-Flower-Head-Pins-Boxed/dp/B001K58PHO) and just write the letters on. They are SO great for organizing!!
LikeLike
A lovely block with clear instructions. I love your new friend.
LikeLike
Wow, Kitty, I really love the transparency play that you created with your block and now that you point it out, this bundle and grouping of colors definitely lends itself to that interaction. And I was thinking in the back of my head the whole time that transparency is another fun way to play with a rainbow… 🙂
LikeLike
These are awesome! Transparent look blocks have been on my list and you really shed some light on how to get the effect. Great tips and pictures, too. I hope we get a chance to see the finished charity quilts sometime as well.
LikeLike
Oh wow! This block is amazing! I love the transparency look a lot! Great job!
LikeLike
When I first saw your block I literally froze, and then I thought… “Transparency? She’s a genius!!!” The block is amazing, your directions are wonderful and the quilt layouts have me wanting to go home and start cutting fabric!!!
LikeLike
So glad you mapped out that transparency business… I like the way those blocks work, but they make my head hurt when it comes to figuring out how they’re put together. Thank goodness for tutorials like yours!
LikeLike
Love your block and all the potential layouts. I haven’t tried transparency yet. Maybe…
LikeLike
You are soooo good, Kitty. Someone commented on my blog today that your block is at the top of their list to make immediately! I love it too. It’s classic and clean. Really beautiful. And your tutorial looks gorgeous, as always.
LikeLike
Great block, Kitty! Transparency looks stunning in a quilt…and your rainbow version looks fun too!
LikeLike
This is a great block, and love that you show several possibilites of how the block can be put together. I’m especially drawn to the bright rainbow one… hmm, yeah, I always go for the most colorful one. Again.
Hee, hee, I just love it when little nature friends drop in to see what we are working on. I have a dragonfly who likes to visit me often out on the terrace.
LikeLike
There is something about a transparency project that gets me everytime – I love what you have come up with and thanks a million for the tute!
LikeLike
I love this, Kitty! I’ve been really smitten with transparency blocks, but hadn’t a clue about how to begin one. Your block and clear directions make this very doable. Thanks so much:)!
LikeLike
Well, this is a first. I’ve never seen a quilter actually use an inch worm to confirm accurate 1/4″ seams before! I love the transparency block. I’ve been attempting to teach my son the concept, so it was nice to have a visual example.
LikeLike
Excellent tutorial and block design! I especially favored the multi colored layout, scrappy is my favorite go to. I have bookmarked it and added it to my to do list. Thank you for sharing. Have a wonderful creative day!
LikeLike
I love your interpretation Kitty! Bravo on all your successes recently-so impressed. p.s. get well soon sister. Lyme disease? three kids? baby? hugs your way
LikeLike
This is an awesome block. I love it.
LikeLike
Absolutely love the block! And that rainbow layout? *swoon* Awesome job!
LikeLike
I think I already mentioned on IG, but I love this block. I really like transparency blocks and you nailed it! Thanks for sharing!
LikeLike
I think I already mentioned on IG, but I love this block. I really like transparency blocks and you nailed it! Thanks for sharing!
LikeLike
This is super cool and modern! I like both options!
LikeLike
Hiya Kitty, I love straight lines in quilts, geometric type quilts, so I love your block. It looks so “clean and fresh” to coin a phrase my mother in law used to say. A lovely summery block. Well done
LikeLike
Lovely design! The transparency effect is really successful, and I love the multicolored layout at the end. This pattern has so many possibilities!
LikeLike
Kitty, this is an awesome block! I love the multicolored rainbow layout and there are just so many possibilities! Amazing job!
LikeLike
What an intricate looking block Kitty. I like this one a lot. Thank you for the great tutorial.
LikeLike
I love the modern look of this one, also thanks for the rainbow colorway. I now know how to use those pins so I must find me some. crystalbluern at onlineok dot com
LikeLike
(Audible clapping.) Yeah for you! Something totally different that I would never have thought of, and haven’t seen. I’ve looked at color compositions with the overlapping designs before, but never picked this palette out with the ability to handle it. Bravo! Bullseye would be my favorite of the 3.
LikeLike
Great block, with so many fun possibilities! I’ve not tried the transparency look, but I always love it when I see it. Thanks for the pinning tip for matching seams!
LikeLike
Hi Kitty: I love this block! This palette really does lend itself well to transparency play. You did a marvellous job and your attention to detail in the post is really helpful.
LikeLike
Great block, I love the transparency look and how the blocks interact in a whole quilt design.
LikeLike
Great block! I like all those layouts you made up. Well done!
LikeLike