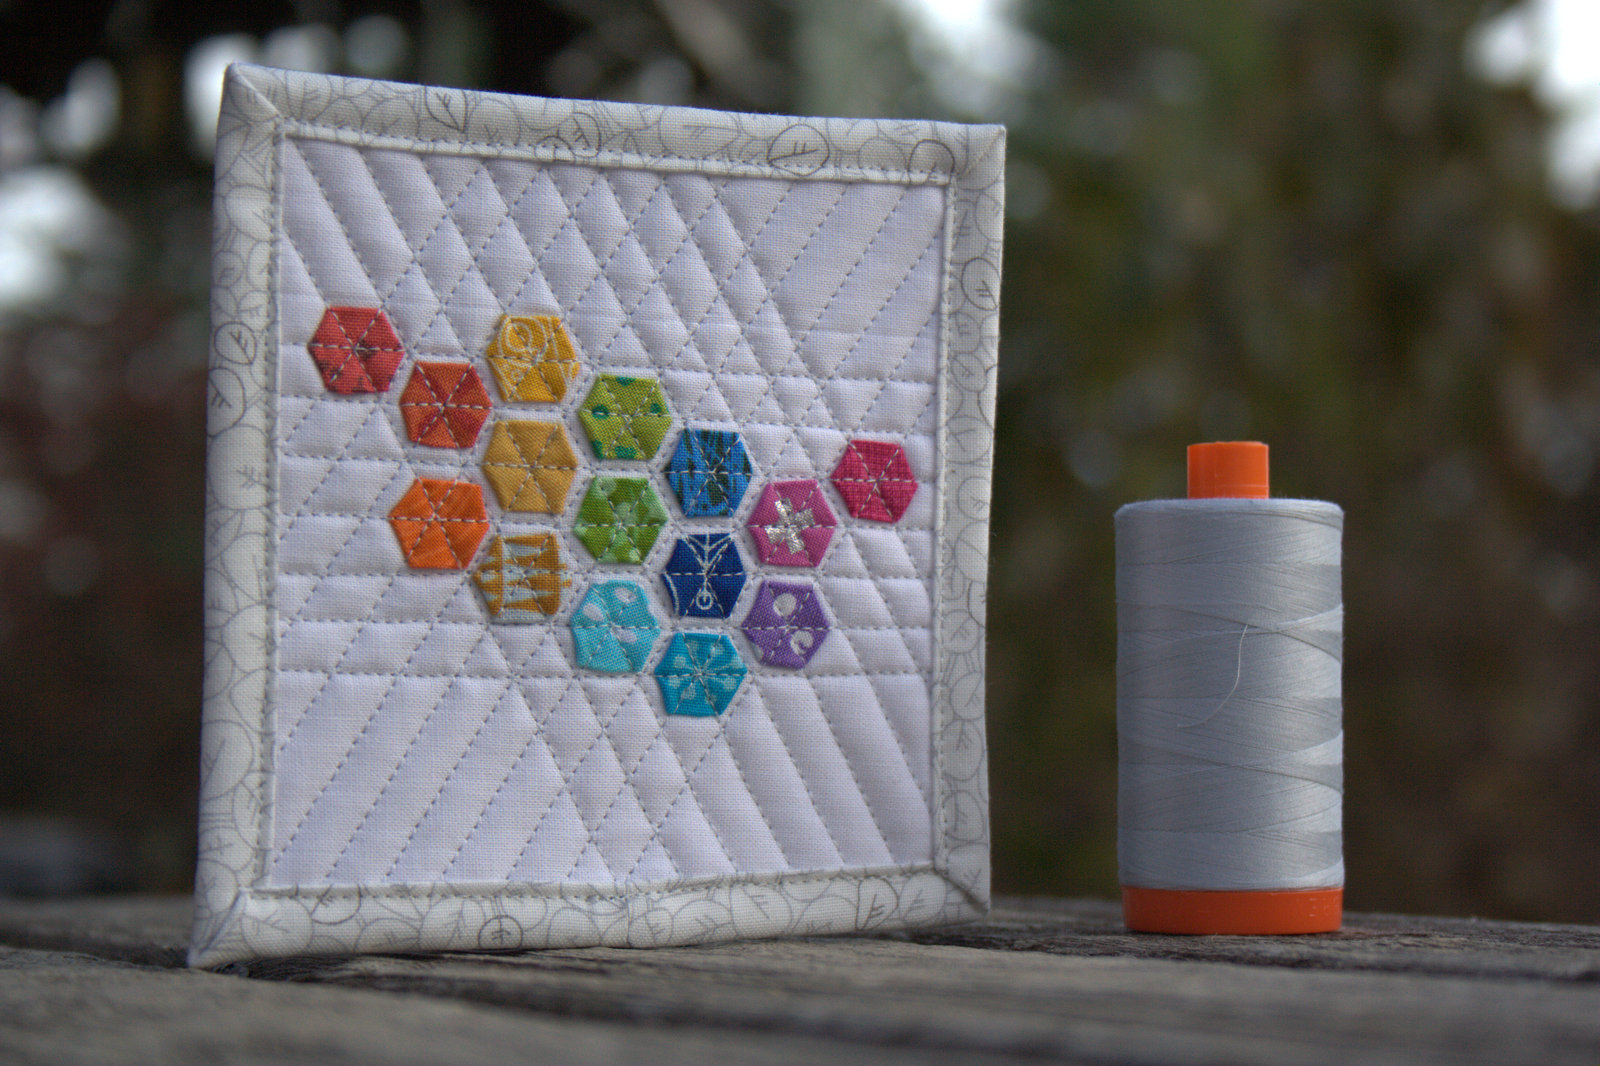
When I realized that my Unlocked quilt qualified for the Large Quilts Category in this year’s Blogger’s Quilt Festival hosted by Amy’s Creative Side, I knew that I also wanted to enter one of the smallest quilts I’ve made to date: the teeny tiny modern hexies mini mini quilt I made for Jennifer at Little Black Cat Quilting as part of the #miniminiquiltswap. You can see my progress post on this mini mini here, and the finish post here. I am entering this mini mini quilt into the ROYGBIV Category, since I cannot let a year go by without a rainbow entry!
This mini mini quilt makes me giggle. The English paper pieced hexies are 1/4″ each, and were hot-iron-basted in lieu of thread or glue due to their size. I then carefully removed the cardstock templates and followed this awesome tutorial by Nicole at Modern Handcraft to attach the hexies to the mini mini quilt, which finishes at 4 1/2″ square (18″ around–it would easily fit into the mini quilts category, too!).
I love how teeny tiny the hexagons are, and how well the diagonal quilting worked despite slight wonkiness due to their teeny size. I quilted with 50wt Aurifil thread in 2600-Dove, using the walking foot on my Bernina 560.
A single-fold binding with my favorite neutral from Carolyn Friedlander’s Botanics line finished this quilt in a subtle way, letting the rainbow hexagons be the stars. I really love this mini mini quilt and had such a fun time shrinking the pattern as much as my adult fingers could manage.
The toothpick for scale in this process photo helps you see exactly how tiny these hexagons are!
Just one more peek with a US quarter after quilting. Such cute little hexies!
I invite you to take a minute to browse the gorgeous quilts that have been entered into this online festival, and/or enter a quilt of your own! Here links to all of the categories included in the Festival to make browsing easy: Mini, Small, Large, Appliqué, Art, Hand Quilted, Home Machine Quilted, Modern, Original Design, ROYGBIV, Scrappy, Viewer’s Choice (If you feel so moved, you can nominate Mini Mini Modern Hexies in the Viewer’s Choice category, too!)
Here is the schedule for those of you who want to follow along, view the quilts, and vote for your favorites:
October 23-29, 2015 – Linky’s Open & Nominate for Viewer’s Choice
October 29-Novebmer 5, 2015 – Vote for favorites in each of the categories
Halloween is a fun time of year around our house, since my kiddos love to dress up in costumes from years past all year ’round, and the end of October means NEW costumes and candy! While I’m not really big into decorating the house for holidays (with the exception of Christmas and Easter–how can you resist those?), I do like making holiday crafts with the kids to help build excitement.
Today I’m going to share a quick tutorial for some spooktacularly sturdy beanbags, a perfect addition to a Halloween party but also a great addition to any child’s toybox. I should note, too, that beanbags are my go-to gift for two year old birthday parties. When a child turns two, I’ve found it’s really fabulous to have something you’re SUPPOSED to throw. Beanbags are such a versatile gift since they can be personalized in any way; you can change the shape, change the fabric, or personalize with applique letters or pictures. I’ve included affiliate links in this post so that if you decide to buy any of the tools I’m using, I will receive a small commission, too. I only share tools and products I love, so you can be sure they are tried, tested, and loved!
Materials needed (to make 4 beanbags):
8 charm squares of fabric
Die cutting machine & 5″ circle die (such as Sizzix cutting machines, AccuQuilt, Cricut, etc)
8 x 5″ diameter circles of fabric
Sewing machine (zipper foot suggested but not required) – I use a Bernina 560
I made my beanbags using my Sizzix fabi die cutting machine and the BigZ L Circle 5″ die. You can also use any palm-sized circle item in your kitchen to trace circles on fabric for the beanbags if you don’t have a die cutting machine.
I figured since it’s nearly Halloween, it was the perfect time to use my Cotton + Steel Spellbound Collaboration charm pack. The 5″ circle die worked perfectly with the charm squares, which made my job even easier! I used my go-to thread, 50wt Aurifil 2600-Dove for all sewing.
Choosing four pairs of coordinating charm squares, cut eight (8) 5″ circles, layering your Sizzix sandwich: bottom cutting pad, die with the blades facing up, fabric centered over the circle blade, and top cutting pad. All necessary circles for this project can be cut with one pass through the die cutting machine, which made this a really quick project to make with my kids.
Next, pin your pairs of fabric right sides facing. I used only four pins, two of which marked a 2″ opening. With a 1/4″ seam allowance, sew the circles together, leaving 2″ open for turning and filling. Remember to backstitch at the beginning and end of each seam.
Beanbags once they have been turned. On the left are beanbags before pressing; on the right are beanbags after pressing and turning in the opening.
Turn beanbags right side out through the 2″ opening. Gently slide your finger along the seam from the inside to make sure the circle is fully turned. Press with a hot iron. Turn in the seam allowance around the opening and press, too, since that will make sewing the beanbags together much smoother once they are filled with dried beans. Since it’s a curve, this step is a little tricky (or at least it was a little tricky for me). Just remember what you’re making: these are going to be tossed and thrown and loved, and perfection is overrated!
Now comes the fun part! Grab some small dried beans (I used dried black beans), a funnel and/or spoon, and a couple of eager helpers.
Fill the beanbags with dried beans, leaving at least an inch of empty space at the top. Trust me here; the beanbags will seem too empty, but while you are sewing them shut and top-stitching, you will want that extra wiggle room.
We found that a combination of funnel, spoon, and simple “use your hands to put the beans in” worked well for us.
Either pin or clip the tops once the beanbags are filled (remember to leave that good inch or inch and a half of empty space in the top). This will both remind you that the beanbag is “finished filling”, and remind your kiddos not to cram any more beans into it. (We definitely took as many beans out of the beanbags as we put it. All part of the fun, right!?)
Depending on the size of your helpers, this may be a messy activity. Plan accordingly, or embrace the chaos.
Needle between foot and beanbag.
Once all of your beanbags are sufficiently filled, head back to the sewing machine and topstitch about 1/8″ inch from the edge of the beanbag, beginning by sewing the opening closed. This extra round of sewing will securely close the opening, and will also provide extra durability for the entire beanbag. I made some beanbags for my nearly-six year old when she turned two, and they are still going strong in our playroom.
Foot between needle and beanbag = winning combination for me.
I used my zipper foot to sew these beanbags closed, and sewed most of them with the needle between the foot and the beanbag (shown in the top photo above). It proved more finicky than I remembered, so with the final beanbag, I moved the needle so that the foot was between the needle and the beanbag (shown in the photo above). This worked much more smoothly for me. As you sew around the edges of the beanbag, stop every couple inches with the needle down to reposition the beans, pushing them away from the part of the beanbag you are about to sew. Sew all the way around each beanbag.
Now you have a handful of spooktacular sturdy beanbags and you’re ready for fun! Toss them at pumpkins, into trick-or-treat buckets, or at each other (avoid faces!). Have fun!
As we all recover from the onslaught of quilt market overload, either for those of you who are/were there in person, or those of us scrolling through endless Instagram eye candy and Periscope broadcast pop ups (or just for fun, for those of you who manage to avoid all talk of International Quilt Market), it’s time for the fun virtual quilt show hosted annually by Amy’s Creative Side: Bloggers Quilt Festival. This year, I’m entering my quilt Unlocked into the Large Quilt Category. It is also an original design, but I figured I’d go by the old adage “go big or go home”. Plus, I find it somewhat comical that I will be entering the festival with a large quilt (250″ around) and a 4″ square mini mini. The draw of that dichotomy may have played a large role in my category-decision making process.
It is a quick and easy quilt featuring a column of rainbow keys and lots of yummy negative space. It measures 53″x72″, resulting in a 250″ perimeter and qualifying it for the Large Quilt Category.
Unlocked was longarm quilted by my friend Stephanie at Late Night Quilter, and boy did she take full of advantage of that negative space! She used the Cityscape Path straight line quilting style designed by Krista Withers and photos don’t even come close to doing it justice.
This is my first year entering the Festival, but you can see my spring entry here:
Lately, I’ve been sucked into the world of mini mini quilts, sparked by an Instagram post by my quilty blogger friend Michelle Bartholomew. The Mini Mini Quilt Swap, as far as I can tell, is an open swap of teeny tiny quilts (finishing usually between 3 – 5 inches square). It’s entirely independent, and up to you or a partner to send the invitation to swap, on you and your swap partner’s own set timeline, and open to as much fun and interpretation as you want. As Yvonne from Quilting Jetgirl said, it’s the perfect “Squirrel!” activity for quilters.
I have a big project to fini…. Squirrel! Off to the world of mini mini quilts.
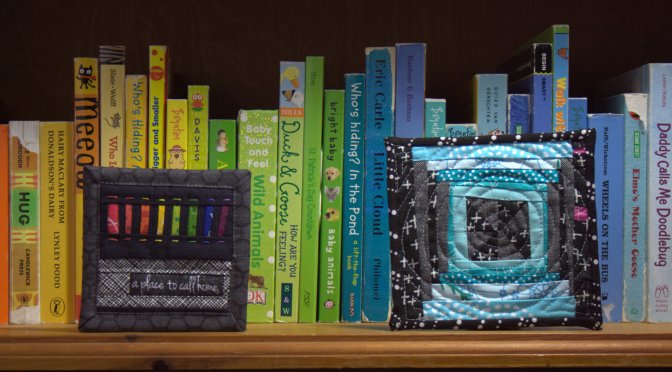
The first two mini mini quilts I made.
I’ve finished four mini mini quilts so far and have at least two (more like three or four) in progress. You can see my mini minis in progress HERE. I have promised mini mini quilts to 9 people and have received 4 (5, technically, since Allison sent me two!) so far. They are a perfect little brain-rest in between bouts of completion on larger projects.
The first mini mini quilt I finished was inspired by Chawne Kimber’s Roberta quilts and her idea to sew SMALLER (check #sewSMALLER on Instagram to find her amazingly tiny and detailed quilting @cauchycomplete). I had played around with the idea after meeting Chawne and seeing her amazing work in person at the Slow Stitching Retreat hosted by Sam of A Gathering of Stitches this summer, and this mini mini was originally one of my play pieces. Michelle claimed it, I quilted it with a spiral and bound it with as much skill as an elephant threading a needle.
As my first mini mini quilt bound, I was silly and tried a normal binding method, except thought it would be a good idea to join the binding at a corner (like a miter, right!?). Trust me, don’t do that. I’m seriously strongly considering ripping off the binding and giving it another go. In fact, I think I will. Sorry, Michelle, it will be a bit longer before your mini is in the mail.
The second mini mini I finished is for Yvonne, who said she liked rainbows and that I could have free reign. I first made the rainbow strips 1/4″ wide, but it ended up far too large.
So I channeled Chawne and sewed smaller… these finished rainbow bars finish at about 3/16ths of an inch. In my typical style, this mini is rainbow with a black/grey contrast (it’s either that or low volume, right!?).
I added a little meticulously cut bit of Medrona Road that says “a place to call home”. Without going into too much detail, one of the projects Yvonne is undertaking in an ongoing manner is her Reclamation Project, where she creates quilts with a personal statement. As she says, she “decided to take seeds of inspiration I found in song lyrics to create my own unique poetry in the form of a simple haiku. Once I had derived my own original work, my goal was to use my poetry as design inspiration for a mini quilt.” (from her Reclamation Project intro) From these projects, and through knowing Yvonne for nearly 2 years (really!?), I know that Yvonne has moved quite a bit in her life. I mean this mini mini quilt as a positive reminder that now that she’s found quilting, she will always have a place to call home. Home is where your sewing machine is, right?!
I quilted this mini mini with 50wt Aurifil 2600 – Dove around the text, and then used 12wt Aurifil in coordinating colors to hand quilt a single stitch above and below each rainbow bar. I think it’s the perfect amount of quilting to bring out the colors without detracting from the overall clean aesthetic of the quilt. I hope Yvonne loves it!
Next, I attempted my first improv and resulted in this mini mini. I love the scrappy binding and the gold 50wt Aurifil works great to bring out the pops of gold in the quilt. This mini mini is not yet claimed, but I figure I will make a few more and then email the folks with whom I agreed to swap and let them choose a mini mini of their liking.
I like the backing, too, which is a scrap of a fun low volume print called Passport Charcoal Etchings by 3 Sisters for Moda included in the low volume fat quarter bundle I put together for Fiddlehead Artisan Supply early in the summer.
Finally, I made what is perhaps my favorite mini mini to date: my ultra tiny modern hexies mini mini, with 1/4″ EPP hexagons glued and sewn according to Nicole at Modern Handcraft‘ awesome Modern Hexies tutorial, and finishing at 4 1/2″ square.
I wasn’t sure if these tiny hexies would work, but with forgoing actual basting (I just used a hot iron and Flatter to press the fabric around each tiny cardstock template), and using a toothpick for fine-tuning placement, it all worked quite smoothly! I quilted with 50wt Aurifil 2600 – Dove and bound in one of my favorite Carolyn Friedlander prints from her Botanics collection.
Now that I’ve bound four of these mini minis, I think I’m beginning to get the hang of a method that works. A single fold binding, joined before it’s attached to the quilt, and sewn to the back before top stitching to the front seems to work the best for me. As you can see, the bottom left corner of the modern hexies mini is a *bit* mis-calculated, but the rest of it is spot on. I’m planning to send this one to Jennifer at Little Black Cat quilting, since it’s somewhat inspired by the gorgeous mini mini she made for me!
I’m linking up with Crazy Mom Quilts Finish it up Friday for the first time in a LONG time. But, hey! A finish is a finish, no matter how small.
It’s here. The season in Maine where the days are brisk but warm in the sun, the colors of the changing trees are stunning, and mornings often arrive with a glistening layer of frost. This year it feels like the true chill of the coming winter arrived overnight. It flipped from unseasonably warm to BAM! frozen. I was tempted to officially dub this week’s color inspiration “Denial”, but decided that instead I should just face it and pull out the winter clothing bins, pull out the knits, pull out the boots and gloves, and see what still fits. I live in Maine, after all.
These color palettes were made using Play Crafts’ Palette Builder 2.1 and my photographs, and illustrate the difference between this week and last.
Corresponding solids from left to right: Bella American Blue, Bella Amelia Lavender, Bella Crocus, Kona Medium Grey, Kona Purple, Kona Avocado
Corresponding Aurifil thread from left to right: 1158 – Med Grey
2510 – Lt Lilac
2524 – Grey Violet
2625 – Arctic Ice
1240 – V Dk Eggplant
5021 – Light Grey
This is what my creeping thyme plant looked like last week. It was vibrant, bold, and flowering happily. A little sea of purply green sweeping along the edge of my edible plants & herb garden.
Corresponding solids from left to right: Kona Graphite, Bella Glacier, Kona Shadow, Bella Indigo, Bella Petal Pink, Kona Straw
Corresponding Aurifil thread from left to right: 1246 – Grey
5008 – Sugar Paper
2847 – Lt Grey Green
2568 – Mulberry
2425 – Bright Pink
2314 – Beige
Flash forward one week and here it is, fully frosted. Despite the indication that winter is indeed coming, I love the frost. It seems to soften everything, muting out the colors and making them glisten. I suppose seeing the world covered in frost is the one time I like pastels.
Again, when you get realllllly close and look at the frost-covered ground, beauty shoots up at you in tiny spikes. How awesome is nature!?
My sewing progress check-ins have been scarce lately, but I have been doing a little bit of sewing. Some consists of projects that I can’t quite show yet, but some consists of literal little bits of sewing: mini mini quilts. The mini mini quilt swap idea has certainly blossomed since my first post about the mini mini I received from Michelle, and it seems that I’ve spread the bug to quite a few of you (Yvonne, Allison, and Jennifer are three who I know have jumped onto the mini mini quilt conga line–it’s a party, afterall!–but I’m sure there are more!). I’ve also agreed to a lot of swaps, but with a relaxed deadline. Many of you swappers asked me to make something I love. I know myself well, though; if I let the momentum go, it *might* be tough to get going again. So I decided to make a few mini minis, trying out techniques or ideas that I wanted to try. Here is a sampling of mini minis in progress, new and old.
Clockwise from top left: Rainbow strip remnants, mini snail house, first attempt at improv, a yet-unknown mini mini component, and small stitching inspired by Chawne Kimber.
This collection includes two “old” mini minis–a foundation paper pieced snail house that I designed a year or so ago for a mini house along, and is actually a large-sized mini mini at 5″ (top right); and, another practice go at small stitching that I created upon returning from the Slow Stitching retreat, inspired by Chawne Kimber (bottom left). There’s also the beginnings of another not-yet-fully-formulated mini mini in those pink donuts (bottom center), my first attempt at improv (bottom right), and a couple rainbow strip remnants that I made while creating Yvonne’s mini mini, which is finished and you’ll hopefully see on Friday (top left). Here are some closer looks.
My first attempt at improv was actually an interesting exercise on two levels. It was inspired by a solid improv mini mini Yvonne was creating, which appealed to me since it looked like improv with intention. The 4″ block consists of four 2″ blocks, each built in a wonky, triangular, log cabin-esque style with the same five fabrics and sewn together. I figured it was as good a place to start my journey into improv as any, and gave it a go. My end feelings were, “Meh” but the response on Instagram was overwhelmingly in the other direction. The photo received 118 “likes” and many comments along the lines of “beautiful!” and “love love LOVE”. This struck me as funny, but is yet another indication that we all have our styles, and what may seem “meh” to you might be absolute visual perfection to another! So I will quilt this up and swap it with someone who hopefully loves loves LOVES it.
This mini snail house is really quite cute, and I’ve been trying to figure out what to do with it. It’s clearly time to quilt it up as a mini mini and see who claims it first.
The first rainbow strip I made was far too large to use in a mini mini, since it had 1/4″ strips of color and black. When I switched to 3/8ths of an inch and a few less colors, it turned out perfectly. I’m intent on using both of them in mini minis, somehow.
Sew smaller, Chawne said. Sew smaller, I did.
Finally, as of yesterday, I have begun another mini mini quilt. I’m honestly astounded that it actually worked, but I’m resisting the urge to latch onto a new obsession and make multiples of this one. I present to you: Modern Hexies, Crazy Mini Mini Edition.
I used the fabulous Modern Hexies tutorial by Nicole at Modern Handcraft, and just shrunk it down to 1/4″ EPP hexagons. Instead of actually basting the teeny hexagons, I used Flatter by Soak and pressed the dickens out of them with a hot iron. Astoundingly, I didn’t even burn my fingers, although I don’t know how.
I am loving how this one is turning out, and can’t wait to finish it! The toothpick helped with little adjustments while gluing, and is a good size reference.
Finding the time to sew is a topic on which I reflect often, always trying to find the perfect balance between sewing time, family time, and other obligations. When my dear friend Leslie asked if I would be interested in being a part of a new series on her blog called Finding the Time to Sew, of course I said yes. Leslie blogs at The Seasoned Homemaker, where she shares her wealth of knowledge about sewing, crafting, DIY, homemaking, cooking, gardening, and more. Leslie recently interviewed me over a virtual cup of tea, and the resulting interview is on her blog today. Read it here!
After you’re finished reading about how I find the time to sew, be sure to read Leslie’s introduction to her Finding the Time to Sew series. She shares some great tips on finding time, and discusses the all-too-real Sewing Space-Time Continuum. Thank you, Leslie for helping spread the word about the importance of making time for yourself, and for sharing my passion!
Thank you all for being my quilting community. I have so much gratitude in my heart today, after another fun Periscope #honestcraftroomies hop last night, and after receiving the sweetest mini mini from Allison from Campbell Soup Diaries as part of the mini mini quilt swap (Check out #miniminiquiltswap on Instagram to see all the creative fire this little project is sparking), and see Allison’s tutorial for this mini here.
I want to keep this short so that I surely will complete it and post it before baby Finn wakes up from his nap. For those of you with a smart phone, I definitely recommend downloading the Periscope app and watching the scopes that were created last night as part of our weekly #honestcraftroomies Periscope hop. They are viewable for 24 hours, which means you have until 9pm EST tonight to watch them! Here was our schedule last night:
The topic of conversation was “Quilting Community” and our conversation ranged from a real live scope from a booming guild meeting, to reflections on why some of us modern quilters love the local traditional guild like family, all the way to “I make my own guild because I live too far from one—and you’re it”! We spoke about quilting conferences vs retreats, person to person interactions, and online relationships.
As an experiment, and a little peek for those of you who may not have a smart phone, I’ve tried to save my video stream and post it here (embedded from youtube). Please note (and this is important!!), in the actual Periscope stream, little comments appear at the bottom of the screen, so when I suddenly look closely at the camera and seem to reply to someone, I’m actually replying to someone! I’m not crazy, I promise! The video I saved to my phone doesn’t save those comments or the stream of hearts indicating when something I say resonates with viewers especially deeply. So here we go: my real-time, un-edited, late night with a sick baby in the next room, take on quilting community and what it means to me. I hope this works.
(Video disclaimer: In watching this again, I’m pretty sure my nervous fried-brained self said I am a single mom. This couldn’t be further from the truth. I meant full time mom, but I’m a total video beginner and was nervous LOL! I have a loving and supportive husband who is not only a fantastic dad and husband, but also amazingly seems to enjoy talking quilting with me. Please pardon the twisted tongue! I have so much respect for anyone parenting solo, but I’m endlessly grateful to have my husband on my parenting team. I couldn’t do it without him.)
The human connection is so essential to most people, and I’m grateful for the relationships I’ve helped foster over the past couple of years. Allison is one of those with whom I’ve been conversing through blog comments and resulting emails for almost as long as I’ve been blogging, so of course I was game for swapping mini mini quilts with her. We agreed that we were both busy, so the timeline would be relaxed. A day or two later (or less?) she wrote back, “I was inspired. I made your mini.” Little did I know how sweet the two (2) minis would be!
The fabric choices alone make these immediately awesome in my book. Allison clearly knows my favorite designers–Carolyn Friedlander (with some of that much coveted Architextures that I never did get my hands on–swoon!) and Alison Glass.
I especially love the little house, which she calls “The House Where Kitty Lives”. I mean–it’s named after me!! So awesome. Here’s a bit of what she wrote on the card (after Schöne Gruße aus Deutschland!), and why it honestly made me tear up when I opened it:
The second mini is titled “Welcome to the House Where Kitty Lives,” and I designed with you in mind. One window for each child, a heart for the love you share as a family, flowers just starting to bud and a house filled with love and happiness!”
Is that the sweetest thing, or what?! I’m still stitching my love into the mini mini I’m making in return for Allison, and I’m not sure I can come close to a creation as personal and beautiful as this. It will still be a mini mini filled with love, and a little sign of how important my quilting community is–even across the world! Allison lives in Germany. Isn’t the internet an amazing thing!?
Thank you to all of you, enjoy the Periscope hop if you have the capability and time to watch, and happy stitching!
We are now two weeks into the year-long 1930s Farmer’s Wife Sew Along hosted by Angie at Gnome Angel and sponsored by Fat Quarter Shop and Marti Michell. I’m a block behind already, but it’s okay. No, seriously, I planned for this. At this point in my life, I have learned to actually PLAN for being behind schedule. (Is that weird or just really resourceful? I haven’t decided yet).
The final layout and block setting I chose/created includes background blocks between the farmer’s wife blocks, so my finished quilt only needs 72 blocks instead of the full 99. This gives me some much needed wiggle room and a whole lot less stress when I’m running “behind”. No worries. This is fun!
I’m having a great time so far experimenting with warm and cool color combinations as I put together the 6″ blocks. Here are the ones I have completed so far. For photos, I’m backing the warm colors with the black fabric in which they will be sashed, and the cool colors in a white/low volume print. I may swap a more grey-silver fabric in as sashing in the final quilt construction. Time will tell.
As you can see, I’ve been inspired by the gorgeous blocks being made by other quilters, especially the fun use of meticulous cutting. While I don’t have many “fussy cut”-able tone on tone fabrics, you can be sure you’ll be seeing more meticulous cutting in future blocks wherever I can make it work. It’s so much fun!
Reading the letters that correspond to each block has been my favorite part. The determined spirit of the farmer’s wives in the 1930s is inspiring and really puts things into perspective. While my block sewing has not been as reflective and relaxing as I imagined (shocker), I am enjoying this journey.
The Farmer’s Wife 1930s Sampler Quilt: Inspiring Letters from Farm Women of the Great Depression and 99 Quilt Blocks That Honor Them by Laurie Aaron Hird for Fons & Porter/F+W; RRP $28.99 – Click here to purchase.
The only requirement for this sew-along is that you have the book by Laurie Aaron Hird, since the block measurements, directions, and templates are all included only in the book. There is also now an ebook available, which makes it super easy to jump right in.
I’m linking up with Angie’s Farmer’s Wife 1930 Sew Along Link up, week 2. I encourage you to hop over and see all of the gorgeously diverse blocks that have been made so far. It’s amazing how each person’s personal style and tastes can be put into the very same block! You can also visit the extremely active and growing Facebook group, which is now over 4,000 strong! I’m looking forward to making more of these blocks, and reading more inspiring reflections by the farmer’s wives of the 1930s.
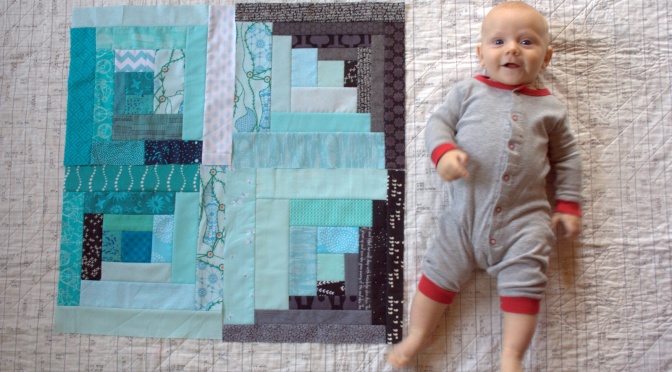
Four months old! Which means I’m now four blocks into my milestone quilt for Finn. For those of you new to this project, my husband had the brilliant idea (through jest) to make a quilt block every month with which to photograph my baby Finn as he grows, and sewing them into a quilt for him as a birthday present in celebration of his first year. I took the idea and ran, and haven’t looked back yet.
This project is still feeling very doable and I’m considering adding an additional four blocks to make it a big larger of a quilt at the end of the year. For now, though, I’m sticking with the one quilt block per month idea, and so far I’m four for four (great record!). You can see my planned layout in my 3 Month post here.
Finn is growing as only babies can. He’s a very stretched out baby, who loves to flex his legs and stand whenever he can, but he also has found the potential in rolling to the side, and has made it halfway over before getting stuck. He sucks and chews on his fingers, either for soothing or maybe he’s teething already (I sure hope not!). He is still so aware of everything around him and loves to “talk” with his baby babble and big bright eyes.
His newfound love of movement makes it quite difficult to get a good photo, but I managed to get a few. Even today, when he’s in the thick of a slimy, drippy, coughy cold, he is so full of bright eyed smiles and giggles. I caught myself almost defiantly asking him the other day, “How are you so happy ALL the time!?”, feeling like I was missing out on something. But then I realized since smiles are contagious, seeing him smile makes me happy no matter how stressed, tired, or otherwise cranky I might be. He’s a gift for sure.
Always on the move, with a smile in his heart.
I am really enjoying creating this quilt along with Finn’s growth. Setting small, attainable goals makes the entire quilt-making process not only doable, but it makes it part of my journey through his first year.
Now up I go to relieve my husband and take my shift holding our poor slimy guy upright so that he can get some sleep without coughing and spitting up slimy gunk. It may be a long night ahead, but hey… it’s all part of the journey and it’s a blessed one indeed.
I grab a needle and thread once the kids are in bed


 This mini mini quilt makes me giggle. The English paper pieced hexies are 1/4″ each, and were hot-iron-basted in lieu of thread or glue due to their size. I then carefully removed the cardstock templates and followed this awesome tutorial by Nicole at Modern Handcraft to attach the hexies to the mini mini quilt, which finishes at 4 1/2″ square (18″ around–it would easily fit into the mini quilts category, too!).
 I love how teeny tiny the hexagons are, and how well the diagonal quilting worked despite slight wonkiness due to their teeny size. I quilted with 50wt Aurifil thread in 2600-Dove, using the walking foot on my Bernina 560.
 A single-fold binding with my favorite neutral from Carolyn Friedlander’s Botanics line finished this quilt in a subtle way, letting the rainbow hexagons be the stars. I really love this mini mini quilt and had such a fun time shrinking the pattern as much as my adult fingers could manage.
 The toothpick for scale in this process photo helps you see exactly how tiny these hexagons are!
 Just one more peek with a US quarter after quilting. Such cute little hexies!