

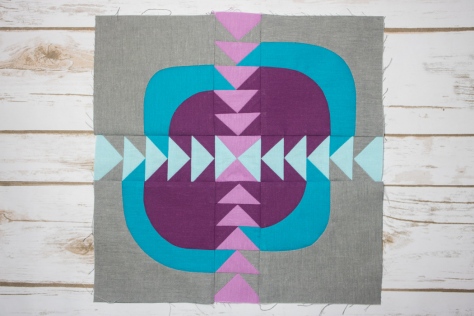
My favorite colors! Flying geese! Curves! Precision delicately dancing with improv! Yessssss, this block has all of those things and I’m excited to share a detailed tutorial with you today. This new block was designed for the New Block Blog Hop sponsored by Cloud9 Fabrics and hosted by Yvonne at Quilting Jetgirl, Cheryl at Meadowmist Designs, and Stephanie at Late Night Quilter. Today is day three of the hop, which means that 46 new block tutorials have already been shared, and 23 more are being shared today. Amazing!
 I’m calling my block Steady On, which just seemed fitting for such a classic made-by-me block. Those of you who know me know that I cannot keep anything simple, and this is a perfect case in point. This block has double improv curves, twenty (20) tiny flying geese, an hourglass block, and quite a few points that should match *just* so, all in the 12 1/2″ unfinished square block. But fear not, this tutorial has detailed photos and instructions on how to make each component of the block, and breaking it down into manageable chunks makes this block come together quite smoothly (Spoiler: we can make some of the flying geese 4 at a time!). There’s something about the determined light colored geese headed bravely into the dark and improvy unknown that urges me to encourage them… Steady on, now! That same encouragement goes for you, since I would LOVE to see you tackle this block and come out victorious (tag @nightquilter and #steadyonquilt when you do!). This is going to be fun, so let’s get started!
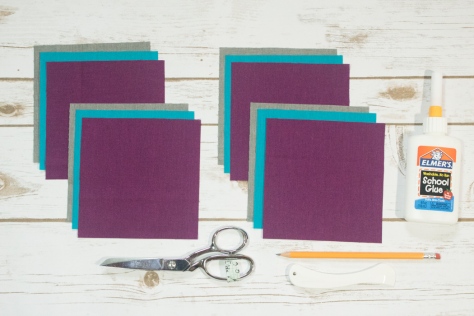
Gather your materials:

- Fat quarter (FQ) of each of the five (5) fabrics generously provided by Cloud9: Amazon, Sky, Shadow, Lilac, and Iris. (There will be fabric left over–enough for a second block or more depending on how frugally you cut your scraps!).
- Clover hera marker and/or other fabric marking tool
- fabric scissors
- washable school glue (I use Elmers)
- Fine glue tip (optional but helpful)
- rotary cutter & mat
- quilting ruler with 1/4″ and 1/8″ markings (I use Omnigrid rulers)
- sewing machine (I have a Bernina 560)
- thread (I use Aurifil 50wt 2600-Dove for nearly all of my piecing)
Press your fabrics and use spray starch or Flatter by Soak to help stabilize them before cutting.

Then cut the following pieces from each fabric:
Iris:
– (8) 1 7/8″ squares (for geese 4 at a time)
– (4) 1 1/2″ squares (for single geese)
– (4) 5 1/2″ squares (for curved quadrants)
Lilac:
– (1) 3 1/4″ square (for geese 4 at a time)
– (6) 1 1/2″ x 2 1/2″ rectangles (for single geese)
– (1) 3 1/4″ square (for hourglass block)
Amazon:
– (8) 1 1/2″ squares (for single geese)
– (4) 5 1/2″ squares (for curved quadrants)
Sky:
– (6) 1 1/2″ x 2 1/2″ rectangles (for single geese)
– (2) 3 1/4″ squares (for hourglass and geese 4 at a time)
Shadow:
– (12) 1 1/2″ squares (for single geese)
– (4) 5 1/2″ squares (for curved quadrants)
Now, we will break down the block into manageable pieces, and make a component at a time. Let’s start with the curved quadrants!
Making Double-Curved Quadrants
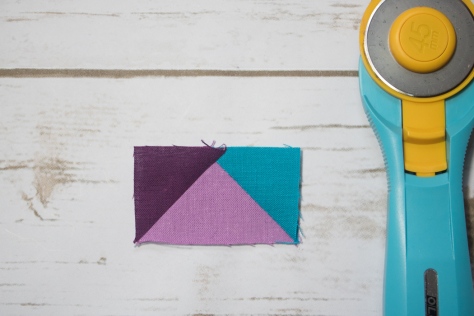
 For this step, you will need your 5 1/2″ squares of Iris, Amazon, and Sky, washable school glue and tip, a marking pen or pencil, scissors, and an iron and pressing surface. To make the double-curved quadrants for this block, follow my tutorial on easy curved piecing using a visual layering approach and glue basting HERE. Go ahead and read it now, I’ll wait for you. When you’ve read through it once and have a grasp on the general technique, grab three of your 5 1/2″ squares, one each of Iris, Amazon, and Sky. For this block, the Iris is the bottom layer, the Sky is the middle layer and the Shadow is the top layer.
 Since this method begins from the bottom up, start with Iris and Amazon. Mark the Amazon square 2 1/4″ up along both sides from the bottom right corner. Make sure your mark extends 1/4″ in from the edges before beginning the curve. This will be your sew line, not your cut line, so by measuring the 2 1/4″ we are ensuring our seams will match up, even though the flying geese are exact and the curves can be improv. (Note here that if you are using fabric with a right and wrong side, you want to be marking the wrong side of the fabric. With the Cloud9 Cirrus Solids that’s not important).
 Draw an improv curve from marked point to point, or trace a perfect curve using the edge of a small plate or glass. Make sure your curve begins and ends at your marked points 2 1/4″ up from the corner.
Using the drawn line as your sew line, follow the steps in my curved piecing tutorial here to sew your first curve. Beautiful, right!?
 Next, grab your Shadow 5 1/2″ square and mark 3 1/4″ up both sides from the bottom right corner. Again, draw your curve as desired, connecting from marked point to marked point, and using that line as the sew line.
 Make four quadrants, measuring 2 1/4″ up on the Amazon square and 3 1/4″ up on the Shadow square for two of them, and measuring 3 1/4″ up on the Amazon and 4 1/4″ up on the Shadow square for the other two. Admire your smooth curves, and set those blocks aside for later!
Making Flying Geese 4 at a Time
Next we will crank out as many flying geese as we can, using the technique of making 4 at a time found in the Reference Section of the Quilter’s Planner. I use my Quilter’s Planner daily, and it sure did save some time with this block! Here’s how:
 Place two 1 7/8″ Iris squares in the top right and bottom left corners of a 3 1/4″ Sky square as shown. Using your fabric marking tool of choice, draw a diagonal line from the top right corner to the bottom left corner. I love my Hera marker since it doesn’t actually mark the fabric, but makes a clear guide line.
 Sew 1/4″ from either side of the drawn line. Press with a hot iron to set the seam (notice that I didn’t do this step? tsk tsk).
 Cut along the drawn line.
 Press the small Iris triangles outward, with seams pressed toward the dark fabric. Then place another 1 7/8″ Iris square in the corner of each unit, and mark a diagonal line as shown above.
 Again, carefully sew 1/4″ from either side of the drawn line. Cut along drawn line.
 Press open, with seams toward darker fabric.
 Trim to 1 1/2″ x 2 1/2″ and set aside.
Repeat instructions above using the remaining 1 7/8″ Iris squares and a 3 1/4″ Lilac square to make four Lilac geese with Iris corners.
Making Single Flying Geese
The remaining flying geese must be made one at a time since the corner colors are mixed up to flow into your improv curved quadrants.
 Grab your 1 1/2″ squares and 1 1/2″ x 2 1/2″ rectangles and lay them out to help plan which corners should be positioned on each rectangle. Use the finished flying geese above to help plan before you start sewing.
 To make a flying geese block (or would it be flying goose?), position a 1 1/2″ square right sides facing the right top corner of a 1 1/2″ x 2 1/2″ rectangle. Draw a diagonal line as shown above.
 Sew along the line and then trim a 1/4″ seam allowance.
 I like to get mine all paired and drawn so that I can chain piece each side.
 Repeat with the other 1 1/2″ square on the top left side of the block. Press seams open or up toward the corner.
 Time saving tip: I cut my 1/4″ seam allowances with scissors while pressing. As long as you are accurate with a pair of scissors, it takes much less time than rotary cutting, at least for me.
Square your flying geese to 1 1/2″ x 2 1/2″ rectangles, making sure that your goose point is a perfect 1/4″ (or slightly further) from the top edge. Set aside.
Making Center Hourglass Block
 Finally, let’s make that center hourglass block. Grab your 3 1/4″ Lilac and Sky squares.
 Place right sides together and mark a diagonal line. I like to pin my pieces together since we are working with such a small scale. If you’d prefer some wiggle room, you can begin with 3 1/2″ squares and trim to size when you’re finished!
 Sew 1/4″ from either side of the drawn line. Cut along the drawn line.
 Press toward darker fabric. You will have two half square triangles (HST).
 Place HSTs right sides together, with the Lilac half of one facing the Sky half of the other, and nesting the seams.
 Draw a diagonal line perpendicular to the existing seam line, again pinning to keep the pieces in place while you sew.
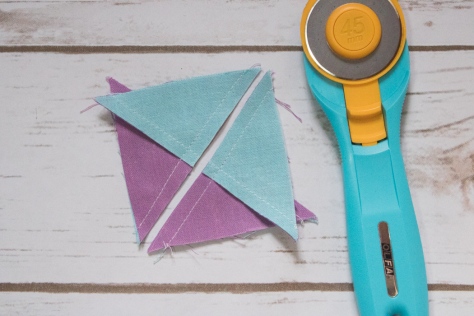 Sew 1/4″ on either side of the drawn line. Then, cut along drawn line.
 Press seams open. You will have two hourglass blocks, but will only need one for this block. Save the other one for your next Steady On block!
 Trim to 2 1/2″ square. Set aside.
Assembling the Block
 Now that you’ve made all of the components, it’s time to sew the block together! Arrange all of your pieces as shown above, paying careful attention the positioning of the flying geese in relation to the large and small curves on your curved quadrants. There should be two Iris flying geese corners next to small curves and three Iris flying geese corners next to large curves.
 Sew the top five and bottom five groupings of geese together, and sew the center horizontal strip of geese and center hourglass block together.
 Perfect points tip: When sewing the flying geese together, keep the piece with the goose point on top. As you’re sewing, make sure your sewing machine needle sews exactly through the “x” that marks the point of the goose, or if anything, slightly to the right (above) the point. This way you won’t lose any points!

 Next, sew the top left and top right curved quadrants to the top grouping of geese, pinning just after each seam that needs to match.
Press seams toward the less bulky side (toward the curved quadrants).
 When aligned properly, the geese corners should flow into the curved piece perfectly–that’s why we so carefully marked our curve starting distances with our improv curves!
 Finally, sew the top and bottom panels to the center horizontal strip, again pinning just after each important seam match. Press toward the less bulky sides (the curved quadrants), and viola! Steady on…
I am really excited about how this block turned out, and I’m eager to play around with different color placements and curve arrangements. I’d love to see if you sew up this block, too, so please tag me @nightquilter #steadyonquilt when you do!
Thank you for visiting and I hope you found this tutorial helpful! Check out all of the other new block tutorials shared today, all of which will be combined to make one big gorgeous charity quilt:
Host: Stephanie @Late Night Quilter
Kathy @Kathys Kwilts and More
Paige @Quilted Blooms
Mary @Strip Quilts Pass it On
Allison @Woodberry Way
Seven @The Concerned Craft
Olusola @Alice Samuel’s Quilt Co.
Ann @Brown Paws Quilting
Jodie @Persimmon + Pear
Vicki @Orchid Owl Quilts
Kitty @Night Quilter <———————You’re here!
Francine @Mocha Wild Child
Shelley @The Carpenter’s Daughter who Quilts
Jayne @Twiggy and Opal
Geraldine @Living Water Quilter
Shannon @Shannon Fraser Designs
Lisa @Sunlight In Winter Quilts
Jessica @Quilty Habit
Cassandra @The (not so) Dramatic Life
Deanna @Stitches Quilting
Denise @Craft Traditions
Also, be sure to visit each host’s blog to find out how to enter to win one of three fabric bundle giveaways. The giving doesn’t stop!
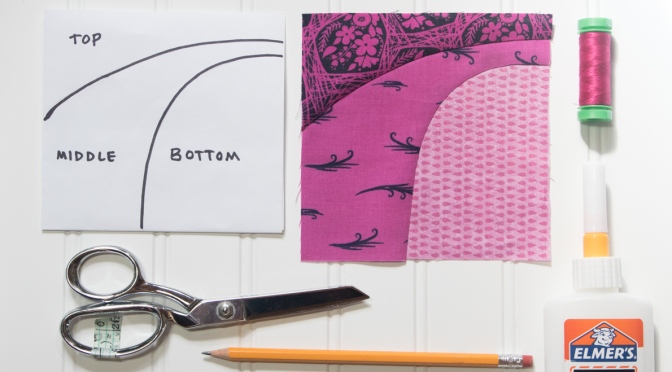
 I first saw this method being used by
  So let’s get started! First, gather your supplies. You will need:
 Before you begin, decide generally how you want your curves to look. I like to sketch mine out on paper more for a visual than for an exact plan. Think of your fabrics in terms of layers: the bottom is the inside of the curve, moving upward and outward. Keep in mind that if you want to have a convex curve next to a concave curve, simply switch the way you view your “top” and “bottom” layers. The inside of the curve is always the bottom, and work from the bottom up.
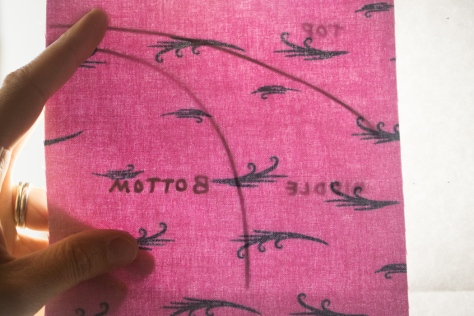 Draw your curve on the wrong side of your top (or in this case, middle) fabric with a pencil or other light fabric marking pen. If you want your curve to be exact, you can trace the line from your paper sketch by holding the fabric and paper up to a window or other light source. Be sure that the right sides of both the paper and fabric are facing away from you, since you want the line drawn on the wrong side of your fabric, but also want the curve to go in the proper direction.
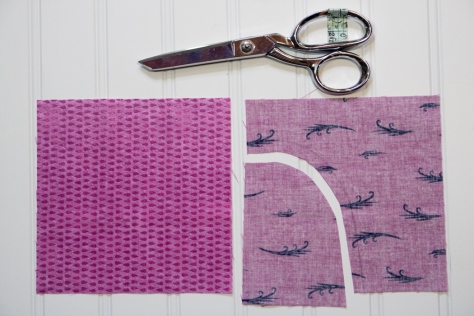 Next, cut between 1/4″ and 3/8″ away from the inside edge of your drawn line. This is your seam allowance.
 Clip your curves to help make your curve smooth. Be sure to cut only halfway to the drawn line, not all the way to the drawn line.
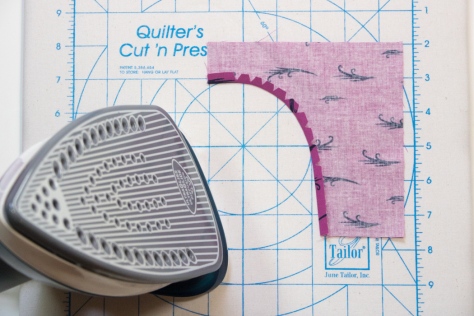 Next, carefully press the seam allowance along your drawn line. Take your time here to make sure your curve is pressed smoothly and exactly along your drawn curve.
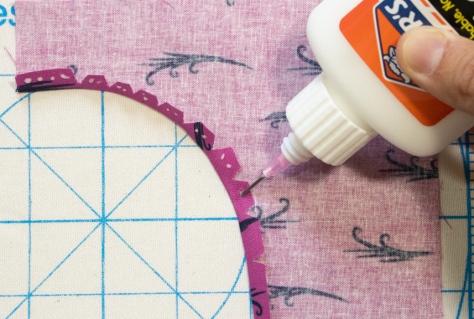 Now it’s time to glue baste this curve onto your bottom layer. Using a fine glue tip and washable school glue, create a small beaded line of glue along the seam allowance. Carefully lining up the outer corners of your squares, layer the middle fabric (with right side facing up and your cut, pressed, and glued seam allowance tucked under) on top of the bottom piece of fabric. This step is why I like to begin with three squares that are the same size. It makes positioning my curves as easy as pie!
 Press with your fingers, making sure the seam allowance is in the right spot and fully folded under. Press with a hot iron to set the glue. Admire your perfect curve… but it’s not sewn yet! Just one more step.
 Once the glue has been set and fabric cooled off, carefully lift up the top layer of fabric to expose the seam allowance. I use my zipper foot with my needle moved all the way to the left, since the narrow foot helps ease around tight turns. Carefully and slowly sew along your drawn line.
 As you sew around the curves, carefully move the top fabric out of the way, being sure not to allow folds or puckers to form under the needle. Backstitch a bit at the beginning and end of your sewn line to secure the stitches.
 Viola! Press again and you have a perfectly sewn curve!
 Trim away the bottom fabric that extends beyond the seam allowance, and save for your next scrappy project.
 Repeat those five easy steps for your other layers: Draw, Cut, Press, Glue Baste, Sew.
 There you have it. Smooth curves, either traced and perfect, or free cut and improv.
 All of my quilt patterns are 20% off for one week only! Now is your chance to restock your pattern library so you’re sure not to run out of projects once the kids are in school. Sale prices are already reflected in my
  On top of that,
  To enter the giveaway today, tell me which bundle would be your first choice: Moonrise (Giveaway #2) or Moonset (Giveaway #1). I will select two winners, and will be sure to give the first choice to the first winner! Leave a comment and make sure I’m able to get ahold of you if you win. For an additional entry, leave another comment telling me how you follow Night Quilter (
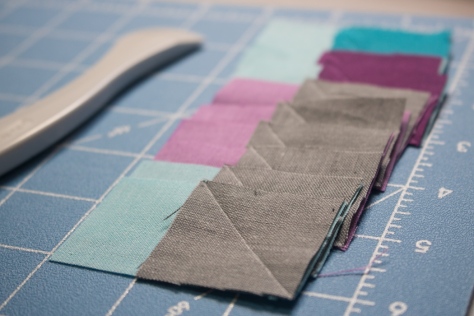
 Corresponding solids from left to right:
 Corresponding solids from left to right:
 Corresponding solids from left to right: