Today I’m happy to share a simple and fun Flying Geese Table Runner project I made using the Cricut Maker. With Easter approaching and my table bare, I wanted to put together a quick project that could brighten the room for Easter, and really all year long. This table runner was also one of the first things I designed in the Cricut Design Space, so I wanted to keep it fairly simple while also using as many Cricut Maker features as I could! You can read a full review of my new Cricut Maker here.
 This post is a sponsored conversation written by me on behalf of Cricut. All opinions and text are my own. This Flying Geese Table Runner includes both traditional piecing and embroidery or hand quilting. If you don’t have a Cricut Maker, I’ve included cutting instructions and a pdf as well, so anyone can make it!
Let’s get started, shall we!? First, gather your materials.
Materials (My fabric details are in parenthesis)
- Cricut Maker
- Cricut Washable Fabric Pen
- Cricut FabricGrip Mat 12″x24″
- 3/4 yard background fabric (Kona cotton in Snow)
- fat quarter focal fabric (Twinklestar in Berry from Garden Dreamer, by Maureen Cracknell for Art Gallery Fabric–from the blogger bundle I put together for Needle & Foot, here)
- 1/2 yard fabric for backing and binding (Painted Desert Morning from Sage, by Bari J Ackerman for Art Gallery Fabric)
- approximately 18″x44″ piece of batting
- 50wt thread for piecing & quilting (I used Aurifil 50wt 2600-Dove for piecing and 50wt 2479- Medium Orchid and 2021-Natural White for quilting)
- 12wt thread, embroidery floss, or perle cotton for embroidery (I used 12wt Aurifil 2435-Peachy Pink)
- sewing machine
- small embroidery hoop (6″ or smaller)
- embroidery needle
- rotary cutter and mat
- iron and pressing surface
Note that if you do not have a Cricut Maker, you will also need a washable fabric marking tool, printer to print the embroidery template, and light box or other bright surface to facilitate tracing the embroidery template onto your fabric.
Now for the fun!
Using the Cricut Maker
Log into Cricut Design Space and get my Flying Geese Table Runner with Embroidery project here, and click “Make it!”
 Prepare your mats as instructed, smoothly spreading your fabric onto your 12″x24″ FabricGrip mat. The Cricut Maker will lead you through the entire process, so simply follow the screen instructions and let the Cricut Maker work its magic!

 The Cricut Maker will both draw the washable embroidery guide lines AND cut the larger rectangle for you!
 When I designed the drawn geese section, I designated the geese shapes as draw lines rather than cut lines and ATTACHED them to a larger cut background rectangle, about 11 1/2″ x 13 1/2″ in size so that they would be easier to embroider. For those of you designing for your Cricut Maker, this is key to remember when you want to combine both cut lines and drawn lines! Also, many thanks to Julie at Intrepid Thread for teaching me how to do this! If you’re a quilter getting to know your Cricut Maker, I highly recommend checking out Julie’s how-to resources both on her blog and YouTube channel!
 The Cricut Maker will also prompt you to cut squares of your focal fabric, small squares of background fabric, and some background rectangles. Once the fabric is cut, carefully remove the excess fabric, revealing your perfectly cut shapes. Carefully remove the fabric from the mats, and then get ready to sew!
You will also need to cut a 19 1/2″ x 13 1/2″ rectangle of background fabric with your rotary cutter and mat for the center portion of the table runner. You can easily shorten or lengthen your table runner by adjusting the dimensions of this center panel accordingly. It should always be 13 1/2″ wide, but can be as long or short as needed to fit your table.
Preparation Instructions if you don’t have a Cricut Maker
If you don’t have a Cricut Maker, here’s how you can cut and prepare your fabric using a rotary cutter, mat, washable fabric pen, and lightbox or other light source.
First, do your cutting. From your background fabric, cut:
- (1) 11″ x 13 1/2″ rectangle (onto which you will trace your embroidery templates
- (12) 2 7/8″ squares
- (2) 2 1/2″ x 13 1/2″ rectangles
- (4) 1 1/4″ x 4″ rectangles
- (1) 19 1/2″ x 13 1/2″ rectangle (as noted above)
From your focal fabric, cut:
We will use the backing of the table runner as the binding, so will keep the backing fabric as a whole 1/2 yard cut until after quilting.
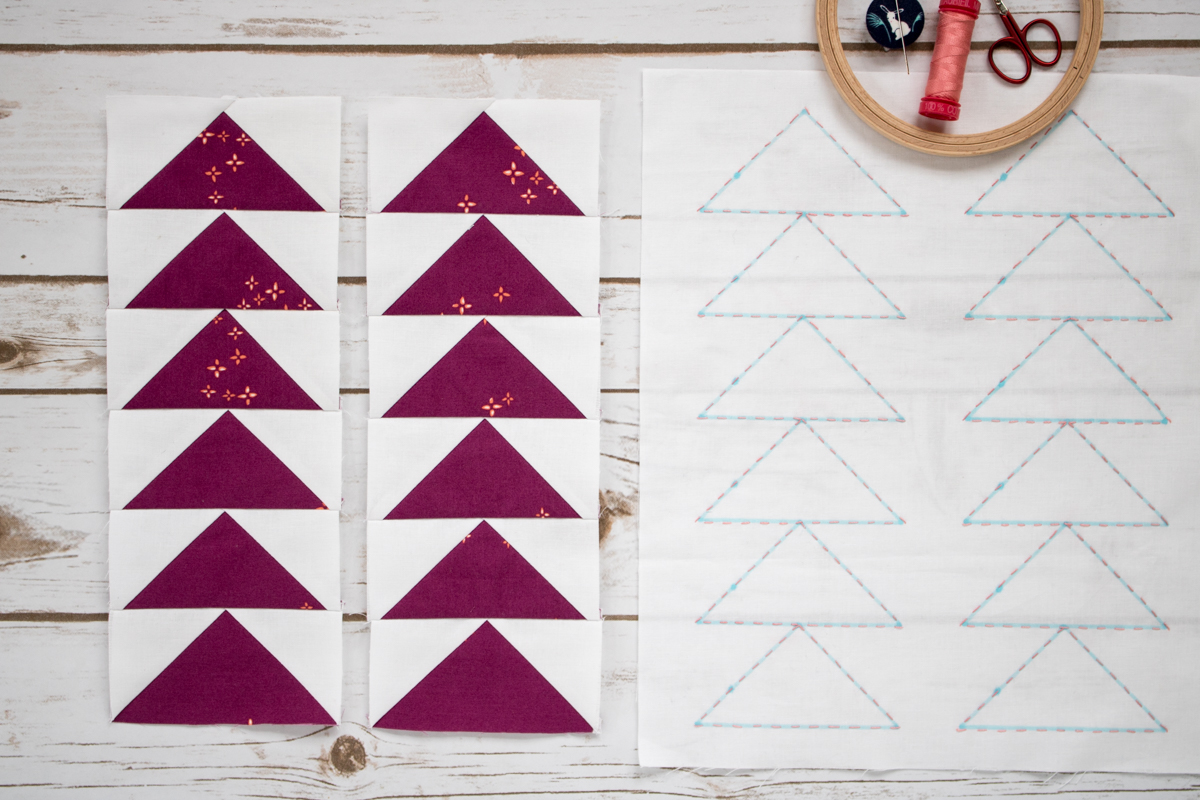
Download the Flying Geese Table Runner Embroidery Template-Night Quilter Printable, print on your computer at 100% scale, tape the two pages together along the match line, and trace onto your 11″ x 13 1/2″ rectangle of background fabric using a washable fabric pen. Be sure to center the template so that there is at least 1/2″ of fabric on both sides of the geese and 1″ above and below the geese.
Once all of your cutting and prepping is complete, it’s time to get stitching!
Embroidering the Accent Geese
 The embroidered accent geese are meant to add some subtle accent interest to your table runner, since hand stitching of any kind (in my mind) adds a special touch. Especially with a project that will be seen often, those hand stitches can echo the sharp aesthetic of the pieced flying geese.
 Gather your embroidery hoop, background fabric with your flying geese drawn on, and a thick 12wt thread, embroidery floss, or perle cotton in a coordinating color. I chose to use Aurifil 12wt thread in 2435-Peachy Pink since it’s a subtle echo of the geese that pulls the beautiful coral color from the Twinklestar in Berry fabric.
 You can use the drawn embroidery guides to do any type of embroidery you want. I chose to do a simple running stitch around each flying goose, but feel free to get creative! Chain stitch would me another fun stitch to use to outline each goose, you could echo the stitching inside each goose as well, or even fill the geese with french knots!
Note that if you choose to use a more dense embroidery design, you may want to layer another piece of white fabric or use an interfacing stabilizer behind your panel. Yet another creative option would be to wait on the stitching, assemble your table runner, and then use the drawn guide lines to hand quilt around each goose, stitching through all three layers of the table runner. If I make another one of these table runners, I will go this route, since I think the stitches would work really well as hand quilting, too.
 Once you’ve finished embroidering your geese, carefully trim the panel into two rows of geese, cutting 1/2″ away from the side points of each row. Do not cut the top or bottom of each row of flying geese. You should now have two embroidered geese panels measuring 5″ x 13 1/2″.
Piecing Flying Geese Four at a Time
 With your fabric pieces cut perfectly by the Cricut Maker, or as specified above, piece your flying geese using the four at a time method. I used the Reference section of my Quilter’s Planner to piece mine, and you can also find a download of the page HERE as a little taste of the awesome that is contained in the Quilter’s Planner. (If you don’t have one already, go ahead and buy a Quilter’s Planner 2018 while they are still available!) Note that we are making flying geese that finish at 2″x4″.
 Make twelve geese total and sew them into two strips of six as shown above. See how they are mirrored by the embroidered strips? Note that your embroidered strips should be cut apart by this step.
Sewing Tip:
 When sewing two geese together, position the point of the goose on top and make sure your stitch line passes exactly through the stitched point of your goose.
 This way, you will be sure to never chop off the point of a flying goose ever again!
 Once your flying geese rows of six are assembled, sew a 1 1/4″x 4″ piece of background fabric to the top and bottom of each strip. Align with your 13 1/2″ embroidered geese strips, and trim the pieced flying geese strips to 13 1/2″ if needed, being sure that your embroidered geese align with your sewn geese before trimming. There is a little bit of wiggle room included in the top and bottom background rectangles to allow for those who sew scant or generous 1/4″ seams, so trim as needed.
Assembling the Table Runner
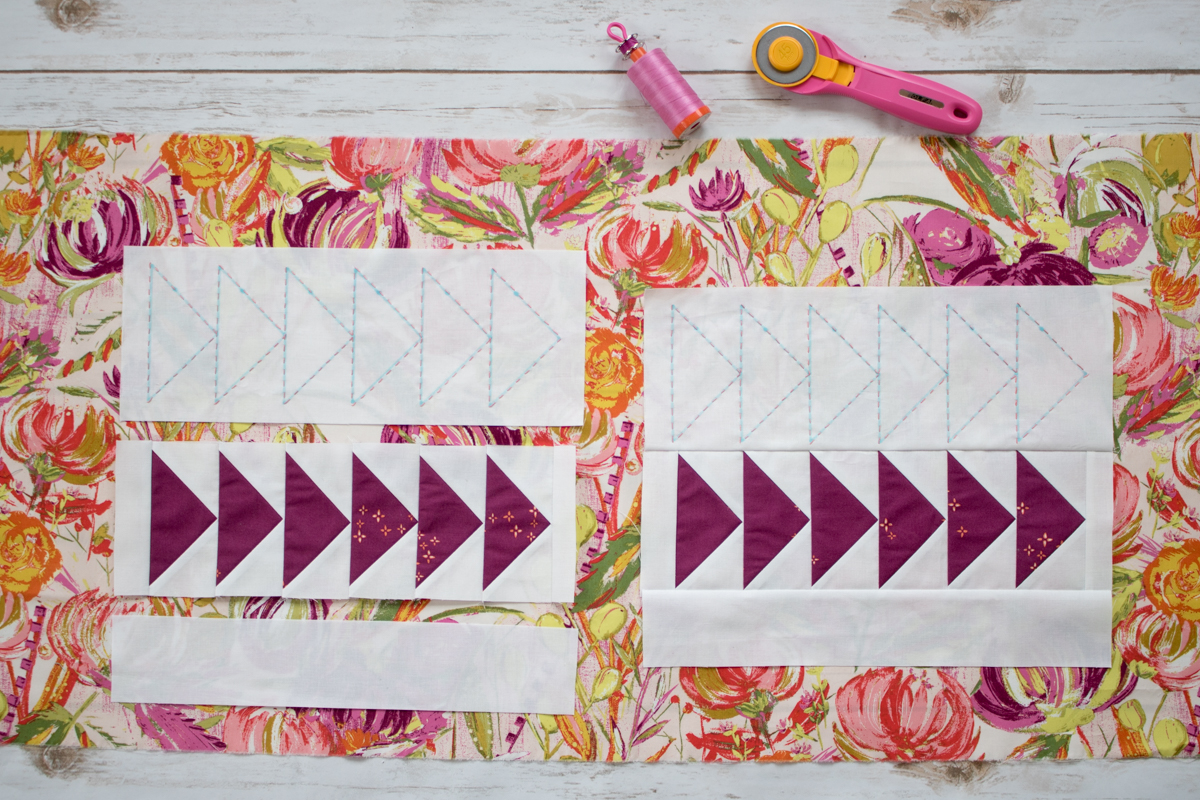 First sew together the flying geese panels of the table runner. I’ve arranged mine on top of my backing fabric so that you can clearly see the different pieces being sewn together. With geese facing the same direction, sew the embroidered flying geese section to the pieced flying geese section. Then sew to the 2 1/2″ x 13 1/2″ background rectangle. Make two.
 Assemble the table runner top by sewing the sections together as shown above: Note that the embroidered flying geese panels should be sewn to the center background piece on both ends.
 Once your table runner top is pieced, position the runner top and batting in the center of your chosen backing fabric, right sides facing away from each other. In other words, layer and baste your table runner and prepare for quilting!
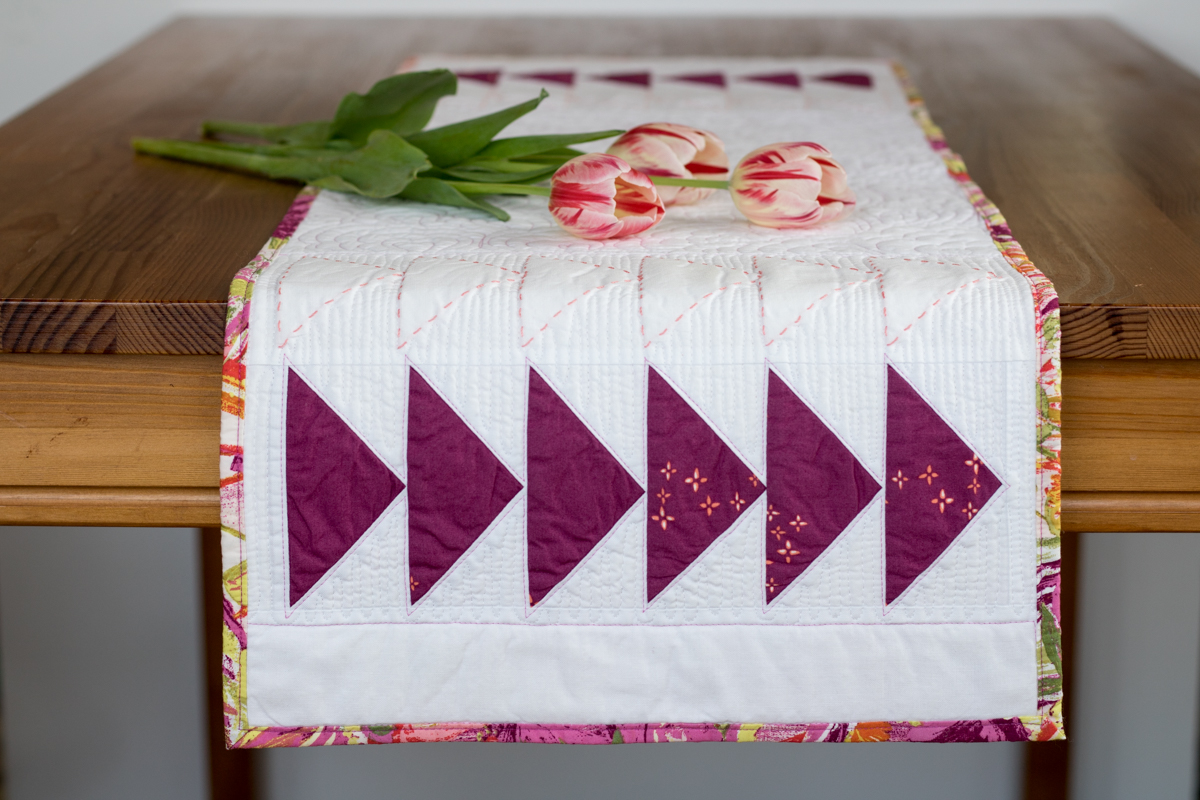
 I chose to use Aurifil 50wt 2479- Medium Orchid to quilt my Flying Geese Table Runner with a dense free motion quilting pattern in the center, simple outlines of the pieced flying geese, and dense free motion quilted switchbacks in Aurifil 2021-Natural White between both the pieced and embroidered geese. I wanted the texture but not the visual distraction from my hand stitching.
 I’m certainly not a free motion quilting pro, but I am pretty happy with my over-all heart-flower free motion quilting motif! Plus, how fabulously do those tulips go with the BariJ Sage fabric backing!?
As you quilt your table runner, be sure to stay 1/4″ away from all edges with your quilting! This will help your binding look great from both the top and the bottom, since we will be using the backing fabric folded over the edges as binding.
 Once your table runner is quilted as desired, carefully fold back the backing fabric and trim the batting *just* outside the top of your table runner top. I gave myself a little less than 1/8″ around the edge of my table runner.
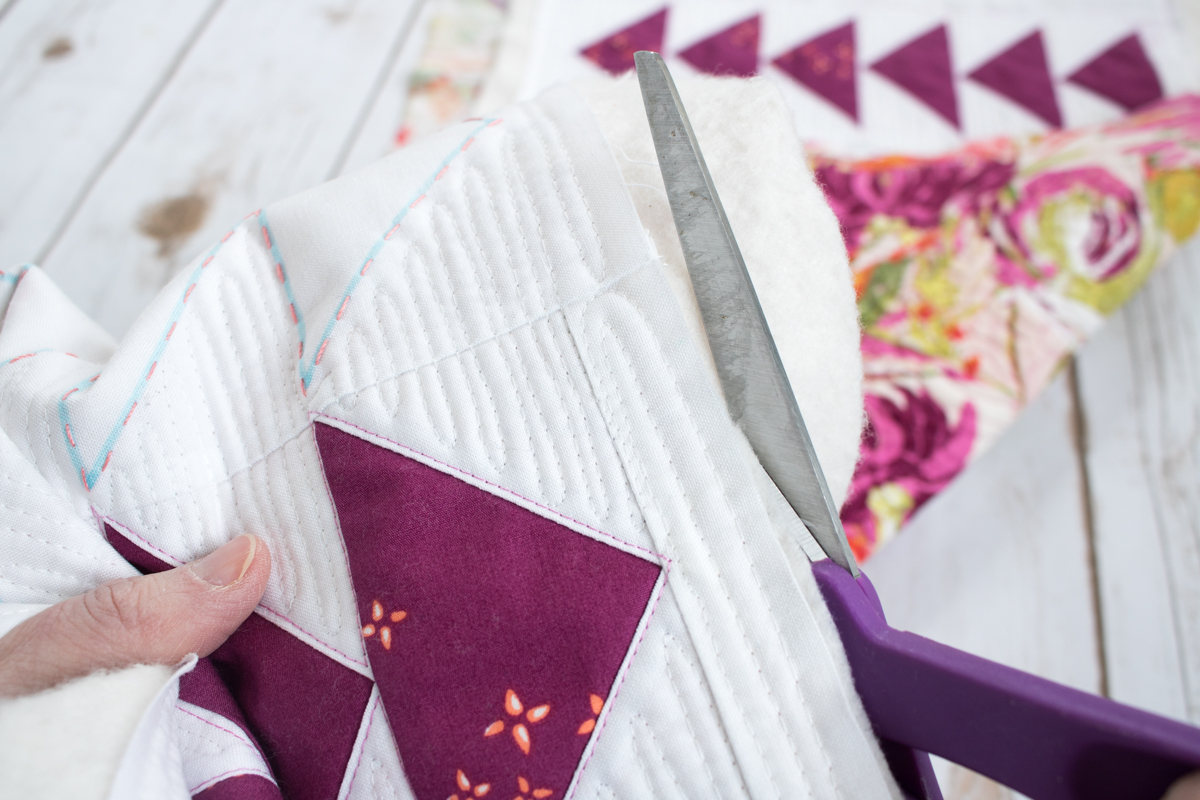 Be extra careful not to cut your backing fabric during this step!
Next, trim your backing fabric between 3/4″ and 1″ from the outer edge of your table runner quilt top. Fold the backing so that its raw edge meets the edge of your trimmed quilt top and batting and press. Fold again and top stitch in place, securing your binding to the front of the quilt.
 A full tutorial for how to bind your quilt with the backing fabric can be found HERE on Cluck Cluck Sew’s blog.
 I wanted my binding to be slightly slimmer, so I cut mine 3/4″ from the edge of the table runner top instead of 1″, but choose whichever you prefer.
 Ta da! Your table runner is nearly finished! All that remains is to wash out the washable fabric marker lines. I’ve found that the Cricut Washable Fabric Pen easily washes out with a bit of soap and cold water. Note that if you prewash your fabrics, you can wash out the fabric pen before trimming and piecing the embroidery panels into your table runner. I don’t prewash my fabrics, so I opted to wash it all at once after it was completely finished.
Set your Easter table and enjoy! I always love a good bundle of fresh flowers on a table, especially during these early days of spring when the snow is still thick on the ground outside.

 After giving my table runner its first wash, and in looking at these photos, I think I will go back and hand quilt within those embroidered flying geese to give them a bit more texture.
 Enjoy, and I hope you’ll share a photo of your Flying Geese Table Runner if you make one! You can tag me on social media @nightquilter or share a link here in the comments.
Happy stitching!

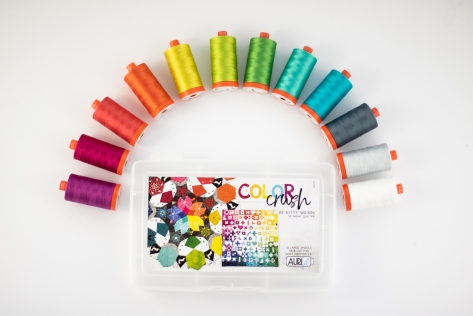
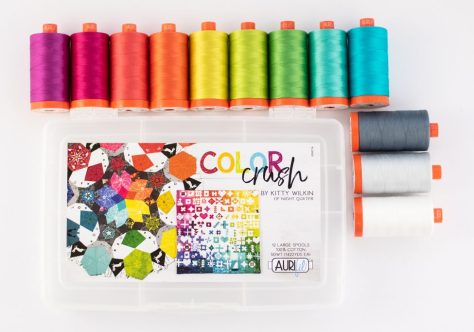
 I’m excited to share a fun little post I wrote for the Aurifil blog, which goes live on AuriBuzz today! Just over one year ago, I excitedly introduced my inaugural Aurifil thread collection, named Color Crush. I wrote about it here, so you can check out the threads in all seriousness before heading into a magical land of imagination if you want.
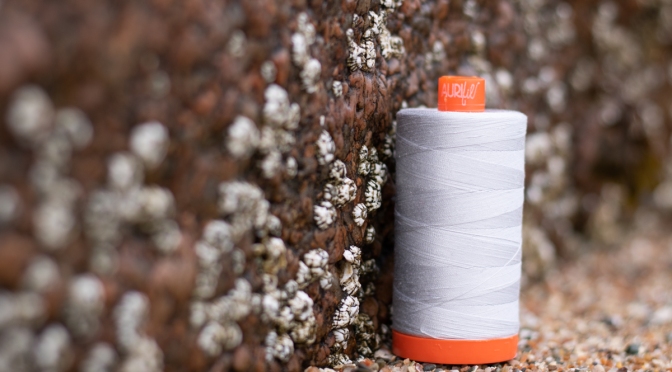
 We had a super fun kick off party in Austin at QuiltCon, and then shortly upon returning home, the COVID-19 Pandemic hit and life was turned on its head. Fast forward a full year. Now that vaccine distribution is increasing, spring is beginning to show its face once more, and things are possibly looking up, I thought I’d finally share a introduction of the specific threads I selected for inclusion in Color Crush, as seen in their natural habitats.
 While the whole world was locked down, my family and I found solace in nature. As any good tree hugging quilting photographer would do, I brought my threads along on many hikes and adventures, seeking out their natural habitats and color inspiration roots. My Color Crush threads trekked in every season, and I highly recommend heading over to the Auribuzz blog today to read about their personalities and see them in all their glory, out in nature. You can read it HERE.
  Enjoy the journey, and let me know which photo was your favorite!!
 I have been using Aurifil thread since early in my quilting days, and once I tried my first spool, I was immediately sold on how silky smooth and strong it is. It leaves hardly any lint in my machine, especially compared to the older hand-me-down threads I had been using before switching entirely to Aurifil. Not only that, the range of available colors has my rainbow-loving heart swooning. Paired with Aurifil’s commitment to seeking the most sustainable options: using 100% cotton thread, putting their most recent thread addition on a wooden spool, going plastic neutral in 2019, and a continuing focus on
  Over the past few years, I’ve found myself grabbing the same set colors of thread for most of my projects, and so finally I decided to reach out to Aurifil to see if they would still be interested in my curating a thread collection, since they had mentioned it a while back. I was excited to receive a resounding yes, and then the fun began!
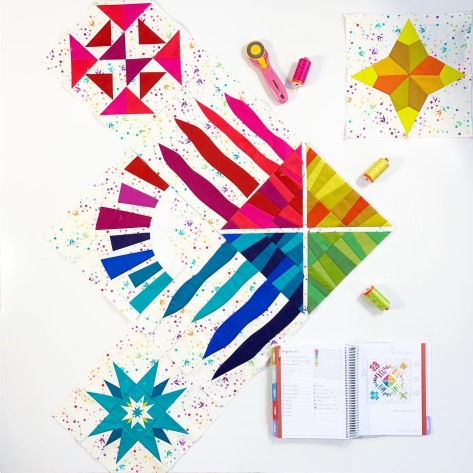
 I carefully considered each of the colors of thread *I* always use, trying to decide if it would be a universally helpful color to have, and have very intentionally decided upon this spectrum of luscious, vibrant, tertiary-heavy threads. Here are just a couple of the projects on which I’ve personally used these threads recently:


 If you want to purchase Color Crush and your local quilt shop doesn’t currently stock it, please ask them to special order. Any shop can grab it from a distributor of course, but ANY shop can purchase directly from

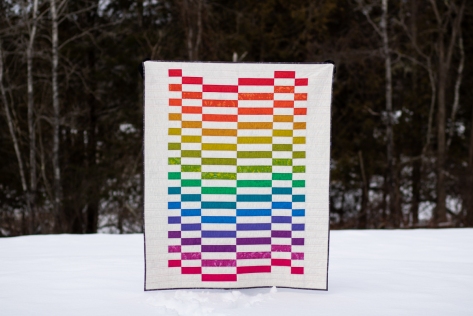
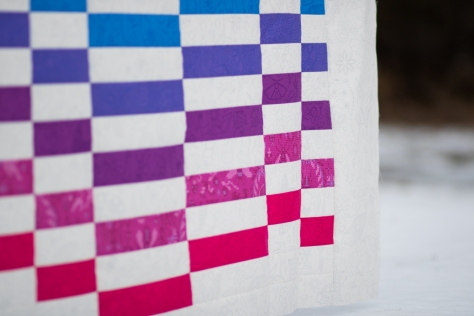 Staggered is a fun, easy, extremely versatile pattern that is a great way to showcase your favorite fabric line. Perfect for precuts, this would be a fantastic pattern for that precious fat quarter bundle or jelly roll you have stashed away. I used the new Alison Glass Sun Print 2020 fabrics by Andover Fabrics for mine, and it seriously brightens my day. My kids are already asking who gets the finished quilt! I especially love how the Menagerie fabric from Sun Print adds some twinkle among the other rich range of colors. Anyone who knows me knows how much I love Alison Glass fabrics, and this *might* be my favorite line of hers so far.
 The range of greens-teals-blues are especially to die for! I just love how they play in this Staggered quilt. You can probably tell, but I’m smitten!
 I quilted my Staggered quilt using coordinating 50wt Aurifil threads– I have another fun release to share–from my very own curated collection of Aurifil threads, called
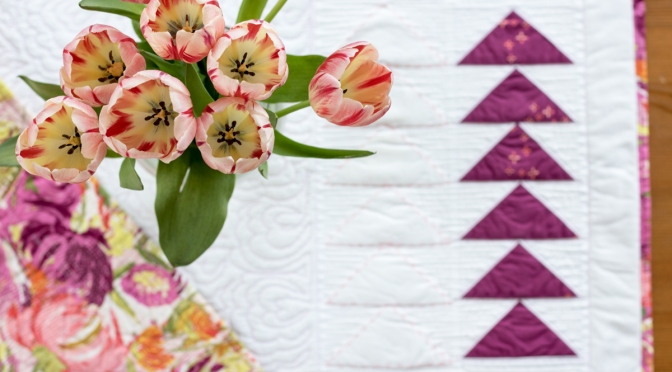

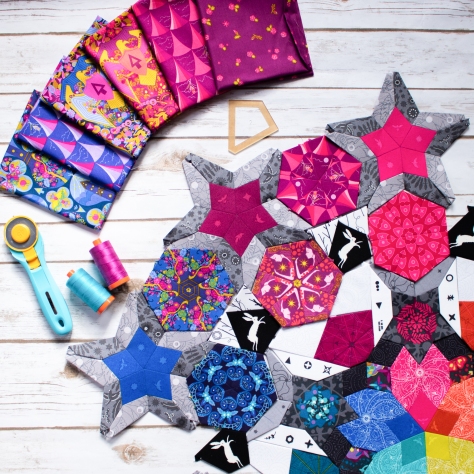
 I headed off to QuiltCon with an English Paper Piecing (EPP) project–the Mandolin Quilt Block by Jodi at Tales of Cloth. I had gotten a bit further than
  While I was traveling, the mending on my most-worn jeans began to wear through, but fortunately I was able to pick up a mending kit from the
  I used the 12wt
  My long flight back to NJ after QuiltCon allowed me to finish both of these hand stitching projects, which felt pretty amazing since I typically make progress at a snail’s pace.
 I’ve been wanting to create a pattern exclusively for
 It was tough to limit myself to just a few of the colors, but with my design I had to pick my top favorites. Turquoise and magenta won the day, and that perfect purple print with both turquoise and magenta details, called Energy in Berry, was the perfect middle man! Plus, I can’t think of a better fabric name to go in a Superbolt!
 I quilted Superbolt with a variety of color-coordinating Aurifil 50wt and 40wt threads. I quilted straight lines in the lighting bolt white sections using 50wt thread in 2600-Dove and the walking foot on my Bernina 560. I’ve been wanting to practice free motion quilting ever since taking
  I used a different design in each colored section, and tried to choose mostly curved designs for the darker areas, with more angular and sharp designs for the light ones. I used 40wt 1148-Light Jade in the teal section (Charisma in Seafoam from Panache), 50wt 2535-Magenta in the purple (Energy in Berry), and 40wt 1100-Red Plum in the bright pink (Spirit in Pink). Because the thread color blends in so well, it’s hard to see how fantastic my free motion quilting was, so you’ll just have to take my word for it! LOL
 I found the perfect backing fabric for this mini in my stash, Aloe Vera in Candy from Pretty Potent by Anna Maria Horner, and with the addition of a few leftover blocks from the mini quilt top, it came together as a really fun quilt back.
 The striped fabric makes a perfect binding, but also makes a great label! I took the photo before I hand stitched the top edge, and don’t mind that top stray thread that escaped my snips, but I love how easy the stripes made it to write in a straight line! I usually kilter when I write, so having that extra guide was super helpful.
 Today I’m excited to be the first quilting stop on Patty’s Flit and Bloom Blog Tour, where I get to show you what I’ve been working on these past couple of months using her newest fabric line for
 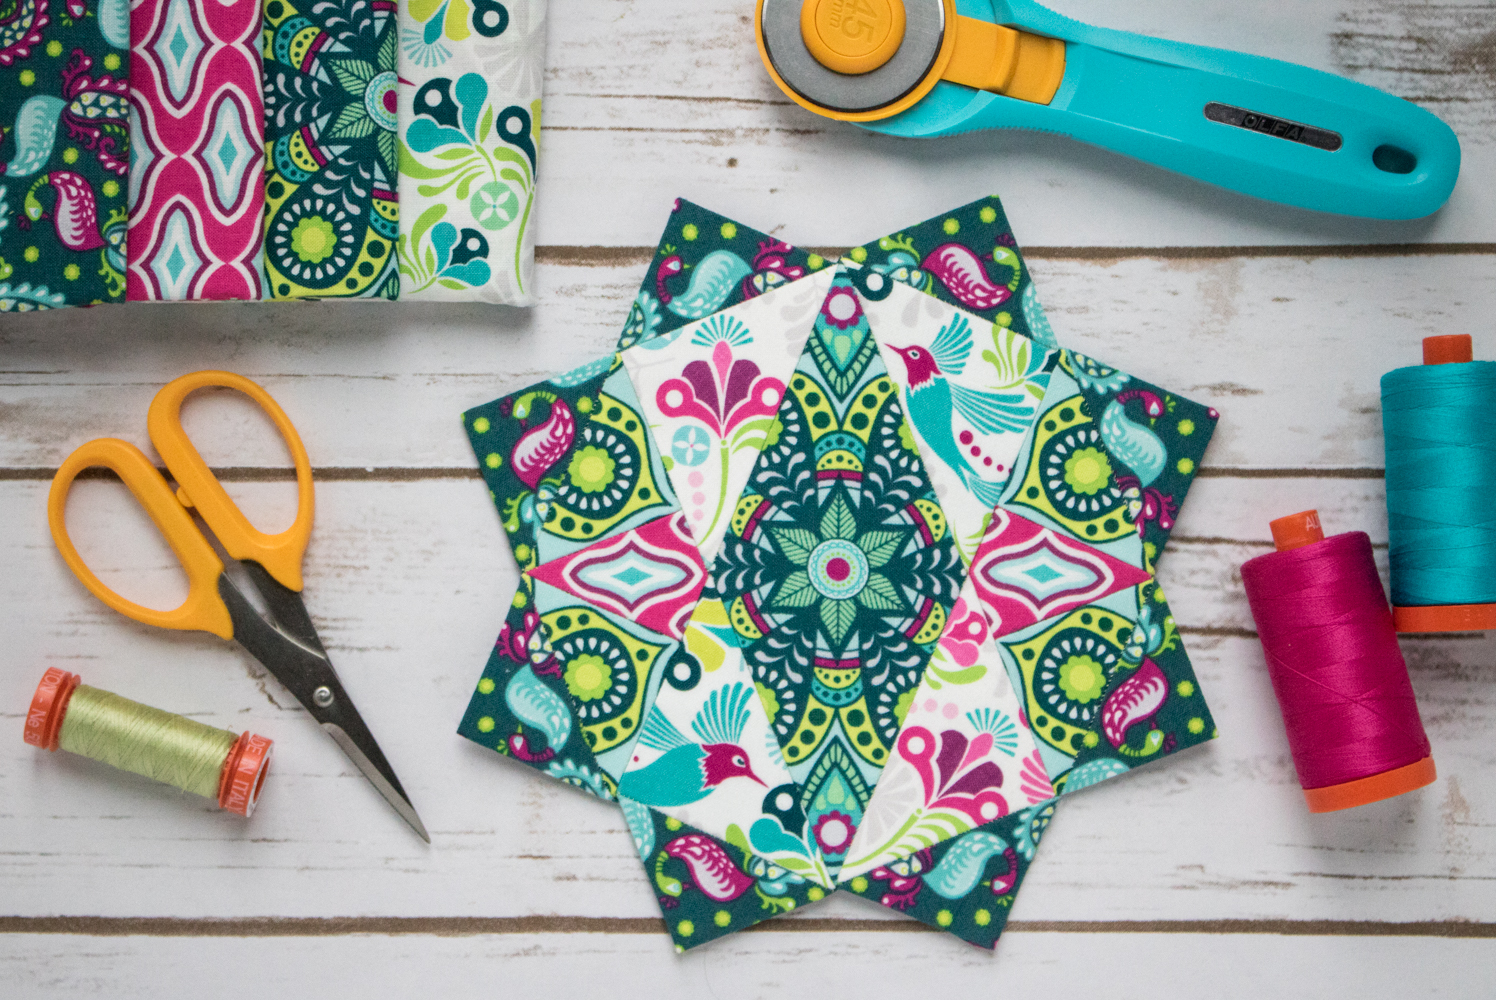 I began with one of my favorite EPP patterns,
  Aren’t these peacocks fun as they dance in pairs around the block?
 While I was stitching my Moonstone block, Mathew (aka
  I knew I wanted to incorporate the hummingbirds into this flower block, since hummingbirds and flowers go together like rock and roll, but couldn’t fit them onto any of the individual shapes. Then I realized that I could split the hummingbirds across two background fabrics and decided to go headfirst into meticulous cutting at its best.
 I labeled the humming bird front-back pairs since the Flowermania block is pieced in such a way that they are only joined right at the end as the segments are stitched together. This fussy cutting feat was no easy task, I might add. From the careful cutting to make sure the hummingbird halves would seamlessly meet when stitched together, to basting the pieces *just* so, to then stitching it all together and having it meet perfectly around the green diamonds, this was a challenge. They are not all perfectly matched up, and I learned a few tricks along the way that I’ll keep in mind next time, but overall I’m happy with the outcome.
 Some hummingbirds match perfectly, but even the imperfect ones are perfect in their own way. Hummingbirds are happily flitting around this Fowermania bloom, and it seems to me that it’s the perfect poster-child block for Flit and Bloom fabrics. Right!?
 Finally, I started to dive into a Lucy Boston Patchwork of the Crosses block, since what is EPP without Lucy Boston? I love how rotating the fabrics creates even more meticulously cut geometric fun, and I look forward to seeing how this block shapes up.
 One of my favorite parts of planning with Lucy Boston blocks is in the outer pairs. I like to make a few “test pairs” with different fabrics and arrangements to see which ones I visually like best.
 I love that Flit and Bloom has plenty of opportunity for mirror image fussy cutting, since those are my favorites–can you see why?
 Which arrangement is your favorite?
 I used
  Be sure to visit the rest of the stops on the Flit and Bloom Blog tour to see what everyone has made with this fun fabric:
 While I was piecing my newest Quilt Theory quilt,
 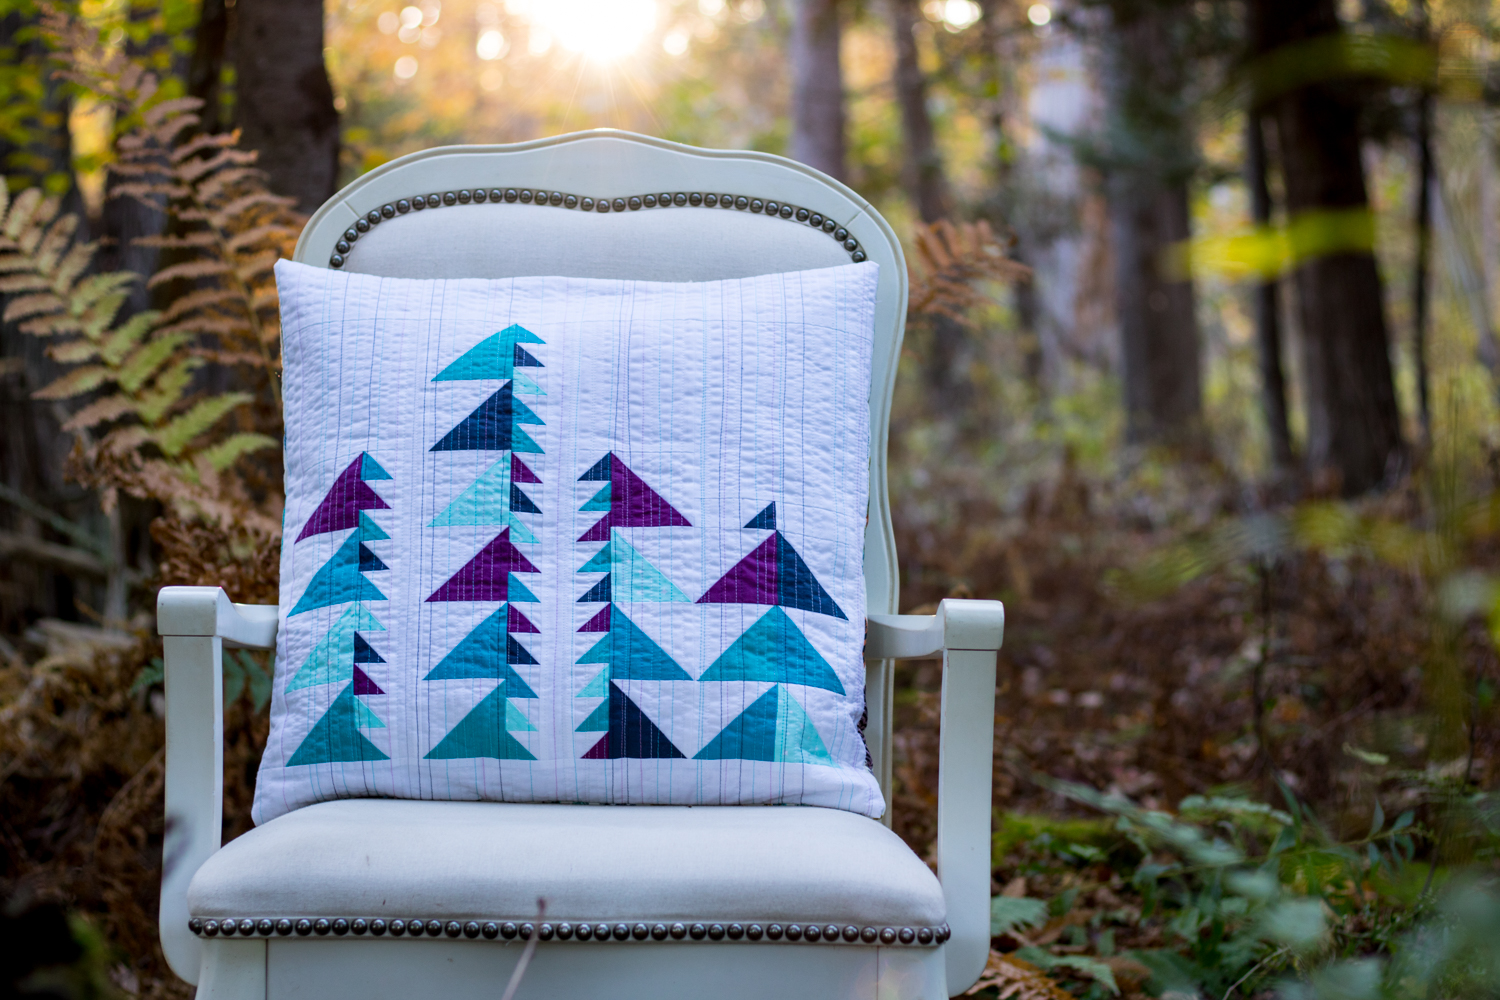 Thus, the Glade Pillow was born. A free bonus pattern for all who purchase Into the Forest, the Glade Pillow uses up a large majority of your scraps, and the pieces are actually sewn while you piece your quilt blocks. That’s a win in my book. I hope you like it, too.
 I had a fun photoshoot for this pillow, caught right at dusk with two of my little ones in tow, and thought it would be fun to show you a bit more about the pillow, as well as share peeks at our fun photo shoot. The light is low, and less than optimal, but the photos and memories made are fun ones. It turns out kids have as much fun with a fancy arm chair in the forest as quilters do!
 First, how about some more details about the pillow? Here’s the backing, which I absolutely love! I made an envelop closure but plan to add snaps or buttons in the near future.
 I used scraps from my Into the Forest quilt backing,
  I had fun quilting my Glade Pillow with an assortment of
  Getting photos of this pillow proved a bit tricky, since an eager 2 year old helper often means photos like this (above). Add a 7 year old sister helper, and they quickly morph to this:
 Seriously cute!
 Finn was soon once again distracted by a nearby plant, so Maddie stepped in for her turn.
 Big girl helper, in so many ways! After the photo shoot, Maddie wanted a turn with my camera. With the strap securely around her neck and extra reminders to be extremely careful, I let her commandeer the camera.
 As a result, there’s a bit of proof of what it looks like to have quilty photo shoots with little ones’ help. My middle son was inside intently building with legos and had no interest in helping with our forest romp, but it was really fun to wander into the forest behind our house for a bit. Maddie and Finn had a wonderful time rolling around and being silly in the grass afterward.

 First, to introduce you to my contribution to the third Quilt Theory pattern collection! Inspired by my frequent family hikes, Into the Forest is a reminder of where you should always head–into the forest!
 Take a leisurely stroll with me into the depths of nature. Into the Forest plays with two sizes of the same block to create a simple graphic tree design with a crisp and clean aesthetic, like a morning stroll through a cool forest. Inspired by the majestic evergreen trees ubiquitous in Maine, this quilt uses your 5 favorite fat quarters to make a nature inspired lap quilt finishing at 52″ x 60″. Use organic, repurposed, or naturally dyed fabrics to really become one with nature.
 It seemed only natural to choose
  My Into the Forest quilt was partially pieced and quilted by me, and partially pieced and quilted by
 All of the Quilt Theory patterns are simple enough to be printed on 4″x6″ cards or a single page downloadable pdf. At only $4 each, they are perfect for gift giving or collecting, too!
 Cloud 9 fabrics was generous enough to offer a fat quarter (FQ) bundle of 12 of their luscious organic cirrus solids to one of my lucky readers!
 organic cotton | happy you | happy earth


 He finally realized that I was on the other side taking photos! No photo shoot is complete without a kid cameo, though, right?
 Wandering into a west coast forest…
 Wandering into an east coast forest…
 In the spirit of setting myself up for success, I opted to make four (4) blocks to make a pillow rather than a full sized quilt, and I dove into my bright Alison Glass stash to put together a fully saturated, smooth rainbow gradient. You know how I feel about rainbows. Alison Glass fabric rainbow + Giucy Giuce EPP project = heaven on a summer’s day!
 I used mostly 50wt Aurifil thread, with a few 80wts thrown in, using coordinating colors so that the stitches blend right in with the blocks. The threads shown here are (from top left clockwise): 2535-Magenta, 1154-Dusty Orange, 5015-Gold Yellow, 5017-Shining Green, and 1125-Medium Teal, all 50wt. There’s nothing quite as satisfying as matching the perfect thread to your fabric!
 Alison’s Art Theory print from her Ex Libris line (still my ultimate favorite fabric ever) was my color inspiration, so I planned my 4-block panel around the color flow in the center octagon. Throughout the course of the summer, I finished the four blocks and completely stitched them together!
 Now I am at the point in the game where this could lounge in the works in progress pile for a while, but instead, I am going to use my excitement to forge ahead and aim to finish this beauty, which is sure to be my most favorite pillow of all time.
 My next step is to choose background fabric, press the pieced panel thoroughly, remove the template papers (so that I can use them again!!), and then hand stitch the panel down onto the background fabric. Just last week, I visited my local quilt shop
  After looking at those options, I still felt like I needed to see the Insignia before deciding, and with the encouragement of a few friends on Instagram, especially Erin who said, “I’m a strong believer in first instinct=best instinct!”, I ordered a yard of Insignia in Charcoal from Alison Glass’s shop. (Thank you Erin!). Clearly, my first gut choice is the winning choice!
 Next I will hand stitch this epic panel to the perfect Insignia background using Aurifil’s monofilament thread in Smoke. I plan to quilt this with the Smoke monofilament thread, too, and I’m so excited just thinking about how amazing this pillow will be. This will be my first time sewing with monofilament thread, either by hand or machine, so I’ll be sure to share how it goes.
 As for me, I’m nearly finished piecing my next rendition of a Moonstone block, going with the Gems layout and a more nautical theme. I plan to make only one block and top stitch it to a large zippered pouch for a friend to whom I owe a quilt. I’m hoping the consolation diaper pouch/zipped pouch will hold her (and her nearly 1 year old baby) over until I manage to make the quilt!
 As you can see, I’ve been absolutely struck with Moonstone Madness and it doesn’t appear to be tapering off just yet. I’ve had a wonderful time piecing together these blocks, and the portable nature of English Paper Piecing ensures that it is still very much on the top of my “summer stitching” projects list!