Living out in the country, if I can order something online and have it delivered literally to my door (rural mail delivery is awesome!), I do it! Don’t get me wrong–I’m all about shop local and I support local businesses as much as I can. But with three little ones to wrangle into and out of carseats for every errand, some things like toothpaste, shampoo, kid sneakers, and … fabric!? Those can be delivered right to my door, thank you!
So when Jamie, co-founder of Culcita Box, emailed me a while back and asked if I would be interested in checking out their new fabric subscription service, I only needed a little nudge to say yes. That nudge was in the form of a quick perusal of their website and what their boxes included to make sure it was my style, and instead of a little nudge it was an “absolutely yes!” Full disclosure: Culcita Box provided compensation in the form of product, a subscription box with fabric. All opinions expressed are my own. My excitement and heart eyes are also my own.
There are many things I really love about what Culcita Box is offering. They include modern fabric lines in their boxes, and you can basically customize your subscription, choosing the yardage and frequency that best fits your sewing style (1/4 yard or 1/2 yard, delivered monthly, bi-monthly, or quarterly). Not only that, Culcita Box also offers specific kit subscriptions including everything you need to make a quilt or a bag/accessory, or kits to help you improve your skills. I think those options are super cool and unique, and I could definitely see gifting someone the improve your skills kit subscription if they wanted to get more into sewing.
Jamie was kind enough to send me the March fat quarter bundle box, so let’s take a look at what was in it!
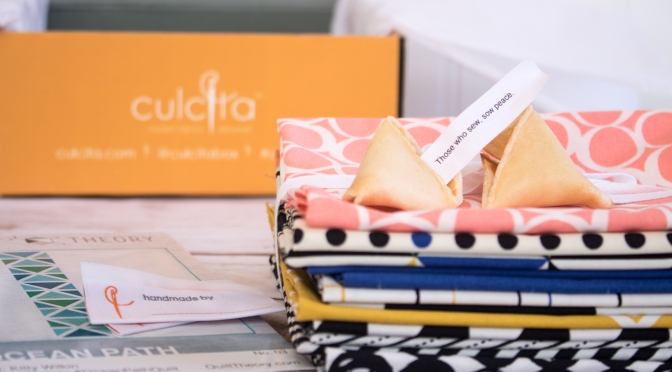
First the deets: the March Culcita box included a bundle of 12 fat quarters of luscious Art Gallery Fabrics–from the Take Shape Capsule, two (2) sew-in labels, a Quilt Theory pattern card for Ocean Path (my pattern!), and perhaps my favorite part–a quilty fortune cookie. I love the attention that clearly went into every detail of this subscription box–from the fun text all over the box, the wrapping, the hand-written note, and even a sewing-related message in the fortune cookie!! It’s like unwrapping a present, and honestly, who doesn’t like unwrapping presents?
I love that the box included two labels, since I think labeling is one of the most important parts of making, yet it’s something that so many people omit from the process. I bet having labels ready to go would help at least get a name and date added to the quilty goodness stitched with love daily. I’m excited to put these to use!
The fortune cookie was such a fun addition. With a sewing-related inspiring message/fortune inside, and a delicious cookie to boot, how can you not love this little detail? Those who sew, sow peace. Yes!
The fabric is luxuriously soft, as we’ve all come to love about all Art Gallery fabrics, and included fabric from one of the new fabric capsules, namely Take Shape. I love the bold geometric shapes and gorgeous color palette. I also really love that these fabrics are a palette and style somewhat different than my usual saturated rainbow tone on tones. With the inclusion of my Quilt Theory Ocean Path quilt pattern card, I’m really wanting to make an Ocean Path pillow version with 2 offset blocks in these geometric beauties. Will my to-do list allow? Time will tell! Either way, I’m excited to add these fabrics to my stash… or projects list!
Many thanks to Culcita Box for letting me try out their subscription box! I would definitely recommend this box for the modern quilter looking to build a stash of beautiful fabrics, or as a gift for those who prefer making bags, working from quilt kits, or building their skills.
Welcome to the final–yes, the very last!!!–block tutorial for the 1930 Farmer’s Wife Sew Along, hosted by Angie at Gnome Angel and sponsored by Fat Quarter Shop and Marti Michell. If you’ve made it this far and have completed all of the blocks, congratulations!! You have finished quite an amazing accomplishment! If you haven’t completed all of the blocks but are still following along, bravo to you as well! And welcome to the club 😀
Since at this point in this Sew Along, I’m sure there are hardly any techniques or block approaches that need additional guidance, I decided, with the approval of Angie, to approach this tutorial a little differently. Today my tutorial will focus on “what next?” Now that this epic sew along is officially complete and you may or may not have all 99 of the blocks sewn, I will reflect on and share a few different approaches you might want to take.
Tips for Foundation Paper Piecing Flora
First, let’s get Flora’s construction covered. I foundation paper pieced my block, so for those of you who do not know how to foundation paper piece, visit my Basic Foundation Paper Piecing tutorial here, as well as the Foundation Paper Piecing tutorial guest post I wrote for the Andover Fabrics blog. Trust me, it is a technique worth practicing and mastering, since it opens a whole new world of sewing possibility!
Since this block is not symmetrical, I printed a mirror image of the templates to help ensure I matched the color placement to that in the book. I selected simple dark, medium, and light green fabrics and carefully marked each piece of the template with a D (dark), M (medium), or L (light) before sewing so that once I had my fabric bits cut, I could chain piece the templates without too much thought. Those two preparatory steps (printing mirror image templates & marking each section of the templates) helped make the actual stitching of this block quick and smooth.
The final block has been sewn! Congratulations! So now what….?
If we reminisce back to October 2015 when we first began this sew along, I originally planned (hoped?) to make 72 blocks instead of the full 99. I planned to sew some with cool colors on a white/low volume background and warm colors on a grey/black background and set them with solid blocks between. It seemed like a solid plan at the time, back when I had in my head that I was making “just a little 6″ block every week”. As you all know at this point, though, these little 6″ blocks pack a punch, often with 30-60 pieces and taking hours to construct. I’ve accepted that the 72 block plan just isn’t in the cards for me at this point in my life. I’m totally ok with that. If you find yourself in the same boat, here are some options.
Keep Plugging Away
My full block inventory, not including Flora = 15 blocks
One option is to keep plugging away at the blocks with the goal of completing all of them eventually. If you want to be sure to complete them in a timely fashion, you may want to set a new goal for yourself and try to hold yourself to it. Perhaps you could aim to make one block per week, at least 3 weeks out of every month. Or you could plan to make 1 block every 2 weeks, where week 1 is spent selecting fabric and cutting and week 2 is spent sewing the blocks together. If this is your choice, make a plan, write it down, and forge ahead!
Change your Block Setting
Adjusting the way you set your blocks could also help you get a decent sized quilt from the blocks you’ve made. If you have made all 99 blocks, you could set your blocks with simple sashing and have a nice, huge quilt.
Adding solid blocks between each Farmer’s Wife block can help you get the most bang for your buck with however many (or few, in my case) blocks you’ve made. Add sashing and that will make your quilt even larger relative to the number of blocks you’ve made. My original mock-up includes both the blocks between each Farmer’s Wife block, and sashing, so you can reference that (included a few images up) for a visual.
Or you could think even further out of the box and arrange your blocks in a more modern, negative-space filled setting. I love the idea of arranging blocks similar to the design in Alyssa Lichner’s Concerto Quilt pattern for Aria Lane!
Make a Smaller Quilt
If you made less blocks than you initially had planned, you could always make a smaller quilt! Lap quilts are all the rage these days, right!? Are any of your local farmer friends having a baby anytime soon? A good handful of these blocks could be beautifully worked into a “Farmer’s Baby Quilt”. With these intricate blocks, you don’t need many of them to make a gorgeous quilt.
Placemats & Pillows!
If, like me, these 6″ blocks showed you who’s boss (and it wasn’t you) and you only ended up successfully making a bit over a dozen of them, they sure would make beautiful placemats or pillows! Both placemats and pillows are handmade items that are often seen and appreciated daily, making sure your painstaking efforts will be appreciated to their fullest.
I’m actually thinking the blue unicorn block I made very well might have to become a pillow for one of my kiddos. It will surely be cherished that way.
With all of those options on your plate, your beautiful Farmer’s Wife blocks are sure to find their way into a finished work of beauty instead of floundering in a pile in your sewing space, right?! Choose your own adventure, enjoy the journey, and thanks so much for joining in on this wild Farmer’s Wife Sew Along experience!
So which adventure will I choose?
Once I completed Flora, I pulled out all of my completed blocks and put them up on my design wall to take stock of my progress. As seen above, I finished a whopping 16 blocks. I am not counting the three blocks that have foundation paper piecing templates printed, cut out, and fabric pulled, since they are not yet sewn, but I do plan to make them eventually.
At first I considered the “Make a Smaller Quilt” option, and thought perhaps I’ll make a few more blocks to fill out a lap sized quilt in my original layout. Note that these photos are from a purely planning phase–fabric slapped up onto my portable design wall simply for the benefit of playing with different arrangements visually. It’s wrinkled and wonky and that’s all part of the fun!
Since I made the warm colored blocks with a dark background and the cool colored blocks with a white background, I probably will stick with those for sashing and background blocks.
Once I began writing this post, though, the negative-space filled setting inspired by the Concerto Quilt is really calling to me. I may opt to plug away and make some more blocks, with the end goal of setting them in a fade out pattern similar to the blocks in the Concerto Quilt. Time will tell, and since I know that I want to make more blocks before settling on any of the options, it’s absolutely okay to choose later!
Do you see Flora?
Flora is going to go live in my Greenery 2017 quilt, though, since the block reminded me strongly of dappled light through the treetops and I thought adding a Farmer’s Wife block to my year’s Greenery project would be the perfect touch! The quilt is already a green melting pot of blocks from all of the sew alongs and bees I’m joining this year so it feels only right that a Farmer’s Wife 1930s block join the ranks.
The moral of this story is:There are no rules. This is your quilt. You can do anything you want to with these blocks! Enjoy the adventure!
I’m excited to be a part of a week-long blog hop to celebrate the expansion of my friend Bernie’s Etsy shop, Needle & Foot. Bernie recently decided to follow her heart and is now stocking a variety of modern quilting cottons in addition to her made goods, and she invited a few blogging friends to help spread the word and spark inspiration about what can be made using the fabric newly stocked in her shop. She invited me to select some fat quarters from her shop, and I’m excited to show you what I made.
She’s also generously offering a giveaway so that one lucky reader can win either 6 fat quarters or 3 half-yard cuts of fabric! Read on to find out how to enter! In addition to the giveaway at the end of this post, Bernie is offering everyone a coupon code to her new shop. Use the code NANDFREADERS15 for 15% off any order over $5.00, active through Sunday, March 26th.
But first, my makes! When Bernie first invited me to be a part of this blog hop, and asked which fabrics I’d most like to use, it was all I could do to resist her selection of Alison Glass fabrics, since, well… you know how I am with all things Alison Glass! I decided to go with a bit of variety though, with the plan to make a few small things and incorporate her fabrics into my current projects. Stash building is a totally legit way to fabric shop, right!?
I ultimately selected two (2) low volume prints–Hashtags and Small Letters in black–from the Basically Low fabric line by Helen Stubbings for Red Rooster, three (3) prints from Sweet Tweets by Kim Schaefer for Andover fabrics–Rainbow on White (isn’t it gorgeous?!), Hip to Be Square Multicolor, and Cheerios on black, and I just couldn’t resist the Bumble Buzz Blue by Maureen Cracknell’s Garden Dreamer line for Art Gallery Fabrics!
I probably could incorporate that Rainbow on White print into every single one of my projects somehow–the colors are just so perfect! I started out by making a half moon zippered pouch with the Rainbow on White and my Sizzix 8″ Half Oval die, and I added a meticulously cut, fused, and stitched bee from Bumble Buzz Blue as a fun embellishment. The colors play so nicely together, and there’s nothing like a little hand-stitched detail to add some extra fun to FUNctional.
I lined the pouch with the Hip to be Square print, and love how festive it is. This pouch now lives in my purse, and contains two spiral bound notebooks and a couple of mechanical pencils so that I know that I will always have entertainment for my two oldest kids no matter where we may be. I will most likely add a few other items (colored pencils, maybe a matchbox car or two), but it is so nice to have a designated “kid pouch” in my purse.
If the kids decide they can’t share, I could always take it right back and use it to smuggle… er, transport… fabric!
I wasn’t quilt finished using that Rainbow on White, so I decided to pair some with the Basically Low Hashtag fabric and Cheerios on Black to make a block for one of my ongoing Sew-Alongs, the Garden Snail Snail Paced Sew Along hosted by Angie at Gnome Angel. I’m using the snails to brighten up my otherwise-entirely-greenery quilt, and I think this little guy will do *just* the trick!
Doesn’t he look great up there!? I have also begun to incorporate both low volume fabrics into my Greenery quilt blocks, as you can see in the bottom left block. Low volumes fabrics are among my favorite to stash since there’s always a perfect project for them!
I’m pretty set on sneaking one of these bees into the quilt somehow, too. Time will tell!
Giveaway
Now, for the giveaway! Bernie has generously offered a prize of your choice of either 6 fat quarters or 3 half-yard cuts selected from any of the available fabrics at the Needle & Foot Etsy shop.
To enter the giveaway today, tell me what fabrics from Needle & Foot you would select if you were to win. Leave a comment and make sure I’m able to get ahold of you if you win. For an additional entry, follow Needle & Foot on Instagram. For a third entry, follow Needle & Foot on Facebook. Leave a separate comment once you complete each entry.
This giveaway is open to US and international participants, but international winners must be willing to split the cost of shipping. The giveaway will be open for one week, until Wednesday March 29th at 8pm EST when I’ll select the winner randomly with random.org. Good luck!Giveaway is now closed! Congratulations to Chris!
*Please note that comment moderation is on, so if you do not see your comment right after posting, do not be alarmed! I try to respond to each and every comment I get on my blog, but with giveaway posts the numbers are usually too great to do this.
Be sure to visit all of the other stops on the blog hop to see the nice variety of modern fabrics now stocked by Needle & Foot, and to see what everyone else made with them, and don’t forget to use coupon code NANDFREADERS15 for 15% off any order over $5.00 in the shop through Sunday, 3/26.
Happy Monday morning! I have a few quick reminders to share today for the week ahead, as well as a silly story from over the summer.
First of all, today’s the day that I will be a guest on Pat Sloan’s American Patchwork & Quilting podcast, streaming live at 4pm EST and available for download at 6pm–I hope you’ll tune in! You can listen on your computer, subscribe by iTunes (search American Patchwork & Quilting), or download to a player. If you can’t listen in during the live broadcast at 4pm, you can download the episode (Episode 333) anytime after 6pm. You can read more about my experiences chatting with Pat here.
Second, today kicks off a fun Blog Hop celebrating the expansion of my quilty friend Bernie’s Etsy shop Needle & Foot, which now hosts a selection of modern fabrics. See the kick off blog post and lineup here at Needle & Foot, and visit Cheryl at Meadowmist Designs for the first stop! Come back Wednesday for a chance to enter a great giveaway, and to see what I made! In addition to the giveaways throughout the hop, Bernie is offering everyone a coupon code to her new shop. Use the code NANDFREADERS15 for 15% off any order over $5.00 (the coupon code will be active through Sunday, March 26th).
And finally, a new face! Since the photos were taken over the summer and I never shared, I thought it was high time I updated my headshot photo! While I still think I look much like the old photo, it was taken nearly a decade ago on the windy moors of England. It was time for a new one. So this summer, I requested that my husband, aka fearless quilt holder assistant, take some new headshots for me.
This is what he did when I was trying to take a photo to show him the desired framing for the photo.
In his typical form, he made the process fun, giving goofy prompts to generate the proper variety of faces. A model I am not, and a photographer he is not… yet I think we got some winners!
“You’re fun and sassy and having a great time…”
“So endearing and sweet…”
“…so you’re walking along and begin to realize there might be a snail in your shoe…”
So which am I really? Not sure, but I ultimately decided on a different headshot altogether; one that I think is a bit less dramatic, but still looks ok and looks like me.
I will be slowly updating my blog and other social media to have this photo, but thought it would be fun to share the process. Really, the snail in the shoe prompt was too silly not to share… what would your face look like if you were walking along and slowly began to realize that there miiiiight be a snail in your shoe…?
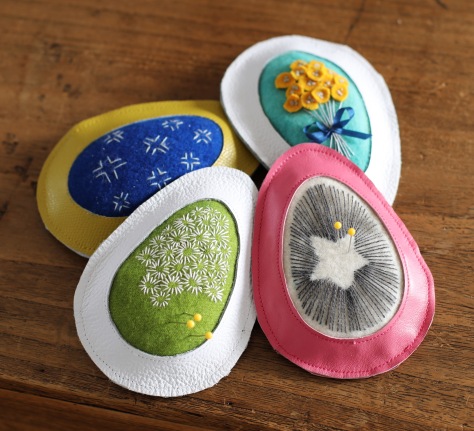
Recently Hillary from Entropy Always Wins and I had the opportunity to meet in person after following each other’s work online for years. Both loving embroidery, repurposing textiles, creativity and the sewing community in general we plotted a tutorial that would allow us to play off each other’s creative personality and engage the greater sewing community as a whole.
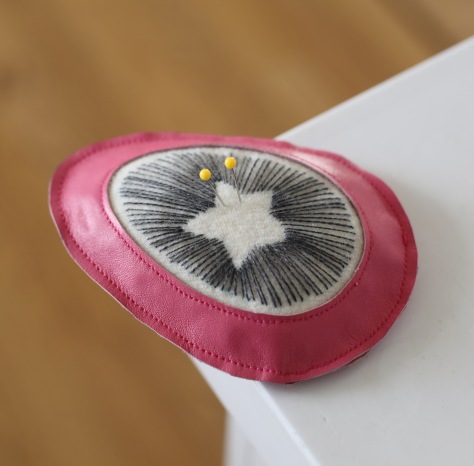
A year ago Hillary made an Easter Egg shaped pincushion out of velvet and repurposed leather. We expanded on this idea and invite anyone who wants to participate to make a similar pincushion and, if interested, incorporate repurposed leather (Earth Day is coming up after all, and repurposed leather is typically thin enough to easily sew on a domestic sewing machine.) Be bold. Be brave. Let’s sew leather!
In this tutorial we give everyone some guidelines but the emphasis is on PLAY and MAKING THIS PROJECT YOUR OWN. Don’t celebrate Easter? No biggie, make a similar pincushion in another shape. We will be following on Instagram so please tag your makes #eastereggpincushion (as well as tagging @nightquilter and @entropyalwayswins) so we can all enjoy. To celebrate this group project we will both randomly be giving participants some of our own pincushions as well as supplies to make them. All you need to do to be eligible is to play along, tag us, and tag #eastereggpincushion so that we can find you!
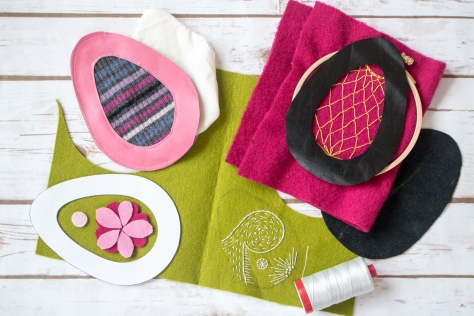
Suggested Supplies
Thin leather (~6×12 inches)
Wool felt, velvet, jeans or any other material for the inner portion of the pincushion (~6×6 inches)
Embroidery hoop (a 4” hoop will *just* fit the inner egg)
Crushed Walnut shell or other favored pincushion fill
Step 1: Templates and Leather
Print the Embroidery Egg Template and cut along both inner and outer egg outlines. Trace the template onto the wrong side of the leather, marking out two eggs–one with only the outline and one with both the inner and outer lines drawn.
Carefully cut along the marked lines, remembering to cut one piece along only the outer egg outline and cut the other piece along both the inner and outer egg outlines.
Set your leather pieces aside.
Step 2: Embroidery
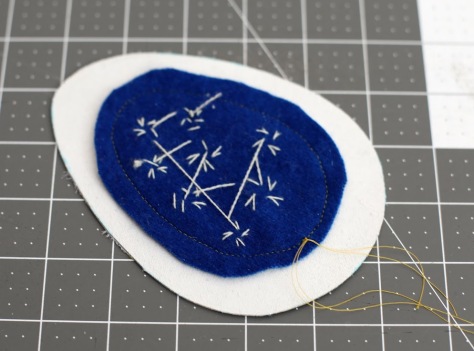
Using chalk or water soluble marker, trace the inner egg outline onto your embroidery surface (felt, velvet, jeans, etc) so you will know the limitations of your embroidery design.
Adorn at your heart’s desire with embroidery, applique, etc. You are welcome to copy our experiments but please feel free to try your own ideas.
Step 3: Attach the Embroidery to the Leather Upper
Align your embroidered material so that the embellishments fit within the window of your leather upper (the egg with the hole cut out of the middle).
Secure the right side of your embroidery to the wrong side of your leather upper with double sided tape, glue, clips, or other method.
Then, using a ¼ or ⅛ inch seam allowance, top stitch the two together along the inner egg as shown.
Self-threading needles work wonders for threading the loose ends to the back of the piece!
Thread the top threads to the back of the piece, tie all loose ends together and trim.
Finally, if possible, trim the seam allowance of your embroidered material carefully about ½” away from the stitched line so that it remains easily inside the outer margins of the egg.
Step 4: Make an inner pincushion
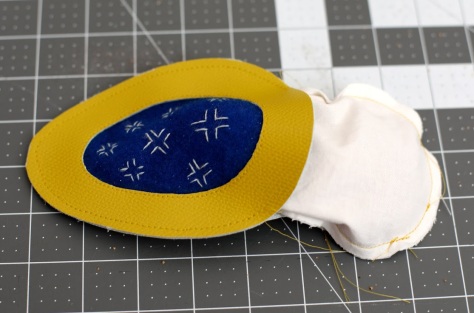
Using only the outer margin of your Egg Template, trace and cut two pieces of muslin. Sew the two pieces together using a ¼ inch seam allowance, leaving a small opening to use for filling.
Any guesses how many tries with the 10sec timer on my camera it took for me to get this photo? LOL
Fill with crushed walnut shell (a funnel can be helpful for this). One half cup of crushed walnut shell for this project seems to be the right amount. Use a little more if you want a more rounded pincushion. Sew the opening of the inner pincushion completely closed.
Step 5: Finishing your pincushion
Place the two leather egg pieces wrong sides together and secure with clips. (Note that pinning will create visible holes in the leather–use clips!) Sew around the outer margin of the egg using a ¼ seam allowance, leaving an opening at least 3 inches long unsewn.
Stuff your filled and fully closed inner pincushion through this opening. Ensuring the inner pincushion remains entirely inside, top stitch the remaining way around the outer edge of the egg.
Thread the top threads to the back of the piece, tie all loose ends together and trim or bury.
When Pat first invited me to be a guest on her show, I was honored, flattered, and more than a bit nervous since I’m severely hard of hearing and the chat typically happens on live radio over the phone. The phone, as silly as it may seem, is strongly in the running for my biggest fear. With a few emails back and forth, Pat was extremely understanding and accommodating, and suggested a number of alternatives. I ultimately decided to go with her offer of prerecording (instead of live), with Facebook messenger chat open so that if I mis-heard something or missed one of her questions, I could ask her to type it out and the editor could edit out the long pauses. I am so incredible grateful for Pat’s willingness to work around my hearing loss, and once we got going, it was honestly SO fun to talk all things quilting with her! We ended up having a really relaxed and fun conversation, and I had no trouble hearing her (after all that!).
I do hope you’ll have a listen, and if you’re like me and relatively new to podcast listening, you have plenty of time to give it a practice run and make sure you know how to listen in by Monday! The show time is Monday, March 20th at 4pm Eastern (3pm Central, 2pm mountain, 1pm Pacific) and you can click this graphic to go to the link to listen:
You can listen on your computer, subscribe by iTunes (search American Patchwork & Quilting), or download to a player. If you can’t listen in during the live broadcast at 4pm, you can download the episode (Episode 333) anytime after 6pm on Monday! In the meantime, feel free to have a listen to previous episodes–you can browse them all here!–there are so many great stories, tips, and laughs shared by many quilters and folks in the industry.
Are you a podcast listener? I know I am looking forward to listening to see how I did (eek), as well as to hear what the other guests have to say. I think I may be hooked on quilting podcasts, now–I may not be able to hear all of them, but they are still so much fun to listen to. Thanks again to Pat Sloan for having me, and happy sewing!
My greenery quilt is slowly growing, despite the fact that I haven’t been sewing all that many new blocks for it over the past month. Between travel, deadlines, and other quilty projects, the greenery block making has dwindled a bit. I’m sneaking two more blocks in this month, but you’ll have to wait just a bit for those reveals! It’s just another reminder of how perfect of a project this is for me–no stress, no worries! I make blocks when I can, and the quilt will grow as it grows!
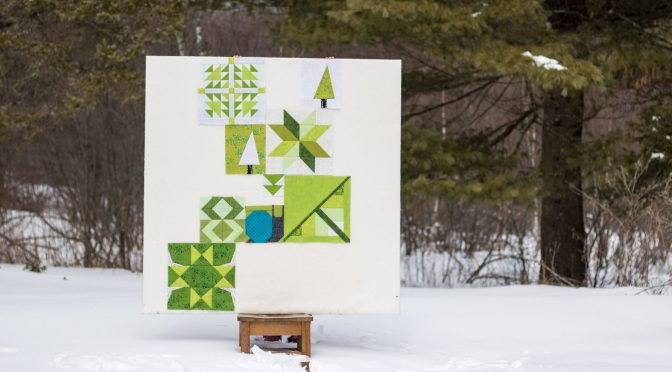
I haven’t shown much of an update here, so I thought it would be a good time to show you the blocks I do have! I brought my portable design wall right out into the blizzard aftermath, since with all of this white, I thought some green would do it good!
There really aren’t a whole ton of blocks yet, but I’m including blocks from a few different sew-alongs and bees. Here’s a tour…
Unnamed by Jane Armstrong, from the first week of January in the Quilter’s Planner 2017. I started off on the right foot at least! Not one bit of the final layout for this quilt is decided yet, except that this little snail is going to live next to this lovely upward ramp! They seem to go together, and so it shall be.
Doves in the Daylight by Michelle Bartholomew, from week 2 of the year. Gosh, I love this block!
Double-Edged Star by Amy Garro, from the last week in February in the Quilter’s Planner. I still want to go back and make some of the blocks I’ve missed, but for now, 1 block per month from the Quilter’s Planner seems to be my pace!
Honey Pot Bee Blocks
The little improv trees are what kicked off this Greenery quilt, and they were a Wild Card to help get us started with Molli Sparkles’ Honey Pot Bee. Pssst…. I’m a Queen Bee for April, so I’ll be adding another block to the mix soon. You’ll just have to wait and see which block!
This is Patience Corners, block 1 for the Sewcial Bee Sampler led by Sharon Holland and Maureen Cracknell. I’ve only completed one block from the Sewcial Bee so far, but I love the classic simplicity of these blocks and plan to make quite a few more (as soon as I finish my round 2 Quilt Theory quilt–my big deadline at the moment!)
And all together now, in the snow, since what better time to spread some greenery than a mid-March blizzard!? Per a suggestion by Anna from Mod Quilt Mom, I’m naming my quilt “It’s Easy Being Green 17” since it’s all about greenery and will be comprised of blocks made in 2017. I still might edit it a bit, but for now, the hashtag is #itseasybeinggreen17quilt on Instagram.
No child-assisted blog post of mine would be complete without a hi from my helper, so here’s a quick photo of my adorable helper today (this is for you, Mom aka Grandma)! Maddie had a snow day, and Max, who goes to preschool just a couple towns over, had school as usual. Isn’t it wild the difference a couple towns can make regarding snow in rural Maine!? So today is a fun Maddie-Mommy-Finn quasi-snow day!
With a bit of growing greenery thrown in, since spring MUST be around the corner!
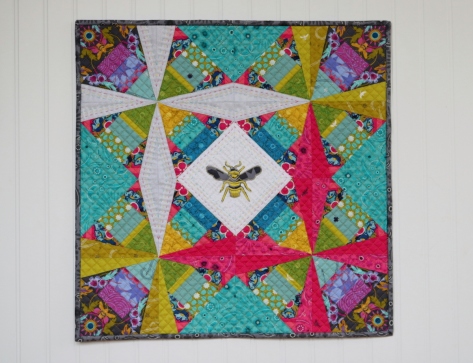
Right before the mad-dash to get packed for our trek to QuiltCon, I finished a mini quilt and excitedly mailed it to a hotel in Savannah, where it patiently waited for Giuseppe to arrive. Here’s a closer look at my mini quilt that hung in the Andover Fabrics booth at QuiltCon.
This quilt got its name after it was nearly completed, as I sat hand stitching the binding to the back. A mini quilt made at the request of Andover Fabrics, out of entirely Alison Glass fabrics, to be displayed in the Andover booth at QuiltCon–can you imagine how thrilled I was to make it? I had selected my pattern Constant Flux since I have been wanting to play with different arrangements and color schemes for it, and simply rearranged the blocks to create a central focal square (I rotated each block 180 degrees).
With freestyle embroidery fresh on my mind and Nichole Vogelsinger’s book Boho Embroidery freshly on my bookshelf, I was inspired to add an embroidered, appliquéd bee from Alison’s Seventy-Six line in the center.
Just getting started with my favorite stitch: Hungarian braided chain, in 12wt Aurifil 2120-Canary.
So when a local friend of mine sent a message connecting me with a textile designer friend of hers who needed product photography, and calling me “the bee’s knees”, the name just felt right. I think the entire world pretty much knows that I think nearly all of Alison Glass’s fabrics are the bee’s knees, so it felt like the perfect name: The Bee’s Knees (aka all of my favorite things–Alison Glass fabrics, plus meticulous cutting, plus embroidered applique, plus detailed machine and hand quilting) in Constant Flux (the pattern name). More figuratively, it’s a nod to the fact that the fabrics and styles that we consider the bee’s knees are constantly changing.
I had a lot of fun with the meticulously cut (yeah, yeah, fussy cut) sections, including bees and flowers as framing for the color flow. I love pairing meticulous cutting with foundation paper piecing. The fussy cutting templates I include in my pattern came in handy, too.
I knew I wanted to incorporate both hand and machine quilting, and I knew that I wanted the machine quilting to be dense. It took me a while to decide between using 50wt Aurifil 2600-Dove or 5015-Gold Yellow for the quilting, and finally I opted for the Gold Yellow to pull out the gold of the centrally stitched bee. I quilted a diagonal grid approx 1/2″ apart on all of the colored sections of the quilt and I love the texture it created. I wanted the white star and central diamond to pop, so I let them be, patiently awaiting hand quilting.
I used a rainbow of 12wt Aurifil thread to help pull the rainbow from the gorgeous fabrics into the white sections, and I love the outcome! I decided to switch to 12wt 2600-Dove for the center so that the bee would stand out.
The back shows that my hand quilting still has plenty of room for improvement (especially when trying to maneuver around the bee), but it’s still fun to see the back, too!
I used Seventy Six fabrics Rising in Graphite and Numbered in Duck Egg for the back, with an Insignia in Chartreuse label.
Labeling is one of my favorite parts–maybe because it helps me know that my name is on my work, or maybe because it means I’m finished with a project!!
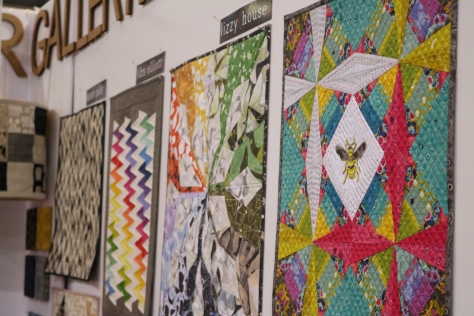
This quilt is currently in Andover headquarters in NYC for photography and other fun fabric adventuring before it returns to me, but it was super fun to see it hanging in the booth at QuiltCon (see it, top right??). You can see a photo of me proudly standing next to it in my QuiltCon post here.
I’m linking up with Crazy Mom Quilts Finish it up Friday, since this finished mini hopped right into the mail upon its completion and hasn’t been shared in detail here yet. Finishes do feel good, don’t they!?
The past few weeks have been spent in preparation for our trip to Savannah, Georgia for QuiltCon, the wild travel adventure that was required for us to get there, the excitement of the event, and finally the long trip home. We arrived home late last Tuesday night after a day of flights and then a fully day’s drive with all three kids, having picked up the big kids who spent the week with my parents in New Jersey. When we left home, Maine had 3 feet of snow and highs of 35, yet we arrived home to rain, patches of mud, and just a layer of snow in the yard. It’s amazing what a week can do! There are so many things I’d love to share with you about what I’ve been up to over the past few weeks and my experiences at QuiltCon, so I figured a quick post of highlights would be my best chance of getting it written clearly. I’ll aim to go into more depth for some parts in the days to come.
First and most exciting is that Andover Fabrics asked me to make an Alison Glass mini quilt to hang in their booth at QuiltCon. How could I say no to that honor?! I decided to go with my pattern Constant Flux, but printed the templates at 90% and rearranged the blocks a bit so that the large focal square was in the middle. I used all fabrics from the Seventy-six, Insignia, and Sun Print 2017 fabric lines by Alison Glass. I added a Wild Boho-inspired bee applique which I embroidered with 12wt Aurifil thread. Both dense 1/2″ machine quilting and colorful hand-quilting finished it off, and from what I heard, there was quite a buzz about it (har har buzz!).
Here I am proudly standing next to the quilt hung in the fabulous Andover booth.
Workshops and Lectures
Trying new things and stretching my mind are among my top favorite things, so I was sure to register for some workshops and lectures at QuiltCon. I focused on areas I felt I could most benefit from improvement or practice: improv, sewing curves, and improv free motion quilting on a domestic machine.
I really loved the Minimalist Improv class with Season Evans. Her minimalist mindset and explanation of her process was so enlightening, and actually forcing myself to *try* a minimalist palette with improv piecing was so liberating. I made an entire mini quilt during the class, and didn’t touch a rotary cutter or ruler once (except for squaring the finished block). As much as I tried to go into the class with a blank slate mind, I had a preexisting idea to create a minimalist quilt focusing on a trianglesque shape in the upper right hand corner. I abandoned the angular construction plan to try my hand at Season’s style, but still snuck in the little triangle. It’s not as minimalist as Season would create, but it’s VERY minimal for me, I created it entirely improv, AND I love it. Total win!
I also was inspired by Sherri Lynn Wood‘s lecture on finding the Flow with Improv, and took some really great ideas home with me as a result. I’m excited for the next chance I get to play with improv, since Sherri’s lecture inspires me to take a different perspective and tap into other experiences to help me overcome (or flow past) the usual brain-breaking path of uncertainty I traipse while attempting improv.
Sew all the Curves with Jen Carlton-Bailley was another fun one! I was encouraged to learn that I am doing everything right when it comes to traditionally piecing curves, I just need more practice for it to feel smooth! It was also really fun to see the many styles and varieties of quilt patterns that incorporate curved piecing, photos of which Jen shared many!
Improv Machine Quilting with Christa Watson was everything I hoped and more. It was such an organized class, with introductions to different motifs and then opportunity to practice on our practice pieces. I LOVE the idea of improv free motion quilting, since it takes some of the pressure off of my self-inflicted desire for perfection. One tip shared by Christa that I especially love was, “The best way to hide imperfections is with more imperfections.” The human touch adds so much personality, story, meaning, depth…. and imperfections. I’m newly inspired to densely quilt the bajeezus out of some of my quilts, and embrace the flow that emerges.
If you ever have an opportunity to take a class or attend a lecture with any of these talented women, I highly recommend it! I came home ready to celebrate my mistakes, find the flow whether I’m happy with the progress or not, sew curves until the cows come home, free motion quilt all the things, and allow myself to create minimalist creations from time to time as a stress-free palate cleanser. Plus, my husband really likes the mini quilt I made, so that’s a double win!
Quilt Show
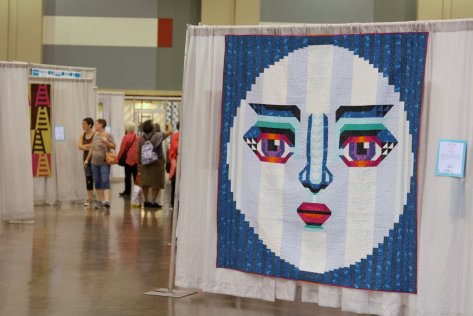
Thursday morning when I first stepped foot onto the showroom floor, and began slowly walking around to take in the vast depth of beauty, originality, workmanship, and meaning that was displayed in those aisle, I was moved to tears. I don’t have the opportunity to attend many quilt shows, and being in the presence of so many quilts created with such passion by talented fellow quilters and friends was an amazing experience.
Despite keeping a fairly light class schedule, I am sure I did not get to see every single quilt that hung at the show, and more time was spent examining details than taking photos. It’s impossible to select favorites, so instead I will share a selection of photos I took of quilts that stood out to me. You can see all of the award winners on the Modern Quilt Guild website, here.
Let’s begin with the Best in Show, since it was a pretty epic and gorgeous quilt. Bling by Katherine Jones@twocatsquilts was foundation paper pieced from solids based upon the inspiration of a princess cut diamond. It struck me that the quilt is entirely foundation paper pieced, since that confirms that paper piecing has a strong place in the modern quilt world. Sure, it can help you create perfect shapes and images, but it’s clear now that it can also help take an abstract idea and break it into manageable, clear chunks.
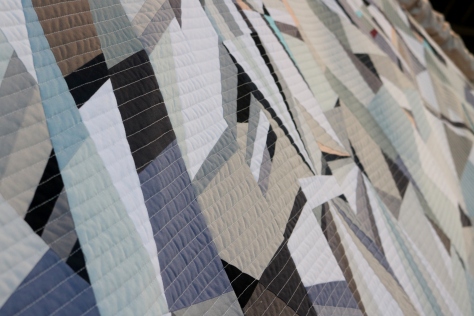
Detail: Bling by Katherine Jones @twocatsquilts
The quilting was dense straight line quilting on the diagonal, which did its job. Think about removing all of the papers after piecing this one! Astounding!
I also saw a lot of curves in the show, the variety of which are demonstrated by this award winner (above: Madonna by Brittany Bowen Burton @brittanybowenburton, which won Best Machine Quilting, Framed, Needle Moves),…
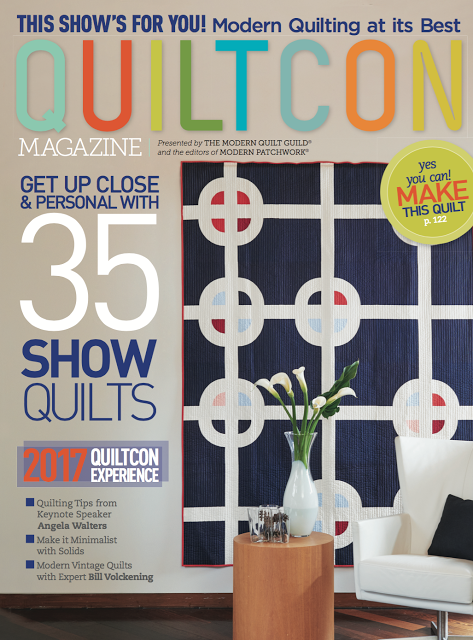
…the cover quilt on the QuiltCon magazine, Sightseeing by Daisy Aschehoug of Ants to Sugar@antstosugar,…
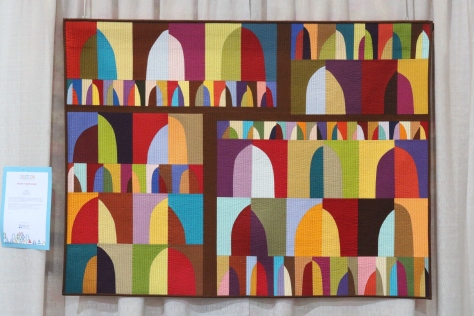
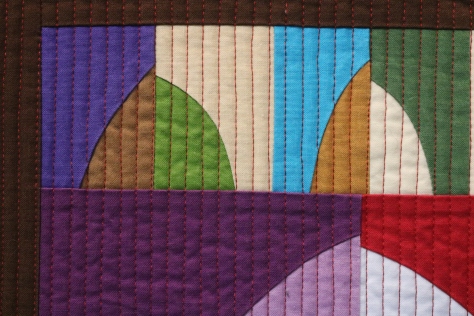
Arches by Leah PahlmeyerDetail: Arches by Leah Pahlmeyer
…and Arches by Leah Pahlmeyer. There were many more quilts with curves, both improv and traditionally pieced, and probably your best bet at seeing as many of them as possible is checking out the #quiltcon2017 or #quiltcon hashtags on Instagram.
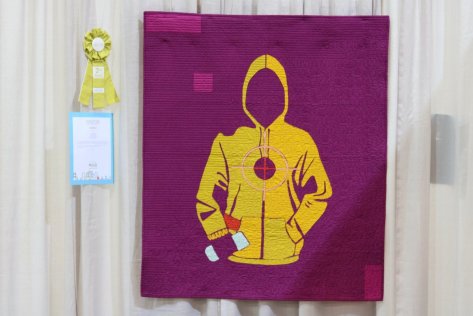
Tea and Skittles by Thomas Knauer @thomasknauer, 2nd place Applique
Statement quilts are still making a strong stand, which was both humbling and empowering to see. As Yvonne of Quilting Jetgirl reflected in her recent blog post about QuiltCon, many people use quilt-making as a tool in processing events, or perhaps create quilts out of necessity to help them process, creating some of the most beautiful and powerful textile creations I’ve ever seen. (Read Yvonne’s full post here for more examples and reflection!) I wish I had taken more photos of these powerful quilts, but reading the descriptions and doing my own processing of the inspiration dominated in their presence. The quilt shown above is Tea and Skittles by Thomas Knauer@thomasknauer (Applique 2nd place), and stopped me in my tracks. Read the story here.
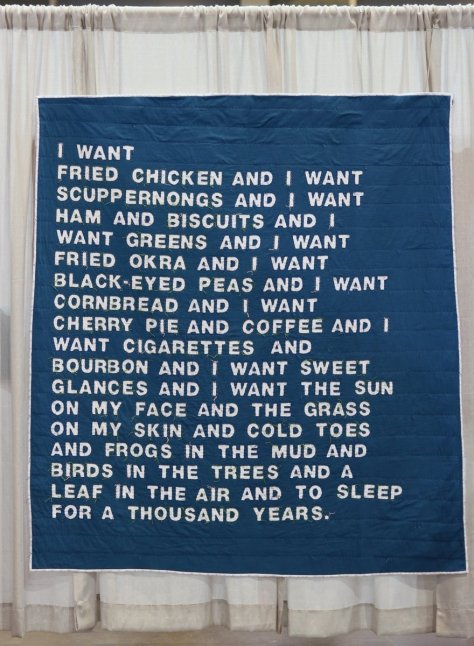
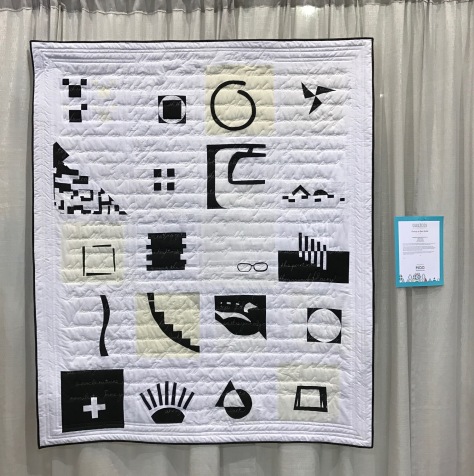
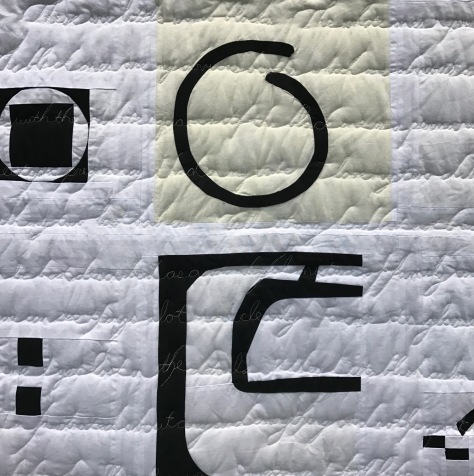
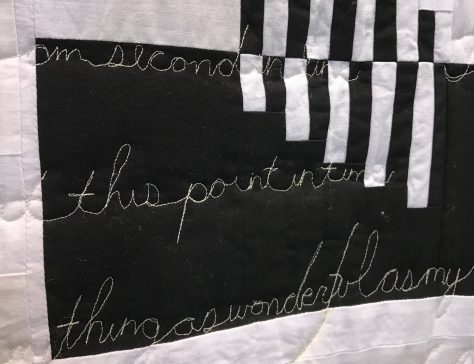
Minimalism with Meaning: The Story of Us by Hillary Goodwin and her BeeSewcial matesDetail: Minimalism with Meaning: The Story of Us by Hillary Goodwin and her BeeSewcial matesDetail: Minimalism with Meaning: The Story of Us by Hillary Goodwin and her BeeSewcial mates
Hillary tasked her beemates to make blocks that told a story about themselves and then quilted their words into the fully pieced quilt. Quilts tell stories, truly, a fact that is abundantly clear at a quilt show like Quilt Con.
Go North by Maritza Soto @sotosewn, Free Spirit Award of Quilting Excellence
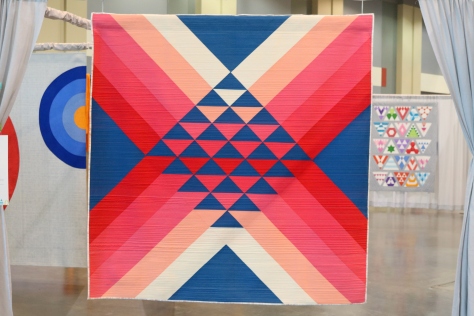
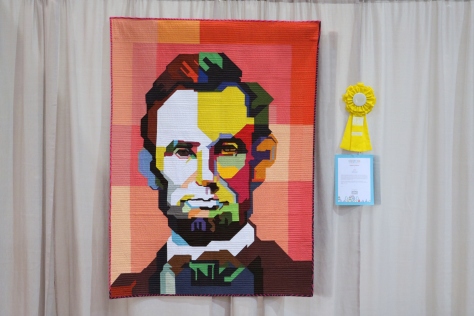
Solid fabrics seemed to dominate, with tone on tone and subtle prints playing a stronger hand that bold large-scale prints. This Free Spirit Award of Quilting Excellence winner, Go North by Maritza Soto@sotosewn is a good example, as is the amazingly improv quilt Lincoln by Kim Soper@lelandavestudios (below), which won 1st place for Improvisation.
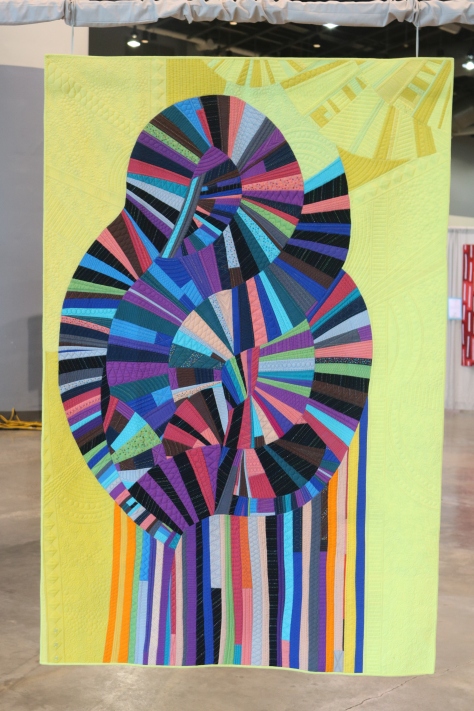
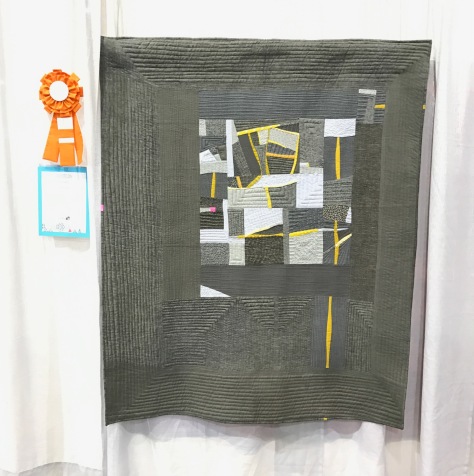
Lincoln by Kim Soper @lelandavestudios, 1st place ImprovisationCanary Meets Gold Mine by Stephanie Ruyle @spontaneousthreads, 1st place Handwork
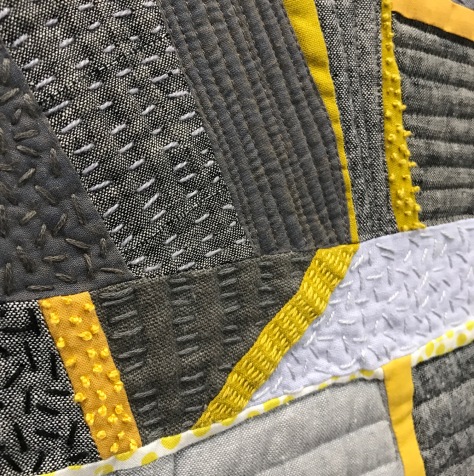
I also was excited to see quite a bit of hand quilting and even embroidered details on quilts, which is right up my alley these days! I loved this quilt Canary Meets Goldmine by Stephanie Ruyle@spontaneousthreads even before I realized it had won 1st place for Handwork.
Detail: Canary Meets Gold Mine by Stephanie Ruyle @spontaneousthreads, 1st place Handwork
The full amazingness of this quilt cannot be realized until it is inspected from a nose-distance away. French knots!! Amazing, right!?
There were so many amazing quilts and seeing them firsthand, from a nose-distance away in many cases, truly inspired me to continue making beautiful things, to stretch the “rules” and create whatever moves me, continue fine-tuning my skills and techniques, and to attend as many quilt shows as I possibly can.
The booths and vendor hall was much fun at QuiltCon. I was able to find replacement milliners needles right before my Facebook Live chat with Aurifil thread, thanks to Red Thread Studio, with quite a few offers of a loaner if I had not been able to find the right needle to purchase. It was exciting to see one of my local quilt shops, Alewives Fabrics, rocking the vending floor, too. Their weekly Lucy Boston kits seemed to be a big hit. I loved playing around on a Handiquilter long arm machine, and can certainly see the appeal of a long arm after having tried it out first hand.
I did not spend as much time at the booths as I would have liked, both because of fullllll days, but also because most of the time they were absolutely mobbed! These photos were taken Sunday afternoon shortly before the end of the show, which is how you can see the booths.
Special Exhibits
There were quite a few special exhibits at QuiltCon, including the quilts of Angela Walters, Siddi Quilts, Quilt Design a Day, Charleston MQG & Emanuel AME Church Project, The Modern Quilt Guild’s 2016 Quilts of the Month, Kona Color of the Year 2016, and The Pulse of Quilting (shown above). I honestly could have spent all four days just exploring these exhibits–there was so much to see, and so many powerful things being done through the gift and art of quilting.
Quilty Friends
Stretching my brain to learn new things in classes, finding renewed inspiration in lectures, seeing row upon row of gorgeously mind blowing quilts, shopping a hall of vendors filled with all of my favorite things–all of these are wonderful, but none compare to the delight of seeing quilty friends in person. A highlight of QuiltCon will always be the personal connections made between friends old and new, the laughs shared over lunch, the deepening of friendships forged through blog comment exchanges and social media posts. Call me a sap if you must, but seeing so many fellow quilters so full of enthusiasm and spirit fills my social quilting cup until my next chance to attend a big event.
From top left to right, me and: Giuseppe @giucy_giuce, Michelle @michellebartholomew, Mathew @misterdomestic, Erin from @Aurifilthread, Finnnnnn!!!, Anne @playcrafts, Christa @christaquilts, Stephanie @latenightquilter, Karen @karenlewistextiles
I took only a handful of selfies, but enjoyed meeting so many new friends, old friends, and even more new friends.
Savannah
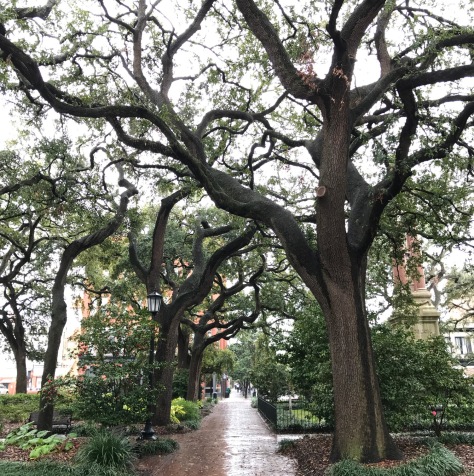
And finally, Savannah!
This post would not be complete without at least a collection of photos from gorgeous historic Savannah, Georgia. It was especially fun to explore since my husband Garrett (who incidentally began an instagram account @knightquilter while he was there) and youngest son Finn were also there with me.
I was sure to teach Finn the fine art of hugging trees, and he was a big fan of the birds chirping in the trees (I couldn’t hear them, but I confirmed their presence on several occasions to make sure I was understanding the source of his excitement).
Savannah is a gorgeous city and I would absolutely return to explore more!
I’m so grateful to my family for supporting me in my travels.
Between my parents watching my older two kids, my husband not only taking time off work so that he could be with Finn full-time so that I could attend workshops, lectures, and “do my thing” with quilty friends I rarely see, but also begging for Night Quilter t-shirts to wear during the event, and taking an actual legit interest in quilting and the industry to help support and understand my passion, I am surrounded by the most amazing supports.
Without that support, none of this would be possible, and no reflection on an event as amazing as QuiltCon would be complete without a huge, from the bottom of my heart, thank you. What an amazing week it was!
I’m still working on a post about my experiences at QuiltCon last week, but as March continues to skip on, I thought I should share February’s stitches for my 1 year of stitches project in the meantime. QuiltCon post coming soon!
My 1 year of stitches project is a personal challenge to stitch at least one stitch every single day. I am working with no set plan, I don’t mark the fabric before stitching; I simply stitch whatever wherever whenever. It’s quite fun!! You can follow along with my daily stitches at @NQ1yearofstitches on Instagram.
Even after a short month, it grows! As a reminder, here’s the hoop after the month of January:
and here it is showing the progress from February:
I guess 28 days can make a big difference!
The highlight of the month was getting the chance to chat with Erin from Aurifil on Facebook live while attending QuiltCon in Savannah. You can see my low key chat HERE on the Aurifil Facebook page. I talk about my process, how the project came to be, why I use Aurifil 12wt thread, and I show a quick demo on how to stitch a French knot. It was a really fun opportunity, and while a bit nerve-wracking knowing I would be live, Erin made it easy by being totally awesome and relaxed. Plus, she’s from Maine. Perfect! The whole experience inspires me to try a bit harder to figure out a way to video my stitches live each day, or at least some days each week. I’ll get right on that and will let you know if I figure it out!
Back to my embroidery progress! Here are some close up shots of the various sections of this freestyle hoop.
I am still stitching without a plan, deciding each day’s stitches the morning–or sometimes night!–of the current day. I have tried a handful of new stitches and look forward to trying even more as the year progresses!
Those little white three-petalled trillium flowers are the most recent addition. Time will tell where this will go from here!
This month, I had a photography helper, so of course I can’t end the post without a few Finn cameos. I often use the photos on my phone as a reference, so I pulled up January’s photo to make sure I arranged the thread in a consistent way. Finn was please as punch that they matched.
He also helped me put the thread back into the box, then arranged around the hoop, back into the box, then arranged around the hoop. What a helper!
Hmmm what shall I stitch today?
I grab a needle and thread once the kids are in bed

 So when Jamie, co-founder of Culcita Box, emailed me a while back and asked if I would be interested in checking out their new fabric subscription service, I only needed a little nudge to say yes. That nudge was in the form of a quick perusal of their website and what their boxes included to make sure it was my style, and instead of a little nudge it was an “absolutely yes!” Full disclosure: Culcita Box provided compensation in the form of product, a subscription box with fabric. All opinions expressed are my own. My excitement and heart eyes are also my own.
  There are many things I really love about what Culcita Box is offering. They include modern fabric lines in their boxes, and you can basically customize your subscription, choosing the yardage and frequency that best fits your sewing style (1/4 yard or 1/2 yard, delivered monthly, bi-monthly, or quarterly). Not only that, Culcita Box also offers specific kit subscriptions including everything you need to make a quilt or a bag/accessory, or kits to help you improve your skills. I think those options are super cool and unique, and I could definitely see gifting someone the improve your skills kit subscription if they wanted to get more into sewing.
 Jamie was kind enough to send me the March fat quarter bundle box, so let’s take a look at what was in it!
 First the deets: the March Culcita box included a bundle of 12 fat quarters of luscious Art Gallery Fabrics–from the Take Shape Capsule, two (2) sew-in labels, a Quilt Theory pattern card for Ocean Path (my pattern!), and perhaps my favorite part–a quilty fortune cookie. I love the attention that clearly went into every detail of this subscription box–from the fun text all over the box, the wrapping, the hand-written note, and even a sewing-related message in the fortune cookie!! It’s like unwrapping a present, and honestly, who doesn’t like unwrapping presents?
 I love that the box included two labels, since I think labeling is one of the most important parts of making, yet it’s something that so many people omit from the process. I bet having labels ready to go would help at least get a name and date added to the quilty goodness stitched with love daily. I’m excited to put these to use!
 The fortune cookie was such a fun addition. With a sewing-related inspiring message/fortune inside, and a delicious cookie to boot, how can you not love this little detail? Those who sew, sow peace. Yes!
 The fabric is luxuriously soft, as we’ve all come to love about all Art Gallery fabrics, and included fabric from one of the new fabric capsules, namely Take Shape. I love the bold geometric shapes and gorgeous color palette. I also really love that these fabrics are a palette and style somewhat different than my usual saturated rainbow tone on tones. With the inclusion of my Quilt Theory Ocean Path quilt pattern card, I’m really wanting to make an Ocean Path pillow version with 2 offset blocks in these geometric beauties. Will my to-do list allow? Time will tell! Either way, I’m excited to add these fabrics to my stash… or projects list!


 In this tutorial we give everyone some guidelines but the emphasis is on PLAY and MAKING THIS PROJECT YOUR OWN. Don’t celebrate Easter? No biggie, make a similar pincushion in another shape. We will be following on Instagram so please tag your makes
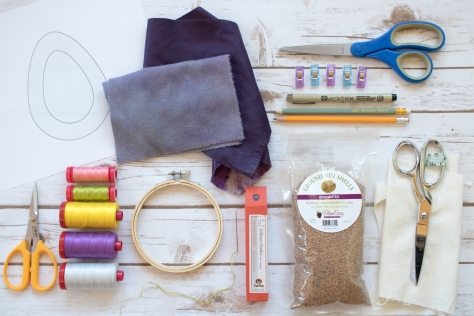
 Print the
  Trace the template onto the wrong side of the leather, marking out two eggs–one with only the outline and one with both the inner and outer lines drawn.
 Carefully cut along the marked lines, remembering to cut one piece along only the outer egg outline and cut the other piece along both the inner and outer egg outlines.
 Set your leather pieces aside.
 Using chalk or water soluble marker, trace the inner egg outline onto your embroidery surface (felt, velvet, jeans, etc) so you will know the limitations of your embroidery design.
 Adorn at your heart’s desire with embroidery, applique, etc. You are welcome to copy our experiments but please feel free to try your own ideas.
 Align your embroidered material so that the embellishments fit within the window of your leather upper (the egg with the hole cut out of the middle).
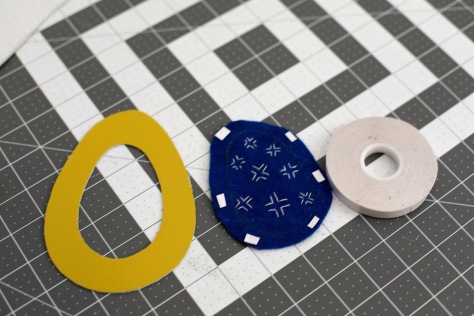 Secure the right side of your embroidery to the wrong side of your leather upper with double sided tape, glue, clips, or other method.
 Then, using a ¼ or ⅛ inch seam allowance, top stitch the two together along the inner egg as shown.
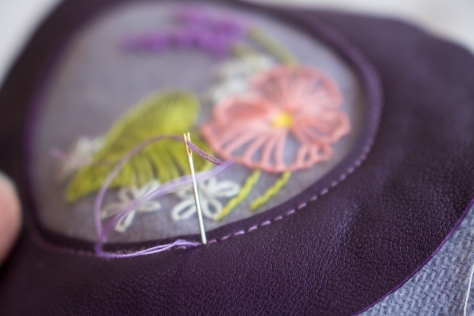

 Finally, if possible, trim the seam allowance of your embroidered material carefully about ½” away from the stitched line so that it remains easily inside the outer margins of the egg.
 Using only the outer margin of your Egg Template, trace and cut two pieces of muslin. Sew the two pieces together using a ¼ inch seam allowance, leaving a small opening to use for filling.


 Place the two leather egg pieces wrong sides together and secure with clips. (Note that pinning will create visible holes in the leather–use clips!) Sew around the outer margin of the egg using a ¼ seam allowance, leaving an opening at least 3 inches long unsewn.
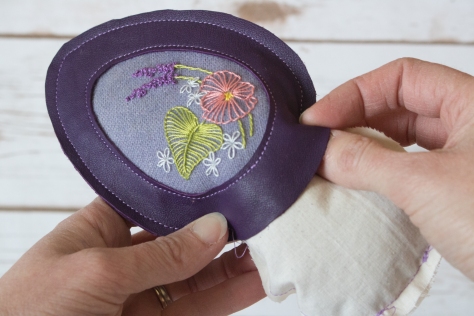
 Stuff your filled and fully closed inner pincushion through this opening. Ensuring the inner pincushion remains entirely inside, top stitch the remaining way around the outer edge of the egg.
 Thread the top threads to the back of the piece, tie all loose ends together and trim or bury.
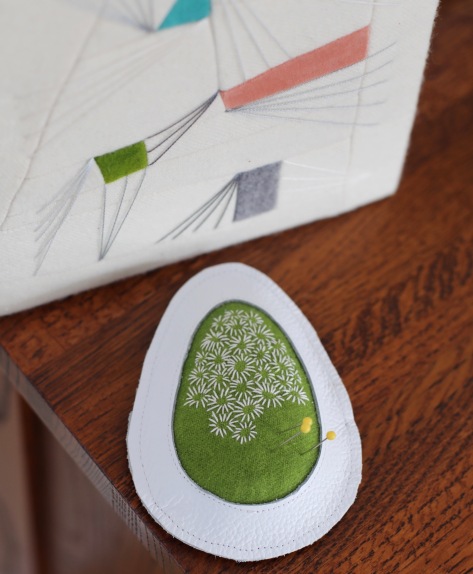


 I haven’t shown much of an update here, so I thought it would be a good time to show you the blocks I do have! I brought my portable design wall right out into the blizzard aftermath, since with all of this white, I thought some green would do it good!
 Unnamed by Jane Armstrong, from the first week of January in the Quilter’s Planner 2017. I started off on the right foot at least! Not one bit of the final layout for this quilt is decided yet, except that this little snail is going to live next to this lovely upward ramp! They seem to go together, and so it shall be.
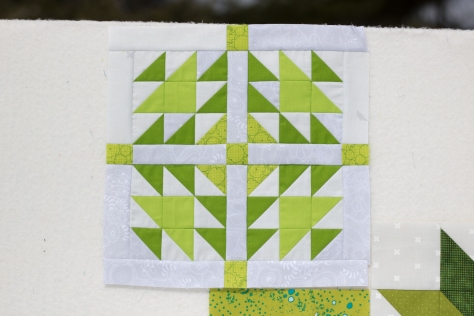 Doves in the Daylight by
  Double-Edged Star by
 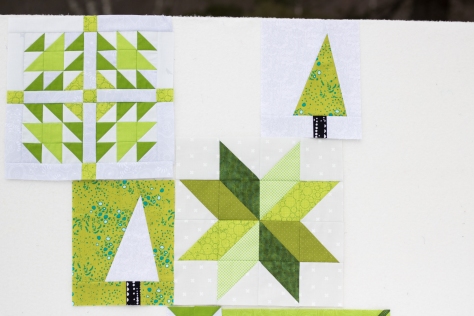 The little improv trees are what kicked off this Greenery quilt, and they were a Wild Card to help get us started with
 This is Patience Corners, block 1 for the
  And all together now, in the snow, since what better time to spread some greenery than a mid-March blizzard!? Per a suggestion by
  No child-assisted blog post of mine would be complete without a hi from my helper, so here’s a quick photo of my adorable helper today (this is for you, Mom aka Grandma)! Maddie had a snow day, and Max, who goes to preschool just a couple towns over, had school as usual. Isn’t it wild the difference a couple towns can make regarding snow in rural Maine!? So today is a fun Maddie-Mommy-Finn quasi-snow day!
 This quilt got its name after it was nearly completed, as I sat hand stitching the binding to the back. A mini quilt made at the request of
  With freestyle embroidery fresh on my mind and
 I had a lot of fun with the
  I knew I wanted to incorporate both hand and machine quilting, and I knew that I wanted the machine quilting to be dense. It took me a while to decide between using 50wt Aurifil 2600-Dove or 5015-Gold Yellow for the quilting, and finally I opted for the Gold Yellow to pull out the gold of the centrally stitched bee. I quilted a diagonal grid approx 1/2″ apart on all of the colored sections of the quilt and I love the texture it created. I wanted the white star and central diamond to pop, so I let them be, patiently awaiting hand quilting.
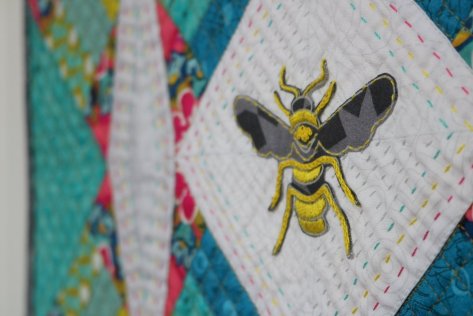 I used a rainbow of 12wt Aurifil thread to help pull the rainbow from the gorgeous fabrics into the white sections, and I love the outcome! I decided to switch to 12wt 2600-Dove for the center so that the bee would stand out.
 The back shows that my hand quilting still has plenty of room for improvement (especially when trying to maneuver around the bee), but it’s still fun to see the back, too!
 I used Seventy Six fabrics Rising in Graphite and Numbered in Duck Egg for the back, with an Insignia in Chartreuse label.
 Labeling is one of my favorite parts–maybe because it helps me know that my name is on my work, or maybe because it means I’m finished with a project!!
 This quilt is currently in Andover headquarters in NYC for photography and other fun fabric adventuring before it returns to me, but it was super fun to see it hanging in the booth at QuiltCon (see it, top right??). You can see a photo of me proudly standing next to it in my
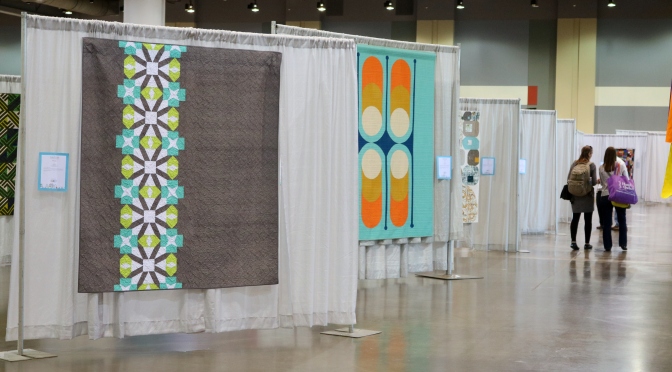
 First and most exciting is that
  Here I am proudly standing next to the quilt hung in the fabulous Andover booth.
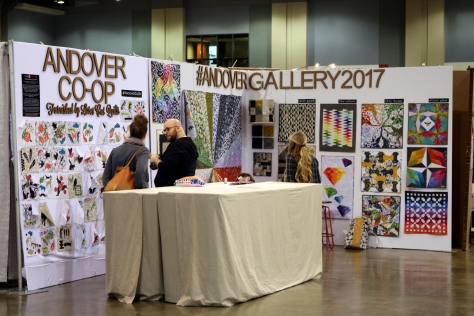
 I really loved the Minimalist Improv class with
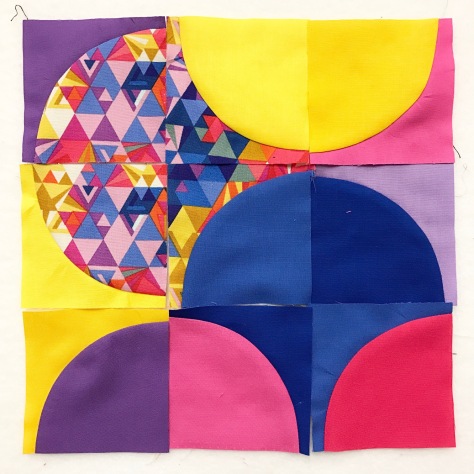 Sew all the Curves with
  Thursday morning when I first stepped foot onto the showroom floor, and began slowly walking around to take in the vast depth of beauty, originality, workmanship, and meaning that was displayed in those aisle, I was moved to tears. I don’t have the opportunity to attend many quilt shows, and being in the presence of so many quilts created with such passion by talented fellow quilters and friends was an amazing experience.
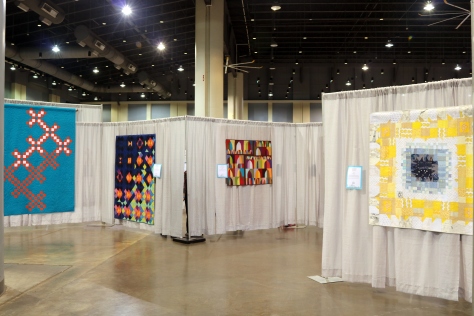 Despite keeping a fairly light class schedule, I am sure I did not get to see every single quilt that hung at the show, and more time was spent examining details than taking photos. It’s impossible to select favorites, so instead I will share a selection of photos I took of quilts that stood out to me. You can see all of the award winners on the Modern Quilt Guild website,
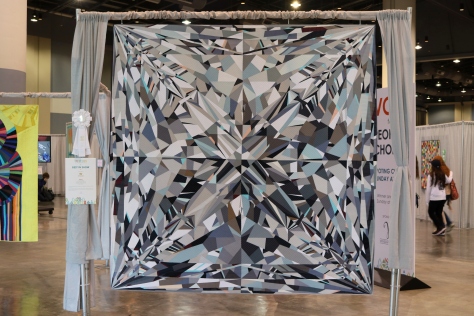

 The booths and vendor hall was much fun at QuiltCon. I was able to find replacement milliners needles right before my
 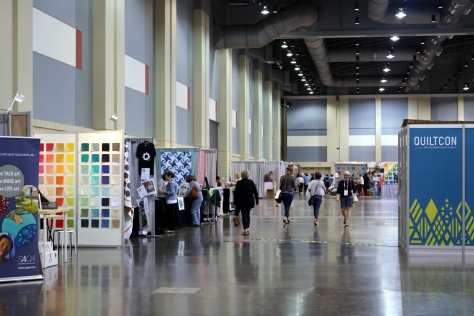 I did not spend as much time at the booths as I would have liked, both because of fullllll days, but also because most of the time they were absolutely mobbed! These photos were taken Sunday afternoon shortly before the end of the show, which is how you can see the booths.
 There were quite a few
 This post would not be complete without at least a collection of photos from gorgeous historic Savannah, Georgia. It was especially fun to explore since my husband Garrett (who incidentally began an instagram account
  I was sure to teach Finn the fine art of hugging trees, and he was a big fan of the birds chirping in the trees (I couldn’t hear them, but I confirmed their presence on several occasions to make sure I was understanding the source of his excitement).
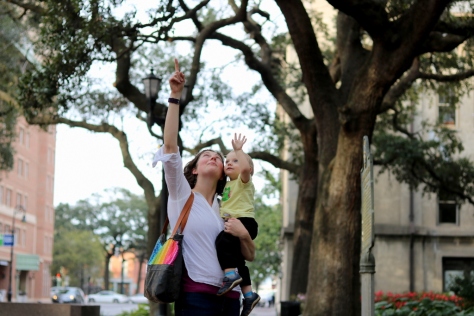 Savannah is a gorgeous city and I would absolutely return to explore more!
 I’m so grateful to my family for supporting me in my travels.
 Between my parents watching my older two kids, my husband not only taking time off work so that he could be with Finn full-time so that I could attend workshops, lectures, and “do my thing” with quilty friends I rarely see, but also begging for Night Quilter t-shirts to wear during the event, and taking an actual legit interest in quilting and the industry to help support and understand my passion, I am surrounded by the most amazing supports.
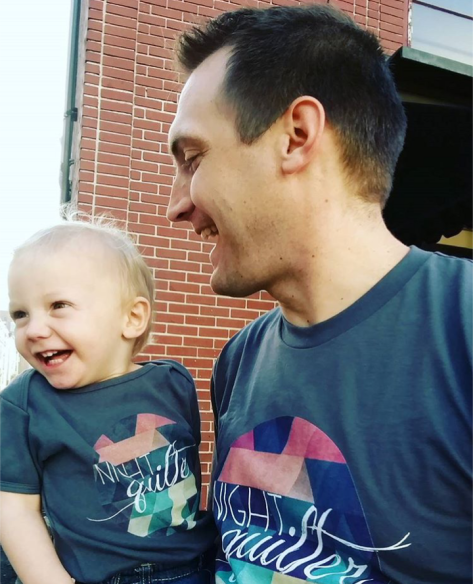 Without that support, none of this would be possible, and no reflection on an event as amazing as QuiltCon would be complete without a huge, from the bottom of my heart, thank you. What an amazing week it was!
 and here it is showing the progress from February:
 I guess 28 days can make a big difference!
 The highlight of the month was getting the chance to chat with Erin from Aurifil on Facebook live while attending QuiltCon in Savannah. You can see my low key chat
  Back to my embroidery progress! Here are some close up shots of the various sections of this freestyle hoop.
 I am still stitching without a plan, deciding each day’s stitches the morning–or sometimes night!–of the current day. I have tried a handful of new stitches and look forward to trying even more as the year progresses!

 Those little white three-petalled trillium flowers are the most recent addition. Time will tell where this will go from here!
 This month, I had a photography helper, so of course I can’t end the post without a few Finn cameos. I often use the photos on my phone as a reference, so I pulled up January’s photo to make sure I arranged the thread in a consistent way. Finn was please as punch that they matched.
 He also helped me put the thread back into the box, then arranged around the hoop, back into the box, then arranged around the hoop. What a helper!