Today I’m happy to share a simple and fun Flying Geese Table Runner project I made using the Cricut Maker. With Easter approaching and my table bare, I wanted to put together a quick project that could brighten the room for Easter, and really all year long. This table runner was also one of the first things I designed in the Cricut Design Space, so I wanted to keep it fairly simple while also using as many Cricut Maker features as I could! You can read a full review of my new Cricut Maker here.
 This post is a sponsored conversation written by me on behalf of Cricut. All opinions and text are my own. This Flying Geese Table Runner includes both traditional piecing and embroidery or hand quilting. If you don’t have a Cricut Maker, I’ve included cutting instructions and a pdf as well, so anyone can make it!
Let’s get started, shall we!? First, gather your materials.
Materials (My fabric details are in parenthesis)
- Cricut Maker
- Cricut Washable Fabric Pen
- Cricut FabricGrip Mat 12″x24″
- 3/4 yard background fabric (Kona cotton in Snow)
- fat quarter focal fabric (Twinklestar in Berry from Garden Dreamer, by Maureen Cracknell for Art Gallery Fabric–from the blogger bundle I put together for Needle & Foot, here)
- 1/2 yard fabric for backing and binding (Painted Desert Morning from Sage, by Bari J Ackerman for Art Gallery Fabric)
- approximately 18″x44″ piece of batting
- 50wt thread for piecing & quilting (I used Aurifil 50wt 2600-Dove for piecing and 50wt 2479- Medium Orchid and 2021-Natural White for quilting)
- 12wt thread, embroidery floss, or perle cotton for embroidery (I used 12wt Aurifil 2435-Peachy Pink)
- sewing machine
- small embroidery hoop (6″ or smaller)
- embroidery needle
- rotary cutter and mat
- iron and pressing surface
Note that if you do not have a Cricut Maker, you will also need a washable fabric marking tool, printer to print the embroidery template, and light box or other bright surface to facilitate tracing the embroidery template onto your fabric.
Now for the fun!
Using the Cricut Maker
Log into Cricut Design Space and get my Flying Geese Table Runner with Embroidery project here, and click “Make it!”
 Prepare your mats as instructed, smoothly spreading your fabric onto your 12″x24″ FabricGrip mat. The Cricut Maker will lead you through the entire process, so simply follow the screen instructions and let the Cricut Maker work its magic!

 The Cricut Maker will both draw the washable embroidery guide lines AND cut the larger rectangle for you!
 When I designed the drawn geese section, I designated the geese shapes as draw lines rather than cut lines and ATTACHED them to a larger cut background rectangle, about 11 1/2″ x 13 1/2″ in size so that they would be easier to embroider. For those of you designing for your Cricut Maker, this is key to remember when you want to combine both cut lines and drawn lines! Also, many thanks to Julie at Intrepid Thread for teaching me how to do this! If you’re a quilter getting to know your Cricut Maker, I highly recommend checking out Julie’s how-to resources both on her blog and YouTube channel!
 The Cricut Maker will also prompt you to cut squares of your focal fabric, small squares of background fabric, and some background rectangles. Once the fabric is cut, carefully remove the excess fabric, revealing your perfectly cut shapes. Carefully remove the fabric from the mats, and then get ready to sew!
You will also need to cut a 19 1/2″ x 13 1/2″ rectangle of background fabric with your rotary cutter and mat for the center portion of the table runner. You can easily shorten or lengthen your table runner by adjusting the dimensions of this center panel accordingly. It should always be 13 1/2″ wide, but can be as long or short as needed to fit your table.
Preparation Instructions if you don’t have a Cricut Maker
If you don’t have a Cricut Maker, here’s how you can cut and prepare your fabric using a rotary cutter, mat, washable fabric pen, and lightbox or other light source.
First, do your cutting. From your background fabric, cut:
- (1) 11″ x 13 1/2″ rectangle (onto which you will trace your embroidery templates
- (12) 2 7/8″ squares
- (2) 2 1/2″ x 13 1/2″ rectangles
- (4) 1 1/4″ x 4″ rectangles
- (1) 19 1/2″ x 13 1/2″ rectangle (as noted above)
From your focal fabric, cut:
We will use the backing of the table runner as the binding, so will keep the backing fabric as a whole 1/2 yard cut until after quilting.
Download the Flying Geese Table Runner Embroidery Template-Night Quilter Printable, print on your computer at 100% scale, tape the two pages together along the match line, and trace onto your 11″ x 13 1/2″ rectangle of background fabric using a washable fabric pen. Be sure to center the template so that there is at least 1/2″ of fabric on both sides of the geese and 1″ above and below the geese.
Once all of your cutting and prepping is complete, it’s time to get stitching!
Embroidering the Accent Geese
 The embroidered accent geese are meant to add some subtle accent interest to your table runner, since hand stitching of any kind (in my mind) adds a special touch. Especially with a project that will be seen often, those hand stitches can echo the sharp aesthetic of the pieced flying geese.
 Gather your embroidery hoop, background fabric with your flying geese drawn on, and a thick 12wt thread, embroidery floss, or perle cotton in a coordinating color. I chose to use Aurifil 12wt thread in 2435-Peachy Pink since it’s a subtle echo of the geese that pulls the beautiful coral color from the Twinklestar in Berry fabric.
 You can use the drawn embroidery guides to do any type of embroidery you want. I chose to do a simple running stitch around each flying goose, but feel free to get creative! Chain stitch would me another fun stitch to use to outline each goose, you could echo the stitching inside each goose as well, or even fill the geese with french knots!
Note that if you choose to use a more dense embroidery design, you may want to layer another piece of white fabric or use an interfacing stabilizer behind your panel. Yet another creative option would be to wait on the stitching, assemble your table runner, and then use the drawn guide lines to hand quilt around each goose, stitching through all three layers of the table runner. If I make another one of these table runners, I will go this route, since I think the stitches would work really well as hand quilting, too.
 Once you’ve finished embroidering your geese, carefully trim the panel into two rows of geese, cutting 1/2″ away from the side points of each row. Do not cut the top or bottom of each row of flying geese. You should now have two embroidered geese panels measuring 5″ x 13 1/2″.
Piecing Flying Geese Four at a Time
 With your fabric pieces cut perfectly by the Cricut Maker, or as specified above, piece your flying geese using the four at a time method. I used the Reference section of my Quilter’s Planner to piece mine, and you can also find a download of the page HERE as a little taste of the awesome that is contained in the Quilter’s Planner. (If you don’t have one already, go ahead and buy a Quilter’s Planner 2018 while they are still available!) Note that we are making flying geese that finish at 2″x4″.
 Make twelve geese total and sew them into two strips of six as shown above. See how they are mirrored by the embroidered strips? Note that your embroidered strips should be cut apart by this step.
Sewing Tip:
 When sewing two geese together, position the point of the goose on top and make sure your stitch line passes exactly through the stitched point of your goose.
 This way, you will be sure to never chop off the point of a flying goose ever again!
 Once your flying geese rows of six are assembled, sew a 1 1/4″x 4″ piece of background fabric to the top and bottom of each strip. Align with your 13 1/2″ embroidered geese strips, and trim the pieced flying geese strips to 13 1/2″ if needed, being sure that your embroidered geese align with your sewn geese before trimming. There is a little bit of wiggle room included in the top and bottom background rectangles to allow for those who sew scant or generous 1/4″ seams, so trim as needed.
Assembling the Table Runner
 First sew together the flying geese panels of the table runner. I’ve arranged mine on top of my backing fabric so that you can clearly see the different pieces being sewn together. With geese facing the same direction, sew the embroidered flying geese section to the pieced flying geese section. Then sew to the 2 1/2″ x 13 1/2″ background rectangle. Make two.
 Assemble the table runner top by sewing the sections together as shown above: Note that the embroidered flying geese panels should be sewn to the center background piece on both ends.
 Once your table runner top is pieced, position the runner top and batting in the center of your chosen backing fabric, right sides facing away from each other. In other words, layer and baste your table runner and prepare for quilting!
 I chose to use Aurifil 50wt 2479- Medium Orchid to quilt my Flying Geese Table Runner with a dense free motion quilting pattern in the center, simple outlines of the pieced flying geese, and dense free motion quilted switchbacks in Aurifil 2021-Natural White between both the pieced and embroidered geese. I wanted the texture but not the visual distraction from my hand stitching.
 I’m certainly not a free motion quilting pro, but I am pretty happy with my over-all heart-flower free motion quilting motif! Plus, how fabulously do those tulips go with the BariJ Sage fabric backing!?
As you quilt your table runner, be sure to stay 1/4″ away from all edges with your quilting! This will help your binding look great from both the top and the bottom, since we will be using the backing fabric folded over the edges as binding.
 Once your table runner is quilted as desired, carefully fold back the backing fabric and trim the batting *just* outside the top of your table runner top. I gave myself a little less than 1/8″ around the edge of my table runner.
 Be extra careful not to cut your backing fabric during this step!
Next, trim your backing fabric between 3/4″ and 1″ from the outer edge of your table runner quilt top. Fold the backing so that its raw edge meets the edge of your trimmed quilt top and batting and press. Fold again and top stitch in place, securing your binding to the front of the quilt.
 A full tutorial for how to bind your quilt with the backing fabric can be found HERE on Cluck Cluck Sew’s blog.
 I wanted my binding to be slightly slimmer, so I cut mine 3/4″ from the edge of the table runner top instead of 1″, but choose whichever you prefer.
 Ta da! Your table runner is nearly finished! All that remains is to wash out the washable fabric marker lines. I’ve found that the Cricut Washable Fabric Pen easily washes out with a bit of soap and cold water. Note that if you prewash your fabrics, you can wash out the fabric pen before trimming and piecing the embroidery panels into your table runner. I don’t prewash my fabrics, so I opted to wash it all at once after it was completely finished.
Set your Easter table and enjoy! I always love a good bundle of fresh flowers on a table, especially during these early days of spring when the snow is still thick on the ground outside.

 After giving my table runner its first wash, and in looking at these photos, I think I will go back and hand quilt within those embroidered flying geese to give them a bit more texture.
 Enjoy, and I hope you’ll share a photo of your Flying Geese Table Runner if you make one! You can tag me on social media @nightquilter or share a link here in the comments.
Happy stitching!

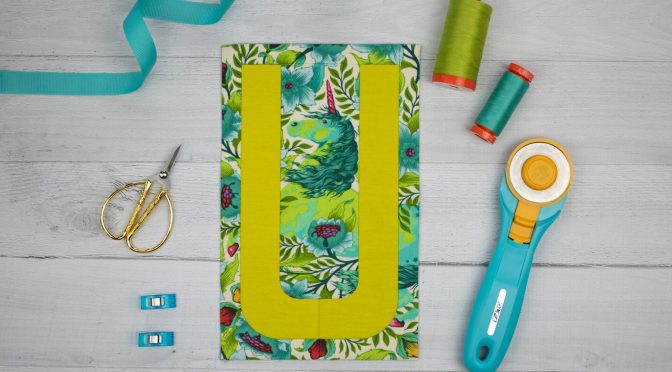
 Today I’m excited to be joining the My Typecast of Characters Blog Tour with Sheri at Whole Circle Studio with the ubiquitous yet uplifting, uniquely utilized U is for Unicorn! When Sheri asked if I would sew up an English Paper Pieced letter with curves and landed on U, I knew immediately that it was a perfect project to showcase Tula Pink’s Pinkerville fabrics and the fabulous U-nicorn.
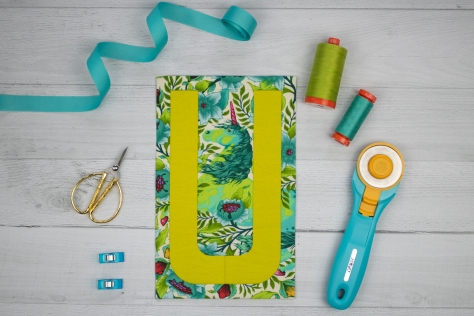 Though it’s subtle, I meticulously cut the background so that the unicorn is continuous and the fabrics all line up (mostly). The coordinating Tula Pink solid in Limeade made the perfect coordinating yet stand-out pop for the U. I used coordinating 50wt Aurifil thread to sew up my block, and between the 1231-Spring Green and 1148-Light Jade the stitches blended right in.
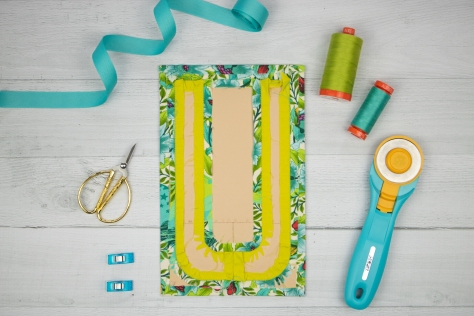 To conserve fabric with the fussy cutting, I opted to keep a few of the paper shapes together, as you can see if you inspect the backside of my letter. Can you see where there are perforations but no fabric seam? That’s where I condensed my shapes. If you’re new to EPP, basting and stitching smaller shapes may be easier, so do what’s comfortable for you.
 One of the really cool aspects of these Typecast letter patterns designed by Sheri and produced by Paper Pieces is that they arrive completely assembled, with perforations where you’re to separate each piece, as you can see above. This means that not only is it easy to know exactly where each EPP pieces goes (especially if you label them before tearing the individual pieces apart–hint hint!), but it also gives you the option to condense pieces easily if you so desire and are fairly comfortable with EPP. I’m all for saving time and fabric! The Typecast Pattern Guide and paper packs are all now available, so be sure to check out details at Whole Circle Studio HERE so that you can stitch up your own EPP sentiment.
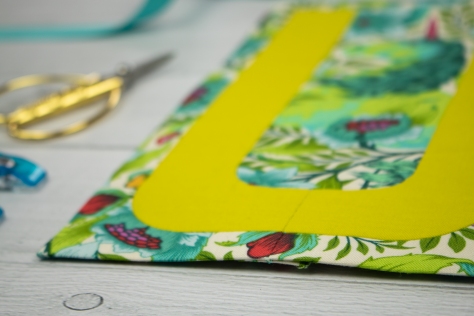 I’m pretty happy with how my fussy cutting went, and was able to give the impression that the U was just set right down on top of the continuous unicorn fabric, Frolic Imaginarium from Pinkerville by Tula Pink.
 I could see this U framed in a shadowbox or stitched down onto a background fabric and wrapped around a canvas in a child’s room, or of course stitched into a pillow for a Unicorn-loving friend.
 I’m excited to be joining in the fun with
  When I first saw Mathew’s Aura fabrics, of course I immediately dreamed of
  I’m so thrilled with how it turned out!! AND pillows are hard to photograph! I just solved that issue by taking lots, and hope my single monstera potted plant can help bring a bit of tropical vibe to the mid-winter Maine photos.
 Looking at the varied and gorgeous flower bundles on
  They aren’t all perfect, but I’m mighty happy with the result! I also love how the blue section emphasizes the center star, while also helping blend into the Endless Paradise AGF denim background. One of my favorite aspects of the Pollen Pillow & Pollinate quilt patterns are how incredibly versatile they are.
 Here’s a look at the pillow top after it was pieced and quilted, but before it was stuffed as a pillow, so that you can see the fabric placement details a bit better. Here are the Aura fabrics I used: Laki Island Daylight for the center star and outer piehexies, Hawaiian Honu Dusk (turtles!) and Hula Dolphins Ocean (tiny dolphins circle around this one) for the star, Loulu Fans Sand for the outermost triangles, Hawaiian Honu Dusk for the turtle diamonds around the outside edge, and AGF Denim in Endless Paradise for the accent pieces in the outer piehexies and the background. I LOVE the fabric names, too!
 I used coordinating 50wt thread to hand stitch the full Pollen Pillow design, stitching during travel to QuiltCon, in cafes, or in the car while waiting for preschool pickup. I adore the portability of English Paper Piecing (EPP)! When the Pollen Pillow design was fully stitched, pressed, papers removed, etc., I then stitched it to the backing using 50wt thread in 2000-Light Sand and 1320-Bright Teal. I quilted the pillow with some minimal quilting to secure the pieces while still letting the fabrics shine. I quilted a fun geometric echoey pattern in the background using the walking foot on my Bernina 560, and making it up as I went along. I love using the wide width of my walking foot as a gauge when quilting, since I avoid marking fabrics whenever possible!
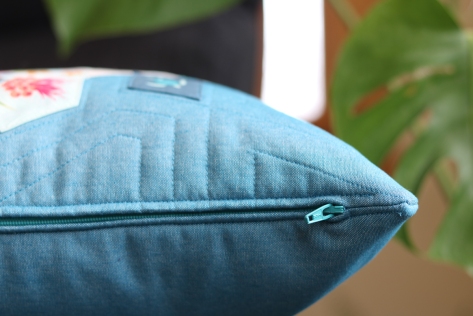 Even having made multiple pillows, the insertion of a zipper still gives me the willies a bit before diving in. This time I used
  Those of you familiar with my
  Here are just a couple more photos to round out this post. The first is of my daughter Maddie, who really wanted to be a pillow holding model (so helpful!). You can see the most pattern details in this photo, I think, so I’m glad she wanted to help!
 Finally, here is a photo of my original Pollen Pillow duking it out with this newbie for the prime spot. It’s so fun to see both of these pillows next to each other, since it’s a perfect example of how different fabric choices and color placement can result in very unique aesthetics with the Pollen Pillow pattern.
 A few months ago when Sharon asked me to be a part of her book tour, I didn’t hesitate to say yes. I had made Sharon’s block for the Splendid Sampler 2 and loved it, and English Paper Piecing (EPP) is quickly becoming my go-to style of quilting because of its portability and versatility. A Stitch in Time is a fun book including 18 small projects that combine EPP with vintage linens, embroidery, appliqué, patchwork and quilting. It’s a great resource for hand-stitched gifts that won’t require a year’s worth of stitching.
 As I flipped through the beautiful book trying to decide what project to make, I fell in love with the mousie pincushions immediately. I opted to make the larger of the two, and thus my Mummy Rosie came to be.
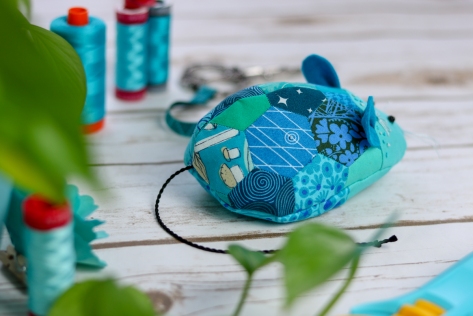 I used a bunch of turquoise/teal scraps to piece Rosie’s back, and realized that this project would make SUCH a great scrap buster. I might just start making 3/4″ hexies and throwing them in a jar to make mousies!
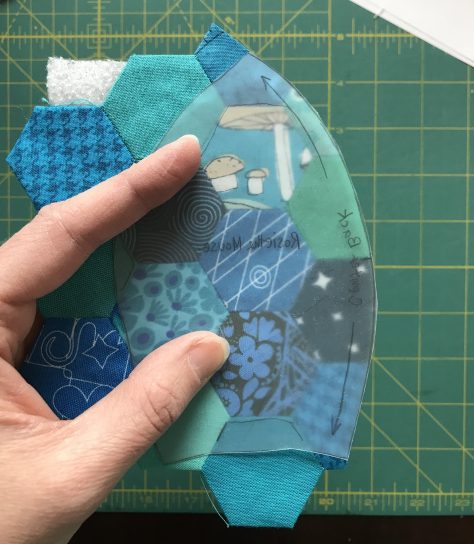 Any project that involves cutting through a hand-stitched panel always is painful, but I forged ahead with gritted teeth and it was worth the pain of trimming. As you can see, I marked the template plastic with guides around some of the hexies so that when I cut each panel, they would be symmetrical. It worked well!
 I love how so many of the projects in Sharon’s book include little embellishments with embroidery, cute ribbon, and vintage lace. Rosie not only has a scissor pocket on the bottom, which makes use of a pretty coordinating ribbon I bought from my local quilt shop
  I decided to pull out the
 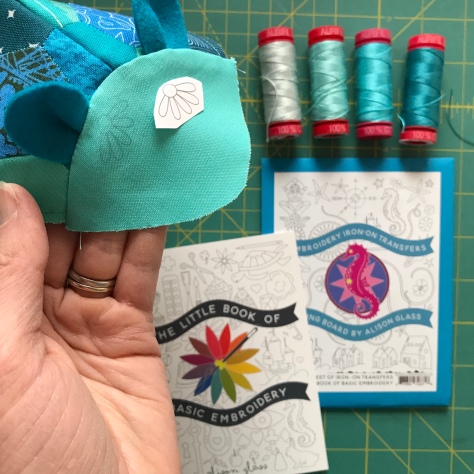 Here’s a peek at the process. You can see how well the lines transfer onto the fabric. It’s reallllly easy to use, too. I used a selection of
  I think it’s a good look, don’t you?
 The pattern calls for attaching 2 1/2″ scissors, but I opted to attach my 4″
  Rosie’s ready for action, don’t you think?
 Once again I was honored to have the task of doing the quilt photography for the
  This year, we were definitely a lot more relaxed and peaceful during the photoshoots, which I’m sure Garrett appreciated!
 With projects photographed all through Maine, next year’s planner is sure to inspire, and if you haven’t ordered yours yet, I definitely recommend doing so! As an added bonus (and added irons on the fire) I also contributed a pattern to the
  Perhaps the most exciting and monumental project I tackled over the course of the summer was the design of my very first English Paper Piecing pattern with
  Perfect for both beginner and experienced EPPers alike, Pollinate is a diverse pattern that has endless possibilities for design and color play. Plus, the “filler” sections look like bees!! You can see the many different Pollinate quilts taking shape on Instagram by checking out the
  This summer I was honored to work with
  I photographed all 9 different weights of thread offered by Aurifil in a variety of stagings, and truly enjoyed the process. You can scroll through the photos on the top of the Aurifil Thread website to see a selection of my photos, and I’ve included a couple of my favorites here. There’s also a fun interview with me on the
 This summer I also tackled the
  I’m excited to be one of the
  Here is a screenshot showing some of the blocks I’ve made so far. You can see all of them on
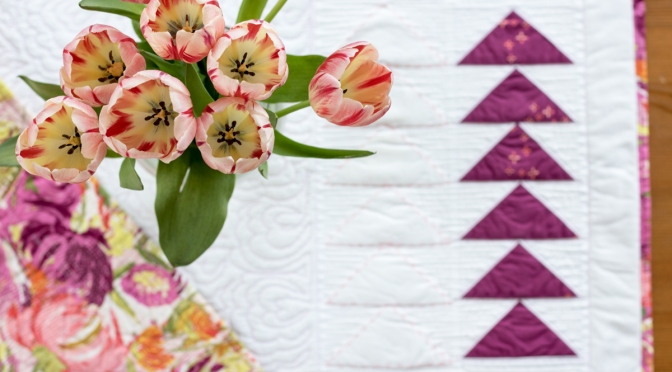

 I headed off to QuiltCon with an English Paper Piecing (EPP) project–the Mandolin Quilt Block by Jodi at Tales of Cloth. I had gotten a bit further than
  While I was traveling, the mending on my most-worn jeans began to wear through, but fortunately I was able to pick up a mending kit from the
  I used the 12wt
  My long flight back to NJ after QuiltCon allowed me to finish both of these hand stitching projects, which felt pretty amazing since I typically make progress at a snail’s pace.
 I’m using *gasp*
  I have a highly technical approach to selecting fabrics when it comes to a project like this. I place my center on the floor, surround it with all of the Alison Glass fabrics I can find, and then play.
 I audition fabrics not only in person, but also through the screen of my phone’s camera, since oddly, some fabric arrangements look different from afar. Alison makes it pretty easy since her fabrics are such a vibrant spectrum of tone on tone color that already transition so well through the rainbow. It’s still fun to decide where to put each bright little bit, and mixing fabrics from new and old fabric lines.
 I love English Paper Pieced patterns that have acrylic templates, since I’m a big fan of meticulous cutting (aka
 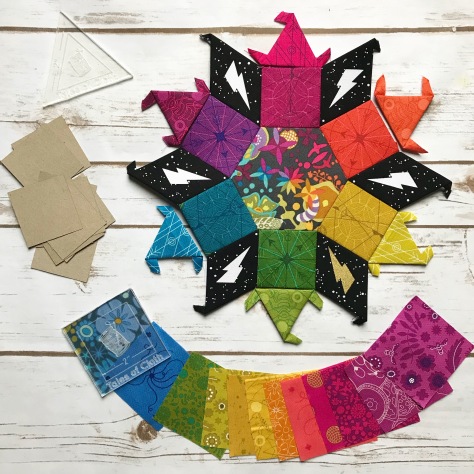 Even with a project focused on the color flow and not so much the individual pieces, I still fit meticulous cutting in where I can. You *might* notice that the squares around the center are all meticulously cut from Compass from Sun Print 2018, alternating designs since I only had fat eighths of the fabric, which didn’t include a full repeat of the design. The triangles are also meticulously cut, alternating between Latitude from Diving Board and Link from Sun Print 2017.
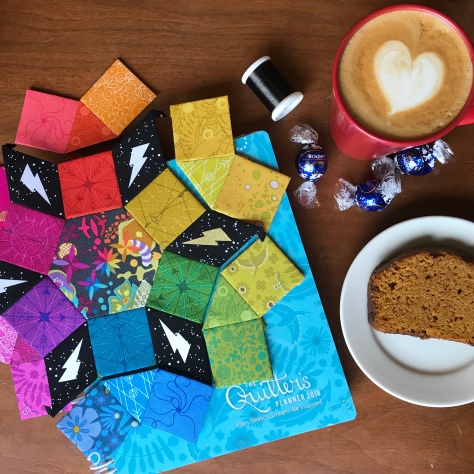 I’ve been using
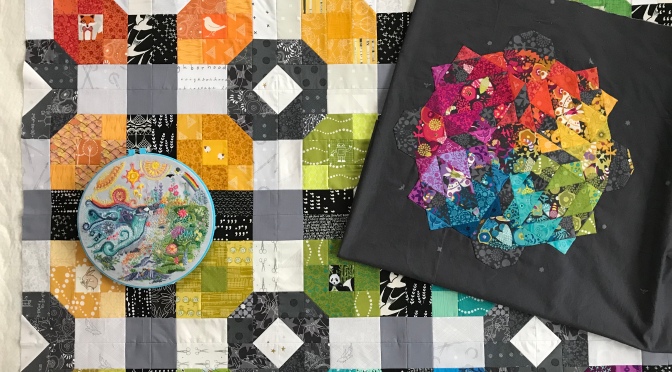
 So here I go again, publicly announcing my goals so that maybe the thought that you or someone out there is eagerly anticipating my finish, cheering me on, and helping spark my fire even when I’m feeling heavily weighted with other responsibilities, will help me stay on track.
 I still have about 14 days worth of stitches to complete to have fully finished the stitching for my 364 days of stitching, 1 year of stitches freestyle embroidery project I took on in 2017. The photo included above is an old old old one from May 2017, so there is MUCH more stitched at this point (see the photo with the projects together to get a peek!)! I want to get the stitches finished and documented, post the fully updated post on IG at my @nq1yearofstitches account, publish a blog post with monthly updates that has been in draft form since May 2017, and fully finish the hoop so it’s ready to hang on my wall.
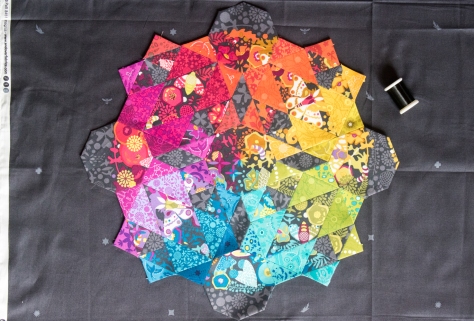 I want to completely finish my epically gorgeous (modest, aren’t I? haha) rainbow Moonstone pillow I made using
  I’m doing some secret sewing for a book release blog tour in March, and unfortunately can’t tell you much more than that. I have my project chosen and fabrics pulled, but haven’t cut into it yet. I’m planning to use some thrifted leather and scraps of Oakshott Lipari red fabrics in this one, paired with Essex Linen in charcoal. It’s a small project, but I’m excited about this one! This project is my given, since the fact that I have a hard deadline means that I will finish this project no matter what. I don’t mind setting myself up for some success, though, so it’s included here.
 This one is a stretch only because of the limited time I have this quarter, but I want to put this quilt at the top of my list. I began it back in
 Today I’m excited to be the first quilting stop on Patty’s Flit and Bloom Blog Tour, where I get to show you what I’ve been working on these past couple of months using her newest fabric line for
  I began with one of my favorite EPP patterns,
  Aren’t these peacocks fun as they dance in pairs around the block?
 While I was stitching my Moonstone block, Mathew (aka
 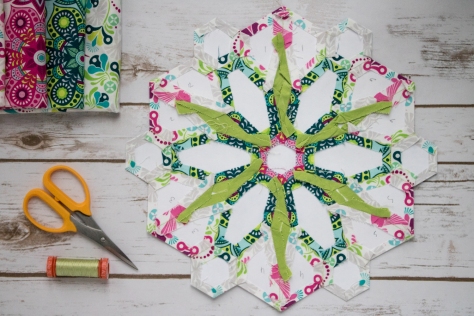 I knew I wanted to incorporate the hummingbirds into this flower block, since hummingbirds and flowers go together like rock and roll, but couldn’t fit them onto any of the individual shapes. Then I realized that I could split the hummingbirds across two background fabrics and decided to go headfirst into meticulous cutting at its best.
 I labeled the humming bird front-back pairs since the Flowermania block is pieced in such a way that they are only joined right at the end as the segments are stitched together. This fussy cutting feat was no easy task, I might add. From the careful cutting to make sure the hummingbird halves would seamlessly meet when stitched together, to basting the pieces *just* so, to then stitching it all together and having it meet perfectly around the green diamonds, this was a challenge. They are not all perfectly matched up, and I learned a few tricks along the way that I’ll keep in mind next time, but overall I’m happy with the outcome.
 Some hummingbirds match perfectly, but even the imperfect ones are perfect in their own way. Hummingbirds are happily flitting around this Fowermania bloom, and it seems to me that it’s the perfect poster-child block for Flit and Bloom fabrics. Right!?
 Finally, I started to dive into a Lucy Boston Patchwork of the Crosses block, since what is EPP without Lucy Boston? I love how rotating the fabrics creates even more meticulously cut geometric fun, and I look forward to seeing how this block shapes up.
 One of my favorite parts of planning with Lucy Boston blocks is in the outer pairs. I like to make a few “test pairs” with different fabrics and arrangements to see which ones I visually like best.
 I love that Flit and Bloom has plenty of opportunity for mirror image fussy cutting, since those are my favorites–can you see why?
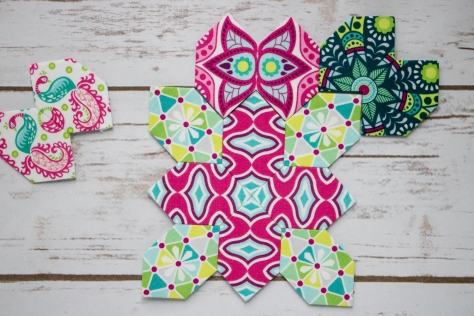 Which arrangement is your favorite?
 I used
  Be sure to visit the rest of the stops on the Flit and Bloom Blog tour to see what everyone has made with this fun fabric:
 The article, written by
 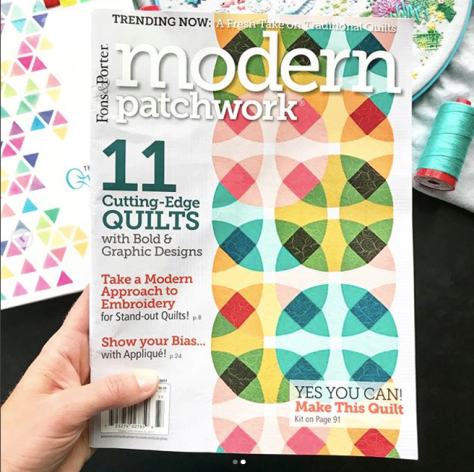 I ordered my copy of the magazine through the