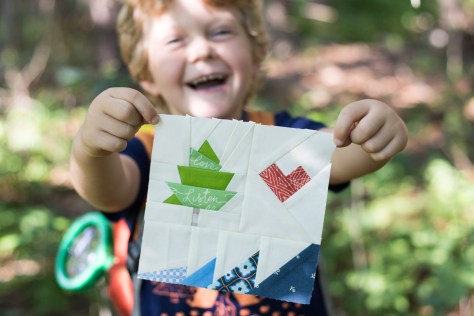
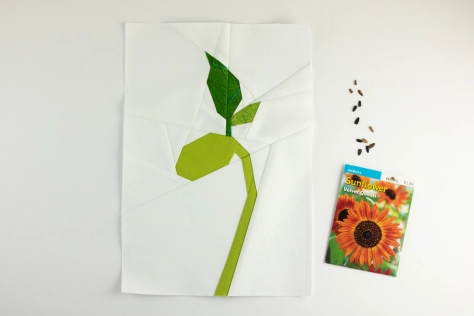
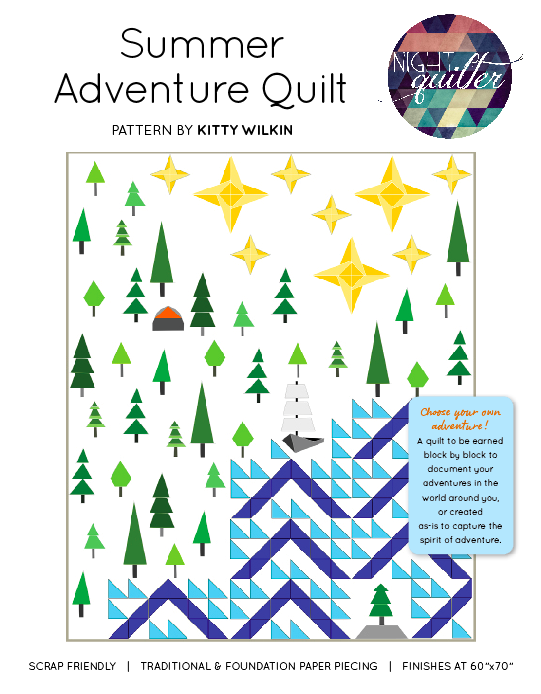
 Today I’m excited to reveal the block I designed for the Splendid Sampler 2 book: Adventure Abounds, found on page 122. Those of you who know me are most likely not surprised by this block one bit! For those of you who are new, welcome! I’m Kitty Wilkin, aka Night Quilter, and I’m so glad you’re here! I am a full time mom of three kiddos in rural Maine, but I’m also a pattern designer (EPP, FPP, traditional piecing–I love it all!), quilt and product photographer, teacher, social media manager for the Quilter’s Planner, AND an avid fussy cutter, which I prefer to call meticulous cutting. I’m often inspired by the natural world around me, and when Pat and Jane asked me to design a block reflecting my best quilty life, I knew it had to include family adventures in nature tied together through the creation of a quilt. With strong influence from my Summer Adventure quilt pattern, this block has a bit of everything–sea, trees, and lots of love!
If you’re new to the Splendid Sampler books curated by Pat Sloan and Jane Davidson, find out more about the Splendid Sampler 2 book and sew along HERE.
 Today I am going to share 3 tips for using fussy cutting in foundation paper pieced blocks, using my Adventure Abounds block from the Splendid Sampler 2 book. If you’re new to foundation paper piecing (FPP), read my beginner basics FPP tutorial HERE first to make sure you know all of the key components and basic tips. Then let’s dive in!
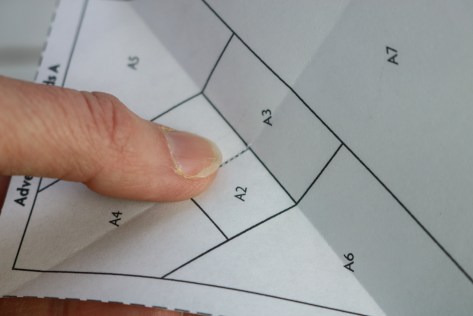
 There are a few things you should remember before beginning FPP: First, the templates are a mirror image of the finished block, so when planning your fabric placement, visualize the right side of your fabric on the back of the template. Second, I highly recommend color coding your paper templates before starting so that you know exactly where each fabric should be. Third, don’t forget to use paper scissors to cut out and trim the templates! Your fabric scissors don’t want to go there!
 Once your fabrics are selected, your templates are cut out along the 1/4″ seam allowance line and color coded, you’re ready to dive in. Here are three tips for using fussy cutting in FPP:
1. Place your fussy cut on piece 1
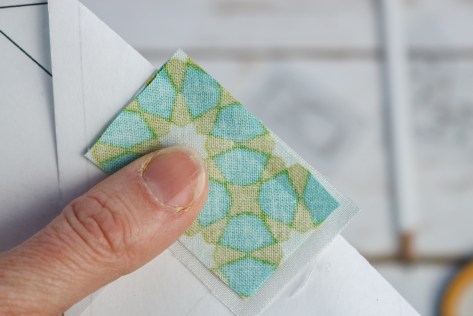
One of the easiest ways to use fussy cutting with FPP is to position your fussy cut fabric on the very first piece placed. With this method, simply hold your fabric up to a light source on the wrong side of the paper template, aligning the fabric motif you want to feature. Use a little dab of washable glue stick to hold it in place, and then continue piecing the rest of the block as you normally would. Your fussy cut can be perfectly positioned with very little effort. Depending on the block you’re creating, even this little use of fussy cutting can create quite an impact.
 As an example of this for my Adventure Abounds block, I decided to position a subtle bird in the sky above the ocean, and held it up to a window to make sure it was positioned exactly how I wanted it. With a white on white background for my blocks, this example is subtle, but sometimes those subtle details are my favorite!
2. Create templates
Another way to make fussy cutting a bit easier while foundation paper piecing is to create a template for the pieces you wish to meticulously cut. You can use template plastic for this, or can even repurpose clear plastic lids to food containers. You want to use something that you can see through or at least trace through using a light source.
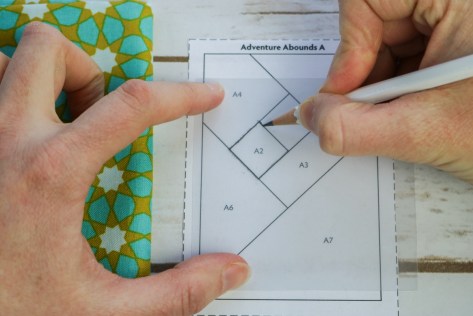 To create a template, first trace the shape from the paper foundation template onto the plastic. Be sure to label your piece, AND make note of directionality since the paper template is a mirror image.
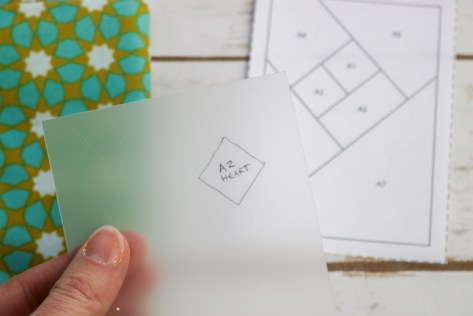 Once I trace the shape, I flip over the template plastic and write my notes on the opposite side, so that when I cut the fabric for that piece, I know that my notes should be legible on the right side of the fabric.
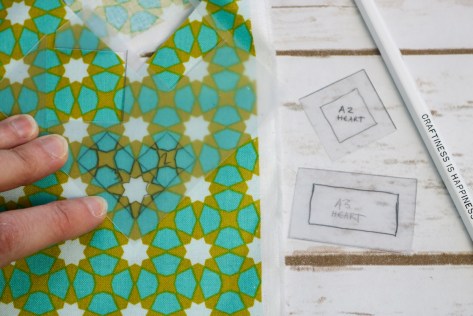
 Next, using a quilting ruler with 1/4″ measure, draw seam lines 1/4″ outside all the edges of your drawn lines.
 Cut out the template along that seam allowance line.
Repeat for all of the shapes you want to fussy cut. You can use the clear templates to be sure you’re cutting your fabric piece exactly as you want it. Note that you will want to use all of the tips outlined in this tutorial when piecing so that the perfectly cut piece of fabric gets sewn in exactly how you want it.
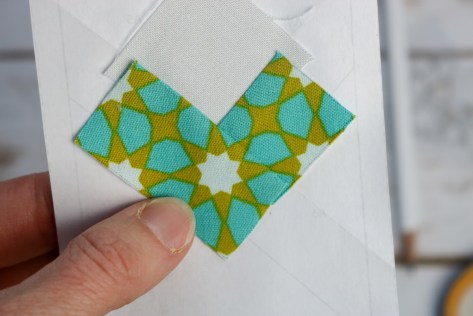
 For my block, I decided to fussy cut the heart so that the fabrics for the two pieces of the heart look continuous despite consisting of two fabric pieces. I decided to make a third reference template of the full heart and traced the pattern from the fabric onto the template, which I used as a reference when cutting out each individual part.
 Once you have your template positioned over the exact motif you want, carefully trace around the template with a fabric marking tool and cut out the fabric, or very carefully use a rotary cutter to cut around the template. Note that with planning templates made with template plastic or repurposed food lids, using your rotary cutter contains a good level of danger–so either purposefully live on the wild side, or use the trace and cut-with-scissors method!
 Your perfectly planned fabric piece is ready to carefully stitch onto your growing foundation paper pieced section.
Because this piecing is quite meticulous, you’ll want to be sure to align this next piece perfectly before stitching.
 Folding along the seam on which you are about to stitch and trimming the overhanging fabric to 1/4″ will help you line up the next piece accurately.
 You can also fold over the piece you are about to stitch along the seam line to see how it looks before actually stitching.
Note that meticulous cutting is exactly that–meticulous. Be sure to be meticulous in all phases of this process to get the best results. Also, be gentle with yourself. This is not easy! Use a stitch length that you are comfortable ripping out if needed to get those first fabrics lined up. I give myself a Rule of 3 when stitching any block: I’m allowed to use my seam ripper to rip out progress and make it align better 3 times during the stitching process for any block. Once I hit my 3 times, I need to just accept the imperfections and move on. We are human, after all. But don’t be afraid to try! As with anything, the more you practice, the easier it will get.
 Once your fussy cut pieces are cut and stitched as desired, continue piecing your non-fussy cut pieces as you would any other FPP block.
3. Focus on the joining seam
A third tool to use while fussy cutting in FPP is to pay close attention to the edge of the motif you want to feature. This works particularly well for lining up directional prints along the seam line, or for less precise fussy cuts.
This method is used for any piece AFTER the first piece placed. If your fussy cut is the first piece, use Tip 1!
 In the Adventure Abounds block I made for the original Splendid Sampler 2 quilt, I used this tip when piecing the text on the tree, specifically the word “love”, since the word “listen” was the first piece placed, and was therefore easy to simply glue in place and piece around. Knowing that I wanted the top of the word love to be juuust below that darker top piece, when I cut the square of fabric I carefully cut just a tad bit more than 1/4″ from that top edge of the word love. I left the rest of the rectangle of fabric a bit larger and less specific, since as long as that edge lined up properly, the rest didn’t matter.
With the Adventure Abounds block I’m making for my own Splendid Sampler 2 quilt, I am not using as finicky or directional of fabric for the tree, so there is no need for fussy cutting. However, I wanted to control the directionality of the fabric in a few of the waves, so that the dots on the Cotton and Steel basics and the wavy paths on the bike path fabric by Alison Glass ran parallel to the seam line. The piece is not the first one placed, so I couldn’t use Tip 1. All I want to control is the directionality of the fabric, so making a template seems like more work than is necessary. Enter Tip 3: Focus on the joining seam.
 Whenever employing any type of meticulous cutting in your FPP, it’s always a good idea to trim your 1/4″ seam allowance before positioning and stitching your fussy cut shape. To do this, simply fold back the foundation paper along the line you are about to sew on, and using a quilting ruler with 1/4″ measure, trim the fabric 1/4″ away from the fold. (Obviously use a cutting mat underneath! This photo shows without the mat for aesthetic consistency). Once your fabric is trimmed, you have a clean line with which to line up your next meticulously placed piece.
This also helps facilitate another key FPP tip, which I originally learned from Lee Heinrich of Freshly Pieced, and which has saved me countless brain-scruntches trying to be sure a fabric piece would align properly on wonky angles in FPP.
 When your paper is folded along the seam-to-be-sewn, you can place it on your next fabric (right side up) and the paper shape as folded will be exactly on top of the fabric that will end up in that space once you sew along the line. Be sure to visit Lee’s tutorial for a perfectly clear and in depth explanation–it’s truly life changing when it comes to FPP!
 What that means for us is that with that clear 1/4″ seam line showing us the direction we want our print to go, simply lining up the folded seam line with the directional print will ensure the pattern runs in exactly the direction we want. Fold up the edge a bit to peek under and make sure the pattern is positioned the way you want it, then without changing the position of the fabric, fold the paper back up and sew along the line.
 You will end up with your directional fabric meticulously positioned along the seam line, just how you wanted it. Paired with that fun bird flying over the ocean that we placed using Tip 1, these tips can help take your foundation paper piecing blocks to a whole new, intentional level.
Here’s the block I made for my slowly growing Splendid Sampler 2 quilt, about which I’ll show you more soon! I’m creating monochromatic blocks and using an alternate rainbow layout I sketched out in my Quilter’s Planner. This Adventure Abounds block will be positioned in the teal row, but as you can see, it is transitioning to the green. I made a compromise from my monochromatic-rule for this block, since I make the rules around here anyway! ha!
 Okay, just one peek at my planned layout and a few of my blocks so far. A full look will come in its own blog post soon, so be sure to follow this space!
Thank you so much for joining me today–I hope this tutorial is helpful and entices some new fussy cutters to try adding some meticulous cutting to their foundation paper piecing! Please show me what you’re making and either comment with a photo, or tag me on social media @nightquilter . Most of all, have fun!!
If you’re sewing along with the Splendid Sampler 2 excitement, be sure to head over to the Splendid Sampler website, and post your completed Adventure Abounds block. There is a fun Martingale book giveaway for one lucky person picked from the blocks shared on their website.
Have fun with your Adventure Abounds block, and may your adventures abound!


 With a focus on hope and new beginnings, I thought today would be the perfect day to re-release my updated Bean Sprout block pattern, since there’s nothing like a freshly sprouted plant to celebrate spring, new life, and the wonder of discovery. As many of you likely know, I’ve been working with the amazing Lindsie Bergevin to convert some of my older patterns into fresher, more professional, and often more diverse versions and Bean Sprout is the latest to receive a make-over.
 With a bit more pattern details, more professional layout, and an added block size (welcome, dear 4″x6″ block!), the newest Bean Sprout block pattern includes all of the great things from the original 2016 design, but in a clearer, crisper presentation. You can buy it now from my Payhip shop HERE. You can use code BIRTHDAY for 15% off it and all other patterns in my shop through the end of April, since I believe in celebrating birthdays all month long.
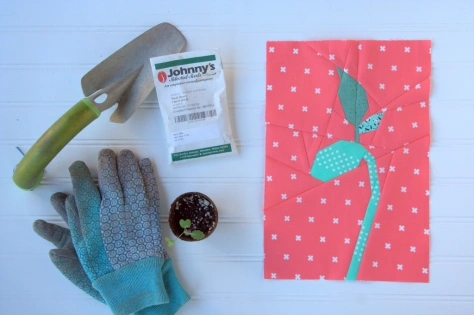 You can see a few other versions of this block I’ve sewn up in the past in its original release post HERE. It’s always fun to look back into the blog archives, isn’t it!?
 I particularly love the idea of a pillow, and very well might be making another one of these someday soon. I’d love to see what YOU make with the pattern, so please use #beansproutblock and tag me @nightquilter on social media so that I can see your beautiful work.


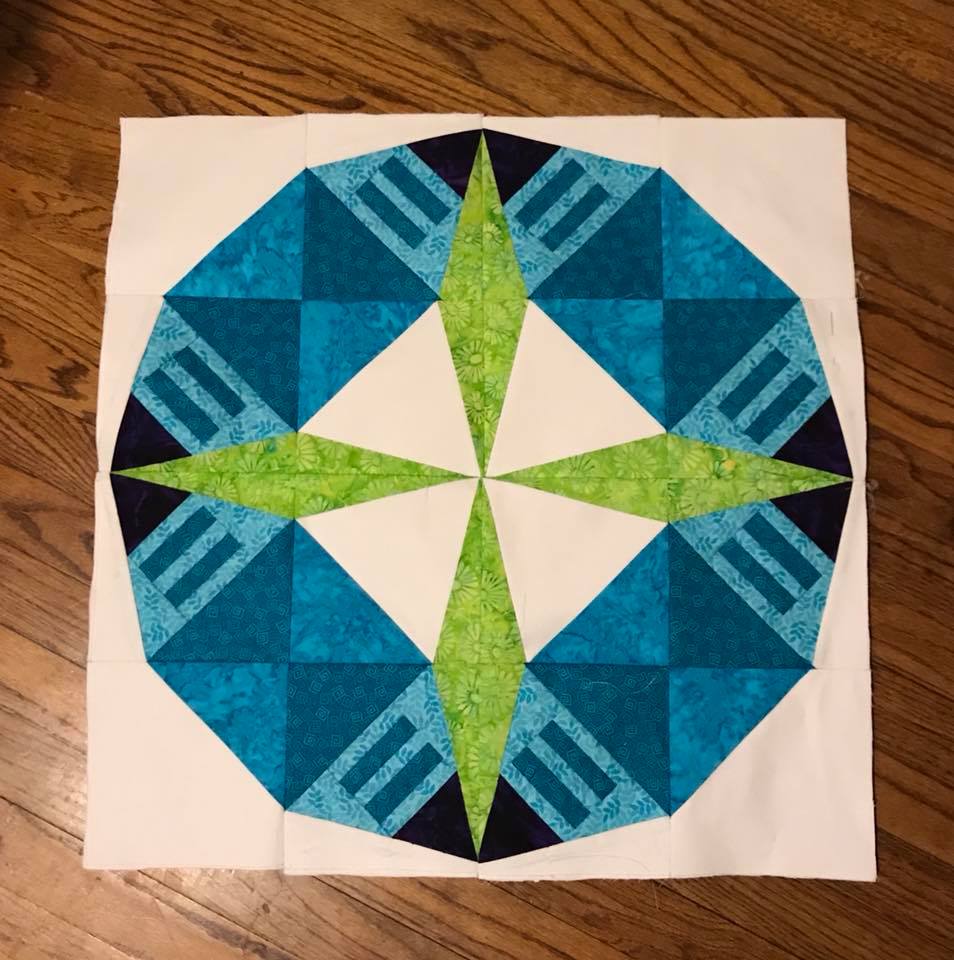
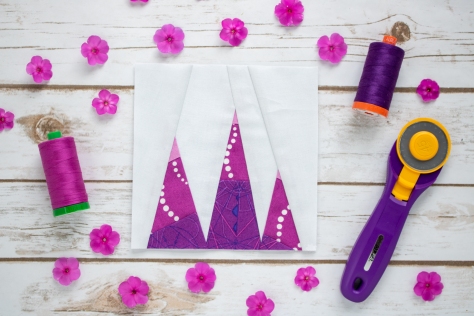 Let’s start with this fun block! When OLFA invited me to design a block for a
  I decided to use the purple shade and chose a small gradient of fabric in the magenta-purple fade I love so much. I chose three Alison Glass prints, which most likely comes as no surprise! The darkest purple/magenta is SunPrint 2018 Compass in Jam, the middle tone is an old one from Alison Glass SunPrint 2014 called Bike Path (I believe it was also printed as part of her Lucky Penny fabric line, so googling or Etsy searches may find some left!), and the lightest is a fabric from her Insignia 2019 fabric line. I love the way the bike path dots add fun tracks of snow down these pinnacle points! Paired with a white solid background, this block is simple and graphic and provides lots of fun for experimentation.
 This block includes a fun twist to foundation paper piecing, since you premake a panel of fabric that is used to to fill each mountainous space. This means that every block you make will be slightly different, which to me equals fun! To find the instructions for this block, head over to the
  I also was honored to be asked to photograph the full OLFA 40th Anniversary quilt, where you can see how the finished Sew Along Quilt may look. Isn’t it fun!? Do you see my block?
 Today I’m excited to be joining the
  Though it’s subtle, I meticulously cut the background so that the unicorn is continuous and the fabrics all line up (mostly). The coordinating Tula Pink solid in Limeade made the perfect coordinating yet stand-out pop for the U. I used coordinating 50wt Aurifil thread to sew up my block, and between the 1231-Spring Green and 1148-Light Jade the stitches blended right in.
 To conserve fabric with the fussy cutting, I opted to keep a few of the paper shapes together, as you can see if you inspect the backside of my letter. Can you see where there are perforations but no fabric seam? That’s where I condensed my shapes. If you’re new to EPP, basting and stitching smaller shapes may be easier, so do what’s comfortable for you.
 One of the really cool aspects of these Typecast letter patterns designed by Sheri and produced by
 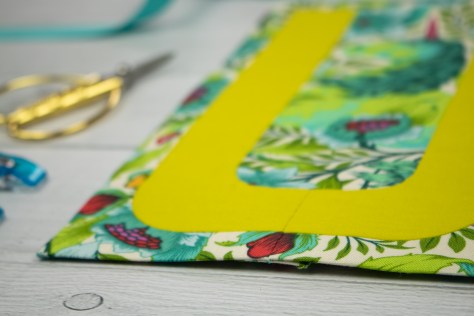 I’m pretty happy with how my fussy cutting went, and was able to give the impression that the U was just set right down on top of the continuous unicorn fabric, Frolic Imaginarium from Pinkerville by Tula Pink.
 I could see this U framed in a shadowbox or stitched down onto a background fabric and wrapped around a canvas in a child’s room, or of course stitched into a pillow for a Unicorn-loving friend.
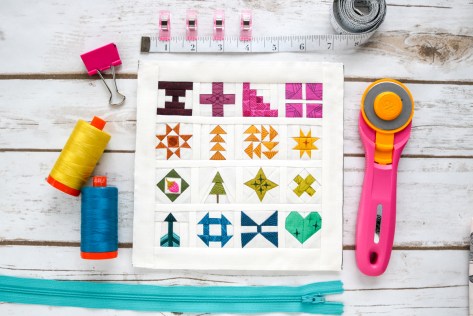
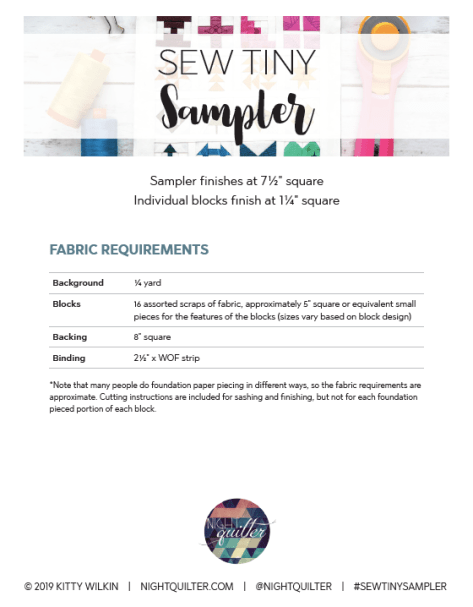 The pattern includes foundation templates for the 16 blocks shown on the cover, plus assembly instructions for putting them all together into a mini mini sampler that finishes at a whopping 7 1/2″ square. Each block measures 1 1/4″ square finished, and 1 3/4″ unfinished. The pattern includes tips on tiny piecing in general, links to resources on
  I had fun playing with
 I highly recommend reading my
  Head over and get your

 I also created a Facebook group called
  You probably remember the improv, make-it-up-as-I-go
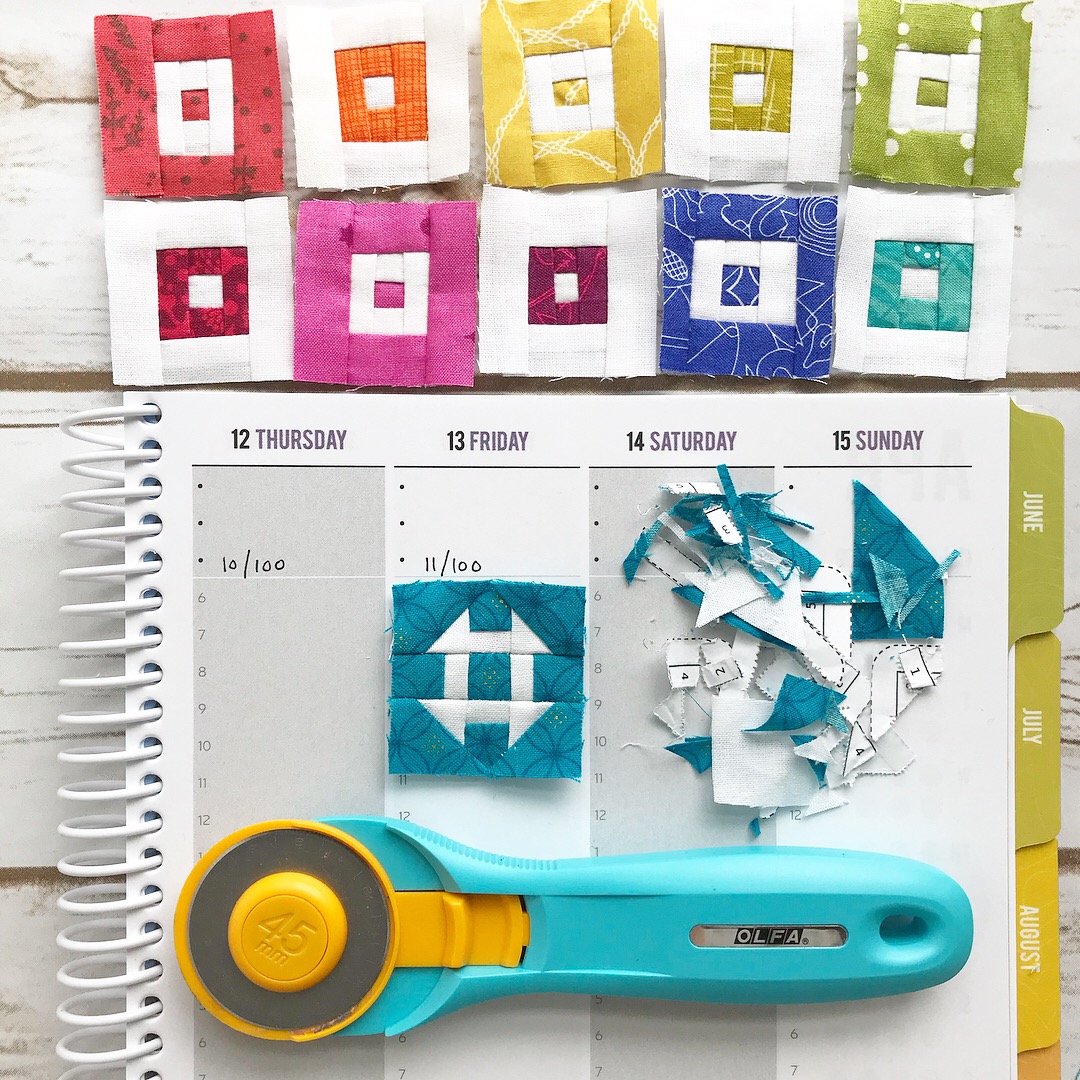 I’m officially 11 days into
  1/100
1/100 2/100
2/100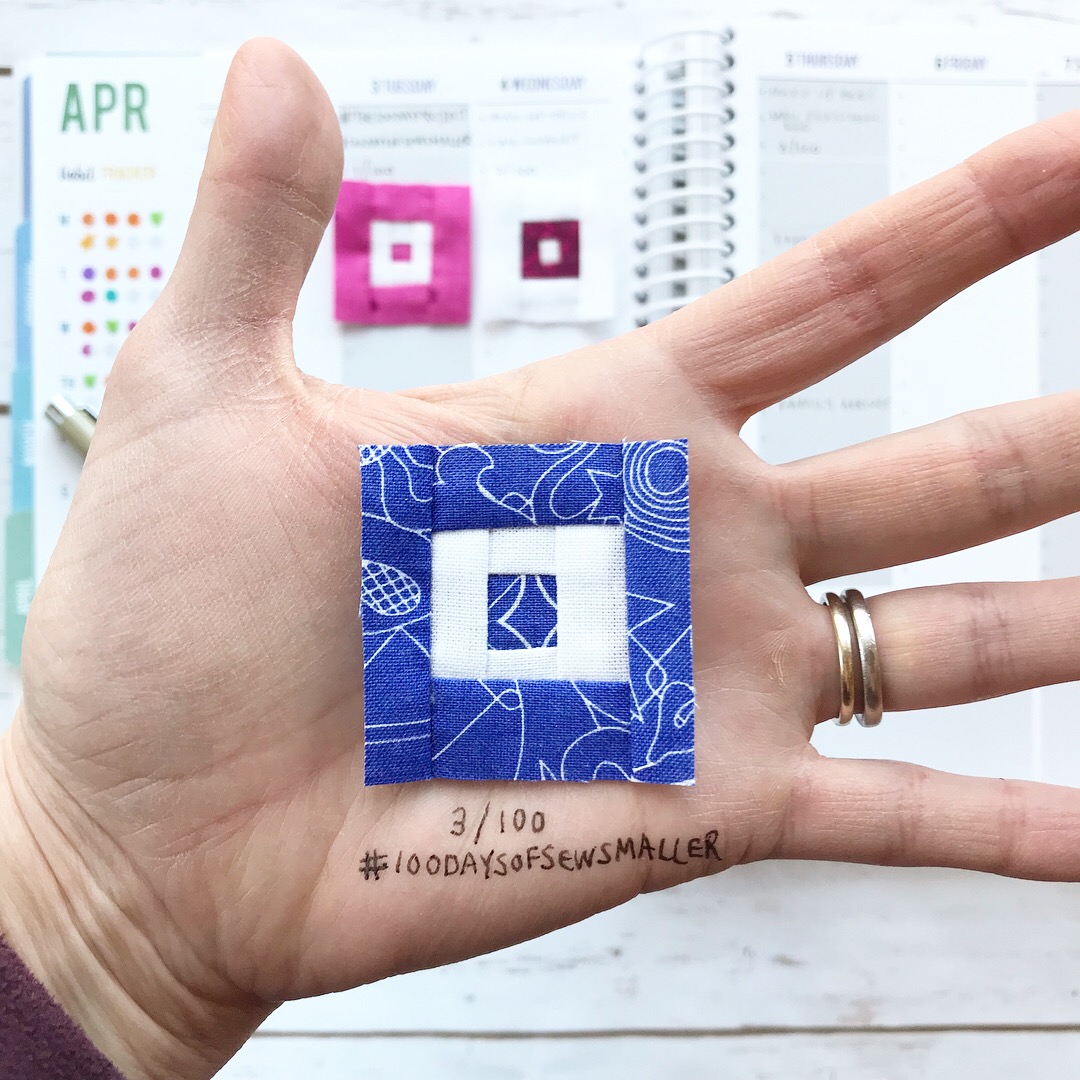 3/100
3/100 4/100 (which was also the day when I created a foundation paper pieced template for my day 11 block. I didn’t sew that one until today, but the idea was born on day 4!
 5/100
5/100 6 & 7/100 – Day 6 was the day of my daughter’s First Communion & Confirmation and my family was visiting all weekend, so I got a self-granted “bye” on posting. I caught up on my birthday, day 7!
 8/100
8/100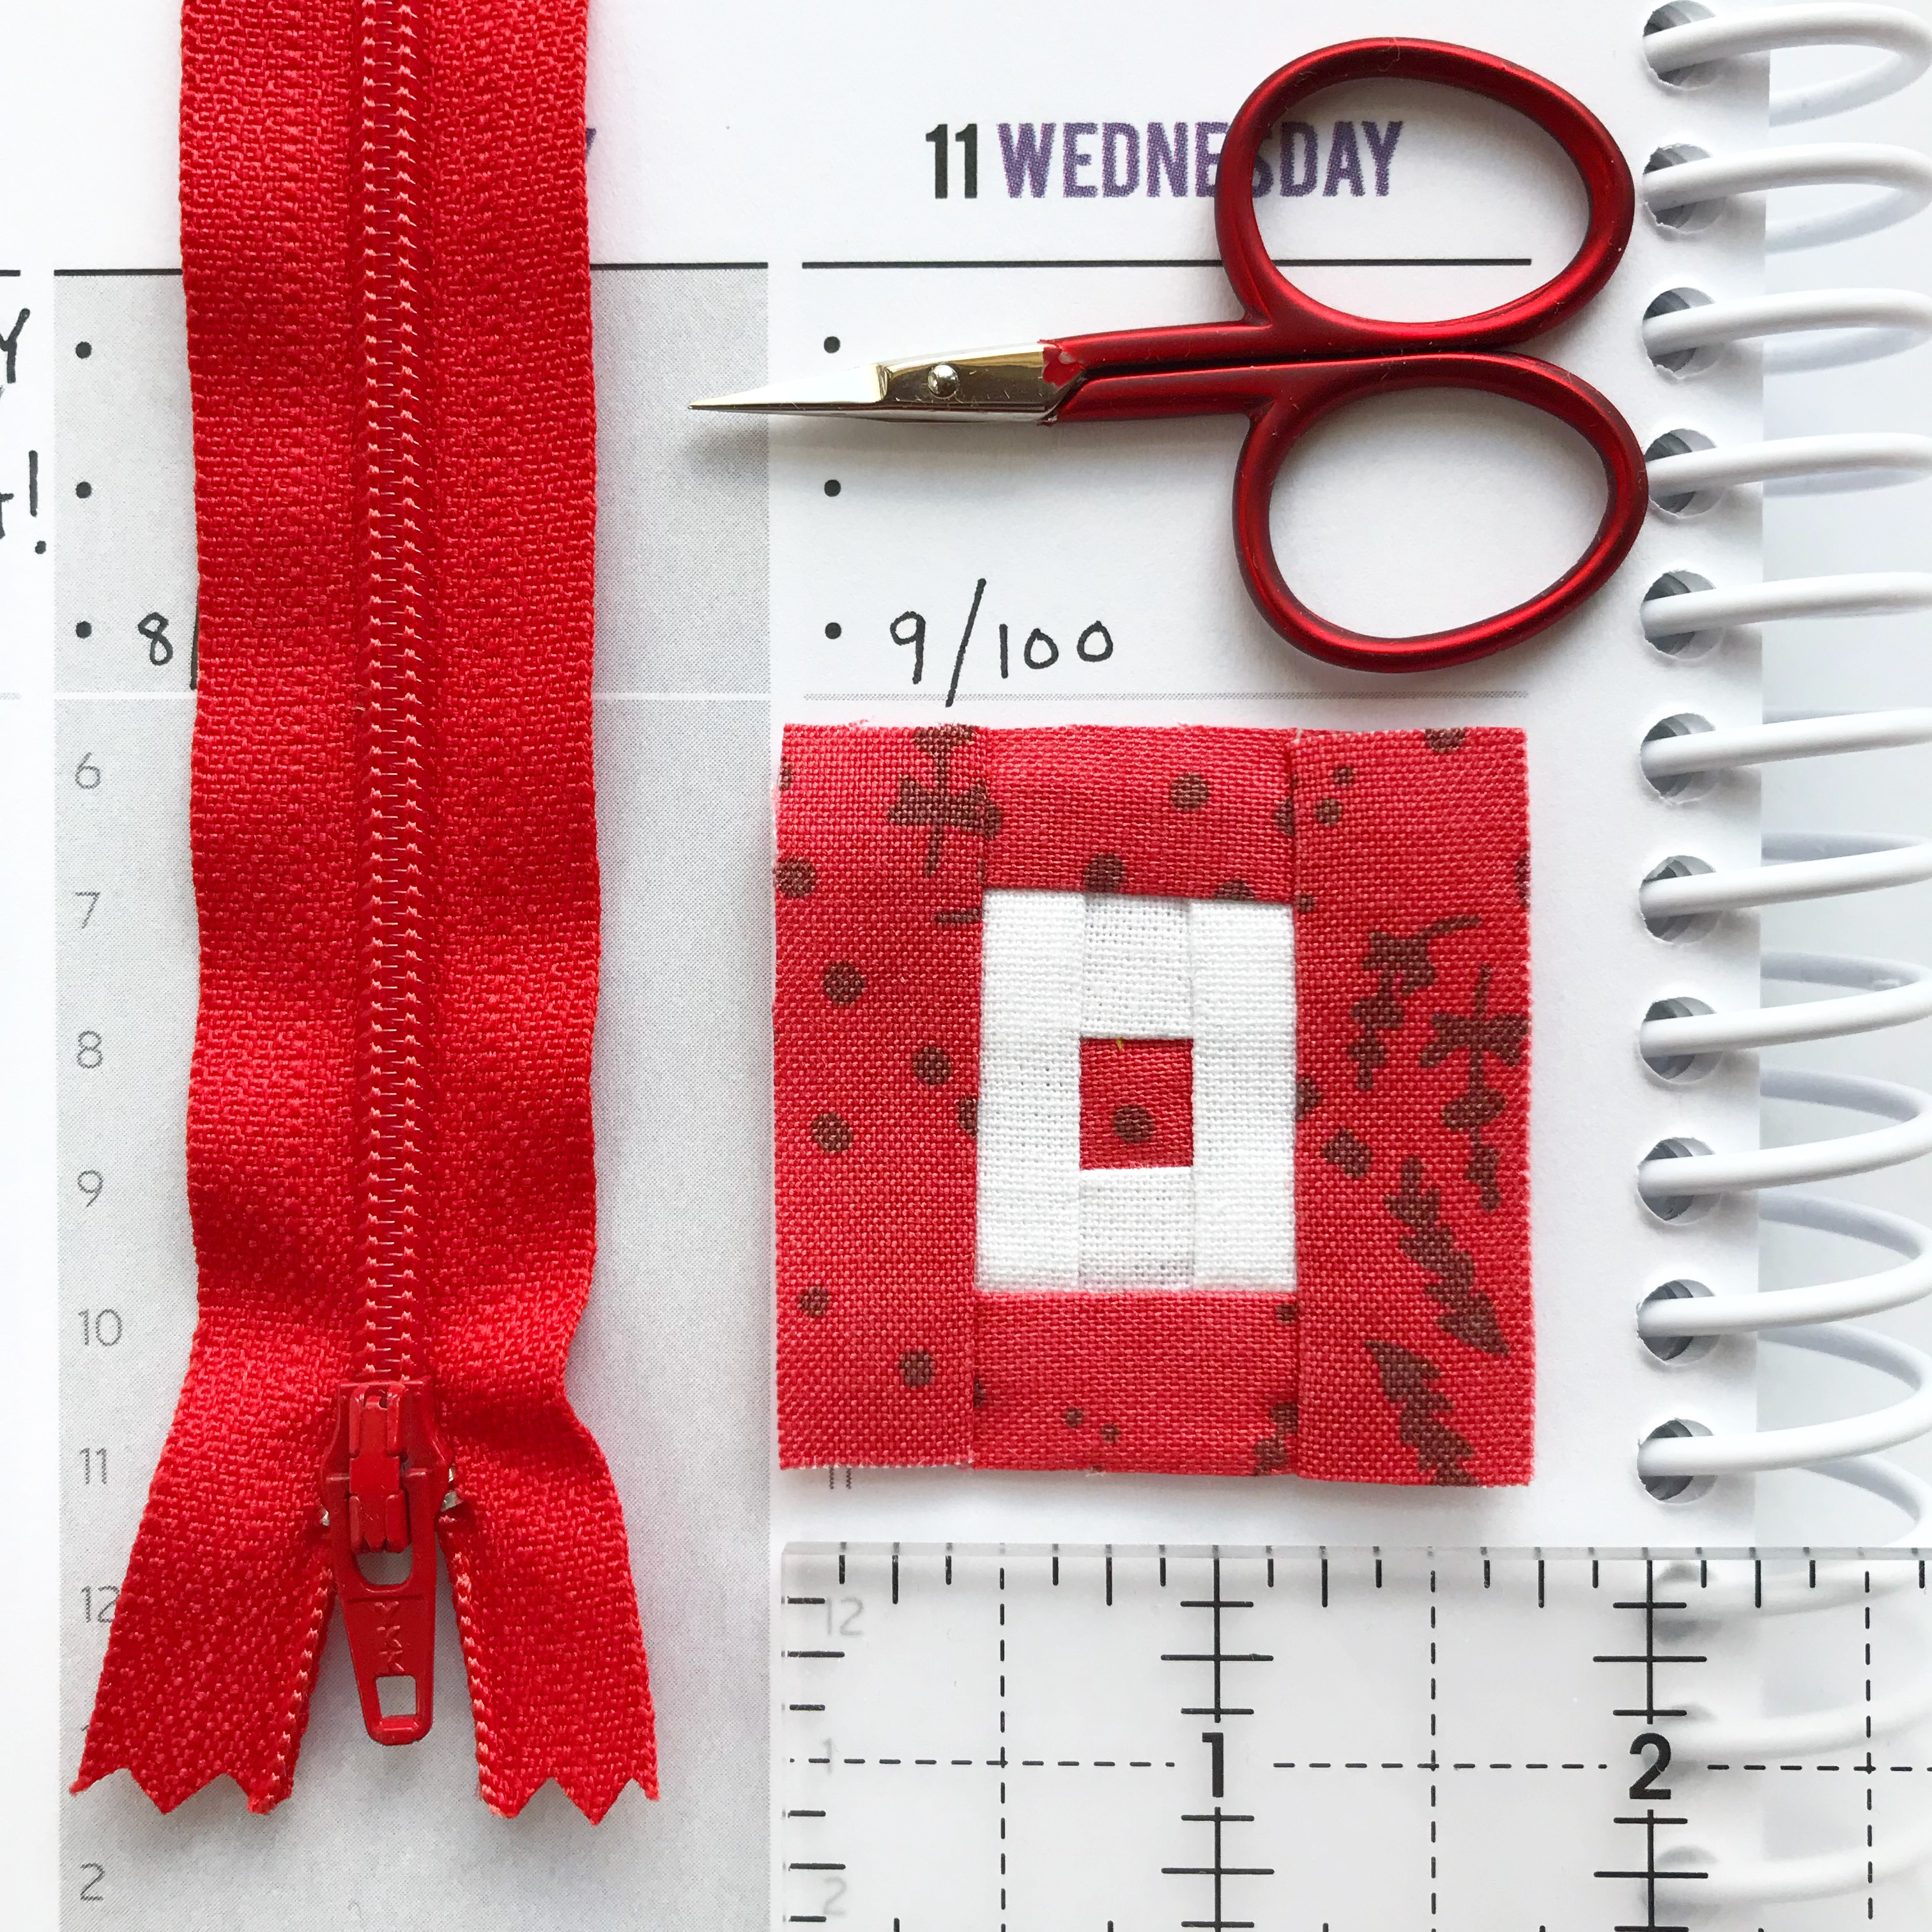 9/100
9/100 10/100
 11/100
 Days 1-3
 The first week of blocks
 The first 10 days
 I love how your challenge is going Kitty and how it relates to you as a quilter but also think you should let it be organic and use the 100 days to explore if needed and push yourself also if needed. Don’t get locked into a direction.
 I’ve worked ahead twice (once when my entire family was visiting for the weekend for my daughter’s First Communion, and once today since I know weekends are often filled with family time and not necessarily sewing time), but have stuck with the block per day format.
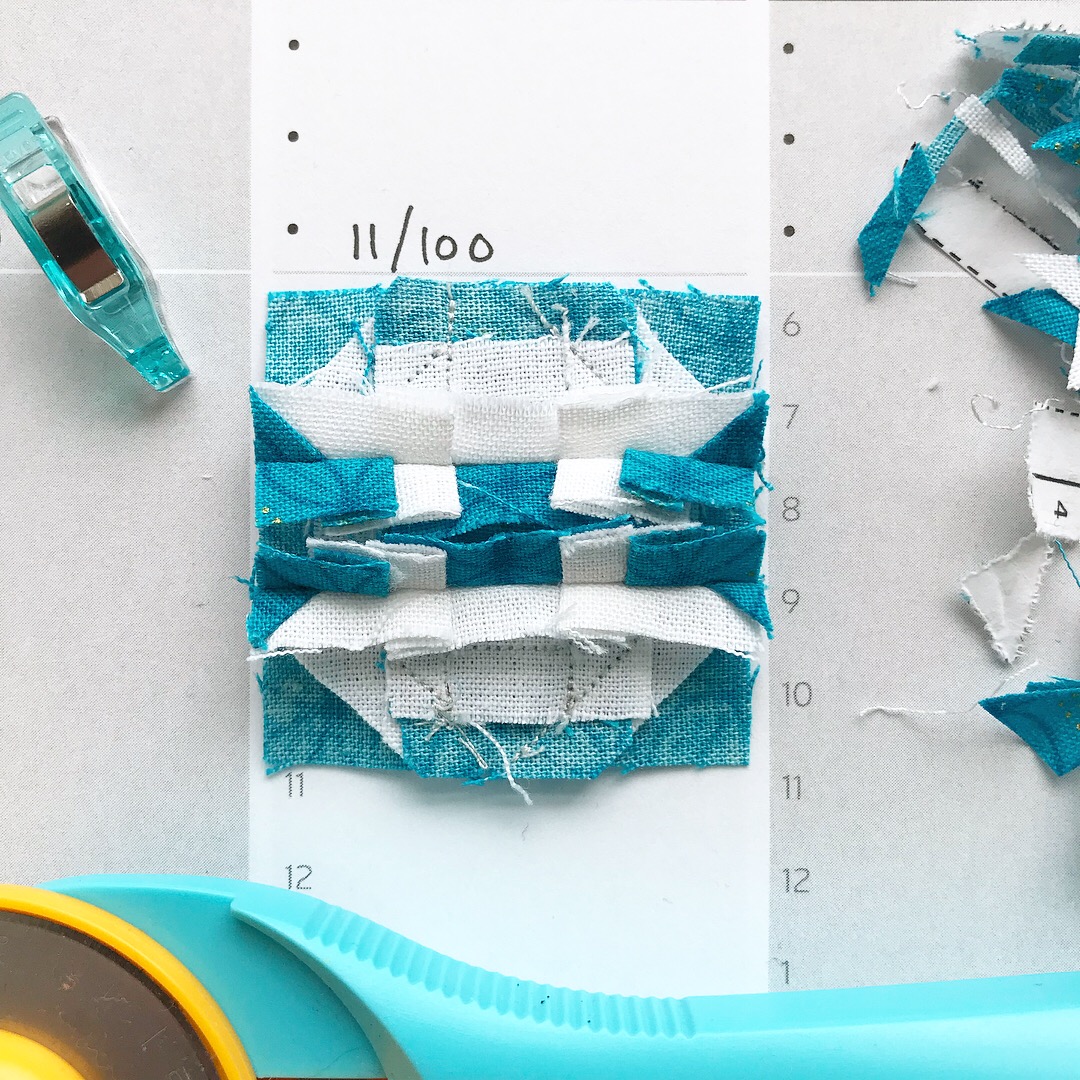 I’ll leave you with a cheeky peek at the backside of my latest block, since one of the big questions I’ve gotten so far over on Instagram is “How big is your seam allowance?”. My answer: 1/4″ seam allowance, just like always. Note that so far I’ve created blocks with mostly straight joins, and I might scale a few seam allowances down to 1/8″ to decrease bulk as I experiment further, but for the most part, the 1/4″ seam works just fine!
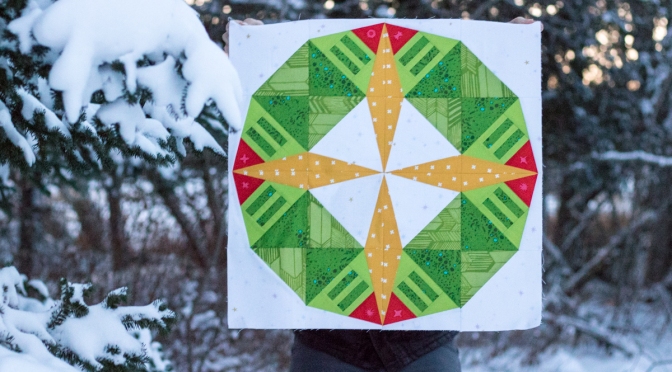
 Back in July, I promised to release this pattern to the public when the snow began to fly. This past weekend, we had our very first snow of the season here in midcoast Maine, which happened to be perfect timing since today I’m pleased to present
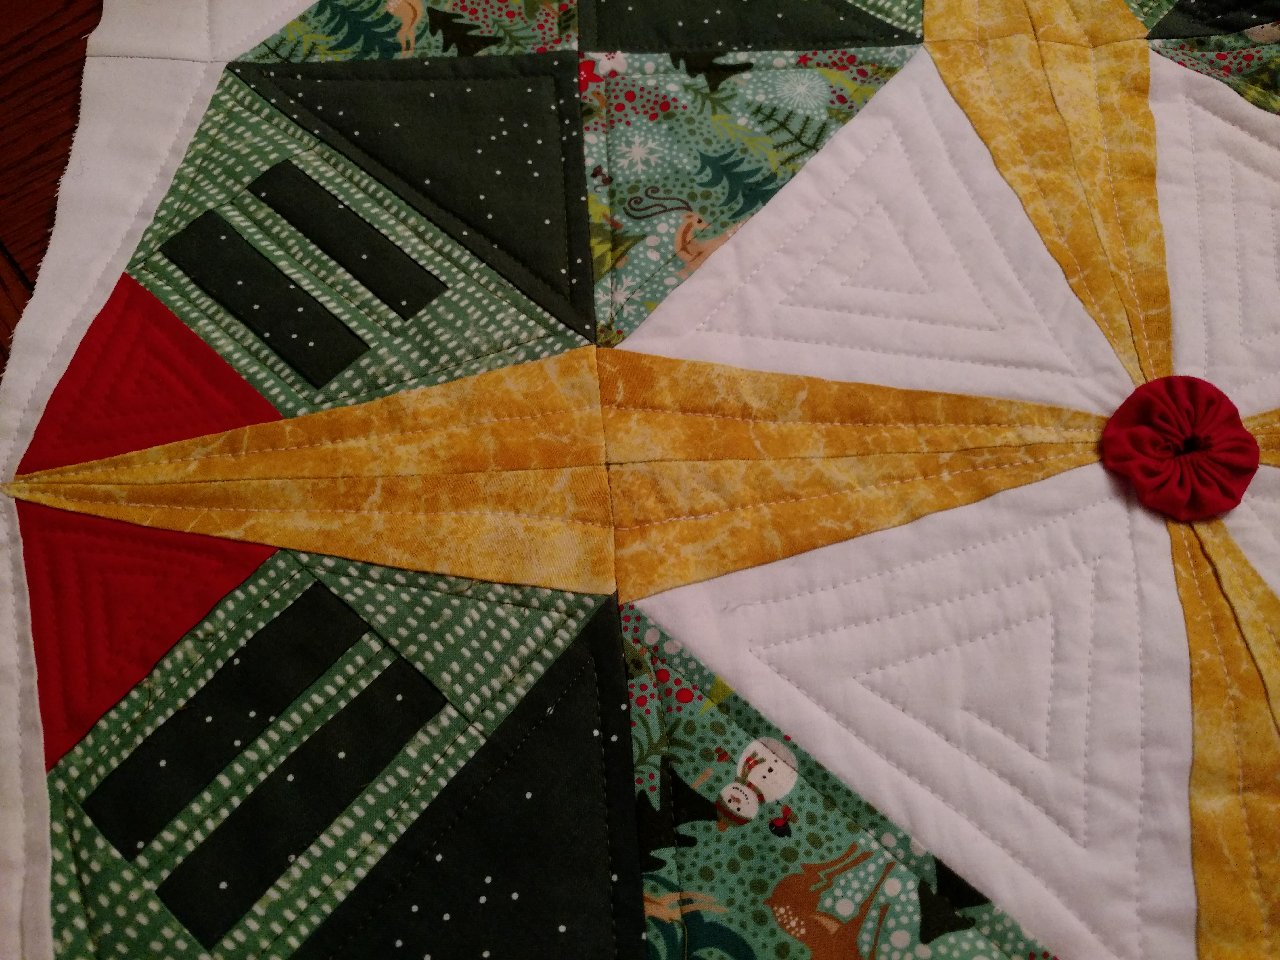
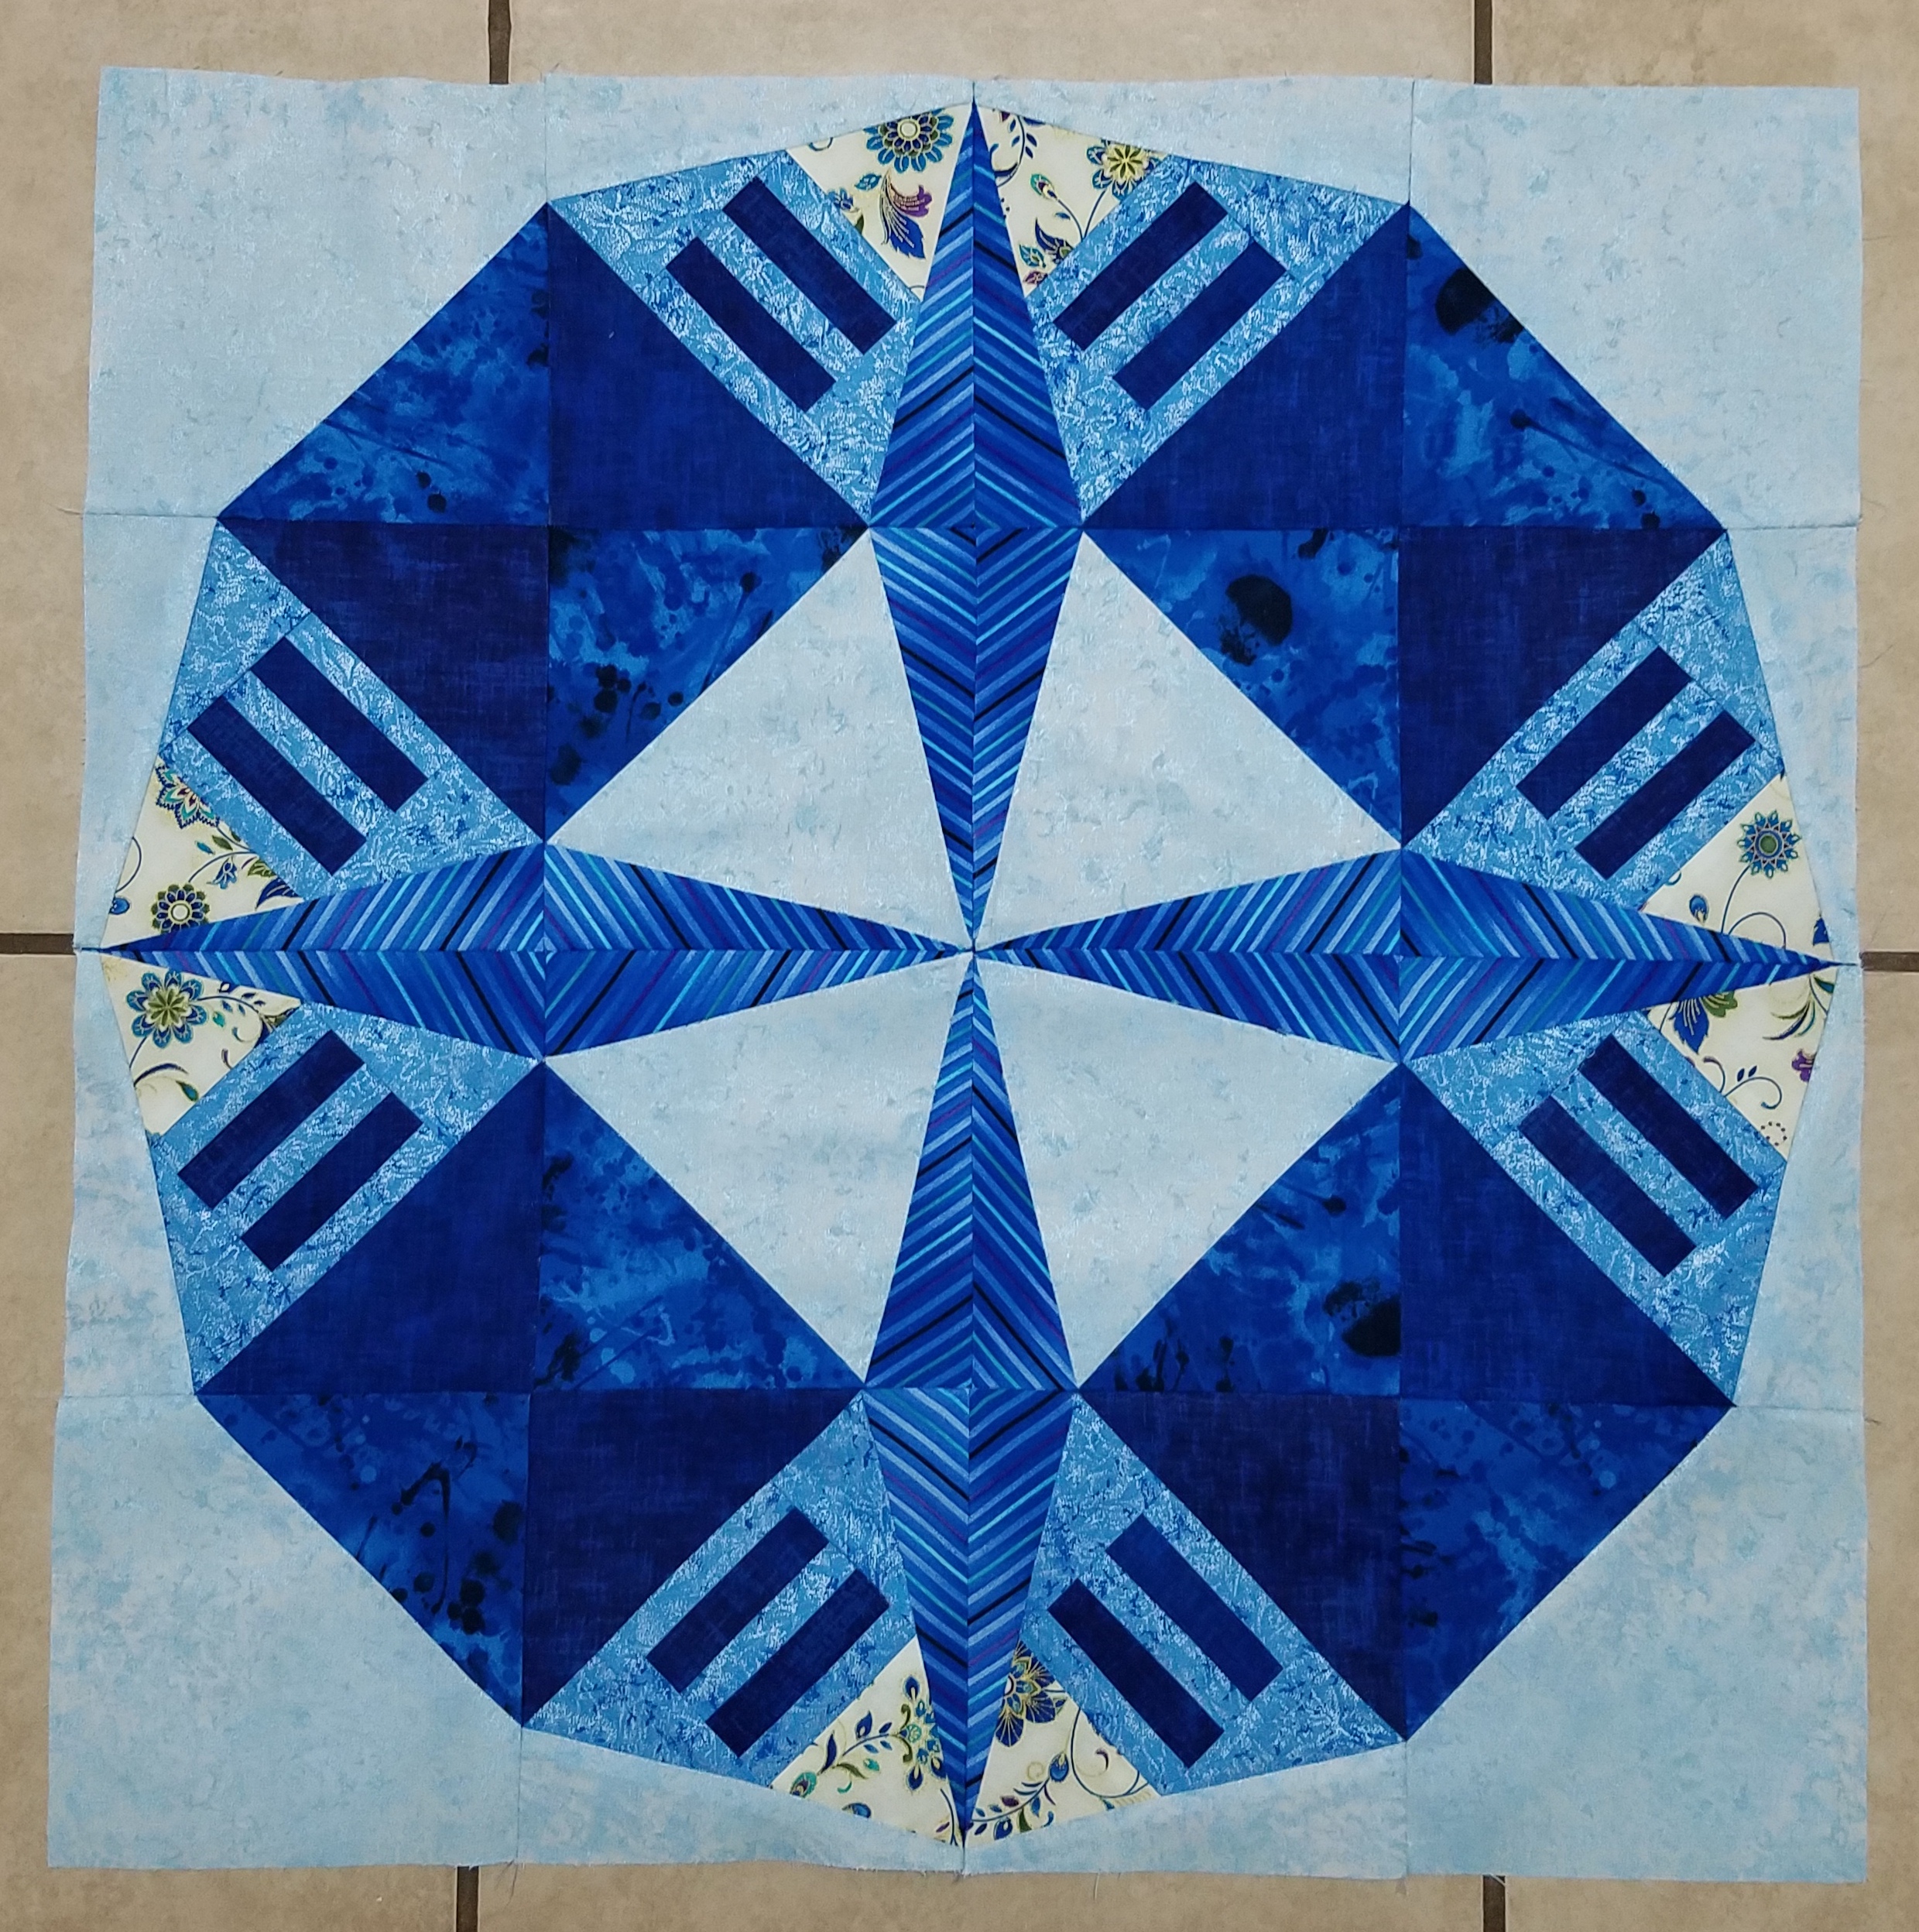
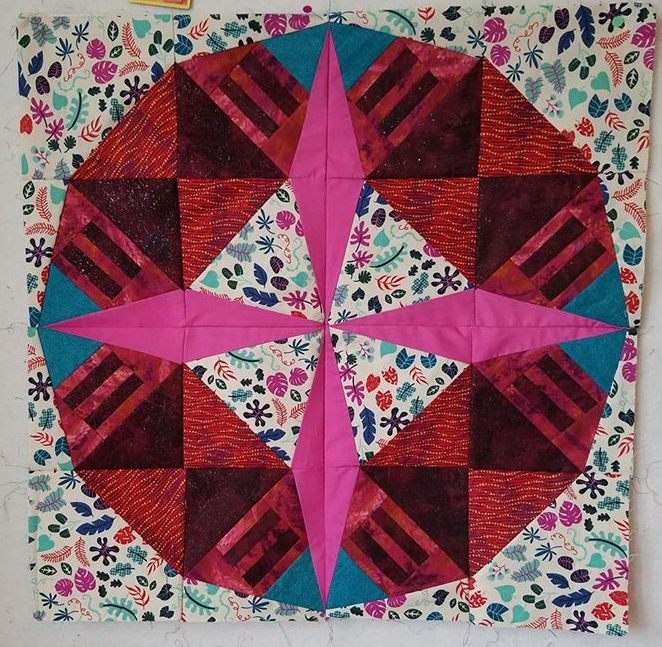
  When playing around with color placement on my Constant Flux pattern, I realized that by merging large sections, an entirely new pattern emerged–one that looks to me like a modern take on a wreath and star. I decided to make it easy and adjusted the pattern templates to reflect this heavily altered version, and thus Constant Flux Christmas was born. This is a fun, beginner-friendly pattern that would look great not only in traditional colors, but also in any other colors you throw its way! I’ll be sharing photos of all of the gorgeous versions sewn up by my pattern testers so you can see for yourself!
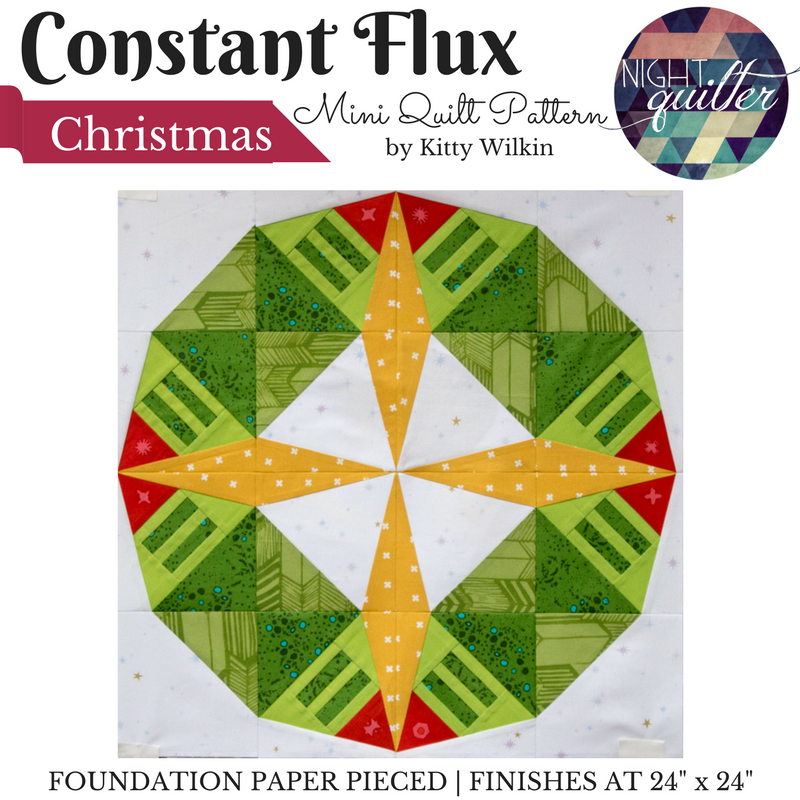
 Constant Flux Christmas is now available for digital download both on


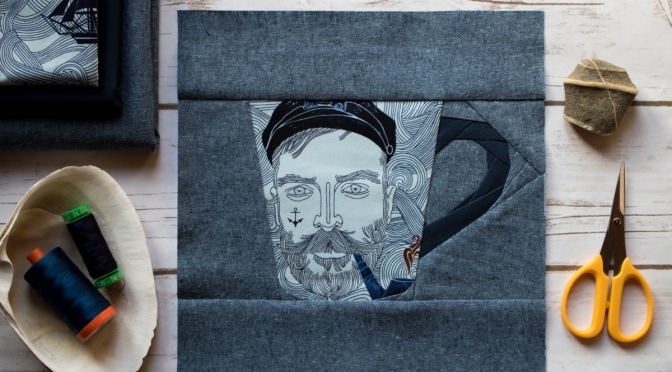
 As soon as Kerry asked me to play along, I knew exactly what fabric I was going to use. A few years ago, while stopping in at
  I used the 10″ Paper Love Mug since it was *just* large enough to fit the full face, and simple enough not to seem busy with the wavy background. Whether my brother will love the mug rug I make with this mug block or just get a good hearty laugh over it, I don’t care. It’s just one of those gifts that must be given.
 I visited my local quilt shop
  I also might add some embroidered detail to that anchor tattoo. We’ll see how brave I get. That’s the one thing with using my brother’s Doppelganger fabric–I daren’t mess up the face! Either way, I think he’ll get a kick out of the gift, and I have finally found a way to gift a piece of this stashed fabric to him!
 The Paper Love Mug (top center) is part of the
  The
The 