

I’ve long been a fan of the Summer Sampler Sew Along put together by Lee Heinrich, Katie Blakesley, and Faith Jones each summer, so when Katie asked me if I would be a “guest expert” for her 2022 Summer Quilt Along, I couldn’t say no. Plus, what a great spark to get me writing here again!
I used my Summer Sampler 2019 quilt top as my example quilt for this post, which I assembled in my own alternate layout to create space for me to participate in the fun of the sew along without the stress of “keeping up” and making every block. You can see (or buy) this year’s sampler here. If you’re participating in this year’s Sew Along, you might be at the point where you are almost ready to photograph your finished quilt top!! If you’re not there yet, no worries–these tips are timeless. Just bookmark this post, and come back when you’re ready.
I could easily talk for weeks about quilt photography, but wanted to share two of my top tips for photographing your quilts (or quilt tops!) since sometimes a little bit can go a long way. If you want to dive into quilt photography more deeply, be sure to check out my on-demand class Take Great Quilt Photos Now!
Light
First and foremost, LIGHT is the most important thing to consider when taking photos. I’m a big fan of capturing natural light, so I almost always take larger quilts outside for photos. In addition to having abundant natural light outside, there are gorgeous natural locations that help complement and celebrate the quilt being photographed and it’s wicked fun to find them!
That said, a bright overcast day provides the ideal lighting for photography. That’s right–overcast. I can’t tell you how many times I’ve heard someone say, “I finished my quilt but I haven’t been able to take any photos because the sun hasn’t been out!” You don’t want direct sun for photos, and I’ll show you why:
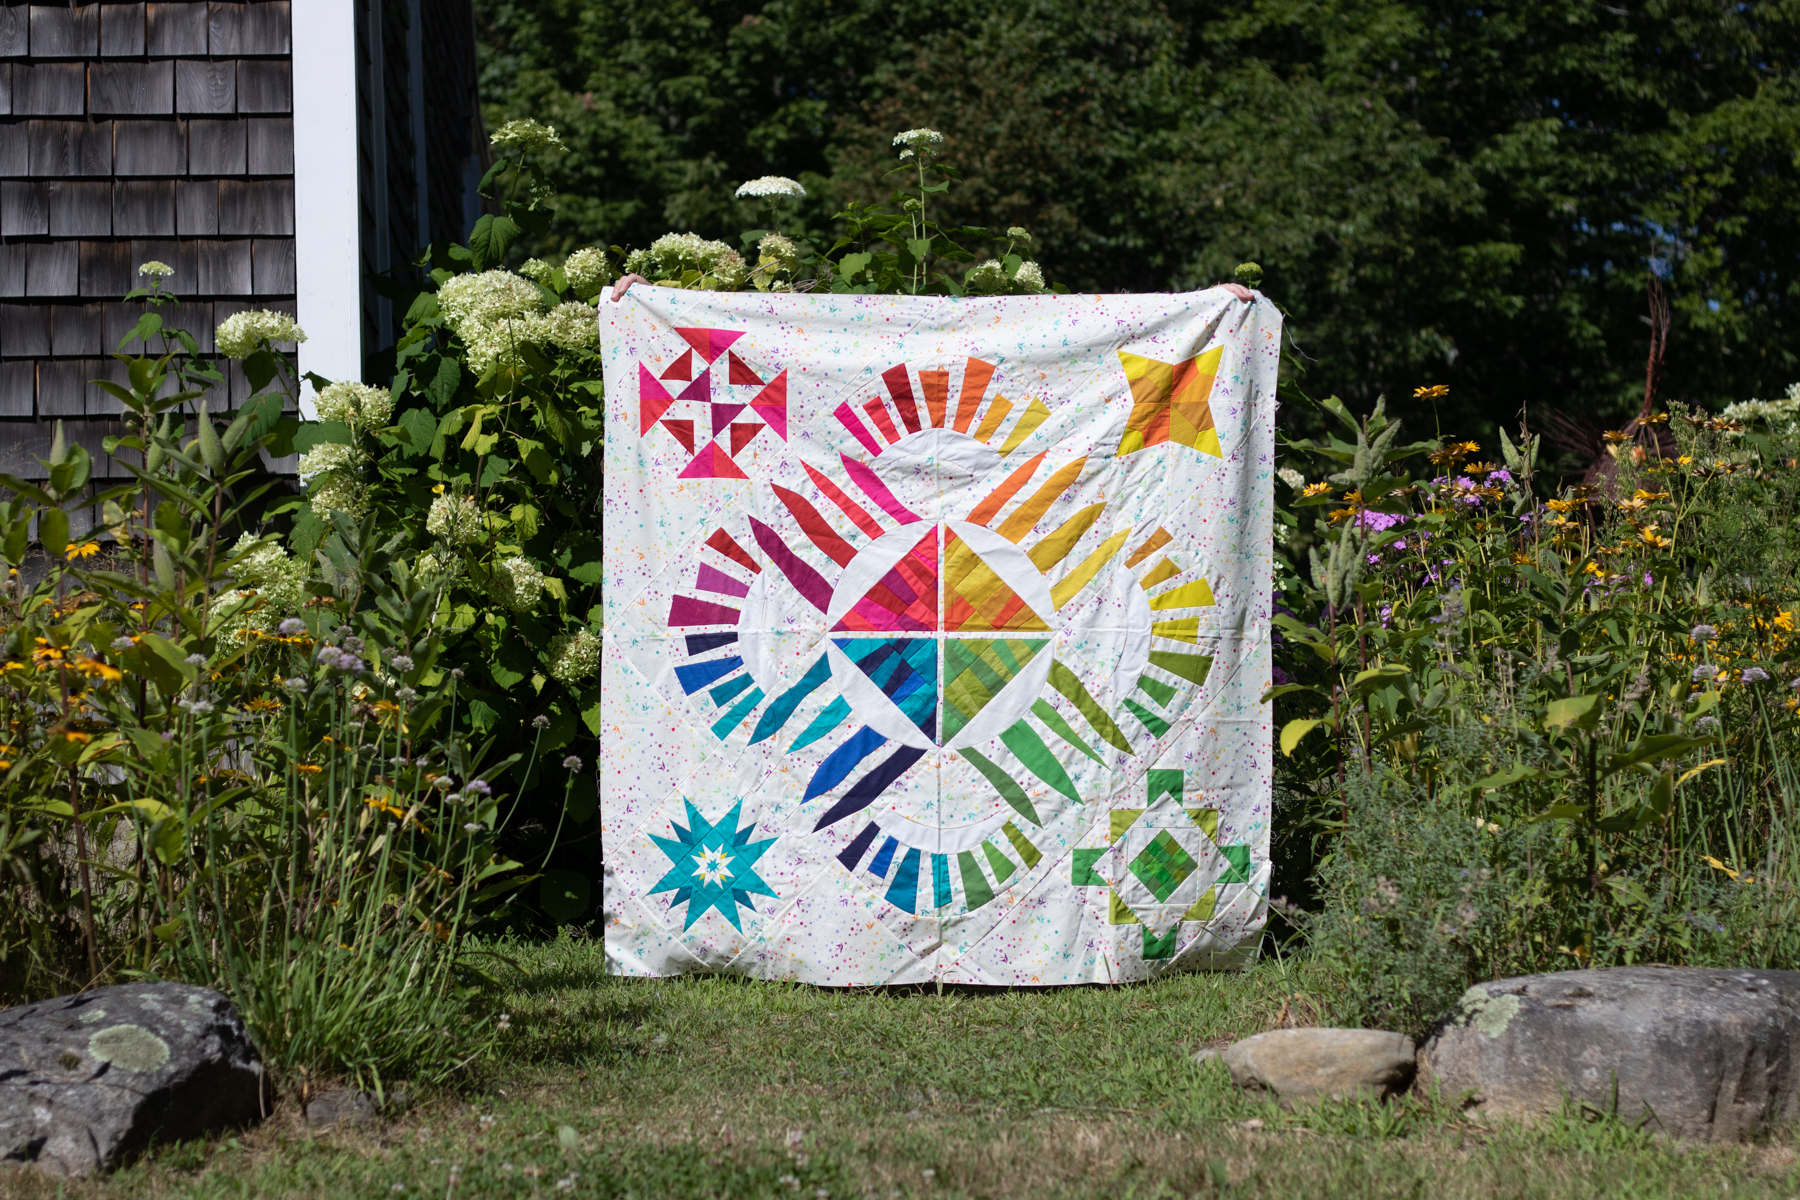


As you can hopefully clearly see in the photos above, the quilt photographed in the full shade/overcast day is the most accurate, vibrant representation of the fabrics and colors in the quilt.
Bright direct sunlight washes out colors and creates dark harsh shadows in every little wrinkle or wave of the quilt. When you’re photographing a finished, fully quilted quilt, you can imagine the shadows that are created along every stitch line. If you have the flexibility to wait until an overcast day, I strongly recommend you do that for your next quilt photos. If you live in a place that rarely has clouds, taking photos early in the morning or right before dusk will be your best bet!
Clear Communication
Photographing a finished quilt often requires a quilt holder, and I’ve often heard questions about how to “get your quilt holder to….” do any number of things. The answer is a tool that will take you far in every relationship, even beyond the relationship of you as quilt-maker/photographer and your quilt holder: clear communication.
BEFORE you head out to the gorgeous location you’ve chosen for quilt photos, have a solid conversation with your quilt holder about your hopes and expectations for the photos and quilt display. Especially if your quilt holder is not a quilter themselves, taking the time to clearly show and explain how you want them to hold the quilt will make the actual photography much much smoother.

Personally, when I’m taking quilt photos, I want to see as little of the holder as possible. My partner Garrett is my usual quilt holder, and he knows that I don’t want to see him (hah!). For these photos, my friend Allie aka Exhausted Octopus stood in as my quilt holder, and did a great job being invisible behind the winner photo (above). You can see her fingers a bit along the top edges, but that’s it.
I am a big fan of saying yes and talking about what you CAN do, but I think for this, it might be easiest to show you a bunch of commonly seen photo scenarios, with what not to do, and things you can communicate to your quilt holder BEFORE the photoshoot (in a kind and supportive way, of course!) Please note that everyone’s definition of a good quilt photo is different–so if you enjoy using any of these photo styles, that’s ok! This is just based on my own personal preferences when taking photos of quilts in beautiful locations.
What not to do…

I DON’T want to see your legs.

I DON’T want to see your head or arms.

I DON’T want the quilt to be crooked. This is something that is sometimes difficult for the quilt holder to perceive while standing behind the quilt with their arms extended, so you can use an “in the field” communication code when actively taking photos. I will say “level!” and my quilt holder will level the top of the quilt, and I’ll either reply with “other way!” if they angle it more, or “good!” when it’s perfectly level and I’m ready to take the photo.

I DON’T want the corners of the quilt to fold over–I want to see the full quilt if at all possible. This is something that is easily attained with hand placement when holding. When the quilt holder grips the quilt right inside each corner, it allows the quilt to be fully displayed and still have the actual corners visible. Note that some quilts are just too large to hold, in which case I’ll bring two quilt holders along–and sometimes chairs for them to stand on–so that one can hold each corner.

I don’t want there to be a sag along the top of the quilt. Before photoshoots I’m always sure to establish that if I say “taught!” when my quilt holder is holding the quilt, that means that there is a slight sag at the top of the quilt and they need to gently pull their hands away from each other a bit to tighten it up.
Code words often shouted from photographer to quilt holder include:
Taught! (to straighten the top of the quilt)
Level!… other way! …. good!
Head/arms/feet (if they are showing)
Break! (if I’m changing settings on my camera, I make sure to tell my quilt holder so that they can rest their arms!)
The conversations that happen before the photoshoot are absolute gold, and can make the process more enjoyable for everyone. As with everything, the more you practice the quilt holding, the communicating about it, and the photography of quilts in unique and gorgeous locations, the easier it will get. You’ll build a relationship with a quilt holder who knows exactly how you like your quilts to be held for photos AND you get gorgeous quilt photos that show off the full glory of your quilt without any distracting bits. If that’s not a win-win-win, I don’t know what is.
I hope these tips are helpful to you and you enjoy documenting your gorgeous makes in stunning locations. You take so much time and put so much love into making the quilt top, taking a gorgeous photo to document it is absolutely worth it! I go into much more detail in my on-demand class Take Great Quilt Photos Now! so check that out.

Also be sure to check out all of the other great tips shared by the other Guest Experts–you can see all of the Sew Along posts here and there are tips ranging from fabric selection to organizing your sewing space. Many thanks to Katie for inviting me to be a part of this, and happy sewing everyone!


 The pattern includes foundation templates for the 16 blocks shown on the cover, plus assembly instructions for putting them all together into a mini mini sampler that finishes at a whopping 7 1/2″ square. Each block measures 1 1/4″ square finished, and 1 3/4″ unfinished. The pattern includes tips on tiny piecing in general, links to resources on
  I had fun playing with

 I highly recommend reading my
 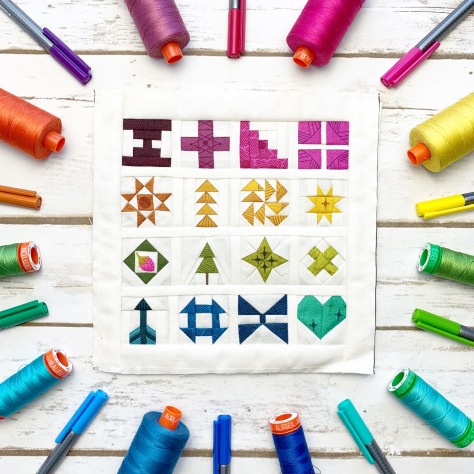 I’m looking forward to seeing all of the tiny blocks created by all of you, and will be sharing some of the blocks some of my friends are making to help celebrate the pattern release soon. In the meantime, you can head over and read about
  Head over and get your
 Today I’m excited to reveal the block I designed for the
  Today I am going to share 3 tips for using fussy cutting in foundation paper pieced blocks, using my Adventure Abounds block from the Splendid Sampler 2 book. If you’re new to foundation paper piecing (FPP), read my
  There are a few things you should remember before beginning FPP: First, the templates are a mirror image of the finished block, so when planning your fabric placement, visualize the right side of your fabric on the back of the template. Second, I highly recommend color coding your paper templates before starting so that you know exactly where each fabric should be. Third, don’t forget to use paper scissors to cut out and trim the templates! Your fabric scissors don’t want to go there!
 Once your fabrics are selected, your templates are cut out along the 1/4″ seam allowance line and color coded, you’re ready to dive in. Here are three tips for using fussy cutting in FPP:
 As an example of this for my Adventure Abounds block, I decided to position a subtle bird in the sky above the ocean, and held it up to a window to make sure it was positioned exactly how I wanted it. With a white on white background for my blocks, this example is subtle, but sometimes those subtle details are my favorite!
 To create a template, first trace the shape from the paper foundation template onto the plastic. Be sure to label your piece, AND make note of directionality since the paper template is a mirror image.
 Once I trace the shape, I flip over the template plastic and write my notes on the opposite side, so that when I cut the fabric for that piece, I know that my notes should be legible on the right side of the fabric.
 Next, using a quilting ruler with 1/4″ measure, draw seam lines 1/4″ outside all the edges of your drawn lines.
 Cut out the template along that seam allowance line.
 For my block, I decided to fussy cut the heart so that the fabrics for the two pieces of the heart look continuous despite consisting of two fabric pieces. I decided to make a third reference template of the full heart and traced the pattern from the fabric onto the template, which I used as a reference when cutting out each individual part.
 Once you have your template positioned over the exact motif you want, carefully trace around the template with a fabric marking tool and cut out the fabric, or very carefully use a rotary cutter to cut around the template. Note that with planning templates made with template plastic or repurposed food lids, using your rotary cutter contains a good level of danger–so either purposefully live on the wild side, or use the trace and cut-with-scissors method!
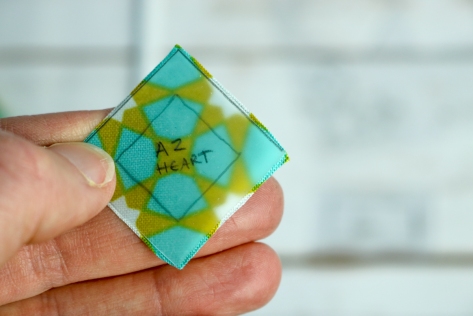 Your perfectly planned fabric piece is ready to carefully stitch onto your growing foundation paper pieced section.
 Folding along the seam on which you are about to stitch and trimming the overhanging fabric to 1/4″ will help you line up the next piece accurately.
 You can also fold over the piece you are about to stitch along the seam line to see how it looks before actually stitching.
 Once your fussy cut pieces are cut and stitched as desired, continue piecing your non-fussy cut pieces as you would any other FPP block.
 In the Adventure Abounds block I made for the original Splendid Sampler 2 quilt, I used this tip when piecing the text on the tree, specifically the word “love”, since the word “listen” was the first piece placed, and was therefore easy to simply glue in place and piece around. Knowing that I wanted the top of the word love to be juuust below that darker top piece, when I cut the square of fabric I carefully cut just a tad bit more than 1/4″ from that top edge of the word love. I left the rest of the rectangle of fabric a bit larger and less specific, since as long as that edge lined up properly, the rest didn’t matter.
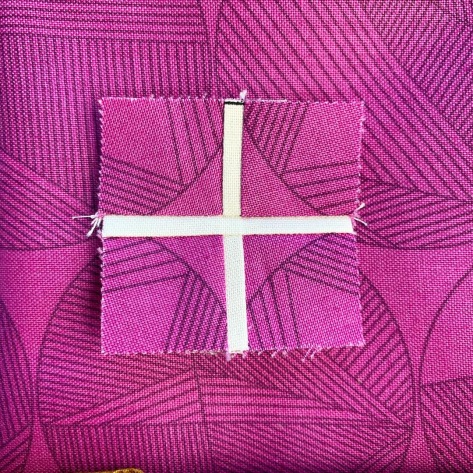
 Whenever employing any type of meticulous cutting in your FPP, it’s always a good idea to trim your 1/4″ seam allowance before positioning and stitching your fussy cut shape. To do this, simply fold back the foundation paper along the line you are about to sew on, and using a quilting ruler with 1/4″ measure, trim the fabric 1/4″ away from the fold. (Obviously use a cutting mat underneath! This photo shows without the mat for aesthetic consistency). Once your fabric is trimmed, you have a clean line with which to line up your next meticulously placed piece.
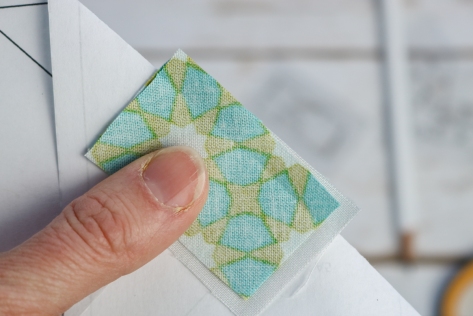
 When your paper is folded along the seam-to-be-sewn, you can place it on your next fabric (right side up) and the paper shape as folded will be exactly on top of the fabric that will end up in that space once you sew along the line. Be sure to visit
  What that means for us is that with that clear 1/4″ seam line showing us the direction we want our print to go, simply lining up the folded seam line with the directional print will ensure the pattern runs in exactly the direction we want. Fold up the edge a bit to peek under and make sure the pattern is positioned the way you want it, then without changing the position of the fabric, fold the paper back up and sew along the line.
 You will end up with your directional fabric meticulously positioned along the seam line, just how you wanted it. Paired with that fun bird flying over the ocean that we placed using Tip 1, these tips can help take your foundation paper piecing blocks to a whole new, intentional level.
 Okay, just one peek at my planned layout and a few of my blocks so far. A full look will come in its own blog post soon, so be sure to follow this space!
 I’m excited to share that I was invited to contribute a block to The Splendid Sampler 2 party, and I happily obliged! There are still a lot of unrevealed details around this splendid sequel, so I can’t tell you anything else about my block, but I am excited to get started sewing along!
