Tag Archives: fat quarter shop

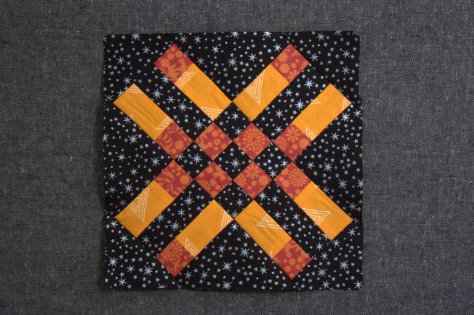
Farmer’s Wife Sew Along – Block 95 Sylvia Tutorial

Ahh, remember the Farmer’s Wife Sew Along!? Today is my day to share the Block 95 Sylvia tutorial for the 1930 Farmer’s Wife Sew Along, hosted by Angie at Gnome Angel and sponsored by Fat Quarter Shop and Marti Michell. Sure, I’m wildly behind on this sew along, but that’s totally ok! With my final deadlines being met within the next couple of weeks, I will have time to catch up a bit, chipping away at the missing blocks here and there. It’s all good! That’s part of what I love about Angie’s Sew Along–there’s no pressure. I’m making this quilt for me and I can take as long as I want to finish it!

farmers wife 95 sylvia tutorialEach of these Farmer’s Wife blocks manage to pack quite a punch in the little 6 1/2″ space. My method of attack when deciding how to piece each block has been consistent: how can I piece this with as little muss and fuss as possible? With Sylvia, at first I was thinking chain piecing would be the way to go, since it would help minimize the teeny tiny pieces in the inner borders I’d need to cut and sew. Looking at it more closely, I decided that with this block, even chain piecing would require piecing TINY bits, cutting, and then piecing again. Plus, sixteenths of an inch!? No thank you! Finally, I decided that foundation paper piecing was the way to go, since:

  • there aren’t any tricky joins,
  • the pieces are teeny enough that the foundation paper will be helpful in reducing wonkiness,
  • the block breaks into pretty manageable pieces, AND
  • all of the border pieces can be cut using a rotary cutter and ruler to decrease the paper removal at the end.

Those who know me know that I LOVE foundation paper piecing (FPP), and it’s true–I do! The precision one can get using FPP is unrivaled, and once the technique is mastered, it makes sewing teeny tiny pieces MUCH more manageable. I am not going to take you step by step through how to foundation paper piece, since I have  written two very clear tutorials already (why reinvent the wheel, right!?), but I will share some block-specific tips and tricks to help you piece Sylvia smoothly.

For those of you who do not know how to foundation paper piece, visit my Basic Foundation Paper Piecing tutorial here, as well as the Foundation Paper Piecing tutorial guest post I wrote for the Andover Fabrics blog here. Trust me, it is a technique worth practicing and mastering, since it opens a whole new world of sewing possibility!

Reflection on the Letter – In Spite of the Mortgage

Nearly every one of the letters in this book seems to talk to me in a very specific, seemingly personal way. After the first dozen times of reading a letter I shockingly thought was *meant for me*, I realized that all of the letters have a very widely applicable message and I was simply interpreting it in a way that worked for me at that moment. That said, I can completely relate to this letter!!

Sometimes it’s necessary to just head off on an adventure despite whatever chores, obligations, or need for frugality you have waiting for you at home. We did a lot of adventuring this summer, but like Mrs. A. M. from the letter, we were able to do it on a very tight budget, not paying for much more than gas money.  Day trips to beaches, mountains, playgrounds, and forested hikes abounded, and I was always sure to pack a picnic lunch, extra snacks from home, and full changes of clothes for all three kids (and myself)… just in case. It was a much needed change from the stay home and do chores days we could have had!

Tutorial

farmers wife 95 sylvia tutorialReady to get sewing? Make sure you have a grasp on how to foundation paper piece, and let’s make Sylvia!

Choosing Fabrics

farmers wife 95 sylvia tutorialAs soon as I saw this block, I knew that I wanted to meticulously cut the center square. I’m arranging my blocks on point, so be mindful of your own plans before meticulously cutting your fabric! (I call “fussy cutting” meticulous cutting, and you can read why here). In looking for a fabric with a perfect color scheme and feature design, I stumbled across my precious Heather Ross Far Far Away unicorns (Windham Fabrics). I added some solid blue from an old project, and some Lizzy House Twinkle Twinkle from her Whisper Palette (Andover Fabrics). While the colors are a bit more muted than my other blocks, I think they will all work together. Plus, this fabric combination was a match made in heaven… once it was together, there was no separating it!

Here are some general tips for foundation paper piecing:

  • Shorten your stitch length to 1.2 (if you are an absolute newbie at FPP, try 1.5 until you get the hang of it);
  • Hand crank your needle down at the beginning of each line to make sure you start off exactly where you want to;
  • Backstitch at the beginning and end of each line to secure your stitches (they will be much sturdier during paper removal this way); and,
  • Foundation paper piecing results in many trimmed thread ends. What better time to make yourself a thread catcher? Here’s a free tutorial on how to make the one I use.

To help you while you stitch up Sylvia, here are some block-specific tips for you with photos from my process.

Tip #1: How to make a fussy cutting template for FPP

Fussy cutting while foundation paper piecing can seem daunting, but with one extra step, it can be super easy! Simply create a fussy cutting planning template for the piece(s) you want to focus on. I go through making such template in detail in my FPP post for Andover here, but here are the basics: Print an extra sheet of paper containing the FPP template with the piece you want to fussy cut (printing on card stock will make the planning template sturdier).

farmers wife 95 sylvia tutorialMark the specific piece you want to meticulously cut. I went a little overboard on marking mine for the sake of clarity here. I circled the number but also traced just outside the line of the particular piece, both with bright pink sharpie. Simply circling the number would probably suffice!

farmers wife 95 sylvia tutorialCut out the center of the piece, creating a window that is exactly the size of the piece you want.

farmers wife 95 sylvia tutorialDraw a 3/8″ seam allowance around the window. I used a green micron pen for this example to ensure the line didn’t get confused with the printed lines on the paper.

farmers wife 95 sylvia tutorialCut along the line you drew.

farmers wife 95 sylvia tutorialYou should how have a planning template to help you cut your fabric for fussy cutting. Notice that I placed my planning template onto the fabric upside down. This is because in foundation paper piecing, we are sewing the block on the reverse side of the template. It did not matter too much for this particular piece, since it’s a square, but always be mindful of directionality of the fabric as well as wrong side-right side. If need be, mark your planning template with “right side up” or “wrong side up” so that your fabric is cut properly!

Tip # 2: Color code your foundation paper

farmers wife 95 sylvia tutorialBetween sewing the fabric on the reverse side of the paper, having the block broken into sometimes odd sections before sewing, and the many pieces involved in most foundation paper piecing patterns, it is in your best interest to color code your paper template before beginning to sew. This way, you can be sure you sew each fabric in the proper place.

Tip #3: Be generous with your fabric pieces

farmers wife 95 sylvia tutorialEspecially when first getting started with foundation paper piecing, one of the biggest tips I can offer is to be generous with your fabric pieces. It’s better to have to trim a bit more off than to be short and have to rip stitches! For my bright blue squares on Sylvia, I cut the fabric into 1 1/2″ squares, which as you can see includes ample overhang.

Tip #4: Use rotary cutter and ruler for rectangular shapes

farmers wife 95 sylvia tutorialThis tip goes for bag-making as well: just because there is a template created for a perfectly rectangular piece, it doesn’t mean you can’t use your rotary cutter and ruler! The outer pieces of Sylvia can be easily cut using a rotary cutter and ruler, which will save time with paper removal at the end. Since these pieces are not easily measured (let’s avoid using sixteenths of an inch if we can help it!) simply cut out the foundation paper piece templates and use them as a guide when rotary cutting. Use the foundation paper piecing method to piece the center portion, then add the D, E, H, and I rectangles using traditional piecing methods. Easy peasy!

farmers wife 95 sylvia tutorialAnd there you have it. Sylvia, in all her glory.

Thank you so much for joining me today and I hope you found this tutorial helpful!

Important Links

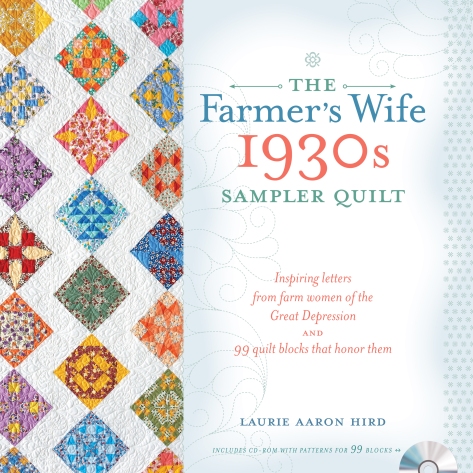
http://www.interweavestore.com/the-farmers-wife-1930s-sampler-quiltThe Farmer’s Wife 1930s Sampler Quilt: Inspiring Letters from Farm Women of the Great Depression and 99 Quilt Blocks That Honor Them by Laurie Aaron Hird for Fons & Porter/F+W; RRP $28.99 – Click here to purchase.


Friday Giveaway & Back to School Pattern Sale

Like it or not, the final days of summer are here. The kids are heading back to school, the nights are getting cooler, and leaves are already beginning to change. Back to school time means that some of us may have more time for sewing, so I thought I’d kick off this Labor Day weekend with a double giveaway sponsored by the Fat Quarter Shop AND a pattern sale of all of my quilt patterns, both foundation paper pieced and traditionally pieced.

night quilter back to school sale patterns All of my quilt patterns are 20% off for one week only! Now is your chance to restock your pattern library so you’re sure not to run out of projects once the kids are in school.  Sale prices are already reflected in my Craftsy shop, and if you are in the EU, please use code BACK2SCHOOL to get 20% off any and all pattern purchases in my Payhip shop.

Giveaway #1 Nightfall fabric by maureen cracknell for art gallery fabrics fat quarter shopOn top of that, Fat Quarter Shop is generously sponsoring a double giveaway! Two lucky readers will win a bundle of Nightfall fabrics from Maureen Cracknell for Art Gallery Fabrics. Both the Moonrise and Moonset fat quarter bundles of 10 fat quarters each are up for grabs this week.

Giveaway #2 Nightfall fabric by maureen cracknell for art gallery fabrics fat quarter shopTo enter the giveaway today, tell me which bundle would be your first choice: Moonrise (Giveaway #2) or Moonset (Giveaway #1). I will select two winners, and will be sure to give the first choice to the first winner! Leave a comment and make sure I’m able to get ahold of you if you win.  For an additional entry, leave another comment telling me how you follow Night Quilter (email list, instagram, facebook, twitter, blog follower, etc.) Tell me how you follow Fat Quarter Shop (facebook,twitter, Instagramtheir blog Jolly Jabber, etc.) in a third comment for a third entry.

This giveaway is open to US and international participants.  The giveaway will be open until Friday September 9th at 8pm EST when I’ll select the winner randomly with random.org. Good luck, happy shopping, and enjoy your Labor Day weekend for those of you stateside! This giveaway is now closed! Congratulations Julianne and Rose!

Monday Giveaway & Off to Slow Stitching

Ahhh Mondays! Mondays often have that heavy feel, transitioning from a relaxing or adventuresome weekend of family fun back into the daily grind of work and household duties. Not this week! I’m home on a quick packing layover, gathering my supplies for the Slow Stitching Retreat at Medomak Retreat Center in Washington, Maine!! I dropped in on this retreat for one blissful day last year, but this year I’m attending the entire week! I’m so excited to relax with Sam from A Gathering of Stitches (the mastermind behind these retreats), Alison Glass, Chawne Kimber, my friend Karin Jordan from Leigh Laurel Studios who is also attending the retreat, and all of the other slow stitchers!

slow stitching retreat a gathering of stitches maine alison glass chawne kimberMy parents have graciously come up from New Jersey and rented a house on a lake only 15 minutes away from the retreat center, so during the day they will be playing with all three kids, and every evening someone will drive Finn to me where he will join me for sleep, to be (hopefully) joyfully picked up each morning. He’s still a nursing babe at 14 months, so I’m looking forward to the nightly mama reconnection time, too.

medomak retreat center maineI originally aimed to schedule some blog posts for while I was away, but life has been very full these days, so this week will be quiet. I will be stitching away in this big, beautiful building and its neighboring barn, and will join you upon my return. Keep your eye on Instagram, since I will post a few updates to help share the blissful relaxation of the week! I have a fun color inspiration post pretty much ready for the week I return, and will get back into the swing of sharing my creative process and projects with you next week. And of course, of course, I will share a reflection of my time slow stitching.

fresh adventures amy sinibaldi art gallery fabric fat quarter shopTo hold you over for the week, I do have a fun giveaway sponsored by the Fat Quarter Shop! One lucky reader will win this Fresh Adventures Playground Fat Quarter Bundle by Amy Sinibaldi for Art Gallery Fabrics, which includes 10 fat quarters.

To enter the giveaway today, tell me what type of adventures you like to go on. I’m a big fan of exploring new places, so my ideal day consists of traveling to a new ocean beach, walking along the coast line, hiking through the neighboring woods, and picnicking on the beach. I’d love to hear about what you do for an adventure! Leave a comment and make sure I’m able to get ahold of you if you win.  For an additional entry, click HERE and sign up for my Night Quilter email list (or let me know you’re signed up). Tell me how you follow Fat Quarter Shop (facebook,twitter, Instagramtheir blog Jolly Jabber, etc.) in a third comment for a third entry.

fresh adventures amy sinibaldi art gallery fabric fat quarter shopThis giveaway is open to US and international participants.  The giveaway will be open until Sunday August 14th at 8pm EST when I’ll select the winner randomly with random.org. Good luck, and enjoy your week! This giveaway is now closed! Congratulations One Creative Family!

*Please note that comment moderation is on, so if you do not see your comment right after posting, do not be alarmed! I will be disconnecting from social media for most of each day on the retreat, but will be checking in each evening to approve new comments. xoxo

Works in Progress: A Little of This, A Little of That

I have a lot of simultaneous projects going on right now, which is pretty typical of my sewing style. I like to have a selection of projects so that when a free moment arises, I have something to work on, but also have a choice as to what I work on each day. It helps my creativity feel refreshed and helps avoid inspiration slumps. When in doubt, I start a new project since I have no shortage of projects I *want* to create, and there’s nothing like curating a new fabric pull or cutting into a new project to renew my excitement for sewing.

It’s been a while since I’ve showed you my ongoing projects, so I thought today would be a good day! These are my most frequently worked upon projects; there are scads more on the semi-permanent back burner that I will pick up again when my plate clears *just* a bit. Today, the highlights!

IMG_5280First up is my ongoing epic Carolyn Friedlander Modern Hexies project. This is my on-the-go English Paper Piecing (EPP) project that lives in my purse. I’m making progress at a bit slower than snail paced this summer, since somehow those free moments that allow for hand stitching while the kids are occupied are few and far between. And oddly, all three kids have not simultaneously fallen asleep in the car on the way to a store even ONCE! What was somewhat regular with two kids is likened to a golden unicorn with three. But still, one stitch at a time, one hexagon at a time, this project progresses.

andover foundation paper pieced project alison glass handcrafted patchworkAnother project I’m plugging away on is a fun one for Andover Fabrics. They were awesome enough to send some Alison Glass Handcrafted Patchwork to me, as well as some yardage of Constellation by Lizzy House from her Whisper Palette collection. I picked up some Andover textured solid from my LQS Fiddlehead Artisan Supply to round it out. I’m working on a new geometric foundation paper pieced pattern, with meticulously cut sections of the gorgeous Handcrafted Patchwork fabrics. There will be a tutorial going up on Andover’s blog very soon, as well as the pattern release, so keep your eye out!

quilter's planner photography outtake karen lewis quilt acadia maineI’ve also been out on three different quilt photography adventures with my amazingly gifted quilt holding assistant, aka my husband. We have been having a blast photographing the quilts for this year’s Quilter’s Planner in a sampling of the gorgeous natural locations in Maine. The planner is now available for preorder! Reserve yours HERE… there are a limited number of early bird specials and some really fun extra bits this year! I’ve shared one fun outtake above, but more will be revealed in the coming weeks. Hint: Shown here is one of the 14 patterns that will be included in the planner this year, this one by the ever talented Karen Lewis! It’s so gorgeous; I can’t wait to show you more! Be sure to preorder yours now; you can read all about it on its Indiegogo page here.

Alison Glass fabric pull for Terrazzo quilt by Lee HeinrichThere are many other fun projects waiting patiently on the decks, including a Terrazzo Quilt (pattern by Lee Heinrich of Freshly Pieced) made using all of Alison Glass’s Sun Prints 2016 provided by Fat Quarter Shop (the fabric pull is shown above!), a simple new pattern I’m making for a secret side project with some fellow designers, a baby quilt for one of my best friends from college who is having her second baby soon (see the quilt I made for her first baby here), a quilt pattern that will appear in a magazine early next year, and more!

Phew! What have you been working on?

I’m linking up with Design Wall Monday at Patchwork Times & Main Crush Monday at Cooking up Quilts since I love to see what everyone else is working on.

Friday Giveaway: Raindrop Bundle by Rashida Coleman-Hale

There’s nothing like beginning a month with a holiday to help it feel like it’s flying by like a firecracker. Pair that with a week long trip down to celebrate with family, and July has truly snuck up on me!

As I get back into the swing of things on the homestead, unpack, and hopefully dive productively into a few big sewing projects, I thought I’d host a giveaway to help get the second weekend of July (how did that happen!?) off to a fun start.

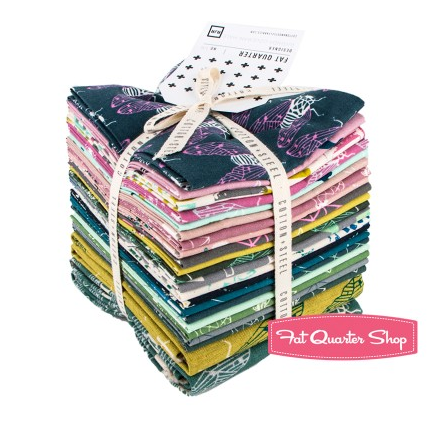
raindrop fat quarter bundle giveaway cotton + steelThanks to the Fat Quarter Shop, one of my lucky readers can enter to win this newly released Raindrop fat quarter bundle by Rashida Coleman-Hale for Cotton + Steel Fabrics. The bundle includes 20 fat quarters and two (2) 24″ x 44″ canvas prints, and seems most fitting to kick off this rainy weekend here in Maine. There are so many great prints in this collection–from the geometric play stash builders to the fabulous cicadas, all inspired by the rainy season in Japan. True to my naturalist heart, I love cicadas. I used to love to collect their exoskeletons from trees when I was a kid, and hook them all over my clothes to surprise the less-bug-loving kids on the block. Ahh, memories!

raindrop fat quarter bundle giveaway cotton + steelTo enter the giveaway today, tell me what you like to do on rainy days. Leave a comment and make sure I’m able to get ahold of you if you win.  For an additional entry, click HERE and sign up for my new Night Quilter email list. You will get occasional emails with highlights, pattern announcements, and special offers. Leave a second comment to let me know you’re signed up!  Tell me how you follow Fat Quarter Shop (facebook,twitter, Instagramtheir blog Jolly Jabber, etc.) in a third comment for a third entry.

This giveaway is open to US and international participants.  The giveaway will be open until Thursday July 14th at 8pm EST when I’ll select the winner randomly with random.org. Good luck, and enjoy your rainy (or sunny if you’re lucky) weekend!  This giveaway is now closed! Congratulations, Kendra!

Pin Cushion Sew Along with Fat Quarter Shop

Today I’m taking part in yet another fun, quick sew along hosted by Fat Quarter Shop. Kimberly from FQS teamed up with Sherri McConnell once again to bring you a video tutorial for a really simple and cute pin cushion, which is being released today. I definitely will be making more of these!

fat quarter shop pin cushion sew alongI really love clear video tutorials since I am very much a visual learner. Seeing each step helps make the process smooth and easy to complete without hang up or confusion. That, to me, is a big win!

fat quarter shop pin cushion sew alongI decided to make my pin cushion with a range of warm Alison Glass Sun Prints 2015 and 2016, and once it was finished, it begged to be photographed out in the garden with the peonies. Such vibrant colors need to be in colorful company.

fat quarter shop pin cushion sew alongI used a Tula Pink ribbon I won in a giveaway from Renaissance Ribbons a year or so ago as the ribbon detail, top stitched with Aurifil 40wt 2230-Medium Peony (so fitting!). I topped the pin cushion with Robert Kaufman Quilter’s Linen, which is a fabulous all-purpose blender fabric that happened to coordinate wonderfully. Aurifil 50wt 5022-Mustard was the perfect thread for hand stitching the opening in the Quilter’s Linen closed, too. I just love when perfectly coordinating fabrics and thread can be found in my stash.

fat quarter shop pin cushion sew alongI backed the pin cushion in Ex Libris Bookplate in Charcoal by Alison Glass (Andover Fabrics), and really would be tempted to use the pin cushion upside down every so often, it’s so pretty. This pin cushion is not for me, though, so the recipient can do with it as she pleases!

fat quarter shop pin cushion sew alongThis is the first pin cushion I’ve stuffed entirely with crushed walnut shell, at Sherri’s suggestion, and I really like the sturdiness and ease with which pins go into it. I bought the crushed walnut shell from a quasi-local, fabulous quilt shop, Clementine in Rockland, Maine months ago but had not yet had a chance to use it. Leah at Clementine suggested the crushed walnut shells since the oils from the nut shells help keep the pins and needles sharp and rust free. They also provide a nice, sturdy base for your pins and needles.

fat quarter shop pin cushion sew alongCheck out the video below and make your own pin cushion if you want! There’s no such thing as too many pin cushions, right?

Be sure to visit the other bloggers in the hop to help spark your inspiration and see what they did with this pin cushion:

Kitty from Night Quilter <–You’re here!

Amanda from Jedi Craft Girl

Nicole from Modern Handcraft

Jessica from Quilty Habit

Jessee from Art School Dropout

Tina from Emily Ann’s Kloset

Michele from Island Life Quilts

Angie from Gnome Angel

Sinta from Pink Pin Cushion

Melissa from Happy Quilting

Friday Finishes & Tula Giveaway

Ahh, Friday! We love Fridays in this house, since not only is it the last day before the weekend, but it also means family movie night. I make homemade pizzas, we set out picnic quilts in the living room, and we have a pizza picnic while watching a movie. After pizza, there’s a short intermission for popcorn making and we enjoy the rest of the movie with huge bowls of popcorn and buttery fingers. My husband has a bit of a thing for popcorn, so he makes enough to feed a small army, which I suppose we are becoming as the kids get older! While this week had its share of frustration, I also finally finished and shared two projects. A week with one finish is great; a week with two finishes is worth celebrating!!

I love linking up with Crazy Mom Quilts’ Finish it Up Friday to share in the celebration of finished projects in the quilting community, so I figured I’d write a summary post this week so that I could link up with just one post instead of two. I also have a great giveaway sponsored by Fat Quarter Shop to share to help kick off the weekend!

So here we go–my finishes for the week!

fqs simple zipper pouch teacher giftI finished three cute Amy Butler-inspired rainbow zipper bags as end of the year teacher gifts for my son’s preschool teachers and communication facilitator. There is a great video tutorial posted by the Fat Quarter Shop so that you can make your own. You can see and read more about my zipper bags HERE.

oakshott lipari vesuvius quilt sizzixI also finished a volcano-inspired quilt with Oakshott’s new Lipari fabric line. This was a much longer term project, taking about 18 hours of work to make, start from finish. I share a tutorial so that you can make your very own Vesuvius quilt if you want! Check it out HERE.

Giveaway!

Tula Throwback bundle FQS giveawayAnd now, for the giveaway! Thanks to the Fat Quarter Shop, one of my lucky readers can enter to win a Tula Pink Throwback fat quarter bundle of 20 fat quarters! The bundle includes some of the most popular prints from Tula’s collections over the past four (4) years, and would be a great stash builder for any modern fabric lover, whether you’re a Tula troops die hard who would pay a premium for these prints on ebay or not. There are also many fabulous opportunities for meticulous cutting with these beauties!

To enter the giveaway today, tell me–are you a fabric designer fanatic, willing to pay top dollar for rare out of print fabrics? or are you happy using whatever gorgeous fabric is available now, regardless of designer? I’m curious, since while I consider myself to be in the latter category, I could definitely see myself paying more than market value for *some* rare and beloved out of print fabrics. Leave a comment and make sure I’m able to get ahold of you if you win.  If you’re a follower of Night Quilter, leave a second comment telling me how you follow for a second entry. Tell me how you follow Fat Quarter Shop (facebook,twitter, Instagramtheir blog Jolly Jabber, etc.) for a third entry.

This giveaway is open to US and international participants.  The giveaway will be open until Thursday June 9th at 8pm EST when I’ll select the winner randomly with random.org. Good luck! This giveaway is now closed. Congratulations, Tessa! 

Thanks again to the Fat Quarter Shop! Blog sponsors help me to keep this blog going by helping cover the costs of hosting, photography equipment, supplies, and of course time. Sweet, precious time. Many many thanks to all who support me!

Simple Zipper Bag Sew Along with Fat Quarter Shop

The school year is winding down, which means teachers’ gifts are at the forefront of my mind (along with excitement–and trepidation!–at the prospect of summer adventure day trips with all three kids). When Fat Quarter Shop invited me to join this Simper Zipper Bag Sew Along, I thought it would be a perfect teacher’s gift project. I stitched up three of the large zipper bags, added some chocolate and a personalized thank you note from my 3 year old son, and viola! Perfect heartfelt teachers’ gifts!

fqs simple zipper pouch teacher giftThese zipper bags are SO easy to make, and Fat Quarter Shop has a very clear instructional video tutorial that you can find here:

The construction of the bags is brilliant, since the lining and the outer panels are quilted together and then simply sewn together and bound–so easy! I definitely will be going back to this pattern for future gifts, and I’m thinking of making a few more to stash coloring supplies for my kids in my purse for when extra entertainment is needed.

simple zipper pouch fat quarter shop teacher giftsThis is admittedly the first time I’ve made handmade teachers’ gifts, but my son’s preschool teachers have done such a fabulous job supporting and guiding him this year, that I felt I really wanted to express my gratitude. When I asked Max if he had any idea what colors might be his teachers’ favorites, he said, “Alllllll the colors!” That’s my boy. I figured I probably couldn’t go wrong with a rainbow-esque bag, especially for preschool teachers.

fqs simple zipper pouch teacher giftI decided on a gorgeous Amy Butler fabric from my stash for the backings and then used it to pull a coordinating rainbow of some of my favorite fabrics. You can see Alison Glass, Carolyn Friedlander, Cotton + Steel–they’re all there!

fqs simple zipper pouch teacher giftI chose to use strips of fabric instead of mini charm squares, and arranged the fabrics in a way that worked with the three zippers I had on hand, making each bag unique while still having the same general aesthetic. I used the edge of my walking foot to space horizontal straight line quilting on the front, using my go-to thread, 50wt Aurifil 2600-Dove. It blended perfectly with the “I love you” appliquéd hand while providing some subtle texture and interest to the rainbow fabrics.

fqs simple zipper pouch teacher giftI lined my bag with an appropriate Cotton + Steel print, Study Hall in Black and White from their Black and White Collection.

fqs simple zipper bag teacher giftI love the neat detailing that results with the construction of this bag. Sewing in the zipper is made SO easy, and the top stitching frames it nicely.

fqs simple zipper pouch teacher gift

More about that “I love you”; I think the American Sign Language (ASL) sign for “I love you” is known pretty universally, but in case you’re not familiar with it, the appliqué on each pouch is a tracing of my son’s hand making the “I love you” sign. My son is hard of hearing and wears hearing aids (when we can convince him to keep them in), and so he has a communication facilitator in addition to his two amazing teachers. His communication facilitator was fantastic, signing to him all day to increase exposure and familiarity to sign, since we are all trying to learn ASL as a family, and ensuring he heard directions during the day. The entire preschool class learned some sign language throughout the year, and the three teachers worked so well together to help ALL of the children in class have the best experience possible. When Max gave the gifts to his teachers, the “I love you” appliqué of Max’s hand was met with “awww” and a few misty eyes. I think the zipper bags were a win!

How would you use one of these Simple Zipper Bags? Be sure to visit Fat Quarter Shop and the other bloggers’ posts to see their creative takes on the pattern:

Erin from Why Not Sew?
Kitty from Night Quilter <—That’s me!
Leanne from She Can Quilt
Vanessa from Lella Boutique
Amanda from Jedi Craft Girl
Sherri from A Quilting Life
Cristy from Love You Sew
Leslie from Seasoned Homemaker
Tiffany from Tiny Seamstress


Have fun making your zipper bags!

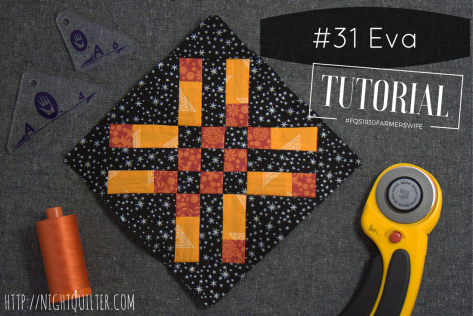
Farmer’s Wife Sew Along – Block 31 Eva Tutorial

Today is my day to share the Block 31 Eva tutorial for the 1930 Farmer’s Wife Sew Along, hosted by Angie at Gnome Angel and sponsored by Fat Quarter Shop and Marti Michell.

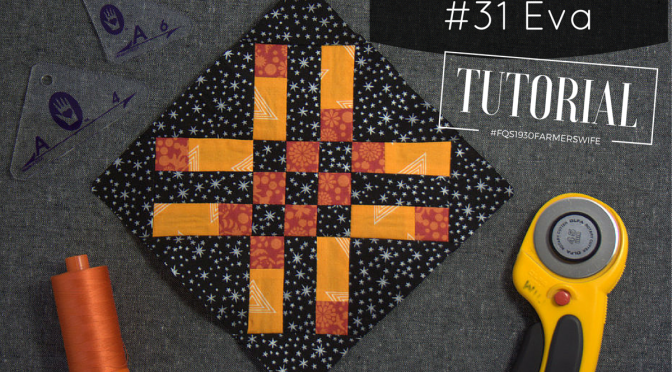
Farmers Wife 31 Eva TutorialAs with Autumn, a first look at block 31 Eva may cause you to balk: 37 pieces in one 6″ block, and many of them are tiny squares!? But with a creative look at the block construction,  Eva can come together smoothly and without too many teeny pieces. This sew along continues to show me that there is nearly always a faster and easier way to approach block construction than purely cutting out all of the pieces and sewing them together. With a few shortcuts and piecing tricks, Eva comes together quite smoothly. In this tutorial, I’ll show you how to use strip piecing to save a bit of time and create larger, more manageable pieces, and fill in the gaps using Marti Michell templates (Set A) or rotary cutting to help make putting Eva together smooth and enjoyable.

Note: Exact measurements for the pieces needed to construct this block will not be provided in this tutorial in order to protect copy write. It is a prerequisite of making this block that you have a copy of the book, The Farmer’s Wife 1930s Sampler Quilt: Inspiring Letters from Farm Women of the Great Depression and 99 Quilt Blocks That Honor Them. All measurements can be found in this book and its associated media. That said, even if you aren’t sewing along with us, I think you will find some really helpful tips in this tutorial that will help you look at all block construction more creatively!

Reflection on the Letter – Two Little Sparrows

The letters in this book continue to move me in their honesty and relevance in my life today. It’s amazing how similar the worries of today are to those of the farmer’s wives back in the 1930s. Losing sleep over financial stability seems to me to be part of the human condition. Especially at our current stage of life, growing a young family, recently having bought our first home, and working hard as a one-income family of five so that I may be a full time mom raising our children, my husband and I unfortunately do not escape the worries of making ends meet. Mrs. P. G.’s dream of two sparrows drawing nearer together when faced with the winds of adversity really resonated with me, and gives me renewed hope that “every little thing, is going to be alright” (thanks, Bob Marley, and Mrs. P. G.).

Tutorial

For this block, I specifically chose fabrics with small or nondirectional prints, so that I could quickly strip piece the components without worrying about fussy cutting or directionality. Note that I am arranging my final layout on-point, but for the purposes of being consistent with the diagram in the book, this tutorial pieces the block squared. If you plan to set your blocks on-point, be sure to account for that with any directional fabric placement.

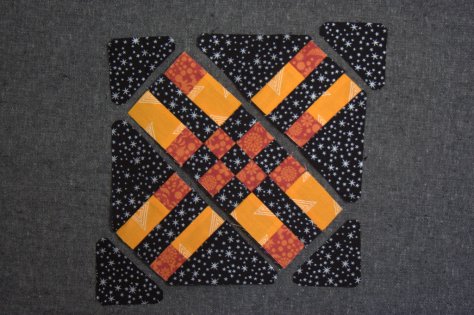
Farmers Wife 31 Eva TutorialWhen broken into more manageable pieces, this block is composed of the center 9-patch, two pairs of mirror image blocks, and 8 surrounding triangles, cut with templates and/or a rotary cutter. I first made the blocks using strip piecing to speed up the creation of the components, and then sewed them all together. Let’s break it down.

Making the Center 9-Patch

In the book, the cream and yellow fabrics were used to make the #31E 9-patch. Choose your coordinating fabrics (I used black and orange and will refer to the fabrics as black and orange throughout).

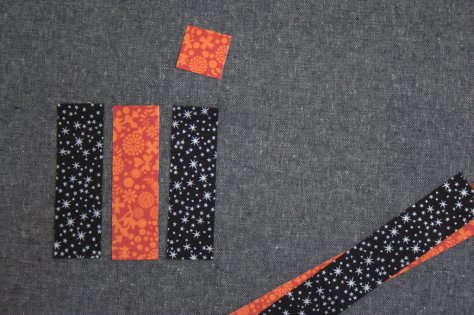
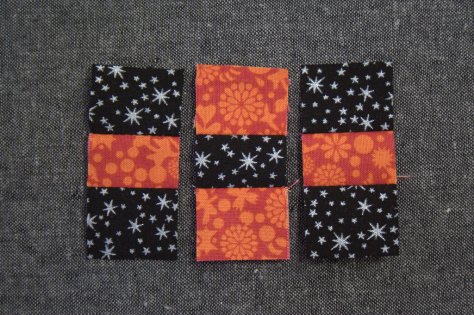
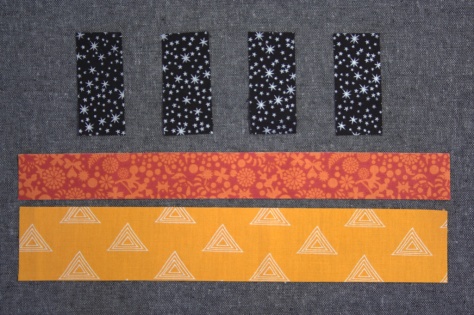
farmers wife 31 eva tutorialCut one (1) 1 3/16″ x 19″ long strip of your cream equivalent fabric (I used black). Subcut two (2) 4″ long pieces. Set the remainder of the strip aside.

Cut one (1) 1 3/16″ x 16 1/2″ long strip of your yellow equivalent fabric (I used orange). Subcut one (1) 4″ long piece and one (1) 1 3/16″ square. Set the remainder of the strip aside.


*Measurement tip: 3/16″ is halfway between 1/8″ and 1/4″. Since the 1 3/16″ measure was used so often in cutting for this block, I marked it with painter’s tape on my ruler to help avoid confusion. 


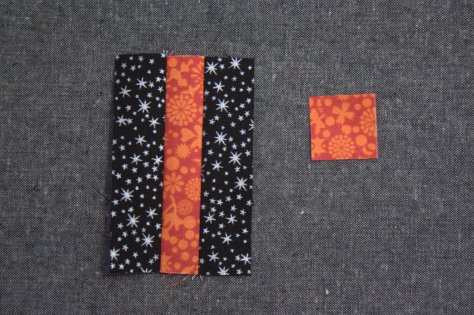
farmers wife 31 eva tutorialSew black strips to orange center as shown. I prefer to press my seams open for ease of matching seams and reduction of bulk. Feel free to press open or toward the darker fabric.

farmers wife 31 eva tutorial
Ruler marked with 1 3/16″ measure.

Cut into three (3) 1 3/16″ wide strips as shown.

farmers wife 31 eva tutorialNext, carefully unsew one of the black squares. Sew the orange 1 3/16″ square to the other side to make the center strip for the 9-patch.

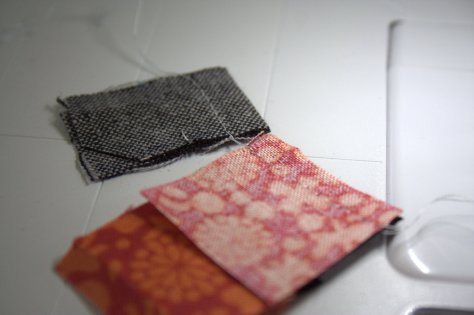
farmers wife 31 eva tutorialThis is a great time to use a leaders and enders project to help smoothly sew these tiny pieces without the fabric getting bunched in the machine. If you don’t have a leaders and enders project in progress, sew through a scrap piece of fabric before sewing the tiny squares together. This will help your stitches stay smooth despite the tiny fabric size!

farmers wife 31 eva tutorialYou now will have your three strips for your 9-patch.

FW Eva front back 9 patchCarefully sew them together, pinning just after each seam join. Press seams open. Above shows my block, front and back. Note how nicely the pressed-open seams sit! Set your 9-patch aside.

Making the Mirror Image Blocks

In the book, the cream, yellow, and blue fabrics were used to make the remaining blocks, each comprised of a #31C and two #31D-#31E units. (I used black, orange, and yellow-orange fabrics and will refer to them as such throughout).

farmers wife 31 eva tutorialCut one (1) 1 7/8″ x 11″ piece from your blue-equivalent fabric (I used yellow-orange). Retrieve the fabric strips set aside during the 9-patch construction, and subcut one (1) 1 3/16″ x 11″ strip from the orange. From the black strip, subcut four (4) 1 3/16″x 2 5/16″ pieces. If you have the Marti Michell template set A, the A-3 template is exactly 2 5/16″ and can be used to easily cut the pieces.

farmers wife 31 eva tutorialSew the orange to the light orange as shown. Press seams open. Subcut the strip set into eight (8) 1 3/16″ segments. Using a ruler marked with painter’s tape as shown previously in this tutorial will help this step go quickly.

farmers wife 31 eva tutorial**MIRROR IMAGE ALERT** At first glance the blocks above may look the same, but notice that they are actually mirror images. The two on top are mirror images of the two on the bottom. Carefully arrange your pieces as shown above, paying very close attention to the direction of the orange bits: orange bit facing down on the left and up on the right for the top two; orange bit facing up on the left and down on the right for the bottom two.

farmers wife 31 eva tutorialVery carefully sew the blocks together, pausing midway to double check the alignment before sewing the second strip onto each center. Press seams open. Set these four blocks aside.

Cutting the Triangles

In the book, the cream fabric was used to make all of the triangles that comprise the background of this block. I used black fabric.

farmers wife 31 eva tutorialCut a 2″ x 18″ strip of black fabric. Using Marti Michell templates A-4 and A-6 or the templates provided in the media associated with the book, cut four (4) #31A and four (4) #31B pieces. The photo above demonstrates how to efficiently cut the pieces from the 2″ strip. One more #31A (the large triangle) and one more #31B (the smaller right triangle) remain to be cut in the photo above.

Assembling the Block

Farmers Wife 31 Eva TutorialNow you have all of the components necessary for piecing Eva! Grab all of your blocks and triangles and let’s lay them out. Here is where the mirror image blocks can get easily mixed up. Take your time, cross referencing with the picture in the book or the photo above to make sure that all of your pieces are heading in the proper direction.

Farmers Wife 31 Eva Alignment Diagram*Note: The orange squares all converge in a horizontal strip in the center of the block. If an oval is drawn horizontally across the center, it should contain all orange squares. 

Once you are sure you have your layout correct, I suggest that you take a photo with your phone for reference. Refer to it before each step, since it’s much easier to take a second look than to rip stitches to resew (ask me how I know! I began assembling the block before realizing that two of my orange bits were facing the wrong direction. Hello, bff seam ripper!)

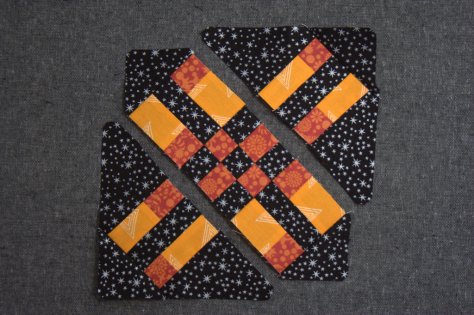
Farmers Wife 31 Eva tutorial assemblyWe will assemble this block in diagonal strips. Begin by sewing the large #31A triangles to either sides of the top right and bottom left mirror image blocks, and the top left and bottom right mirror image blocks to the center 9-patch. Press seams open.

Farmers Wife 31 Eva tutorial assemblyNext, sew the #31B triangles onto each unit.

Farmers Wife 31 Eva tutorial assembly pinsFinally, sew the top right and bottom left units to the center strip. I find it helpful to pin just after each seam match for perfectly matched seams. Between the pressed-open seams and the pin *just* after each seam, my block comes together just how I like it!

Farmers Wife 31 Eva tutorialViola! There you have Eva, easy peasy! I love the look of this block set squared, but since my quilt blocks will be set on point, I decided to have her orange strip head uphill, since optimism makes the world a brighter place, and the letter encourages sticking together in the face of the winds of adversity. Chin up, here we go!

Thank you so much for joining me today and I hope you found this tutorial helpful!

Important Links

http://www.interweavestore.com/the-farmers-wife-1930s-sampler-quiltThe Farmer’s Wife 1930s Sampler Quilt: Inspiring Letters from Farm Women of the Great Depression and 99 Quilt Blocks That Honor Them by Laurie Aaron Hird for Fons & Porter/F+W; RRP $28.99 – Click here to purchase.


Color Realizations {& Giveaway!}

Many makers have a signature style, a color palette they visit again and again, or perhaps an aesthetic that just makes their heart sing and their makes shine. We all know how much I love a rainbow, but recently I’ve felt the need to dive into other color combinations and experiment elsewhere. I’ve tried color combinations that have felt way out of my comfort zone, played with more monochromatic palettes, and have experimented with predetermined colors (paired with improv, no less!). While I do love the makes I’ve created through these experiments, I’ve realized that I truly love a rainbow gradient, but more specifically, I’m drawn strongly to tertiary colors.

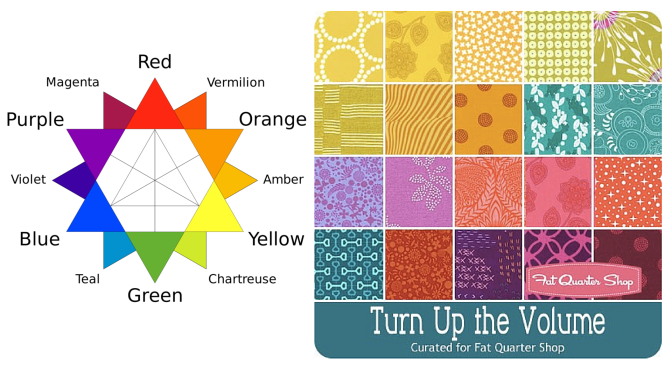
color star tertiary wikipediaAs a refresher, the tertiary colors are the ones that fall between the primary and secondary colors, namely: Vermillion (red-orange), Amber (orange-yellow), Chartreuse (yellow-green, or lime), Teal (green-blue), Violet (blue-purple), and Magenta (purple-red). Thank you, Wikipedia for the great graphic! Even when a project isn’t a full rainbow spectrum, if it consists of tertiary colors it still makes my heart sing. Primaries? Not so much. Secondaries? Meh. Tertiaries? Oh, yesssss! All the colors? Even better!

I’ve decided that once a few last non-rainbow projects are completed, I am going to let go of my hesitancy to creating rainbow-everything. I will embrace my rainbow-loving self and create a rainbow-filled world! I have some really fun projects on the horizon and I can’t wait to share them with you!  Do you have a specific color combination that makes your heart sing and your eyes turn into hearts? Tell me about it in the comments and enter to win a great bundle of some of MY favorites!

Giveaway Time!

turn up the volume bundle for fat quarter shopToday’s giveaway is generously sponsored by the Fat Quarter Shop. When it was time to select the giveaway bundle for the month, this lovely Turn Up the Volume bundle curated by Rebecca Mae Designs caught my eye. Can you tell why? Tertiary colors!! It’s jam packed with vibrant, stash building tertiary colors. Now you have a chance to build your tertiary color stash in a big way (20 fat quarters-big… that’s 5 yards of fabric!).

To enter the giveaway today, let me know what colors you find yourself using again and again. Leave a comment and make sure I’m able to get ahold of you if you win.  If you’re a follower of Night Quilter, leave a second comment telling me how you follow for a second entry. Tell me how you follow Fat Quarter Shop (facebook, twitter, Instagramtheir blog Jolly Jabber, etc.) for a third entry.

This giveaway is open to US and international participants.  The giveaway will be open until Tuesday 5/10 at 8pm EST when I’ll select the winner randomly with random.org. Good luck! This giveaway is now closed. Congratulations to Delaine!!

Thanks again to the Fat Quarter Shop! Blog sponsors help me to keep this blog going by helping cover the costs of hosting, photography equipment, supplies, and of course time. Sweet, precious time. Many many thanks to all who support me!