
Today I’m excited to share my pattern for Quilt Theory’s collection for fall 2017, Into the Forest. This pattern speaks to my heart, and very much fits the vibe for my summer (it fits right in with my Summer Adventure quilt trees). For our third Quilt Theory collection, we challenged ourselves to create a color palette of 12 colors from which to pull, and all designed our quilts around the same color palette, using fabrics from a variety of manufacturers and designers. In this post you’ll not only get to see my newest pattern, Into the Forest, as well the bonus Glade Pillow pattern than accompanies my Into the Forest Quilt, but you will also have a chance to win a fat quarter bundle of Cloud 9 organic cirrus solids, so read on!
 First, to introduce you to my contribution to the third Quilt Theory pattern collection! Inspired by my frequent family hikes, Into the Forest is a reminder of where you should always head–into the forest!

And into the forest I go, to lose my mind and find my soul. – Unknown
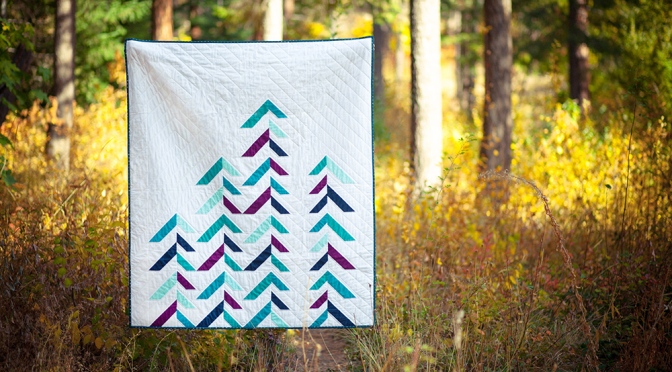
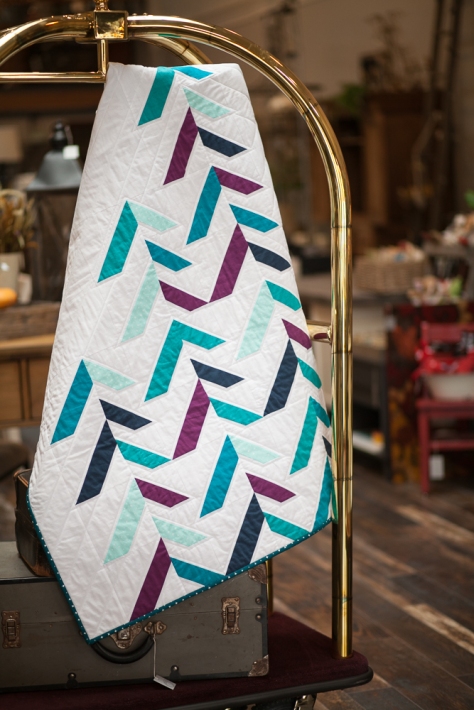
 Take a leisurely stroll with me into the depths of nature. Into the Forest plays with two sizes of the same block to create a simple graphic tree design with a crisp and clean aesthetic, like a morning stroll through a cool forest. Inspired by the majestic evergreen trees ubiquitous in Maine, this quilt uses your 5 favorite fat quarters to make a nature inspired lap quilt finishing at 52″ x 60″. Use organic, repurposed, or naturally dyed fabrics to really become one with nature.
 It seemed only natural to choose Cloud 9 organic fabrics for my Into the Forest quilt, since Cloud 9 fabrics uses only 100% certified organic cotton in the manufacturing of their base cloths and eco-responsible low impact dyes for printing and dying. They work closely with mills that are committed to ethical and responsible conduct. This includes respecting the rights of all individuals, a devotion to sustained social compliance, and an accountability to the environment (from the Cloud 9 website). These practices are more important than ever, and Into the Forest seemed a perfect vehicle for this reminder.
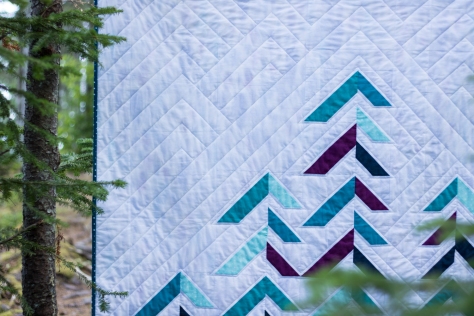
 My Into the Forest quilt was partially pieced and quilted by me, and partially pieced and quilted by Sue Bishop. I’m super grateful for Sue’s willingness to step in and make progress on the quilt while I was traveling in the middle of the summer, and her work is impeccable. The quilt was quilted using straight line quilting on both a long arm and my domestic Bernina, and was both pieced and quilted using Aurifil 50wt 2024-White.
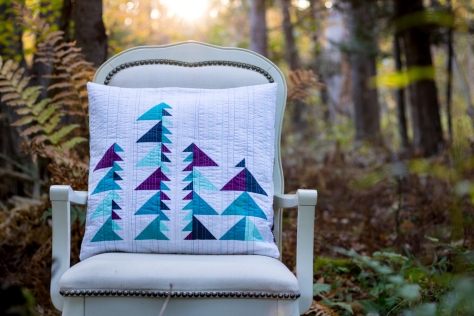 In the spirit of conservation, I also created a free bonus pillow pattern that uses up most of the scraps created through the construction of Into the Forest. The link to the bonus pillow pattern is included on the pdf purchase page here, but note that you need both the pillow pattern and the original quilt pattern to create the pillow. I had a lot of fun quilting the Glade Pillow and used an assortment of Aurifil threads: 40wt: 5005-Medium turquoise, 2785-Very dark navy and 50wt: 2579-Medium orchid, 2800-Mint ice, 2021-Natural white, and of course 2600-Dove. I’ll be sharing a closer look at the Glade Pillow soon, so stay tuned!
 Michelle, our fearless Quilt Theory leader and company photographer got some gorgeous shots of our quilts at Urban Cashmere, too. I love these shots!
 All of the Quilt Theory patterns are simple enough to be printed on 4″x6″ cards or a single page downloadable pdf. At only $4 each, they are perfect for gift giving or collecting, too!
How to buy or stock Quilt Theory Patterns
 You can buy either individual or a pattern collector’s package of PDF patterns through our Quilt Theory website right now!
![]() Collection 3 pattern cards will be coming soon to a local quilt shop near you, and the first two collections are still available, so go ahead and ask for all of them! If you are a quilt shop and want to carry our patterns, set up a wholesale account here, or order through Checker Distributors, EE Schenck Company, or Erie Quilt Art for Canadian shops.
Collection 3 pattern cards will be coming soon to a local quilt shop near you, and the first two collections are still available, so go ahead and ask for all of them! If you are a quilt shop and want to carry our patterns, set up a wholesale account here, or order through Checker Distributors, EE Schenck Company, or Erie Quilt Art for Canadian shops.
Want to buy the cards, but don’t own a quilt shop? Let your local quilt shop know you want them to carry Quilt Theory patterns (click for a handy note to send to your favorite local quilt shop!)
Now, for the Giveaway!
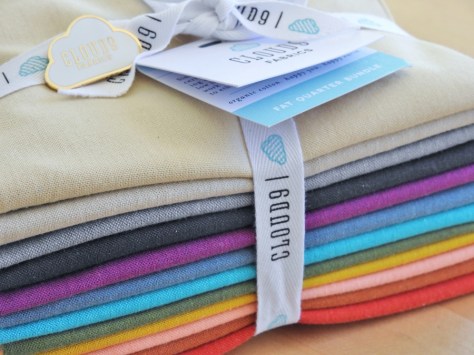
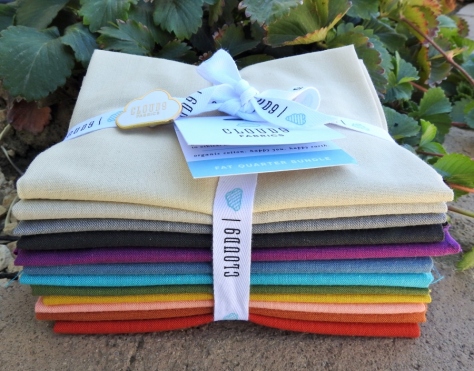 Cloud 9 fabrics was generous enough to offer a fat quarter (FQ) bundle of 12 of their luscious organic cirrus solids to one of my lucky readers!
 organic cotton | happy you | happy earth
Take a look at these luscious colors! Many thanks to Cloud 9 for sponsoring this giveaway, and to Yvonne from Quilting Jetgirl, who photographed these beauties for me!
To enter the giveaway today, tell me your favorite conservation tip–how do you aim to help the earth daily? (If you need ideas, check this list and begin today). Leave a comment and make sure I’m able to get ahold of you if you win. For an additional entry, leave another comment telling me how you follow Night Quilter (email list, instagram, facebook, twitter, blog follower, etc.) Follow Quilt Theory (facebook, twitter, Instagram, etc.) and tell me how in a third comment for a third entry.
This giveaway is open to US participants. The giveaway will be open until Monday October 23rd, at 8pm eastern time when I’ll select the winner randomly with random.org. Giveaway is open to participants 18 years or older. The giveaway is now closed! Congratulations to Abby!
Quilt Theory Release Blog Hop Schedule
Thanks so much for letting me share my quilt with you! Be sure to check out everyone on the Quilt Theory blog hop. Each day, one designer will share more about her quilt and reveal never before seen photos. And each designer will be giving away an amazing prize so be sure to follow along!
- Friday 10/13 – Quilt Theory
- Saturday 10/14 – Michelle @Michelle Bartholomew
- Monday 10/16 – Lorinda @Laurel Poppy and Pine
- Tuesday 10/17 – Kitty @Night Quilter <– You are Here!
- Wednesday 10/18 – Stephanie @Late Night Quilter
- Thursday 10/19 – Yvonne @Quilting Jetgirl
- Friday 10/20 – Cheryl @Meadow Mist Designs
- Saturday 10/21 – Quilt Theory
Just to wrap up I’ll share a few fun outtakes from my Into the Forest photo shoot, taken with my family at Birch Point State Park in Owl’s Head, Maine before mailing the quilt off to Michelle to work her photography magic.


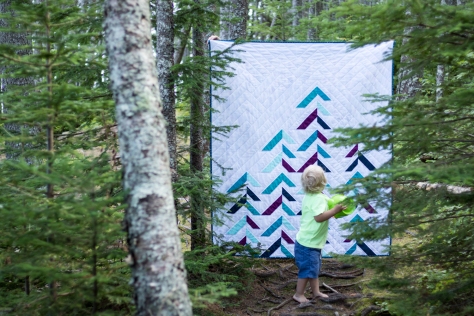
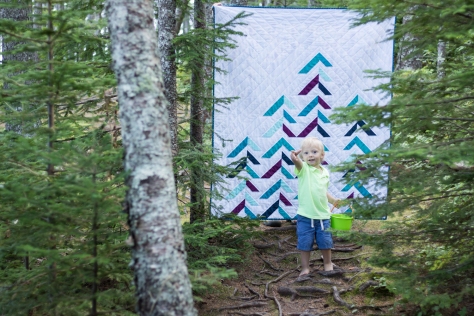 He finally realized that I was on the other side taking photos! No photo shoot is complete without a kid cameo, though, right?
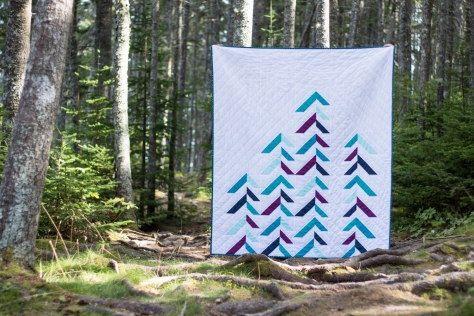
I also love seeing how different the forests on the west coast look compared to the forests on the east coast. Michelle took some absolutely magical photos of Into the Forest, too.
 Wandering into a west coast forest…
 Wandering into an east coast forest…
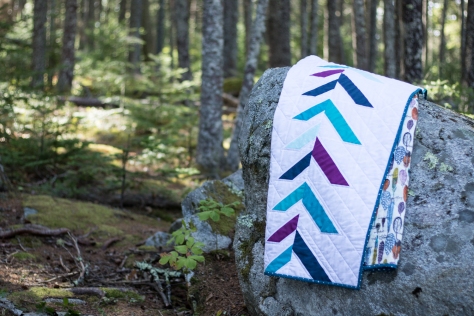
No matter where your forest may be, take Into the Forest with you!
I’ll be linking up with Let’s Bee Social, TGIFF, and Crazy Mom Quilts Finish it up Friday!

 I’m calling my block Steady On, which just seemed fitting for such a classic made-by-me block. Those of you who know me know that I cannot keep anything simple, and this is a perfect case in point. This block has double improv curves, twenty (20) tiny flying geese, an hourglass block, and quite a few points that should match *just* so, all in the 12 1/2″ unfinished square block. But fear not, this tutorial has detailed photos and instructions on how to make each component of the block, and breaking it down into manageable chunks makes this block come together quite smoothly (Spoiler: we can make some of the flying geese 4 at a time!). There’s something about the determined light colored geese headed bravely into the dark and improvy unknown that urges me to encourage them… Steady on, now! That same encouragement goes for you, since I would LOVE to see you tackle this block and come out victorious (tag

 For this step, you will need your 5 1/2″ squares of Iris, Amazon, and Sky, washable school glue and tip, a marking pen or pencil, scissors, and an iron and pressing surface. To make the double-curved quadrants for this block, follow my tutorial on easy curved piecing using a visual layering approach and glue basting
 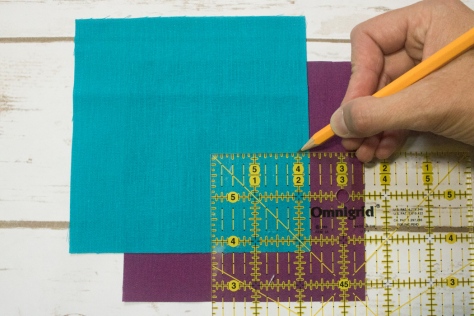 Since this method begins from the bottom up, start with Iris and Amazon. Mark the Amazon square 2 1/4″ up along both sides from the bottom right corner. Make sure your mark extends 1/4″ in from the edges before beginning the curve. This will be your sew line, not your cut line, so by measuring the 2 1/4″ we are ensuring our seams will match up, even though the flying geese are exact and the curves can be improv. (Note here that if you are using fabric with a right and wrong side, you want to be marking the wrong side of the fabric. With the Cloud9 Cirrus Solids that’s not important).
 Draw an improv curve from marked point to point, or trace a perfect curve using the edge of a small plate or glass. Make sure your curve begins and ends at your marked points 2 1/4″ up from the corner.
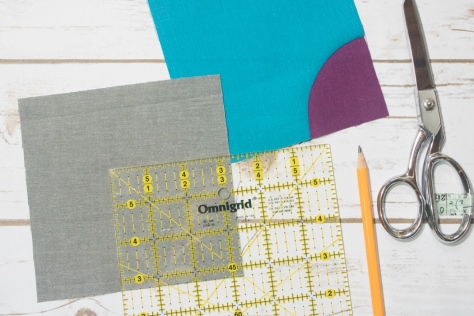 Next, grab your Shadow 5 1/2″ square and mark 3 1/4″ up both sides from the bottom right corner. Again, draw your curve as desired, connecting from marked point to marked point, and using that line as the sew line.
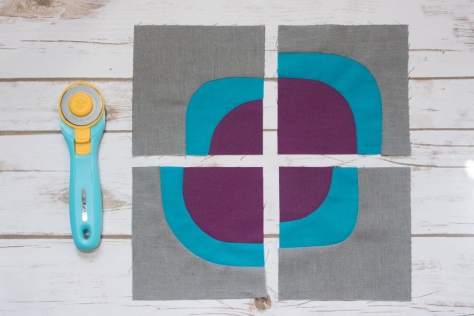 Make four quadrants, measuring 2 1/4″ up on the Amazon square and 3 1/4″ up on the Shadow square for two of them, and measuring 3 1/4″ up on the Amazon and 4 1/4″ up on the Shadow square for the other two. Admire your smooth curves, and set those blocks aside for later!
 Place two 1 7/8″ Iris squares in the top right and bottom left corners of a 3 1/4″ Sky square as shown. Using your fabric marking tool of choice, draw a diagonal line from the top right corner to the bottom left corner. I love my Hera marker since it doesn’t actually mark the fabric, but makes a clear guide line.
 Sew 1/4″ from either side of the drawn line. Press with a hot iron to set the seam (notice that I didn’t do this step? tsk tsk).
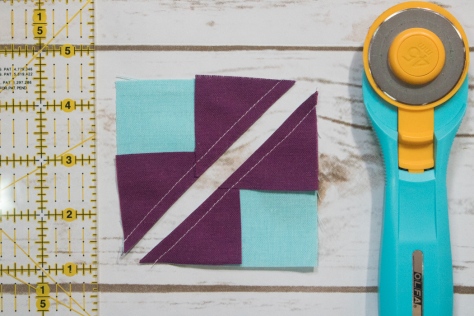 Cut along the drawn line.
 Press the small Iris triangles outward, with seams pressed toward the dark fabric. Then place another 1 7/8″ Iris square in the corner of each unit, and mark a diagonal line as shown above.
 Again, carefully sew 1/4″ from either side of the drawn line. Cut along drawn line.
 Press open, with seams toward darker fabric.
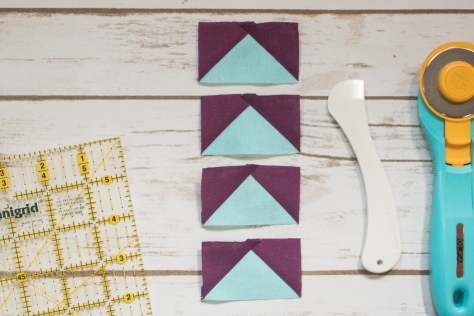 Trim to 1 1/2″ x 2 1/2″ and set aside.
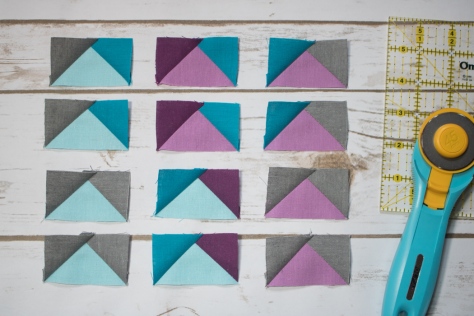 Grab your 1 1/2″ squares and 1 1/2″ x 2 1/2″ rectangles and lay them out to help plan which corners should be positioned on each rectangle. Use the finished flying geese above to help plan before you start sewing.
 To make a flying geese block (or would it be flying goose?), position a 1 1/2″ square right sides facing the right top corner of a 1 1/2″ x 2 1/2″ rectangle. Draw a diagonal line as shown above.
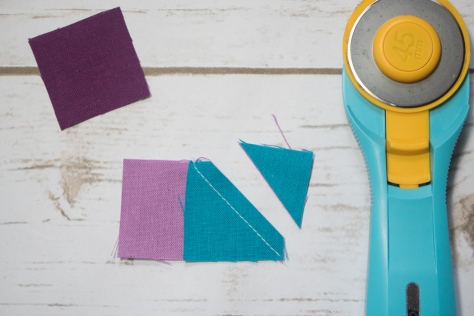 Sew along the line and then trim a 1/4″ seam allowance.
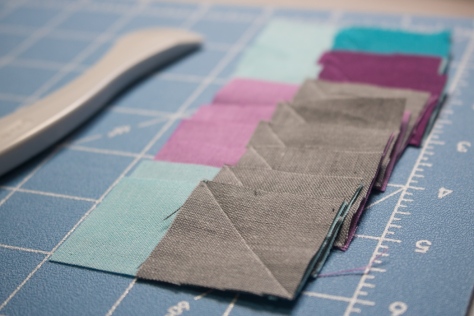 I like to get mine all paired and drawn so that I can chain piece each side.
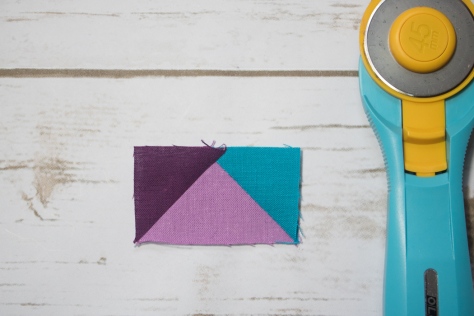 Repeat with the other 1 1/2″ square on the top left side of the block. Press seams open or up toward the corner.
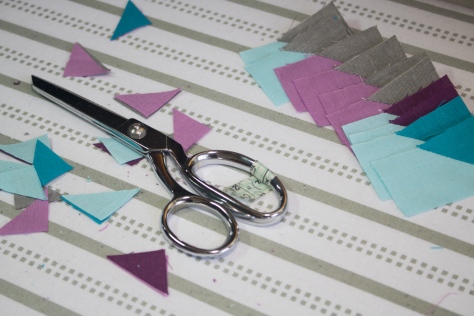 Time saving tip: I cut my 1/4″ seam allowances with scissors while pressing. As long as you are accurate with a pair of scissors, it takes much less time than rotary cutting, at least for me.
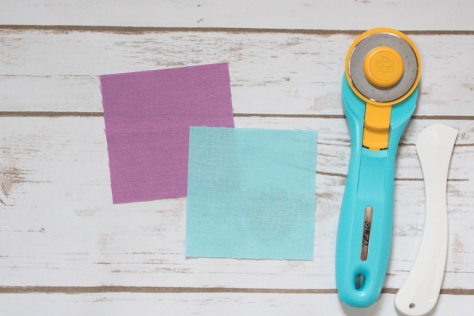 Finally, let’s make that center hourglass block. Grab your 3 1/4″ Lilac and Sky squares.
 Place right sides together and mark a diagonal line. I like to pin my pieces together since we are working with such a small scale. If you’d prefer some wiggle room, you can begin with 3 1/2″ squares and trim to size when you’re finished!
 Sew 1/4″ from either side of the drawn line. Cut along the drawn line.
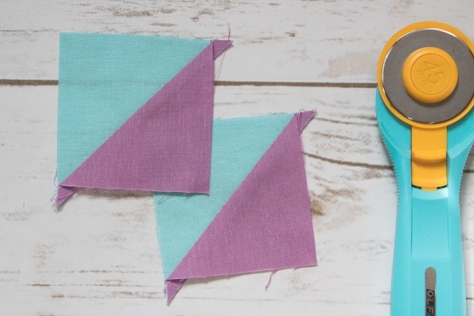 Press toward darker fabric. You will have two half square triangles (HST).
 Place HSTs right sides together, with the Lilac half of one facing the Sky half of the other, and nesting the seams.
 Draw a diagonal line perpendicular to the existing seam line, again pinning to keep the pieces in place while you sew.
 Sew 1/4″ on either side of the drawn line. Then, cut along drawn line.
 Press seams open. You will have two hourglass blocks, but will only need one for this block. Save the other one for your next Steady On block!
 Trim to 2 1/2″ square. Set aside.
 Now that you’ve made all of the components, it’s time to sew the block together! Arrange all of your pieces as shown above, paying careful attention the positioning of the flying geese in relation to the large and small curves on your curved quadrants. There should be two Iris flying geese corners next to small curves and three Iris flying geese corners next to large curves.
 Sew the top five and bottom five groupings of geese together, and sew the center horizontal strip of geese and center hourglass block together.
 Perfect points tip: When sewing the flying geese together, keep the piece with the goose point on top. As you’re sewing, make sure your sewing machine needle sews exactly through the “x” that marks the point of the goose, or if anything, slightly to the right (above) the point. This way you won’t lose any points!
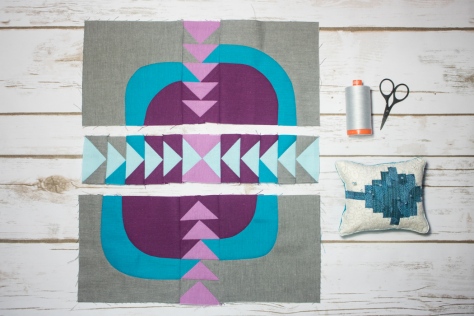
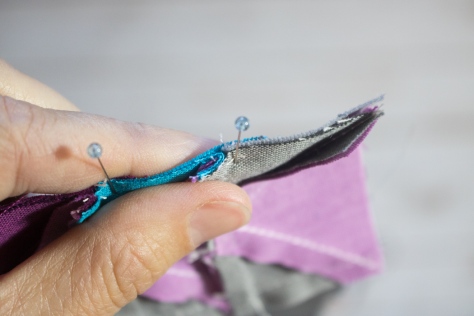 Next, sew the top left and top right curved quadrants to the top grouping of geese, pinning just after each seam that needs to match.
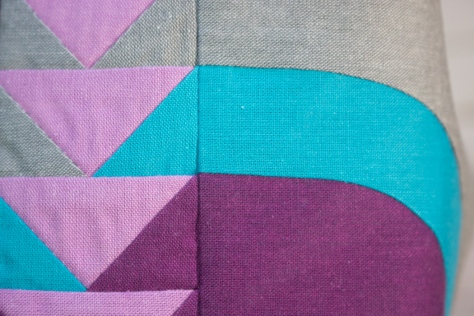 When aligned properly, the geese corners should flow into the curved piece perfectly–that’s why we so carefully marked our curve starting distances with our improv curves!
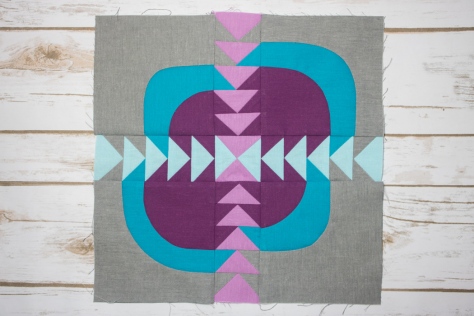 Finally, sew the top and bottom panels to the center horizontal strip, again pinning just after each important seam match. Press toward the less bulky sides (the curved quadrants), and viola! Steady on…