

Today I’m happy to share a simple and fun Flying Geese Table Runner project I made using the Cricut Maker. With Easter approaching and my table bare, I wanted to put together a quick project that could brighten the room for Easter, and really all year long. This table runner was also one of the first things I designed in the Cricut Design Space, so I wanted to keep it fairly simple while also using as many Cricut Maker features as I could! You can read a full review of my new Cricut Maker here.
 This post is a sponsored conversation written by me on behalf of Cricut. All opinions and text are my own. This Flying Geese Table Runner includes both traditional piecing and embroidery or hand quilting. If you don’t have a Cricut Maker, I’ve included cutting instructions and a pdf as well, so anyone can make it!
Let’s get started, shall we!? First, gather your materials.
Materials (My fabric details are in parenthesis)
- Cricut Maker
- Cricut Washable Fabric Pen
- Cricut FabricGrip Mat 12″x24″
- 3/4 yard background fabric (Kona cotton in Snow)
- fat quarter focal fabric (Twinklestar in Berry from Garden Dreamer, by Maureen Cracknell for Art Gallery Fabric–from the blogger bundle I put together for Needle & Foot, here)
- 1/2 yard fabric for backing and binding (Painted Desert Morning from Sage, by Bari J Ackerman for Art Gallery Fabric)
- approximately 18″x44″ piece of batting
- 50wt thread for piecing & quilting (I used Aurifil 50wt 2600-Dove for piecing and 50wt 2479- Medium Orchid and 2021-Natural White for quilting)
- 12wt thread, embroidery floss, or perle cotton for embroidery (I used 12wt Aurifil 2435-Peachy Pink)
- sewing machine
- small embroidery hoop (6″ or smaller)
- embroidery needle
- rotary cutter and mat
- iron and pressing surface
Note that if you do not have a Cricut Maker, you will also need a washable fabric marking tool, printer to print the embroidery template, and light box or other bright surface to facilitate tracing the embroidery template onto your fabric.
Now for the fun!
Using the Cricut Maker
Log into Cricut Design Space and get my Flying Geese Table Runner with Embroidery project here, and click “Make it!”
 Prepare your mats as instructed, smoothly spreading your fabric onto your 12″x24″ FabricGrip mat. The Cricut Maker will lead you through the entire process, so simply follow the screen instructions and let the Cricut Maker work its magic!

 The Cricut Maker will both draw the washable embroidery guide lines AND cut the larger rectangle for you!
 When I designed the drawn geese section, I designated the geese shapes as draw lines rather than cut lines and ATTACHED them to a larger cut background rectangle, about 11 1/2″ x 13 1/2″ in size so that they would be easier to embroider. For those of you designing for your Cricut Maker, this is key to remember when you want to combine both cut lines and drawn lines! Also, many thanks to Julie at Intrepid Thread for teaching me how to do this! If you’re a quilter getting to know your Cricut Maker, I highly recommend checking out Julie’s how-to resources both on her blog and YouTube channel!
 The Cricut Maker will also prompt you to cut squares of your focal fabric, small squares of background fabric, and some background rectangles. Once the fabric is cut, carefully remove the excess fabric, revealing your perfectly cut shapes. Carefully remove the fabric from the mats, and then get ready to sew!
You will also need to cut a 19 1/2″ x 13 1/2″ rectangle of background fabric with your rotary cutter and mat for the center portion of the table runner. You can easily shorten or lengthen your table runner by adjusting the dimensions of this center panel accordingly. It should always be 13 1/2″ wide, but can be as long or short as needed to fit your table.
Preparation Instructions if you don’t have a Cricut Maker
If you don’t have a Cricut Maker, here’s how you can cut and prepare your fabric using a rotary cutter, mat, washable fabric pen, and lightbox or other light source.
First, do your cutting. From your background fabric, cut:
- (1) 11″ x 13 1/2″ rectangle (onto which you will trace your embroidery templates
- (12) 2 7/8″ squares
- (2) 2 1/2″ x 13 1/2″ rectangles
- (4) 1 1/4″ x 4″ rectangles
- (1) 19 1/2″ x 13 1/2″ rectangle (as noted above)
From your focal fabric, cut:
- (3) 5 1/4″ squares
We will use the backing of the table runner as the binding, so will keep the backing fabric as a whole 1/2 yard cut until after quilting.
Download the Flying Geese Table Runner Embroidery Template-Night Quilter Printable, print on your computer at 100% scale, tape the two pages together along the match line, and trace onto your 11″ x 13 1/2″ rectangle of background fabric using a washable fabric pen. Be sure to center the template so that there is at least 1/2″ of fabric on both sides of the geese and 1″ above and below the geese.
Once all of your cutting and prepping is complete, it’s time to get stitching!
Embroidering the Accent Geese
 The embroidered accent geese are meant to add some subtle accent interest to your table runner, since hand stitching of any kind (in my mind) adds a special touch. Especially with a project that will be seen often, those hand stitches can echo the sharp aesthetic of the pieced flying geese.
 Gather your embroidery hoop, background fabric with your flying geese drawn on, and a thick 12wt thread, embroidery floss, or perle cotton in a coordinating color. I chose to use Aurifil 12wt thread in 2435-Peachy Pink since it’s a subtle echo of the geese that pulls the beautiful coral color from the Twinklestar in Berry fabric.
 You can use the drawn embroidery guides to do any type of embroidery you want. I chose to do a simple running stitch around each flying goose, but feel free to get creative! Chain stitch would me another fun stitch to use to outline each goose, you could echo the stitching inside each goose as well, or even fill the geese with french knots!
Note that if you choose to use a more dense embroidery design, you may want to layer another piece of white fabric or use an interfacing stabilizer behind your panel. Yet another creative option would be to wait on the stitching, assemble your table runner, and then use the drawn guide lines to hand quilt around each goose, stitching through all three layers of the table runner. If I make another one of these table runners, I will go this route, since I think the stitches would work really well as hand quilting, too.
 Once you’ve finished embroidering your geese, carefully trim the panel into two rows of geese, cutting 1/2″ away from the side points of each row. Do not cut the top or bottom of each row of flying geese. You should now have two embroidered geese panels measuring 5″ x 13 1/2″.
Piecing Flying Geese Four at a Time
 With your fabric pieces cut perfectly by the Cricut Maker, or as specified above, piece your flying geese using the four at a time method. I used the Reference section of my Quilter’s Planner to piece mine, and you can also find a download of the page HERE as a little taste of the awesome that is contained in the Quilter’s Planner. (If you don’t have one already, go ahead and buy a Quilter’s Planner 2018 while they are still available!) Note that we are making flying geese that finish at 2″x4″.
 Make twelve geese total and sew them into two strips of six as shown above. See how they are mirrored by the embroidered strips? Note that your embroidered strips should be cut apart by this step.
Sewing Tip:
When sewing two geese together, position the point of the goose on top and make sure your stitch line passes exactly through the stitched point of your goose.
This way, you will be sure to never chop off the point of a flying goose ever again!
 Once your flying geese rows of six are assembled, sew a 1 1/4″x 4″ piece of background fabric to the top and bottom of each strip. Align with your 13 1/2″ embroidered geese strips, and trim the pieced flying geese strips to 13 1/2″ if needed, being sure that your embroidered geese align with your sewn geese before trimming. There is a little bit of wiggle room included in the top and bottom background rectangles to allow for those who sew scant or generous 1/4″ seams, so trim as needed.
Assembling the Table Runner
 First sew together the flying geese panels of the table runner. I’ve arranged mine on top of my backing fabric so that you can clearly see the different pieces being sewn together. With geese facing the same direction, sew the embroidered flying geese section to the pieced flying geese section. Then sew to the 2 1/2″ x 13 1/2″ background rectangle. Make two.
 Assemble the table runner top by sewing the sections together as shown above: Note that the embroidered flying geese panels should be sewn to the center background piece on both ends.
 Once your table runner top is pieced, position the runner top and batting in the center of your chosen backing fabric, right sides facing away from each other. In other words, layer and baste your table runner and prepare for quilting!
 I chose to use Aurifil 50wt 2479- Medium Orchid to quilt my Flying Geese Table Runner with a dense free motion quilting pattern in the center, simple outlines of the pieced flying geese, and dense free motion quilted switchbacks in Aurifil 2021-Natural White between both the pieced and embroidered geese. I wanted the texture but not the visual distraction from my hand stitching.
 I’m certainly not a free motion quilting pro, but I am pretty happy with my over-all heart-flower free motion quilting motif! Plus, how fabulously do those tulips go with the BariJ Sage fabric backing!?
As you quilt your table runner, be sure to stay 1/4″ away from all edges with your quilting! This will help your binding look great from both the top and the bottom, since we will be using the backing fabric folded over the edges as binding.
 Once your table runner is quilted as desired, carefully fold back the backing fabric and trim the batting *just* outside the top of your table runner top. I gave myself a little less than 1/8″ around the edge of my table runner.
 Be extra careful not to cut your backing fabric during this step!
Next, trim your backing fabric between 3/4″ and 1″ from the outer edge of your table runner quilt top. Fold the backing so that its raw edge meets the edge of your trimmed quilt top and batting and press. Fold again and top stitch in place, securing your binding to the front of the quilt.
 A full tutorial for how to bind your quilt with the backing fabric can be found HERE on Cluck Cluck Sew’s blog.
 I wanted my binding to be slightly slimmer, so I cut mine 3/4″ from the edge of the table runner top instead of 1″, but choose whichever you prefer.
 Ta da! Your table runner is nearly finished! All that remains is to wash out the washable fabric marker lines. I’ve found that the Cricut Washable Fabric Pen easily washes out with a bit of soap and cold water. Note that if you prewash your fabrics, you can wash out the fabric pen before trimming and piecing the embroidery panels into your table runner. I don’t prewash my fabrics, so I opted to wash it all at once after it was completely finished.
Set your Easter table and enjoy! I always love a good bundle of fresh flowers on a table, especially during these early days of spring when the snow is still thick on the ground outside.

 After giving my table runner its first wash, and in looking at these photos, I think I will go back and hand quilt within those embroidered flying geese to give them a bit more texture.
 Enjoy, and I hope you’ll share a photo of your Flying Geese Table Runner if you make one! You can tag me on social media @nightquilter or share a link here in the comments.
Happy stitching!

 I’m calling my block Steady On, which just seemed fitting for such a classic made-by-me block. Those of you who know me know that I cannot keep anything simple, and this is a perfect case in point. This block has double improv curves, twenty (20) tiny flying geese, an hourglass block, and quite a few points that should match *just* so, all in the 12 1/2″ unfinished square block. But fear not, this tutorial has detailed photos and instructions on how to make each component of the block, and breaking it down into manageable chunks makes this block come together quite smoothly (Spoiler: we can make some of the flying geese 4 at a time!). There’s something about the determined light colored geese headed bravely into the dark and improvy unknown that urges me to encourage them… Steady on, now! That same encouragement goes for you, since I would LOVE to see you tackle this block and come out victorious (tag

 For this step, you will need your 5 1/2″ squares of Iris, Amazon, and Sky, washable school glue and tip, a marking pen or pencil, scissors, and an iron and pressing surface. To make the double-curved quadrants for this block, follow my tutorial on easy curved piecing using a visual layering approach and glue basting
 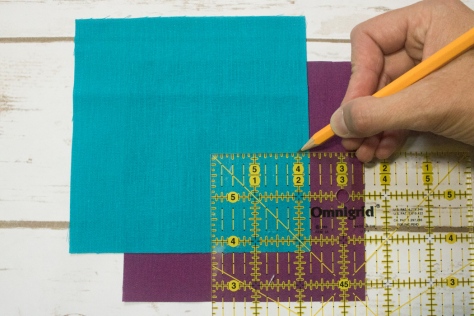 Since this method begins from the bottom up, start with Iris and Amazon. Mark the Amazon square 2 1/4″ up along both sides from the bottom right corner. Make sure your mark extends 1/4″ in from the edges before beginning the curve. This will be your sew line, not your cut line, so by measuring the 2 1/4″ we are ensuring our seams will match up, even though the flying geese are exact and the curves can be improv. (Note here that if you are using fabric with a right and wrong side, you want to be marking the wrong side of the fabric. With the Cloud9 Cirrus Solids that’s not important).
 Draw an improv curve from marked point to point, or trace a perfect curve using the edge of a small plate or glass. Make sure your curve begins and ends at your marked points 2 1/4″ up from the corner.
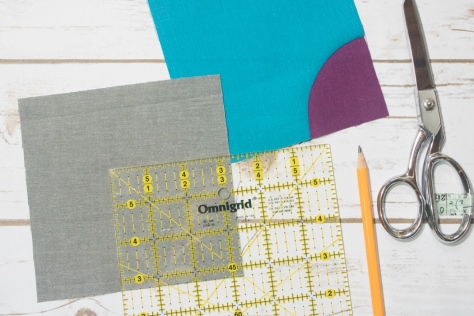 Next, grab your Shadow 5 1/2″ square and mark 3 1/4″ up both sides from the bottom right corner. Again, draw your curve as desired, connecting from marked point to marked point, and using that line as the sew line.
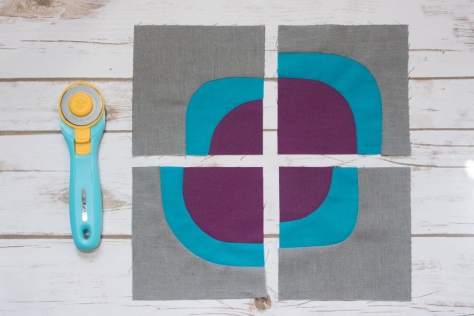 Make four quadrants, measuring 2 1/4″ up on the Amazon square and 3 1/4″ up on the Shadow square for two of them, and measuring 3 1/4″ up on the Amazon and 4 1/4″ up on the Shadow square for the other two. Admire your smooth curves, and set those blocks aside for later!
 Place two 1 7/8″ Iris squares in the top right and bottom left corners of a 3 1/4″ Sky square as shown. Using your fabric marking tool of choice, draw a diagonal line from the top right corner to the bottom left corner. I love my Hera marker since it doesn’t actually mark the fabric, but makes a clear guide line.
 Sew 1/4″ from either side of the drawn line. Press with a hot iron to set the seam (notice that I didn’t do this step? tsk tsk).
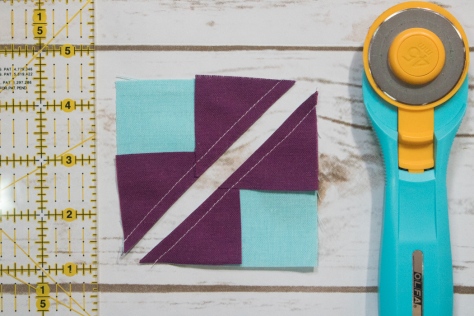 Cut along the drawn line.
 Press the small Iris triangles outward, with seams pressed toward the dark fabric. Then place another 1 7/8″ Iris square in the corner of each unit, and mark a diagonal line as shown above.
 Again, carefully sew 1/4″ from either side of the drawn line. Cut along drawn line.
 Press open, with seams toward darker fabric.
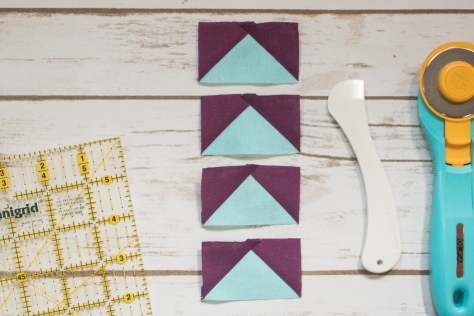 Trim to 1 1/2″ x 2 1/2″ and set aside.
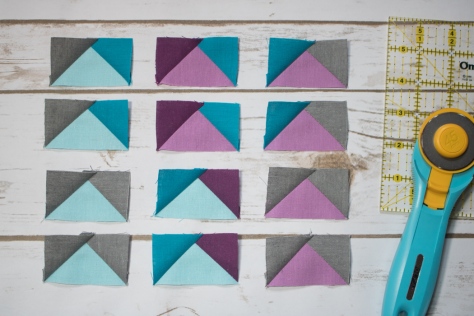 Grab your 1 1/2″ squares and 1 1/2″ x 2 1/2″ rectangles and lay them out to help plan which corners should be positioned on each rectangle. Use the finished flying geese above to help plan before you start sewing.
 To make a flying geese block (or would it be flying goose?), position a 1 1/2″ square right sides facing the right top corner of a 1 1/2″ x 2 1/2″ rectangle. Draw a diagonal line as shown above.
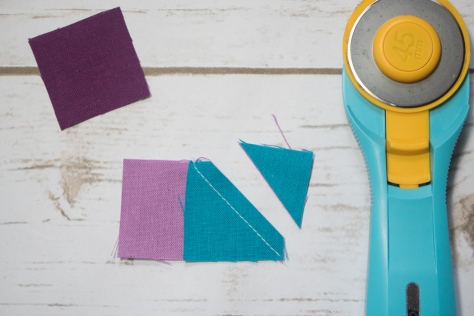 Sew along the line and then trim a 1/4″ seam allowance.
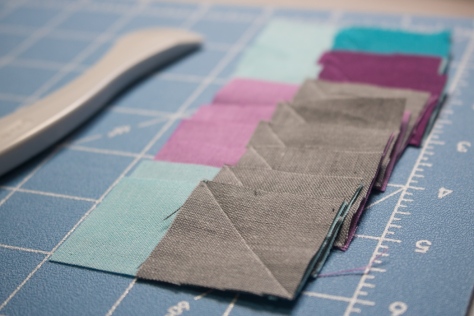 I like to get mine all paired and drawn so that I can chain piece each side.
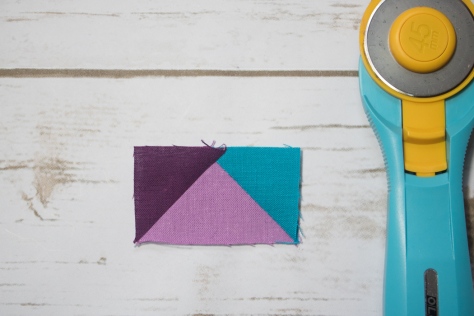 Repeat with the other 1 1/2″ square on the top left side of the block. Press seams open or up toward the corner.
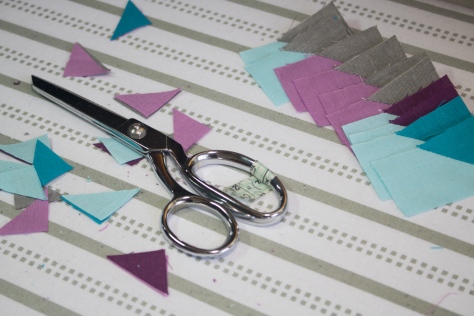 Time saving tip: I cut my 1/4″ seam allowances with scissors while pressing. As long as you are accurate with a pair of scissors, it takes much less time than rotary cutting, at least for me.
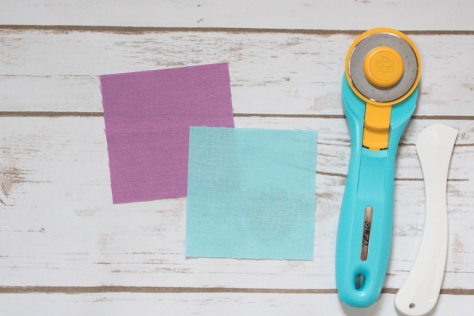 Finally, let’s make that center hourglass block. Grab your 3 1/4″ Lilac and Sky squares.
 Place right sides together and mark a diagonal line. I like to pin my pieces together since we are working with such a small scale. If you’d prefer some wiggle room, you can begin with 3 1/2″ squares and trim to size when you’re finished!
 Sew 1/4″ from either side of the drawn line. Cut along the drawn line.
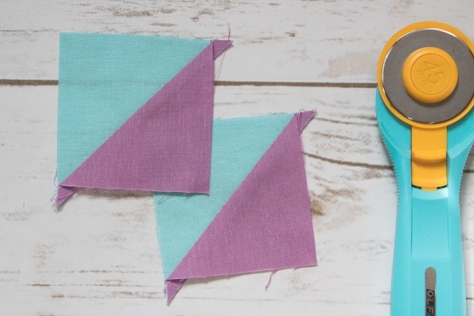 Press toward darker fabric. You will have two half square triangles (HST).
 Place HSTs right sides together, with the Lilac half of one facing the Sky half of the other, and nesting the seams.
 Draw a diagonal line perpendicular to the existing seam line, again pinning to keep the pieces in place while you sew.
 Sew 1/4″ on either side of the drawn line. Then, cut along drawn line.
 Press seams open. You will have two hourglass blocks, but will only need one for this block. Save the other one for your next Steady On block!
 Trim to 2 1/2″ square. Set aside.
 Now that you’ve made all of the components, it’s time to sew the block together! Arrange all of your pieces as shown above, paying careful attention the positioning of the flying geese in relation to the large and small curves on your curved quadrants. There should be two Iris flying geese corners next to small curves and three Iris flying geese corners next to large curves.
 Sew the top five and bottom five groupings of geese together, and sew the center horizontal strip of geese and center hourglass block together.
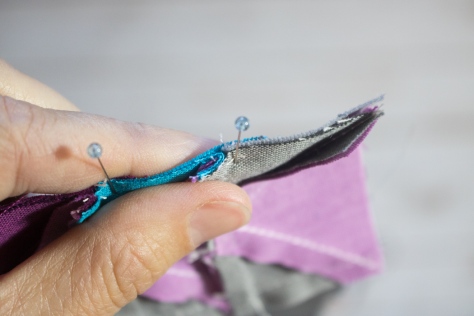
 Perfect points tip: When sewing the flying geese together, keep the piece with the goose point on top. As you’re sewing, make sure your sewing machine needle sews exactly through the “x” that marks the point of the goose, or if anything, slightly to the right (above) the point. This way you won’t lose any points!
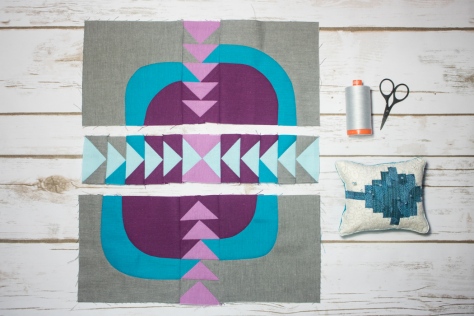
 Next, sew the top left and top right curved quadrants to the top grouping of geese, pinning just after each seam that needs to match.
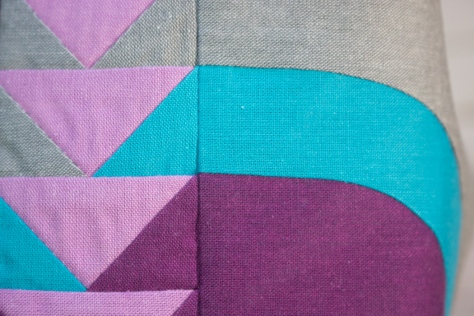 When aligned properly, the geese corners should flow into the curved piece perfectly–that’s why we so carefully marked our curve starting distances with our improv curves!
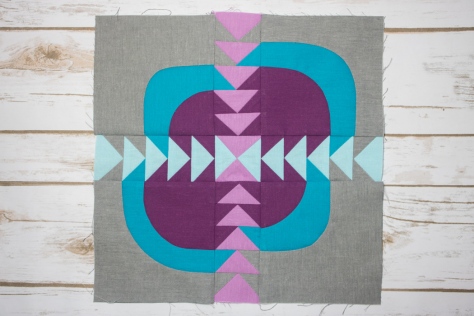 Finally, sew the top and bottom panels to the center horizontal strip, again pinning just after each important seam match. Press toward the less bulky sides (the curved quadrants), and viola! Steady on…