Tag Archives: finish

Friday Finish: Lupine, a Foundation Paper Piecing Pattern

I had never seen lupine before traveling to Maine, but now that I live here they are among my favorite flowers. There is a depth and richness to their color that force me to get really close and admire their intricacy. They are very advantageous growers, almost invasive, and the sheer numbers of lupine seen along roadsides, in fields, and in happy gardens make the color incredibly apparent.

Photo by Steffen Ramsaier, found on Flickr

Early in my sewing days, I was trying to think of a gift to make for my mother-in-law. I immediately thought of lupine, since they are her favorite flower. (If you have children, do you know the book Miss Rumphius? aka the Lupine Lady? Well that’s my mother-in-law–okay, it’s not really, but it certainly could be!) I had recently found paper piecing and wanted to make her a paper pieced lupine pillow.  The only problem was that all of my searches for paper pieced lupine patterns came up empty.

Flash forward a month or so, when I discovered that I could design paper piecing patterns.  A lupine flower was one of the first sketches I did. Talk about complex! I really wanted to get the heart-shaped petals into the pattern, but I knew it had to be fairly simple to be able to be pieced. I drew out a few sketches, chose my favorite, and began to try to break it down into logical pieces. My brain instantly scrambled.  I had to put the pattern aside, and work on a few different projects for a week or two.

paper piecing process
It all starts with the graph paper and sketch.

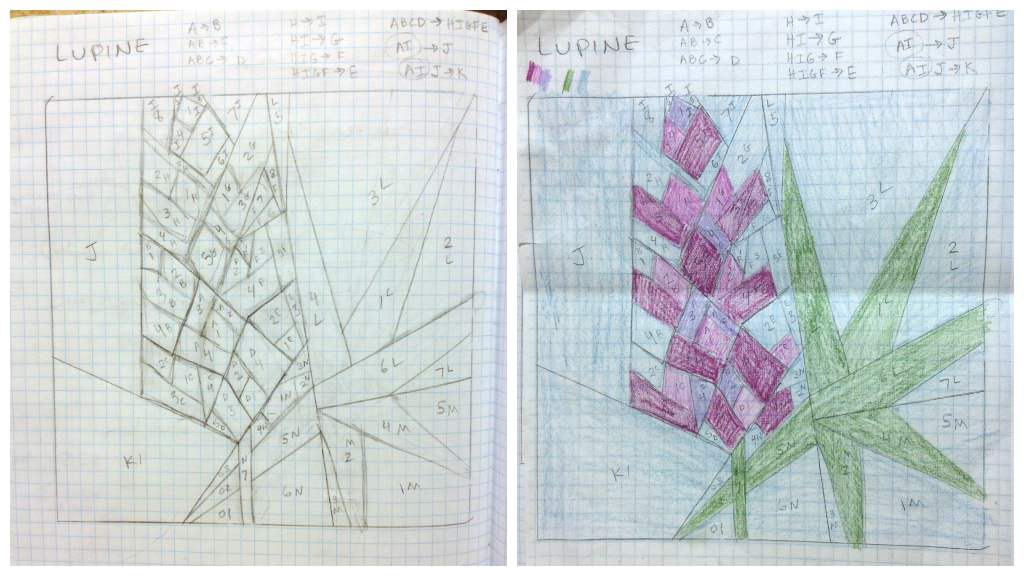
After that much needed breather, I picked up the lupine again one evening and smoothly worked it into numbered paper piecing sections. After a month or so of fine tuning and testing, the pattern is ready!

paper pieced lupine quilt block

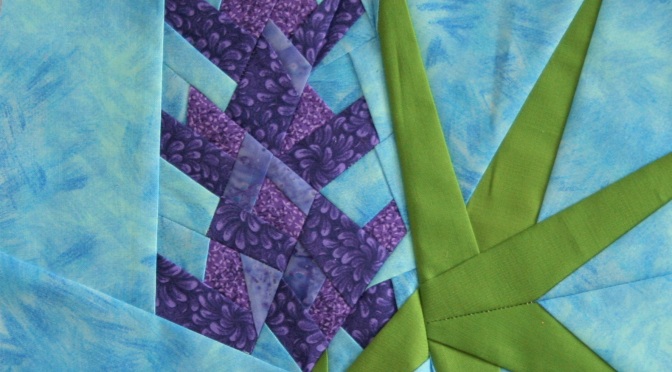
Don’t you love it!? I wasn’t sure about my fabric choices at first, but now that the block is done, I think they were perfect! They blend together just enough to give the flower depth without detracting from the congruence of the bloom.

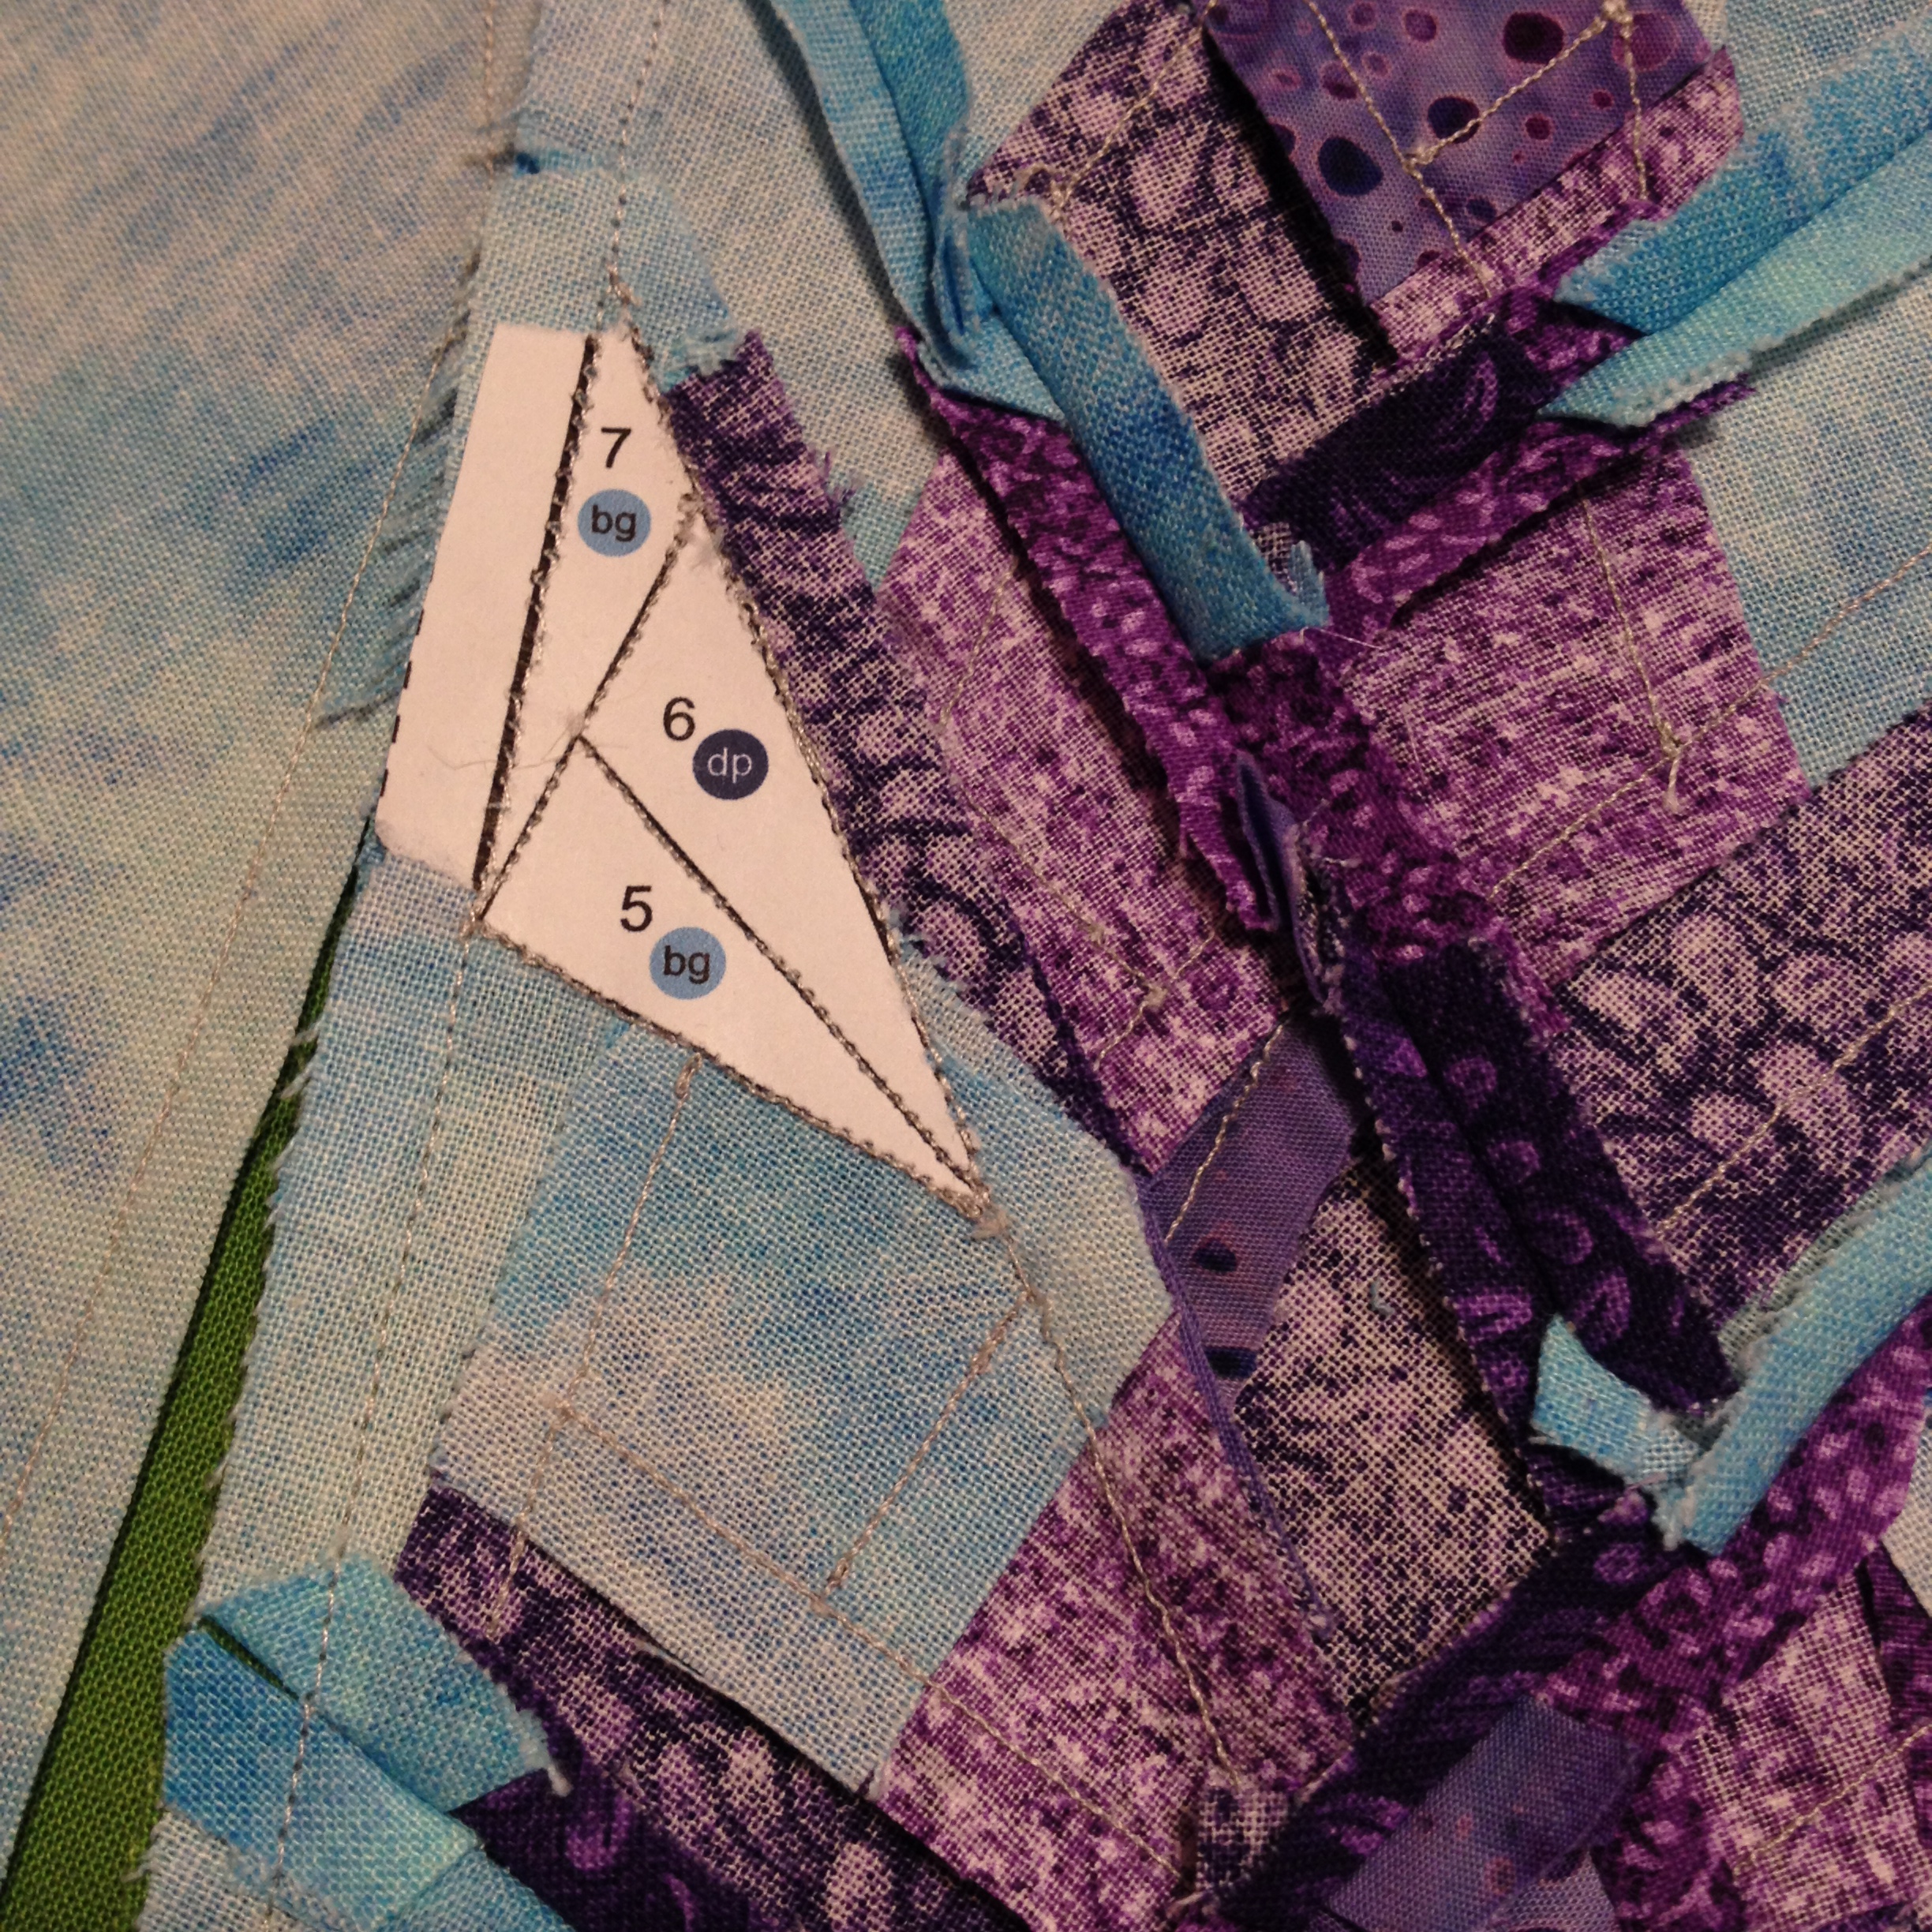
This is not a beginner paper piecing pattern in that there are many pieces and a few sharp angles.  There are only simple joining seams, though; no y-seams! If you have a good sense of paper piecing, this block shouldn’t be too tricky. It took me about 4 hours to complete and measures 10″ square (10.5″ with seam allowance).

paper piecing progressIf you follow me on Instagram, you’ve watched this lupine block’s progression. For those of you who don’t follow me yet, here’s a peek at the process from my Instagram feed (@nightquilter). Of course these are taken with my iPhone during my late night quilting foray, so pardon the blur!

Lupine paper piecing progress
Little by little, it comes together.

paper piecing detail

The back is my favorite! Stragglers hanging on after I’ve removed most of the paper.

The pattern will be available in my Payhip Pattern Store by the end of today, so now if you need to make your mother-in-law (or mom, sister, brother, cousin, friend, or yourself!) a lupine pillow, wall hanging, table runner, bag, etc. you can get right to it!

This particular block will soon become a long-awaited Lupine Pillow for my mother-in-law. I’d say it was worth the wait.

This is my exciting Friday Finish, so I’m linking up!

Crazy Mom Quilts
TGIFF

tgiff-button-blog


The Making of an Easter Tradition

maddie tea leaves cardiLast year in the wee hours of the night on Good Friday, I wove in the ends of my first-ever knitted sweater, an almost-frogged Tea Leaves Cardigan for my daughter Maddie. It had taken me a year and a half to knit, with an ah-bugger-I-think-she’s-outgrown-it-before-I-finished-it break mid-way. This year, in those same wee hours, I wove in the last ends of a sweater vest for my son (the pattern is the Julian Vest by Raya Budrevich). I think I’m creating an Easter tradition: barely finish a knitted item for a beloved family member with the intention that they wear it on Easter.

Since I completed my son’s sweater the night before he was meant to wear it, I didn’t have time to block it. Honestly, I have never blocked a knitted item before, so perhaps I could have had time? Either way, I didn’t have time to learn how to block it and then block it, so I had to improvise.

Improvisational sweater blocking: smash with a stack of books overnight.
As flattened as this sweater looks under this stack, the method did not actually work all that well.

While spending a night under a stack of books helped a little bit, I don’t think it was nearly as effective as actual blocking would have been; the shoulder straps still rolled.  Rolling and last minute finishing aside, the sweater was the perfect Easter sweater, and Max seemed happy to wear it. Maddie’s sweater from last year still fit, too, which is an added bonus!

20140420-235205.jpg
Max modeling his newly finished Julian Vest.

20140420-235226.jpg

I made a few alterations to the pattern, since I knit the Julian Vest in size 4 and my son is currently wearing a 3T.  Once the vest is split for front and back, I knit the back until it was 15 1/2″ from cast on edge (pattern says to knit until 20″ from cast on edge) and I knit the front straps until they were 16″ from cast on edge (pattern again says to knit until 20″).

20140420-235321.jpg

For how trimly the sweater fits, knitting to 20″ length may make it suitable for a VERY skinny, long-torso-ed 4 year old, but it would have been a dress on Max. I think my sizing changes resulted in a good fit, although next time I probably would leave out one row of the “V” pattern in the front, and lengthen the shoulders a bit more. I would have added a few more stitches to the cast-on, too, since my son still has quite a bit of his pudgy baby belly since he’s not yet two years old.

Despite some less-than-pleased comments on the pattern on Ravelry, I really enjoyed knitting this sweater and think that the pattern was well written and easy to execute. I would definitely recommend measuring your child as you knit to make sure that the chosen size will fit well.

Blurry sweatered kids playing before Easter brunch.

I’m pleased that both of my children enjoy wearing their hand-knits, even if they refuse to cooperate for a photo. I told my husband that next year, I will finish a sweater vest for him on the eve of Easter to continue with my tradition. I probably should start now, huh?


Friday Finish: Lillian’s Baby Quilt

Finally! Over the past few weeks especially, I’ve hinted at this project and have shown little peeks at quilting and piecing details, but now I can finally show you the whole finished quilt!

2014-04-02 18.17.06

I began this quilt before little Lillian was born, and my friends didn’t find out the gender in advance, so I worked to choose gender neutral fabrics in creating this quilt. The center square is from a pattern I found in an old quilting magazine (I will link to it when I return to Maine; I don’t have the magazine with me and don’t remember specifics), but I really didn’t like the border suggested in the pattern and after much internal debate decided to design my own. I created the heart cornerstones, and I’m really happy with the mosaic-style cobblestone outer border and how well it frames the quilt.

For the back, I used a flannel fabric similar to the jungle focal panel in the front center square, with a single row of the color cobblestones mirroring the focal panel on the front.

2014-04-02 18.16.35

We are down in New Jersey visiting my family, and last weekend my dear friends and recipients of this quilt came down from NY for a visit. We haven’t seen them in nearly–or over–a year! I have been working hard to complete this quilt so that I could gift it in person, and while I came down to the wire, I did it, hand stitching the label the night before their visit.

20140409-000844.jpg

I’m really happy with the way this quilt turned out, and it is a showcase of many firsts and newly practiced skills, primarily the free motion quilting (FMQ). You can see more about my process in making the quilt, as well as more FMQ detail in my posts Baby FMQ for the Win, Free Motion Quilt-a-thon, A Sensory Adventure with FMQ, and An Unexpected Element. Seriously, the other posts are worth checking out! I’ve only been hinting at it a little, right? hah!

Since it’s a baby quilt and hopefully will see a lot of use and tough love, I opted to machine sew the binding. I also was pressed for time and really wanted to be sure to finish the quilt before departing on our trip. I used the method suggested in Cluck Cluck Sew’s Machine Binding Tutorial. With this method, the binding is sewn to the front of the quilt first, and THEN the back. The final stitching, when done correctly, traces the edge of the quilt right inside the binding, so it looks like part of the quilting. Just like the tutorial promises, most of the time it turned out perfectly:

Stitches trace the edge of the quilt just inside the binding: perfect!

and some of the time, I hiccuped and the stitches ended up on top of the binding:

Oops!
Oops!

All in all, I’m very happy with this quilt, and I’m eager to see many baby, toddler, child photos with this quilt getting grayer and grayer in the background! Enough about the quilt; here are some photos from the day, gifting and of course adorable Lillian!

Gifting the quilt and discussing the little details.
I love babies! Lillian was adoring her view of her momma, otherwise I would have been snuggling that girl up close!

2014-04-05 12.20.55

My son Max wanted Lillian on his lap, always. He was so very gentle!

Since it’s Friday and this is an epic finish for me, I’m linking up! Click the links below to see many other awesome finishes.

Crazy Mom Quilts Finish it up Friday
TGIFF