It’s been quiet here lately, but I have been doing a tiny bit of sewing. Literally, only 2″ finished square little! With the hustle and bustle of life, my sewing progress has slowed a bit. I’m still sewing, and trying to create daily, but progress is slowwww. When I saw that Sue from Moss & Lotus was having a Tomte Sew Along on Instagram, I knew I wanted in. I had been admiring the cute little gnome-like Tomtes popping up in my feed, and resisting the urge to add yet another project to my unfinished projects pile. Then Sue asked me if I would make a block or two, and honestly, how could I say no? These guys (and gals) are adorable! Plus, the bigger Tomtes will make wonderful coaster or mug rug gifts. I love having an end use in mind before beginning a new project!
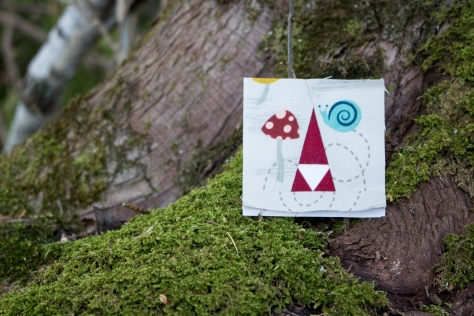
Before stitching up a Peder or Halvor Tomte (my two favs at the moment), I had to sew one of the adorable Tiny Tomtes! This Tiny Tomte is a free addition when you buy the Tomte Bundle and is the size of a mini charm square. I’m going to try to resist the urge to make sweet little Tiny Tomte ornaments for everyone I know, but no promises! This particular little guy will happily live on our tree this year, once I give him a little French knot nose and finish him up with some hand quilting and binding.
I used a Henry Glass print for the background, since the mushroom and snail seemed right at home with this Tiny Tomte. This print actually also happens to be the very first fabric I ever bought, years and years ago before I began quilting. The red fabric is from my scrap bin, some gorgeous Oakshott Lipari from my Vesuvius quilt. The white is a tiny scrap of Robert Kaufman Kona white. These blocks would actually be really fun uses for any tiny scraps. I used 50wt Aurifil 2600-Dove thread since that lives in my machine and works for everything.
After sewing up this Tiny Tomte, I had to take him out on an adventure in the woods so that he would feel at home. During my youngest’s nap, I ventured out behind our house and Tiny Tomte had a fun photo shoot! We found a gorgeous shelf fungus on a tree stump, so Tiny Tomte played beneath it.
And on top of it!
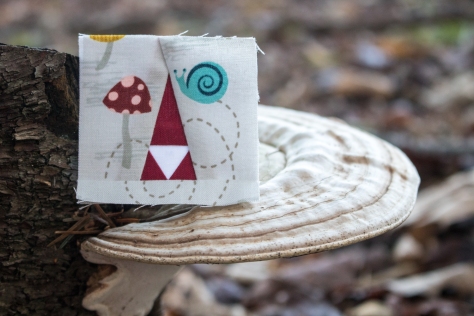
He climbed some trees and gathered some souvenirs.
A pinecone three times his size and an evergreen bough will have to hold him over until we cut our Christmas tree this year. I think they will do just fine.
I’m excited to share that a new pattern of mine is included in the latest issue of Love Patchwork and Quilting magazine, Issue 44. Not only is the pattern included in the magazine, but it also made the cover!
While this is not the first time one of my patterns has been on the cover of a magazine (this was the fun first), it is the first time it’s on the cover of a printed magazine that my friends and family (and me, I suppose!) will be able to see on the newsstands in Joann Fabric and Barnes and Noble and the like. The issue came out Feb 1st in the UK, and will be showing up in stores in the US in 3-5 weeks. Please do let me know when you see it! If you’re techy, you could also get this issue instantly to your phone or tablet with the digital issues on Apple Newsstand, Zinio or Google Play.
This issue includes so many great patterns and inspiration, and even includes quilting stencils designed by Christa Watson. Visit the Love Patchwork and Quilting site to read and see more about what’s included in this fab issue.
Inspired by a tile pattern I saw a couple of years ago, this quilt is a great one to use for color play (or colour play!). It looks great in any colorway, and the fun accent block helps feature your focal or accent fabric.
I love the styling done by Love Patchwork & Quilting for the photos! I made this quilt using Kona cottons from Robert Kaufman and pieced and quilted it with Aurifil thread. I used 40wt thread in coordinating colors for quilting to make it a bit more substantial and echoed the geometric angles of the quilt, and I really like the aesthetic of the straight lines and the ease of quilting with my walking foot. This is a fun pattern and I do hope you’ll check it out!
Also, in the same color theme, I’m having a pattern sale through February 14th with all of my heart-themed patterns 20% off.
Craftsy | Payhip(please use Payhip if you live in the EU)
I made a BIG Love Struck block to help spread the world, and I think it eventually will become a festive pillow. Each heart-tipped arrow finishes at 6″ x 18″ and was a really quick sew, so if you’re looking for a fast and fun Valentine’s project, the BIG Love Struck pattern might be the perfect one! (or Hello, Love… or Love Struck… or Love is the Key… or…<3)
It’s a snow day here, so back to the kiddos–enjoy your day!
It’s finally time to share one of the big “secret sewing” projects I’ve been working on behind the scenes for the past few months! Those of you who are also on social media have most likely seen the announcement that I have teamed up with six (6) other pattern designers to launch a new company called Quilt Theory. Today is my day to introduce you to my pattern called Ocean Path, its inspiration and creation, and tell you a bit more about Quilt Theory. You also will have a chance to win a copy of my pattern, Quilt Theory coloring pages, and all of my Art Gallery Pure Elements scraps (enough to get you amply started on your very own Ocean Path Quilt) and Aurifil thread.
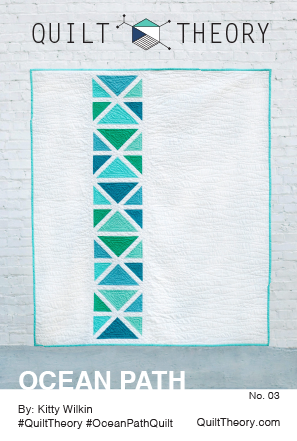
Ocean Path
First, I’d like to introduce you to Ocean Path, my contribution to the debut Quilt Theory pattern line. Our underlying theme for this first collection of patterns was “Where can your quilt take you?” since the designers that comprise Quilt Theory live all across the country.
Living in midcoast Maine, an ocean path felt like the perfect inspiration for my quilt. I wanted to embrace the simple beauty of nature while providing a pattern that could be adapted to fit any color scheme, style, or decor.
I should note here that the stunning photos included in this post were taken by Michelle Bartholomew all the way across the country in Washington state. Michelle is the mastermind behind Quilt Theory, a talented quilter and photographer, and I’m so grateful to be working with her!
Oh, how it glows!
There’s something about the simple beauty of the ocean–the clean lines, soothingly subtle color play, and oh so much space to breathe that makes my heart happy–-and I aimed to captured it all in this simple yet striking pattern. I would like to think that you can take a stroll along the coast through the making of the Ocean Path quilt.
Using simple construction from easily cut triangles and sashing, this quilt comes together in a breeze. Generous negative space provides room for intricate free motion quilting, or you could finish it with simple modern straight line quilting.
Many thanks to Art Gallery Fabrics for providing the beautifully soft Pure Elements fabric for this quilt. I used Tile Blue PE-418, Emerald PE-417, Ocean Waves PE-442, Warm Wave PE-464, and Mirage Blue PE-424 for the feature triangles. The background and sashing are Snow PE-433. The backing is Seawater NE-123 from Skopelos by Katarina Roccella, which is the absolute perfect fabric to back this design!
I quilted Ocean Path with echoing, organic triangles within each colored portion using 50wt Aurifil variegated 4654-Seamist. I quilted the bulk of the background with organic horizontal wavy lines with 50wt 2021-Natural White using the walking foot on my Bernina 560, and went a little wild and free motion quilted pebbles into all of the sashings between the triangles and drifting out into the wavy lines. It was one of those times that once I had the vision in my head, there was no turning back. I’m excited to report that it turned out pretty much the way I hoped! I did all of my piecing with 50wt Aurifil 2021-Natural White and 2600-Dove. Many thanks to Aurifil for providing the thread!
I think Ocean Path would look equally striking in many other color combinations–from fiery reds and oranges on a dark background, to the soothing calm of cool colors on a light background. I can’t wait to see your version!
All of the Quilt Theory patterns are simple enough to be printed on 4″x6″ cards or a single page downloadable pdf. At only $3 each, they are perfect for gift giving or collecting, too!
About Quilt Theory
Let me tell you a bit more about the designers behind Quilt Theory.
2016 collection of Quilt Theory patterns.
In February 2016, a group of quilters connected to cultivate relationships with others running businesses in the quilting industry. A tight-knit group was quickly woven together as we shared successes, answered questions, and supported one another. What started as a way to collect real-time insight and expertise quickly evolved into an opportunity to collaborate.
Our goal at Quilt Theory is to create simple and modern quilt patterns, and we challenged ourselves to design a line of patterns printed on small cards. As a group, we have become a strong team as we worked through pattern writing, testing, editing, and quilting.
Quilt Theory designers have been featured in 20+ major quilting publications and international quilt exhibits. Combined, we have 47 years of quilting experience, and we are excited to share our debut collection for Fall 2016.
How to buy or stock Quilt Theory patterns
You can buy either individual or a pattern collector’s package of PDF patterns through our Quilt Theory website right now!
Pattern cards will be coming soon to a local quilt shop near you! If you are a quilt shop and want to carry our patterns, set up a wholesale account here, or order through Checker Distributors.
Want to buy the cards, but don’t own a quilt shop? Let your local quilt shop know you want them to carry Quilt Theory patterns (click for a handy note to send to your favorite local quilt shop!)
Now, for the Giveaway!
To celebrate the launch of Quilt Theory, I am giving away a copy of my pattern, Ocean Path (printed or PDF, your choice!) along with a PDF of all of the Quilt Theory Coloring Pages. I’m also including all of the fabric leftover from the making of my quilt, which contains enough fabric to get you amply started on your Ocean Path quilt, plus the rest of my large spool of color coordinating 50wt variegated Aurifil thread in 4654-Seamist.
To enter the giveaway today, tell me what color way you would use to create Ocean Path. Leave a comment and make sure I’m able to get ahold of you if you win. For an additional entry, leave another comment telling me how you follow Night Quilter (email list, instagram, facebook, twitter, blog follower, etc.) Follow Quilt Theory (facebook, twitter, Instagram, etc.) and tell me how in a third comment for a third entry.
This giveaway is open to US and international participants. The giveaway will be open until Sunday, October 16th, at midnight eastern time when I’ll select the winner randomly with random.org. Giveaway is open to participants 18 years or older. *If you buy my pattern and then you win it, I’ll refund you or let you pick out another free Quilt Theory pattern! This giveaway is now closed! A winner will be announced shortly!
Be sure to visit the rest of the Quilt Theory designers this week during our blog hop.
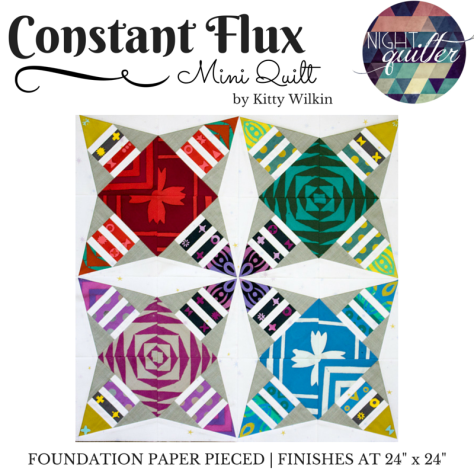
It’s no secret that I love to design foundation paper pieced patterns. You’ve seen me create the likes of Lupine, Love Struck, Bean Sprout, Love is the Key, Fish Panels, Buoys, and more. Recently, though, I’ve been wanting to play more with geometric foundation paper pieced patterns, and I’m excited to share my very first one with you today!
Constant Flux is an easy, very beginner-friendly, and diverse pattern. There are no tricky angles, odd shapes, or difficult joins, yet the design options are boundless. The mini quilt consists of four 12″ blocks, finishing at 24″, but it’s easy to make a quilt of any size by simply making more blocks or adding borders!
Andover Fabrics asked me a while back if I would do a guest post on their blog. Of course I said yes, and decided to share a foundation paper piecing tutorial to try to spread the love of this oft-disparaged quilting style. This pattern is the result, and the tutorial will be posted on the Andover blog soon, so keep your eye out for it! The tutorial will take you step by step through how to foundation paper piece this pattern, which in turn can be applied to all other foundation paper pieced patterns! I’ll be sure to link to it as soon as it’s live. In the meantime, go ahead and buy the pattern and start choosing your fabrics!
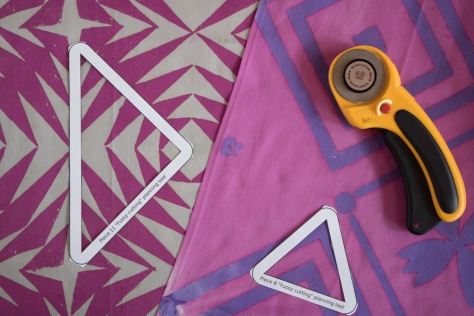
I created my version of Constant Flux inspired by Handcrafted Patchwork by Alison Glass from Andover Fabrics and just had to keep her gorgeous large motifs intact, so the pattern includes tools to help you plan meticulously cut elements if you so desire. I also include measurements for precutting fabric to make the process move more smoothly, so be sure to check out the tutorial early next week.
Constant Flux is available in my Craftsy store (and Payhip for those of you in the EU) and will be on sale for only $5 for the first week, after which it will return to its normal price of $8.
The name of Constant Flux makes me happy because of the play on words. The visual aspect of the pattern strongly elicits movement, thus the “Flux” part. Yet aspects of the quilt can be meticulously cut as exact replicas, which is where the “Constant” part of the name comes in. Depending on the way you look at it, the constant can imply both that the movement is happening at all times, or that there are some things that are constant despite the movement! Constant Flux.
For now, I haven’t quilted my first one and I already want to make Constant Flux in a different colorway. Look at all of the options I came up with in just a short moment of color arrangement play! The pattern comes with a full page coloring sheet so that you can explore your options before diving in. That bottom right version is calling to me–which one would you make first?!
I’d love to see what you create, so when you stitch up your Constant Flux quilt, please tag #constantfluxquilt and @nightquilter so that I can see your creation!
Today I am excited to release my newest foundation paper pieced (FPP) pattern, Bean Sprout. Today is arbor day, so for now I’m thinking of it as more of a tree sprout, but regardless of which species you’re growing, this block pattern is ready to roll!
To me, the bean sprout is the epitome of spring, new life, and the wonder of discovery. I have watched my children’s excitement over the first sprout of newly planted seeds, and wanted to capture that fresh promise. This block is perfect for the gardeners among you, and I can see it as a focal block in a quilt, or even turned into pillows, tote bags, wall hangings, or table runners.
You may remember my first iteration of this Bean Sprout block, which I turned into a pillow and donated to my daughter’s school for their annual fundraiser auction/raffle. Since then, I made a few tiny tweaks to the pattern to make it a bit more versatile, easier to piece, and clearer to follow. The block finishes at 8″x12″, but can easily be made into a 12″x12″ finished block by adding two side strips, which is explained in the pattern.
The pattern includes clear piecing diagrams, sewing tips, and templates for the 8″x12″ finished block, with various shading to help with accurate fabric placement. Quarter inch seam allowances are included on all pattern pieces to help ensure easy piecing, and a 1″ reference square is on every printable page so that scale can be confirmed. Full foundation paper piecing instructions are not included in the pattern, but I have a thorough paper piecing tutorial HERE. Lee Heinrich from Freshly Pieced also has a fabulous tutorial on the Bernina We All Sew blog HERE, which will ensure you will never miss corners again. Knowing all of the information in these two tutorials will help demystify FPP, or at the very least will GREATLY reduce seam ripping.
Sew up the bean sprout block to bring spring no matter the weather!!
Bean Sprout is available for sale in my Payhip shop, at an introductory price of $2.50 through the weekend. Tuesday morning EST, it will go up to its standard price of $5.00.
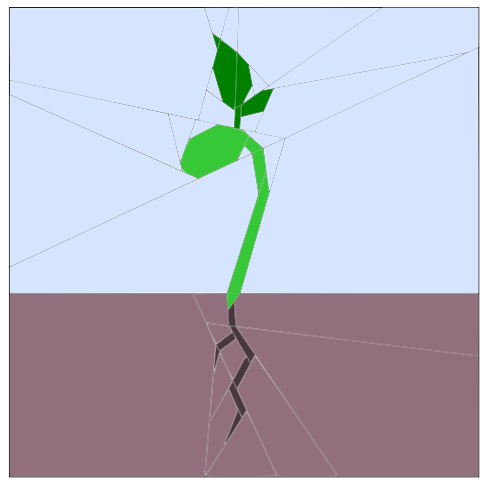
I pushed spring into summer with my latest version of the block, using Cotton + Steel teals and coral that remind me of watermelon. I wanted to show the versatility of the color possibilities with this true-to-life block. While my brain initially goes to the greens and blues true to real life bean sprouts and summer sky, there are many other combinations that could work well to make the block shine! (For the avid gardeners among you, yes, I know the seedling shown is a brussel sprout plant, not a bean!)
There’s not much more exciting than seeing what others create with my patterns, so if you make this block, please use the tag #beansproutblock on social media and tag me @nightquilter. Sending an email would also work! Enjoy, spread the word, and go grow some quilts!
I’m excited to share one of the big behind-the-scenes projects I’ve been furiously sewing over the past few weeks: my version of the Welded Quilt, the newest free quilt pattern released as part of a collaboration between Art Gallery Fabrics and Fat Quarter Shop called AGF Stitched with Kimberly (or #agfstitched).
This quilt is the third pattern released by Fat Quarter Shop and Art Gallery fabrics (you may have seen the Birchen and Fractal quilt patterns already released). The original version of the Welded quilt features Artisan by Pat Bravo. There’s an awesome instructional video HERE that helps make the organization and piecing of this on-point quilt very straight forward, without having to worry about bias edges. Fat Quarter Shop also has quilt kits and backing sets available.
When I was invited to be a part of the team to make this quilt, I accepted excitedly. I loved the idea of making an on-point quilt, and I knew that I wanted to use the focal diamonds to feature some meticulous cutting (fussy cutting to the rest of the quilting world). I also know how easy Kimberly makes quilt-making with her simple instructions.
I was invited to use the Art Gallery fabrics of my choice to make this quilt, and the fabric was generously provided by AGF. I quickly selected fabrics from Utopia by Frances Newcombe, including this Dreamlandia Irradiated (featuring the awesome deer), and some coordinating Curiosities by Jeni Baker. I added Art Gallery Pure Elements in Raspberry Rose, Teensy Weensy Lotus from Littlest for the light sashing, and Optical Origami Mod from Urban Mod by the AGF Studio to round out the palette.
I did have a few extra dates with my BFF the seam ripper due to directionality miscalculations, so pay extra attention to directionality of your edge pieces if you choose fabric with a distinct top and bottom. Those seam ripping dates were well worth it, though. I’m thrilled with the resulting quilt.
I quilted it with straight lines in a grid work pattern framing the center diamonds, using my domestic Bernina 560 and a walking foot. I kept the quilting fairly minimal to preserve the super softness of the Art Gallery fabrics. I used my go-to thread, Aurifil 50wt in 2600-Dove for both piecing and quilting. I LOVE how this thread complements just about every fabric color combination and pattern.
I machine bound the quilt for durability using the fabulous machine binding tutorial by Allison at Cluck Cluck Sew, and it turned out so well. Practice certainly helps, but I’m finding myself favoring the sharp look of the machine binding more and more (although I will always love hand stitching binding!).
I just can’t get over how cute those Utopia deer are peeking out from this quilt. As you can probably tell, I had a blast prancing through our front field with the rest of my family for this quilt photo shoot.
Quilt Stats
Pattern: Welded, part of the AGF Stitched with Kimberly collaboration (instructional video here)
Size: 61” x 79.5″
Fabric (all by Art Gallery Fabrics): Front: Dreamlandia Irradiated, Specks of Carambola, and Atomic Influx Perse from Utopia by Frances Newcombe; String Lights Carmin, Book Pressed Memories, and Firefly Jar Dark from Curiosities by Jeni Baker; Art Gallery Pure Elements in Raspberry Rose, Teensy Weensy Lotus from Littlest, and Optical Origami Mod from Urban Mod by the AGF Studio. Back: Candied Lollies Mint from Curiosities by Jeni Baker. Binding: Firefly Jar Dark from Curiosities by Jeni Baker.
Batting: 100% cotton Soft n’ Crafty batting
Thread: Aurifil 50wt in 2600 – Dove for both piecing and quilting
Quilting: Straight line quilting in a grid work pattern using my Bernina 560 and a walking foot
Time:
Piecing the top: 14 hours 20 min (includes fussy cutting and seam ripping to fix directionality)
Piecing the back: 45 minutes
Squaring, layering, and basting: 1 hour
Quilting: 5 hrs 10 min
Finishing (squaring): 25 minutes
Binding: 2 hr 30 min Total: Approx. 24 hours 10 min
Why did it take me so long to bind!? Meticulous machine binding, I suppose! It was worth every minute!
++++++++++++++++++
Now, for a giveaway!
Fat Quarter Shop has generously offered a giveaway to one of my readers. Comment below to be entered to win a bundle of your favorite Art Gallery Fabrics collection! You can enter by leaving two comments:
What Art Gallery Fabric collection would you choose?
If you follow me, Night Quilter, let me know how–or visit my right sidebar to follow me if you don’t already, then tell me how! (e-mail, WordPress, Bloglovin’, Instagram, Twitter, Craftsy)
The giveaway will be open until Wednesday, September 30th 12noon EST. I will select one winner randomly from the comments below. Good luck!Note: This giveaway is now closed! Congratulations, Nicole!
Once you enter, be sure to check out the versions of Welded created by the other talented quilt bloggers participating in this event (links will be added as soon as available):
Just for fun, here are some behind the scenes shots from our frolicking fun family photo shoot:
My awesome husband not only is a champion quilt holder, but he also climbs downed branches to help adjust the quilt *just so*.Finn cheered us on from the stroller while Maddie and Max ran wild.Max needed a piggy back all the way home after playing in the field and climbing the apple tree to pick apples.
Everyone’s husband makes a SnapChat story about his family’s quilt photoshoot adventures, right? Yes, my husband is a tech geek extraordinaire! We had fun. Thanks again to Fat Quarter Shop and Art Gallery Fabrics!
P.S. I always try to respond to comments, but may not be able to on the giveaway posts due to the high number of comments. Please know I appreciate your visit and hope you follow or come back again!
Today I’m so excited to share that my magazine debut (as the covergirl, no less!) is here. My pattern Unlocked appears in this month’s edition of Make Modern magazine, and even graces the cover (can you say excited!?!).
Make Modern is a digital modern quilting magazine, full of great patterns for quilts and smaller sewn items, articles, tips, and features. This issue (Issue 7) has a lovely meet and greet with none other than the most glittery quilter around: Molli Sparkles. Based in Australia, Make Modern was the brainchild of three quilting friends: Jane, Lara, and Kristy. You can read about their philosophy HERE, which I definitely recommend. From the sustainability and accessibility of a digital magazine, to being a positive driving force in the modern quilting world, they’ve got it going on.
You can purchase single issues of the magazine or can choose 3 issue (6 month) or 6 issue (yearly) digital subscriptions. I’m honored to be a part of this publication.
I’ve shown you tiny peeks at my quilt Unlocked, but really nothing that gave away more than the obvious: it features the full Mercury and Grove lines from Alison Glass’s 2015 Sun Prints, on a gorgeous Robert Kaufman Essex Yarn Dyed Linen in Charcoal background. I used my go-to thread panacea Aurifil Dove #2600 for piecing. It’s very scrap-friendly, since each key only needs a fat eighth of fabric. Unlocked is also super versatile since a simple adjustment of the number of keys made and surrounding background results in any sized quilt you want.
While I really wanted a castle door or giant gate in which to photograph this quilt, a trip to Ireland was not in the budget, so Belfast, Maine had to suffice. I have the world’s best quilt holding husband, who schlepped our kids and a quilt all over town at the whim of me, his crazy quilt-making photo-crazed wife. We got some great shots, though, so I’d say it was well worth it! He really should start a blog “Behind the Quilts”.
Unlocked was longarm quilted by my ever-talented friend Stephanie at Late Night Quilter and it looks amazing. She used the Cityscape Path straight line quilting style designed by Krista Withers and photos don’t even come close to doing it justice. I’m so grateful to Stephanie for quilting this, since I was able to finish the quilt top and mail it off to Stephanie right before giving birth to Finn. Then, she was able to quilt it and get it back to me a couple weeks postpartum so that I could bind it and photograph it in time for the publication deadline. Teamwork at its best!
Head on over to Make Modern and grab your copy of this fabulous modern quilting publication.
The internet has been down for most of the week here at home, which translates to radio silence on this here blog. My goal for the year was “Balance”, after all, so maybe it was decided that I needed to take a blogging break. Either way, here’s a little peek at what I’ve been doing during the silence.
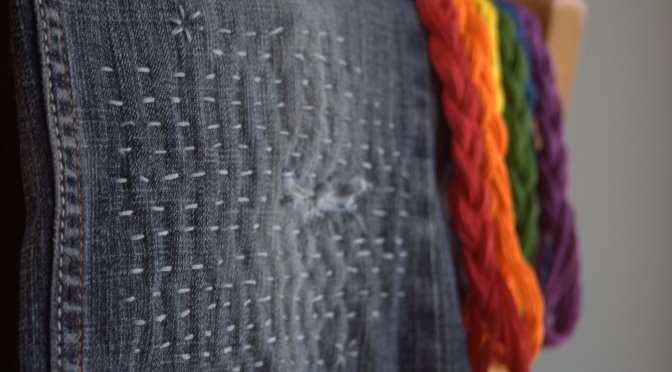
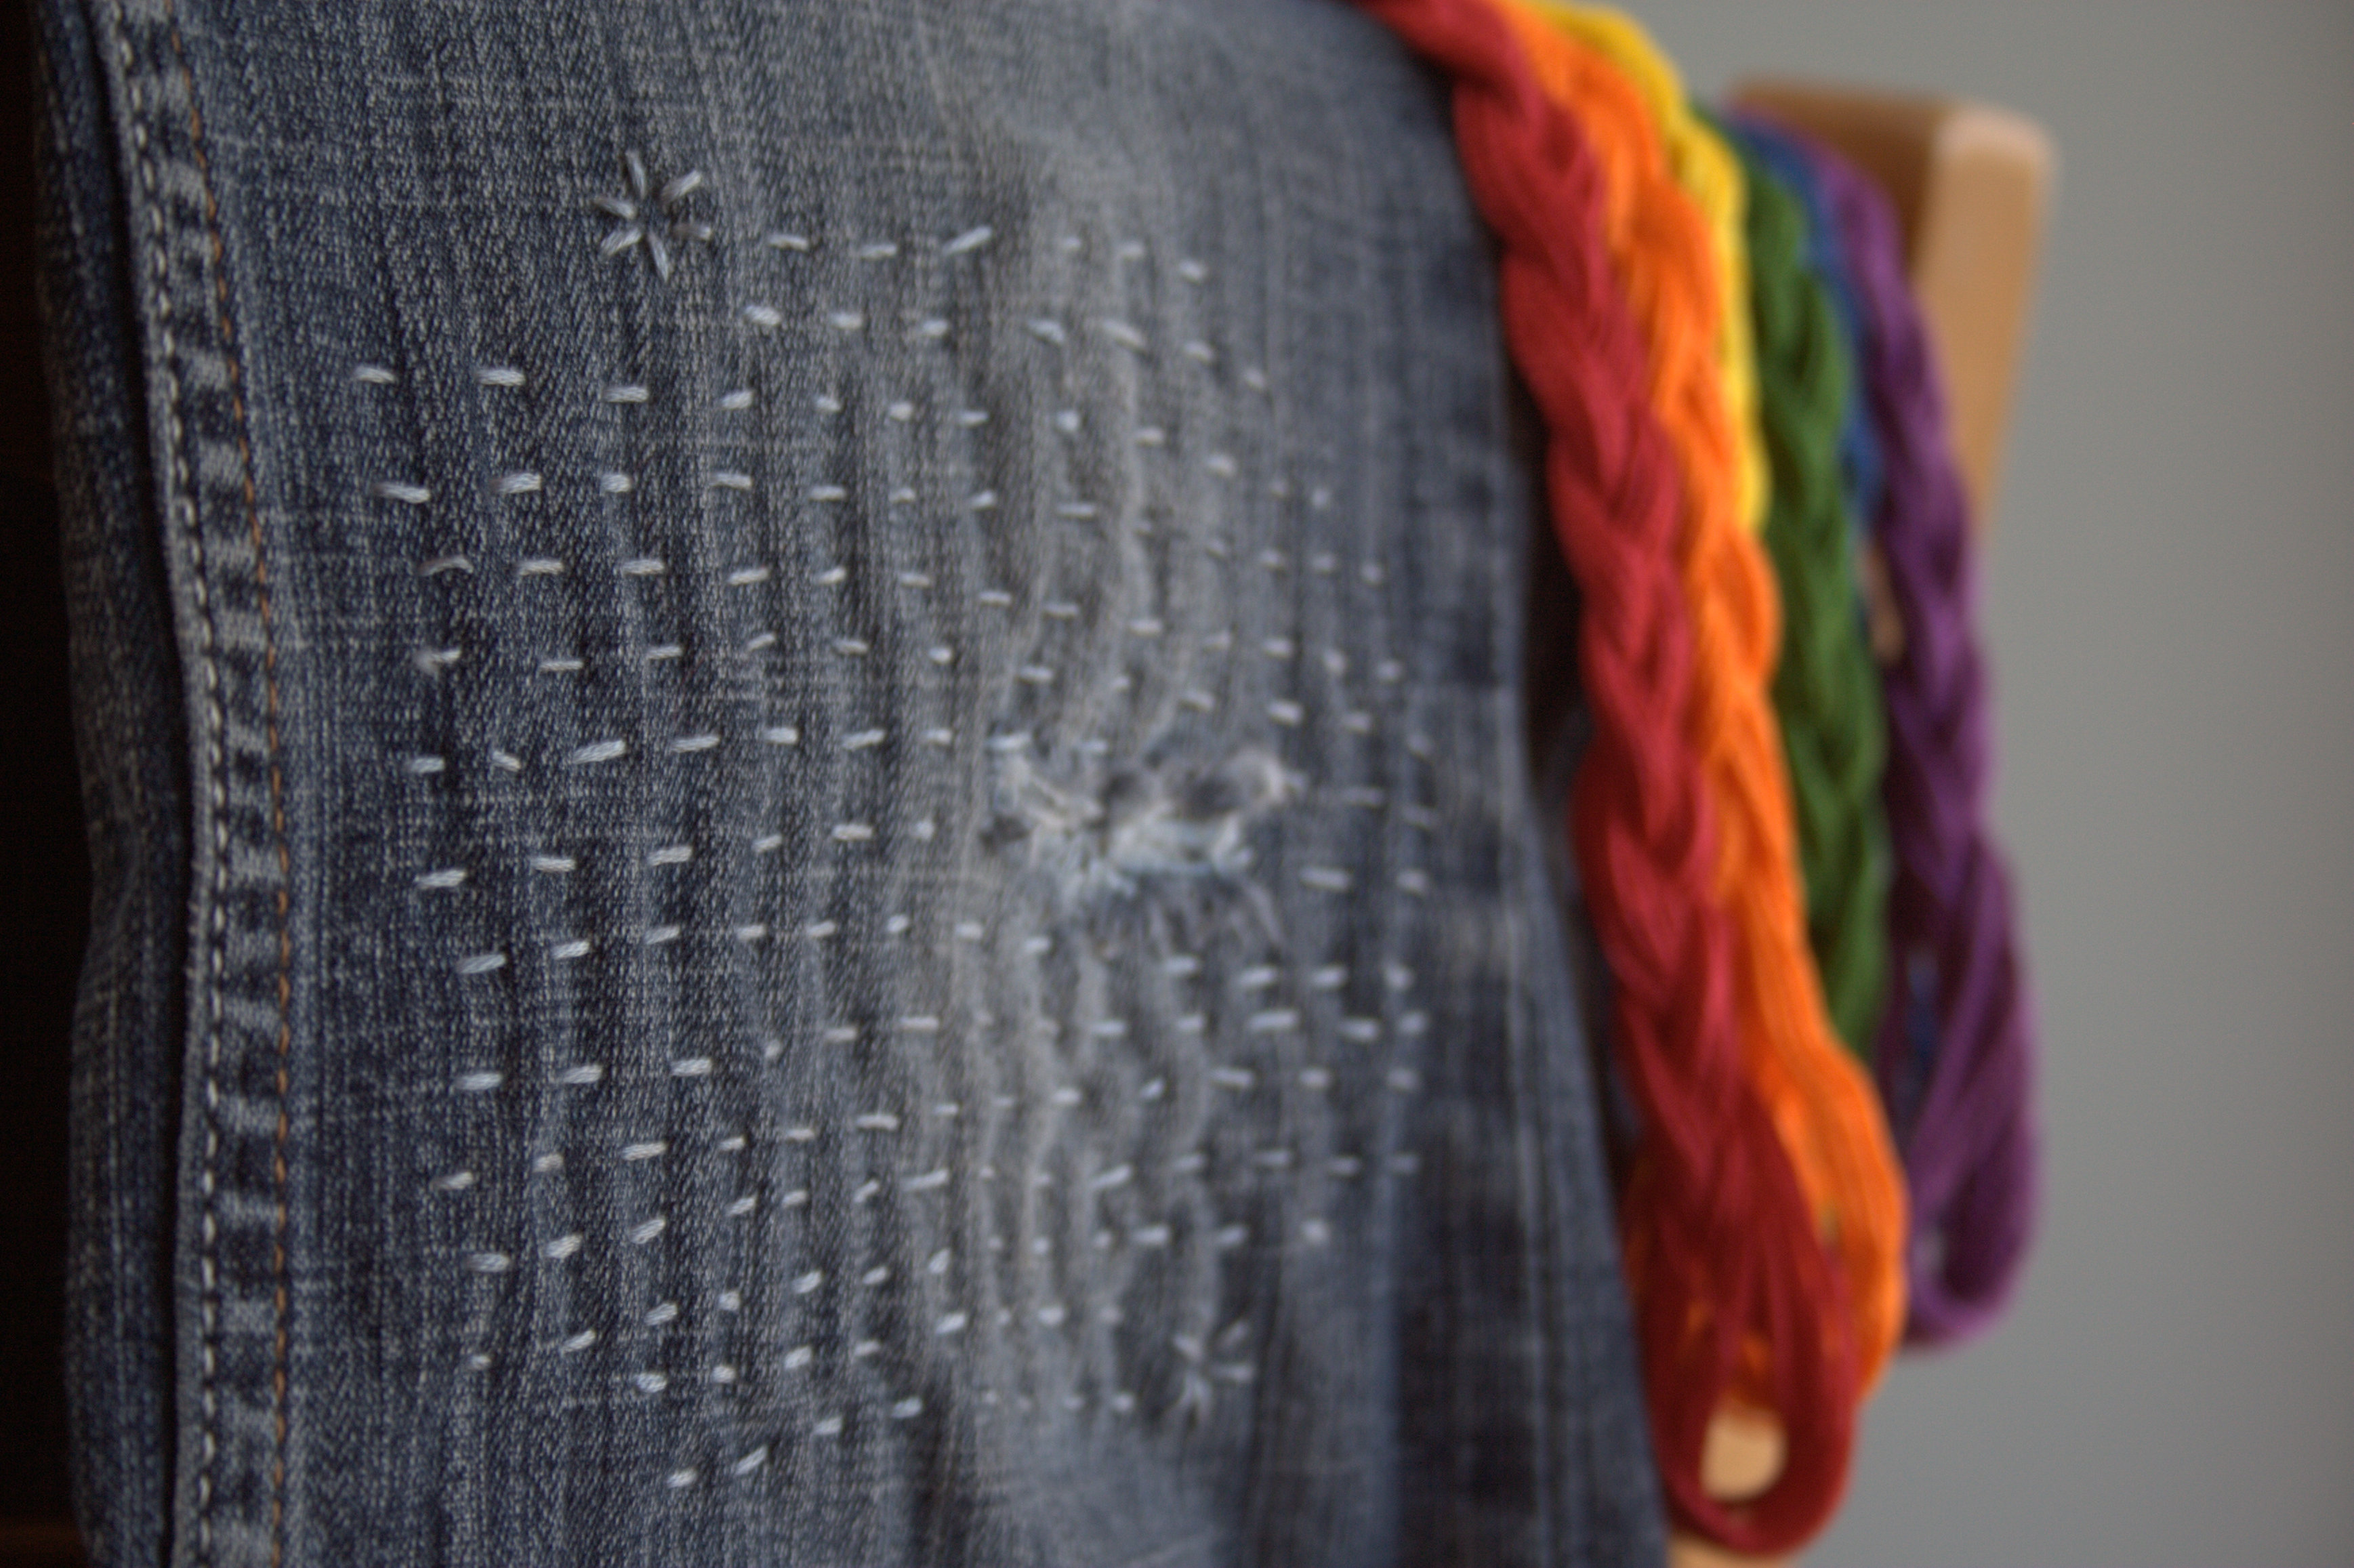
I mended my first pair of jeans. Yes, I know, it’s a little embarrassing that as an almost-34 year old, I have yet to mend clothes. I did try mending a hole in a pair of jeans a couple years back, but it was such an epic fail I can hardly count it. This time I used a patch cut from another pair of old holey jeans, zig zag stitched the edges to prevent fraying, and hand stitched it on with Aurifil floss. Many thanks to Dorie (@tumblingblocks on IG) for the inspiration and tips! The floss was gorgeous to work with, but I was later informed (thanks for the heads up, Sam!) that embroidery floss won’t be strong enough to hold up well as a jeans knee patch. I plan to supplement the stitching with a rainbow of perle cotton and hope for the best. At least it looks awesome, and these favorite post-partum maternity-esque jeans are ready to wear post-baby. It is so peaceful to sit and stitch while sitting next to my kiddos watching a movie. Balance, right?
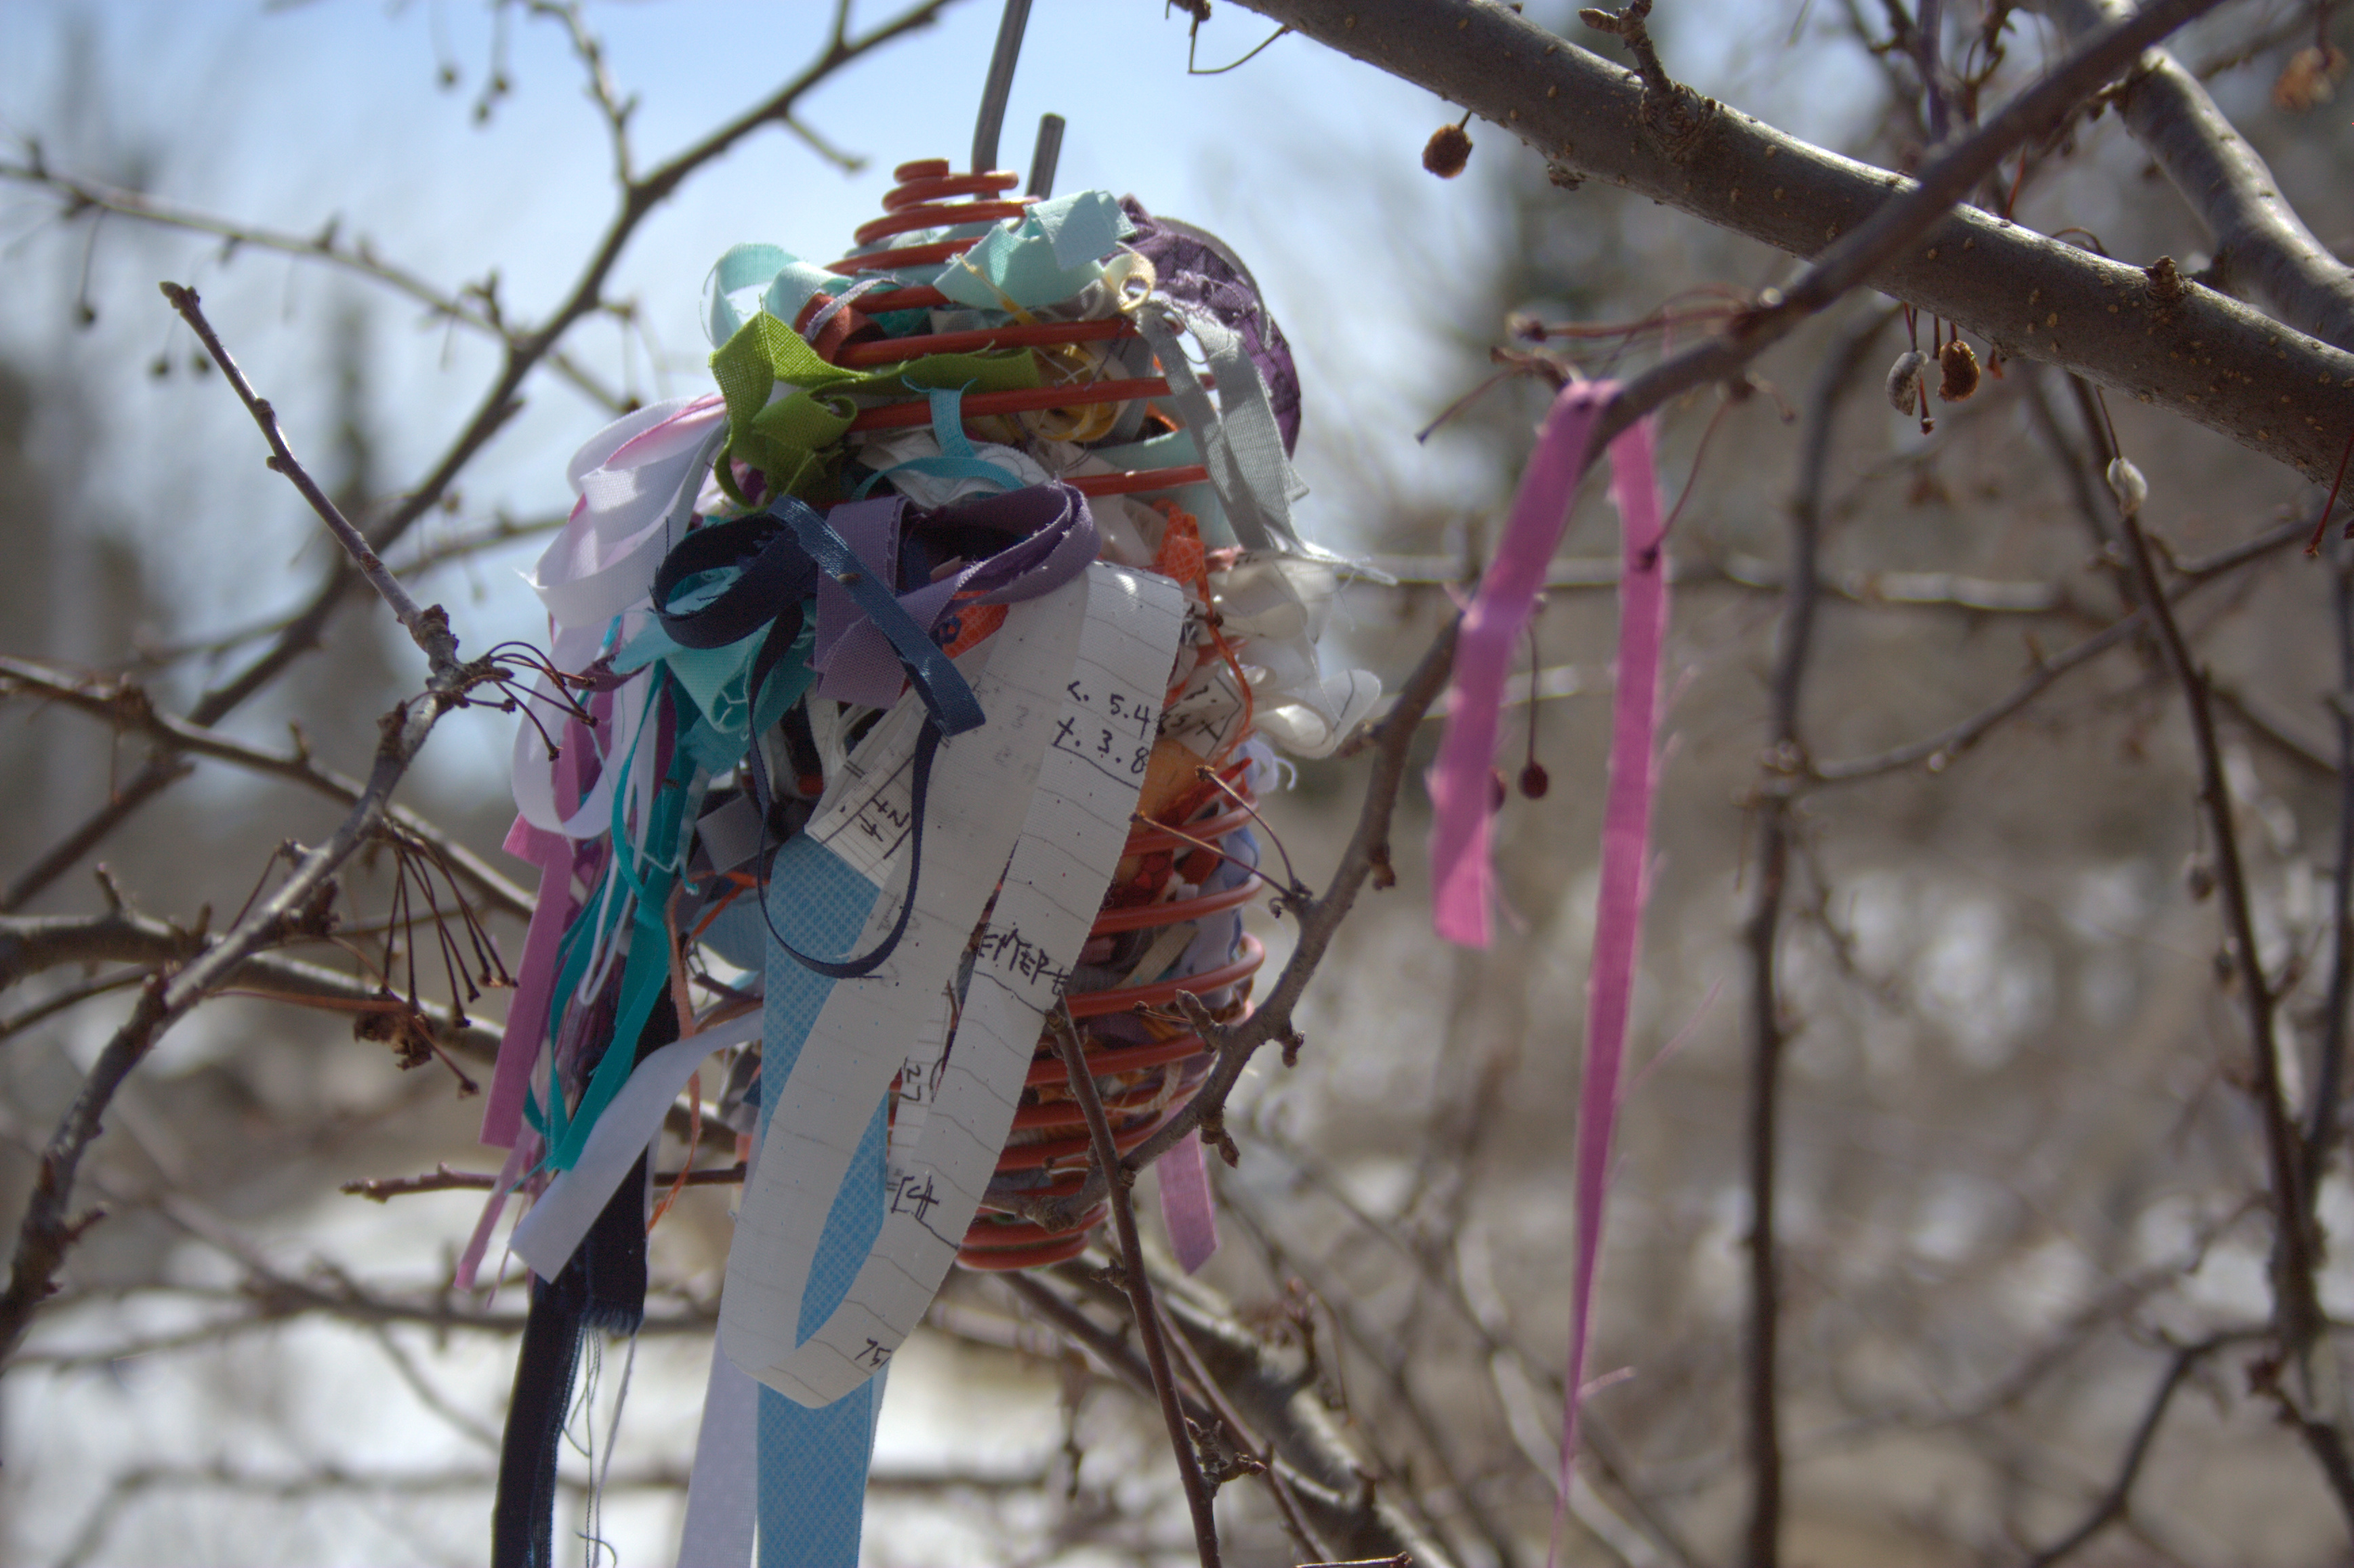
I put my skinny strip scraps outside for the birds. I’ve never tried this before, but have seen that others save their fabric shavings to put out during nest-building season. I’ve been saving my skinnies all winter so I’m really hopeful that we see some colorful, soft nests around the yard this year!
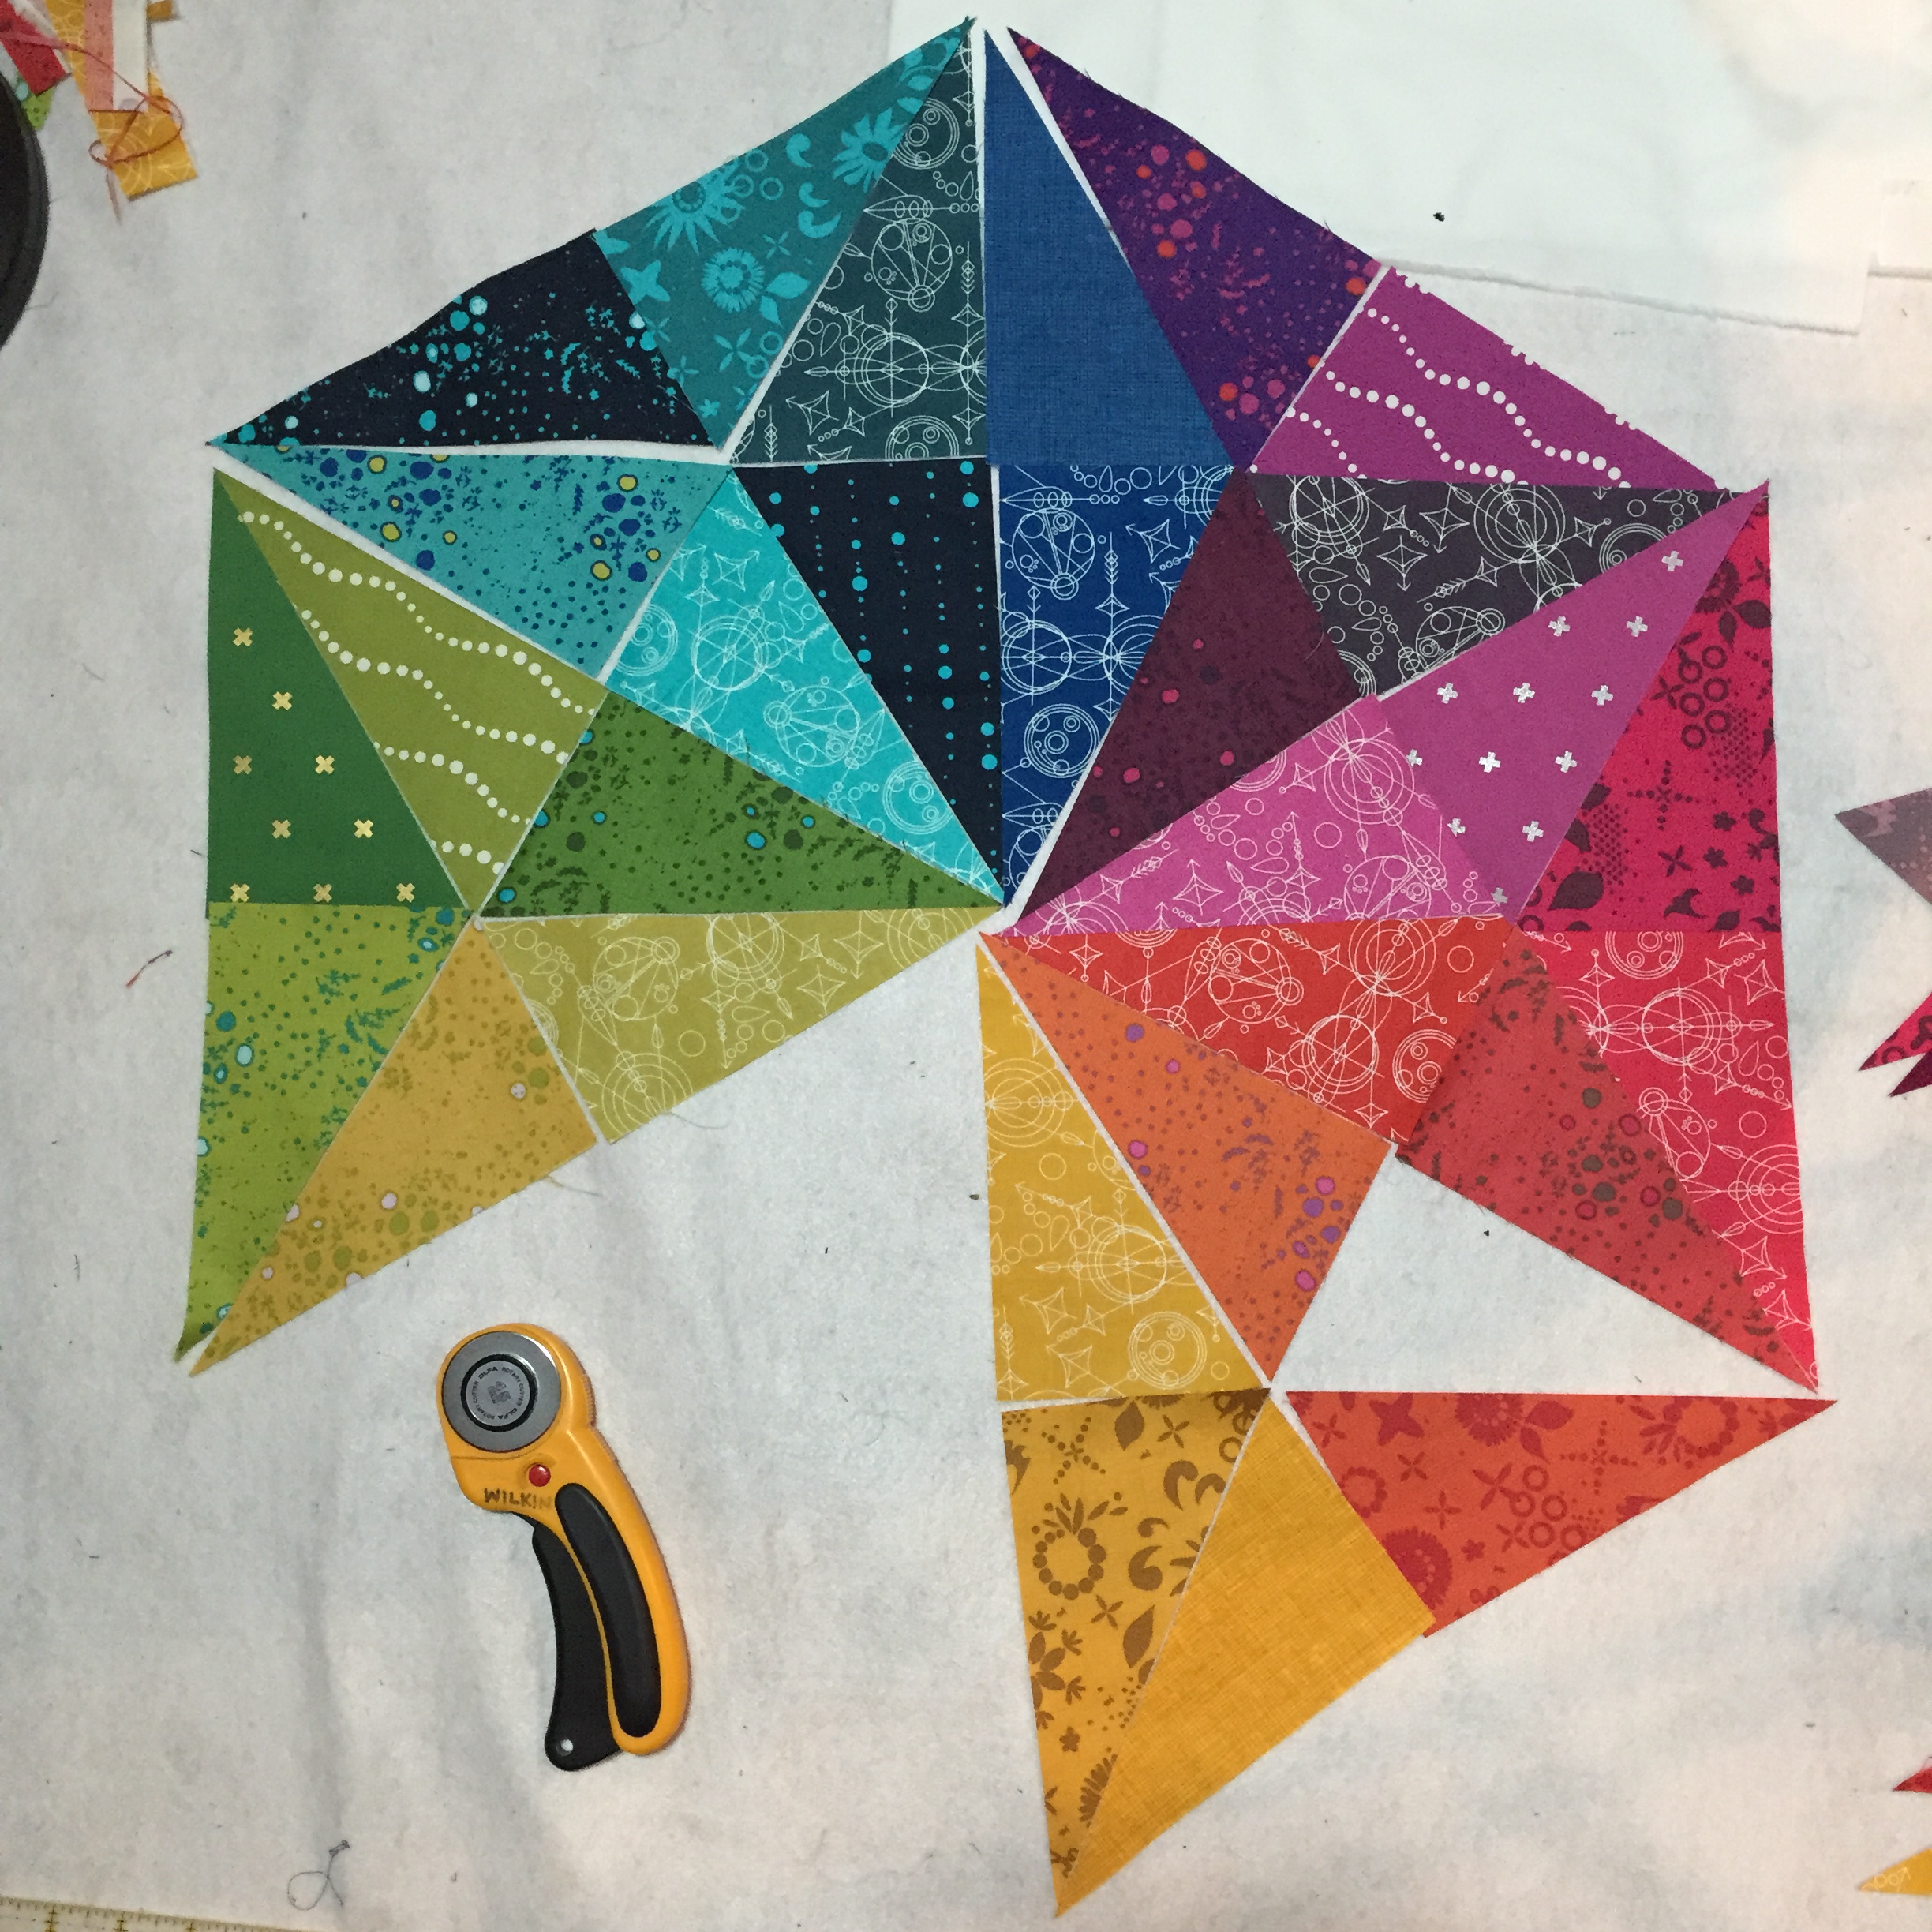
I’ve been working on my Prismatic Medallion mini quilt for my Alison Glass Mini Quilt swap partner. I’m still waiting on a few fabrics, but I’m loving the progress so far!
I made a bit of progress on my newest foundation paper piecing pattern, Bean Sprout. Can you tell my mind is on spring?
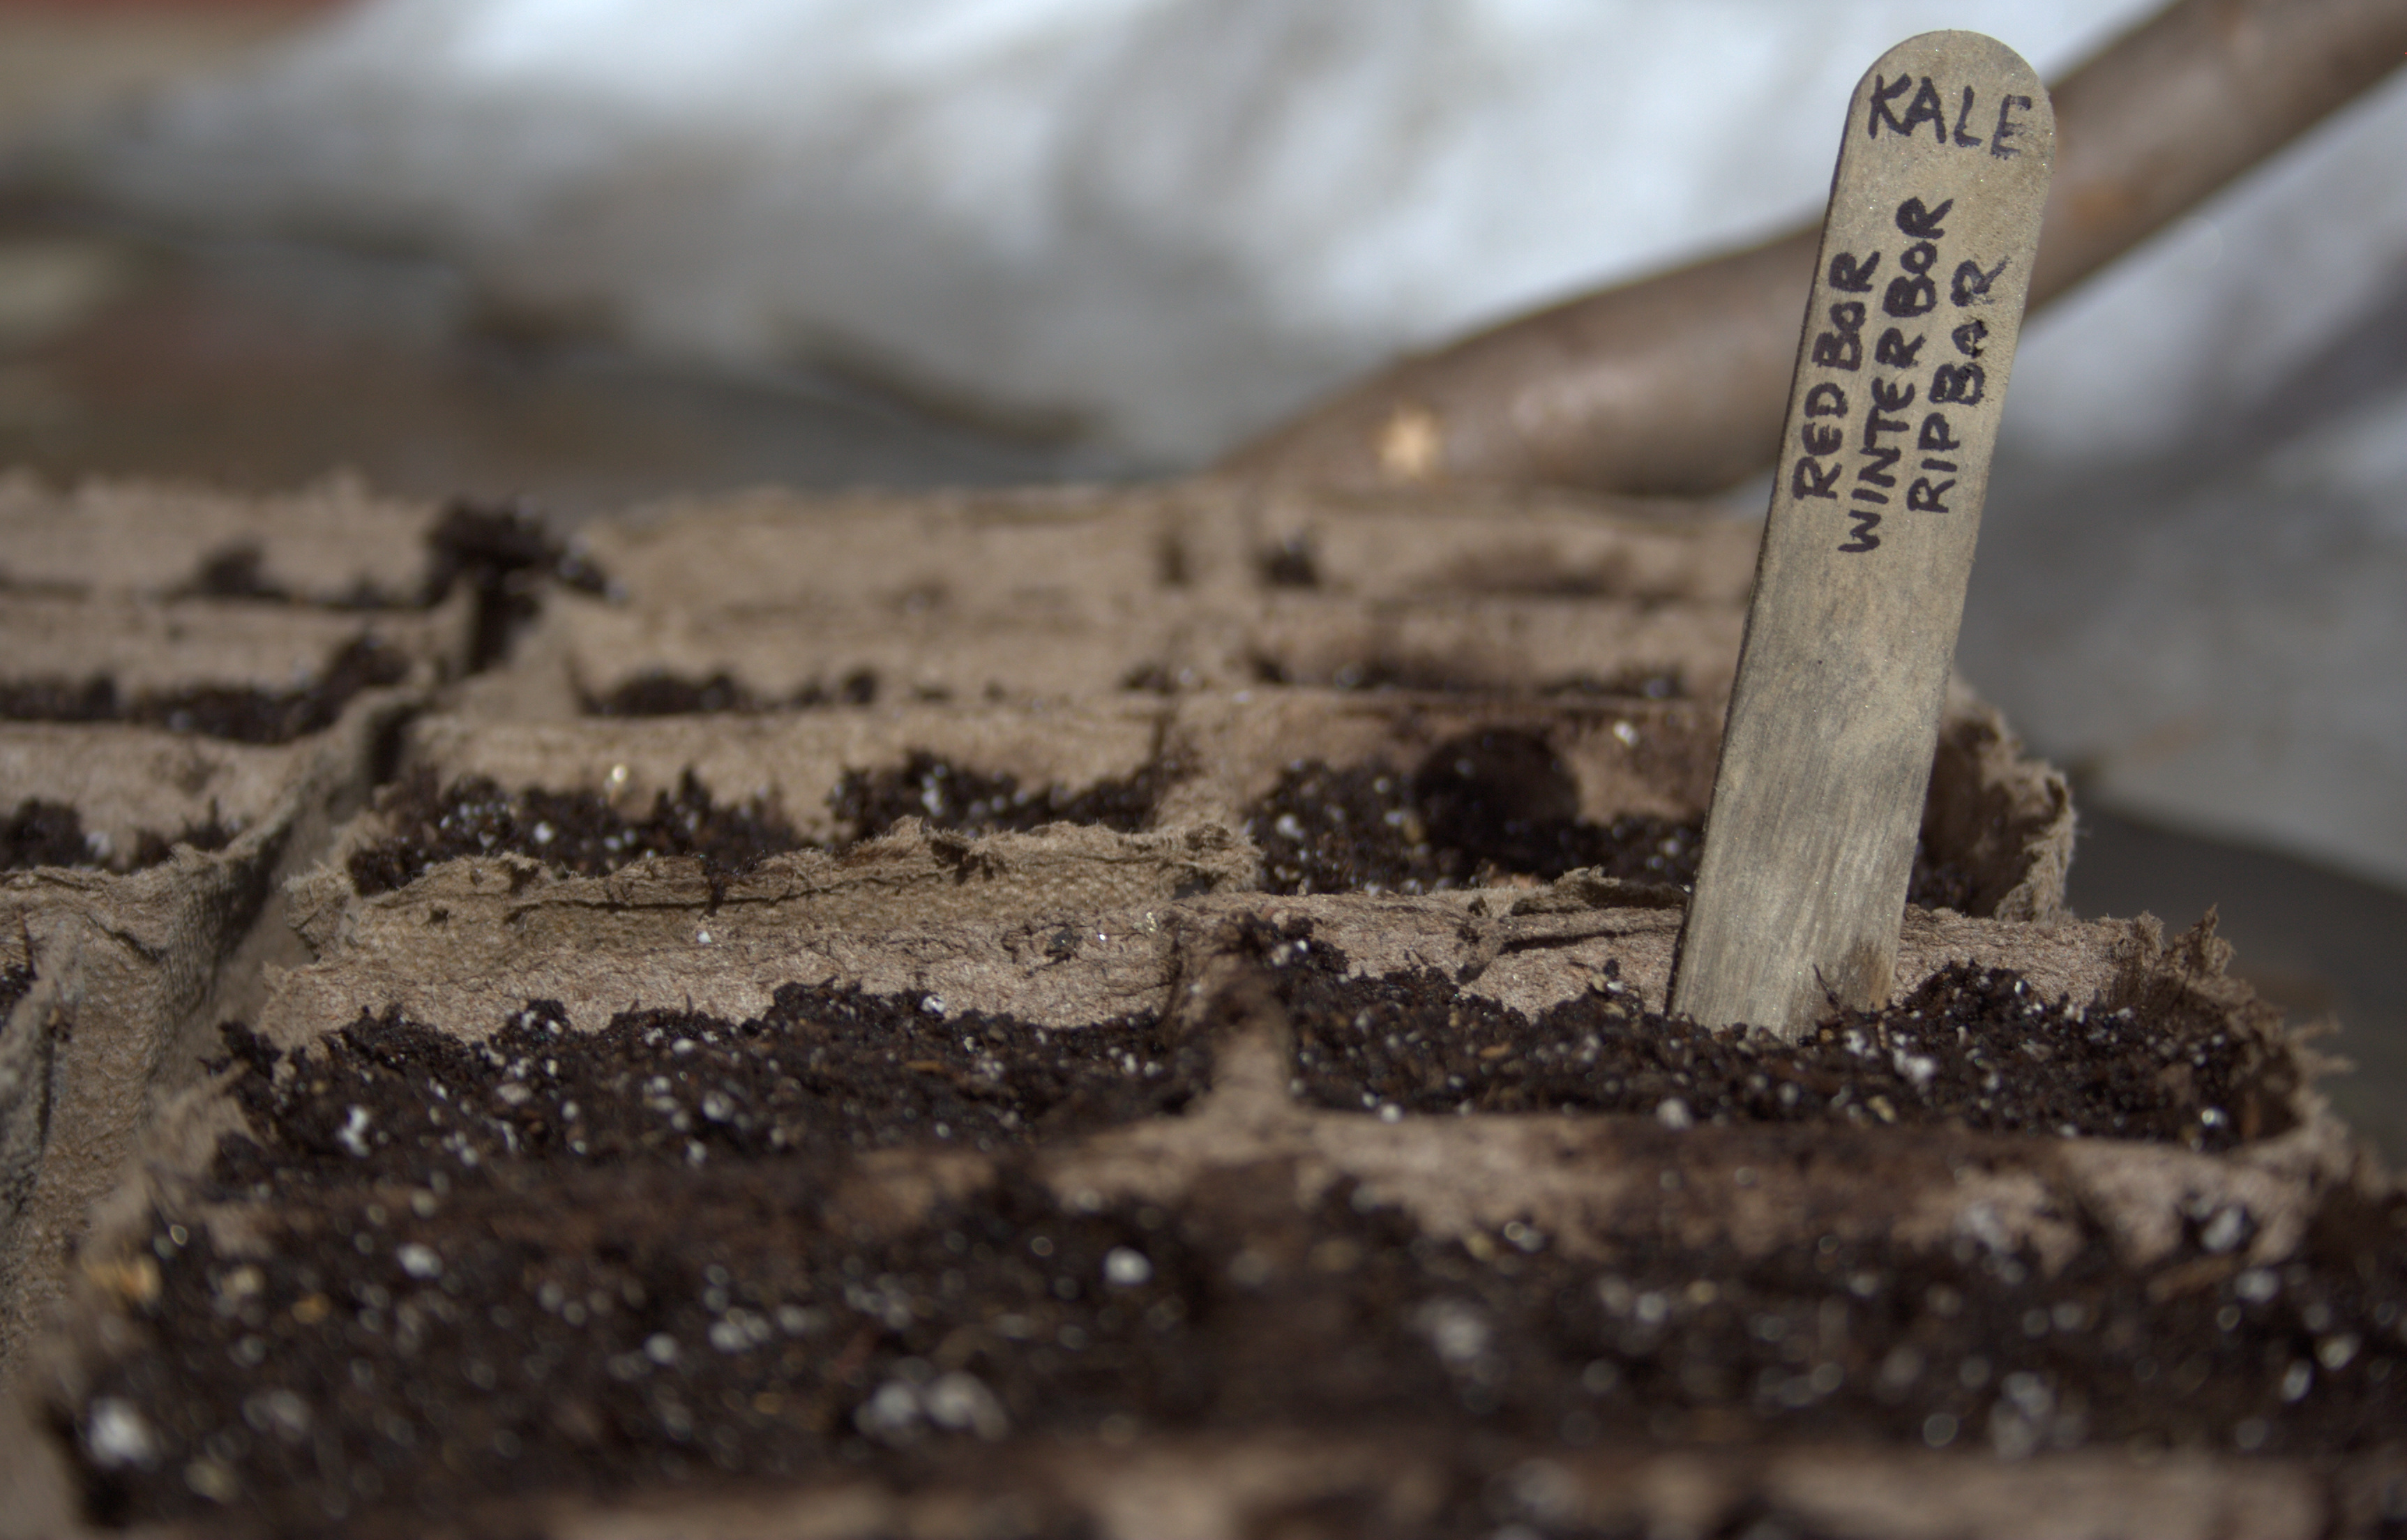
We finally planted seeds. Today, April 3rd, we FINALLY got seeds into planters. It’s far too cold to plant seeds in the ground still, especially since there are still multiple feet of snow on top, but starting seeds inside is one of my favorite parts about spring. It felt so good to get dirt under my fingernails! Last year, we planted seeds in late February, so waiting until April is crazytown. This winter was just so brutal it felt wrong to plant seeds when the temperatures were in the teens and the snow just kept coming. I’m hoping the seeds still get a good enough head start to flourish once the garden is ready for them.
Back outside I go to enjoy this glorious day with my kids. The weekend forecast is for more snow (it darn well better not stick!), but I know that spring is near. Hope, balance, love. That’s what life is about!
Remember back before Christmas, when I only showed you tiny peeks at most of my projects since they were to be given as gifts? Well now that the holidays are long over, now that I’m back and getting into the groove of home life, now that I finally have a free minute to blog about them, now I can show you the full gifts!
I also have finalized and posted another Valentine’s Day themed foundation paper piecing pattern, which goes live in my Craftsy (for US buyers) and Payhip (for international buyers) today! It’s a day full of finishes, both new and old. A picture is worth a thousand words, so without further ado…
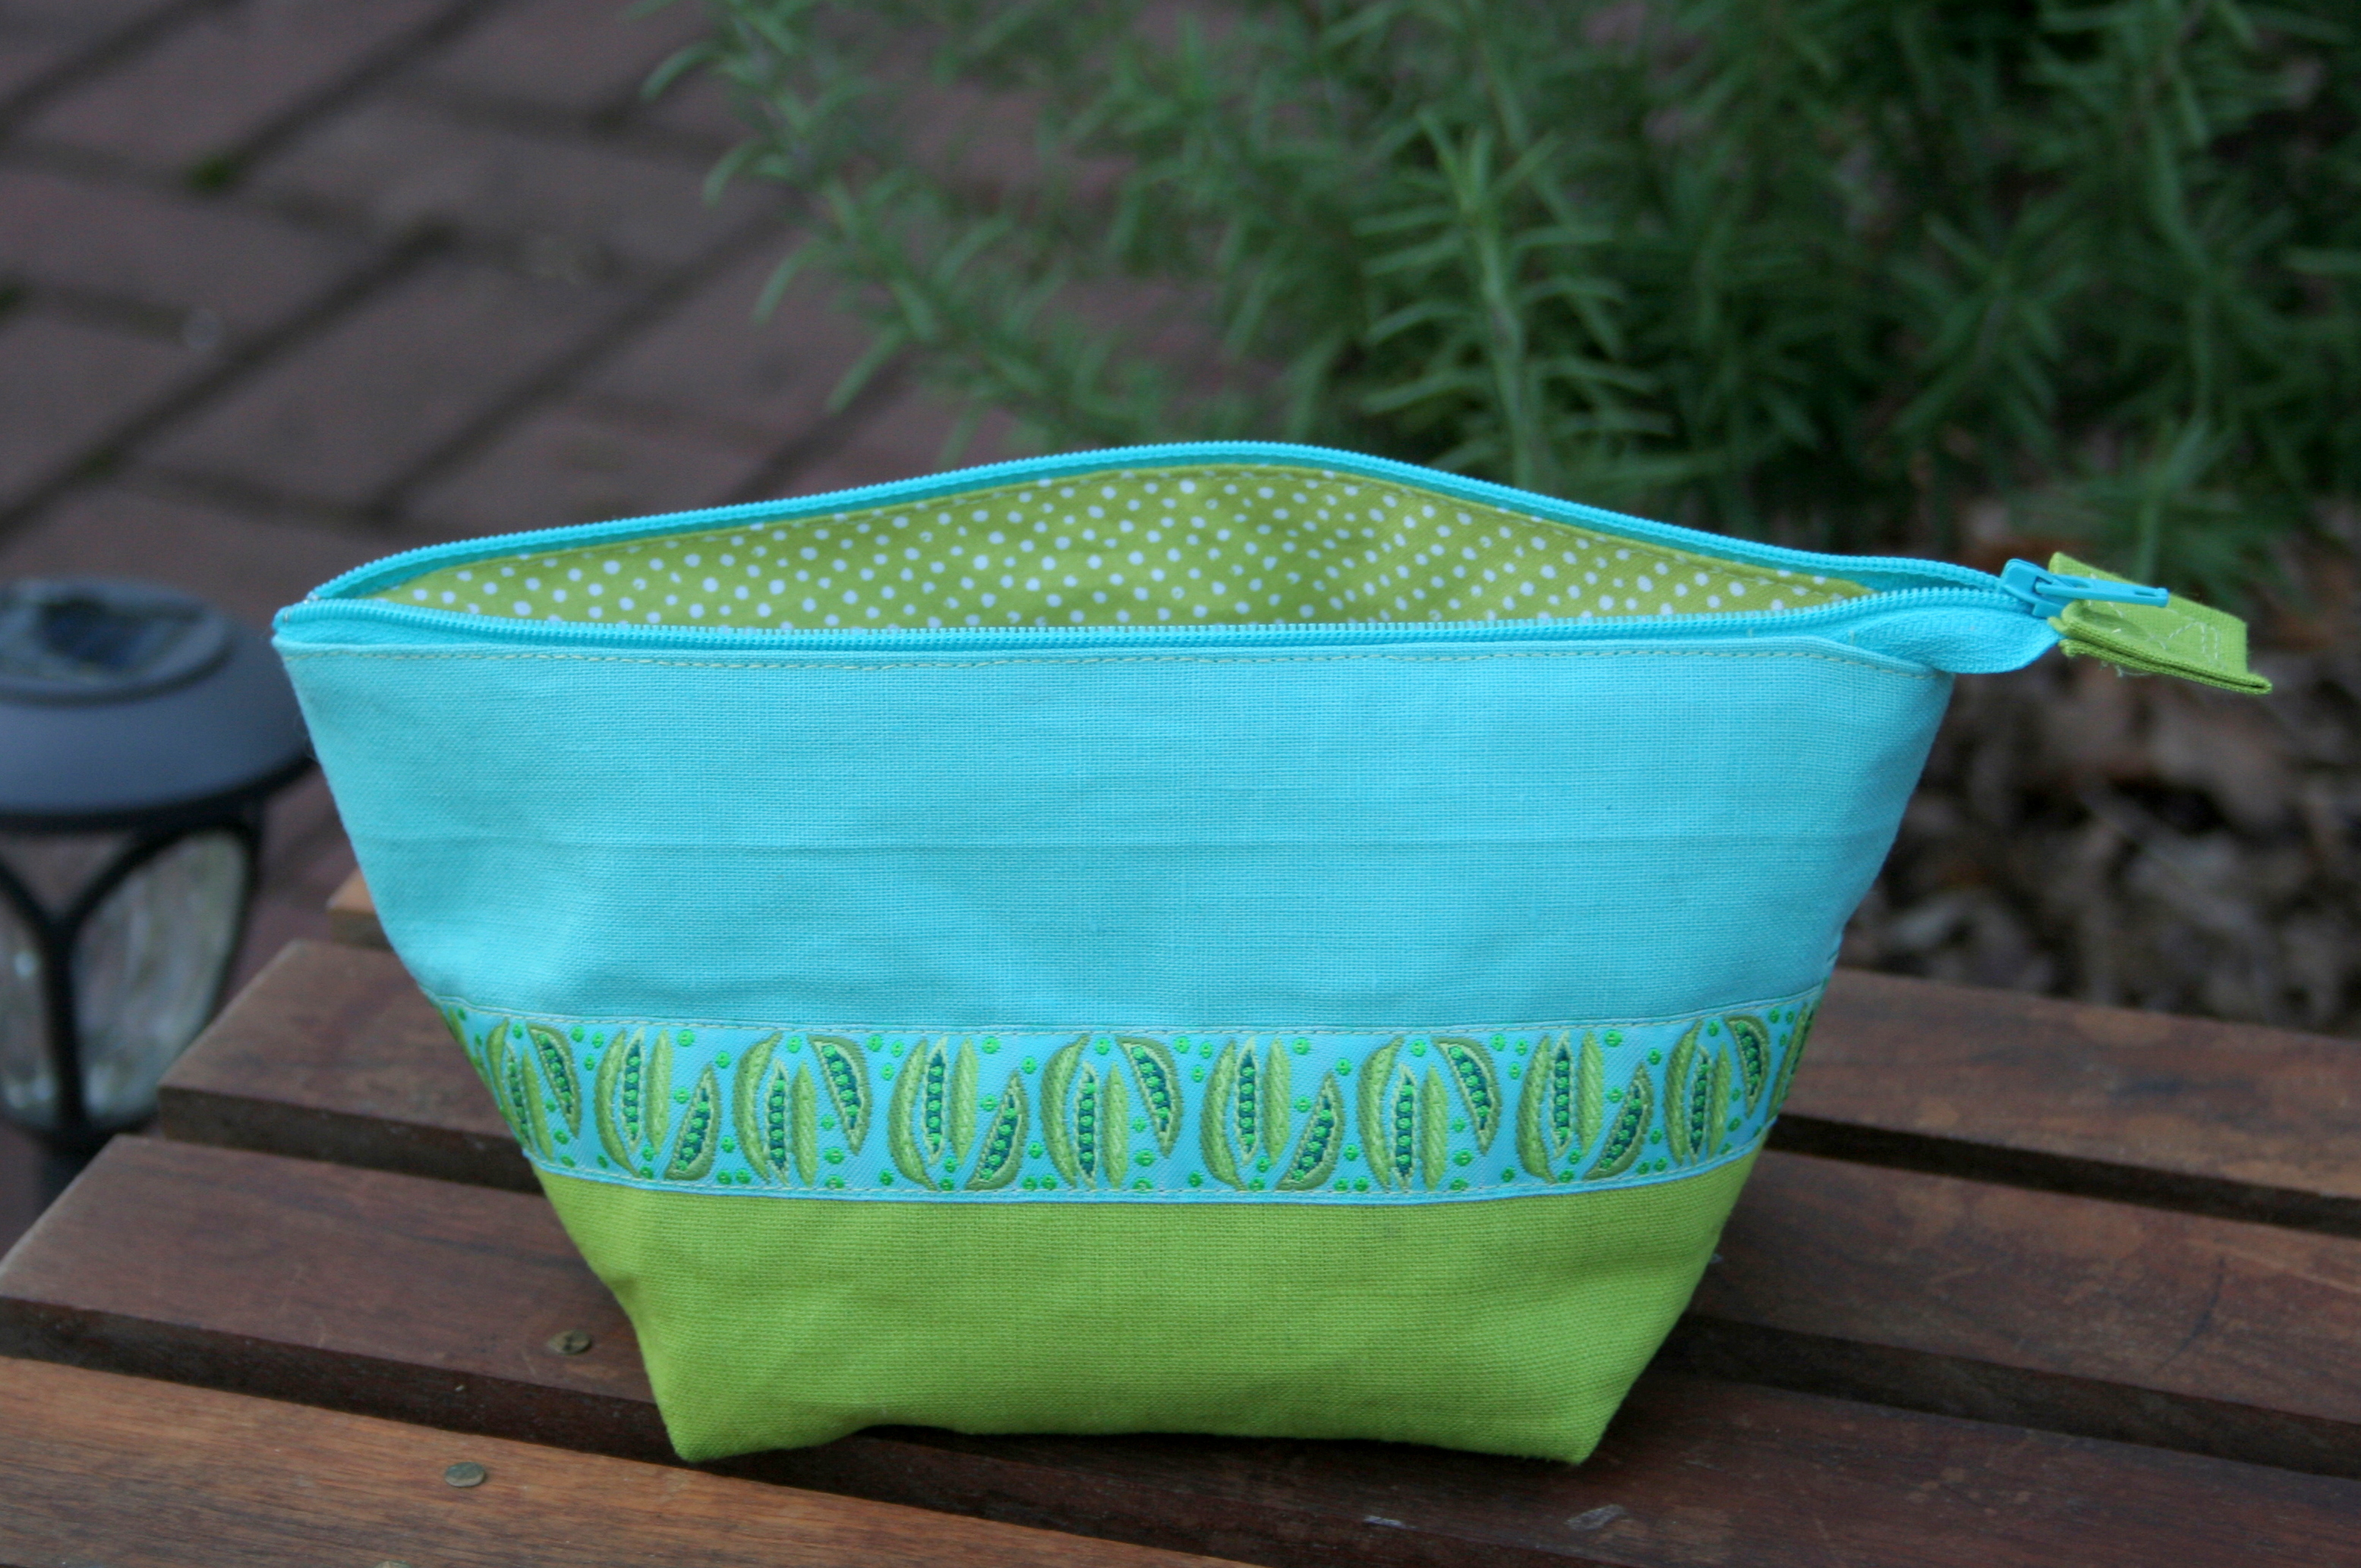
I made this pouch for my sister, since her favorite colors are teal and lime green. The zipper installation was my FIRST ever zipper, and I think it came out quite well. I used linen blend fabric leftover from my Go Anywhere Bag, and I think my sister loved it! Anna from Noodlehead has the best tutorials, and this one was a perfect first-zipped pouch tutorial.
One thing I learned while making this pouch, though, is that when the directions say to “align… the side/bottom seams” while boxing the corners, you really need to line them up perfectly. The bottom and side seams for mine (as you can see in the photo above) did not line up perfectly, since I flew past that little bit of instruction, but now I know for next time! I’m hoping that the chocolates inside the pouch distracted my OCD sister from this slight misalignment! (Love you, Lucy!)
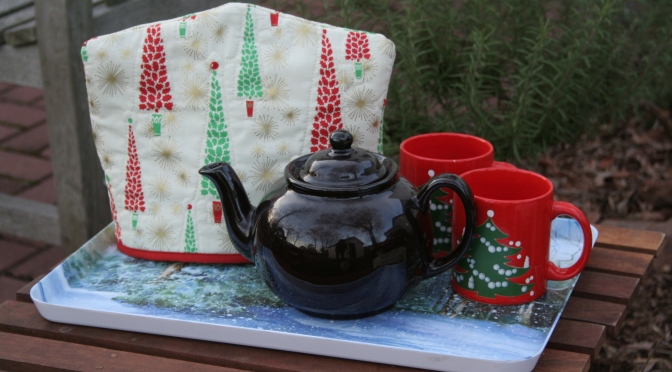
Reversible Tea Cozy
When talking to my mom about quilting about a year ago, she made it clear that she thought making a quilt was too much work and too time consuming, and therefore she did not want me to make her a quilt. She instead requested “a tea cozy for every season”, since it’s a quick project that can be completed in a couple hours. She also drinks tea from her tea pot every afternoon, so it will be well used and loved. It has taken me a while to get this first one made, but I don’t think the next one will be far behind. I used the fabulous tutorial by Yvonne at Quilting Jetgirl. I definitely will be using her tutorial again, since the tea cozy fit my mom’s large teapot quite well. Here are the two Christmas-themed sides of the tea cozy I made for my mom.
A New Paper Piecing Pattern!
And finally, a recent finish: a new paper piecing pattern called Love Struck. Special thanks to Julie from That’s Sew Julie for her awesome pattern testing! This pattern includes printable foundation paper piecing templates including two “printer pages” to help save paper when printing multiples, clear assembly instructions, a coloring sheet on which you can try out color schemes before beginning, and sewing tips along the way. You can find in on Craftsy here (for those in the US) or on Payhip here(if you’re international). Both this and my Key to My Heart pattern are on sale for $2 until Valentine’s day!
We’re getting lots of snow this weekend up here in Maine, so I know what I’m doing all weekend–sewing (and playing with my kids in the snow). If you’re looking for a good weekend project, turn this block into a festive table runner or pillow. Here’s the pillow Julie made from four blocks. AND she says she “whipped up this whole thing in a week while taking care of five kids, one sick, and getting a double crochet hat order together.” Holy smokes, Julie! You’re amazing!!
Get the pattern here:
Craftsy (if you’re in the US) Payhip (if you’re international)
…or go to Julie’s blog and comment to enter for a chance to win a free copy of the pattern!
If you do decide to make this pattern, share the love and tag me @nightquilter on IG or twitter, and use #lovestruckpattern. I’d love to see!
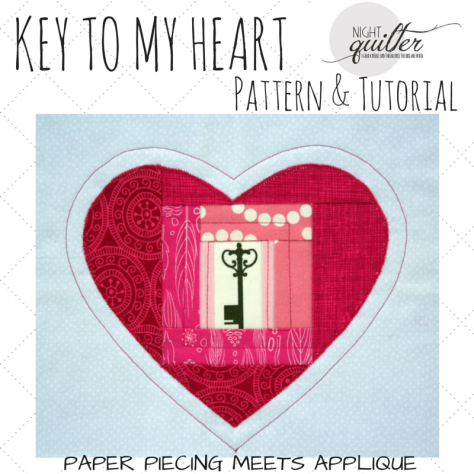
Since returning from vacation, my design wheels have been turning and cranking out ideas faster than I can create them and turn them into patterns. I did manage to finish this pattern, though, complete with a tutorial. Key to my Heart is a pattern that combines foundation paper piecing and applique to help you create a perfect log cabin-style heart on a 9″x9″ block (or a background block of your choice. The heart measures approximately 8″ wide by 7″ tall). The log cabin pattern is paper pieced for quick, “perfect” stitching, and then the heart shape is cut out and appliqued onto the background of your choice. The heart is shown on the paper piecing template so that your block is perfectly centered and ready to go.
This block would be perfect for a variety of Valentine’s Day gifts, or even just to show your love any day of the year. I plan to make my block into a tea cozy using Yvonne’s great tutorial here, but you could make yours into a mug rug, mini wall hanging, table runner, or even add it to a larger quilt.
The pattern is for sale in my Craftsy shop for those in the US, or in my Payhip shop for international folk. It is on sale for only $3.50 until February 1st, when it will be listed at the usual $4.50.
Since this pattern combines paper piecing and applique, I decided to provide a tutorial to help explain and show each step more clearly. Once you’ve printed your pattern template, you are ready to go!
Instructions
Step 1
Paper piece the log cabin portion of the block until fabric extends at least 1/4″ beyond all edges of the heart.
Notes:
*Shorten your machine’s stitch length to 1.2 to make paper removal easy.
*The center square is perfect for fussy cutting! Find key fabric to share the key to your heart. Or, be creative! Do you love cats? Fussy cut a cat for the center. Love tea? Fussy cut a teapot for the center. Whatever you or the gift recipient loves can be fussy cut for the center of this heart. Tip:Hold the paper and your fussy cut square up to a bright window or lightbox to be sure your fussy cut feature is centered before sewing.
Step 2
Using a long basting stitch (2.5 or larger), sew around the outside of the heart, approximately 1/8″ from the line (this distance does not need to be perfect, nor do the stitches need to be perfect. The purpose of these stitches is to hold all of your fabric flat while cutting out the heart shape.)
Step 3
Using scissors appropriate for cutting both fabric and paper, carefully cut along the dotted heart line.
Step 4
Remove paper piecing foundation paper. Jump for joy at how easy it is since you shortened your stitch length to 1.2 before paper piecing!
Step 5
Applique your heart to the center of your background fabric using your preferred applique method.
Notes:
*To accurately center your heart, fold your background fabric in half and press lightly. With the fold running top to bottom, line up the center top and bottom of the heart with the pressed center line of the background fabric. Either measure the distance from top and bottom of the background fabric until it’s equal, or position your heart as desired.
Step 6
Find gorgeous matching thread. (I love Aurifil, and there’s almost always a perfect match!).
Step 7
Quilt and finish as desired.
I would love to see if you create this block. Photos of your finished block can be posted in my Night Quilter Creations group on Flickr found HERE, or can be added to the Craftsy page HERE. The first three (3) people to buy, complete, and upload a photo of a completed block to either the Flickr group or my Craftsy page will receive a full refund OR choice of another pattern from my shop. How about that for sharing the love!?
Want to share the love some more? Instagram your blocks and tag me @nightquilter.


 Before stitching up a Peder or Halvor Tomte (my two favs at the moment), I had to sew one of the adorable Tiny Tomtes! This Tiny Tomte is a free addition when you buy the Tomte Bundle and is the size of a mini charm square. I’m going to try to resist the urge to make sweet little Tiny Tomte ornaments for everyone I know, but no promises! This particular little guy will happily live on our tree this year, once I give him a little French knot nose and finish him up with some hand quilting and binding.
 I used a Henry Glass print for the background, since the mushroom and snail seemed right at home with this Tiny Tomte. This print actually also happens to be the very first fabric I ever bought, years and years ago before I began quilting. The red fabric is from my scrap bin, some gorgeous Oakshott Lipari from my Vesuvius quilt. The white is a tiny scrap of Robert Kaufman Kona white. These blocks would actually be really fun uses for any tiny scraps. I used 50wt Aurifil 2600-Dove thread since that lives in my machine and works for everything.
 After sewing up this Tiny Tomte, I had to take him out on an adventure in the woods so that he would feel at home. During my youngest’s nap, I ventured out behind our house and Tiny Tomte had a fun photo shoot! We found a gorgeous shelf fungus on a tree stump, so Tiny Tomte played beneath it.
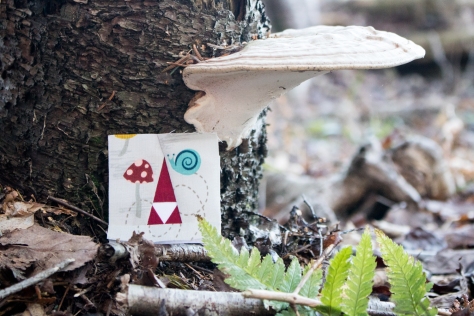
 And on top of it!
 He climbed some trees and gathered some souvenirs.
 A pinecone three times his size and an evergreen bough will have to hold him over until we cut our Christmas tree this year. I think they will do just fine.
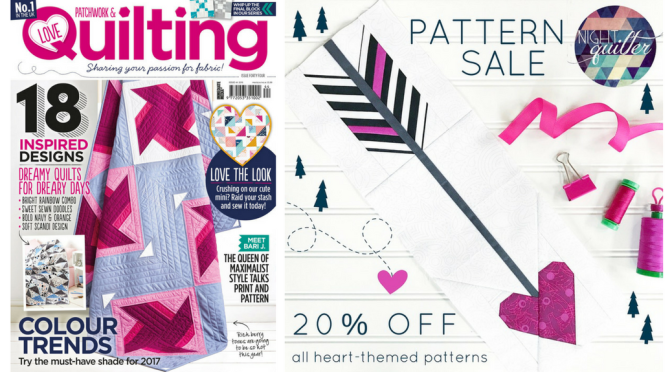
 While this is not the first time one of my patterns has been on the cover of a magazine (
 Inspired by a tile pattern I saw a couple of years ago, this quilt is a great one to use for color play (or colour play!). It looks great in any colorway, and the fun accent block helps feature your focal or accent fabric.
 I love the styling done by Love Patchwork & Quilting for the photos! I made this quilt using Kona cottons from

 First, I’d like to introduce you to
  Living in midcoast Maine, an ocean path felt like the perfect inspiration for my quilt. I wanted to embrace the simple beauty of nature while providing a pattern that could be adapted to fit any color scheme, style, or decor.
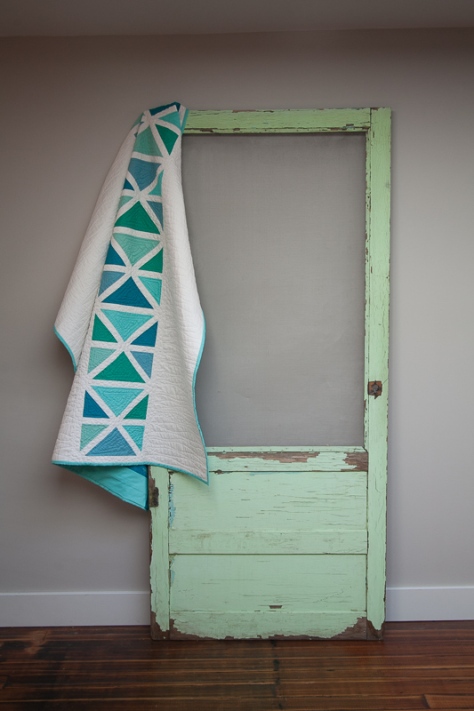 I should note here that the stunning photos included in this post were taken by
 Using simple construction from easily cut triangles and sashing, this quilt comes together in a breeze. Generous negative space provides room for intricate free motion quilting, or you could finish it with simple modern straight line quilting.
 Many thanks to
  I quilted Ocean Path with echoing, organic triangles within each colored portion using 50wt
  All of the Quilt Theory patterns are simple enough to be printed on 4″x6″ cards or a single page downloadable pdf. At only $3 each, they are perfect for gift giving or collecting, too!

 To celebrate the launch of Quilt Theory, I am giving away a copy of my pattern, Ocean Path (printed or PDF, your choice!) along with a PDF of all of the Quilt Theory Coloring Pages. I’m also including

 I created my version of Constant Flux inspired by
 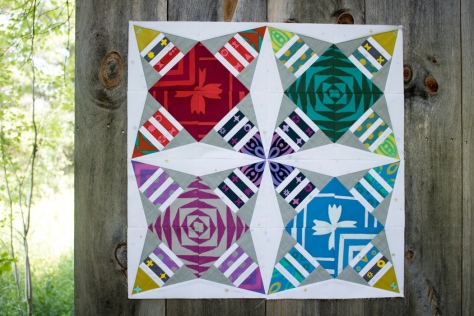 Constant Flux is available in my
  For now, I haven’t quilted my first one and I already want to make Constant Flux in a different colorway. Look at all of the options I came up with in just a short moment of color arrangement play! The pattern comes with a full page coloring sheet so that you can explore your options before diving in. That bottom right version is calling to me–which one would you make first?!


 The pattern includes clear piecing diagrams, sewing tips, and templates for the 8″x12″ finished block, with various shading to help with accurate fabric placement. Quarter inch seam allowances are included on all pattern pieces to help ensure easy piecing, and a 1″ reference square is on every printable page so that scale can be confirmed. Full foundation paper piecing instructions are not included in the pattern, but I have a thorough paper piecing tutorial