

There’s something about making a pattern your own that is especially desirable for many makers. Whether through varied fabric choices, changes in color and value placement, or even addition of new features, taking a set pattern and making it look distinctly yours is satisfying. I also have a really hard time following a pattern without adding at least a *little* change to make it my own, even, as it seems, with patterns I designed myself!
As I photographed my latest Constant Flux Christmas mini quilt top, I realized that I’ve sewn up my Constant Flux foundation paper pieced pattern in three very distinctly different ways. One was even so distinctly different I decided a stand-alone pattern was the best route, since explaining my section-grouping might not be the easiest to do! I thought it would make a fun blog post to show you different ways you can take one pattern (Constant Flux, in this case) and make it look completely uniquely different.
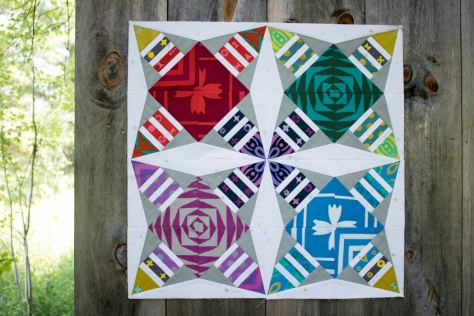 When I first designed Constant Flux, I was aiming for a pattern that was fun and geometric, but allowed for meticulous cutting fun. I used Alison Glass Handcrafted fabrics from Andover, and my focus was on the big scale prints in that line. With meticulous cutting and careful placement, the radiating pattern is clear, with the white star-like secondary pattern for some added interest.
 Then Alison Glass came out with her Seventy-six fabric line and Andover Fabrics asked if I would make a mini quilt for their booth at QuiltCon. How could I resist!? I had been wanting to sew up a Constant Flux quilt in a different colorway anyway, and in looking at Alison’s fabrics, I wanted to use all of the colors.
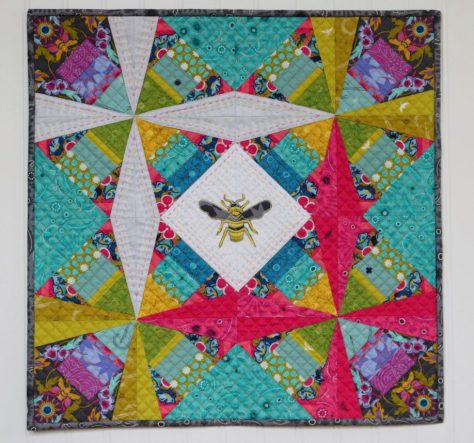
 I had recently discovered Nichole Vogelsinger’s Boho Embroidery book, and really wanted to incorporate a Wild Boho-style embroidered applique in the center, so I rotated the blocks 90 degrees. Same exact blocks and pattern as my original Constant Flux, only rotated and shrunk to 80% so that the scale of the bee fit better. Constant Flux a second way.
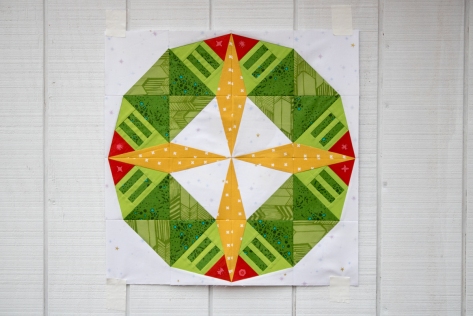 Finally, while playing around with color placement options on my original Constant Flux pattern, I discovered that when arranged a certain way, it looked very much like a Christmas wreath! Because this required merging large sections of the pattern into one fabric instead of many, I decided that it was high time I tackle a holiday pattern, and I made three new templates to make Constant Flux Christmas come together smoothly and easily. It is closely derived from the original pattern, and if you have the original Constant Flux pattern you can technically make the Christmas version if you have a strong understanding of foundation paper piecing and how to join pieces to make it happen. I created a separate pattern to make it easier for everyone. That brings us Constant Flux a third way.
 I wonder what it will look like in my fourth rendition?
Do you follow patterns to a T, or do you change things? I’m always curious to hear, since from talking to other quilters, it seems that we fall into two pretty clear camps: those who follow patterns meticulously, and those who just can’t seem to follow the pattern as written and must change or add some feature nearly every time. I clearly fall into the latter. I’d love to know what camp you fall into!

 July is well underway which means it’s time for the second annual Christmas in July Pattern Bundle Sale! Get it before it melts!
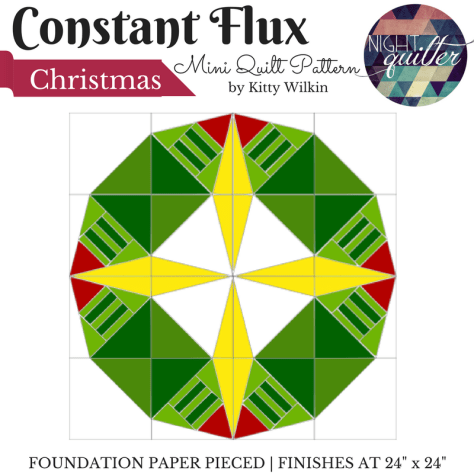 As a bonus, when you purchase the bundle through me, here, you will also get an exclusive Christmas version of Constant Flux, complete with additional pattern templates and fabric requirements to make stitching a Constant Flux Christmas wreath mini quilt easy peasy. Creating the Christmas Wreath version of the Constant Flux pattern is possible with the original pattern by combining necessary piecing segments as long as you have an understanding of how foundation paper piecing works, but the bonus pattern spells it out clearly. Be sure to get yours today, since this pattern will not be released individually until the snow begins to fall.
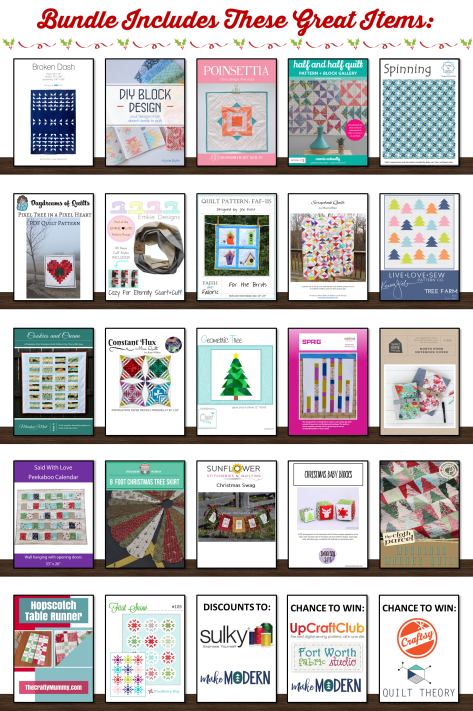
 You will get immediate digital download of all of the patterns shown above, plus*:
 PLUS, as I mentioned above, if you buy the bundle HERE you also receive an exclusive Christmas Constant Flux pattern, which will give you plenty of time to sew up a wreath or two before the holidays!


 I had a lot of fun with the
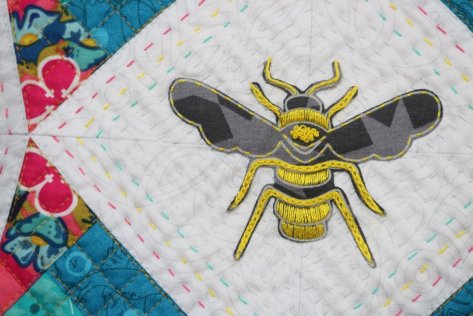
  I knew I wanted to incorporate both hand and machine quilting, and I knew that I wanted the machine quilting to be dense. It took me a while to decide between using 50wt Aurifil 2600-Dove or 5015-Gold Yellow for the quilting, and finally I opted for the Gold Yellow to pull out the gold of the centrally stitched bee. I quilted a diagonal grid approx 1/2″ apart on all of the colored sections of the quilt and I love the texture it created. I wanted the white star and central diamond to pop, so I let them be, patiently awaiting hand quilting.
 I used a rainbow of 12wt Aurifil thread to help pull the rainbow from the gorgeous fabrics into the white sections, and I love the outcome! I decided to switch to 12wt 2600-Dove for the center so that the bee would stand out.
 The back shows that my hand quilting still has plenty of room for improvement (especially when trying to maneuver around the bee), but it’s still fun to see the back, too!
 I used Seventy Six fabrics Rising in Graphite and Numbered in Duck Egg for the back, with an Insignia in Chartreuse label.
 Labeling is one of my favorite parts–maybe because it helps me know that my name is on my work, or maybe because it means I’m finished with a project!!
 This quilt is currently in Andover headquarters in NYC for photography and other fun fabric adventuring before it returns to me, but it was super fun to see it hanging in the booth at QuiltCon (see it, top right??). You can see a photo of me proudly standing next to it in my