The hustle and bustle of the autumn harvest season has overflowed into my sewing habits. Over the past couple of weeks, I’ve been finalizing some new foundation paper piecing patterns with the help of some awesome pattern testers. I’m relatively new to the solicit-pattern-testers game, but I managed to find some great and enthusiastic testers through the Late Night Quilters Club facebook group. Here are my new patterns, and a sampling of the fabulous testing:
Leaf
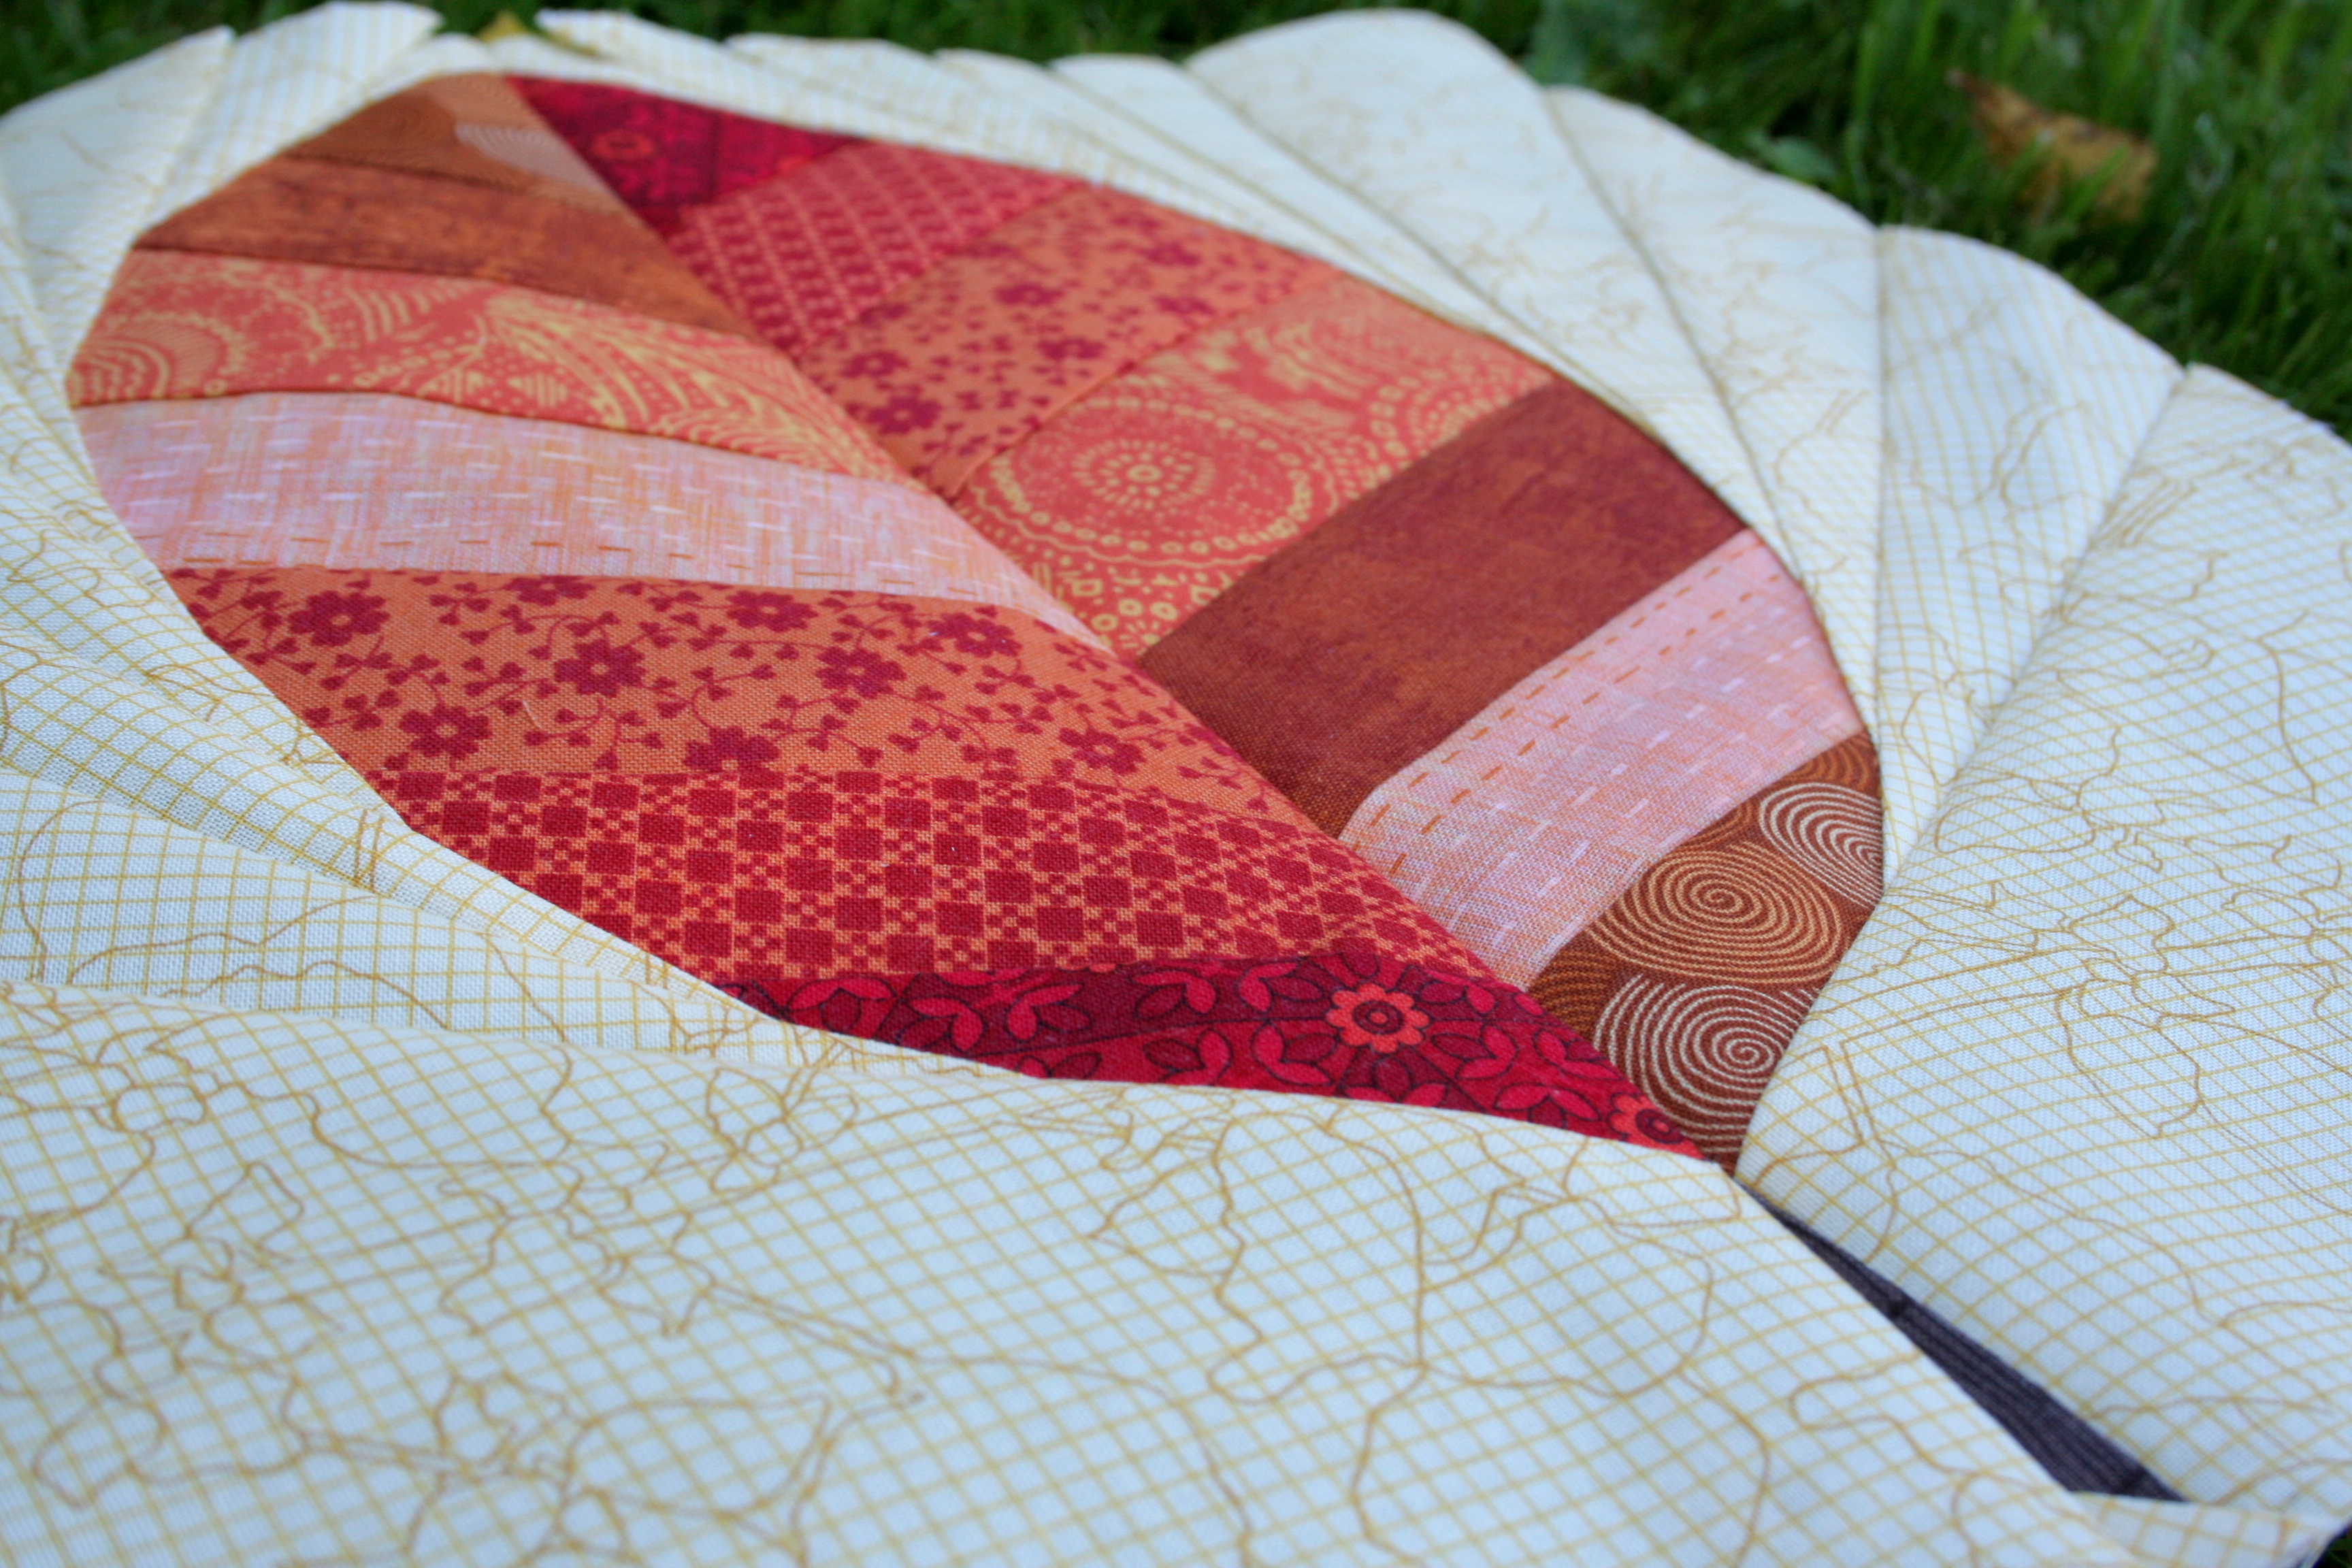
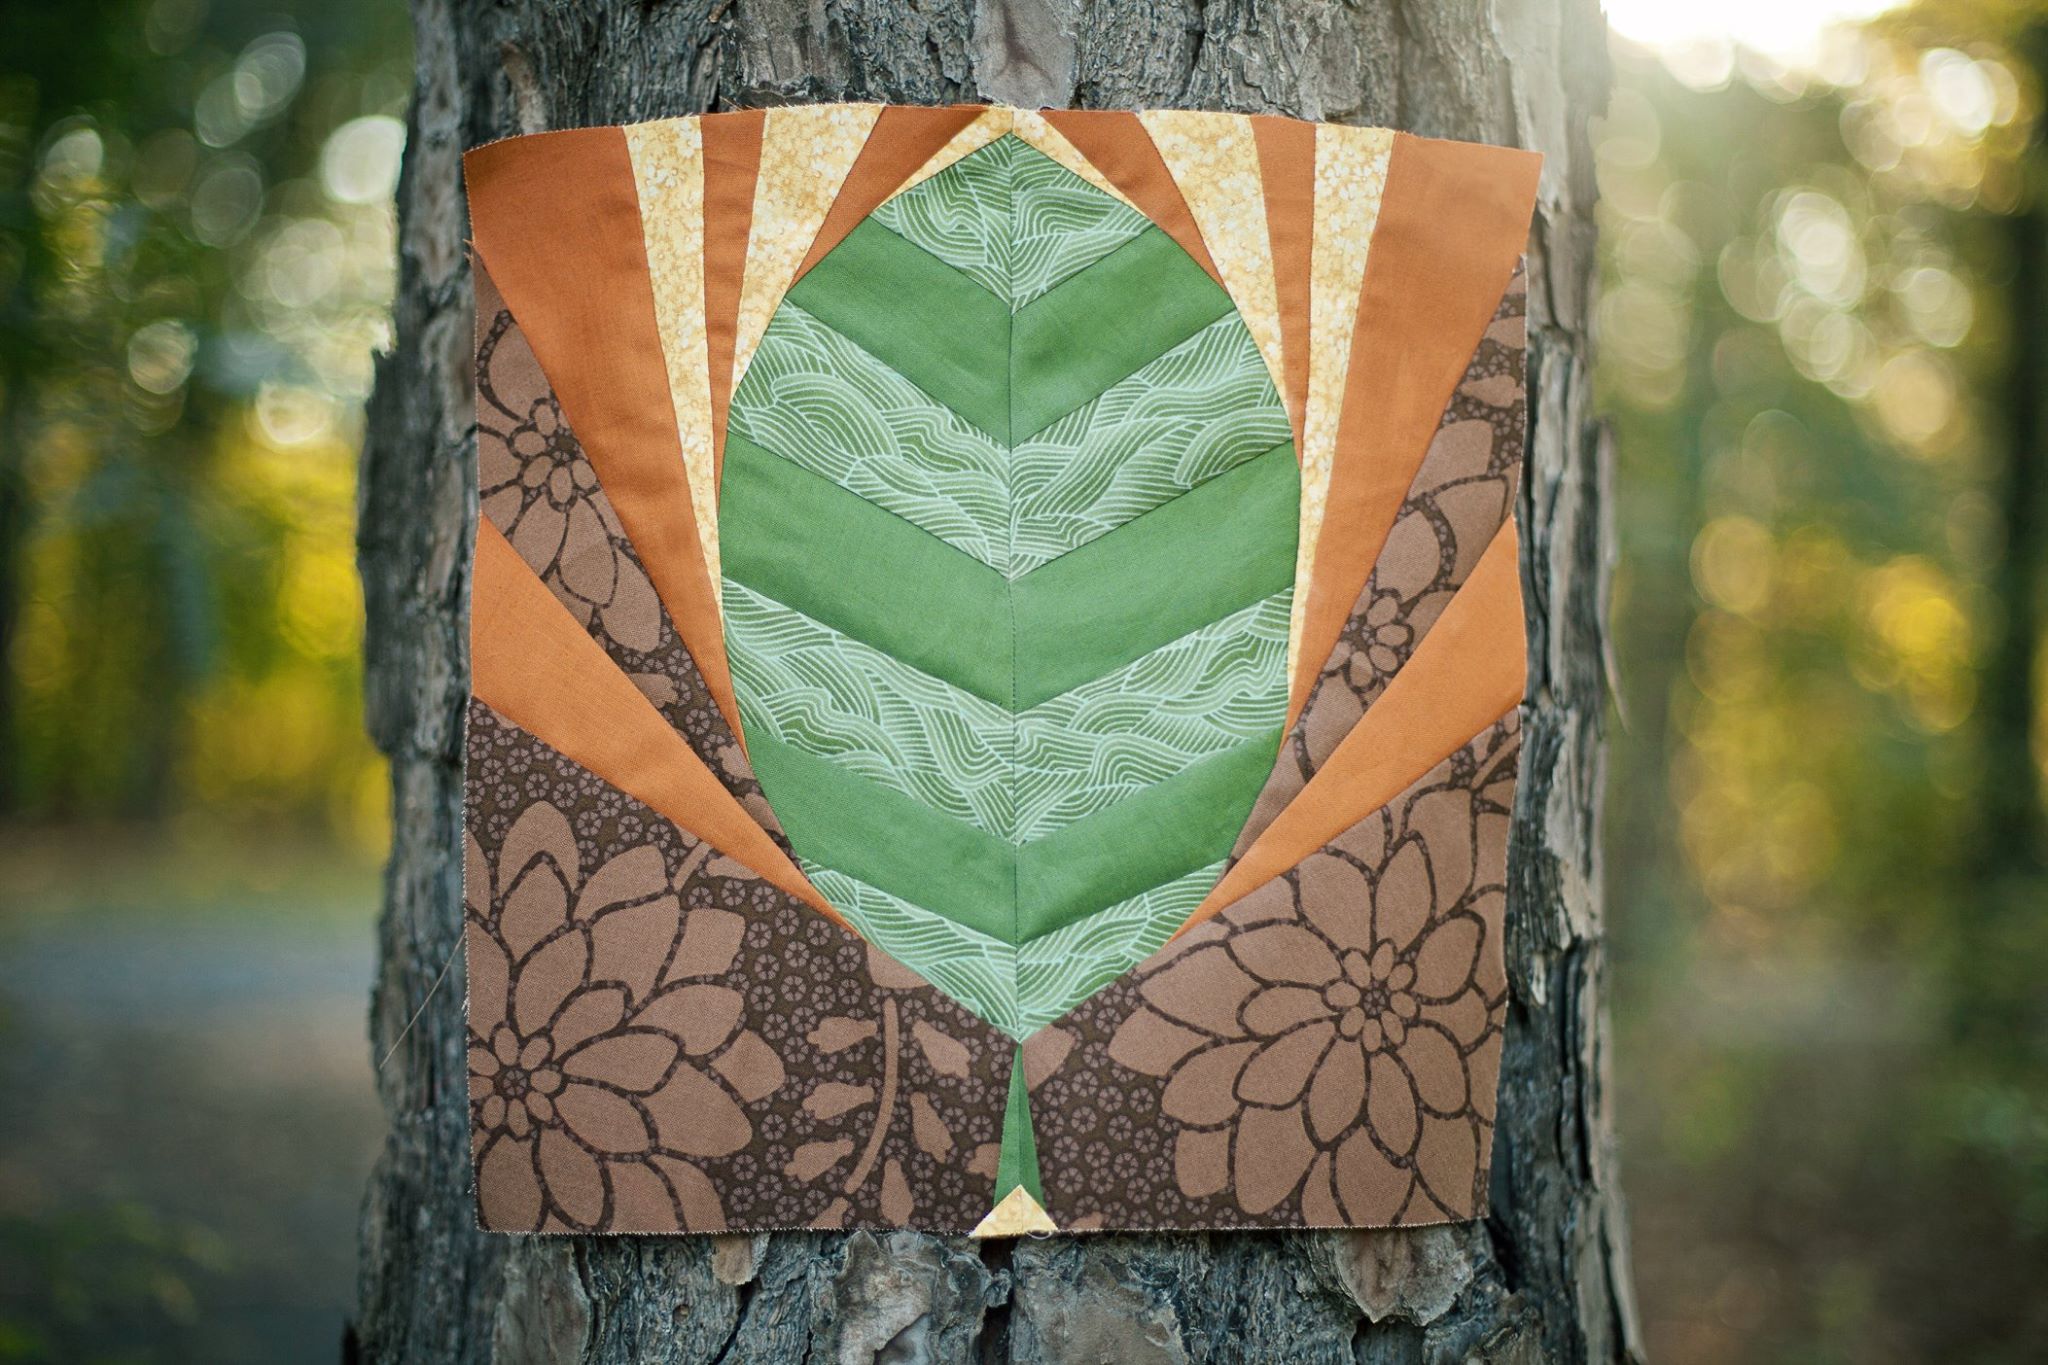
This pattern literally came to me as my family was driving home from church one Sunday. I have been really trying to simplify my patterns and focus on geometric symmetry. Perhaps the turning leaves speckling our drive home inspired me, but either way I quickly sketched out this pattern on a scrap of paper while my husband drove (don’t worry–I didn’t sketch it out while driving!). Here we are a few weeks later and it’s ready to go!
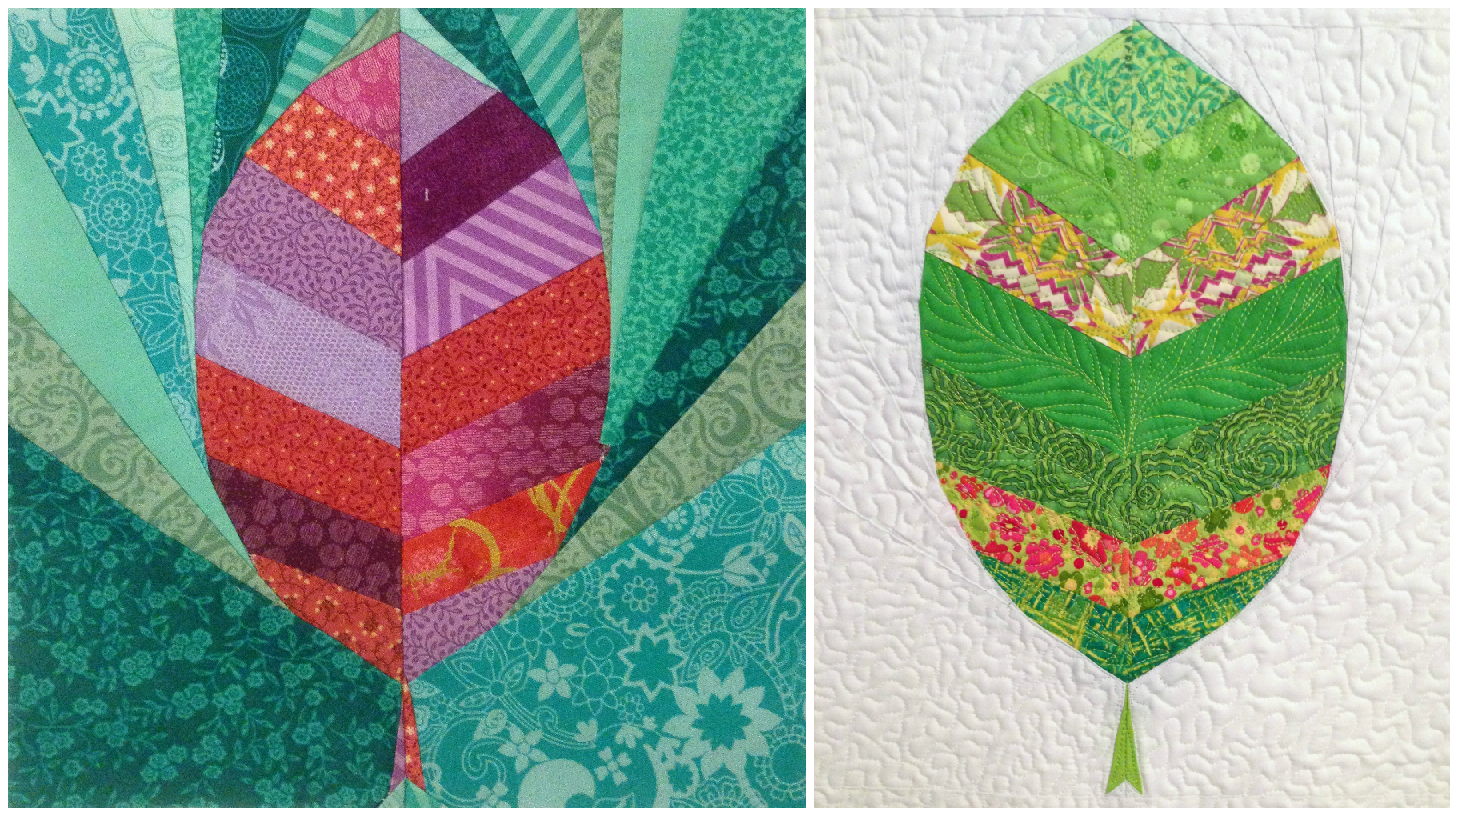
One of the most exciting things about sending your pattern to testers is the anticipation of what color scheme and design each tester will choose. My testers for this leaf didn’t disappoint! Check out these lovely tester versions; they are so incredibly varied and gorgeous!
Each of these three lovely ladies will be giving away a copy of my new pattern on her blog, so head on over to check them out and try your hand at winning this seasonal leaf pattern. The pattern is also listed for sale in my Craftsy store, and will be on sale for $3.50 for one week before it goes back to its usual price.
Fishies Rainbow Row
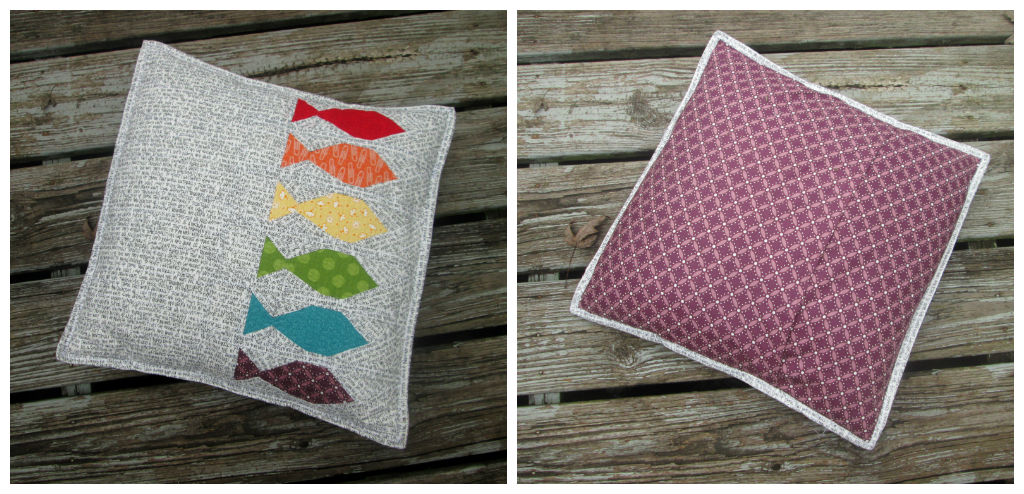
Just about immediately after sketching out my original Fishies panel, the idea for this alternate layout and color scheme came to mind. I sketched it out and wrote out rough piecing instructions and then put it on the back burner. When asking for pattern testers, Julie Schloemer from That’s Sew Julie offered to test my fishies panel pattern. After looking through her blog and seeing her style, I thought she might be interested in making my rough idea into a reality. Little did I know that she would literally make my exact vision into a reality! Here is the Fishies Rainbow Row pattern, exactly as I envisioned it, pieced and quilted by Julie.
I loved watching Julie’s progress with this on Instagram, from the first pieced fish, to the matching of thread in preparation of quilting, all the way to finishing as a lovely pillow. Check out these great photos by Julie:
Julie will also be hosting a giveaway on her blog, where you can enter for a chance to win a free copy of this pattern. The pattern is also listed for sale in my Craftsy store and will be on sale for $3.50 for one week until it returns to its usual price. Get it now!
I also recently created a Flickr group called Night Quilter Creations, where you can post photos of projects you’ve made using my patterns. If you’re on Flickr, go check it out, join in, and post your photos! I’d love to see what you create!
Foundation Paper Piecing is one of those things that when first encountered, may seem daunting enough to send you running for the hills. But once the general concept is grasped, paper piecing opens the door to a whole new world of quilting and fabric-play. Trust me, it’s worth giving it another go. As with anything, the best way to get more comfortable with foundation paper piecing is to practice, practice, practice, and then practice some more. Today I thought I’d share my process with tips along the way, in the hopes that it helps clarify the foundation paper piecing process.
For me, once I wrapped my brain around the fact that I was sewing something backwards while looking through a mirror, it all clicked. I’m a very spatial person, so once I could visualize that the picture was being created on the BACK, I was fine. Yes, the lines along which you sew will be on the back, or wrong-side of your sewn design. Think about that for a minute, and then let’s begin. Take your time, and have FUN!
Basic Foundation Paper Piecing Tutorial
First of all, why paper piecing? The ability to create life-like pictures with fabric is what first got me hooked on foundation paper piecing. Once I got the hang of it, I realized many more benefits to paper piecing:
No other method results in such precision and accuracy when sewing. You can make two blocks that are EXACTLY the same without too much muss or fuss about seams.
It is a great way to use up scraps.
My favorite perk of paper piecing is that it gives me a way to create gorgeous gifts for family and friends without the time invested in sewing an entire quilt. Paper piecing patterns are perfect for wall hangings, table runners, tea cozies, mug rugs, pillows, bags, and even as framed art.
Convinced? Let’s get started!
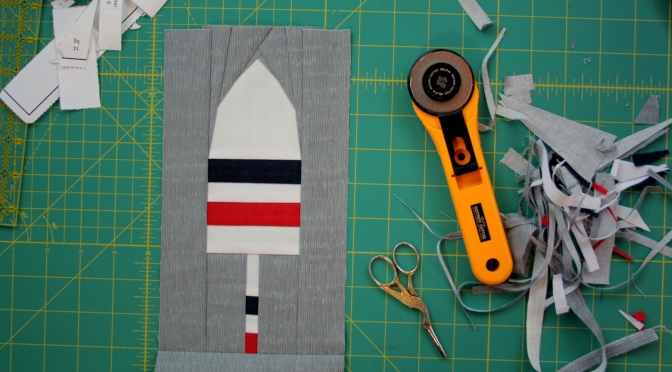
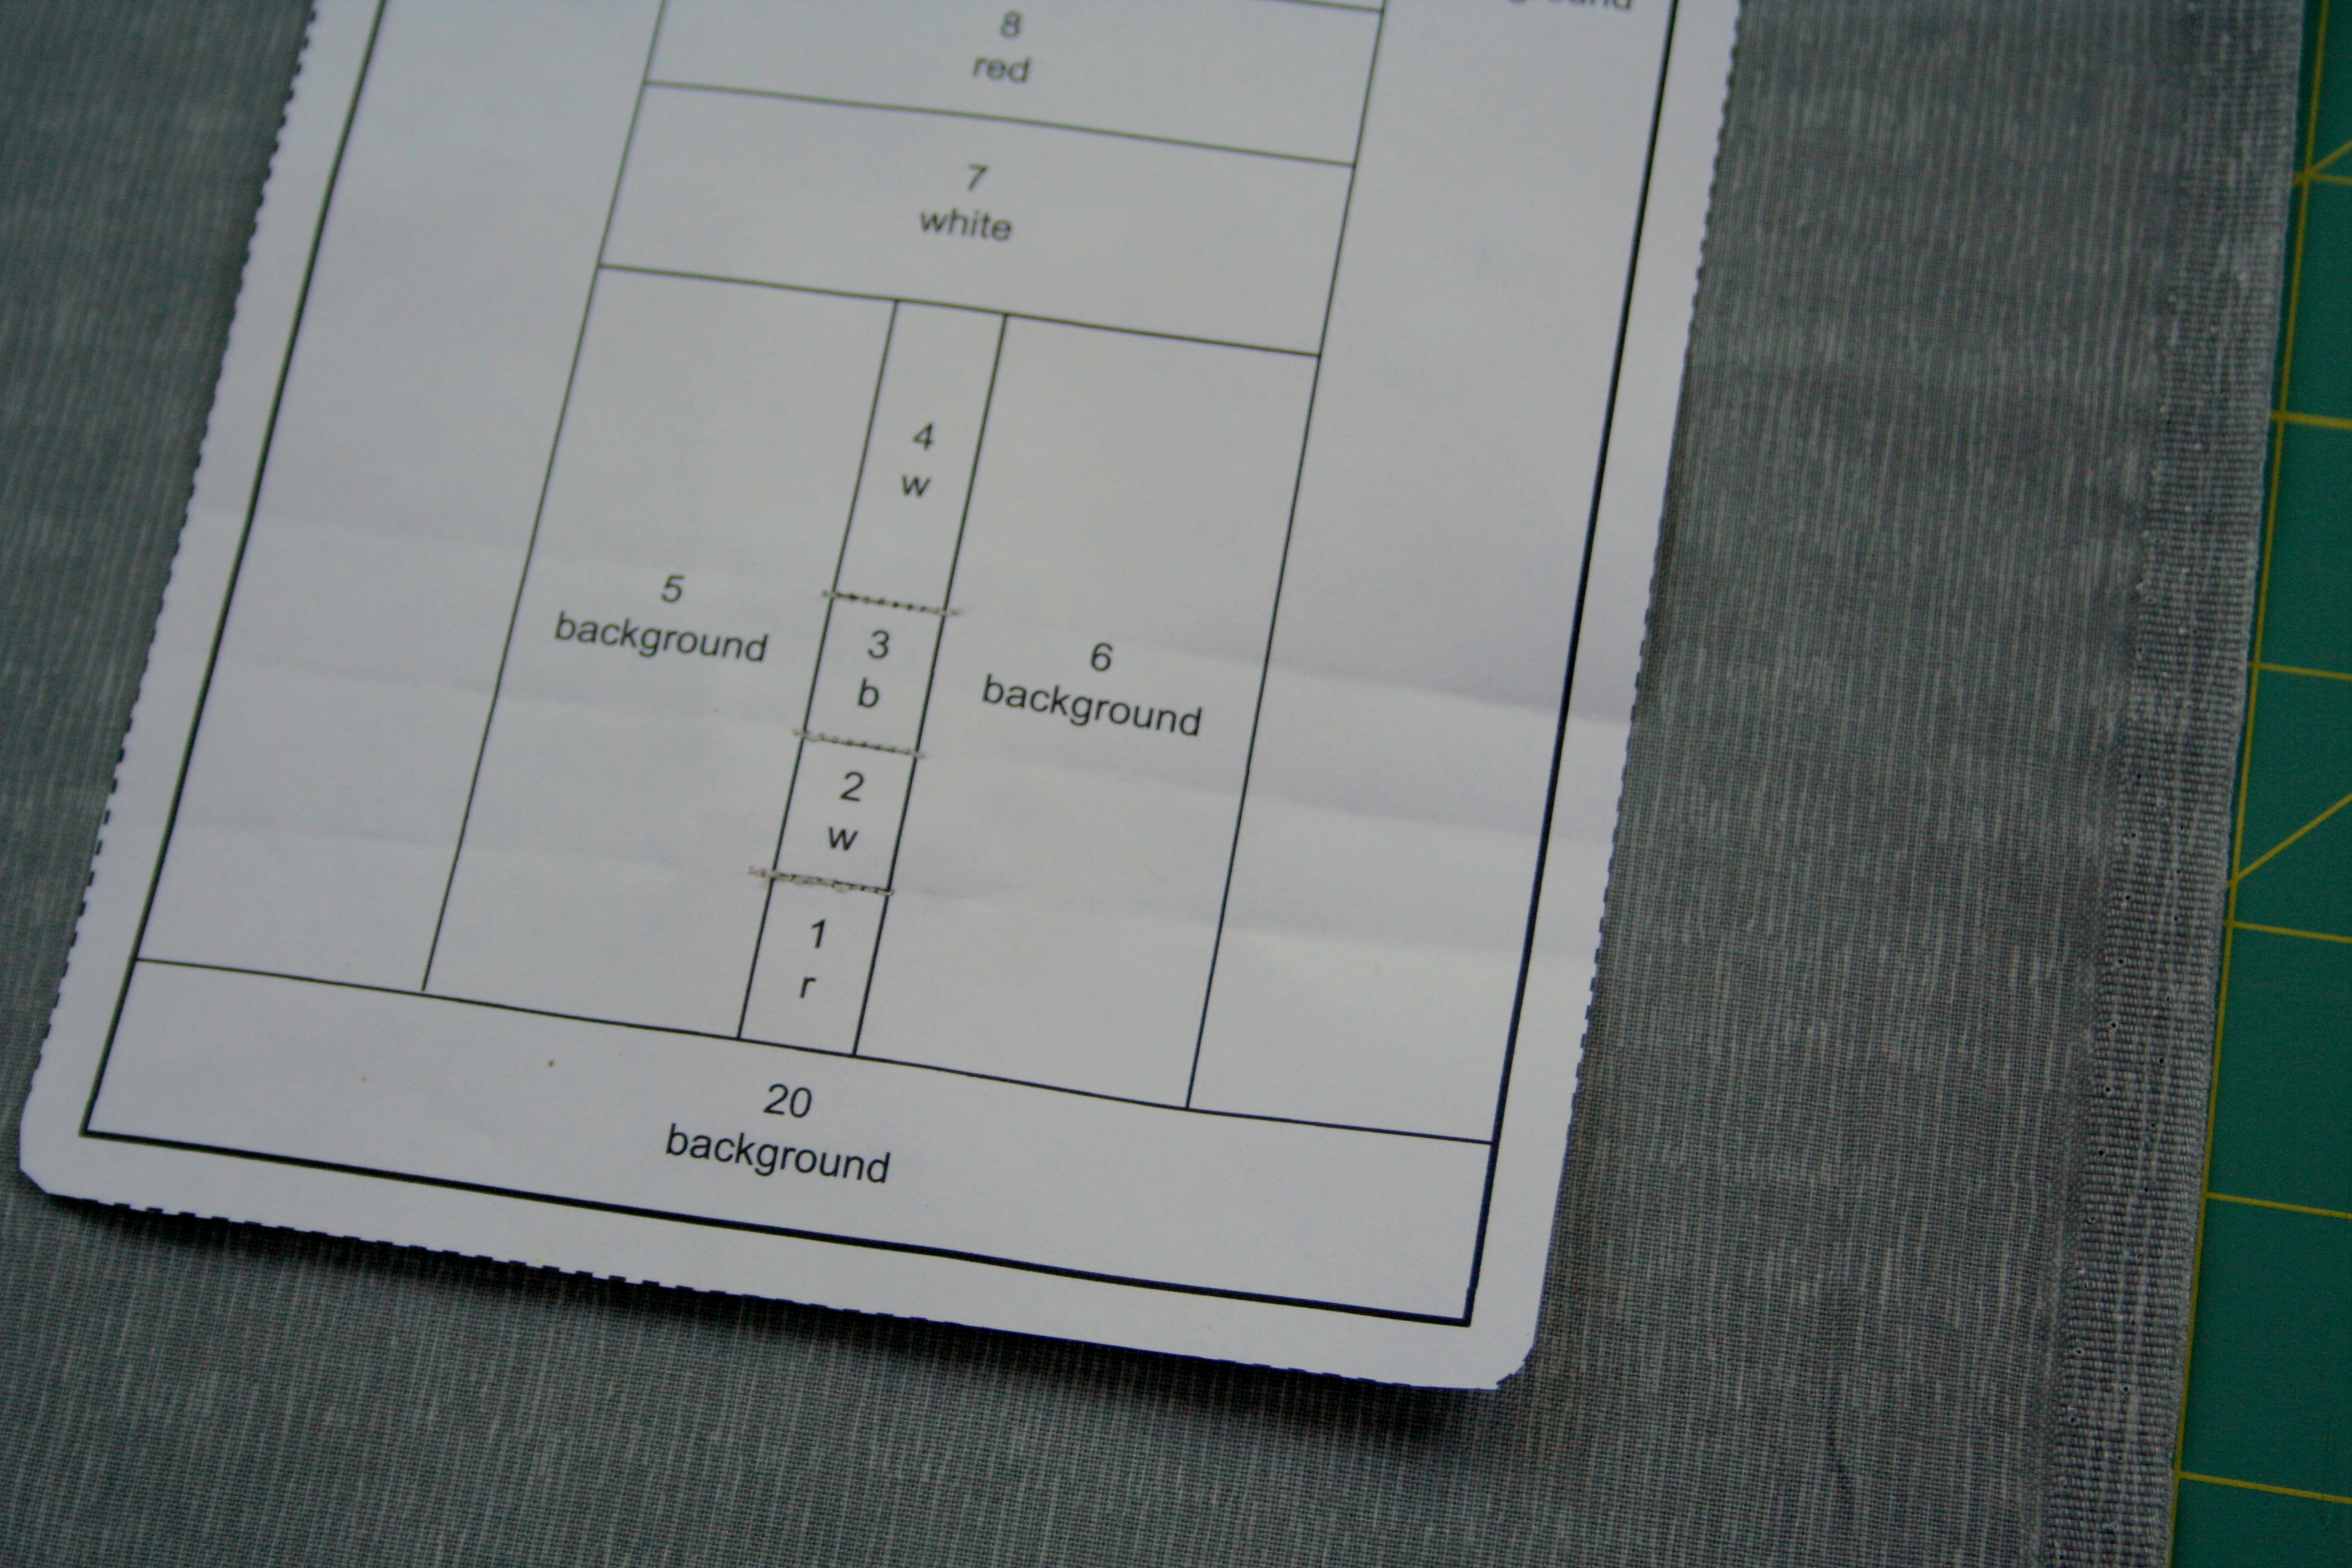
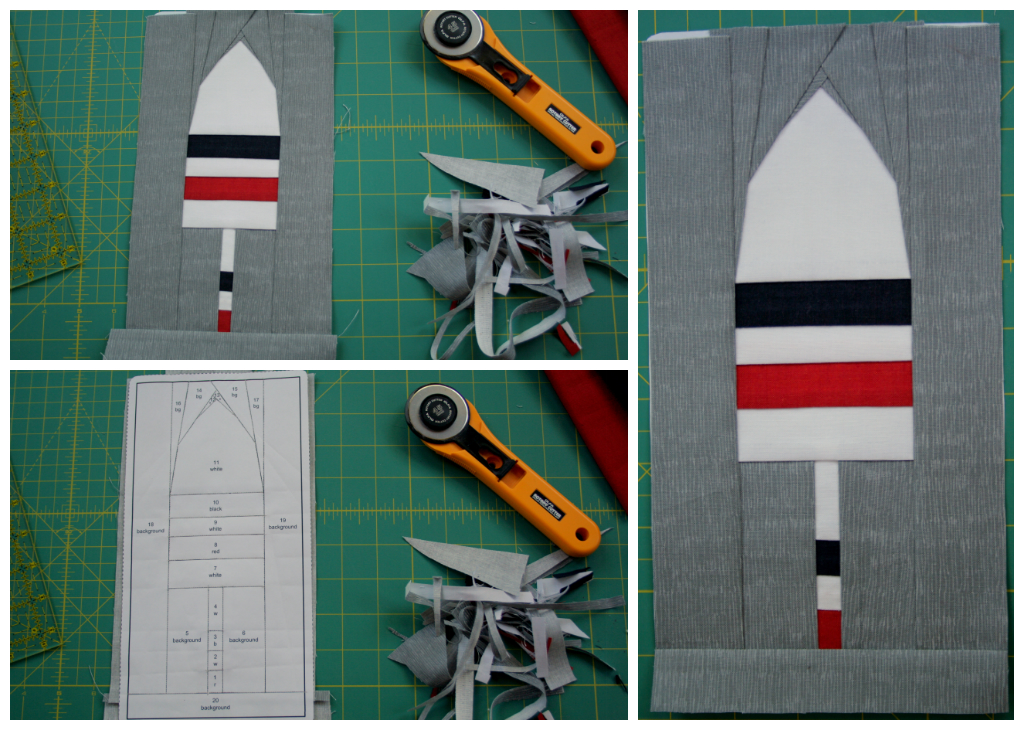
1. Choose a pattern. I am using my Buoy 1 pattern for this tutorial, since it’s fairly straightforward and consists of only one foundation piece. Summertime is calling my name, so this nautical pattern will soon become a pillow perfect for a beach house or someone’s nautical nursery. Buoy 1 used to be on Craftsy but is now no longer available, so you will need use another beginner pattern of your choosing. My available foundation paper piecing patterns are located on Payhip.
2. Assemble your tools. You will need:
– pattern & paper (I use regular printer paper. Some prefer velum or tracing paper)
– fabric & thread (I love Aurifil)
– rotary cutter and mat
– scissors (be sure to use non-fabric scissors to cut out your pattern. I suggest having fabric scissors, craft scissors, and small scissors for trimming threads)
– ruler (add a quarter rulers work well, but so do any quilting rulers with a 1/4″ measure)
– iron and pressing surface
– sewing machine
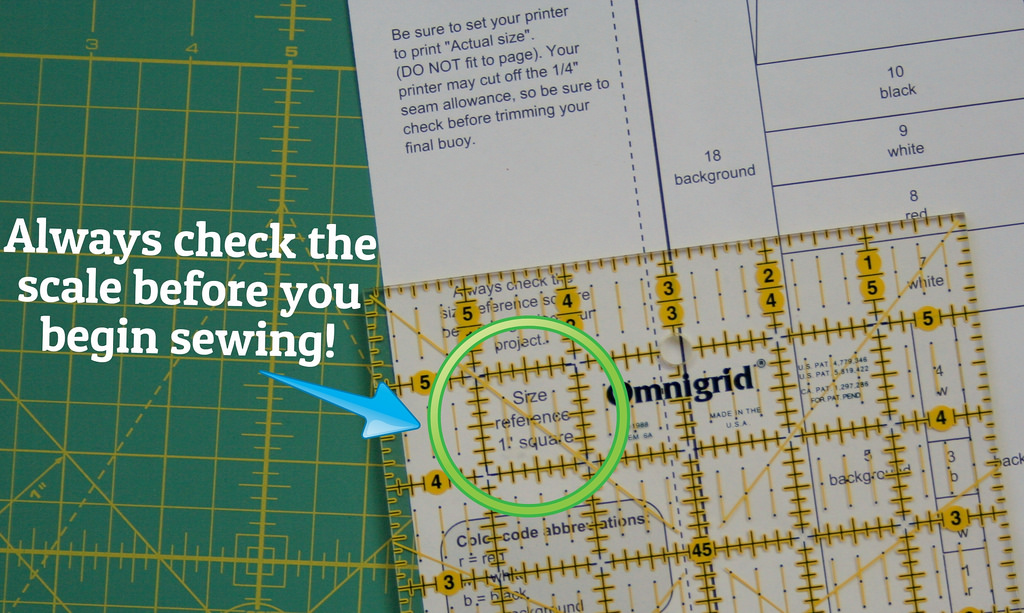
3. Print the pattern with your printer set on “Actual Size” and check the scale. ALWAYS check to make sure the pattern is printed to the correct scale before beginning to sew.
Cut out pattern using craft scissors. Many patterns have a dotted line showing a 1/4″ seam allowance on the pattern. Be sure to check that the seam allowance is included, and if it isn’t, add it on before you cut.
*Here, some people like to color their pattern with colored pencils to help with accurate fabric piecing. I only do this for complicated patterns or when I am using different fabric colors than indicated on the pattern, but you are welcome to get out the colored pencils and do some coloring here if you want!*
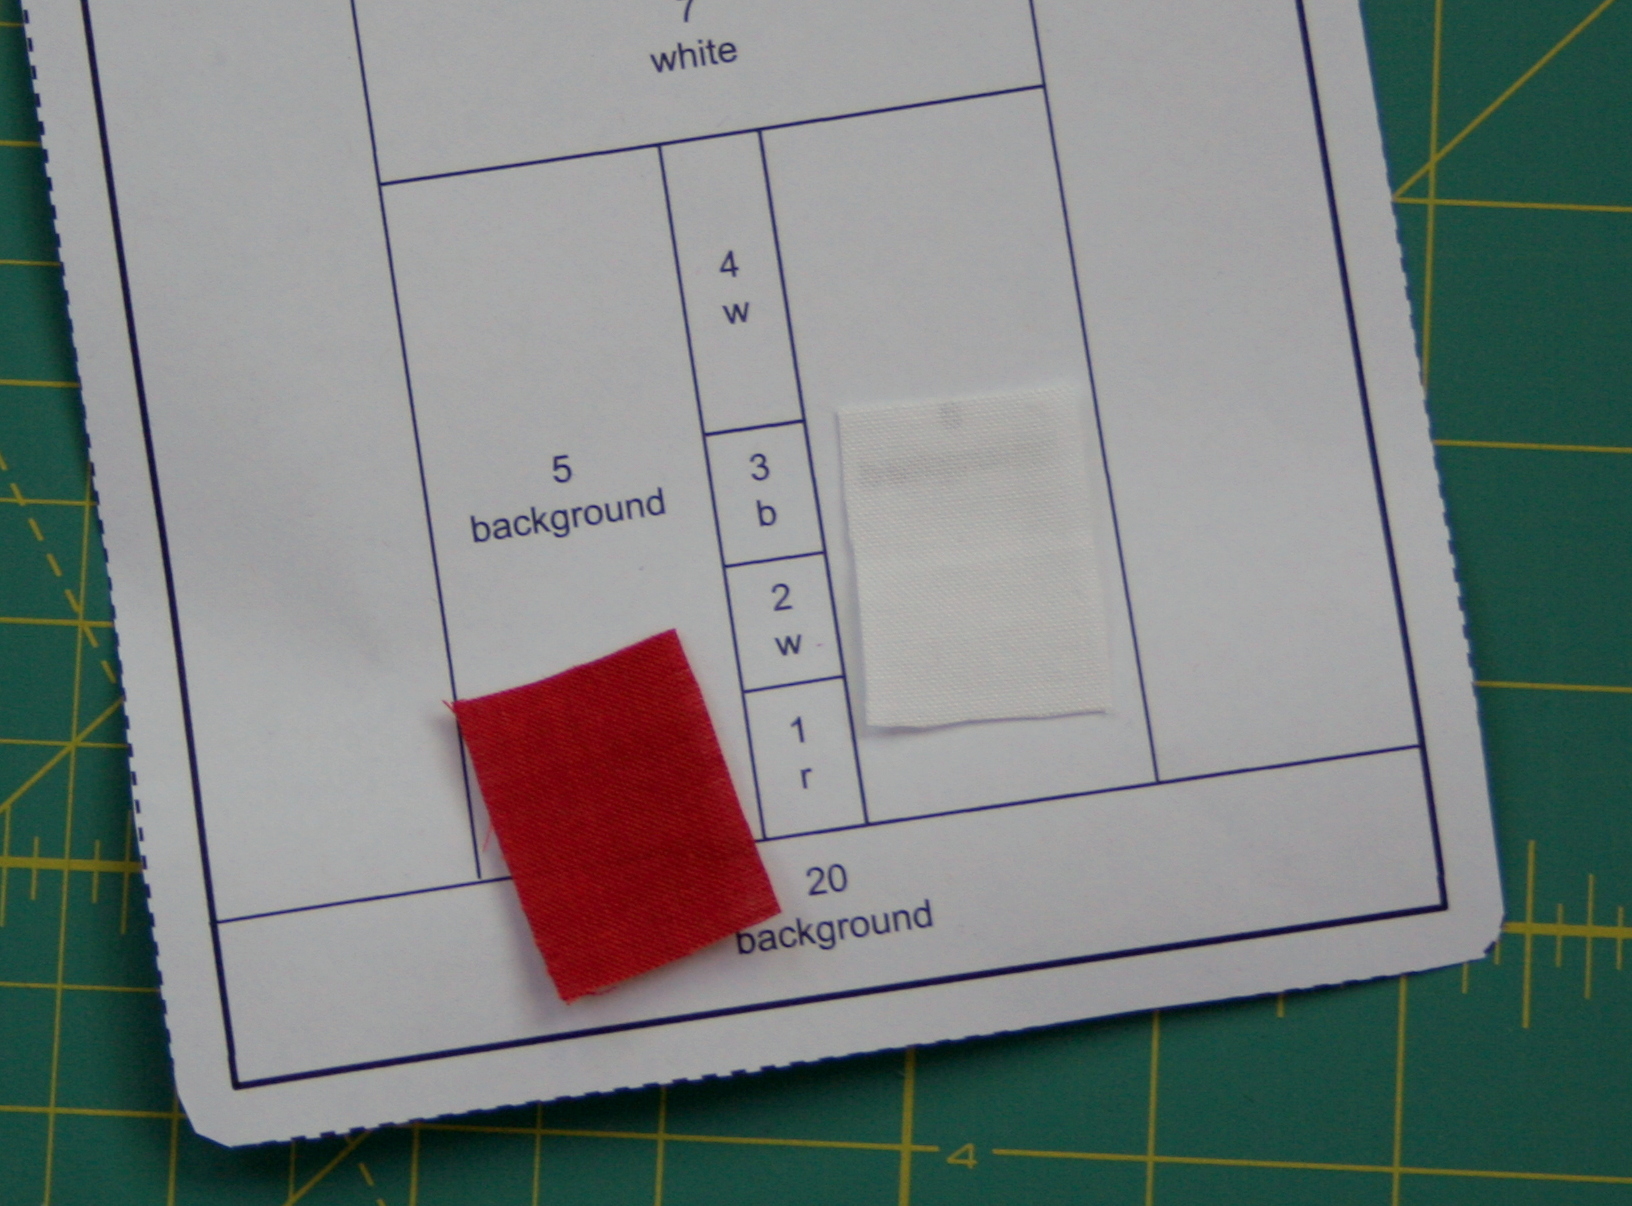
4. You’re ready to begin! Cut fabric pieces (or find scraps) to fit spaces 1 and 2 on the pattern. Be sure to include a 1/4″ seam allowance on all sides. Paper piecing is kind of like paint by number, but with sewing, and always in order. You start with piece 1, sew on piece 2, then piece 3, etc. *When cutting fabric for paper piecing, I am generous in my cutting. I cut pieces that are amply large enough to cover the space and seam allowance and then some–lots of wiggle room. Yes, it may waste a bit more fabric, but it makes the process a lot smoother. To me, smooth (no seam ripper required) sewing is worth more than a few tiny scraps of fabric. Also, when you trim your seam allowances, any large pieces of excess fabric can be used for other pieces of the pattern. Go big!*
5. Here’s where the spatial part comes in, so get ready. Remember, you are using the paper foundation to help you make the pattern on the back, as if you are looking through a mirror. Ready?
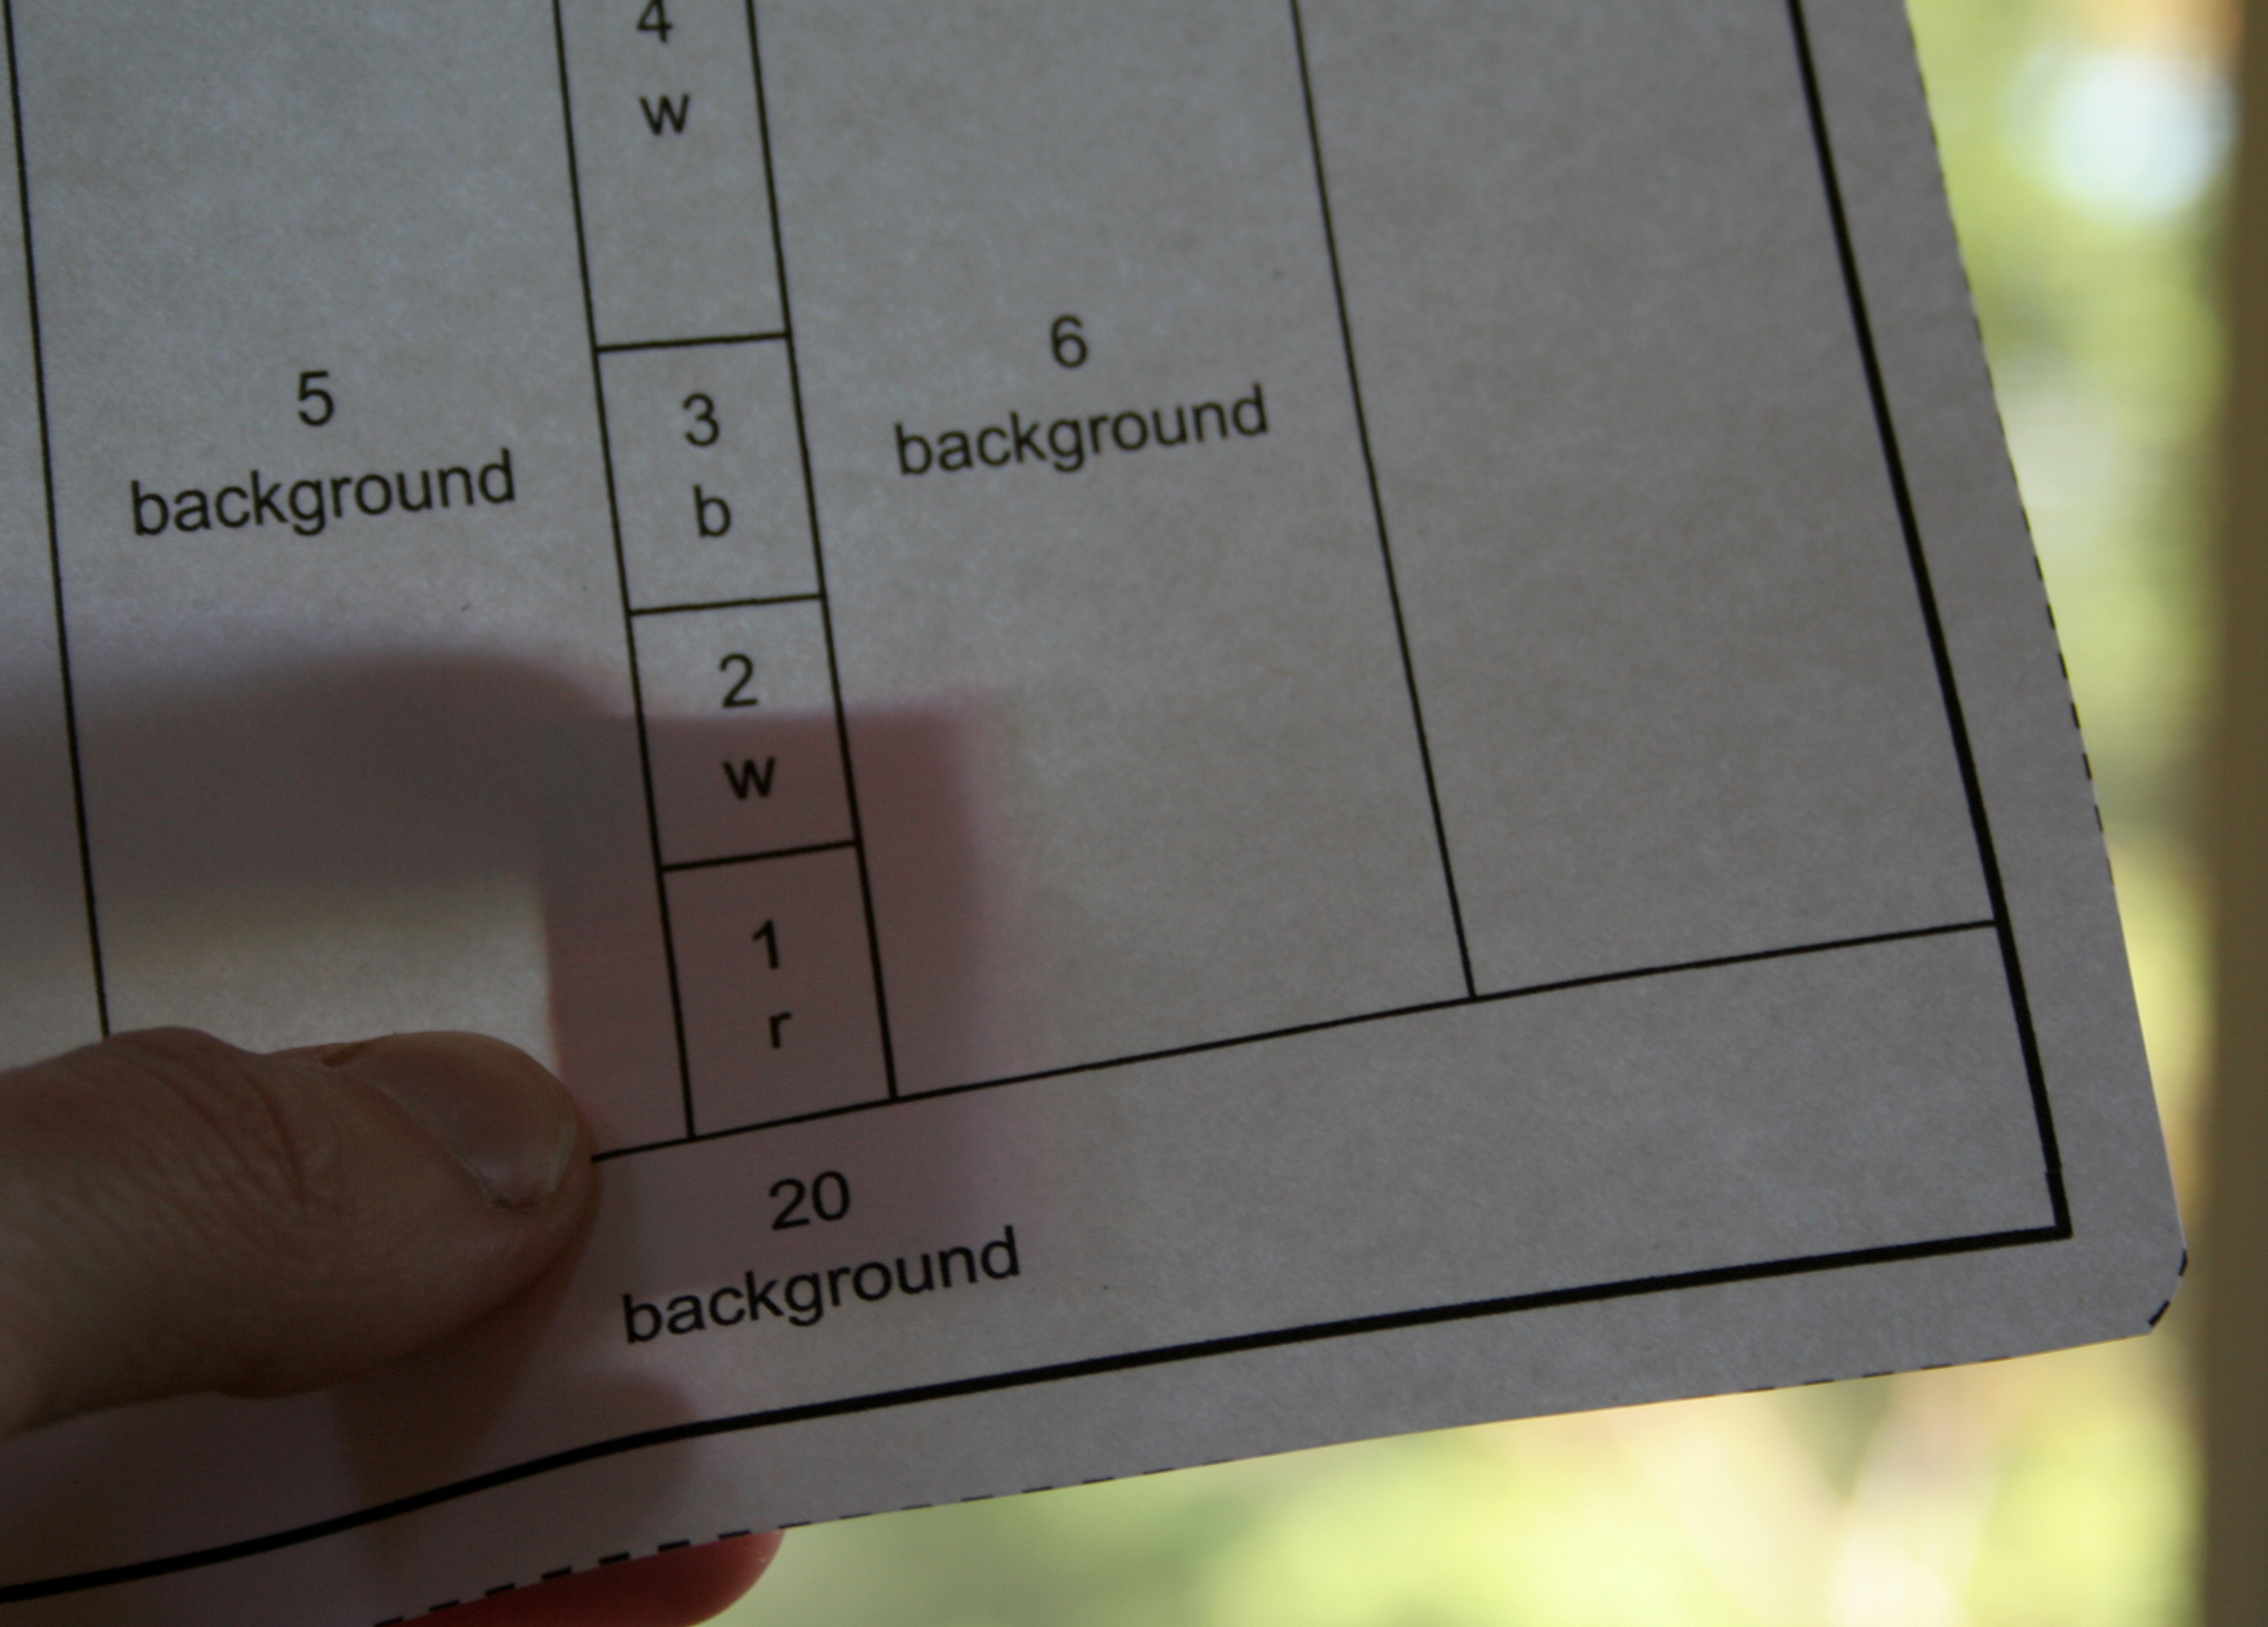
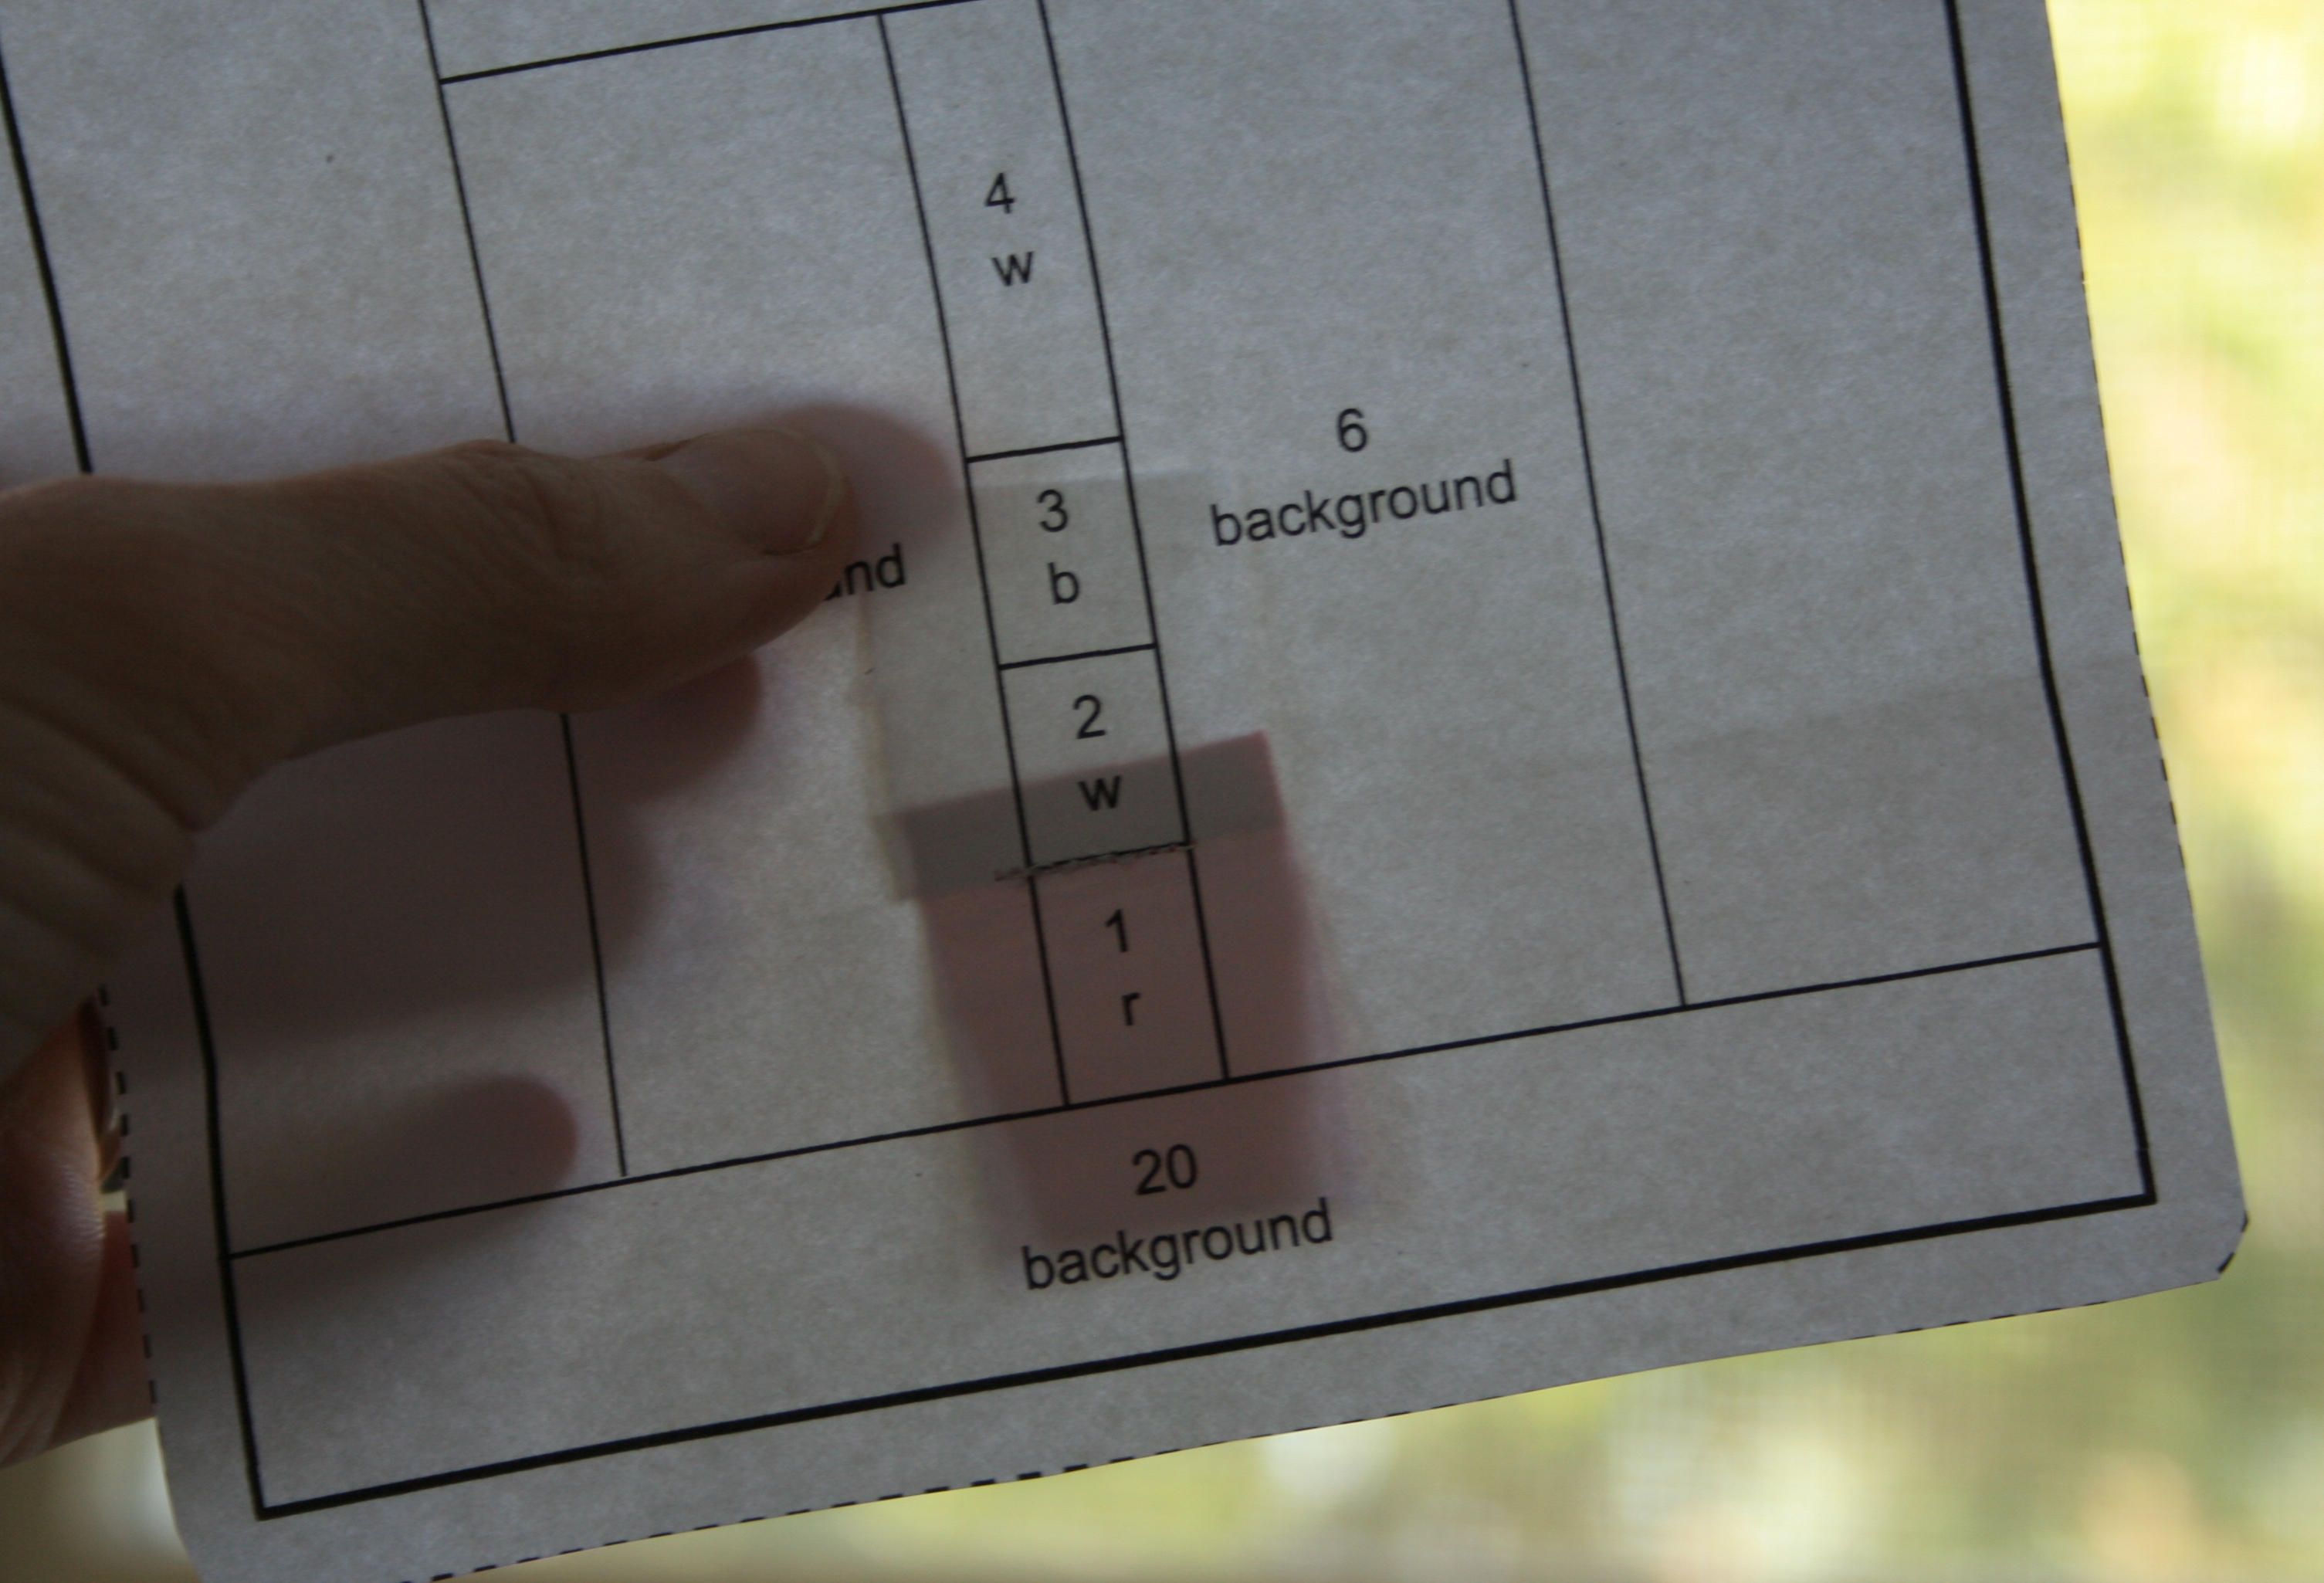
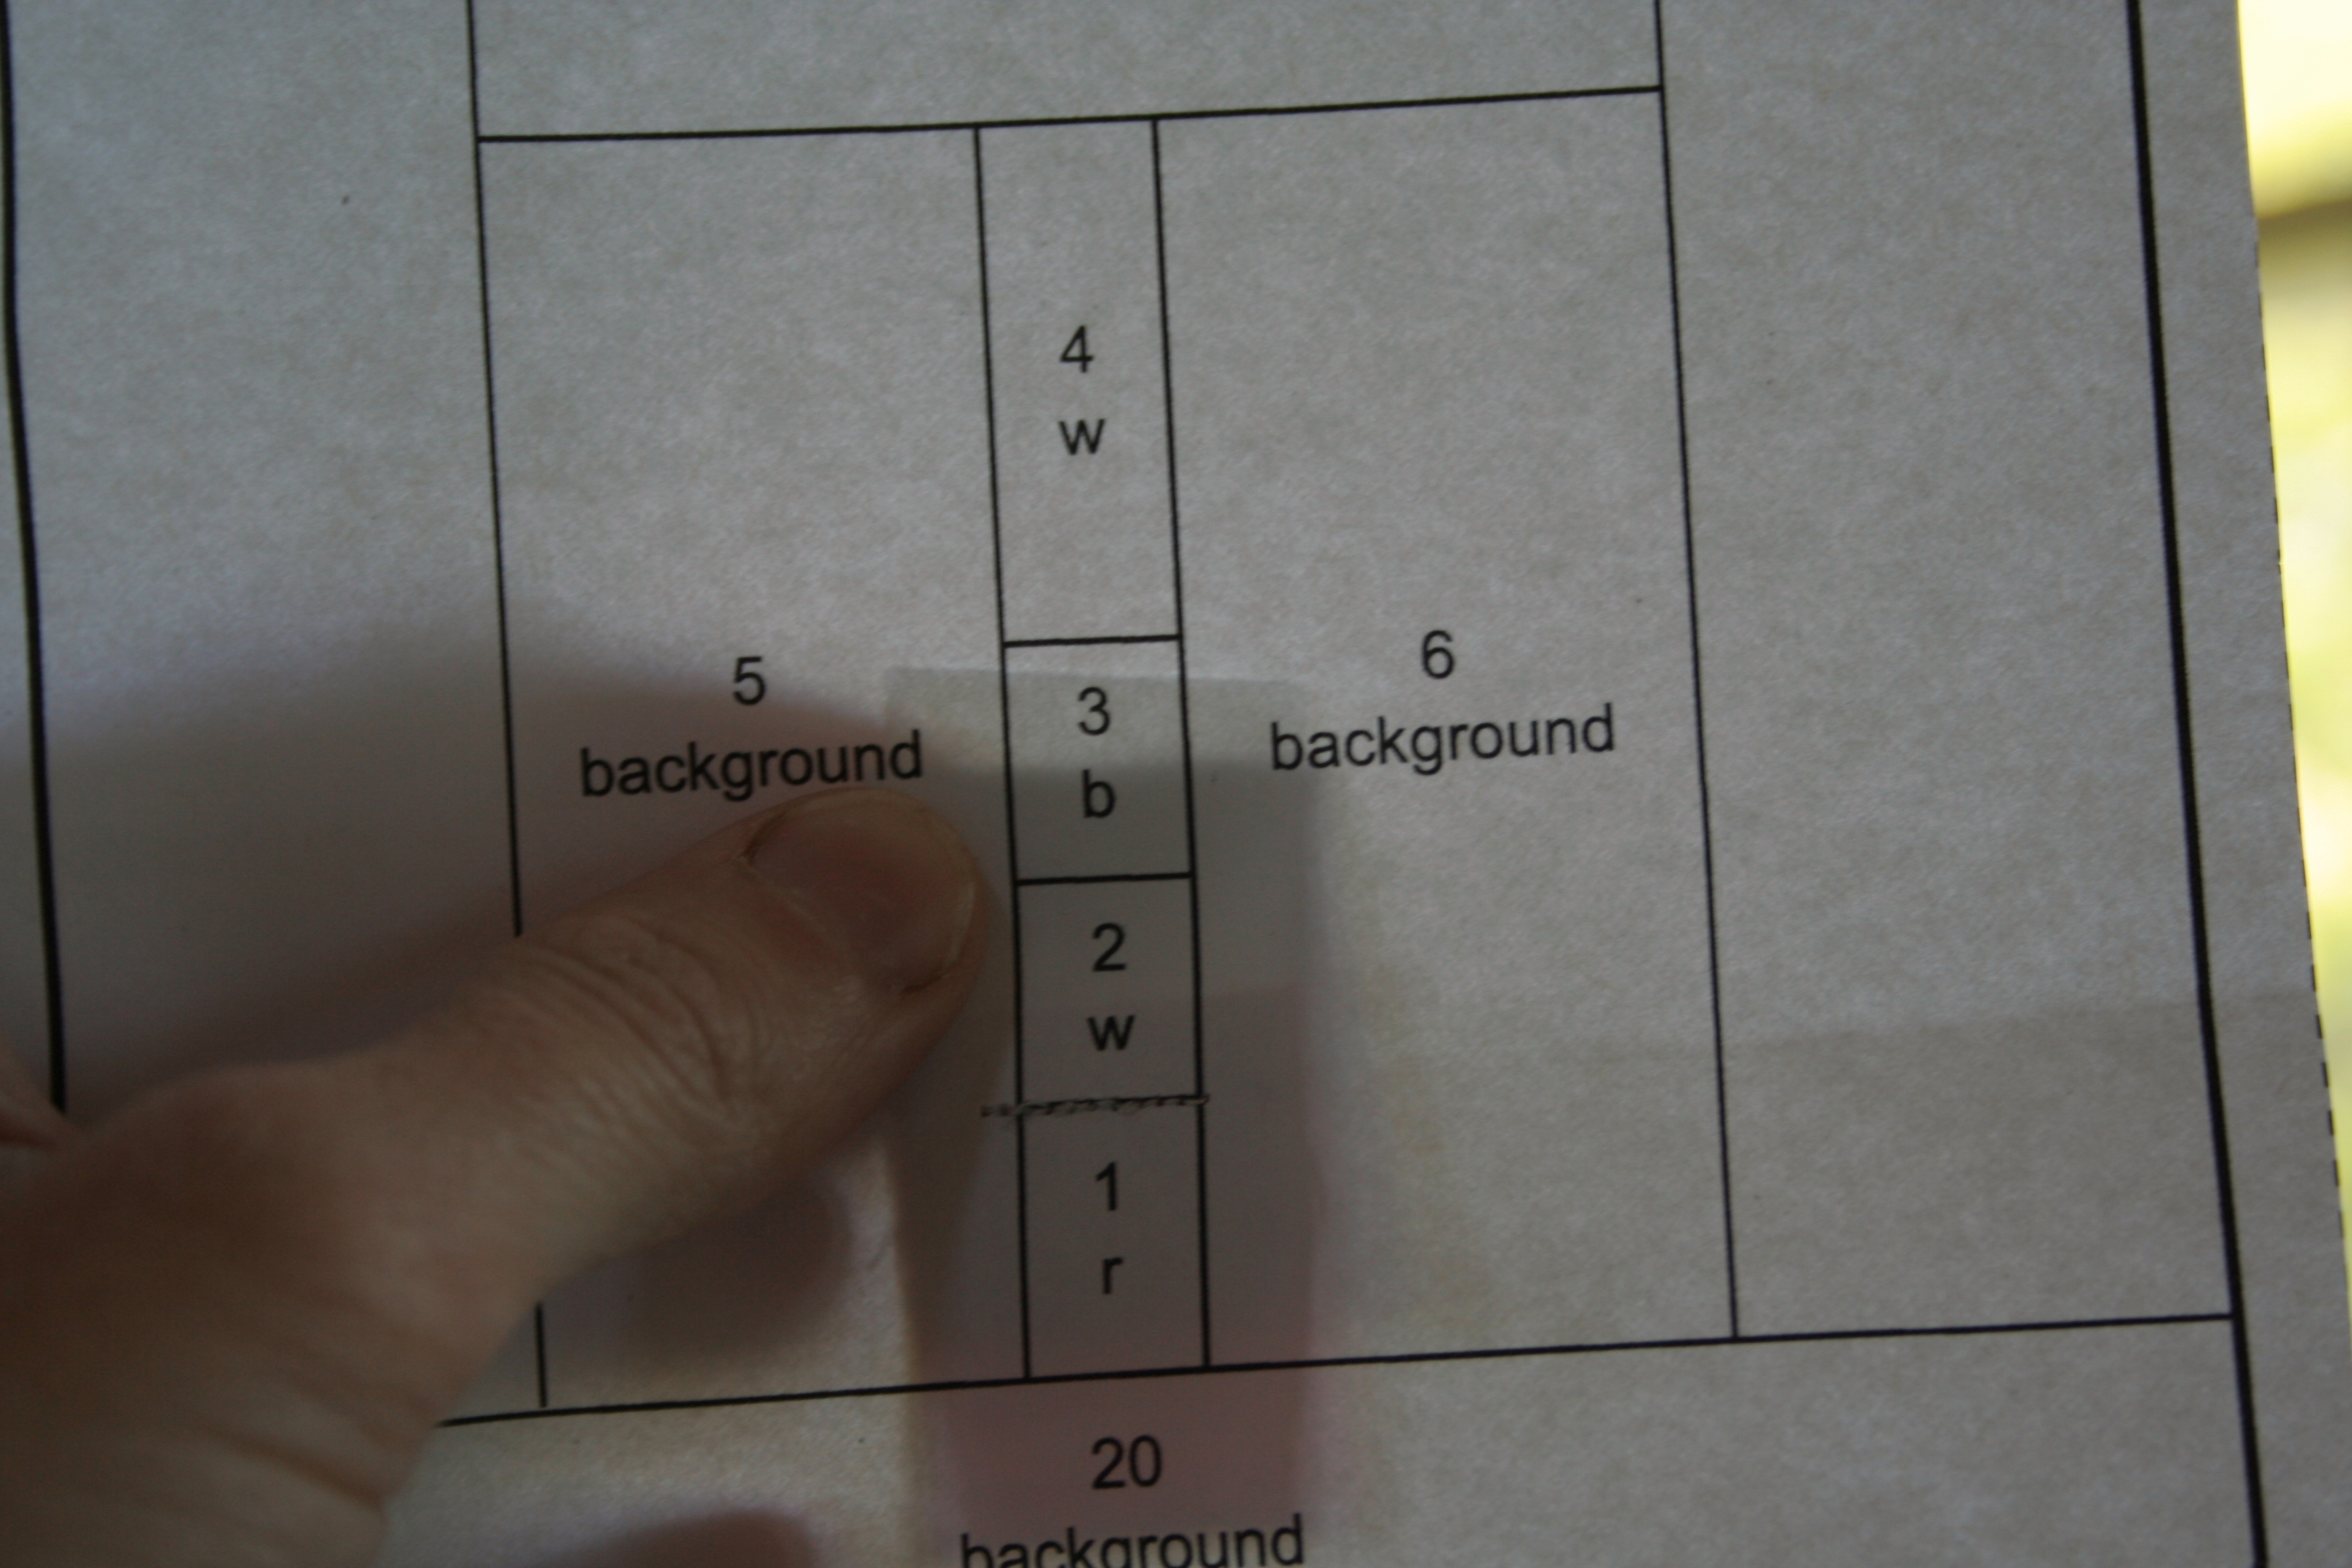
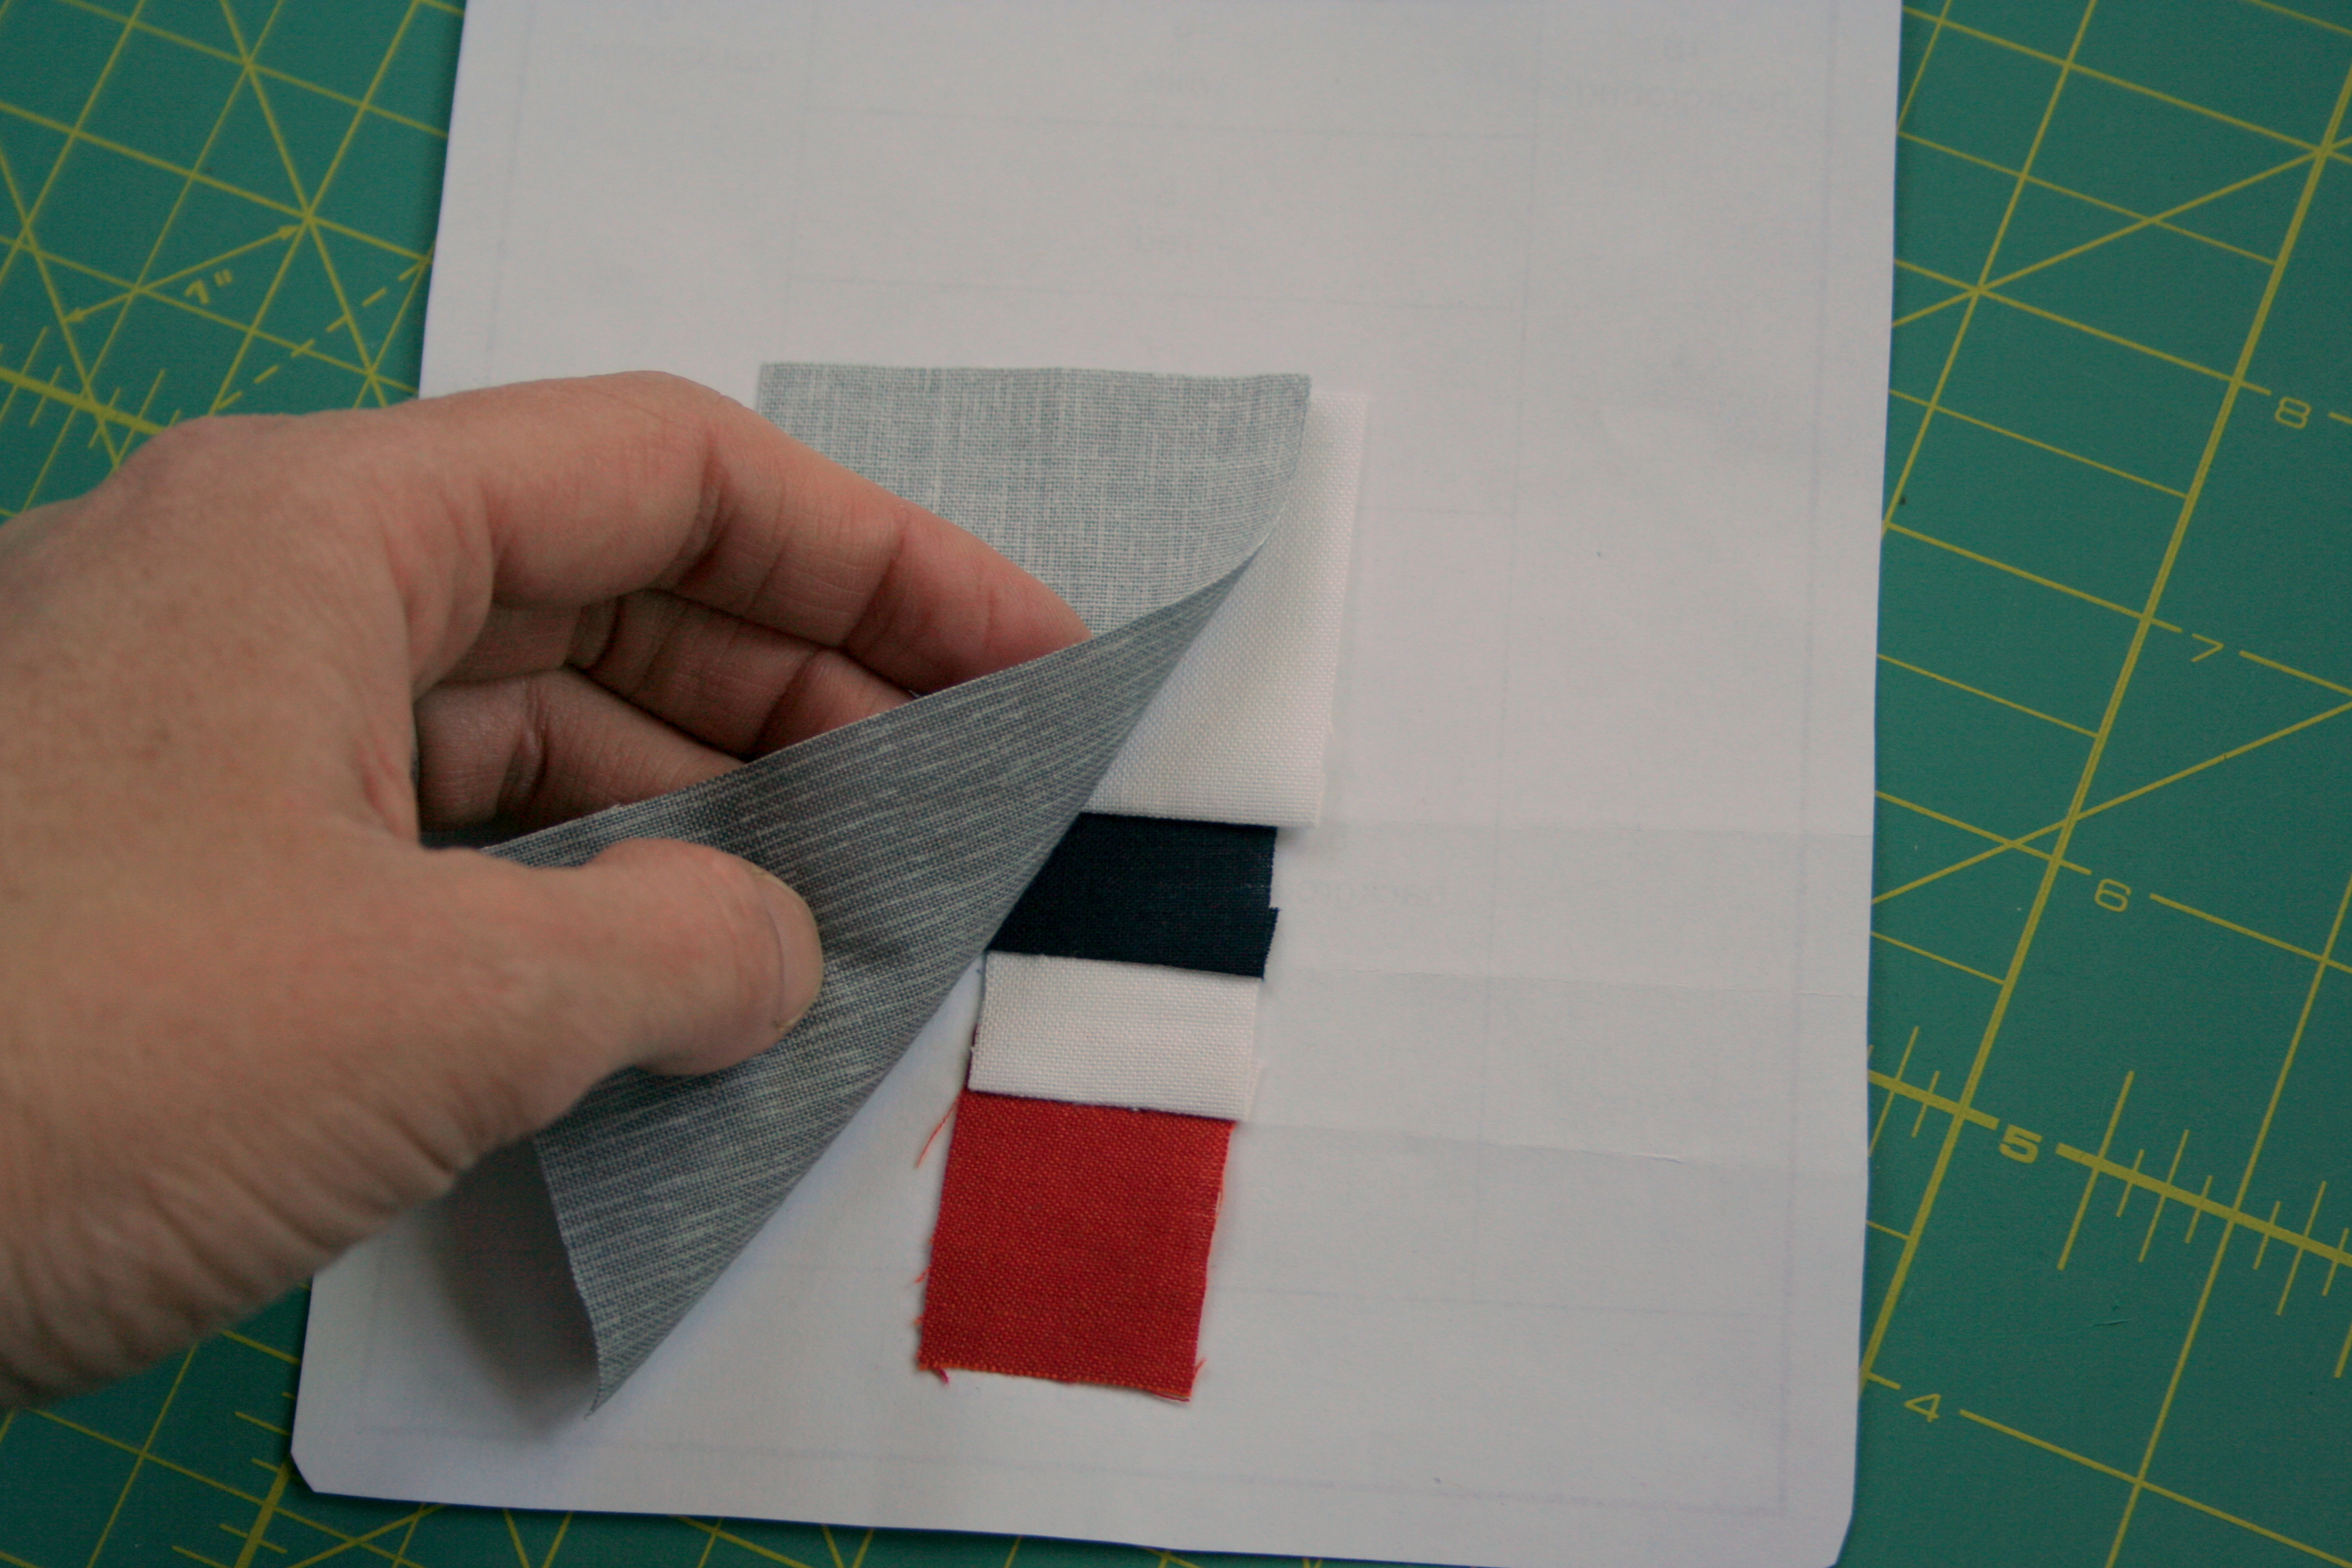
Place the fabric for piece 1 on the back of the paper, wrong side of the fabric facing you (against the paper). Hold it up to a window or a light-box to ensure the fabric fully covers the #1 space, plus seam allowances.
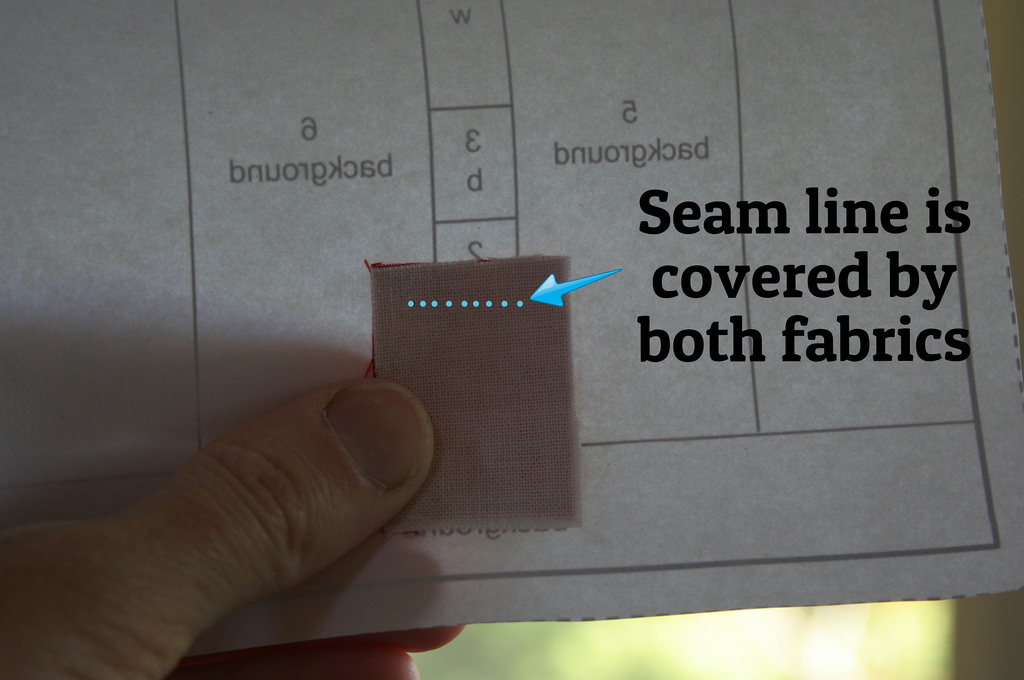
6. Holding fabric 1 in place, position the paper so that the printed side is away from you. Take the fabric scrap for space #2 and place it right side down, on top of fabric 1. Be sure the seam line between 1 and 2 is covered by both fabrics, holding up to the light if needed. The fabrics should now be right sides facing each other, and when you sew along the seam line and fold fabric 2 up, it should cover the #2 space plus seam allowances.
*Before you sew, shorten the stitch length on your sewing machine. I set mine to anywhere between 1.4 and 1.5. That way the paper is very easy to remove at the end.*
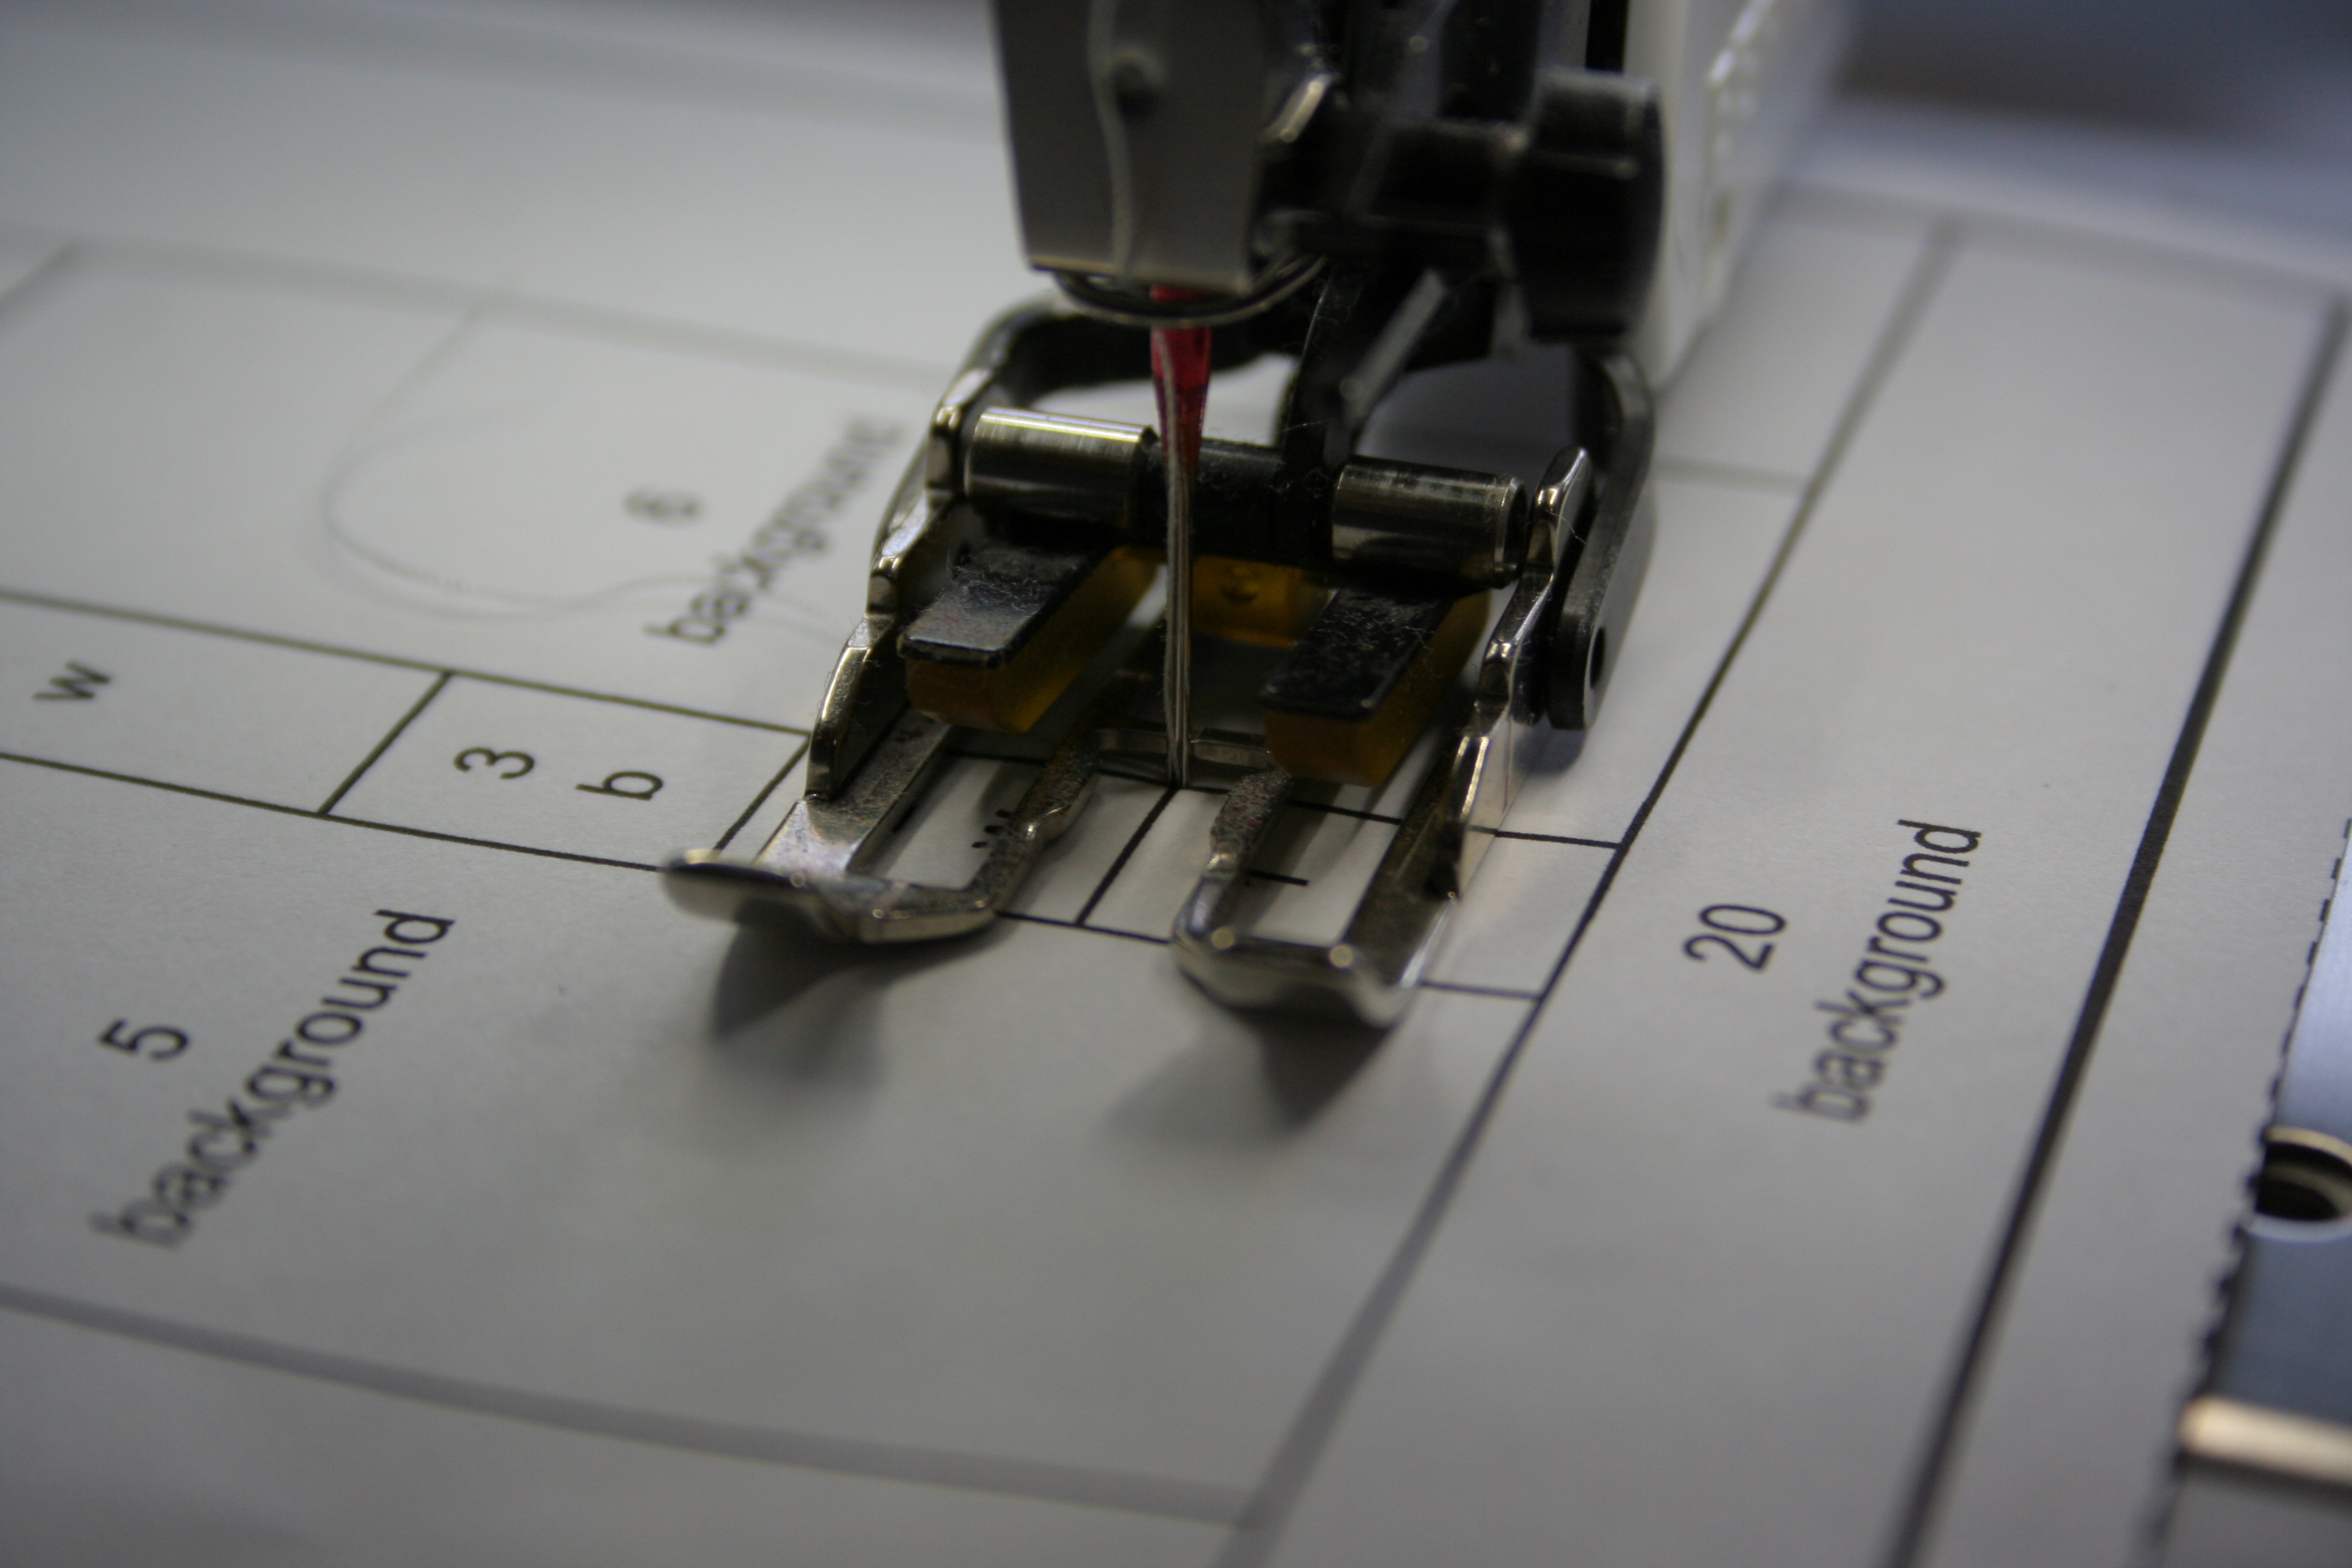
7. Holding both pieces of fabric in place, sew along the line between spaces 1 and 2, with the paper on top. Some people like to pin or even glue their pieces in place before sewing, since the fabric is underneath the paper. I personally just carefully hold them in place with my finger. I haven’t had a problem yet, and it’s one less step if that works for you.
Accuracy tip: Lower the needle by hand for the first stitch, ensuring that your sewing will be straight along the line. Back-stitch for one stitch at the end to secure your threads.
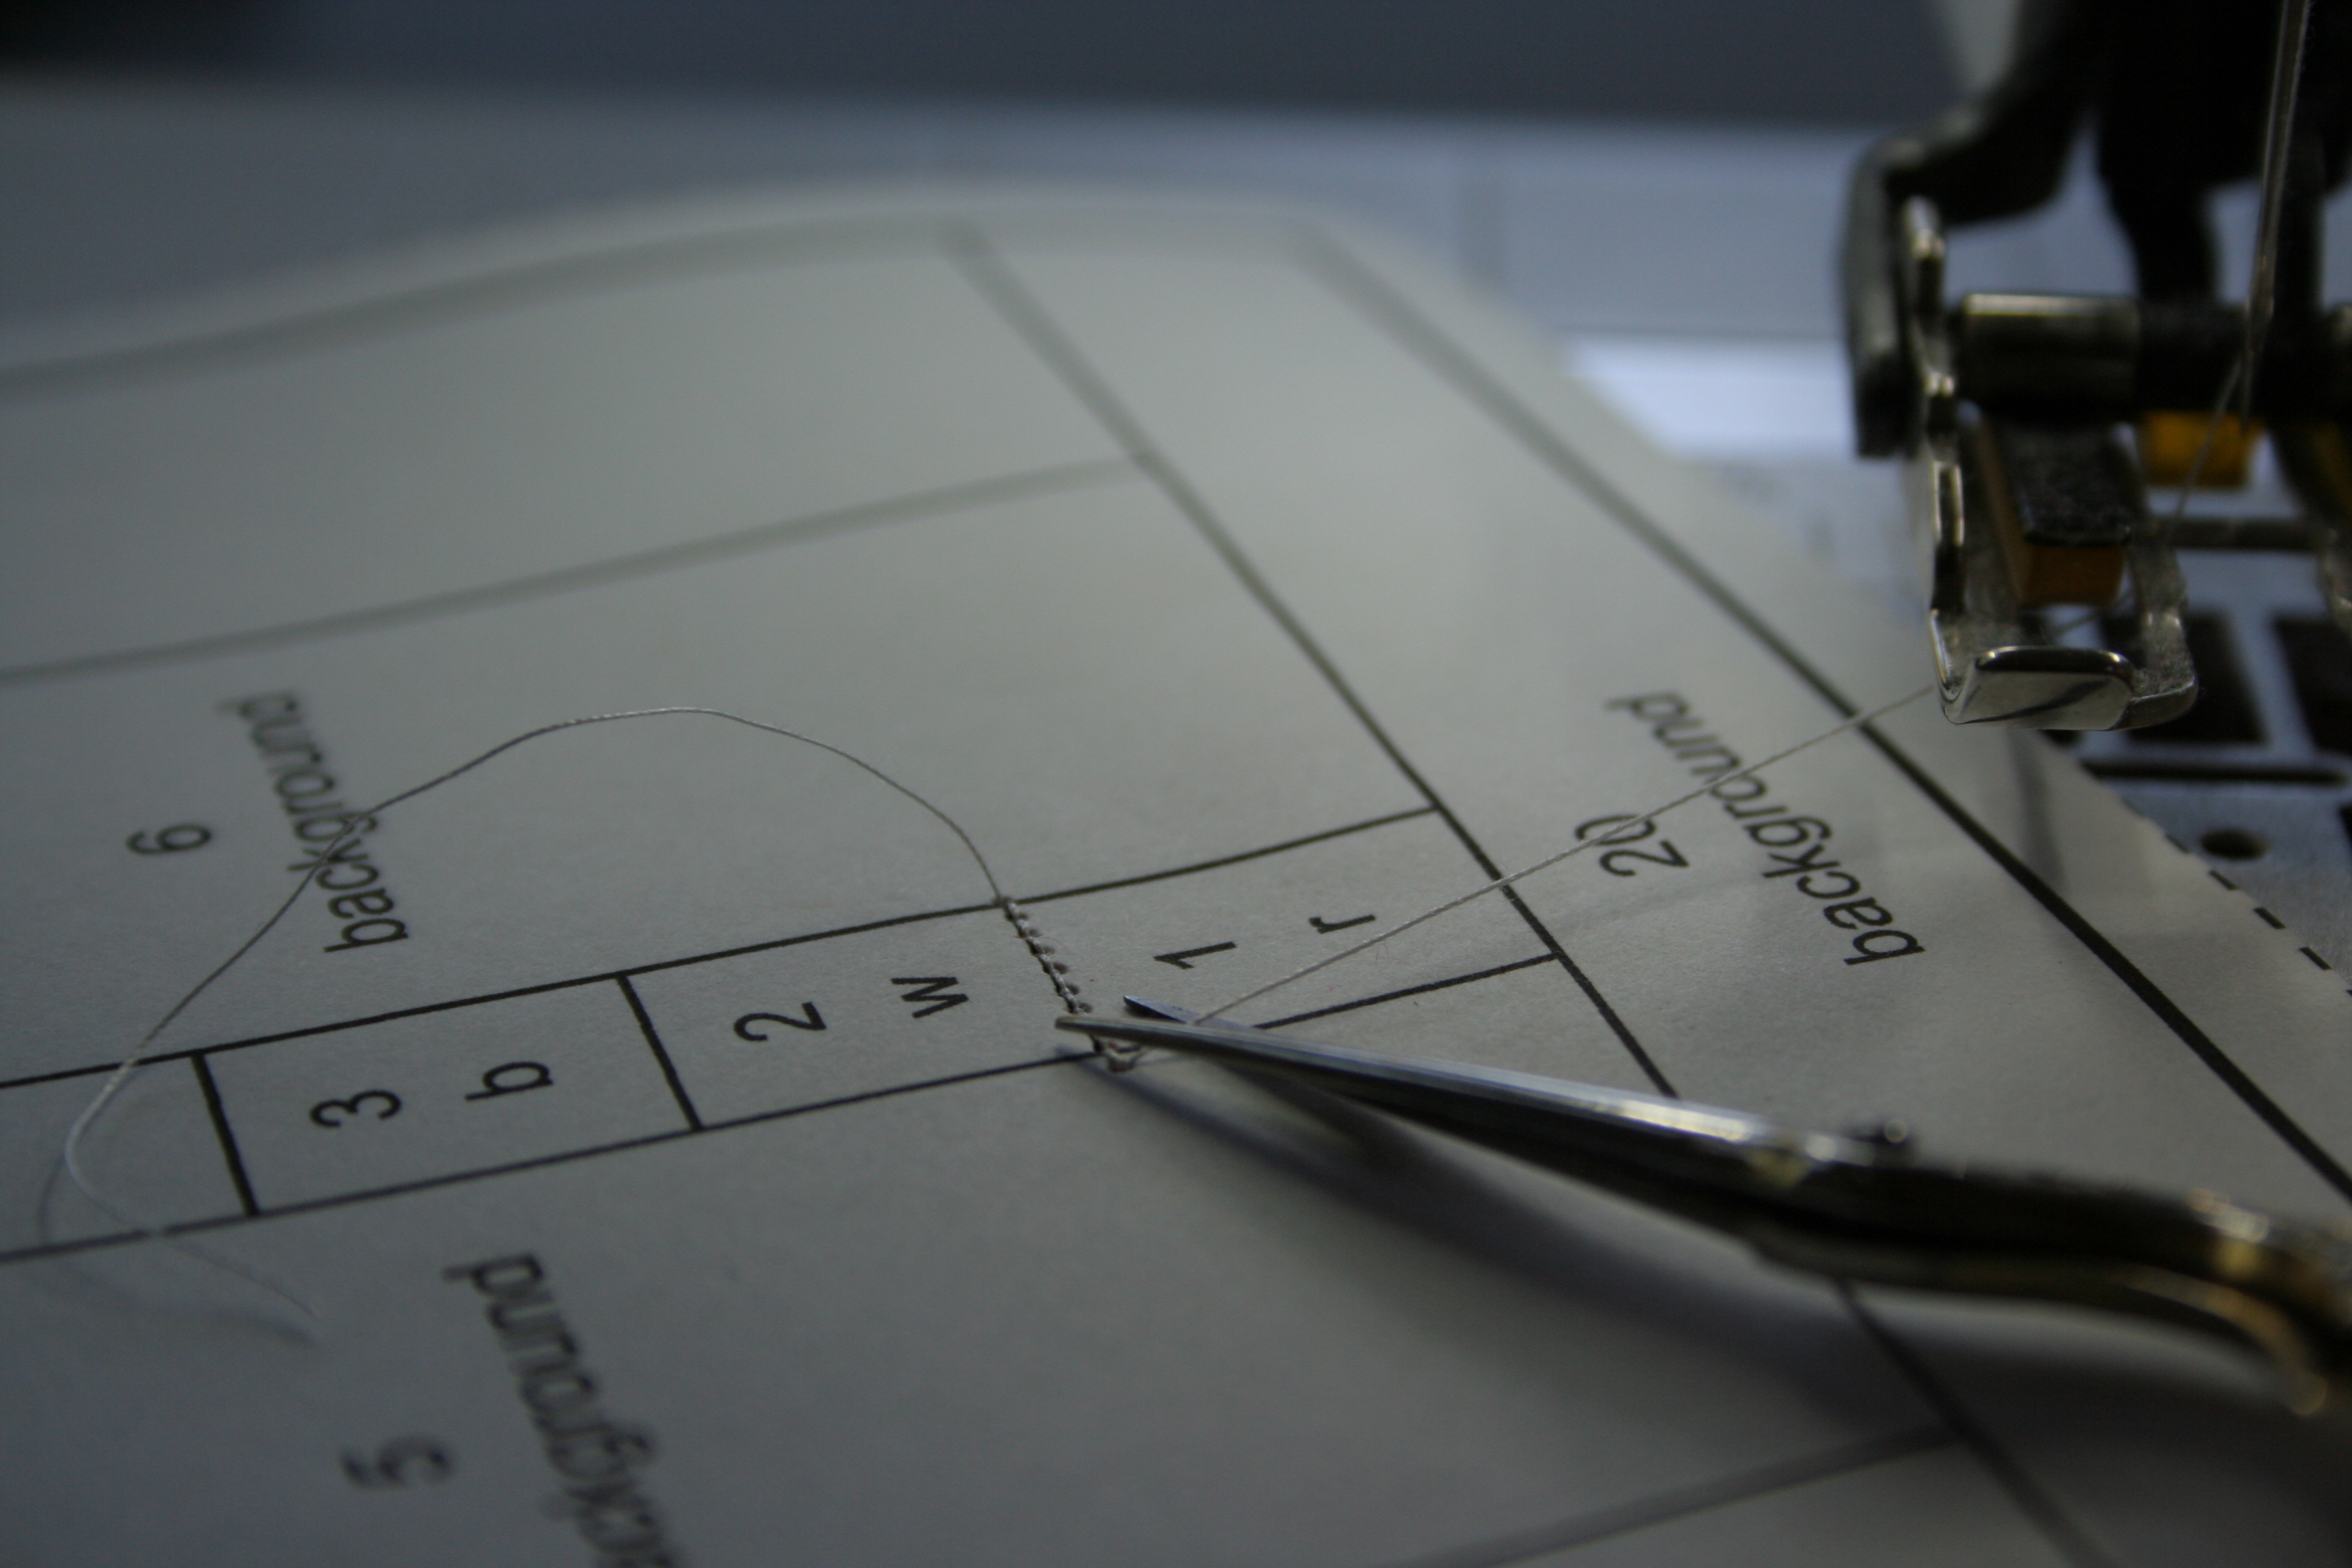
8. Trim thread ends. (If you want to make yourself a cute little thread catch, I have a free tutorial HERE!)
9. Fold the paper down along the seam you just sewed, and trim the fabric to 1/4″.
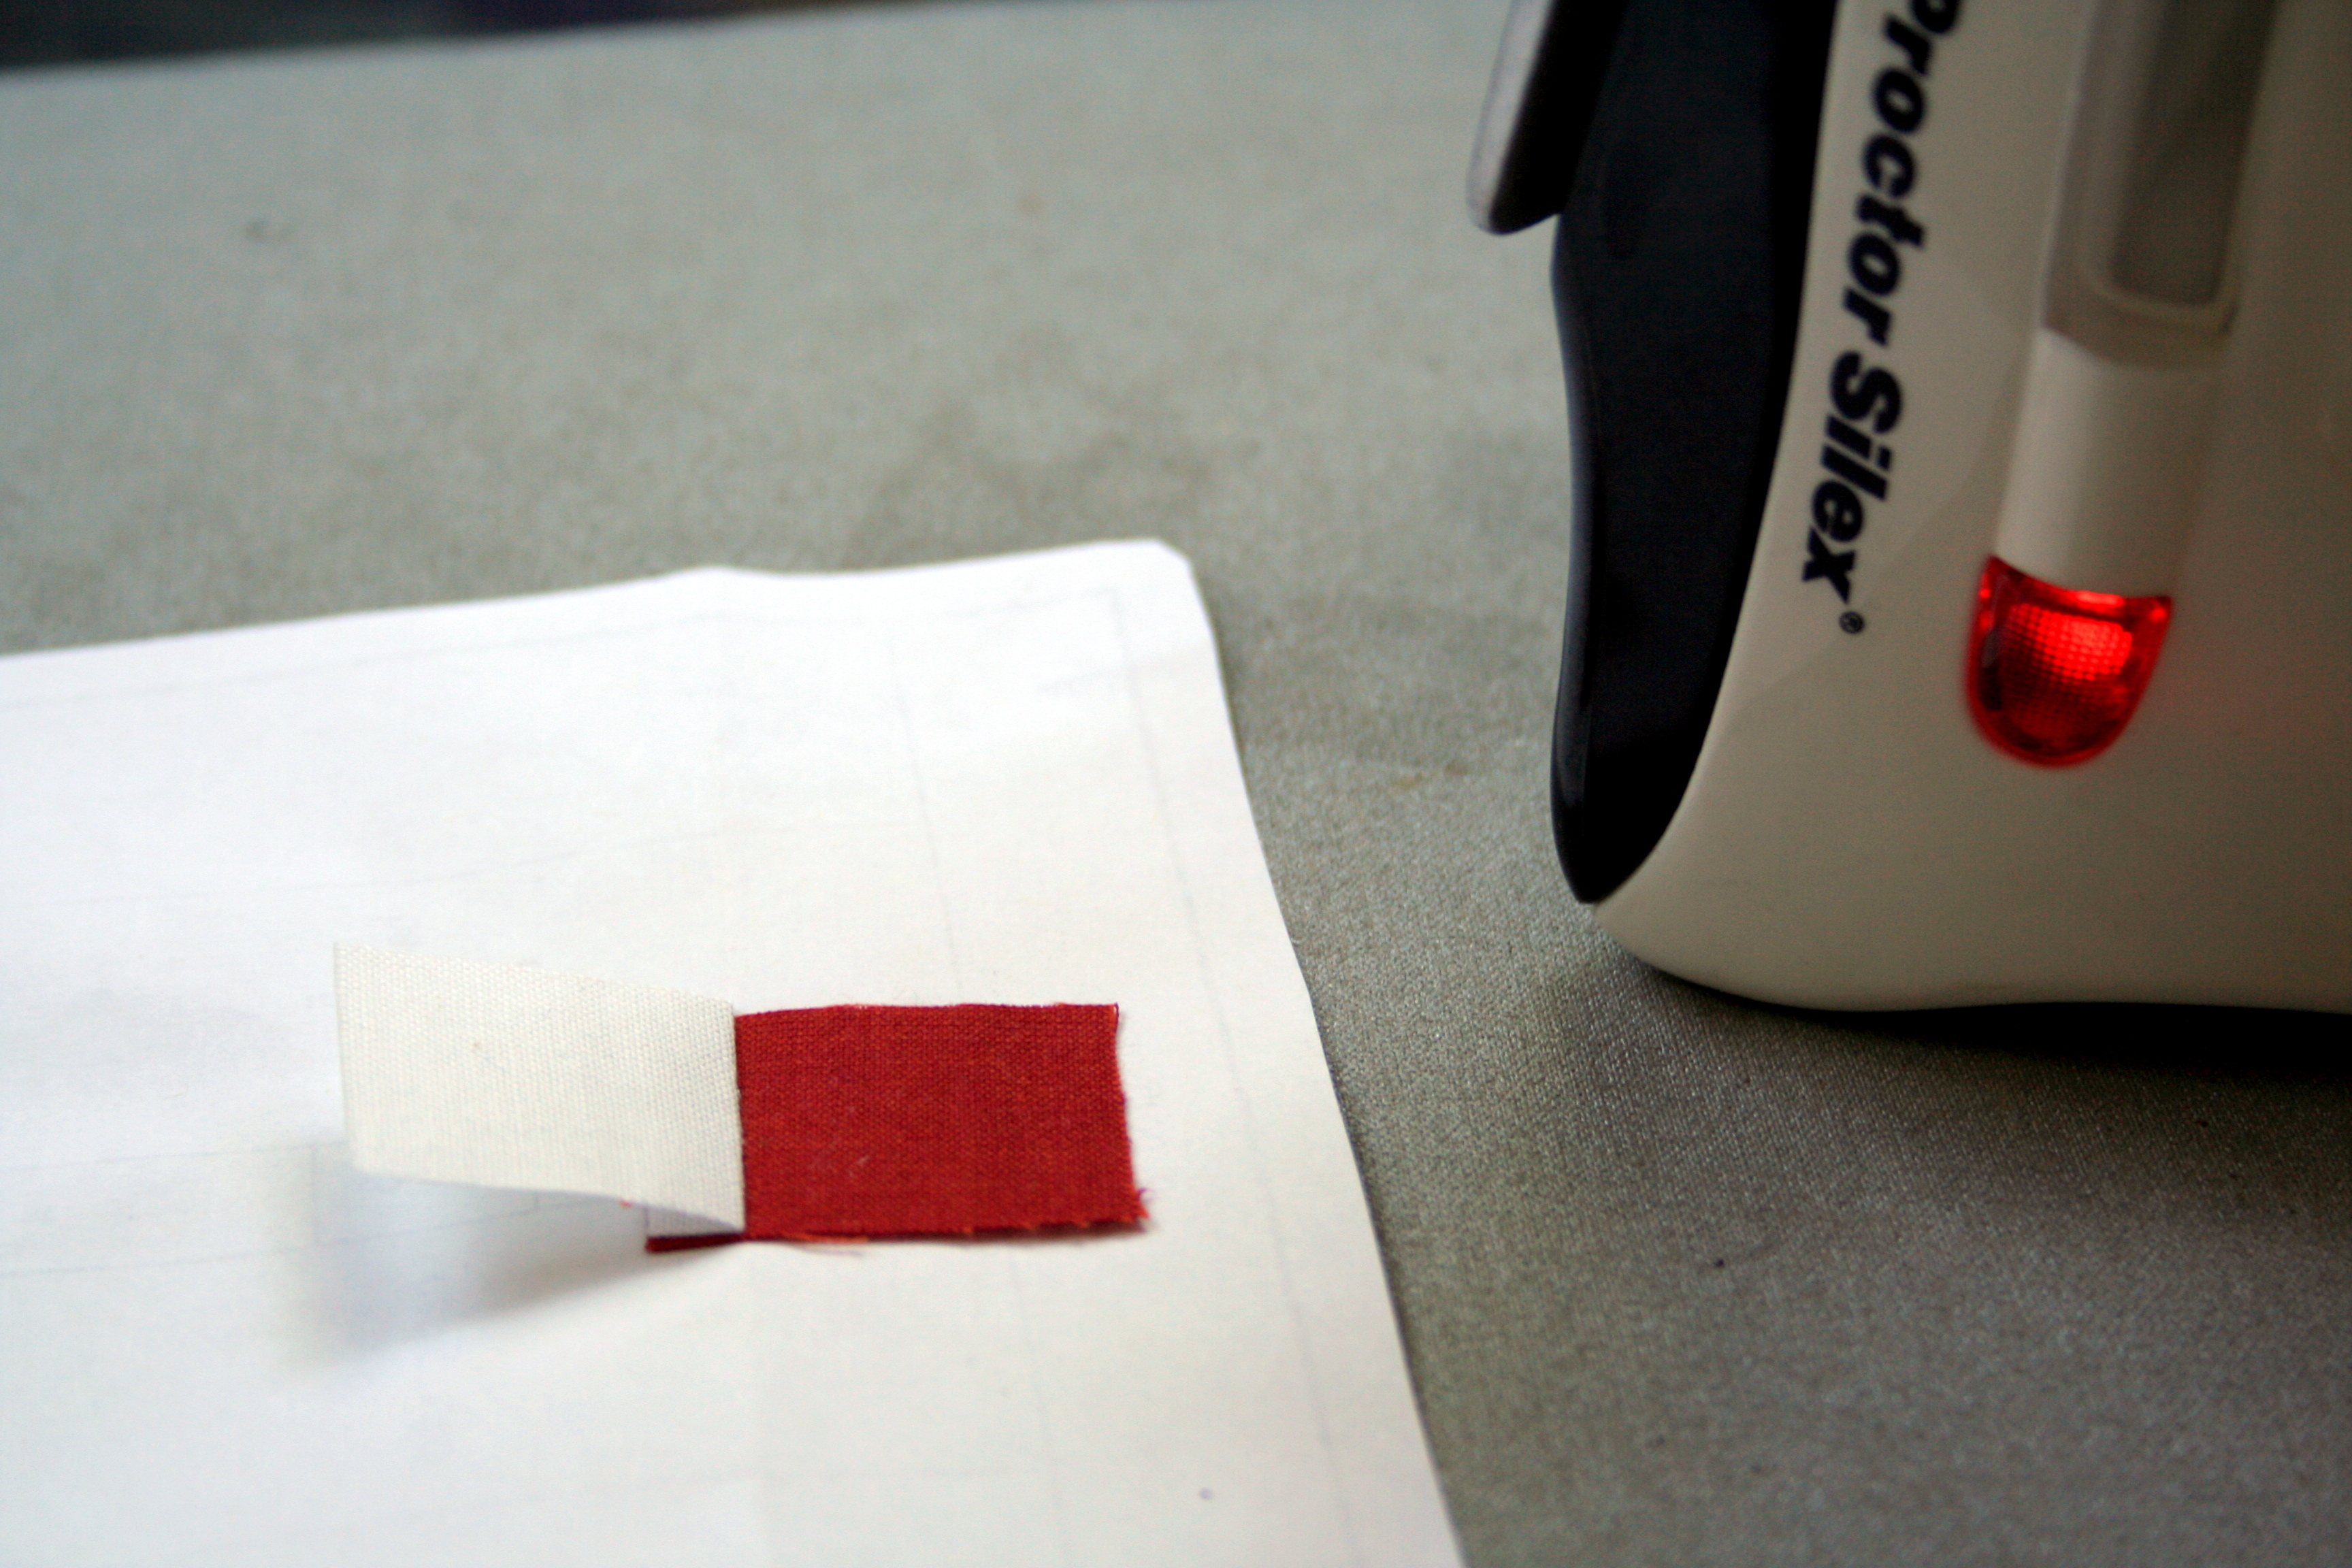
10. With the foundation paper flat and unfolded, press and set the seam with a hot iron (no steam). Finger press fabric 2 up to cover its space and press again.
When you hold the paper up to the light, you should see that fabric 1 covers the #1 space and fabric 2 covers the #2 space, with seam allowances.
11. Continue this method for the rest of the pattern pieces. Cut, line up, sew, fold & trim, press. Cut, line up, sew, fold & trim, press. Repeat.
Getting ready to sew on piece 3–front view.Getting ready to sew on piece 3–back view. Remember: the fabric has right side facing the pattern paper, with the seam along the top edge. Once sewn, the fabric will be pressed up so that the right side is showing.
If you’ve got the hang of it, you can skip the next few parts and just scroll down to the finishing steps. For those of you who run into tricky spots along the way, here are some additional tips to help smooth the process.
Tips for Lining Up Seams:
If you are truly generous in your fabric cutting, this tip is not as necessary since you’re bound to have enough fabric even if your seams end up being larger than 1/4″. However, if the frugal part of you just can’t cut those fabric bits ginormously, here’s a tip to get accurate 1/4″ seams to conserve fabric. Note that this works best for straight-forward seams, and not nearly as well for long, skinny, tricky angles (I’ll address those in a bit).
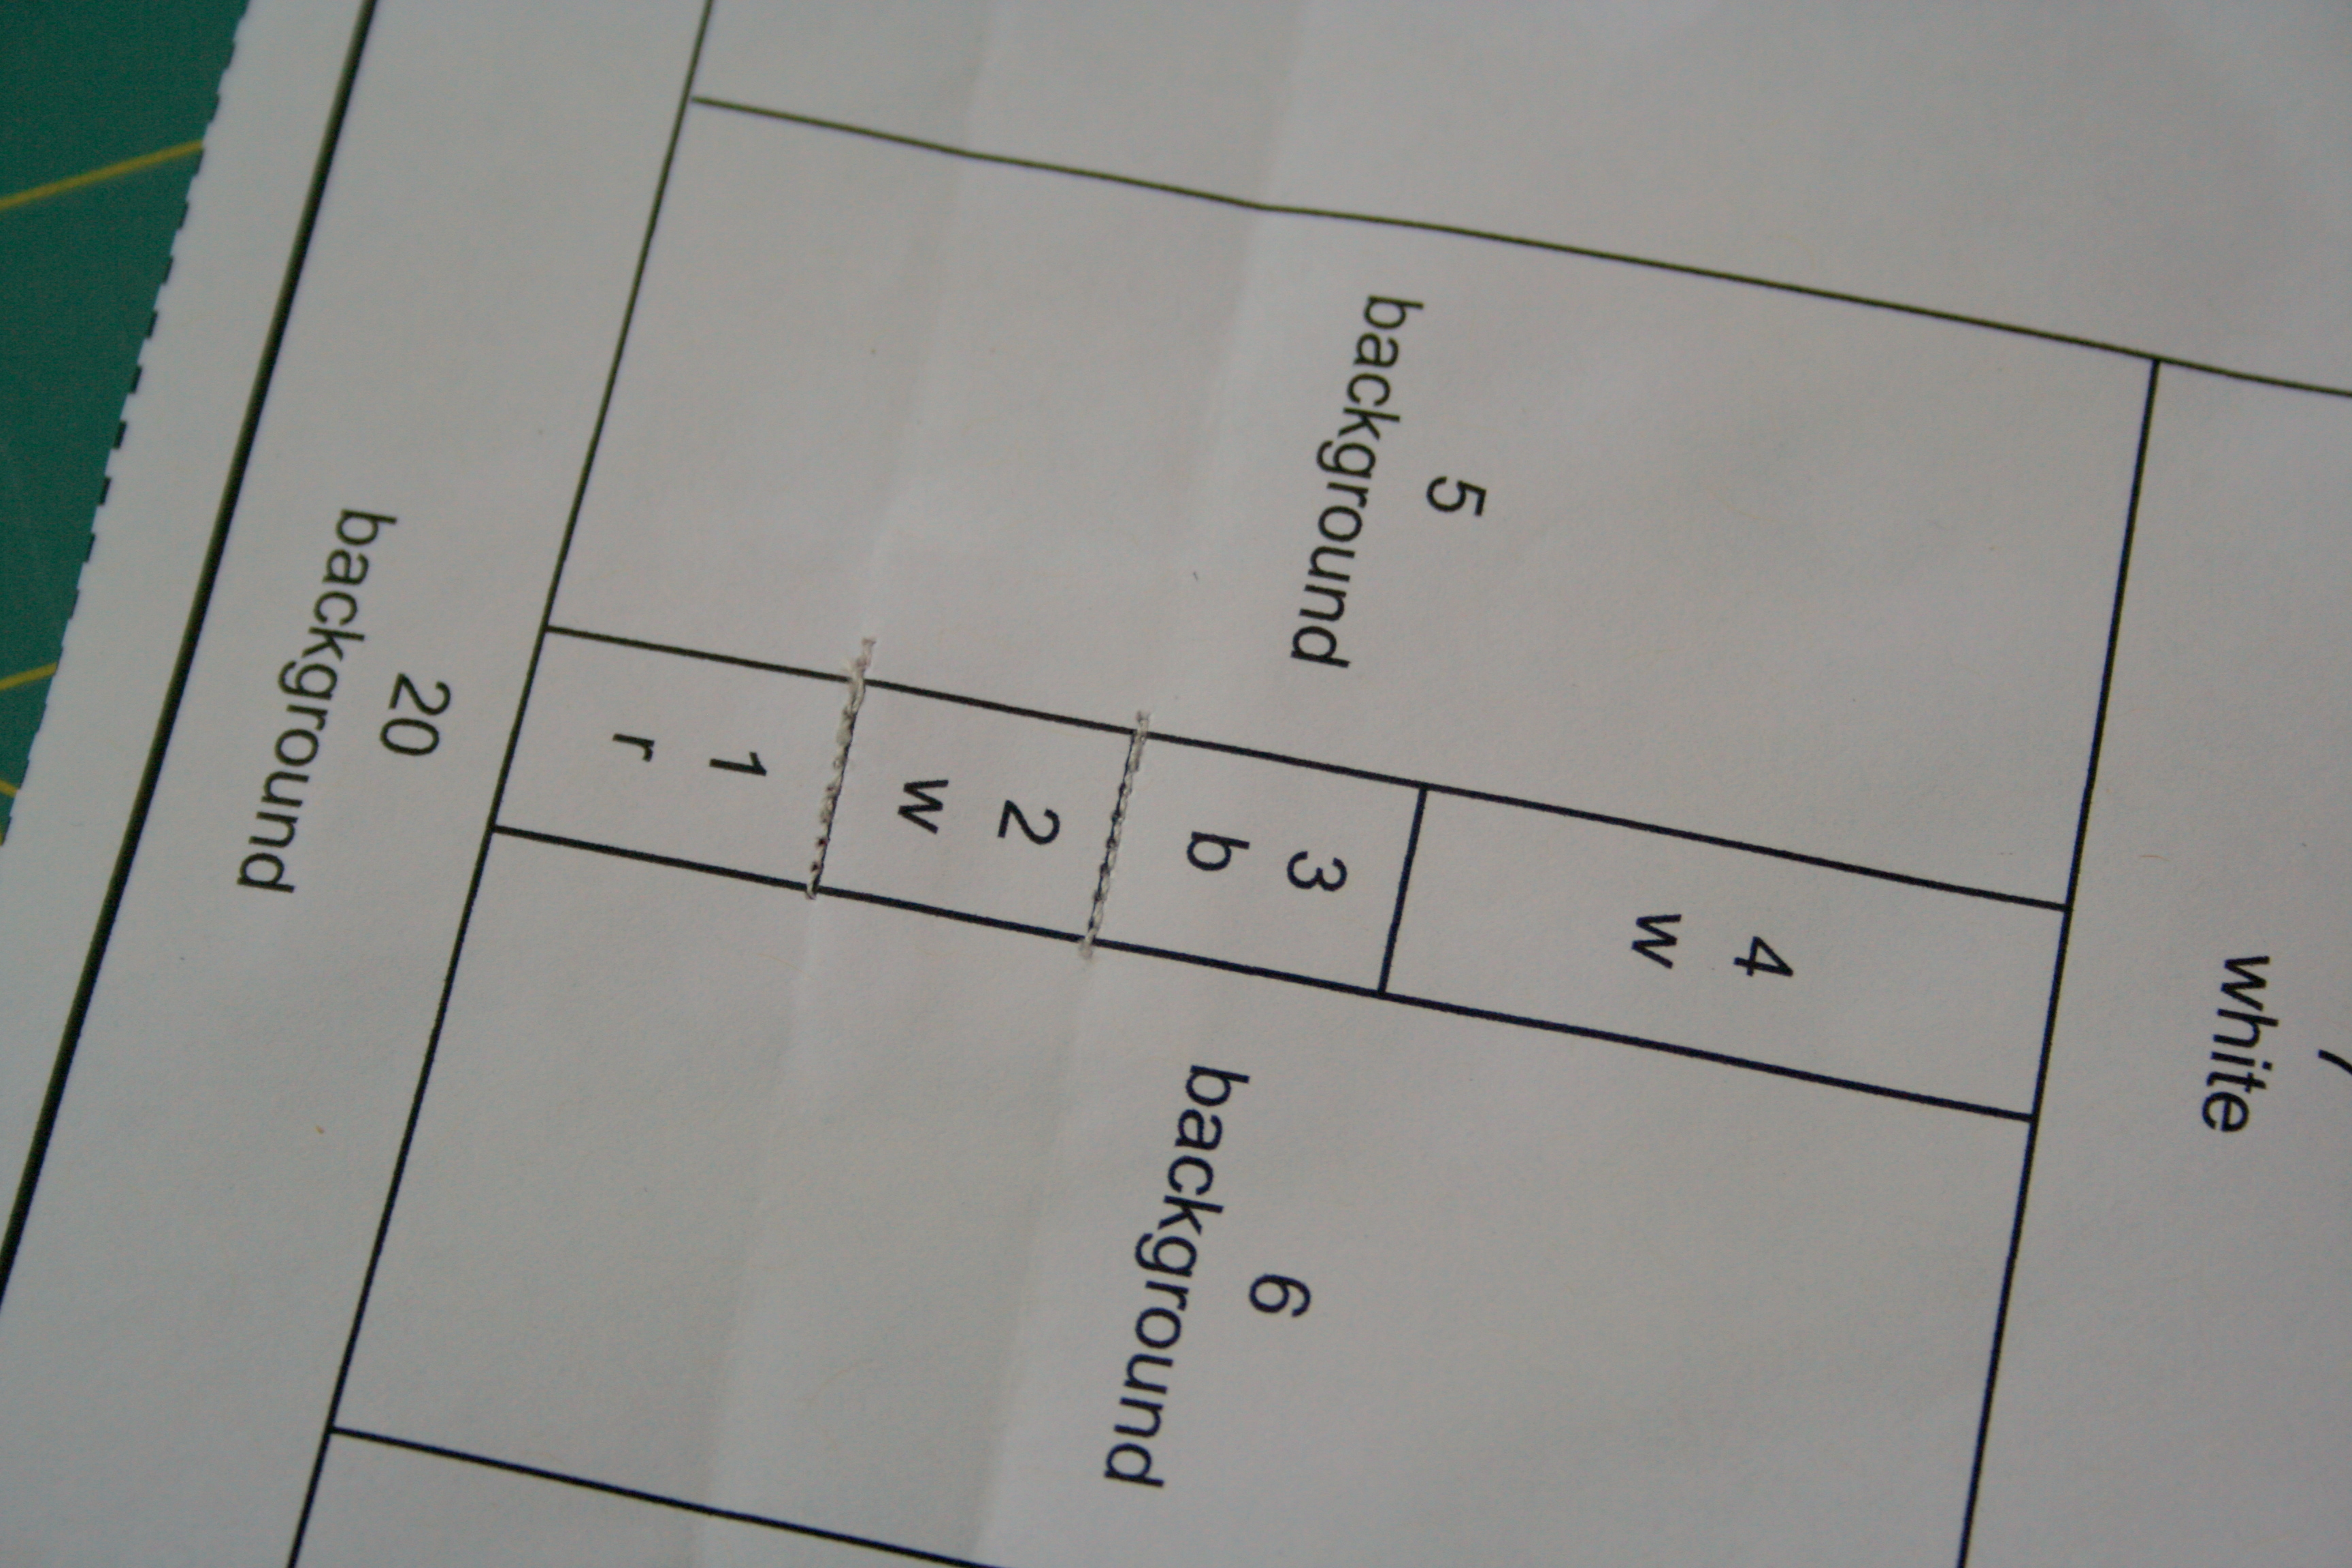
For this example, I have just sewn on piece 3, and I’m getting ready to sew piece 4.
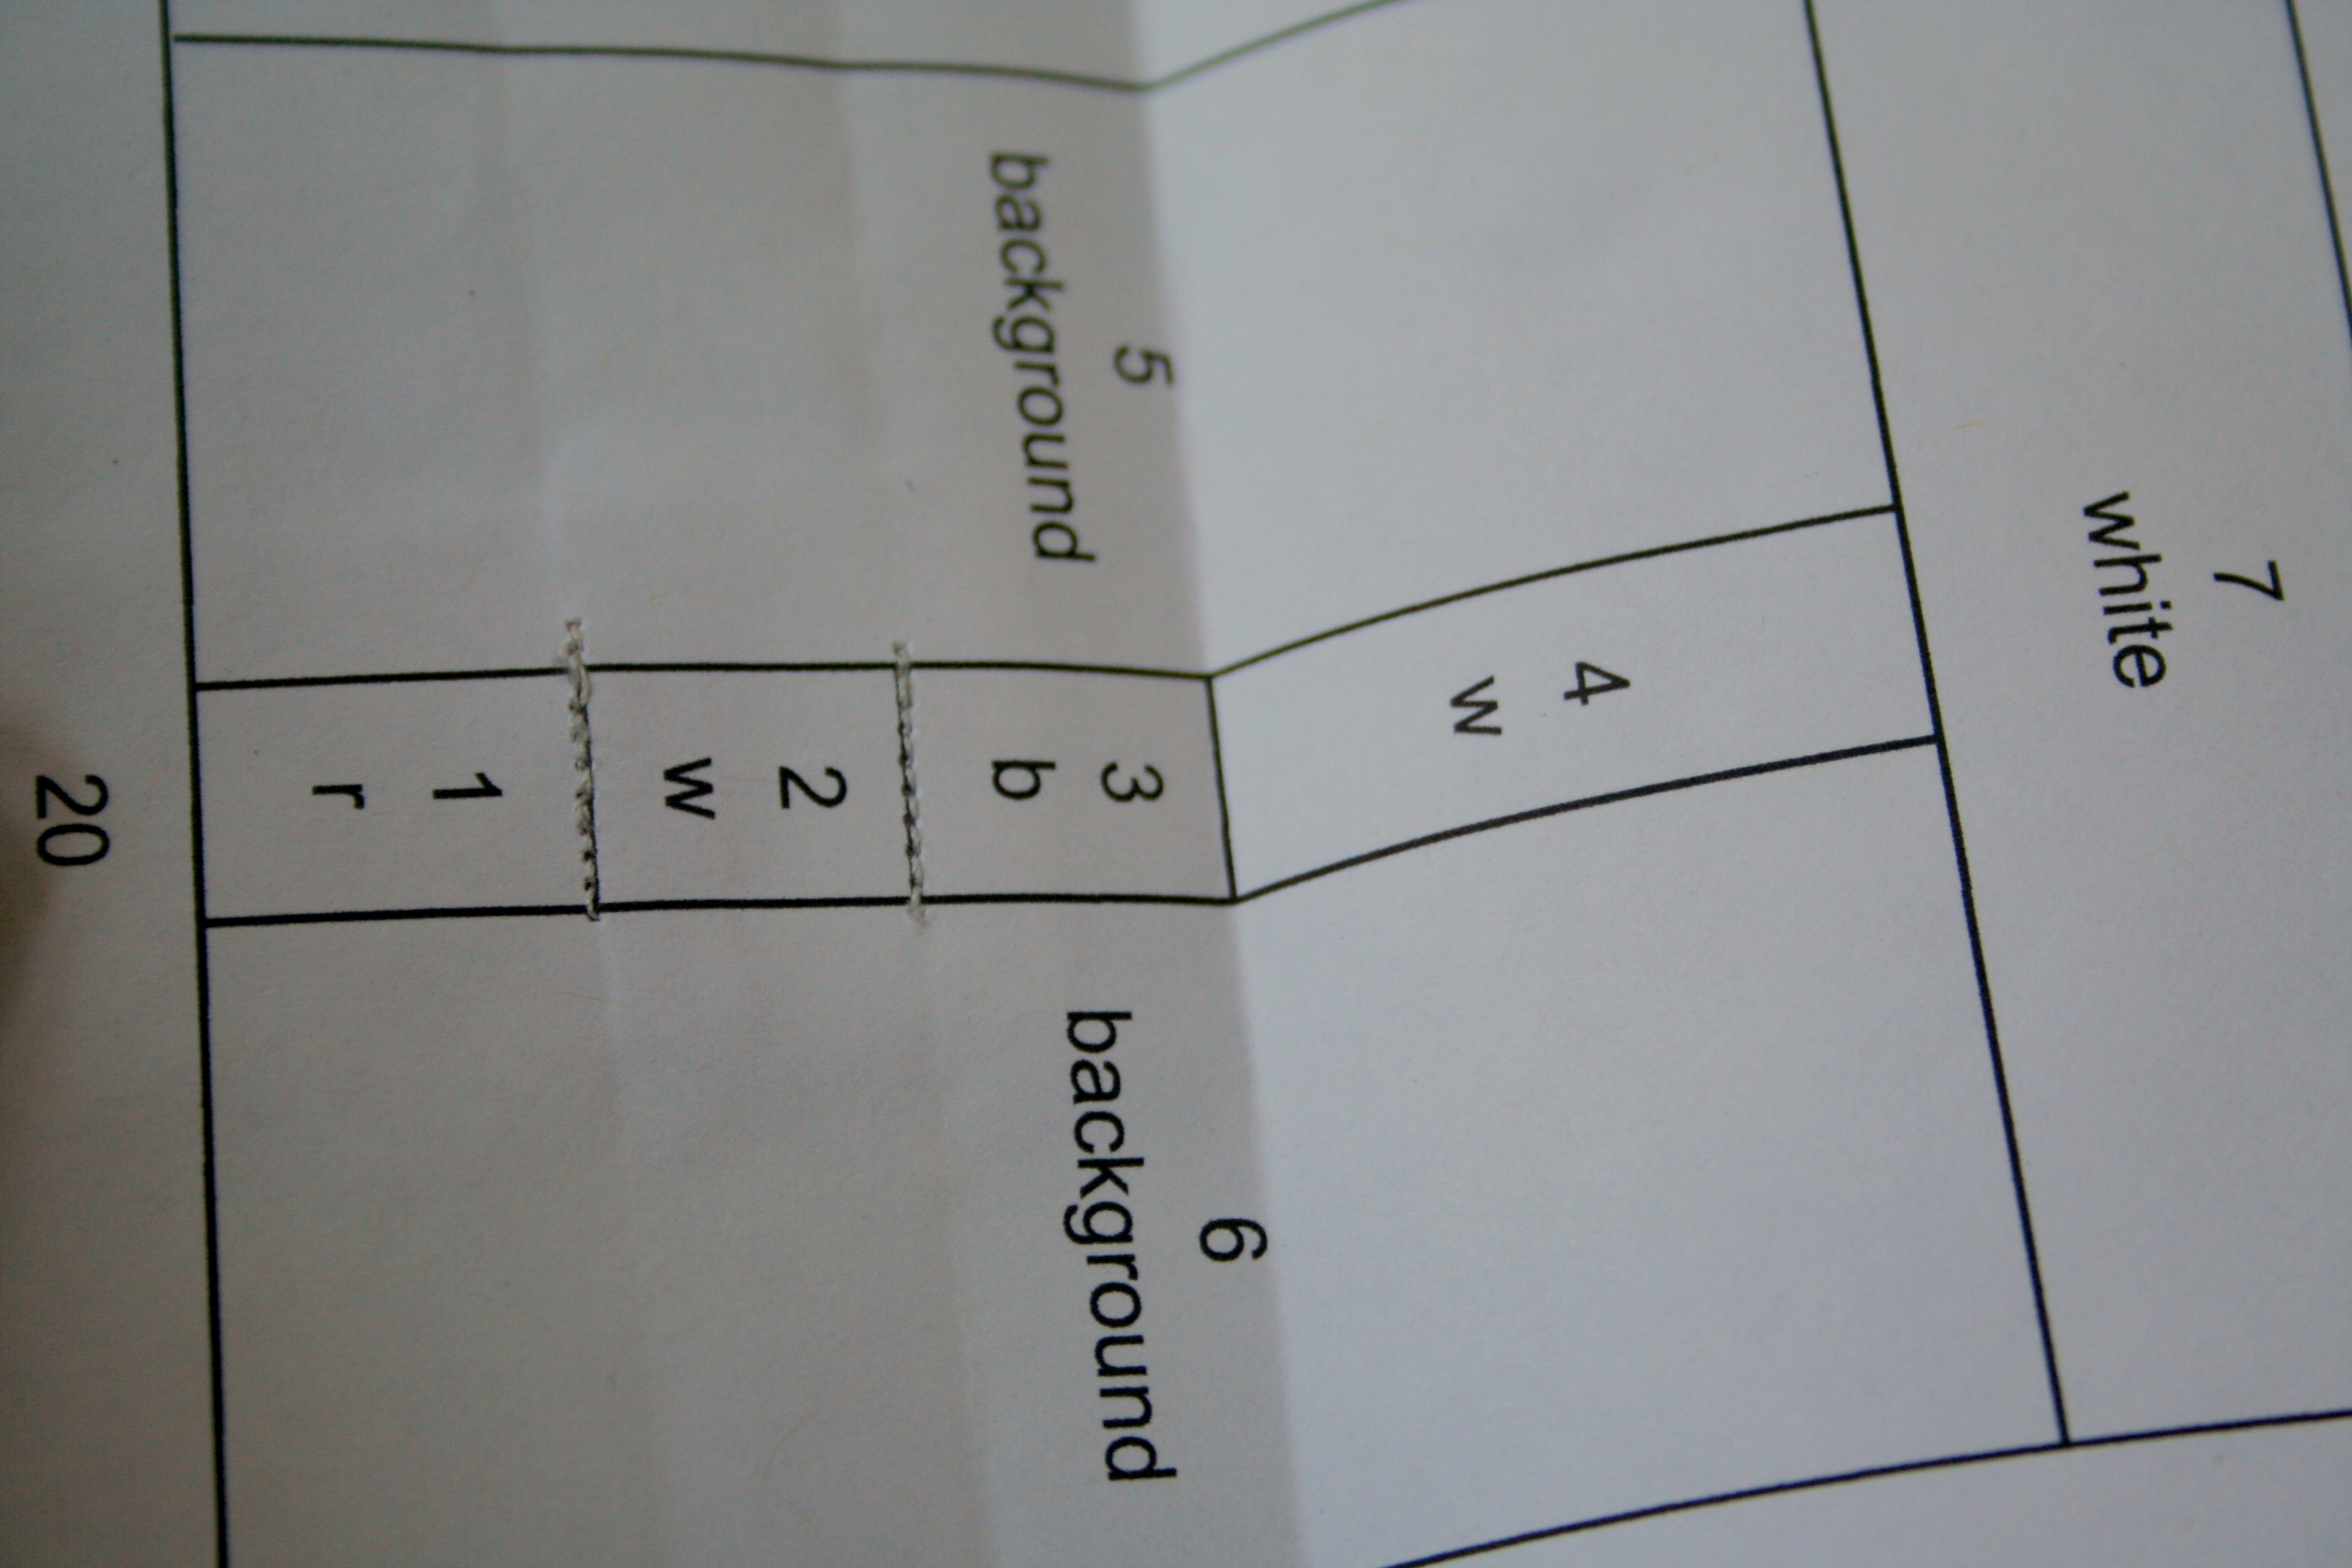
First, fold the paper along the seam line between pieces 3 and 4.
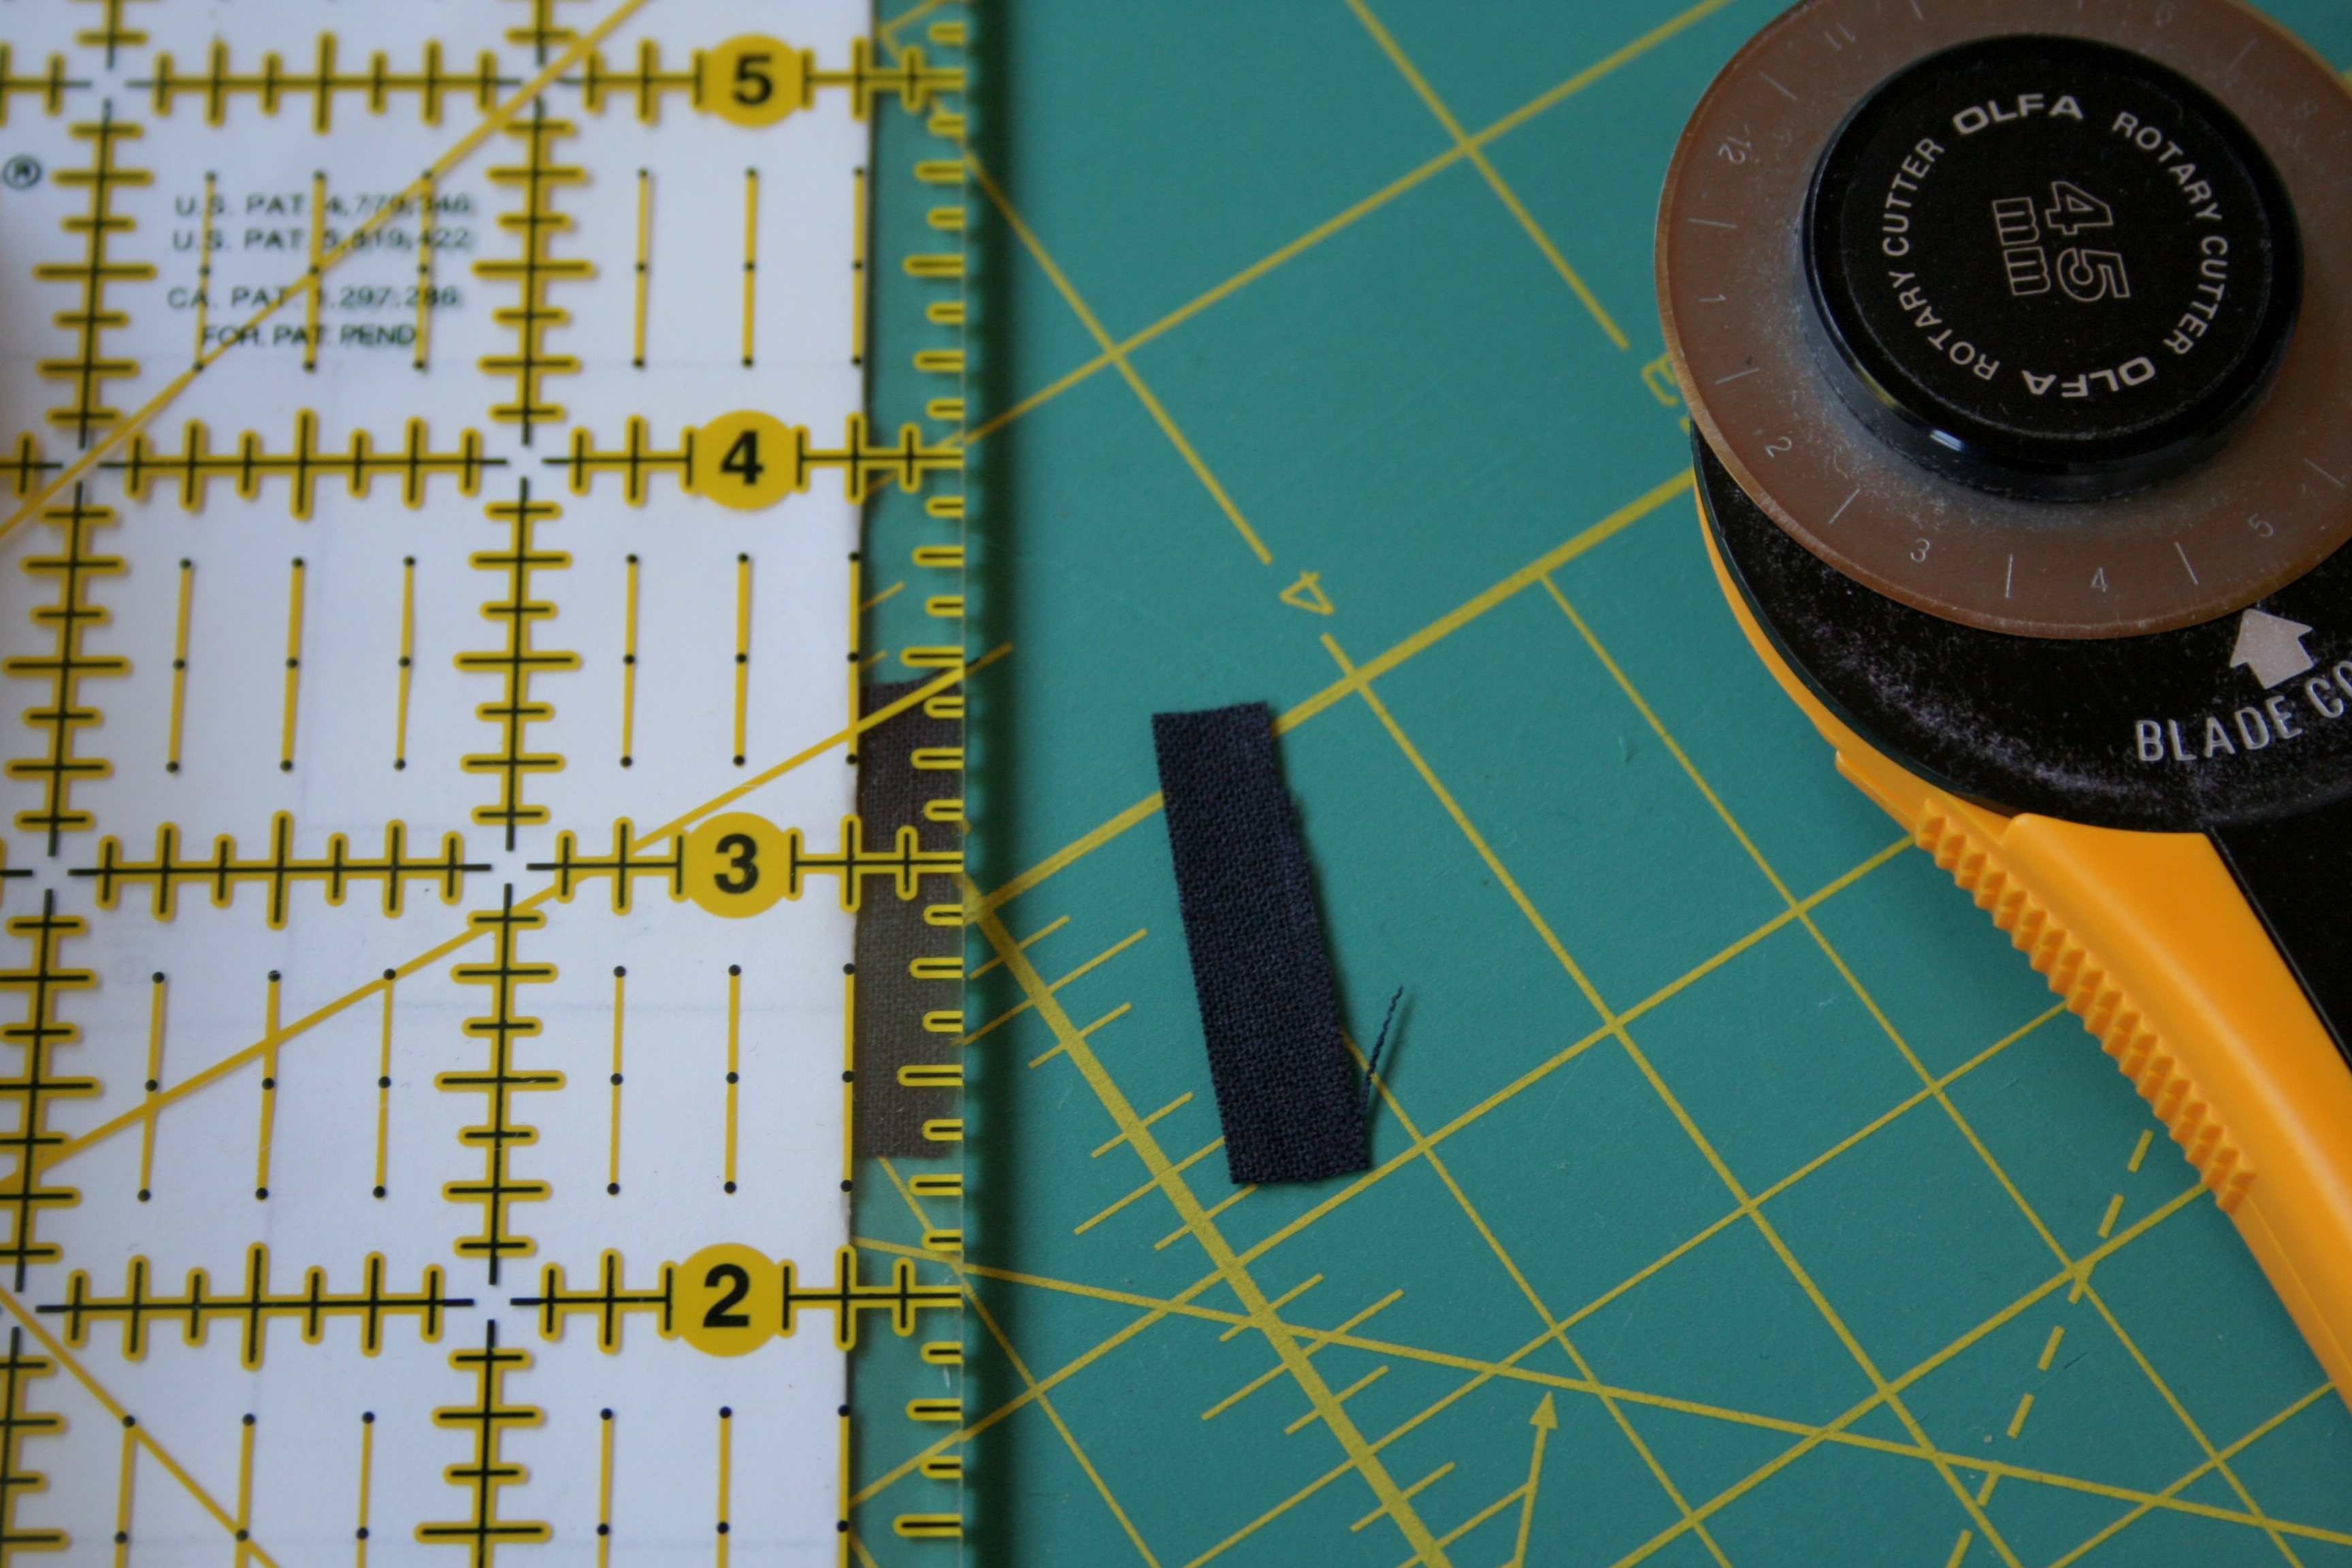
With paper folded over, trim the excess of piece 3 to 1/4″ beyond the fold. This will give you an accurate edge with which to line up the edge of piece 4.
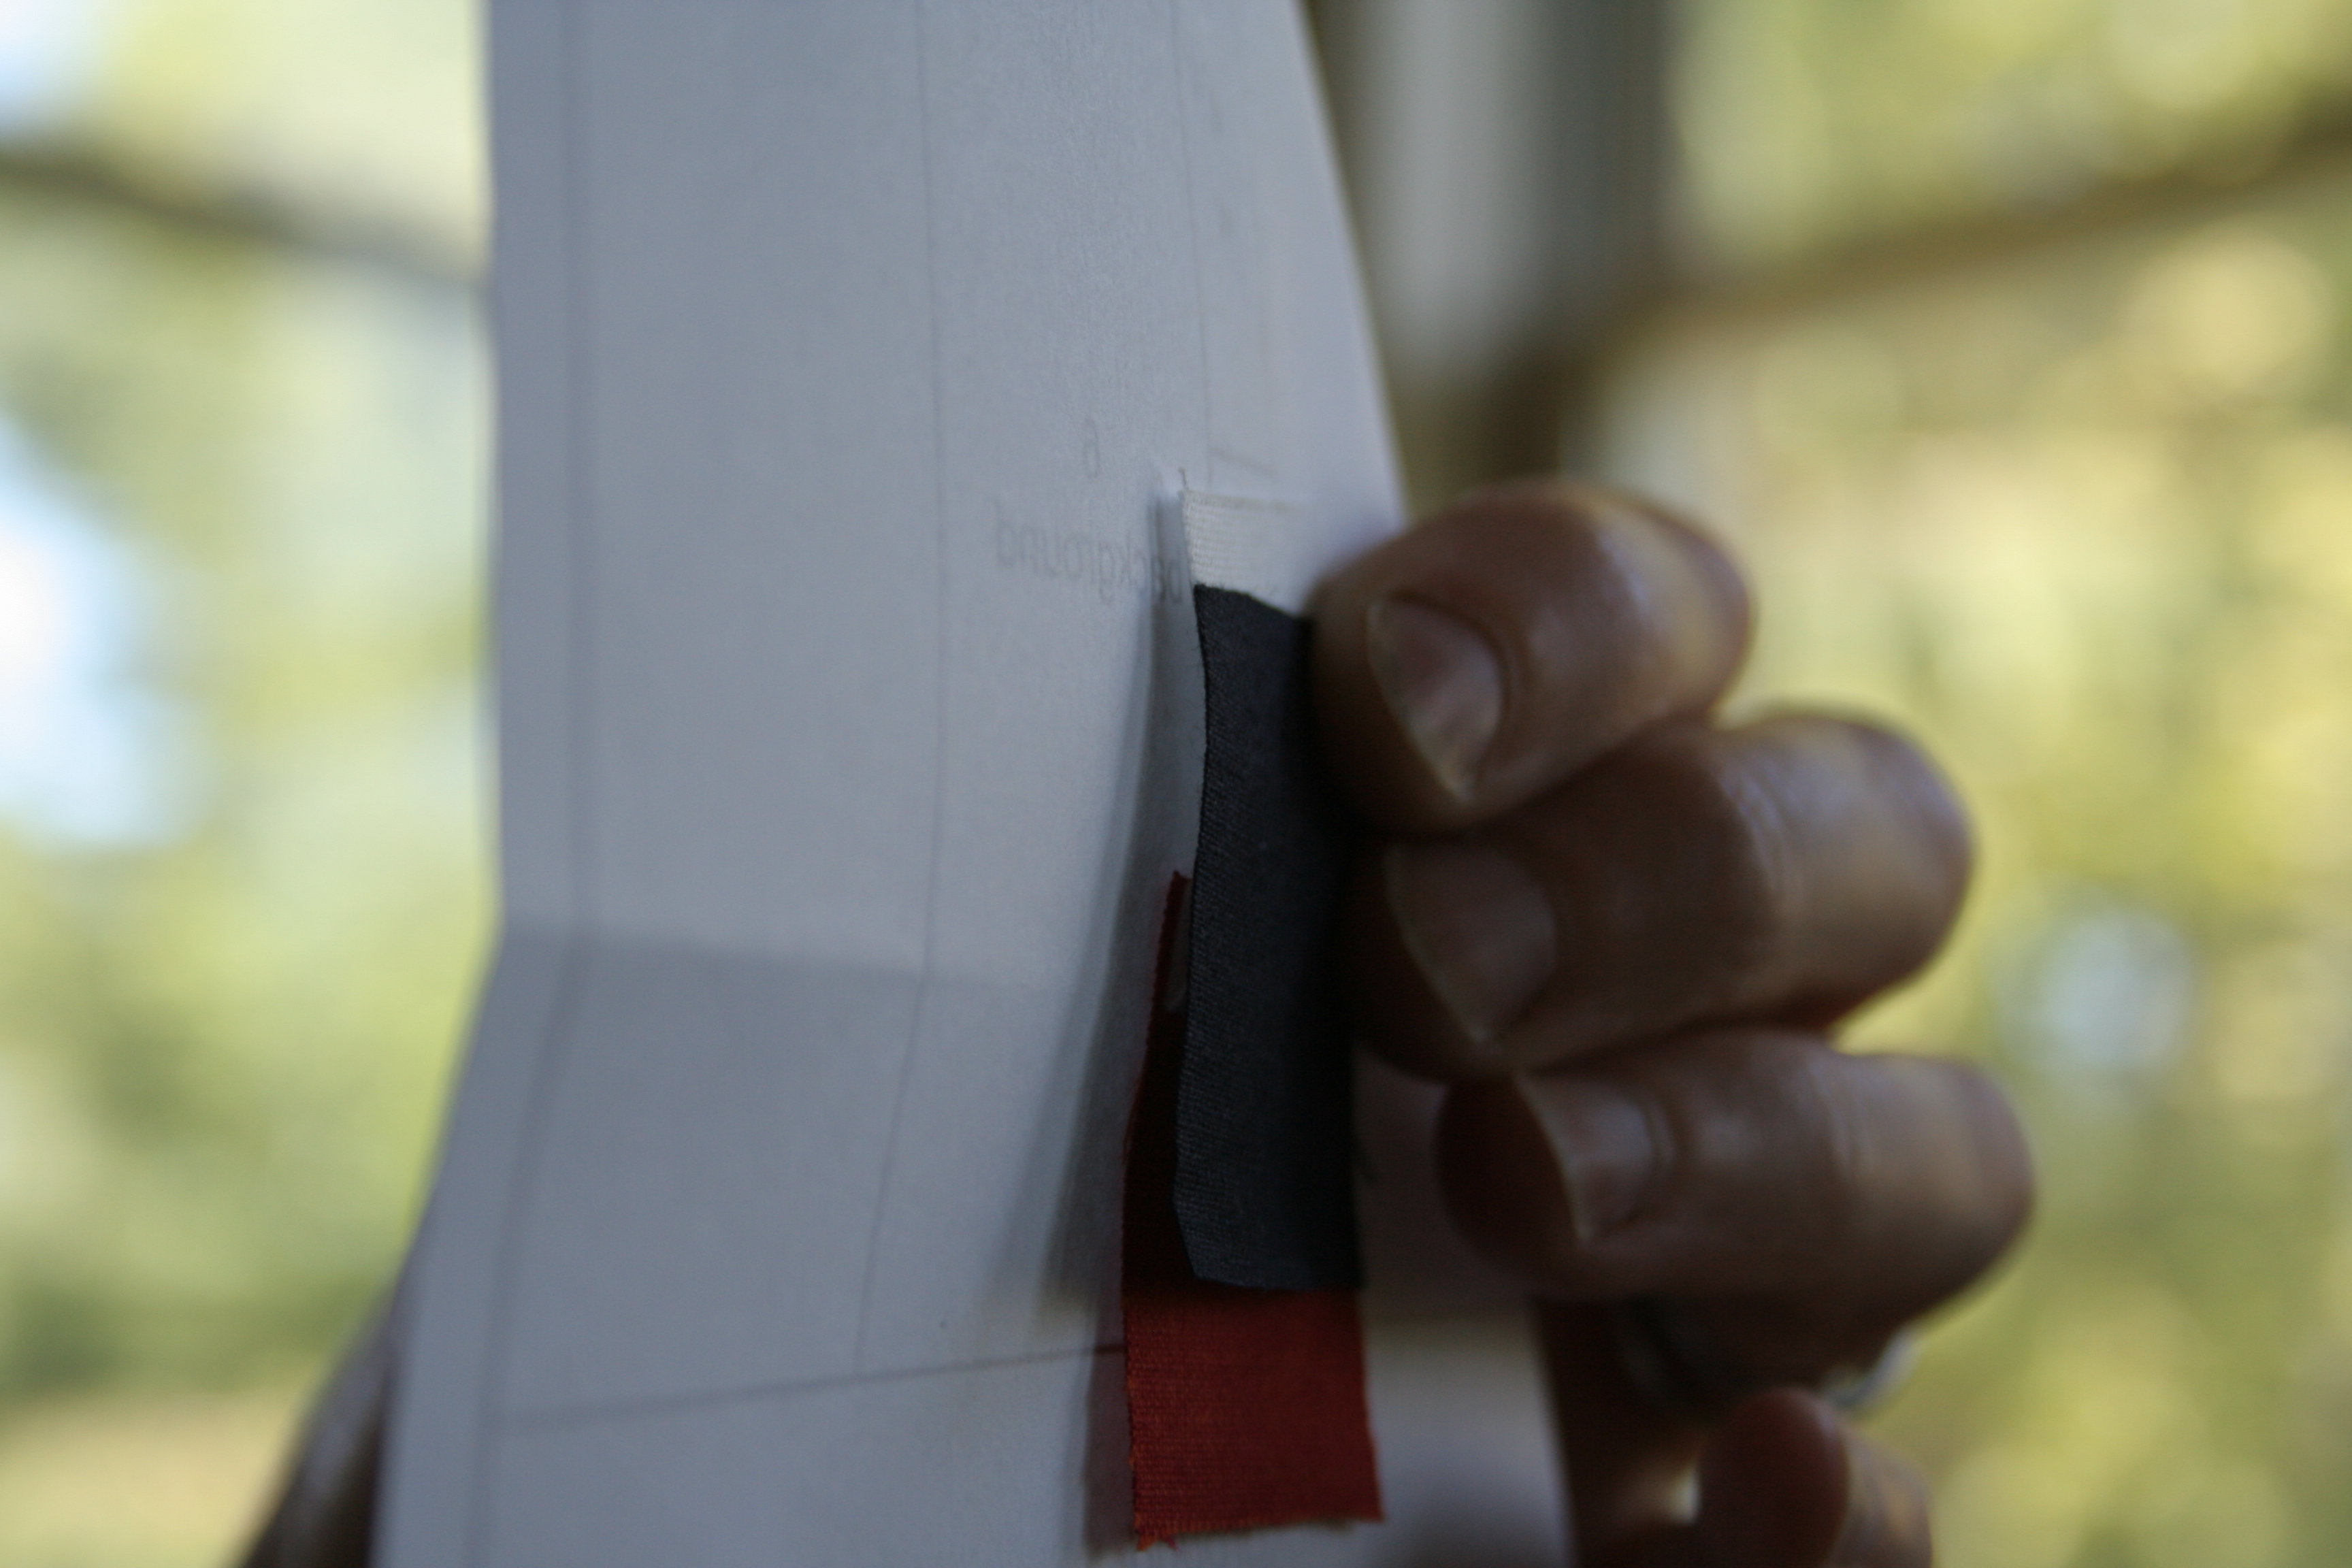
When lining up piece 4 (white) with the edge of piece 3 (black), if you match the edges, the seam will be exactly 1/4″. Note that the right side of fabric 4 is facing the right side of fabric 3. Hold in place, sew, and you’ve got as close to a perfect seam as you’re going to get!
Tips for Using Directional Fabrics:
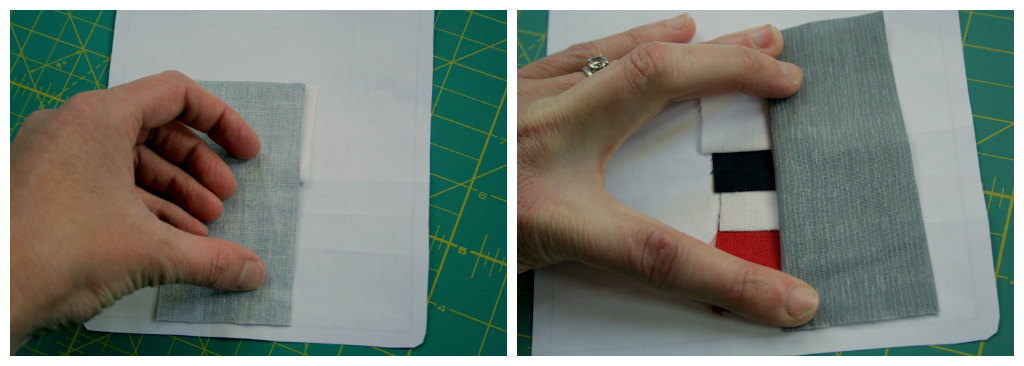
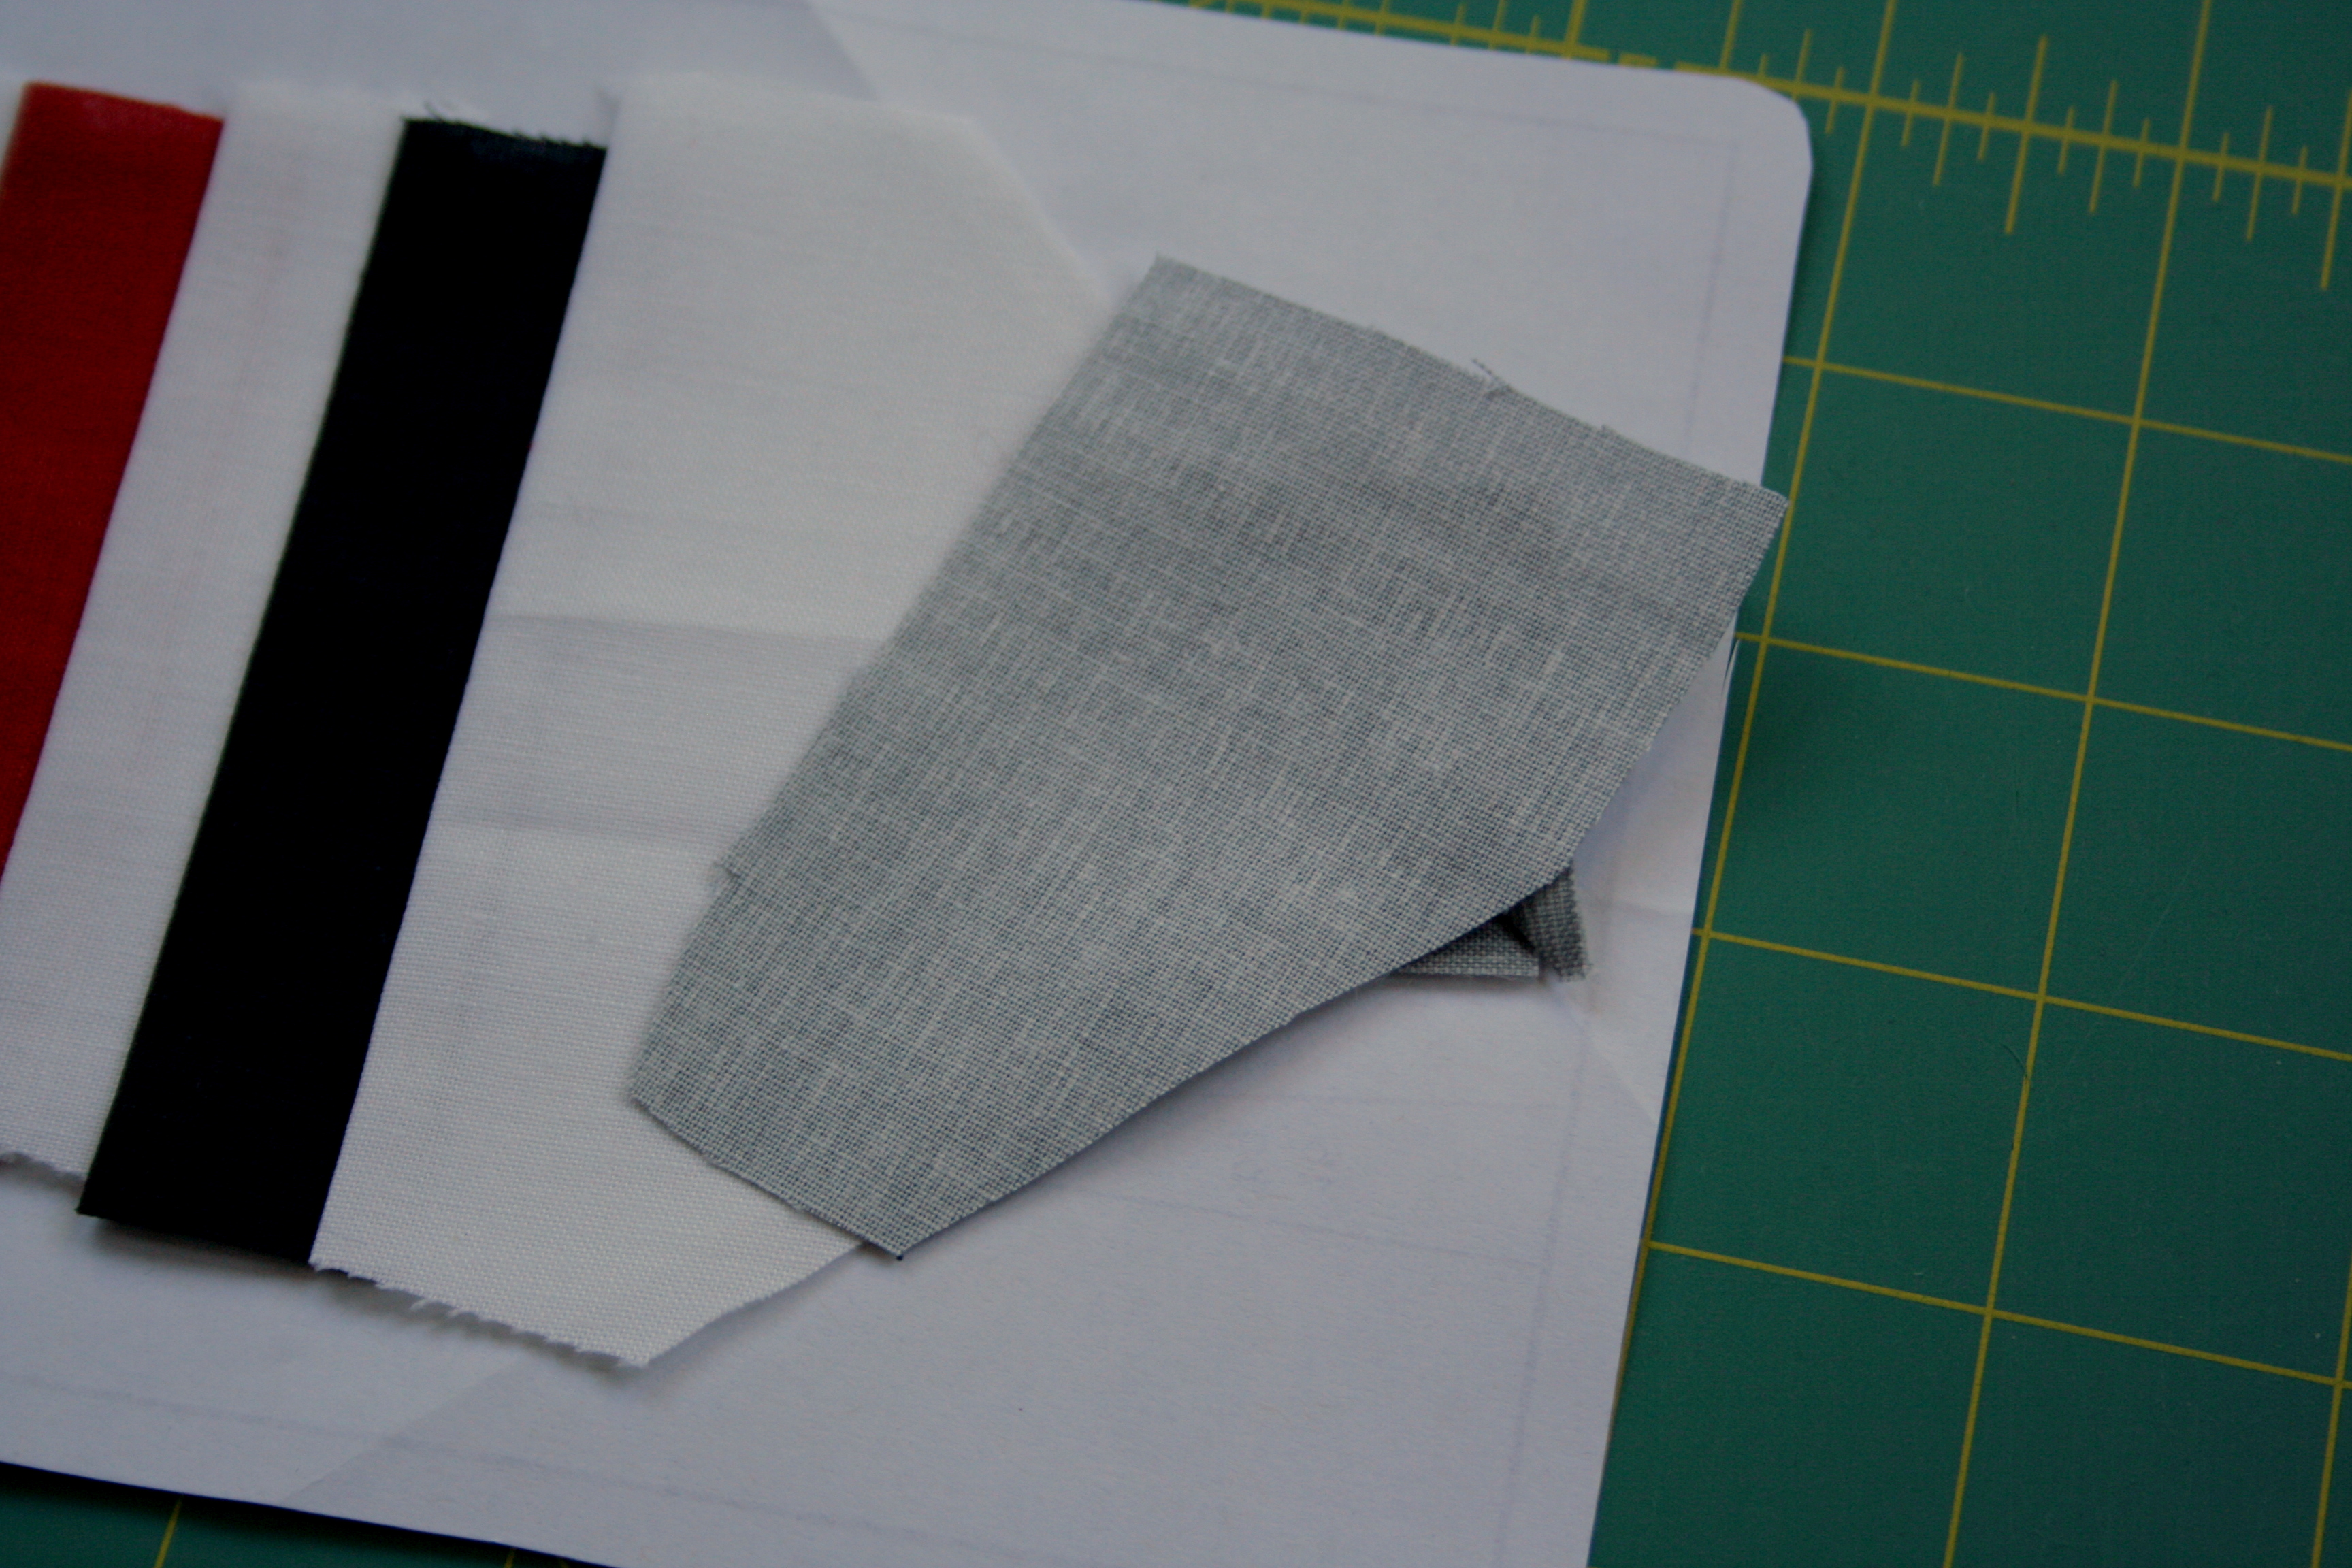
Using fabrics without a directional flow is fairly straight-forward, but if you are using a fabric with a directional pattern that you’d like to keep consistent, it takes a bit more forethought when you cut. First, line up your pattern and your fabric to decide in what direction the fabric should go. To cut the fabric, position the pattern with the printed lines up, and the fabric wrong side facing up. This way, since you are creating your pattern on the back, the shape of the fabric piece will be accurate (note that the above photo shows the fabric right side up, before pieces were cut).
Once your piece is cut, proceed as usual, paying close attention to the direction of the fabric. Remember, right side of fabric piece is placed facing the right side of the emerging picture, on the wrong side of the foundation paper.
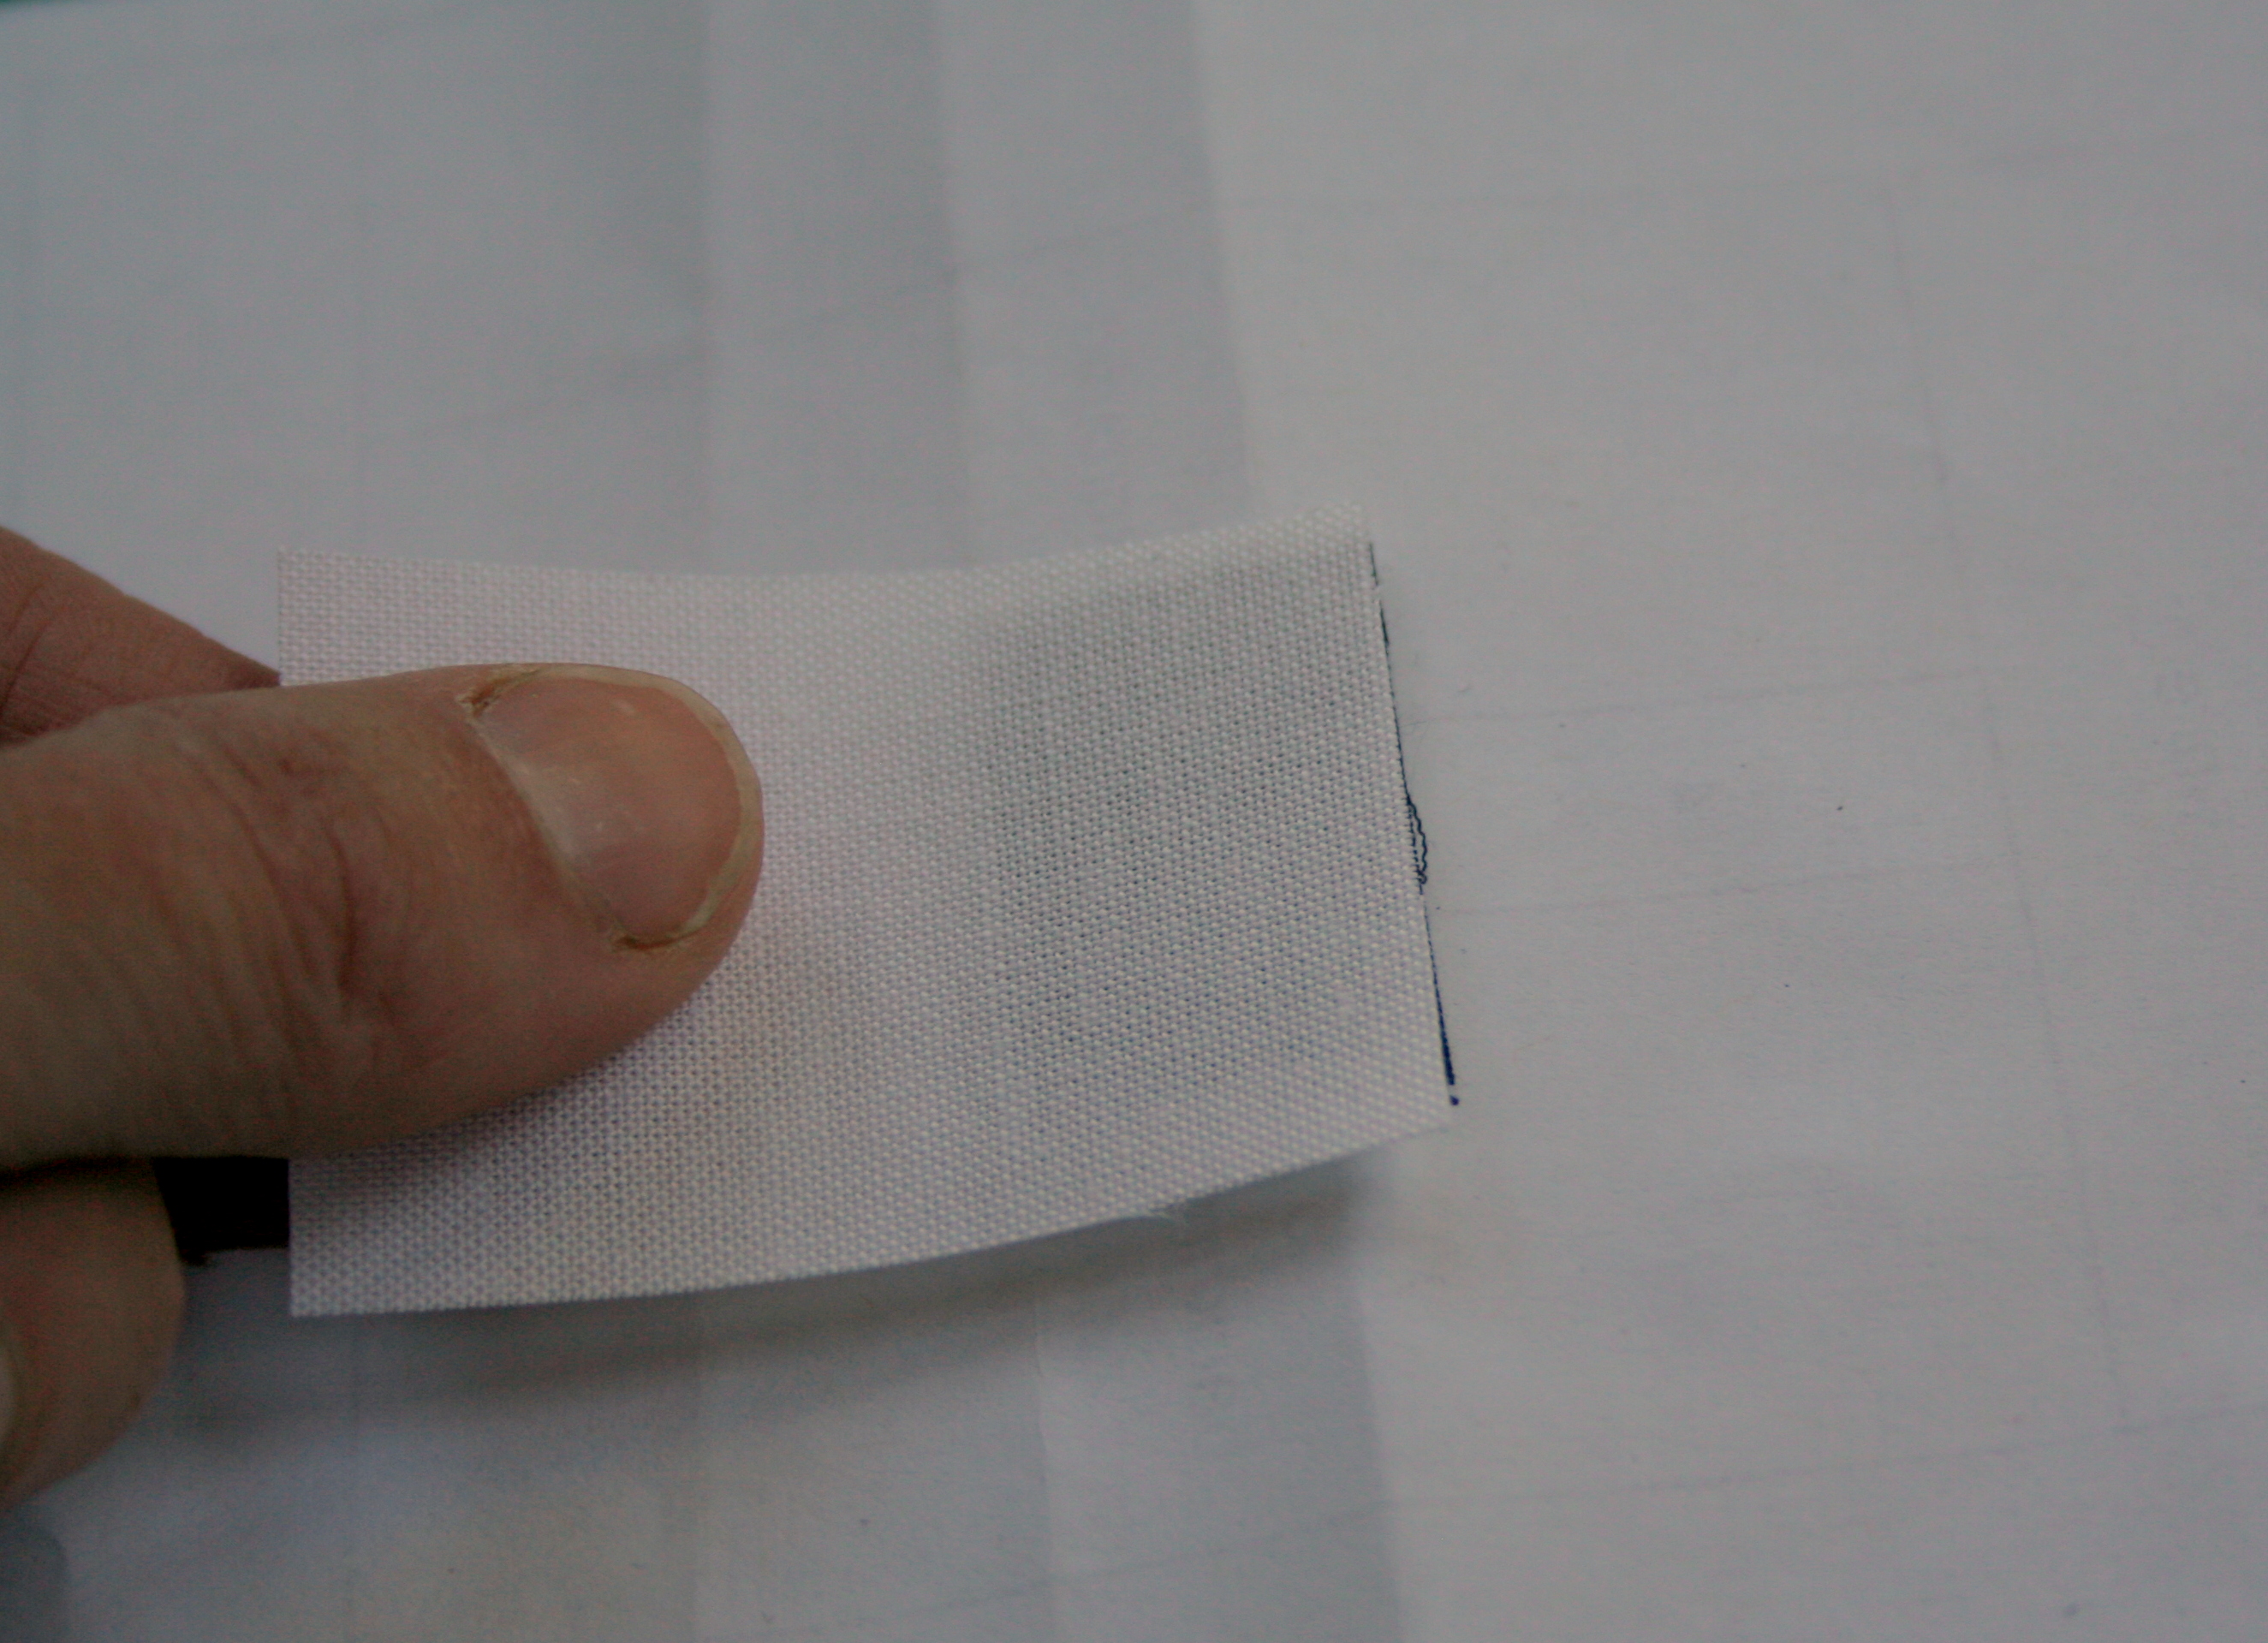
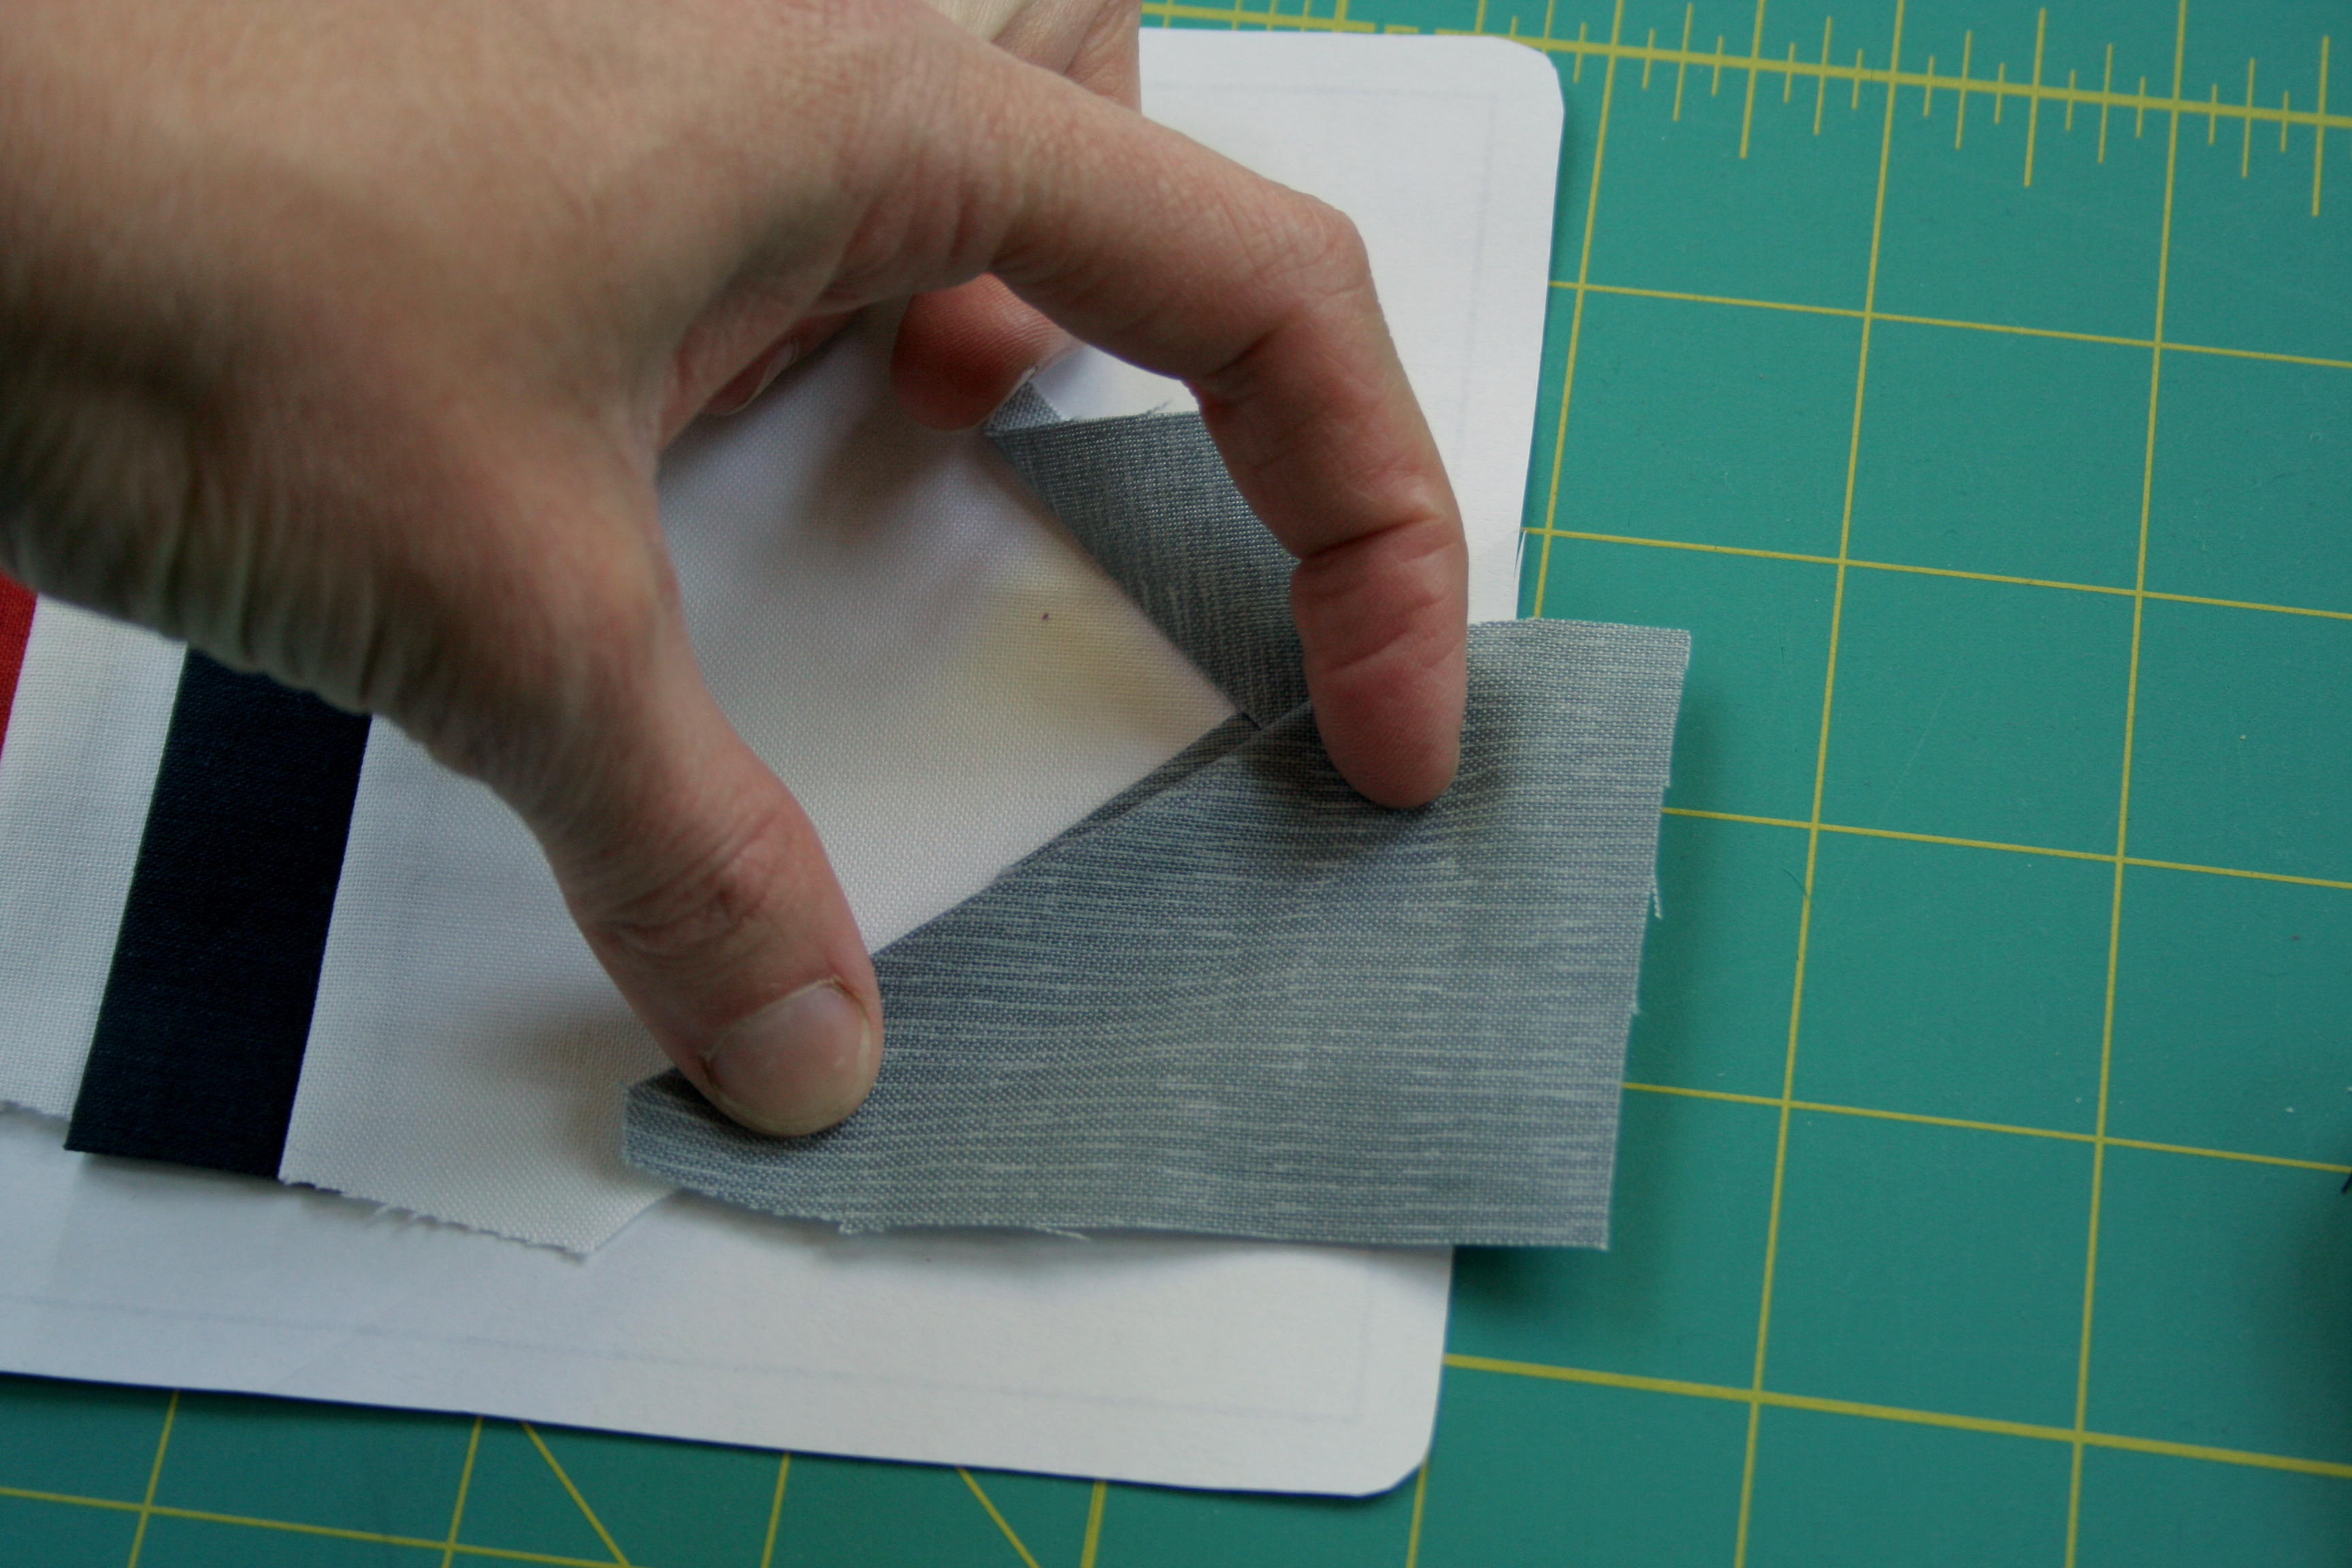
Until you get the hang of aligning the fabric correctly, it’s a good idea to check the direction of the fabric before sewing. Unpicking paper pieced (tiny stitches!) seams is less than desirable (trust me, I know!). To check the fabric direction, simply place the fabric wrong side down, hold along seam line, and fold back. Once you are sure the direction of the fabric is the way you want it, fold it back and sew.
Tips for Tricky Angles:
Many angles in basic paper piecing patterns are fairly straight forward. Sometimes, though, you have an angle that really makes you crunch your brain to properly line up the fabric before sewing so that it fully covers the necessary space with seam allowances. Rather than sew, unpick, sew, unpick, sew, unpick, here are some tips to help get it right the first try.
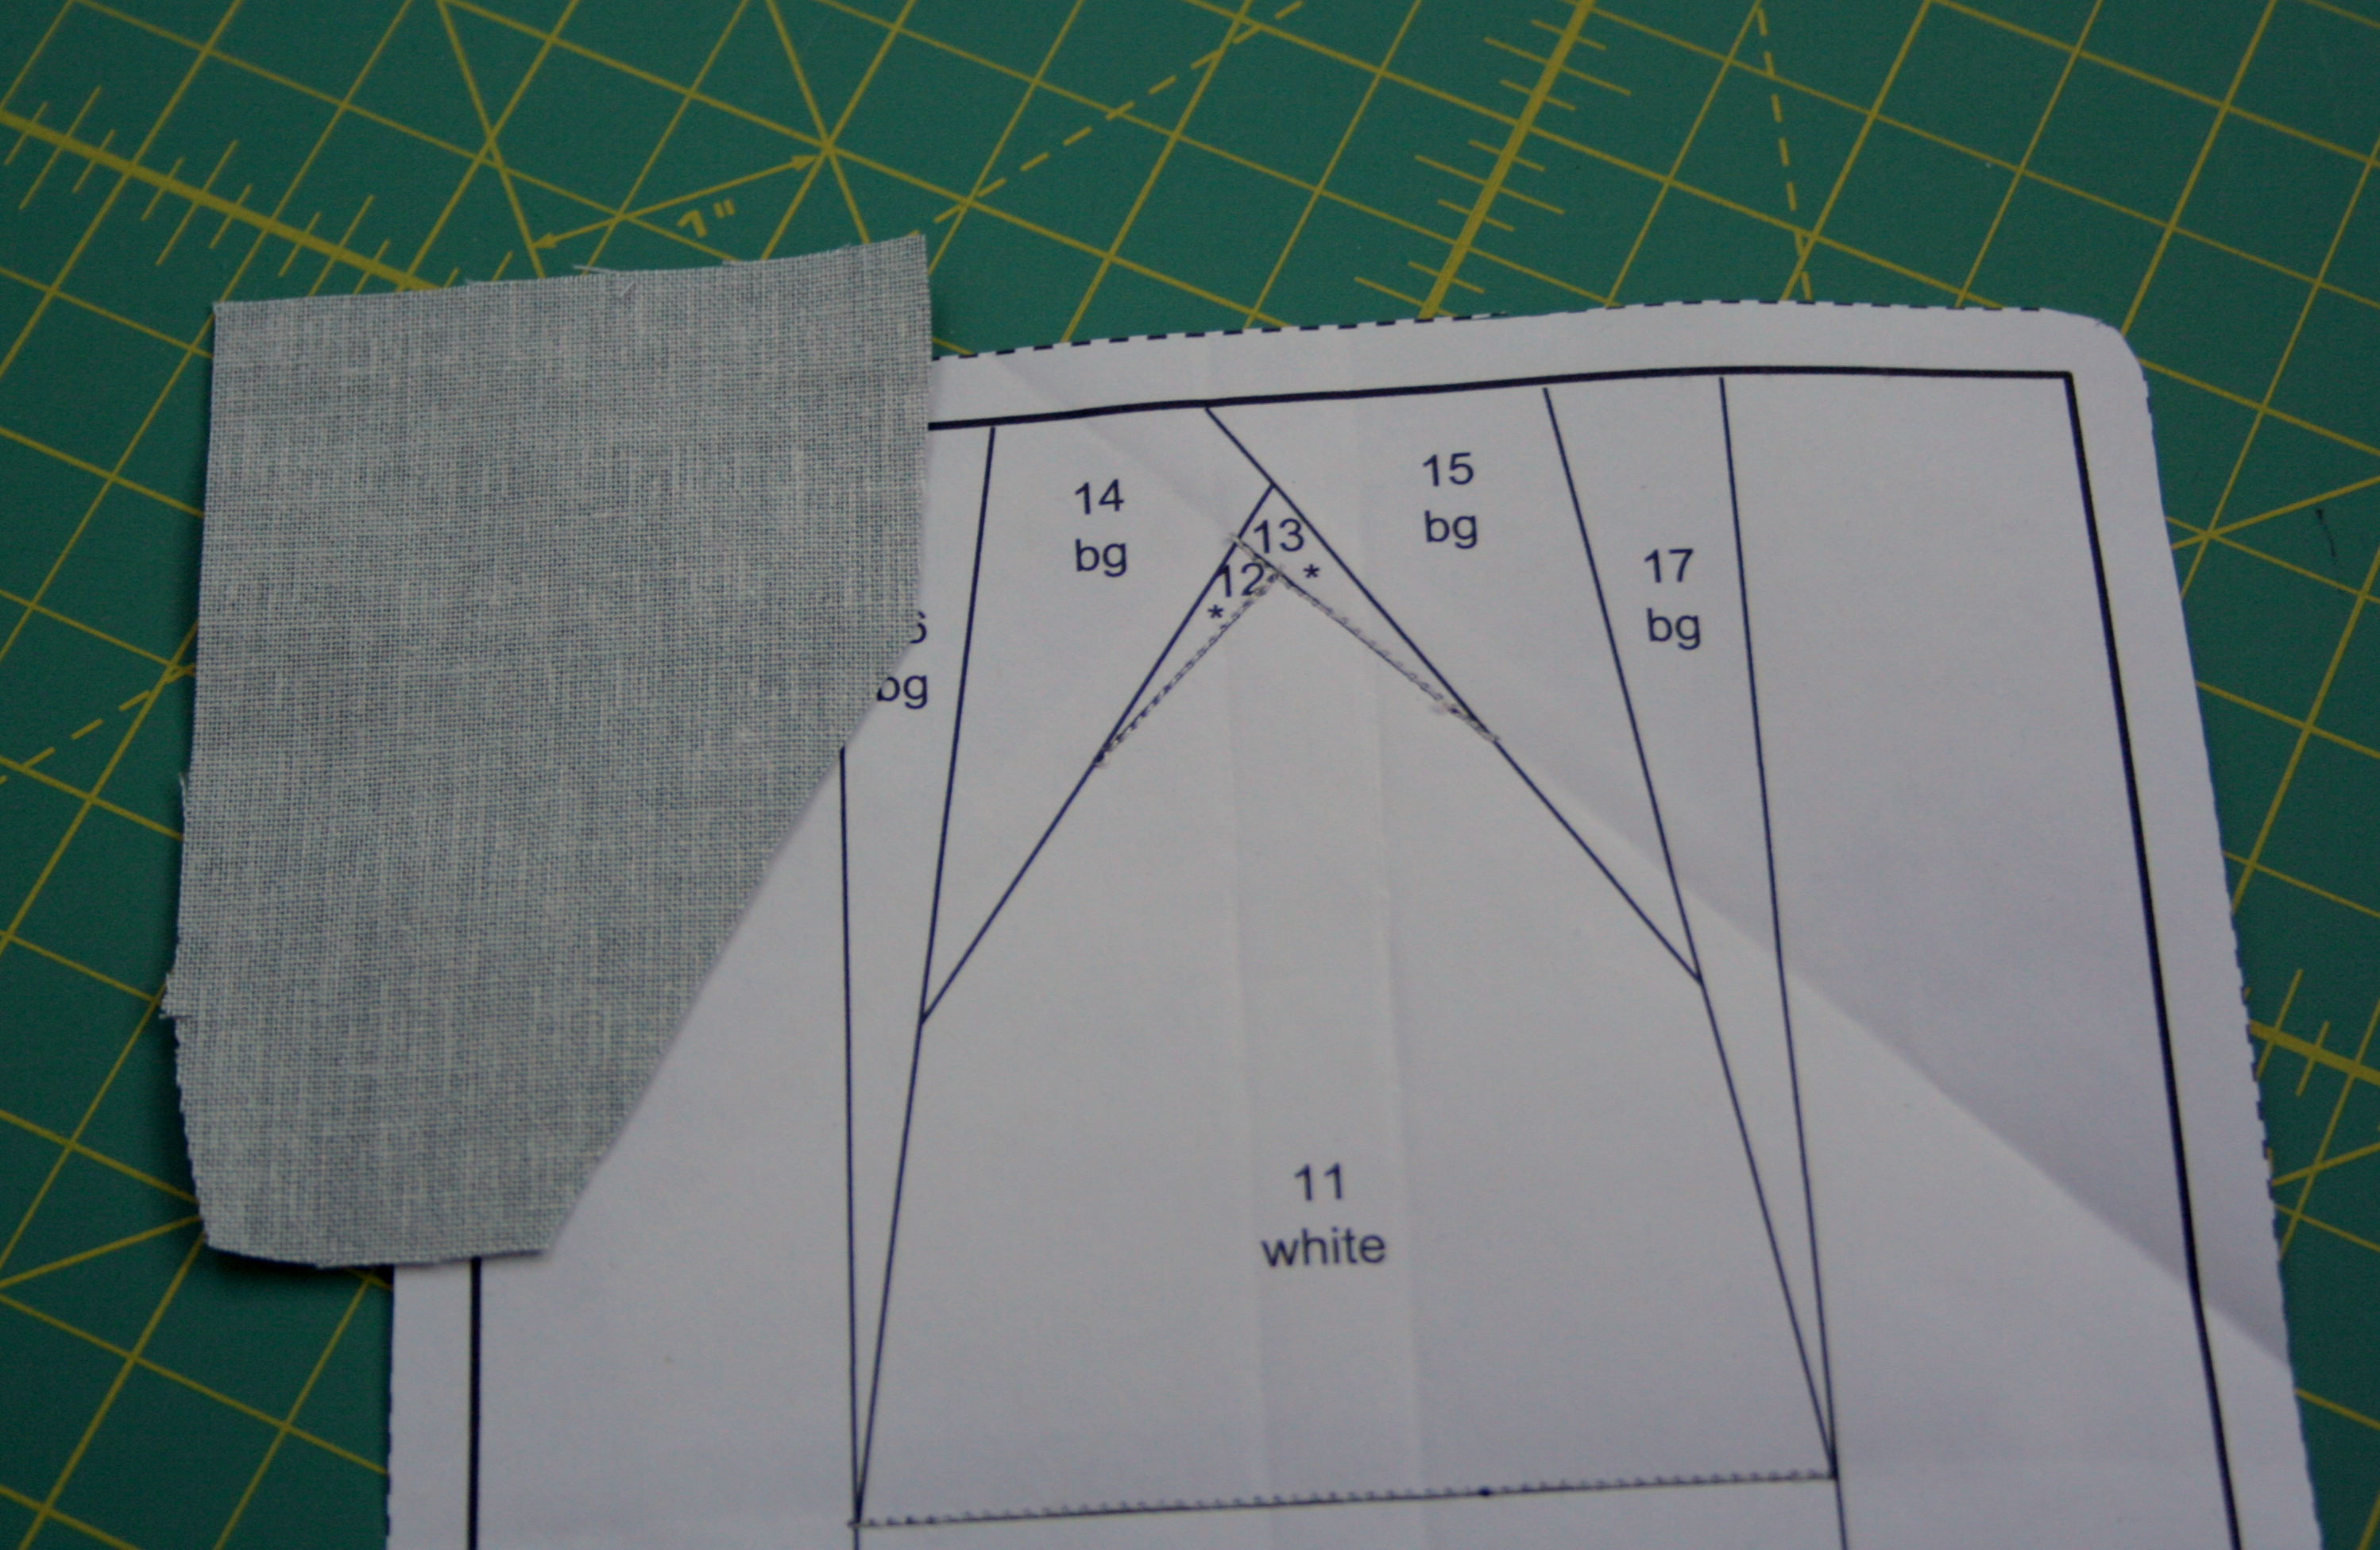
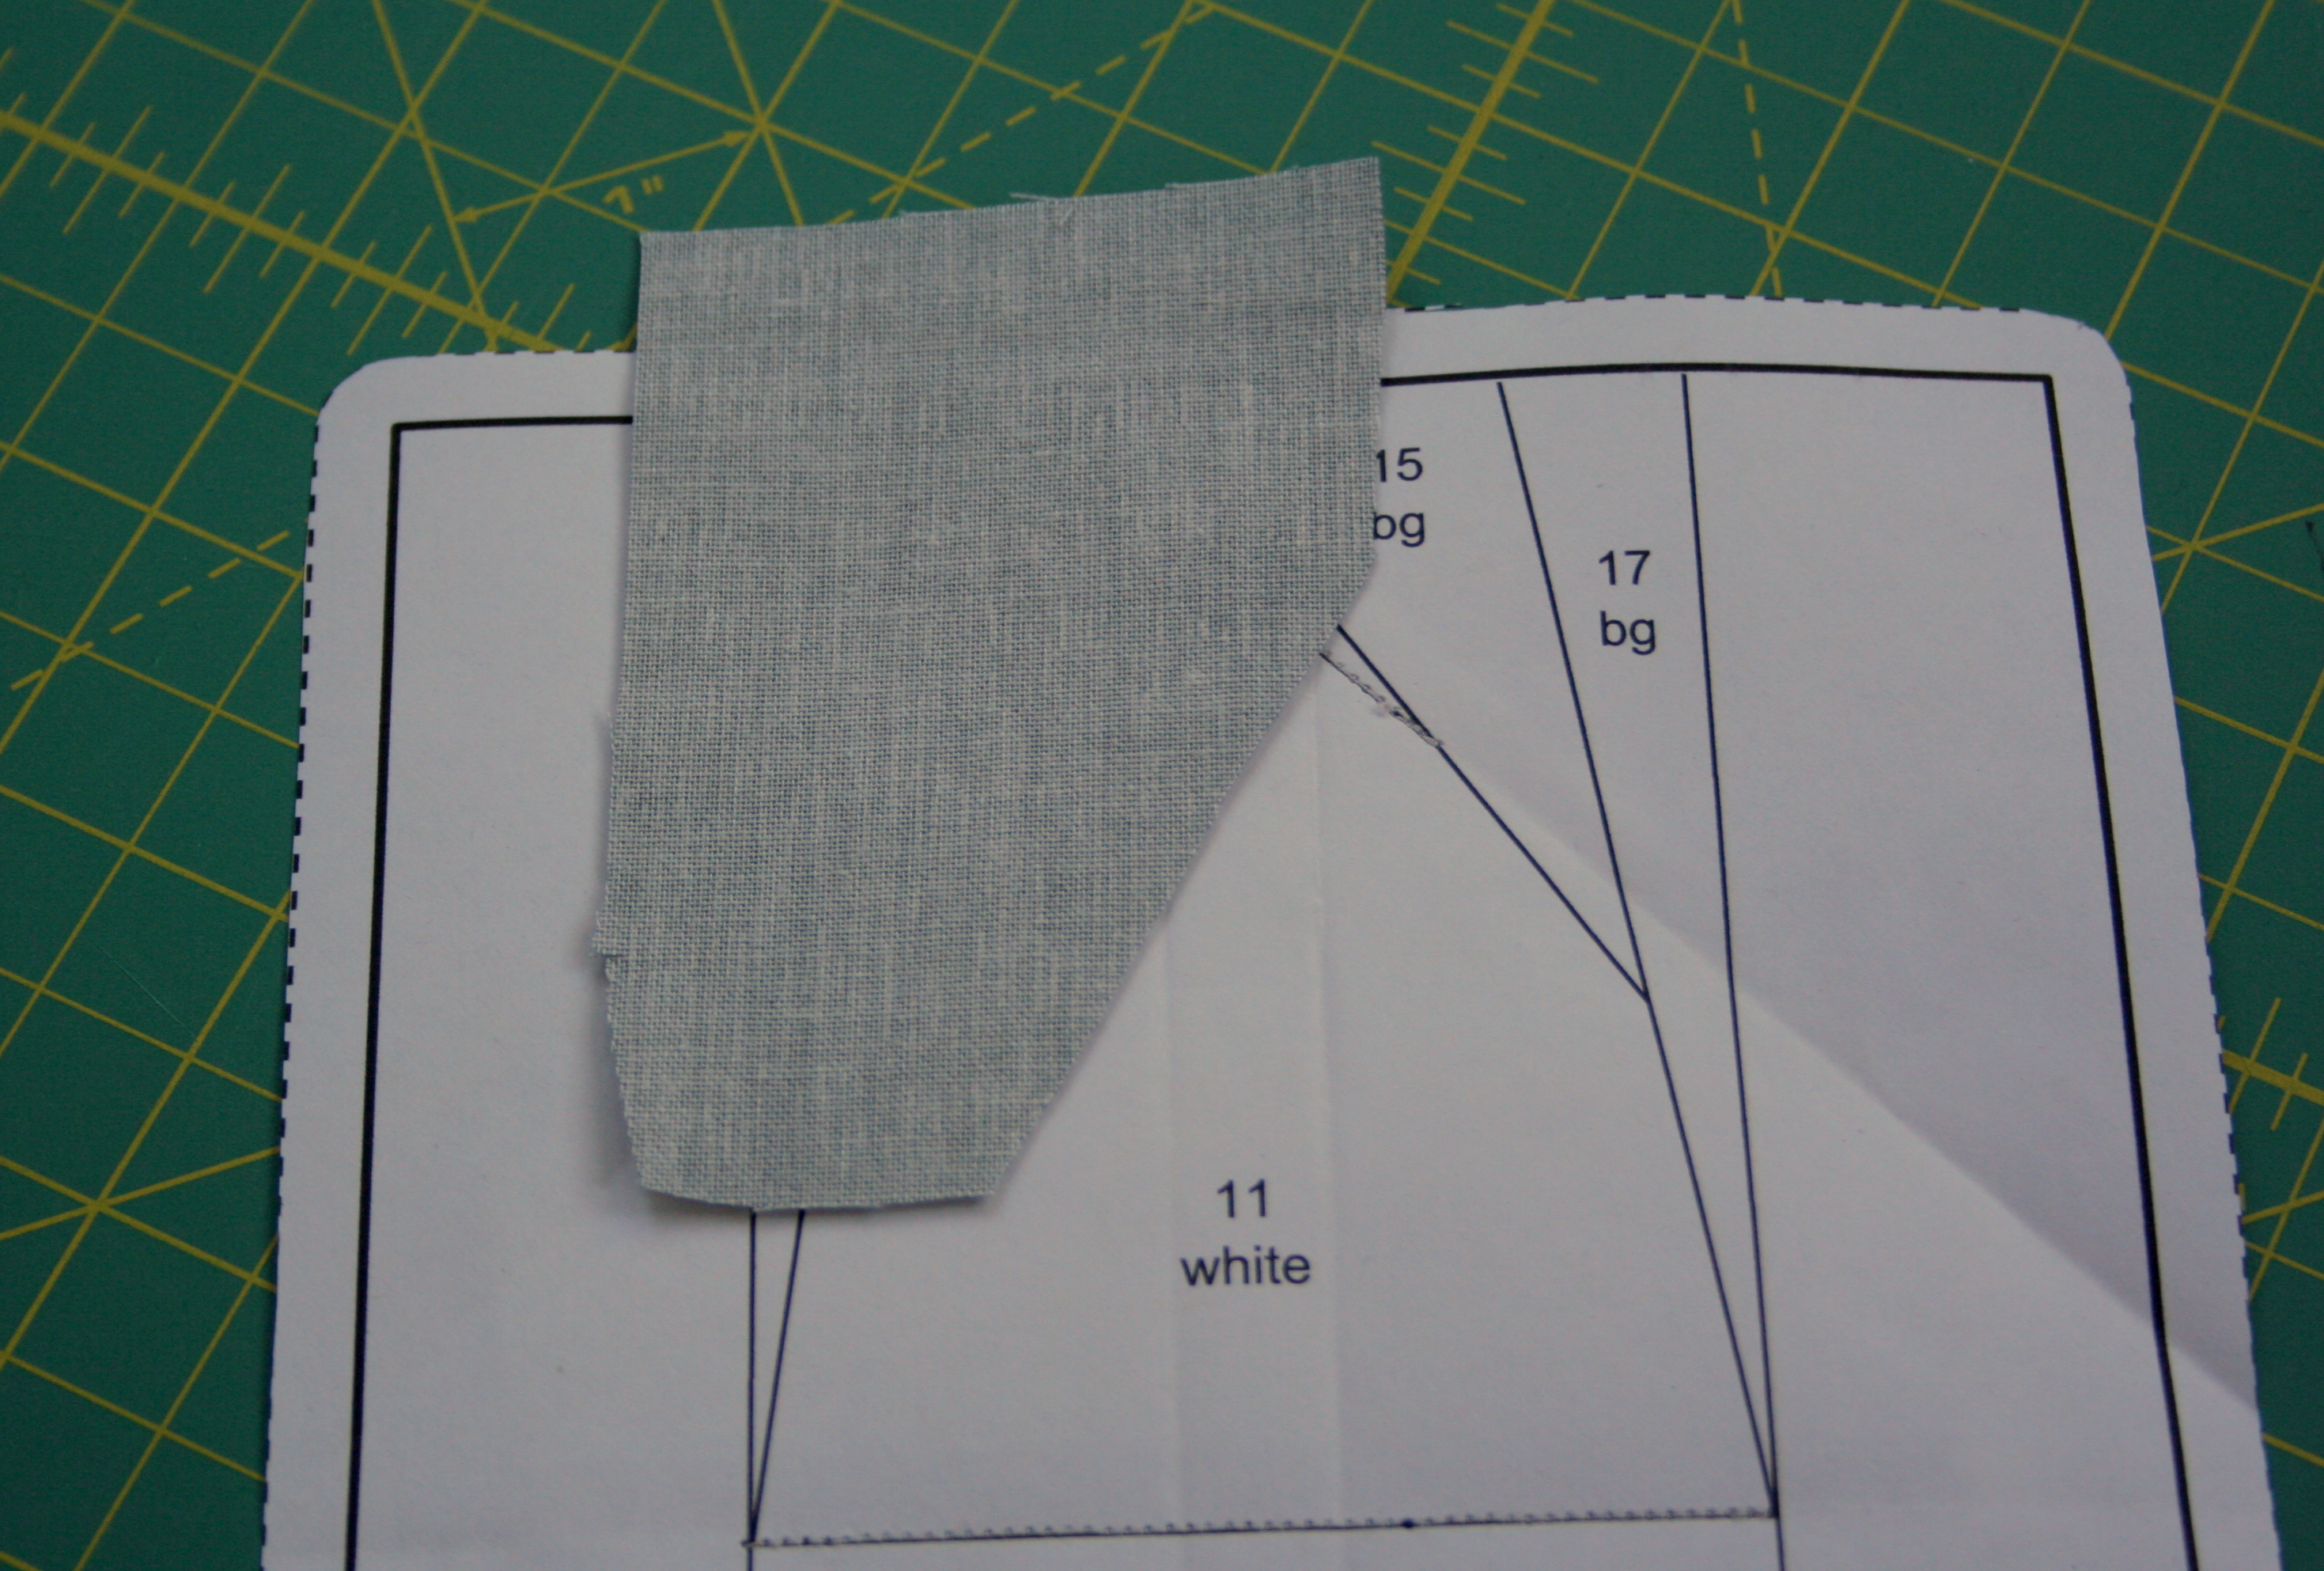
Here I’m trying to piece section 14. When cutting my fabric piece, I’ve been generous with size, and included the angle of the seam I’m about to sew. Note that the fabric is wrong side up, with my foundation paper right side up.
The fabric piece generously covers the space needed, with lots of wiggle room. The angle cut into the piece is key, since that will help align the seam correctly. If just eyeing the angle while cutting doesn’t work for you, you can put your pattern paper on top of your fabric, and using a Herra marker, deeply mark the seam line. Add 1/4-1/2″ to all sides and cut your fabric piece.
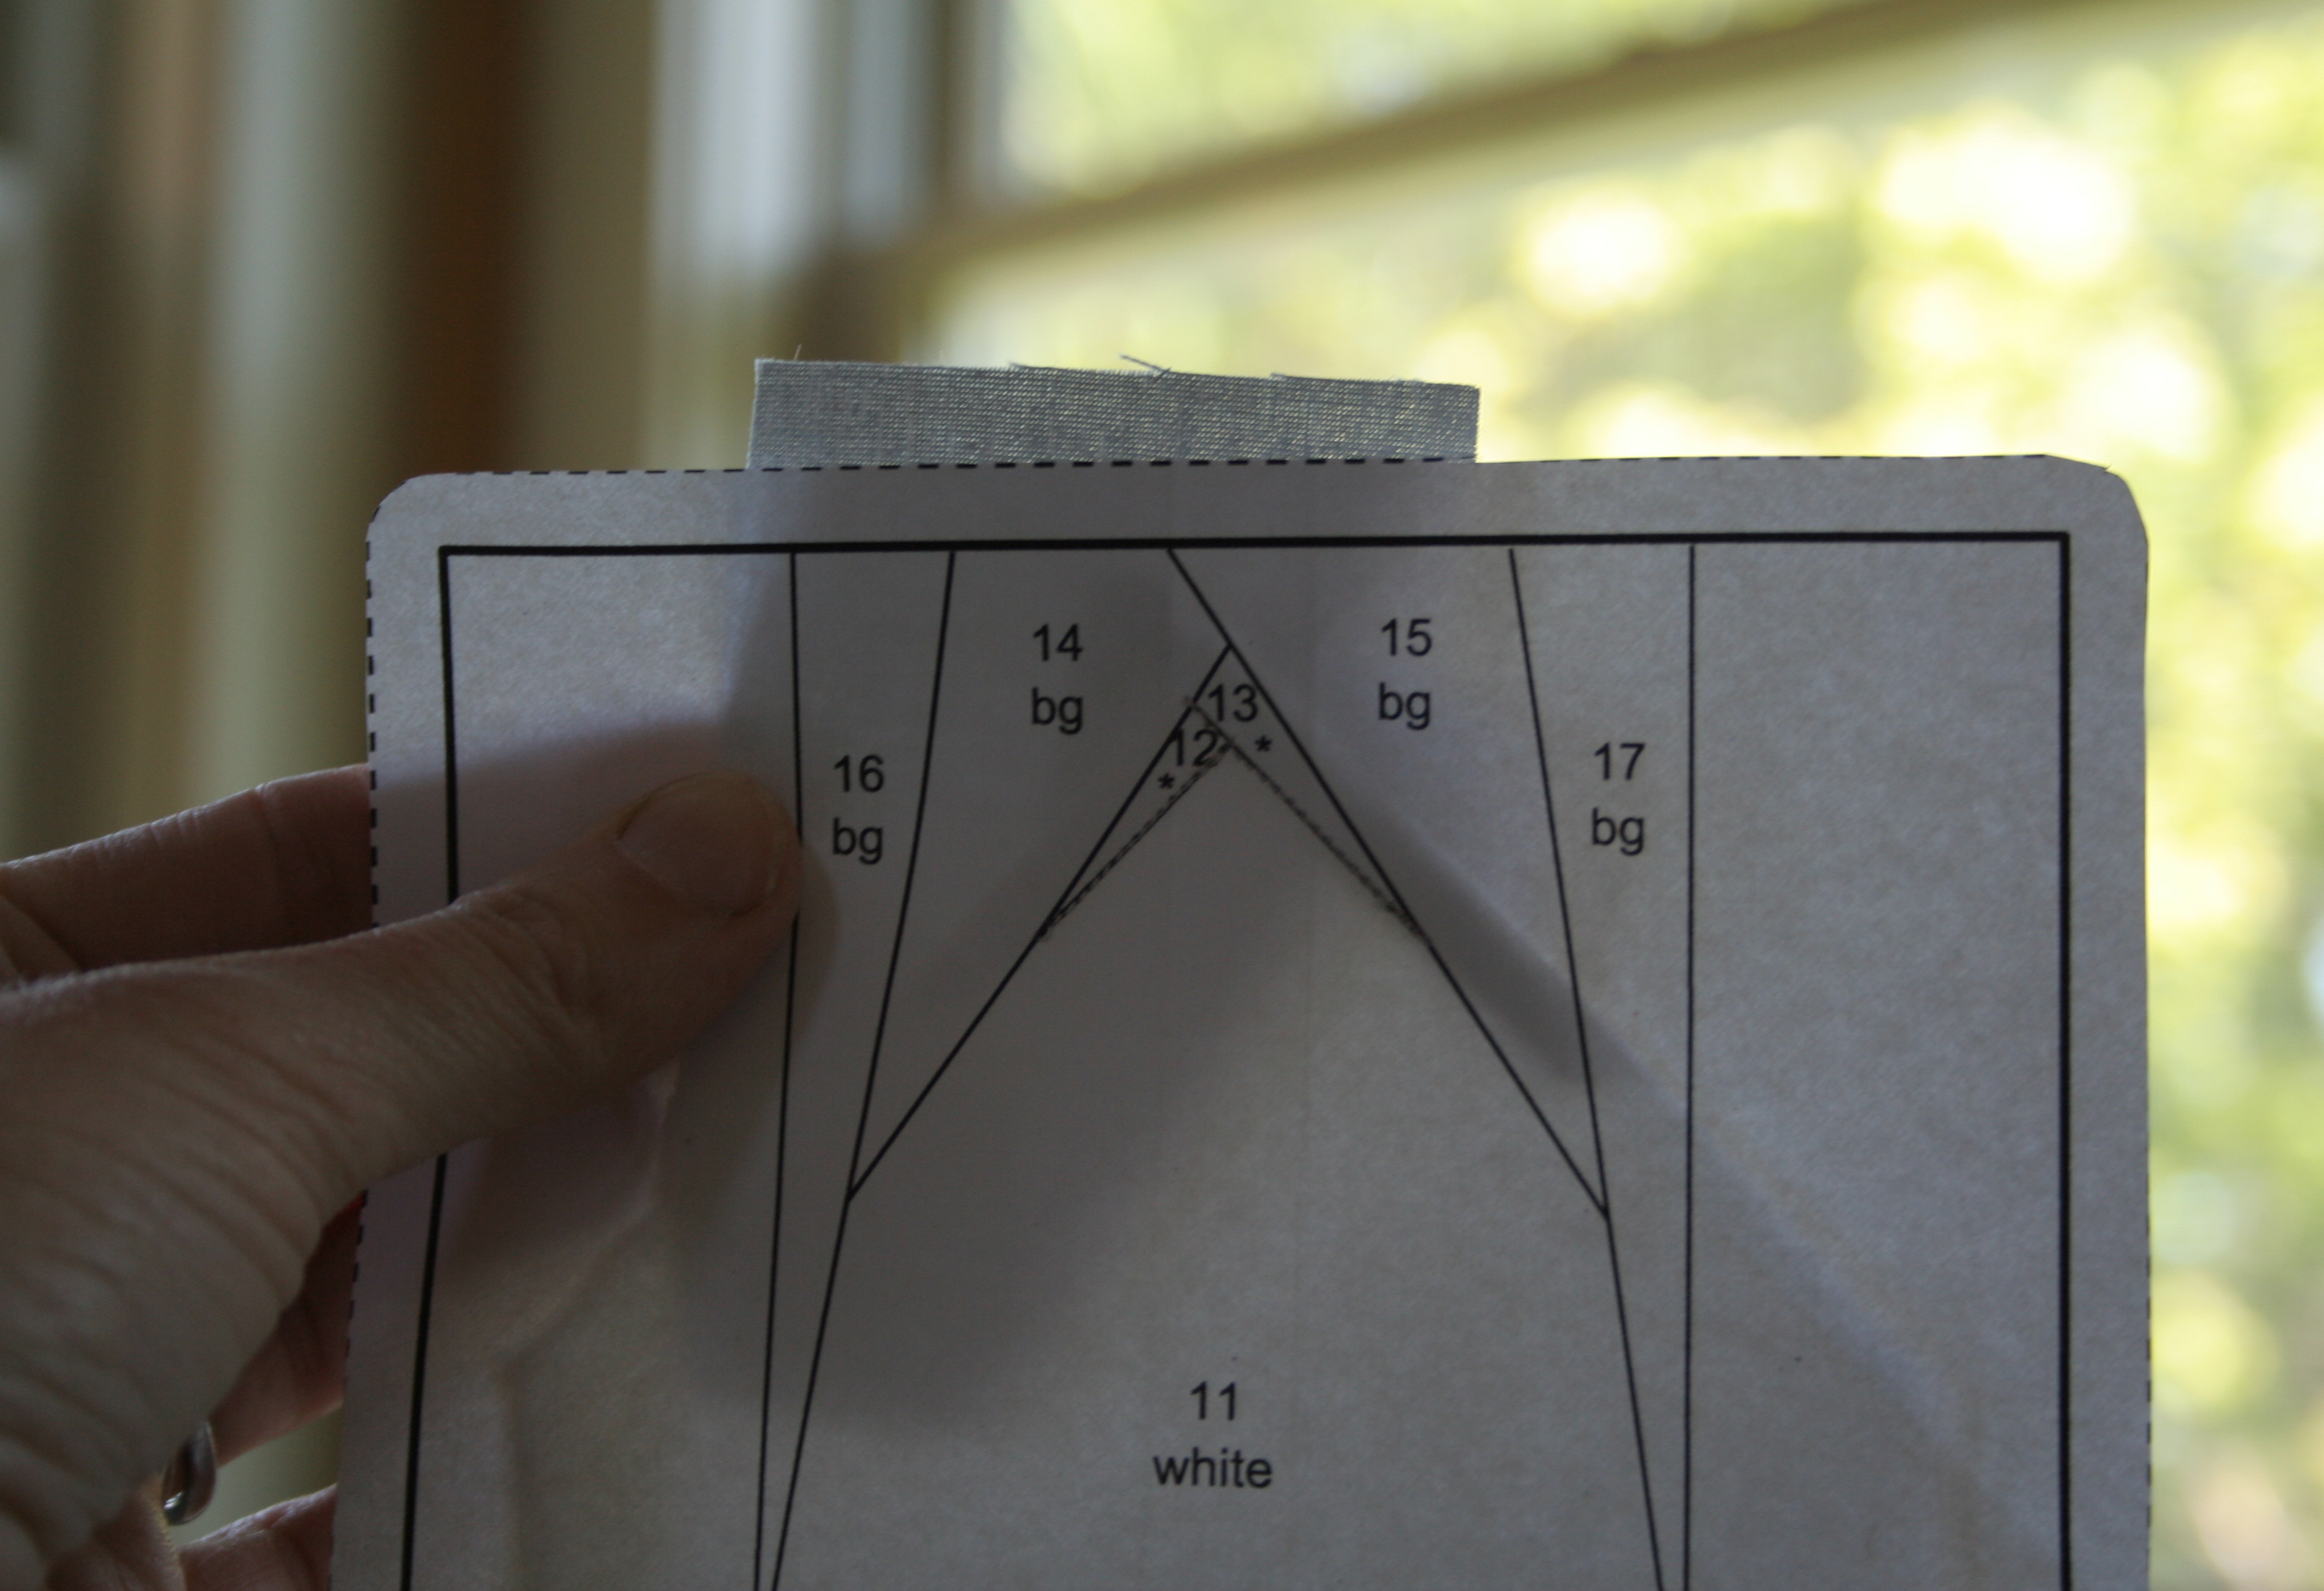
Holding it up to the light, I can see that my fabric piece covers the space, extends amply beyond the seam allowance, and that the general angle of the seam line is consistent with the angle of the fabric piece.
Here’s the tricky part. Placing your fabric right side facing the wrong side of the foundation paper, line your angled seam edge with the seam line on your block. It will look wonky, and may seem like it is headed in the wrong direction.
Fold along the seam line to ensure the fabric will cover the correct area. Once satisfied that it’s all lined up properly, fold back and sew the seam. With particularly wonky angles, I sometimes pin along the seam line, both to ensure I’m accurately checking the fold, and to hold the fabric in the proper place before sewing.
So now you’ve got the basics of foundation paper piecing! Once your entire block is pieced, square up the edges being mindful to keep the 1/4″ seam allowance around the block if you plan to sew it into a quilt, pillow, or just about anything else.
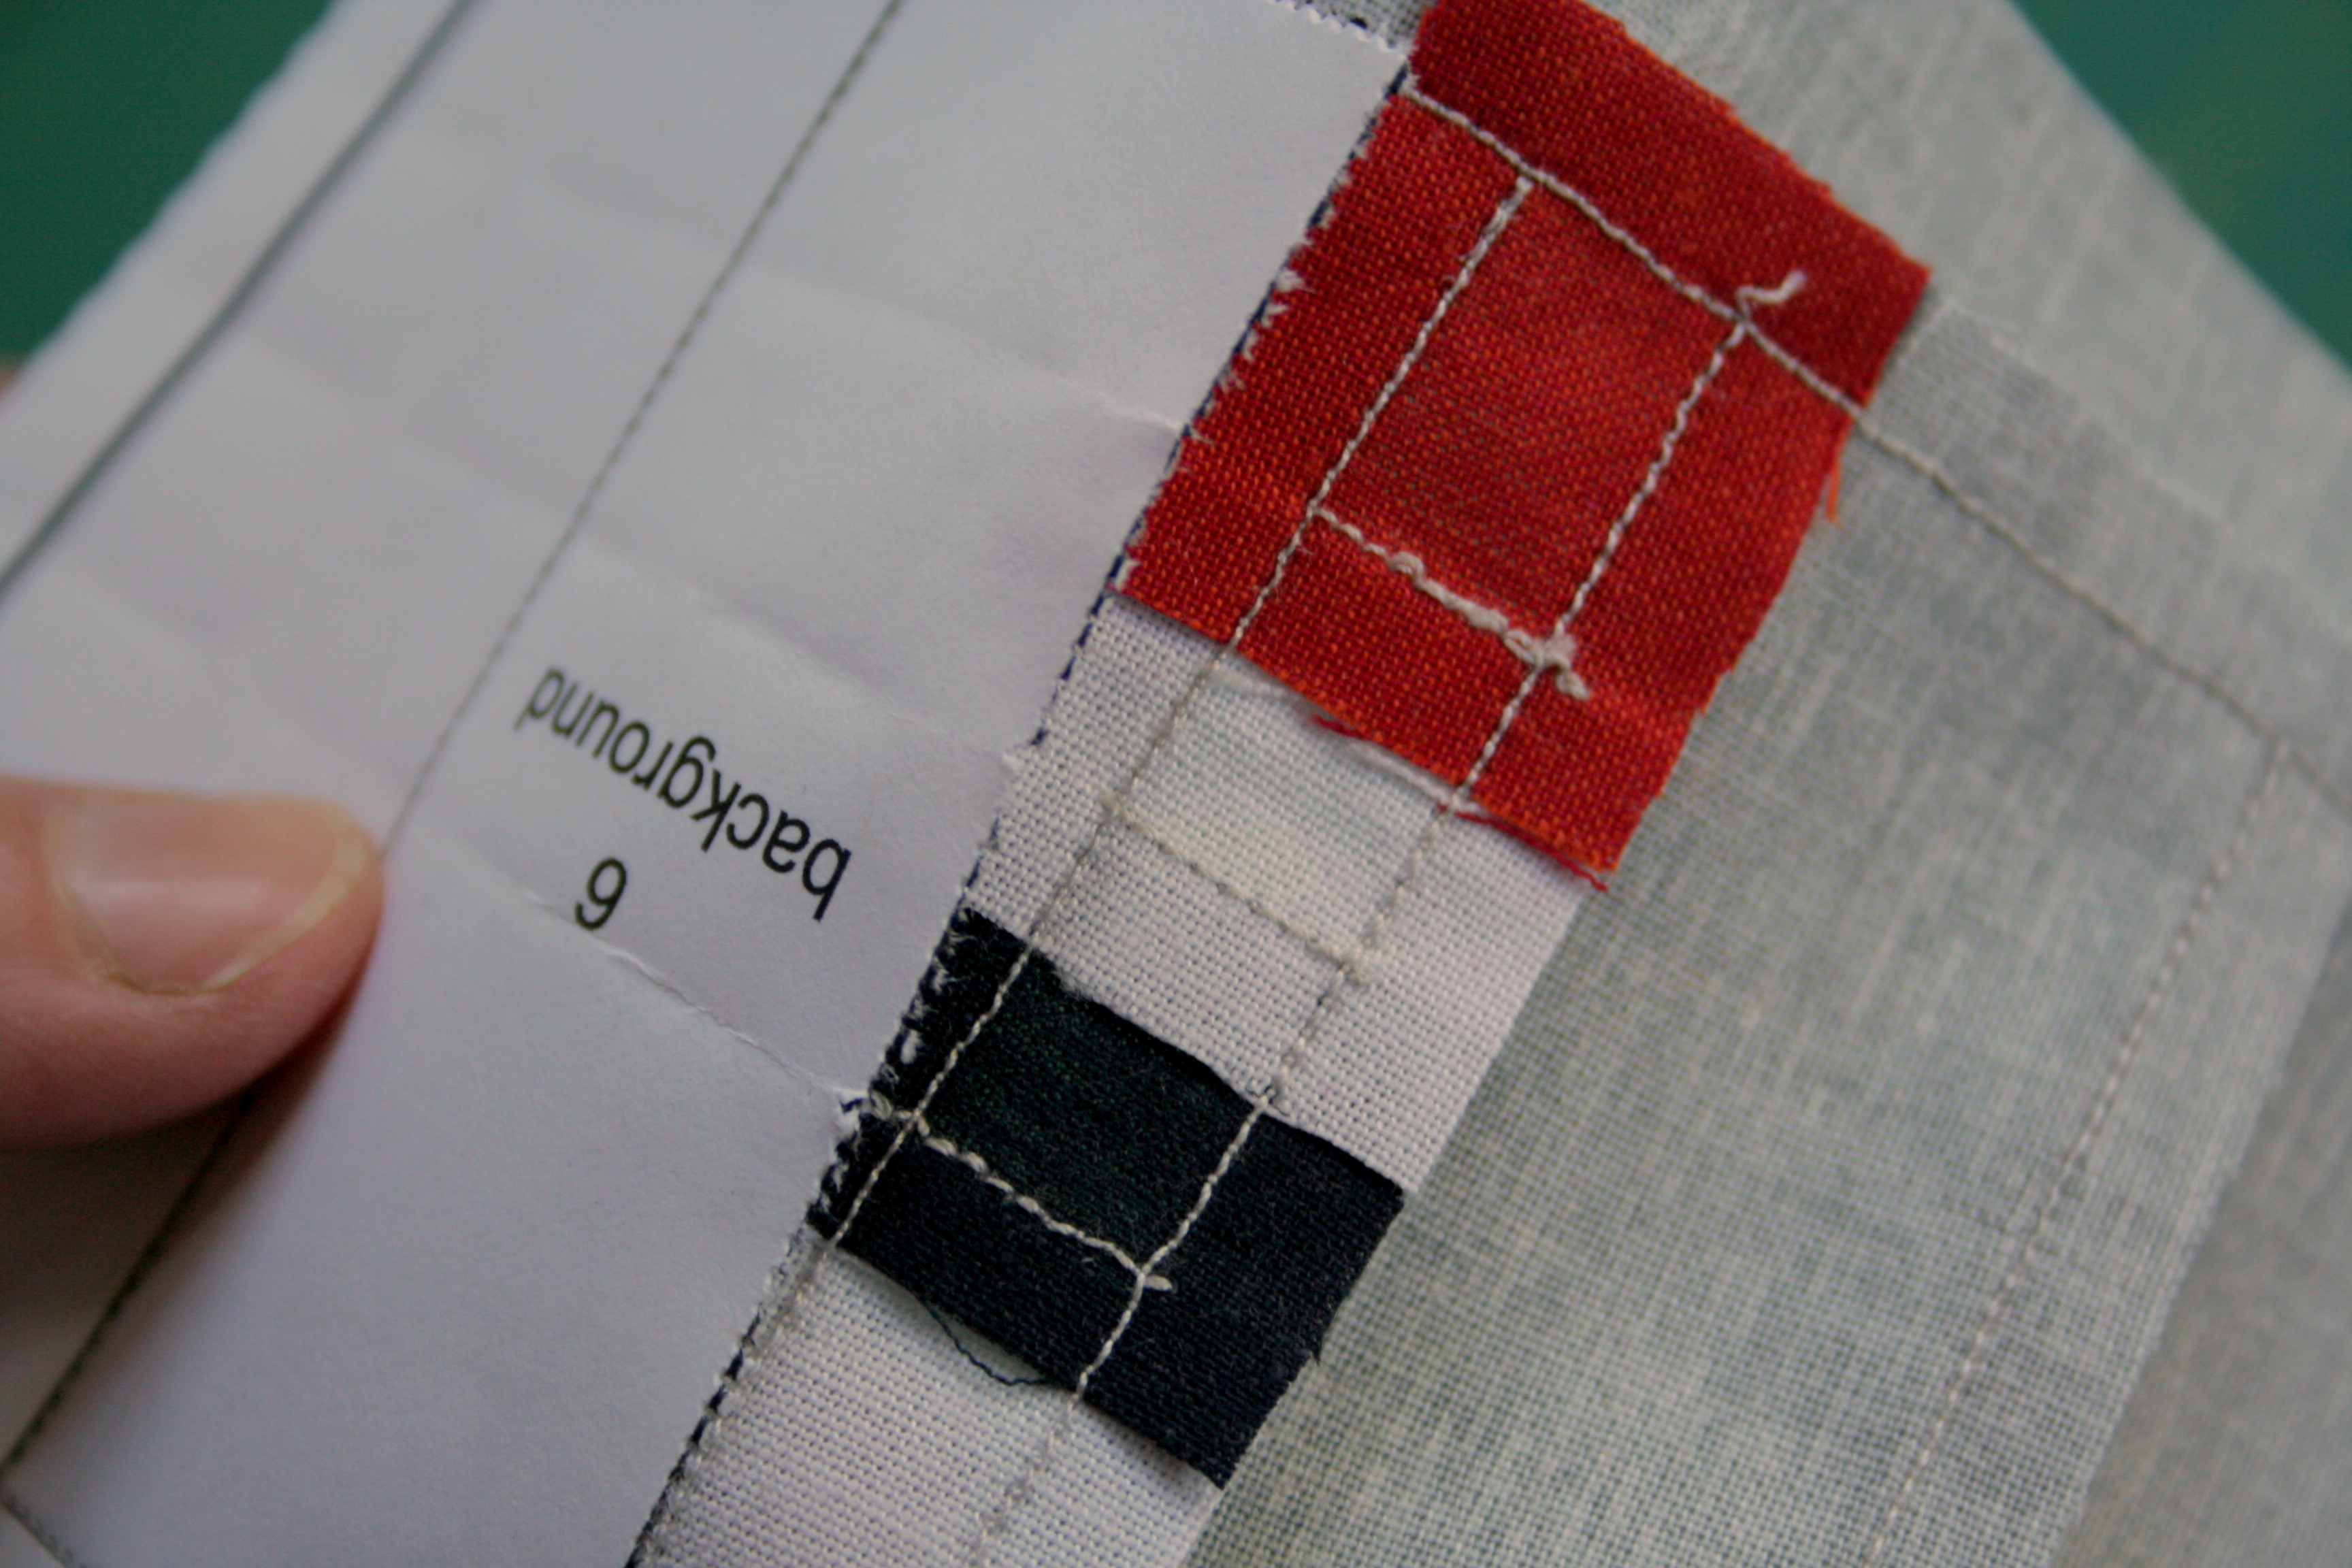
I often will leave the paper on if I plan to sew the block to another paper pieced block, since the 1/4″ seam allowance line helps me with accurate sewing. If you are already a pro at 1/4″ seams or are planning on using a single block for your project, now comes the fun part–removing the paper!
To remove the paper, gently tear away, holding the main block in place and pulling gently away and to the side, similar to how you would tear any perforated piece of paper. With your narrow stitch length, the paper should come away easily.
Once one side of the paper is off, the other side often will just pop out. Go slowly and tear gently to ensure your seams stay tight. If you end up with bits of paper stuck in the seams, carefully use blunt tweezers to remove the final bits. Alternately, I’ve heard that spraying the paper with water helps with removal. I haven’t had to try it yet, though, so can’t vouch for the method.
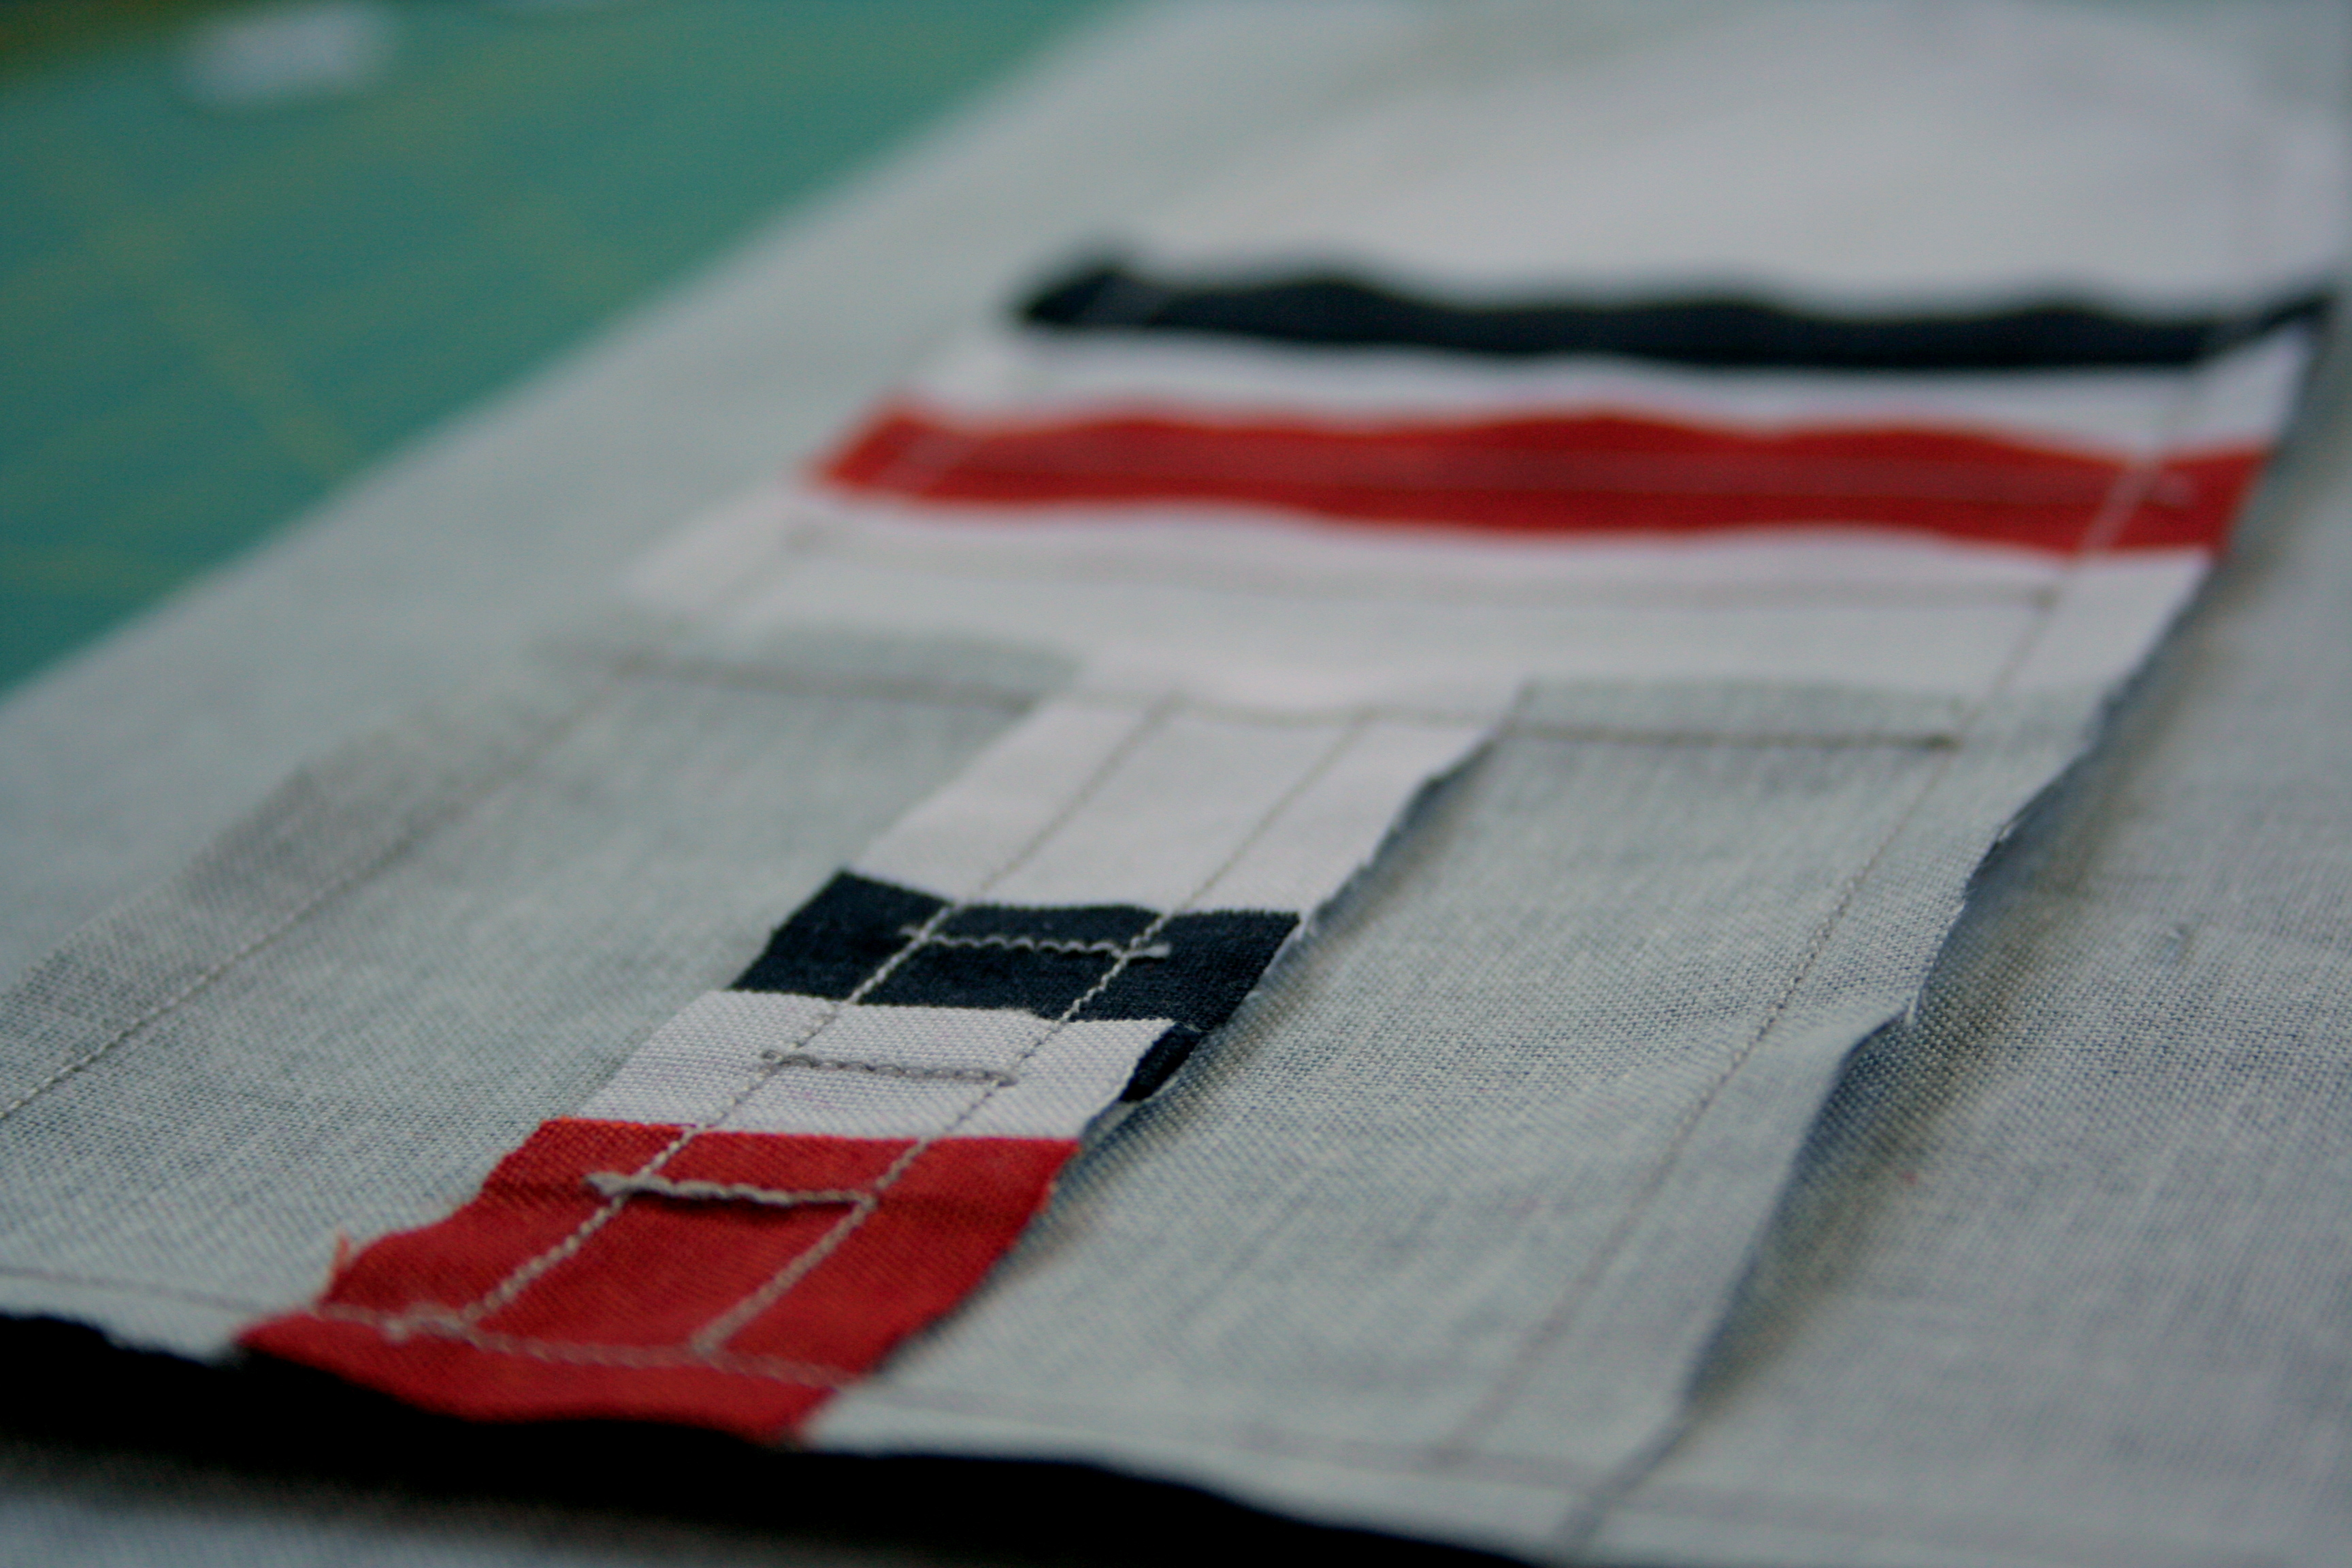
I just love the backs of paper pieced blocks. The precision and accuracy, all the little seams that are proof of my cut, line up, sew, fold & trim, press marathon… they make me happy. Take a good, long, admiring look at the back of your block, and then flip it over and admire your finished block. Gorgeous!
I hope this tutorial was helpful, and that you enjoy paper piecing as much as I do. Coming soon on my blog, I’ll talk about what’s next; now that you’ve made your paper pieced block, what can you do with it!?
Do you have any other tips for beginner paper piecers?
I had never seen lupine before traveling to Maine, but now that I live here they are among my favorite flowers. There is a depth and richness to their color that force me to get really close and admire their intricacy. They are very advantageous growers, almost invasive, and the sheer numbers of lupine seen along roadsides, in fields, and in happy gardens make the color incredibly apparent.
Photo by Steffen Ramsaier, found on Flickr
Early in my sewing days, I was trying to think of a gift to make for my mother-in-law. I immediately thought of lupine, since they are her favorite flower. (If you have children, do you know the book Miss Rumphius? aka the Lupine Lady? Well that’s my mother-in-law–okay, it’s not really, but it certainly could be!) I had recently found paper piecing and wanted to make her a paper pieced lupine pillow. The only problem was that all of my searches for paper pieced lupine patterns came up empty.
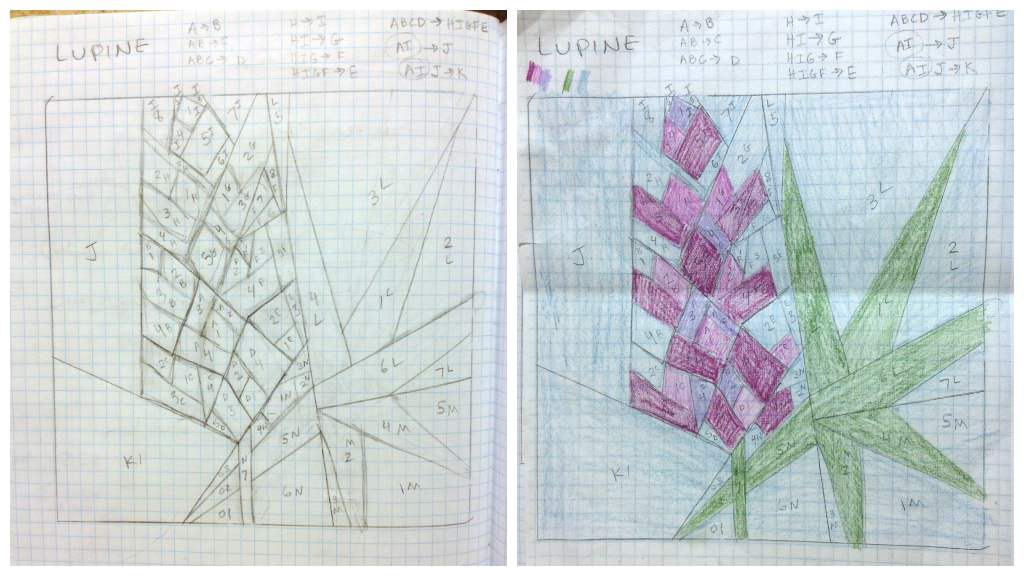
Flash forward a month or so, when I discovered that I could design paper piecing patterns. A lupine flower was one of the first sketches I did. Talk about complex! I really wanted to get the heart-shaped petals into the pattern, but I knew it had to be fairly simple to be able to be pieced. I drew out a few sketches, chose my favorite, and began to try to break it down into logical pieces. My brain instantly scrambled. I had to put the pattern aside, and work on a few different projects for a week or two.
It all starts with the graph paper and sketch.
After that much needed breather, I picked up the lupine again one evening and smoothly worked it into numbered paper piecing sections. After a month or so of fine tuning and testing, the pattern is ready!
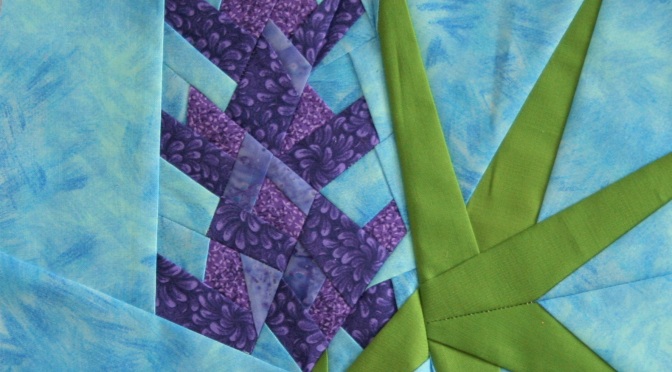
Don’t you love it!? I wasn’t sure about my fabric choices at first, but now that the block is done, I think they were perfect! They blend together just enough to give the flower depth without detracting from the congruence of the bloom.
This is not a beginner paper piecing pattern in that there are many pieces and a few sharp angles. There are only simple joining seams, though; no y-seams! If you have a good sense of paper piecing, this block shouldn’t be too tricky. It took me about 4 hours to complete and measures 10″ square (10.5″ with seam allowance).
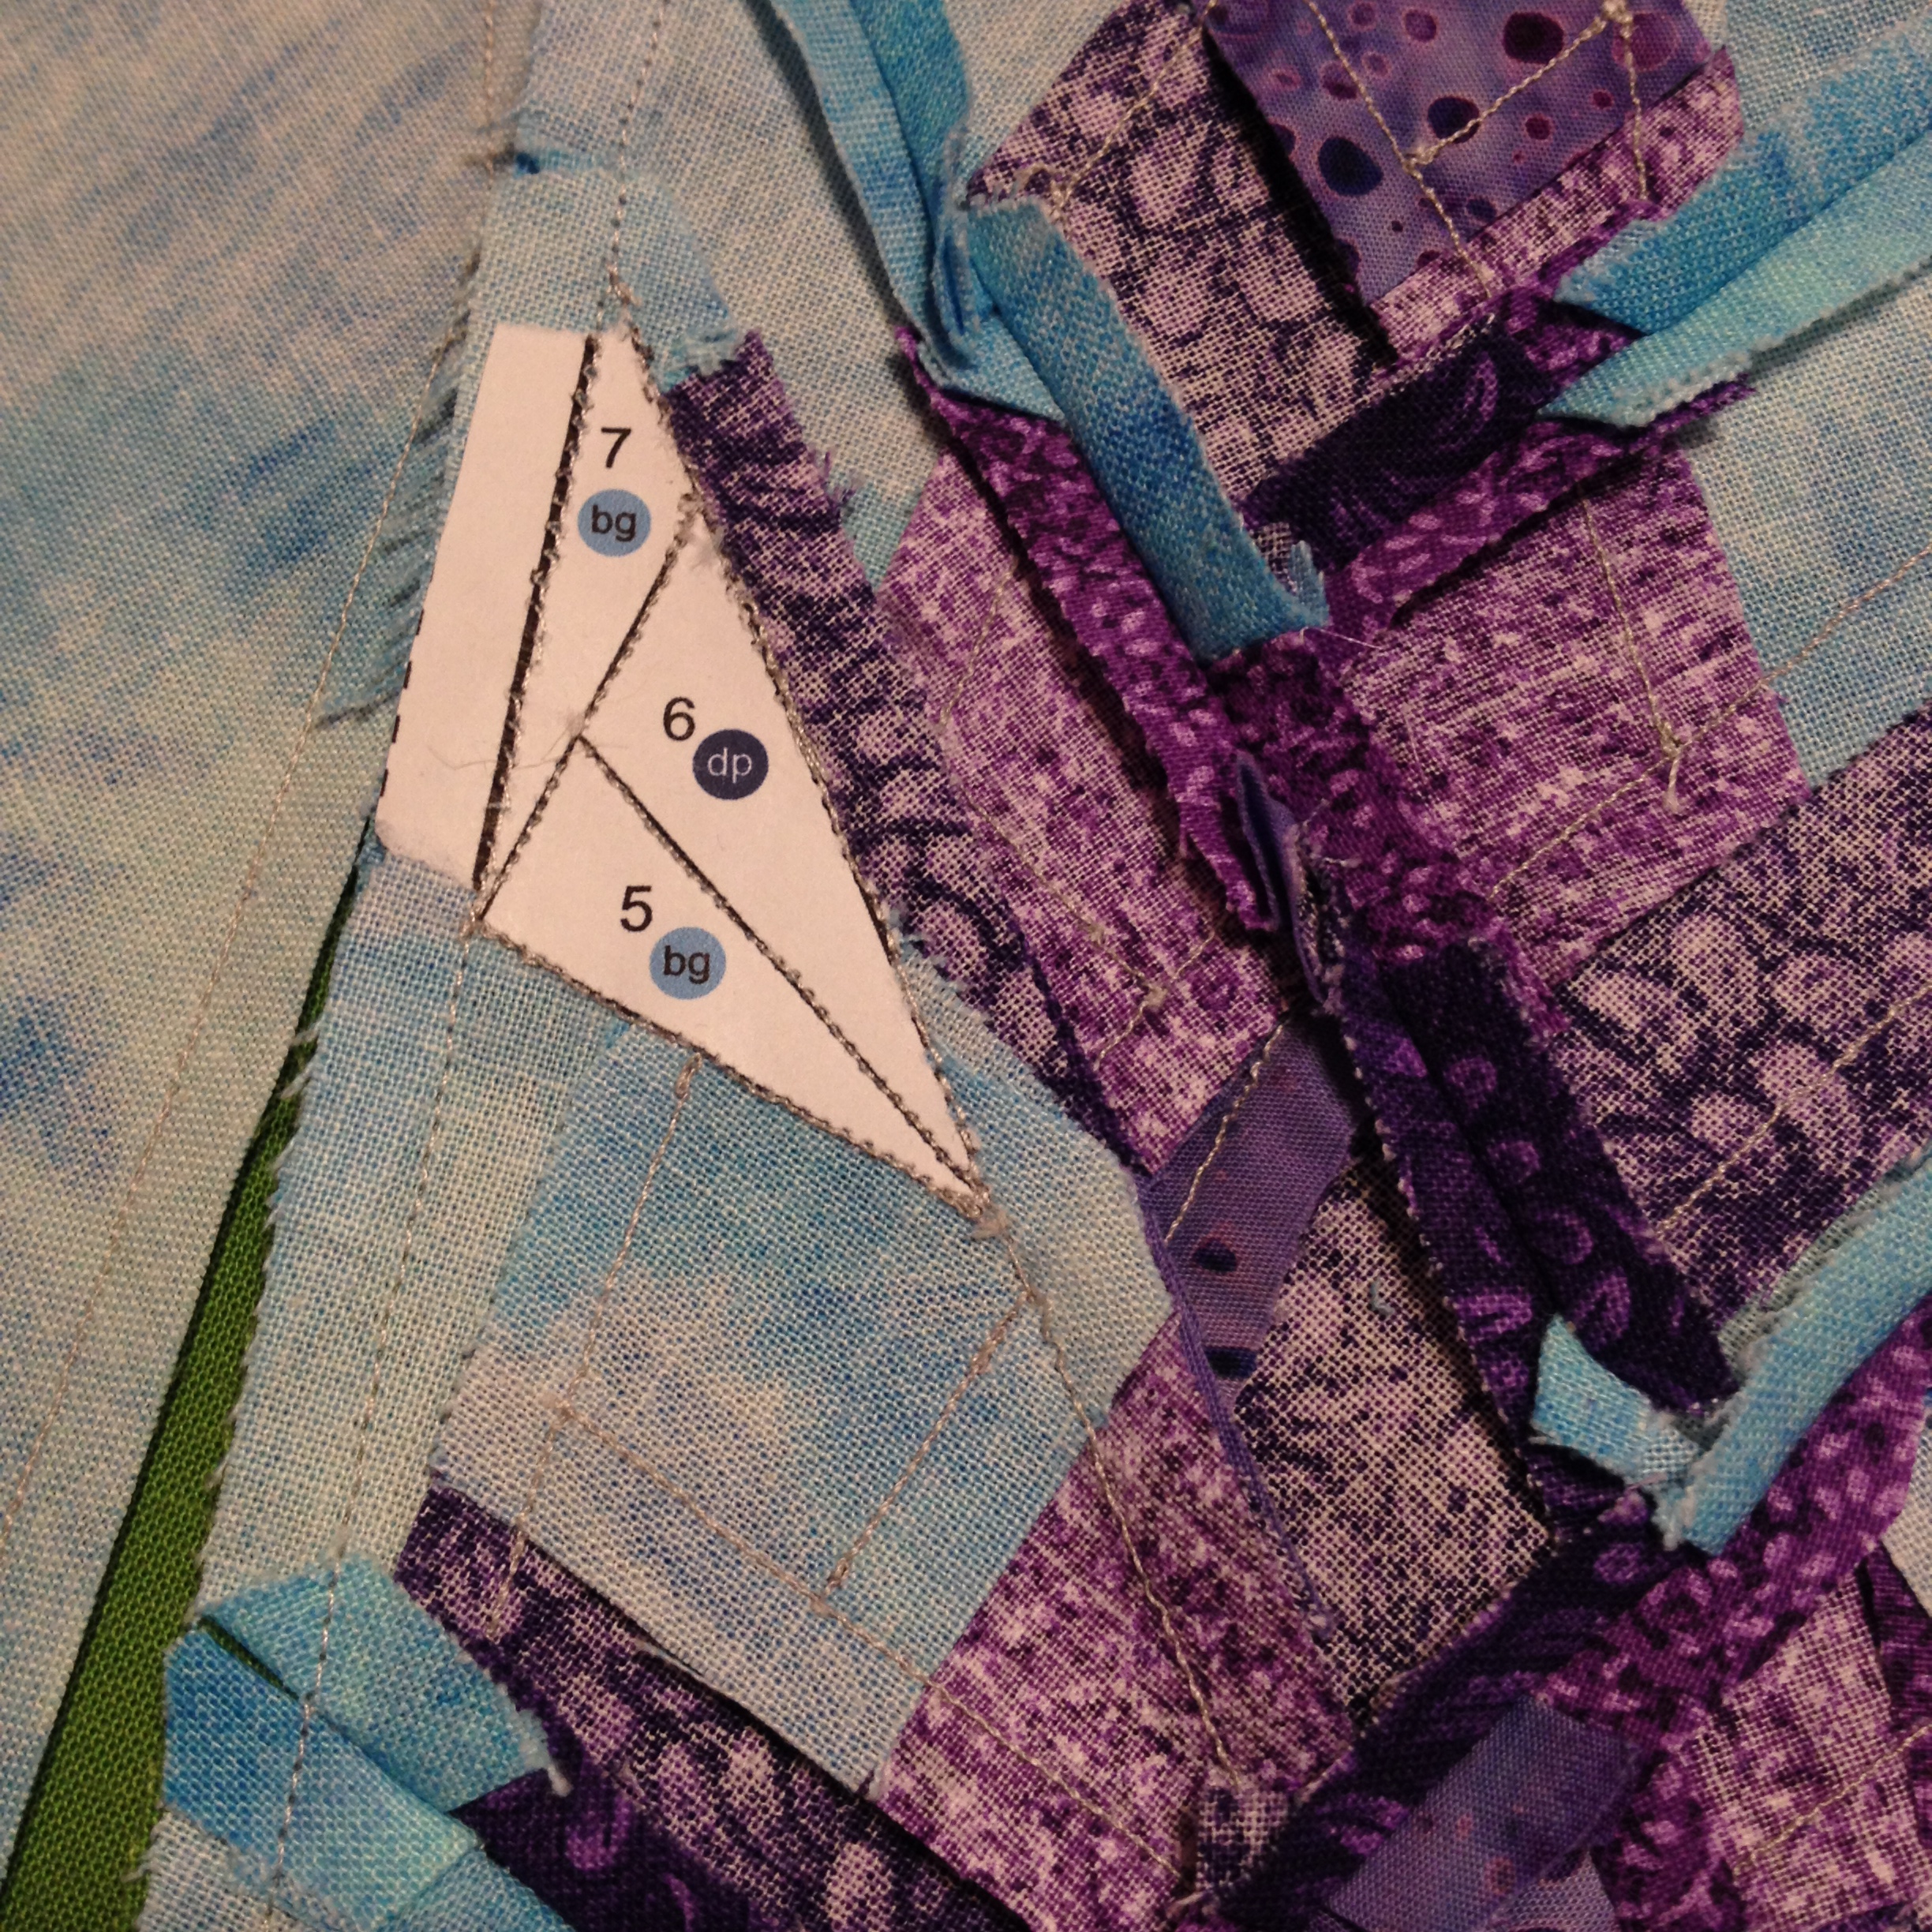
If you follow me on Instagram, you’ve watched this lupine block’s progression. For those of you who don’t follow me yet, here’s a peek at the process from my Instagram feed (@nightquilter). Of course these are taken with my iPhone during my late night quilting foray, so pardon the blur!
Little by little, it comes together.
The back is my favorite! Stragglers hanging on after I’ve removed most of the paper.
The pattern will be available in my Payhip Pattern Store by the end of today, so now if you need to make your mother-in-law (or mom, sister, brother, cousin, friend, or yourself!) a lupine pillow, wall hanging, table runner, bag, etc. you can get right to it!
This particular block will soon become a long-awaited Lupine Pillow for my mother-in-law. I’d say it was worth the wait.
This is my exciting Friday Finish, so I’m linking up!
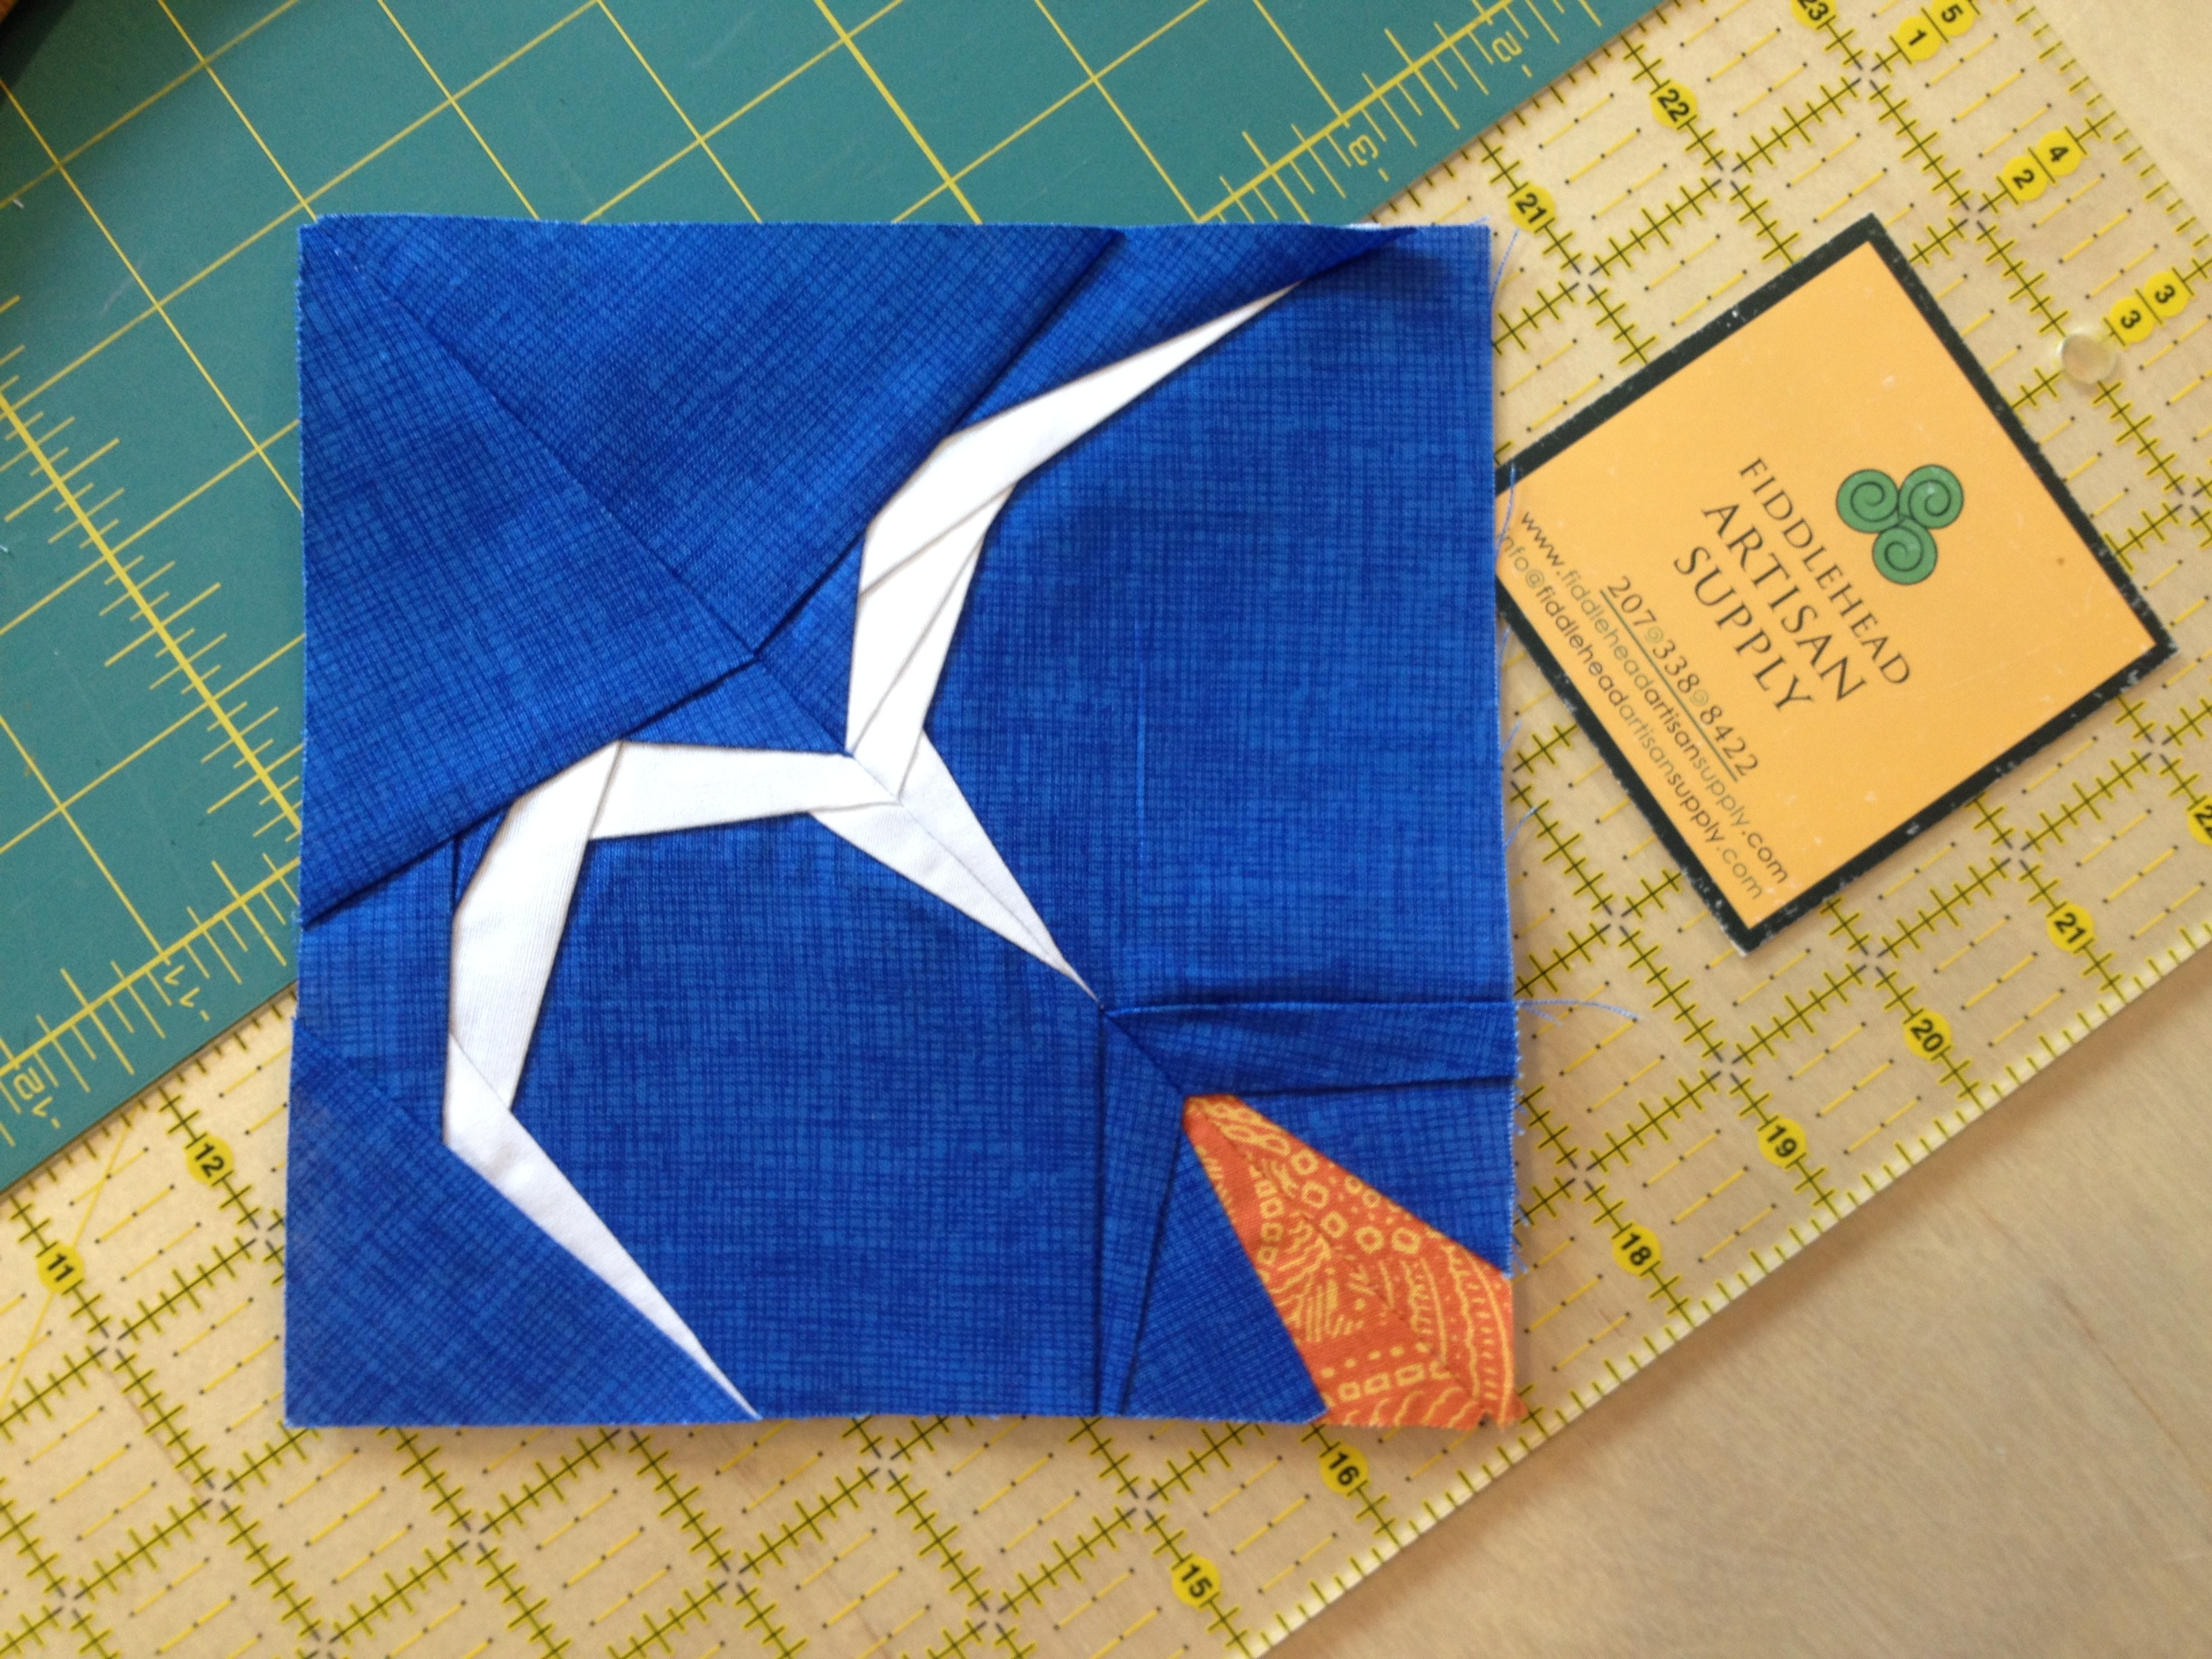
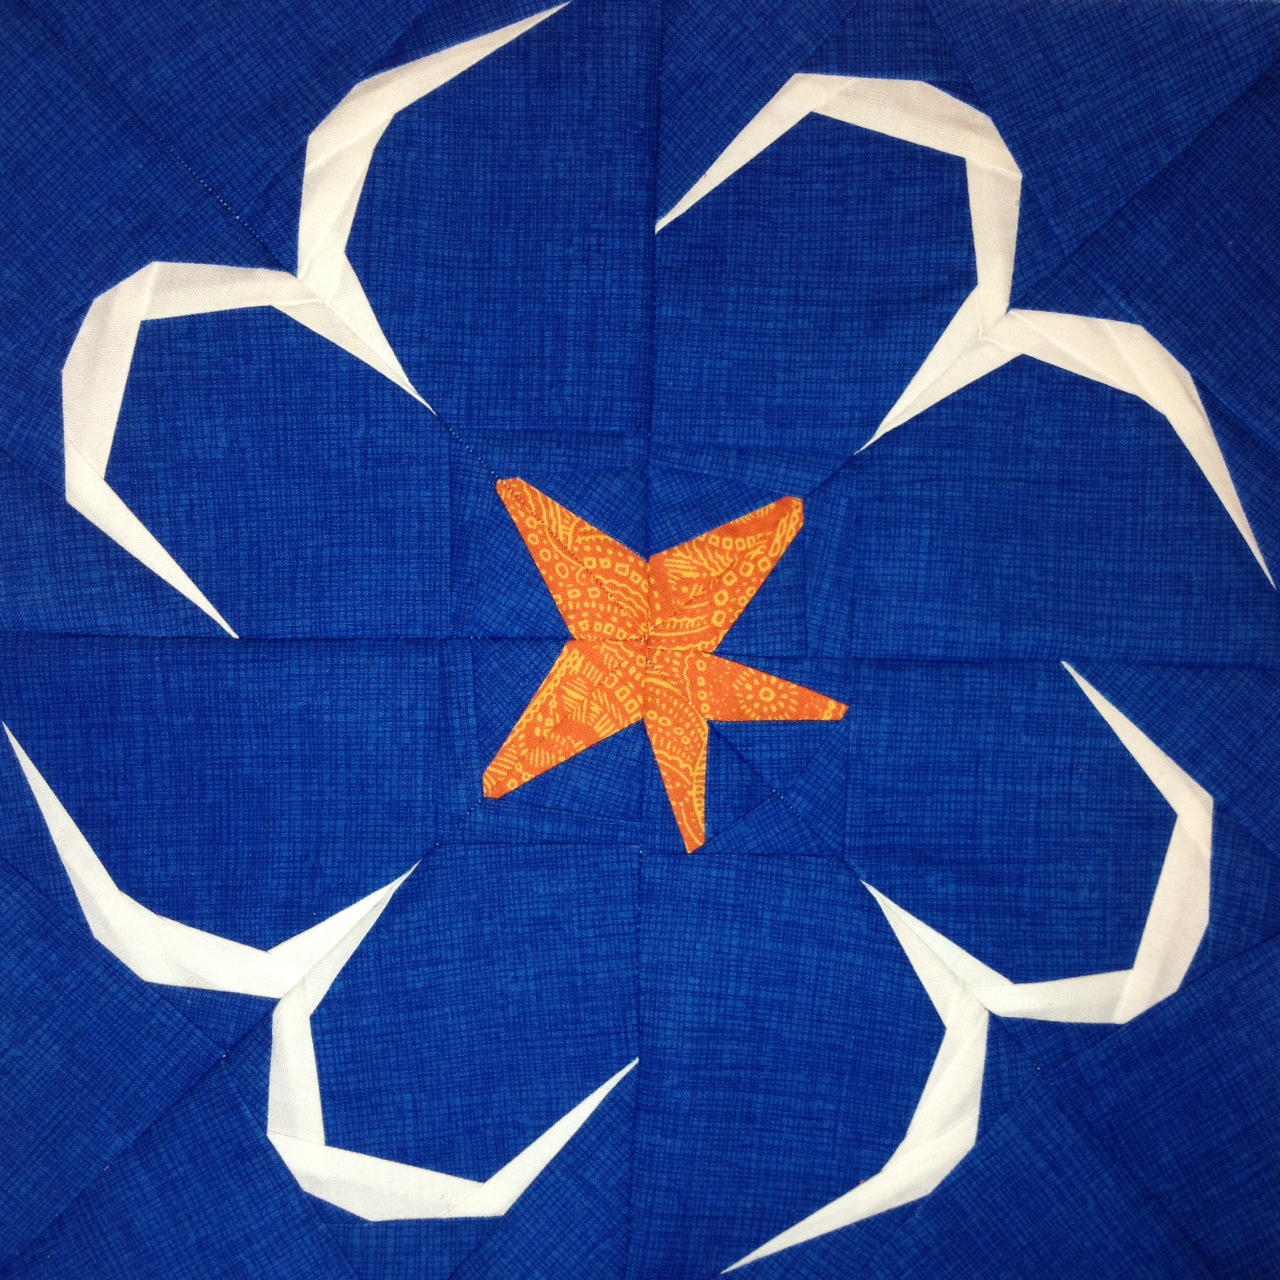
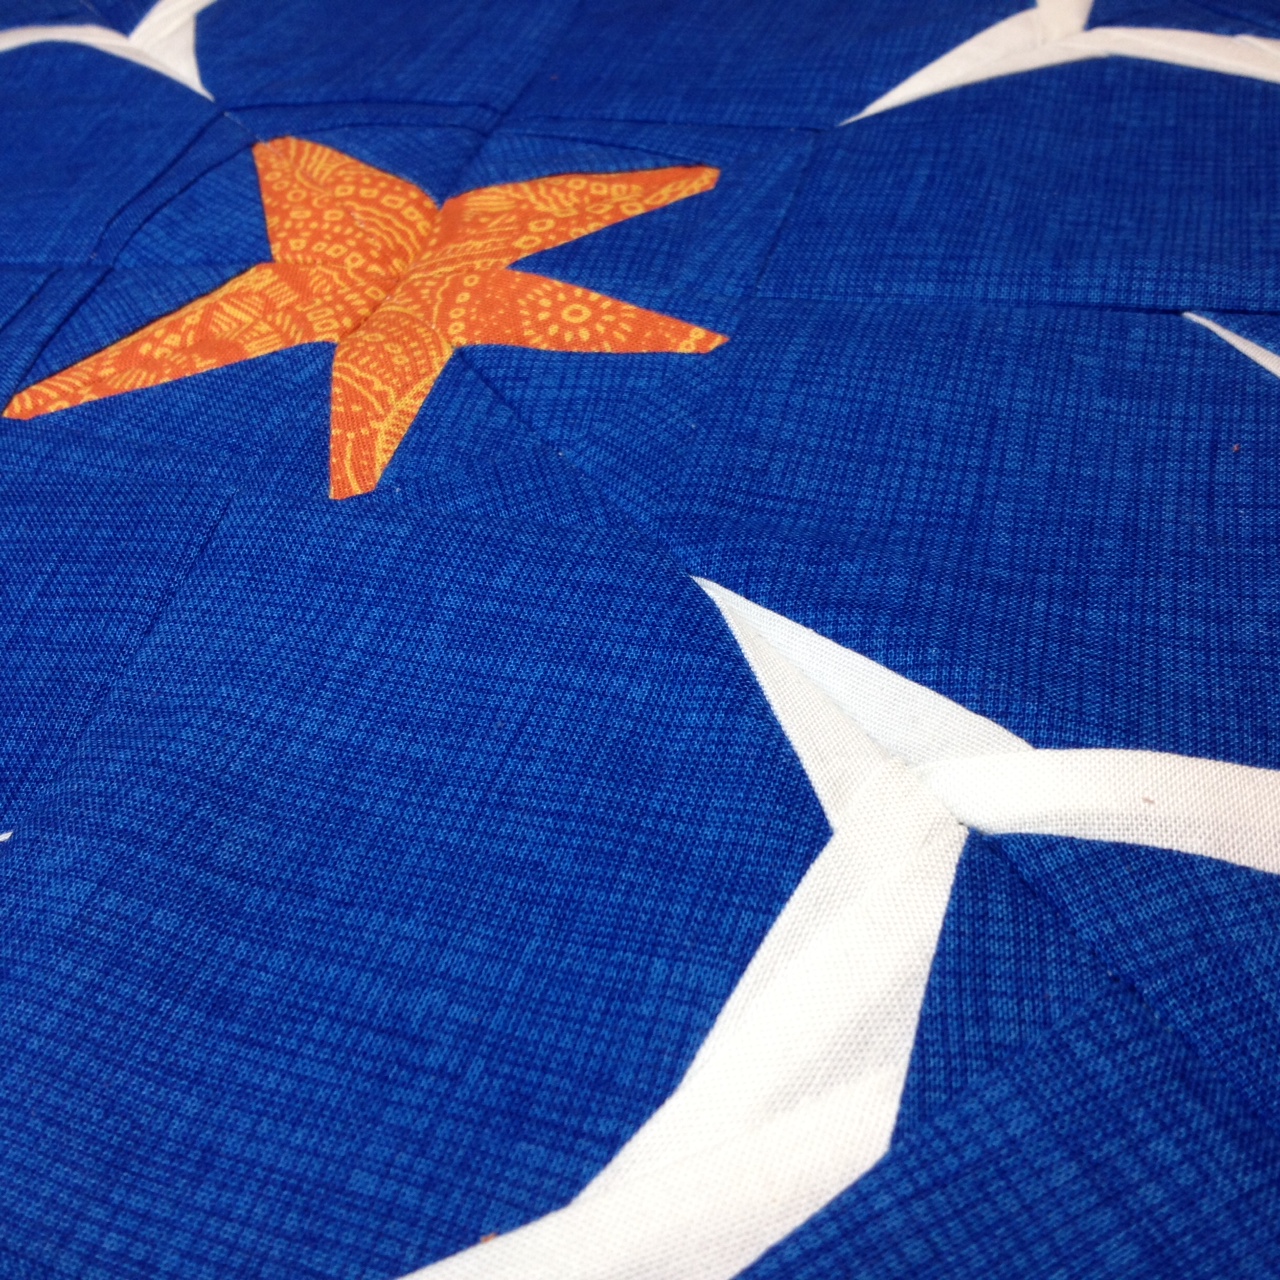
FINISHED! Remember this? I finally finished piecing it!
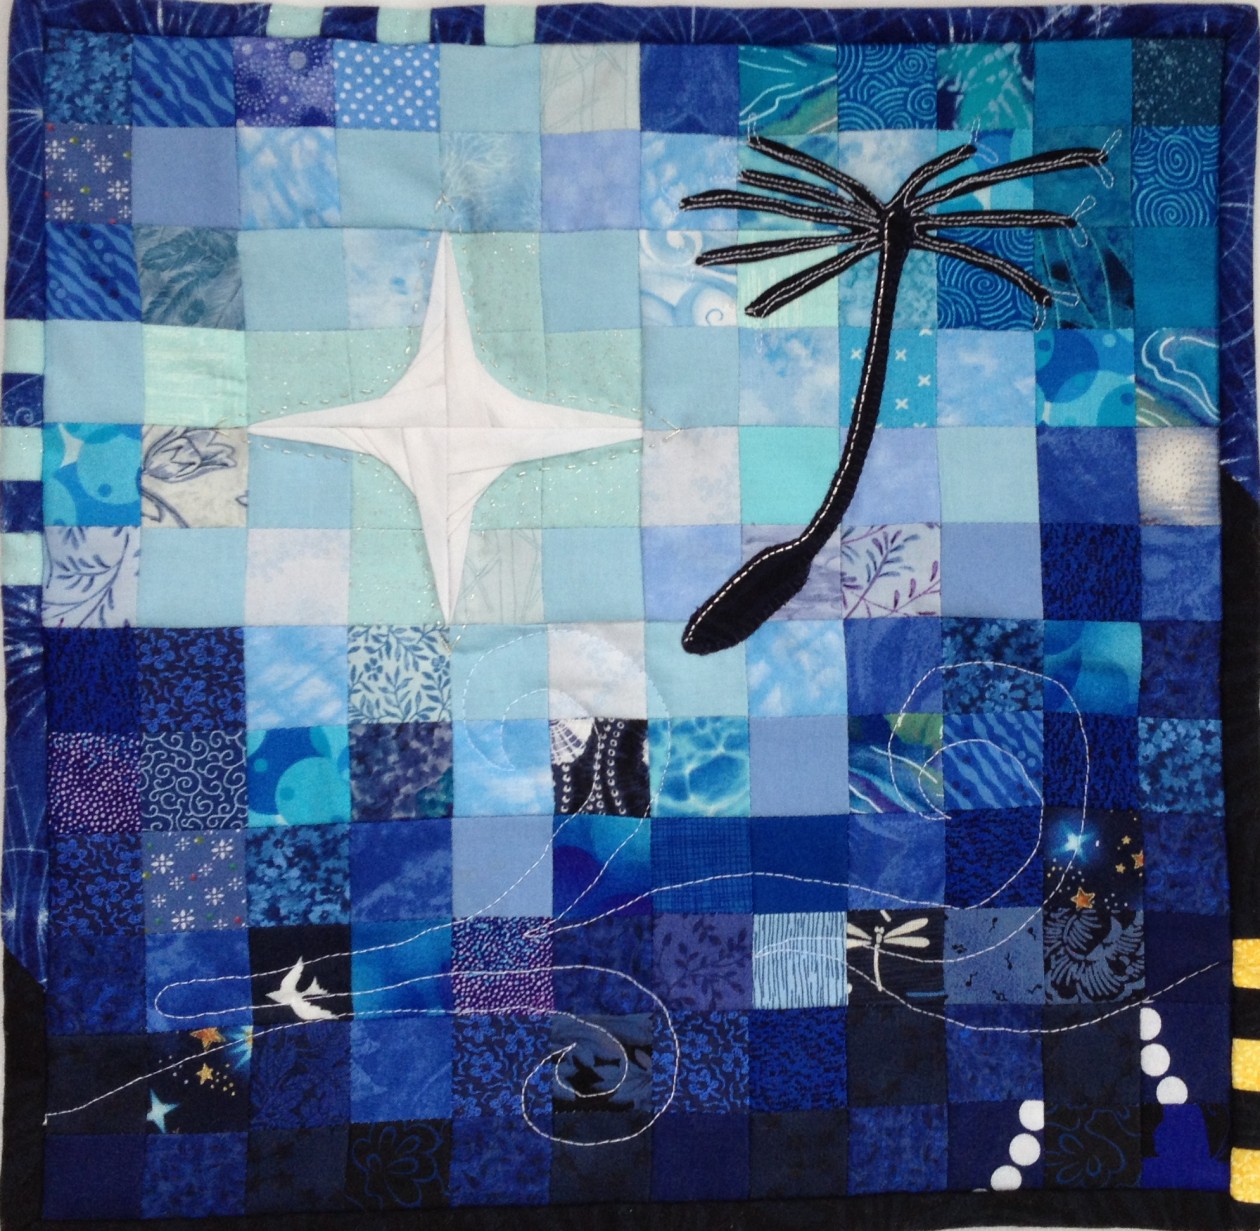
For one of my first designed paper piecing patterns, I’m very happy with it! I love how the gulls are pinwheeling in to fight over the starfish, and as a friend pointed out, the starfish has seen the gulls and is reaching out to flyyyyyyy! Little does that poor little starfish know that he’s actually going to be lunch and not a flying companion. Then again, maybe it is the starfish’s turn to fly!
I’m excited that this pattern pretty much turned out how I had imagined it. I’m debating the next step for this 12×12″ block. Should I make it into a pillow? A quilted wall-hanging? Or perhaps tuck it away and aim to make 11+ more of the blocks using up blue, white and orange (or other colors?) scraps along the way. I do think this pattern would look awesome as a full quilt.
What would you do with this block?
This pattern is for sale in my Pattern Shop on Craftsy; go check it out!
I’m more than a little excited! I’ve officially published my first paper piecing pattern! I decided that the little four-pointed star I designed as an element for my Delight in the Little Things art quilt would be a great spot to start in my attempts to learn the ways of Inkscape. You can find the pattern in my Craftsy Pattern Store. Since my original pattern is for a scant 4″ square, I included larger options in the pattern. Those two dollars and fifty cents not only will get you the 4″ paper piecing pattern template, it will also get you a 6″ and 12″ version. Sweet deal!
What’s even slightly more exciting is that I’ve already had one buyer! Little does that buyer know, but she will be receiving a little “Congratulations! You’re my first buyer” gift in the mail.
These are delicious chocolates made locally in the town of Belfast, Maine. I can vouch for their deliciousness! Yummm! Hopefully she enjoys the chocolates while creating some awesome starry project. I can’t wait to see what others create with my patterns!
I grab a needle and thread once the kids are in bed


 Just about immediately after sketching out my original Fishies panel, the idea for this alternate layout and color scheme came to mind. I sketched it out and wrote out rough piecing instructions and then put it on the back burner. When asking for pattern testers, Julie Schloemer from That’s Sew Julie offered to test my fishies panel pattern. After looking through her blog and seeing her style, I thought she might be interested in making my rough idea into a reality. Little did I know that she would literally make my exact vision into a reality! Here is the Fishies Rainbow Row pattern, exactly as I envisioned it, pieced and quilted by Julie.


 If you follow me on