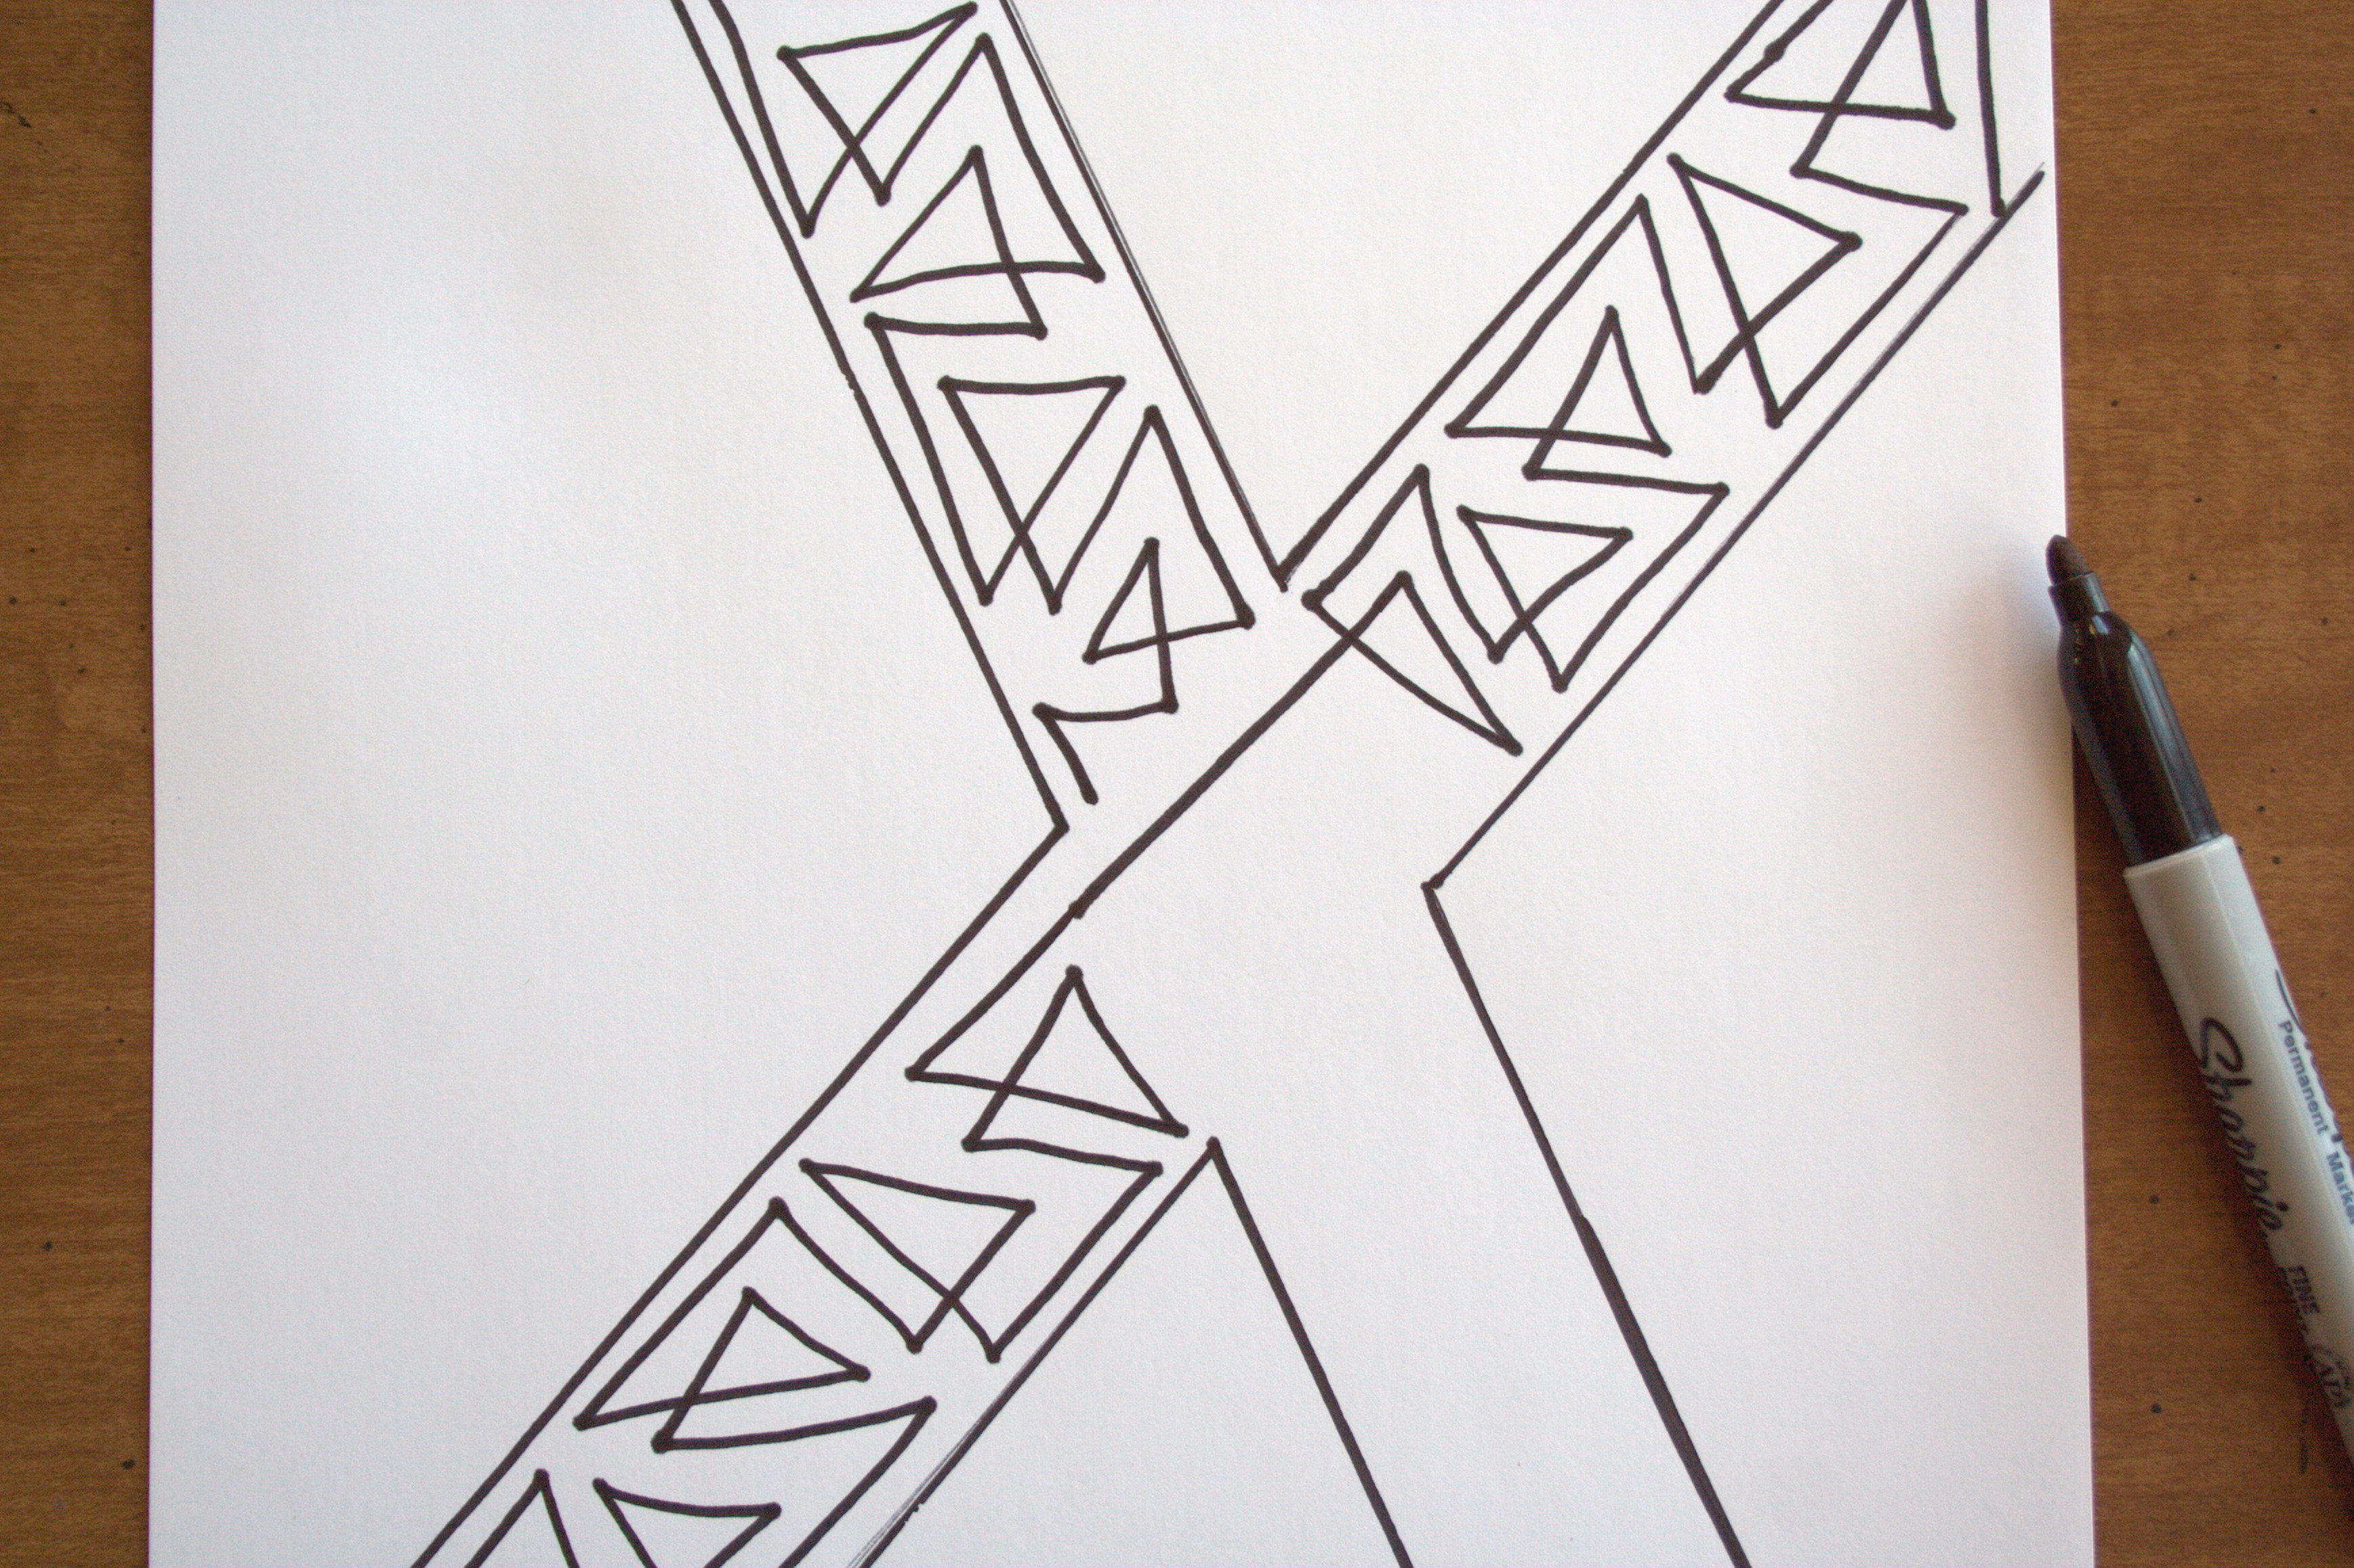
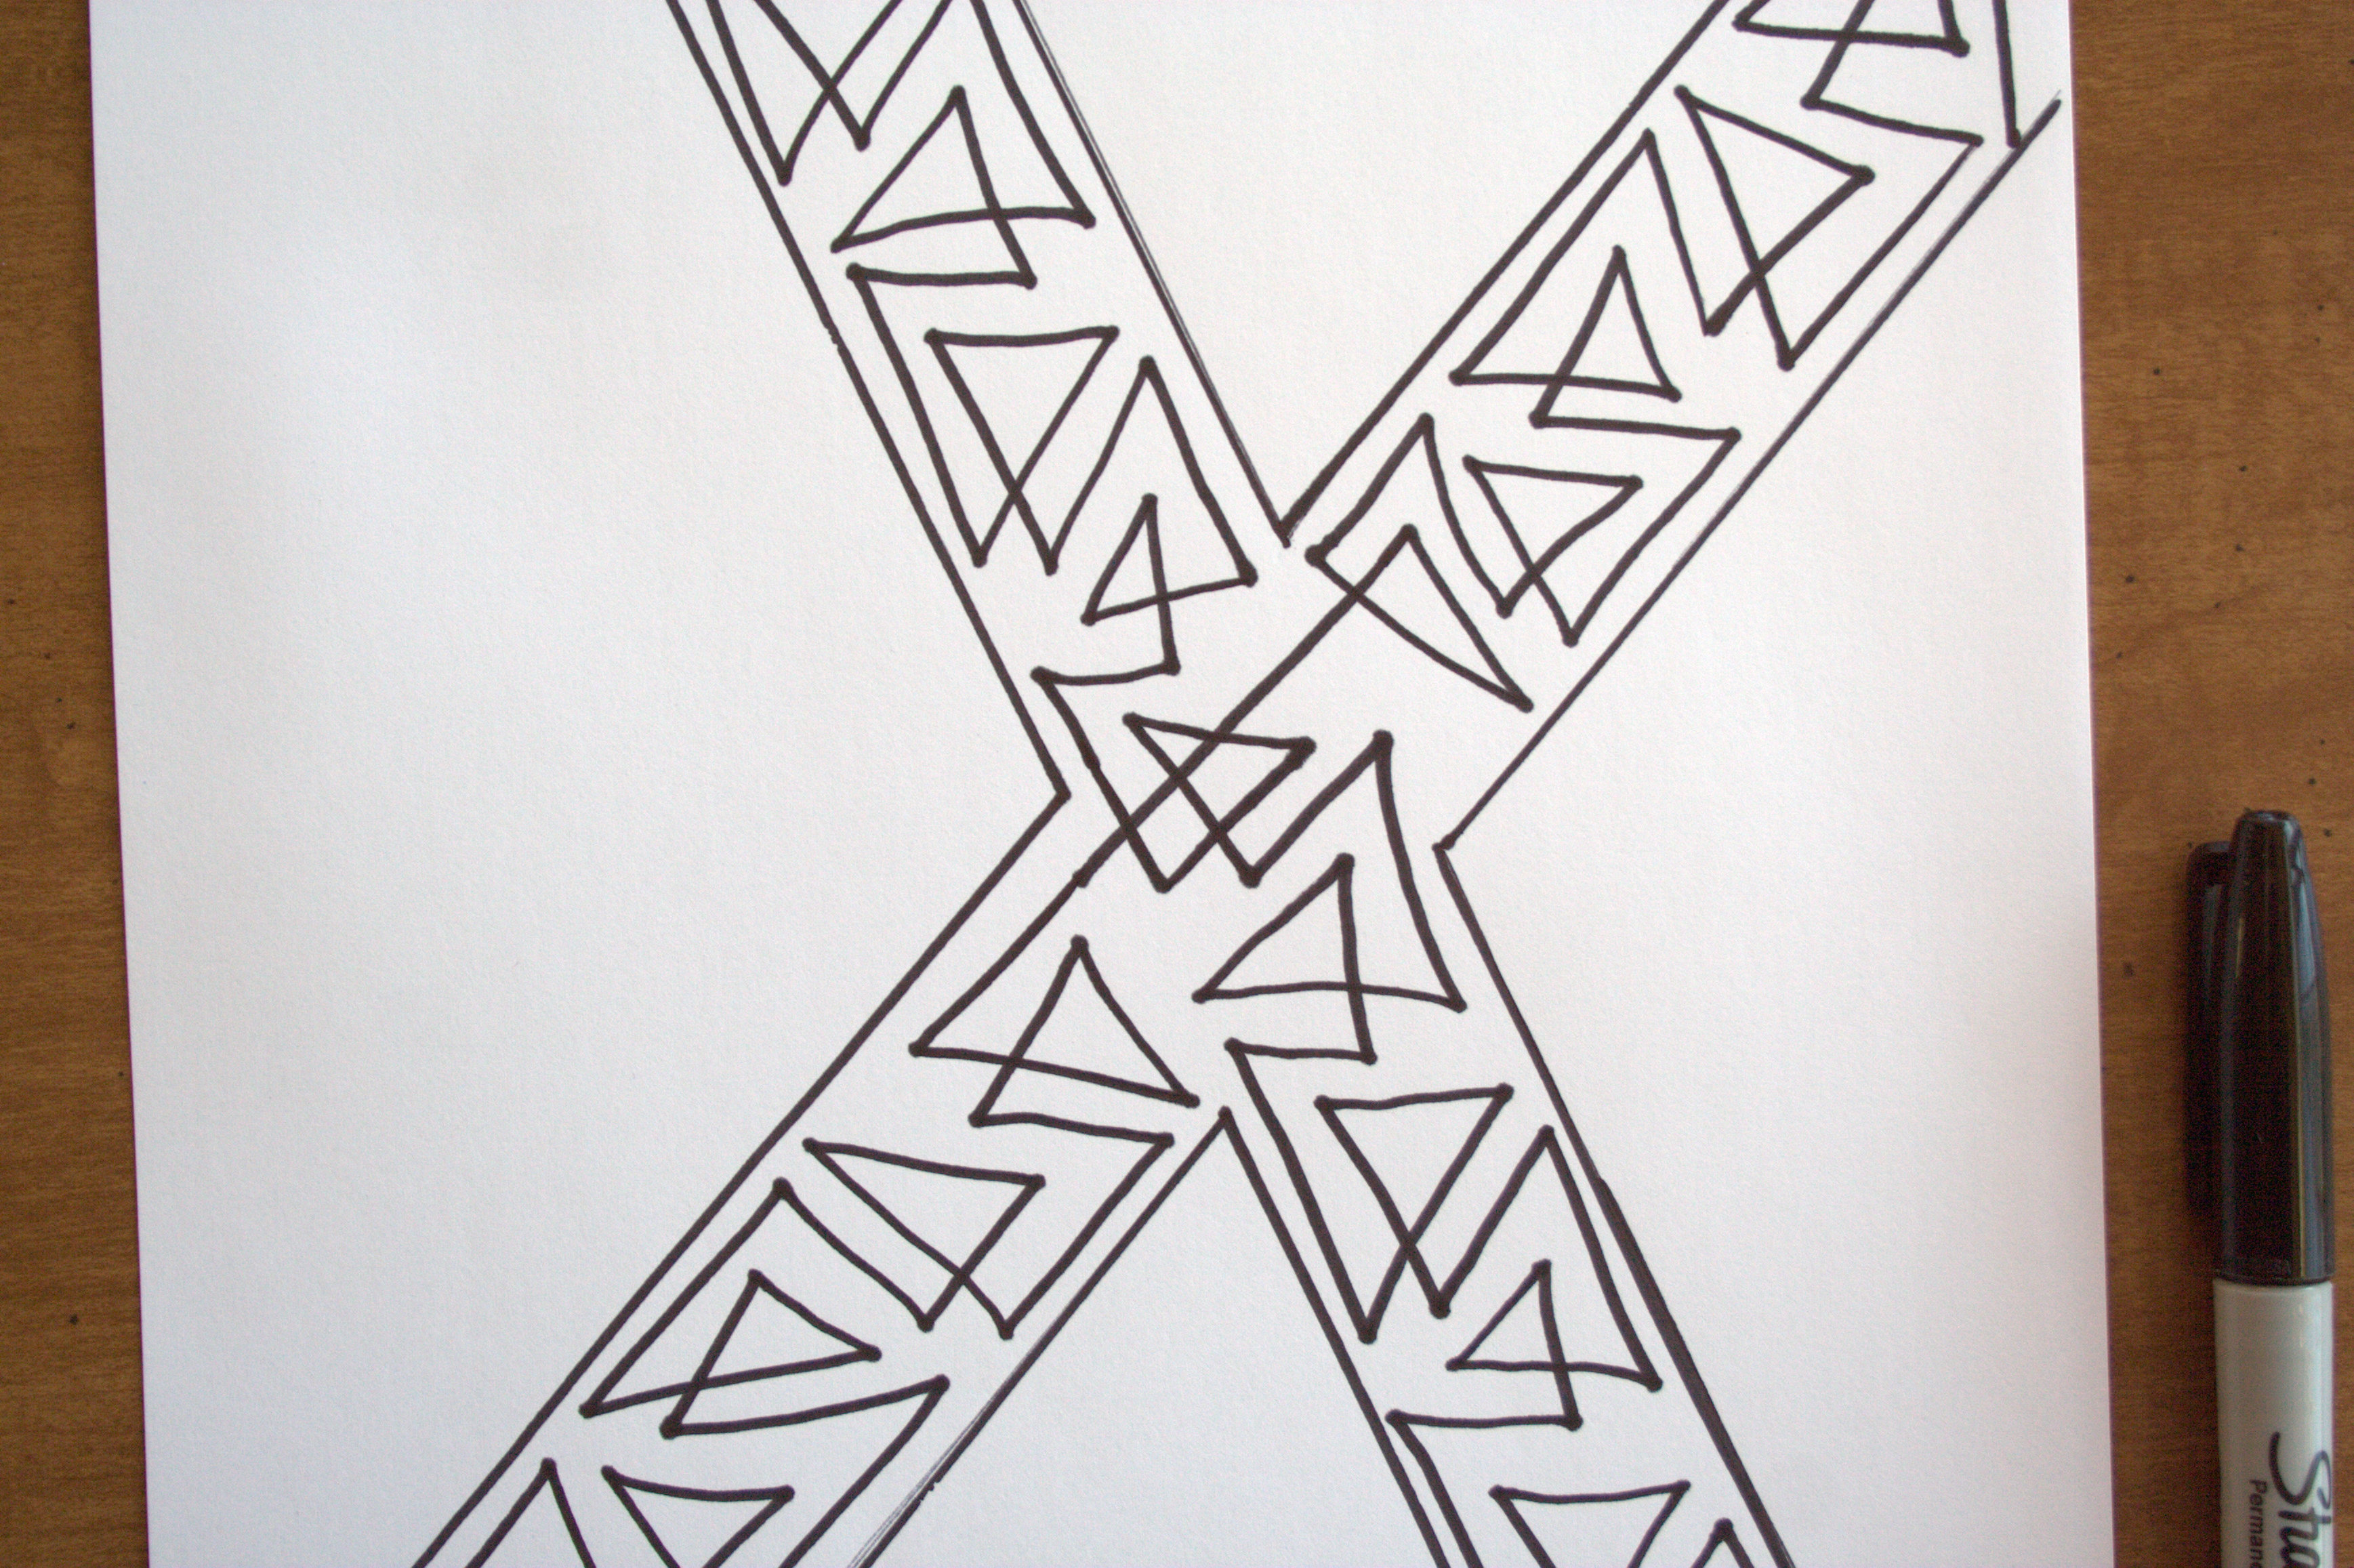
Halloween is a fun time of year around our house, since my kiddos love to dress up in costumes from years past all year ’round, and the end of October means NEW costumes and candy! While I’m not really big into decorating the house for holidays (with the exception of Christmas and Easter–how can you resist those?), I do like making holiday crafts with the kids to help build excitement.
Today I’m going to share a quick tutorial for some spooktacularly sturdy beanbags, a perfect addition to a Halloween party but also a great addition to any child’s toybox. I should note, too, that beanbags are my go-to gift for two year old birthday parties. When a child turns two, I’ve found it’s really fabulous to have something you’re SUPPOSED to throw. Beanbags are such a versatile gift since they can be personalized in any way; you can change the shape, change the fabric, or personalize with applique letters or pictures. I’ve included affiliate links in this post so that if you decide to buy any of the tools I’m using, I will receive a small commission, too. I only share tools and products I love, so you can be sure they are tried, tested, and loved!
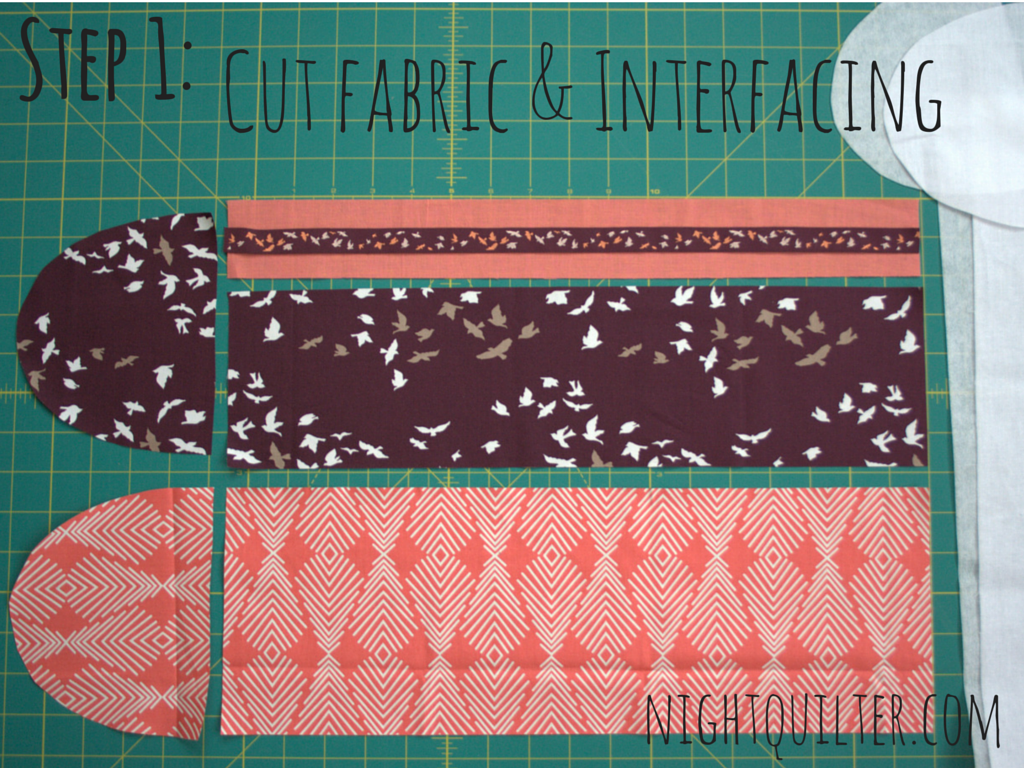
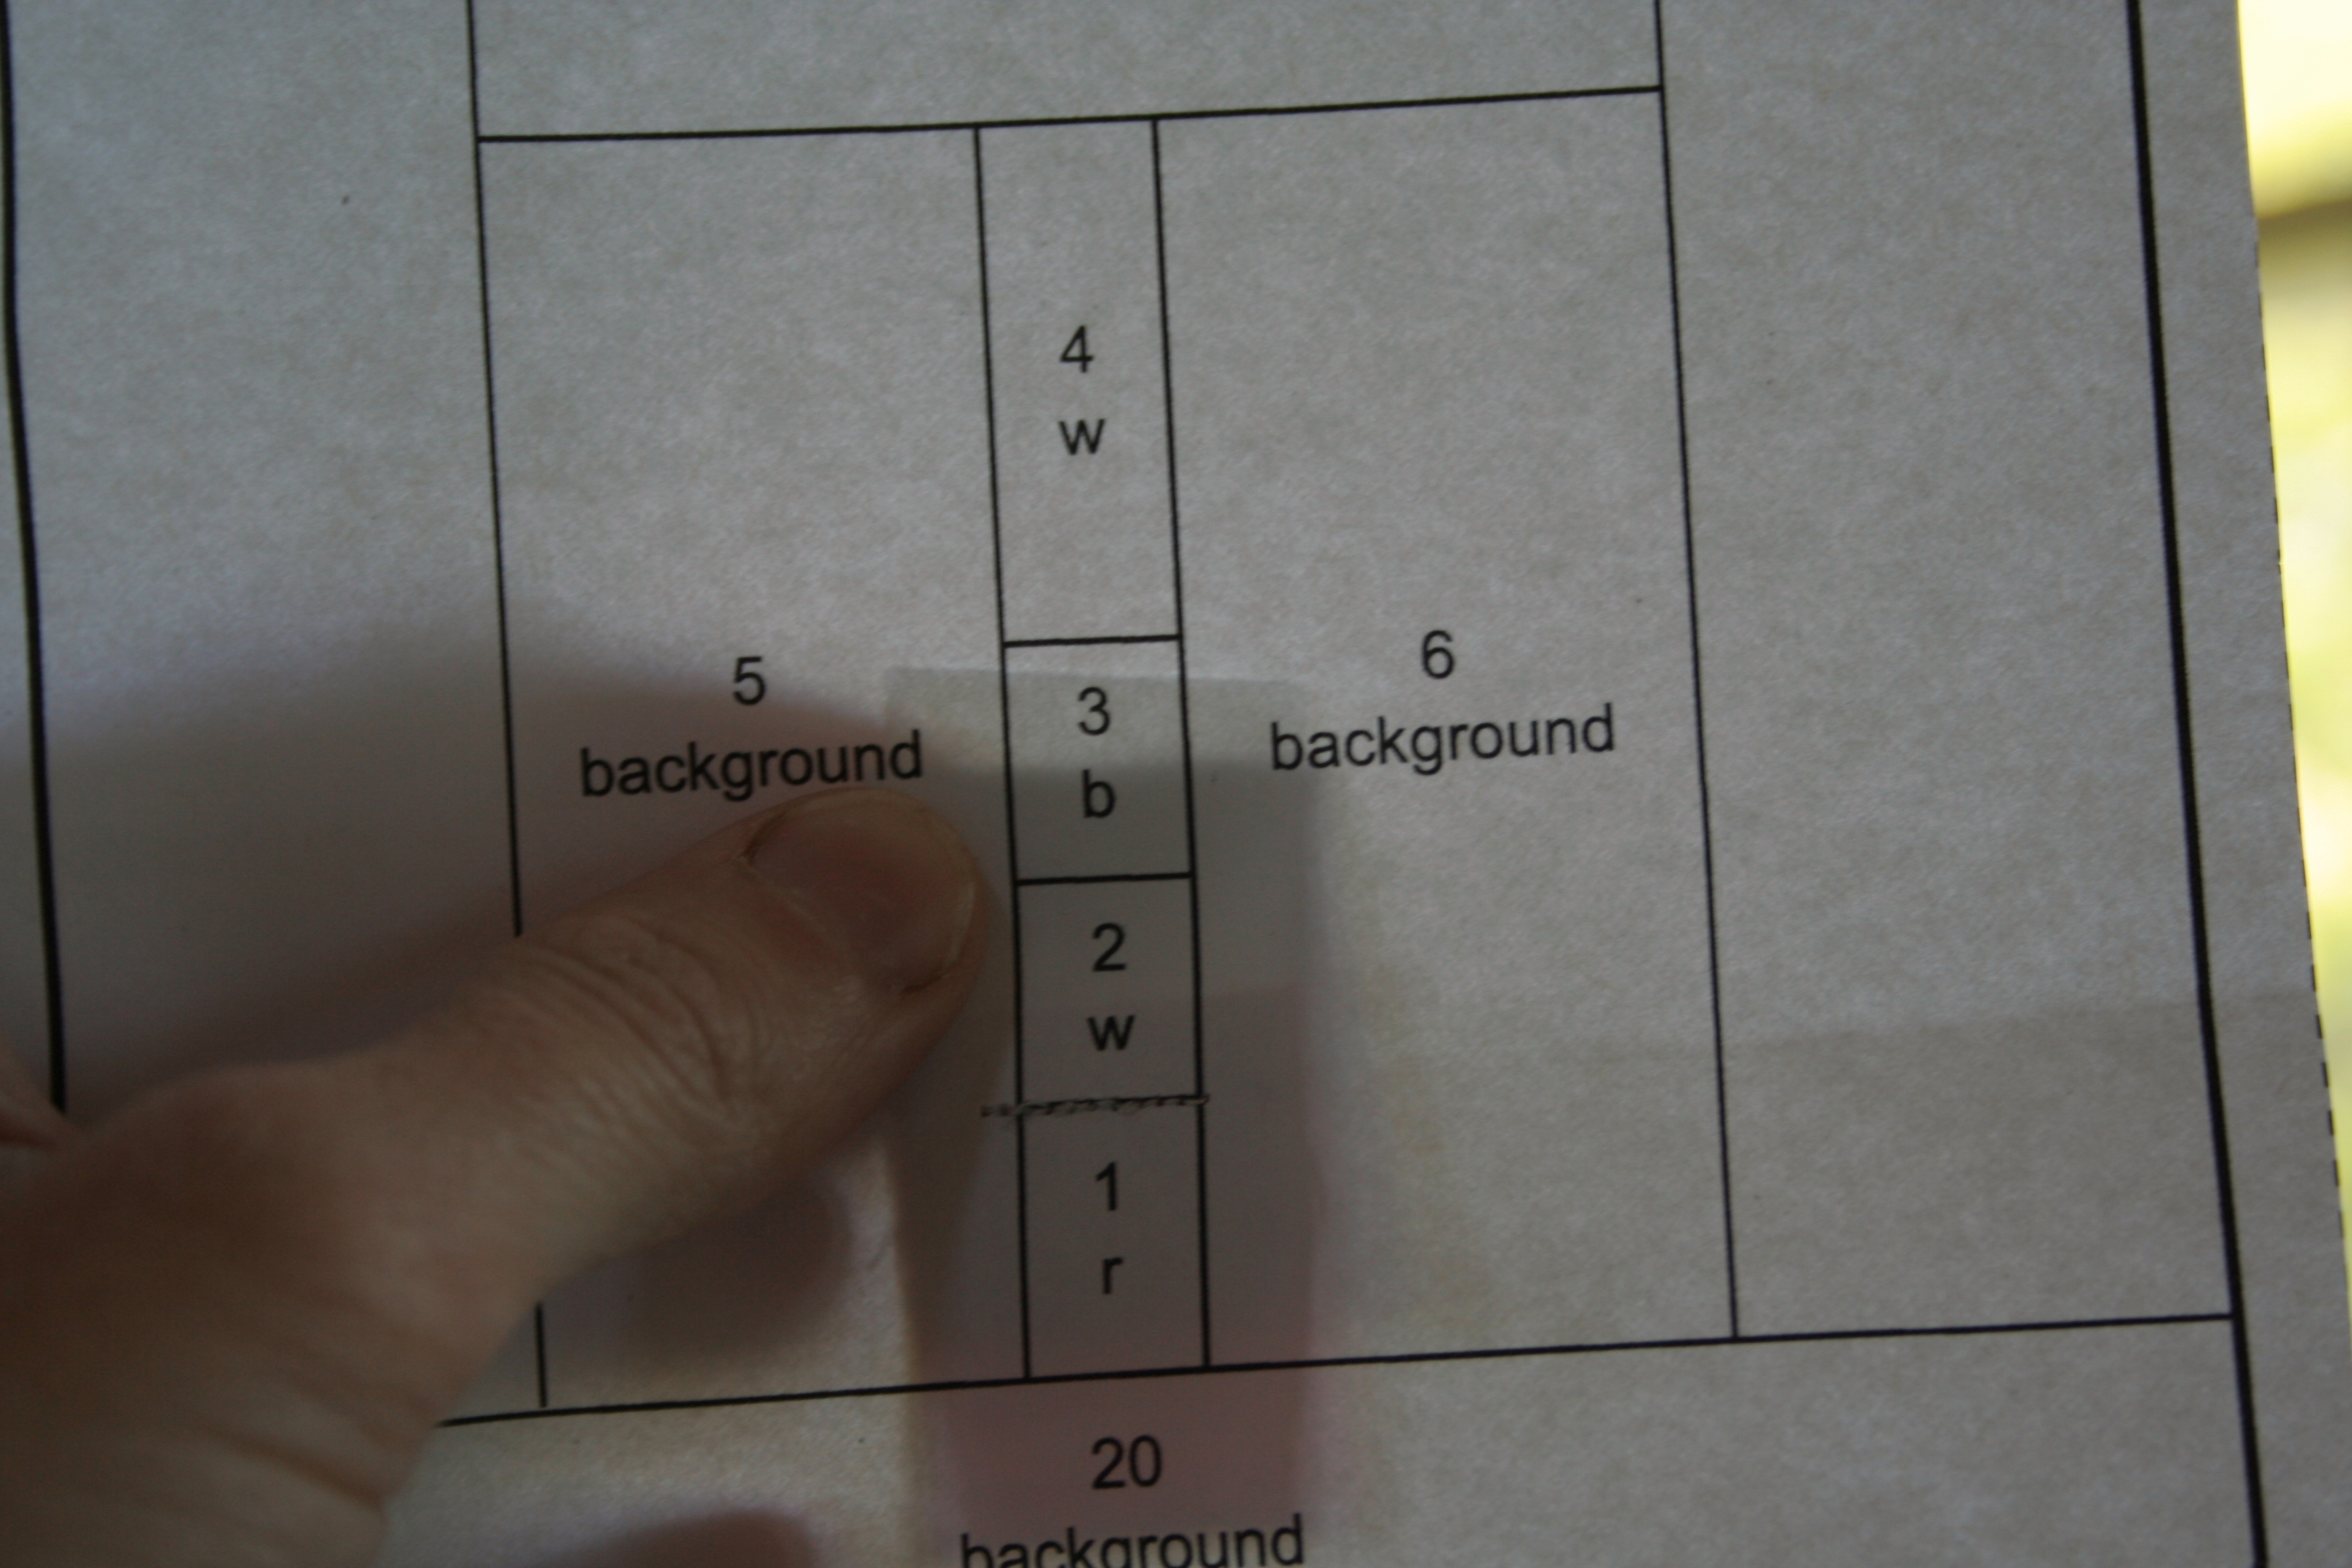
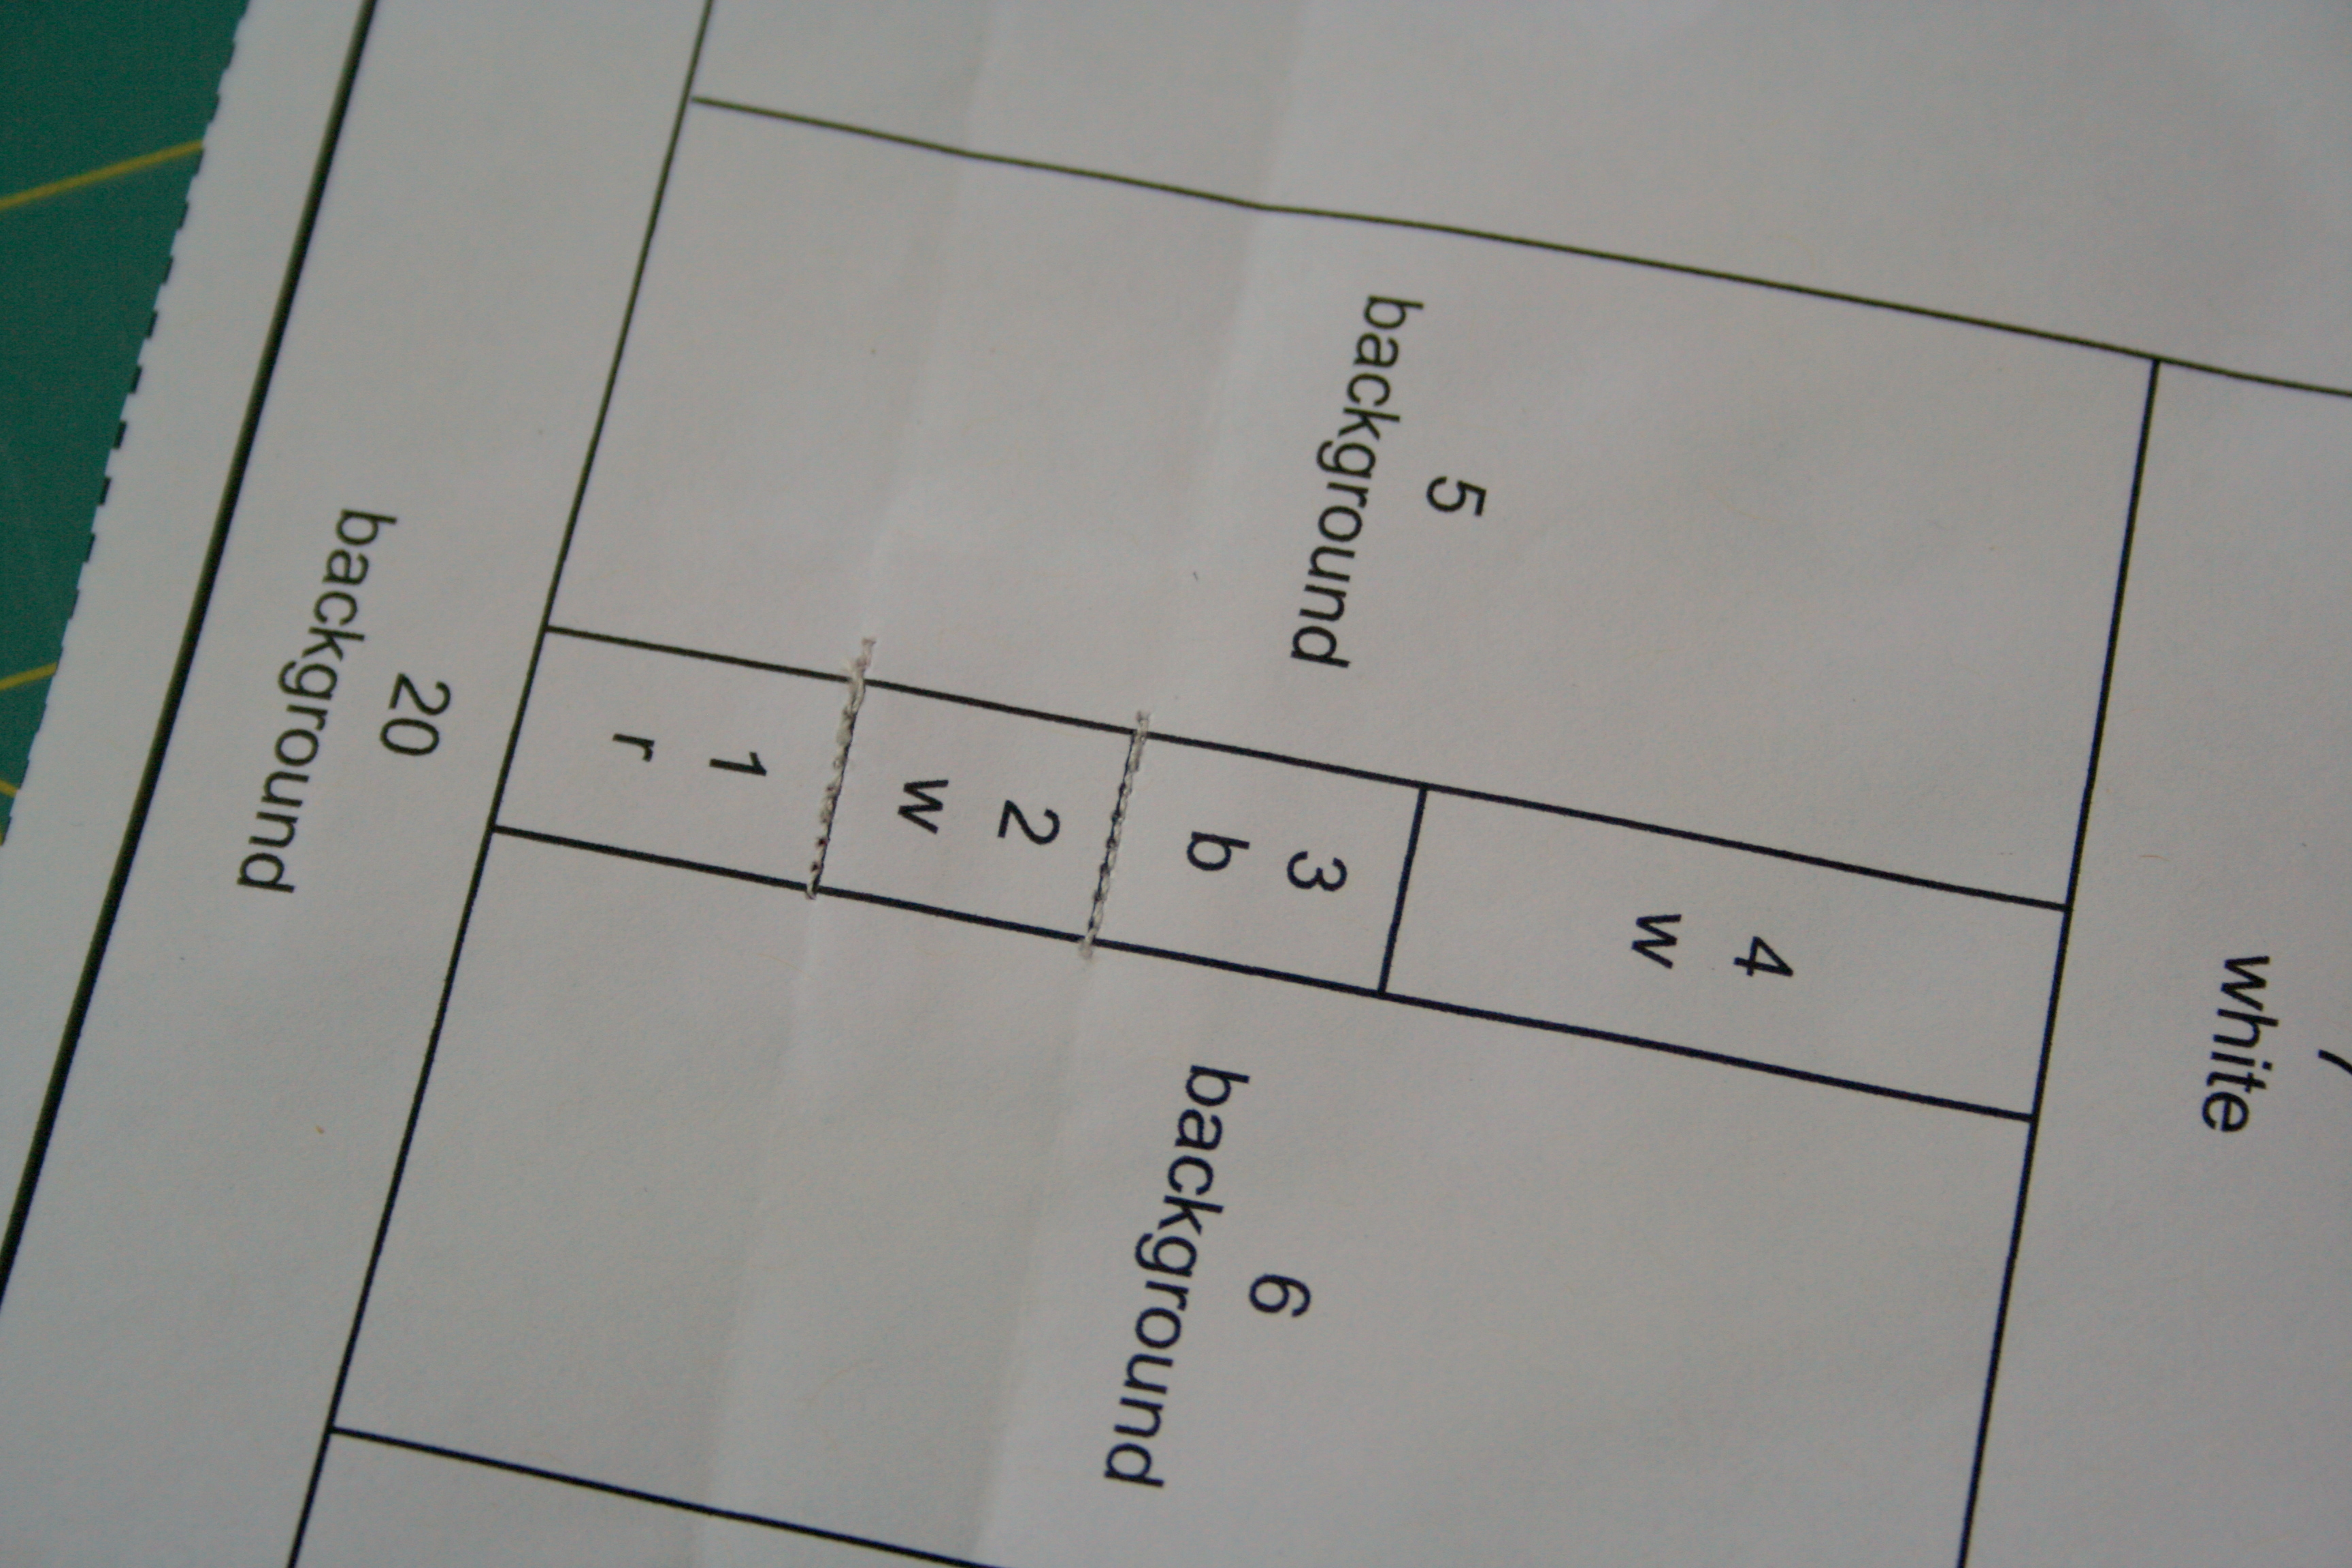
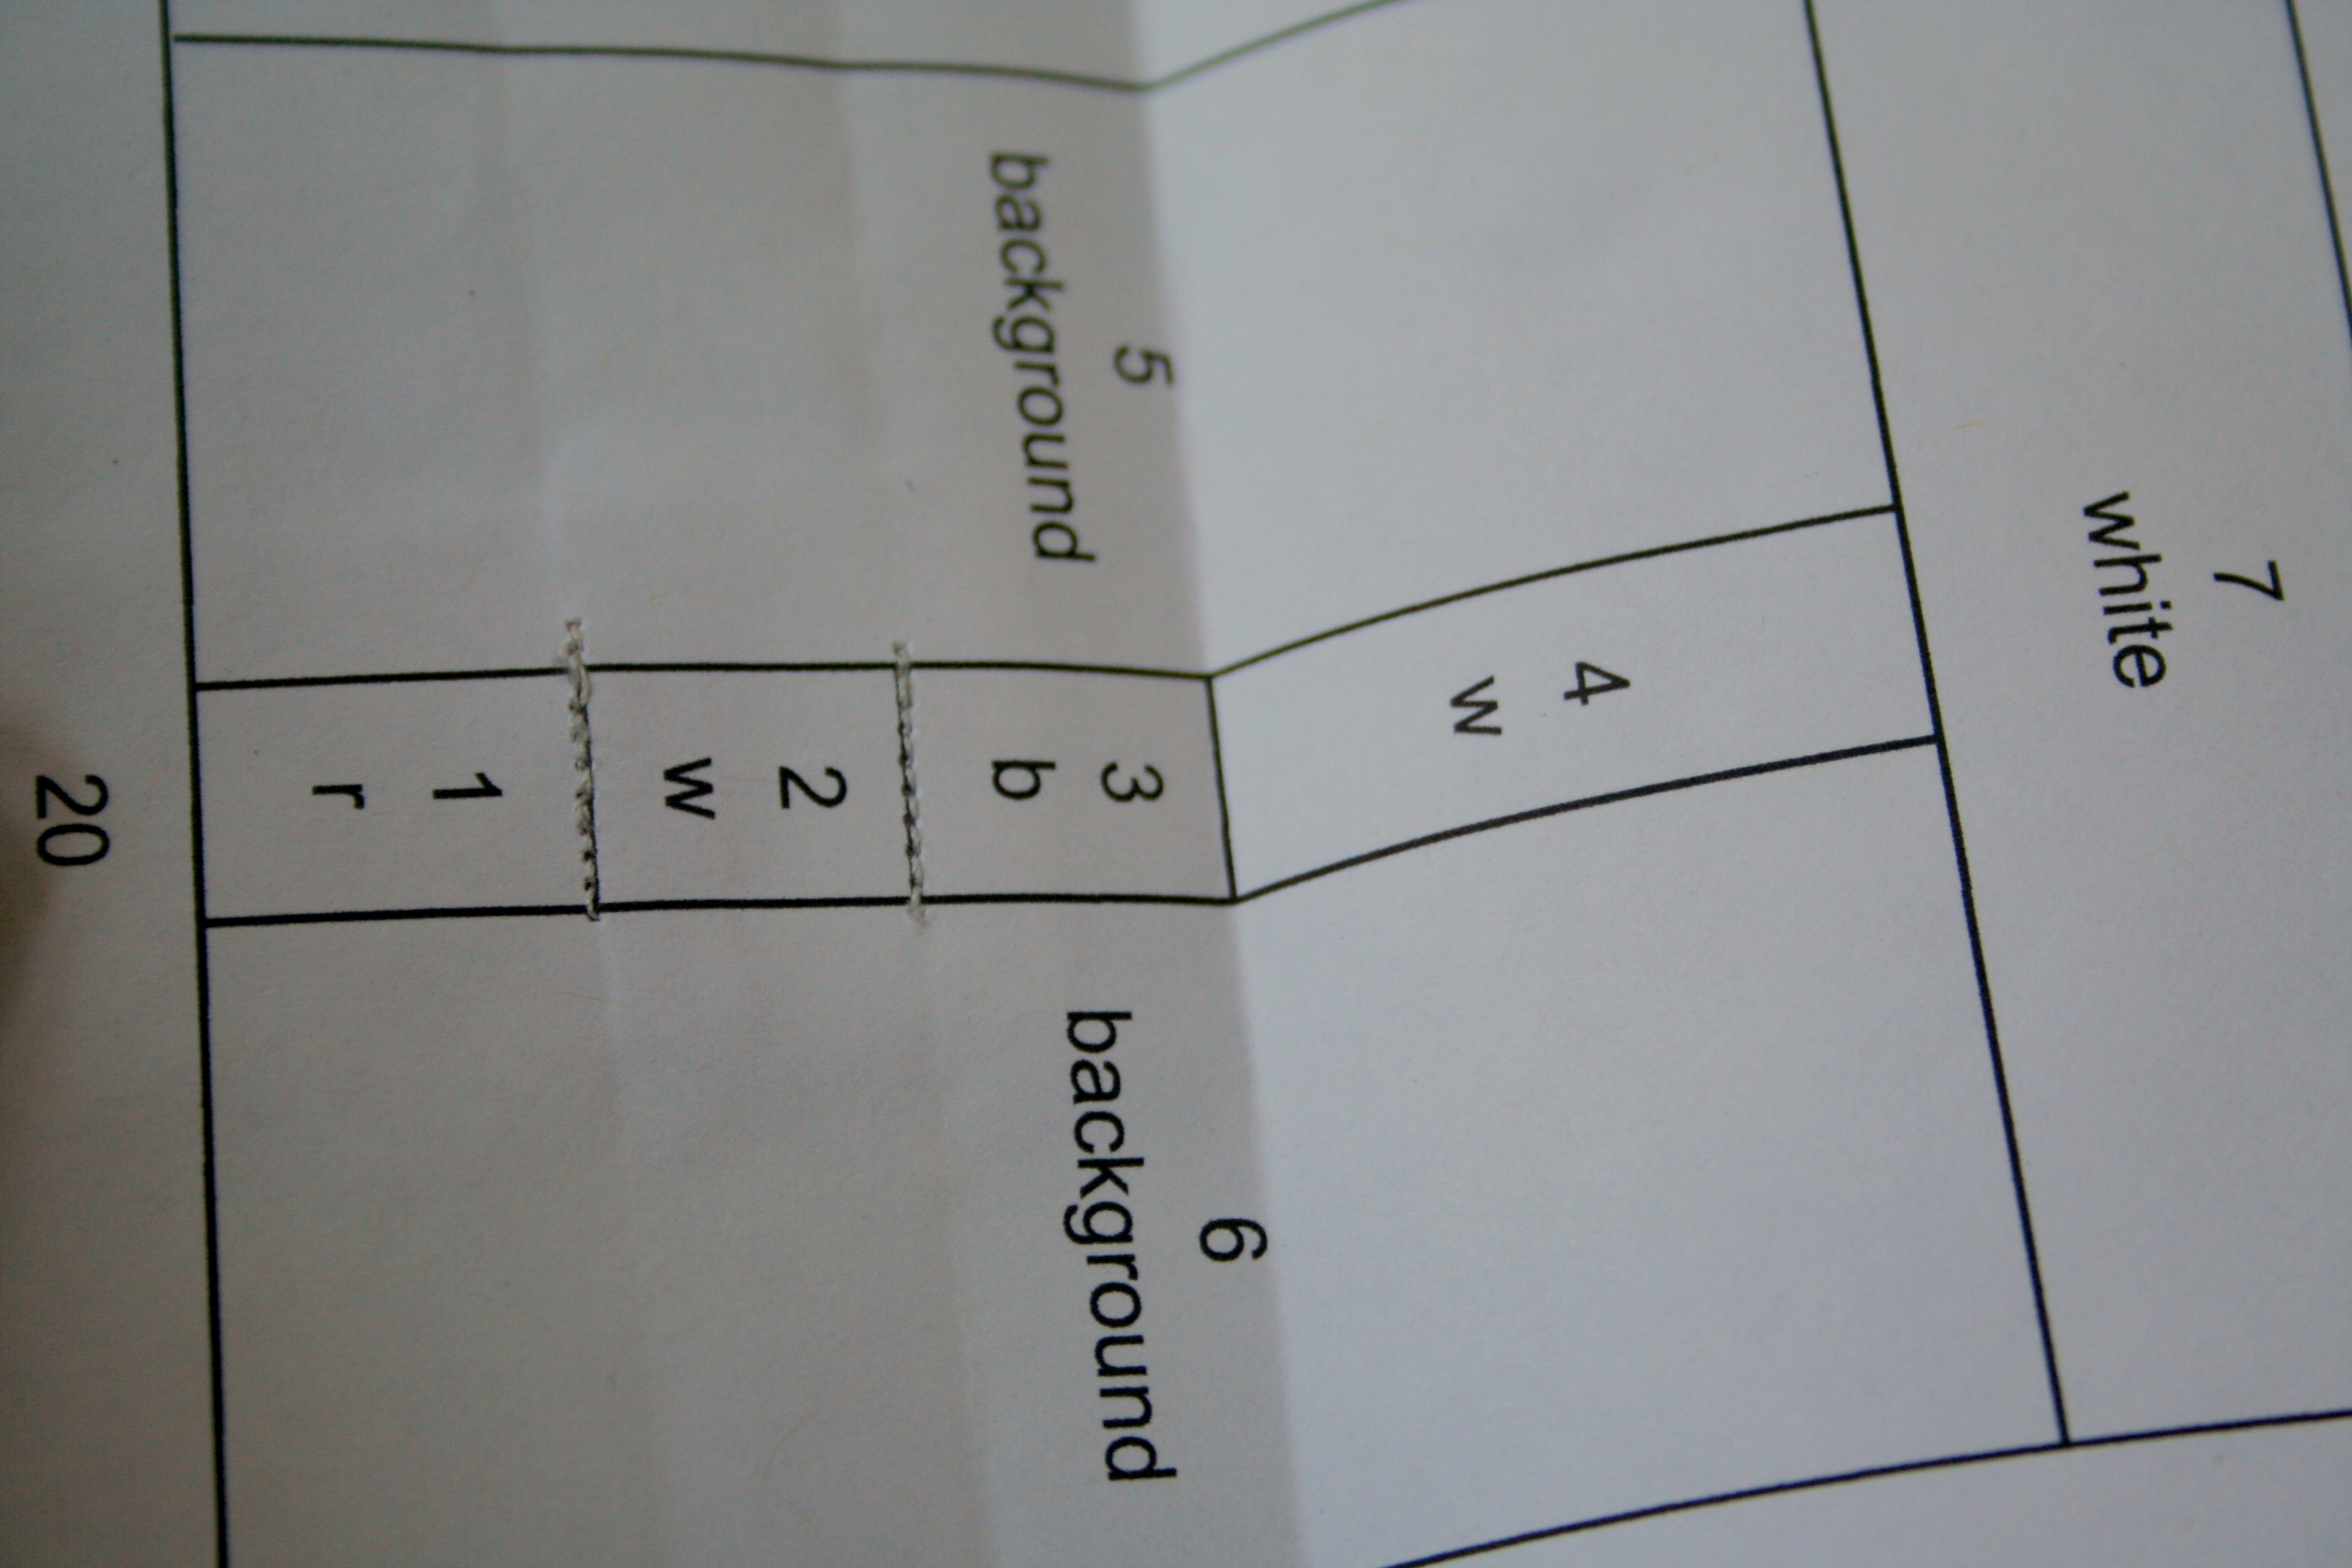
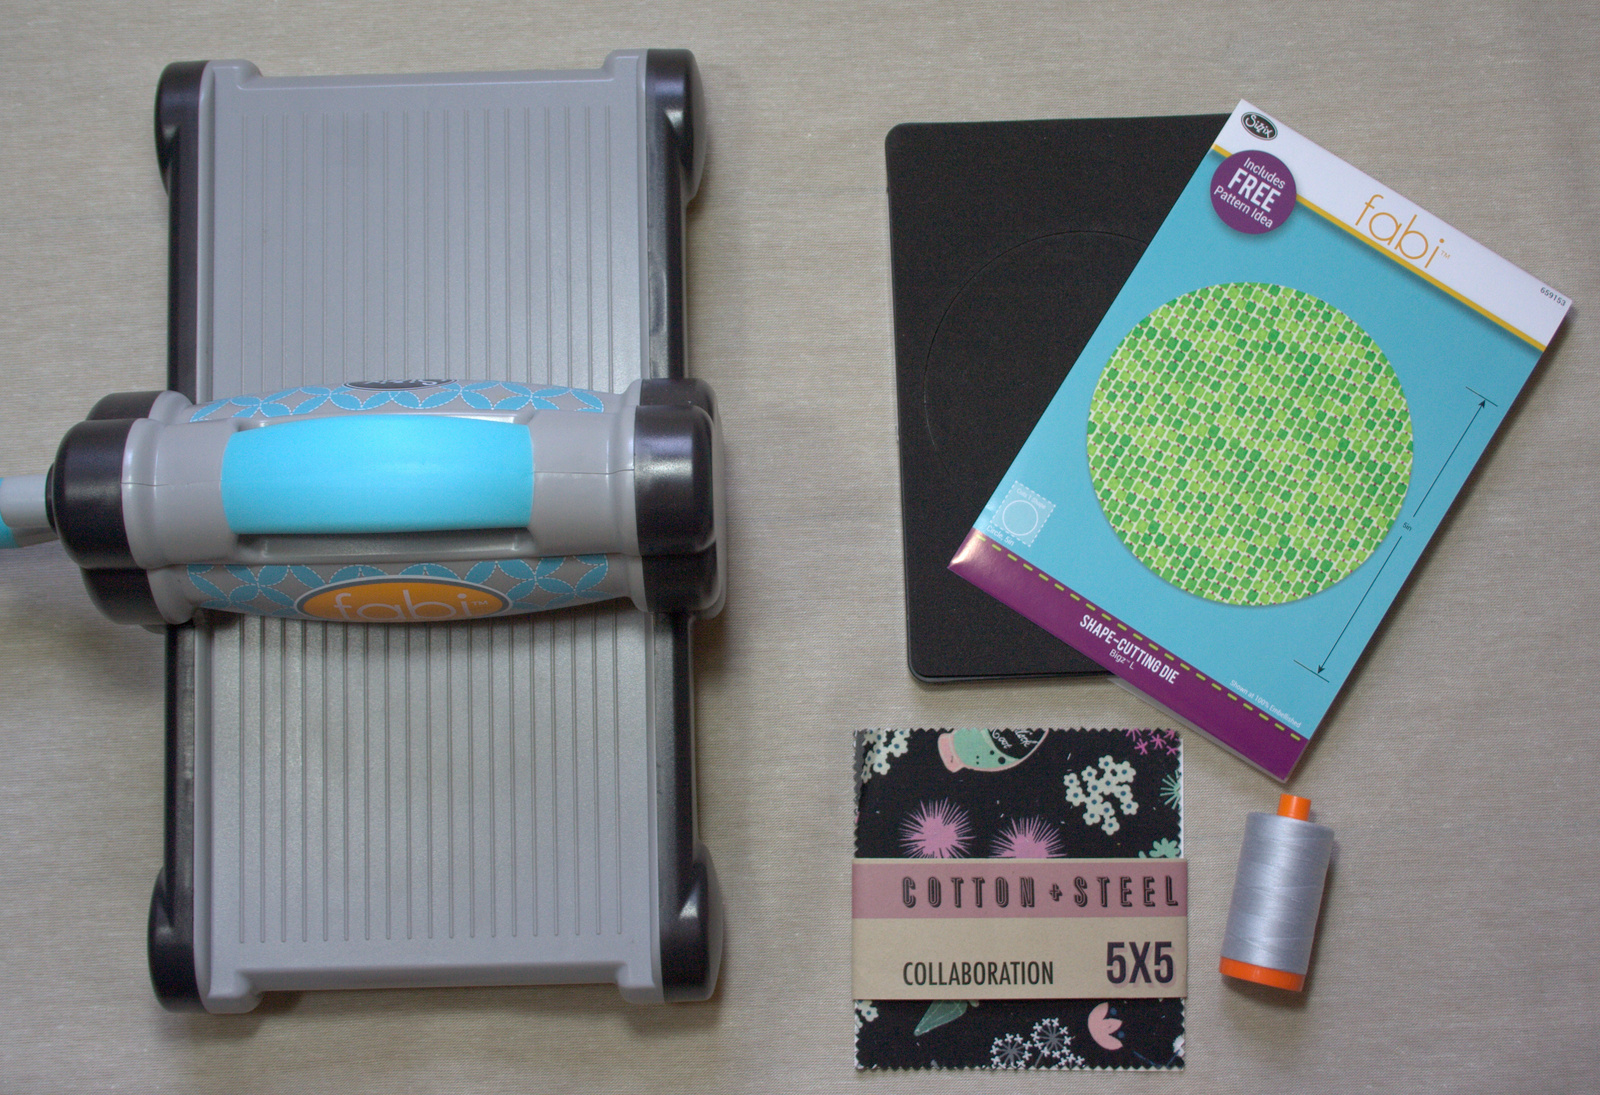
Materials needed (to make 4 beanbags):
8 charm squares of fabric
Die cutting machine & 5″ circle die (such as Sizzix cutting machines, AccuQuilt, Cricut, etc)
8 x 5″ diameter circles of fabric
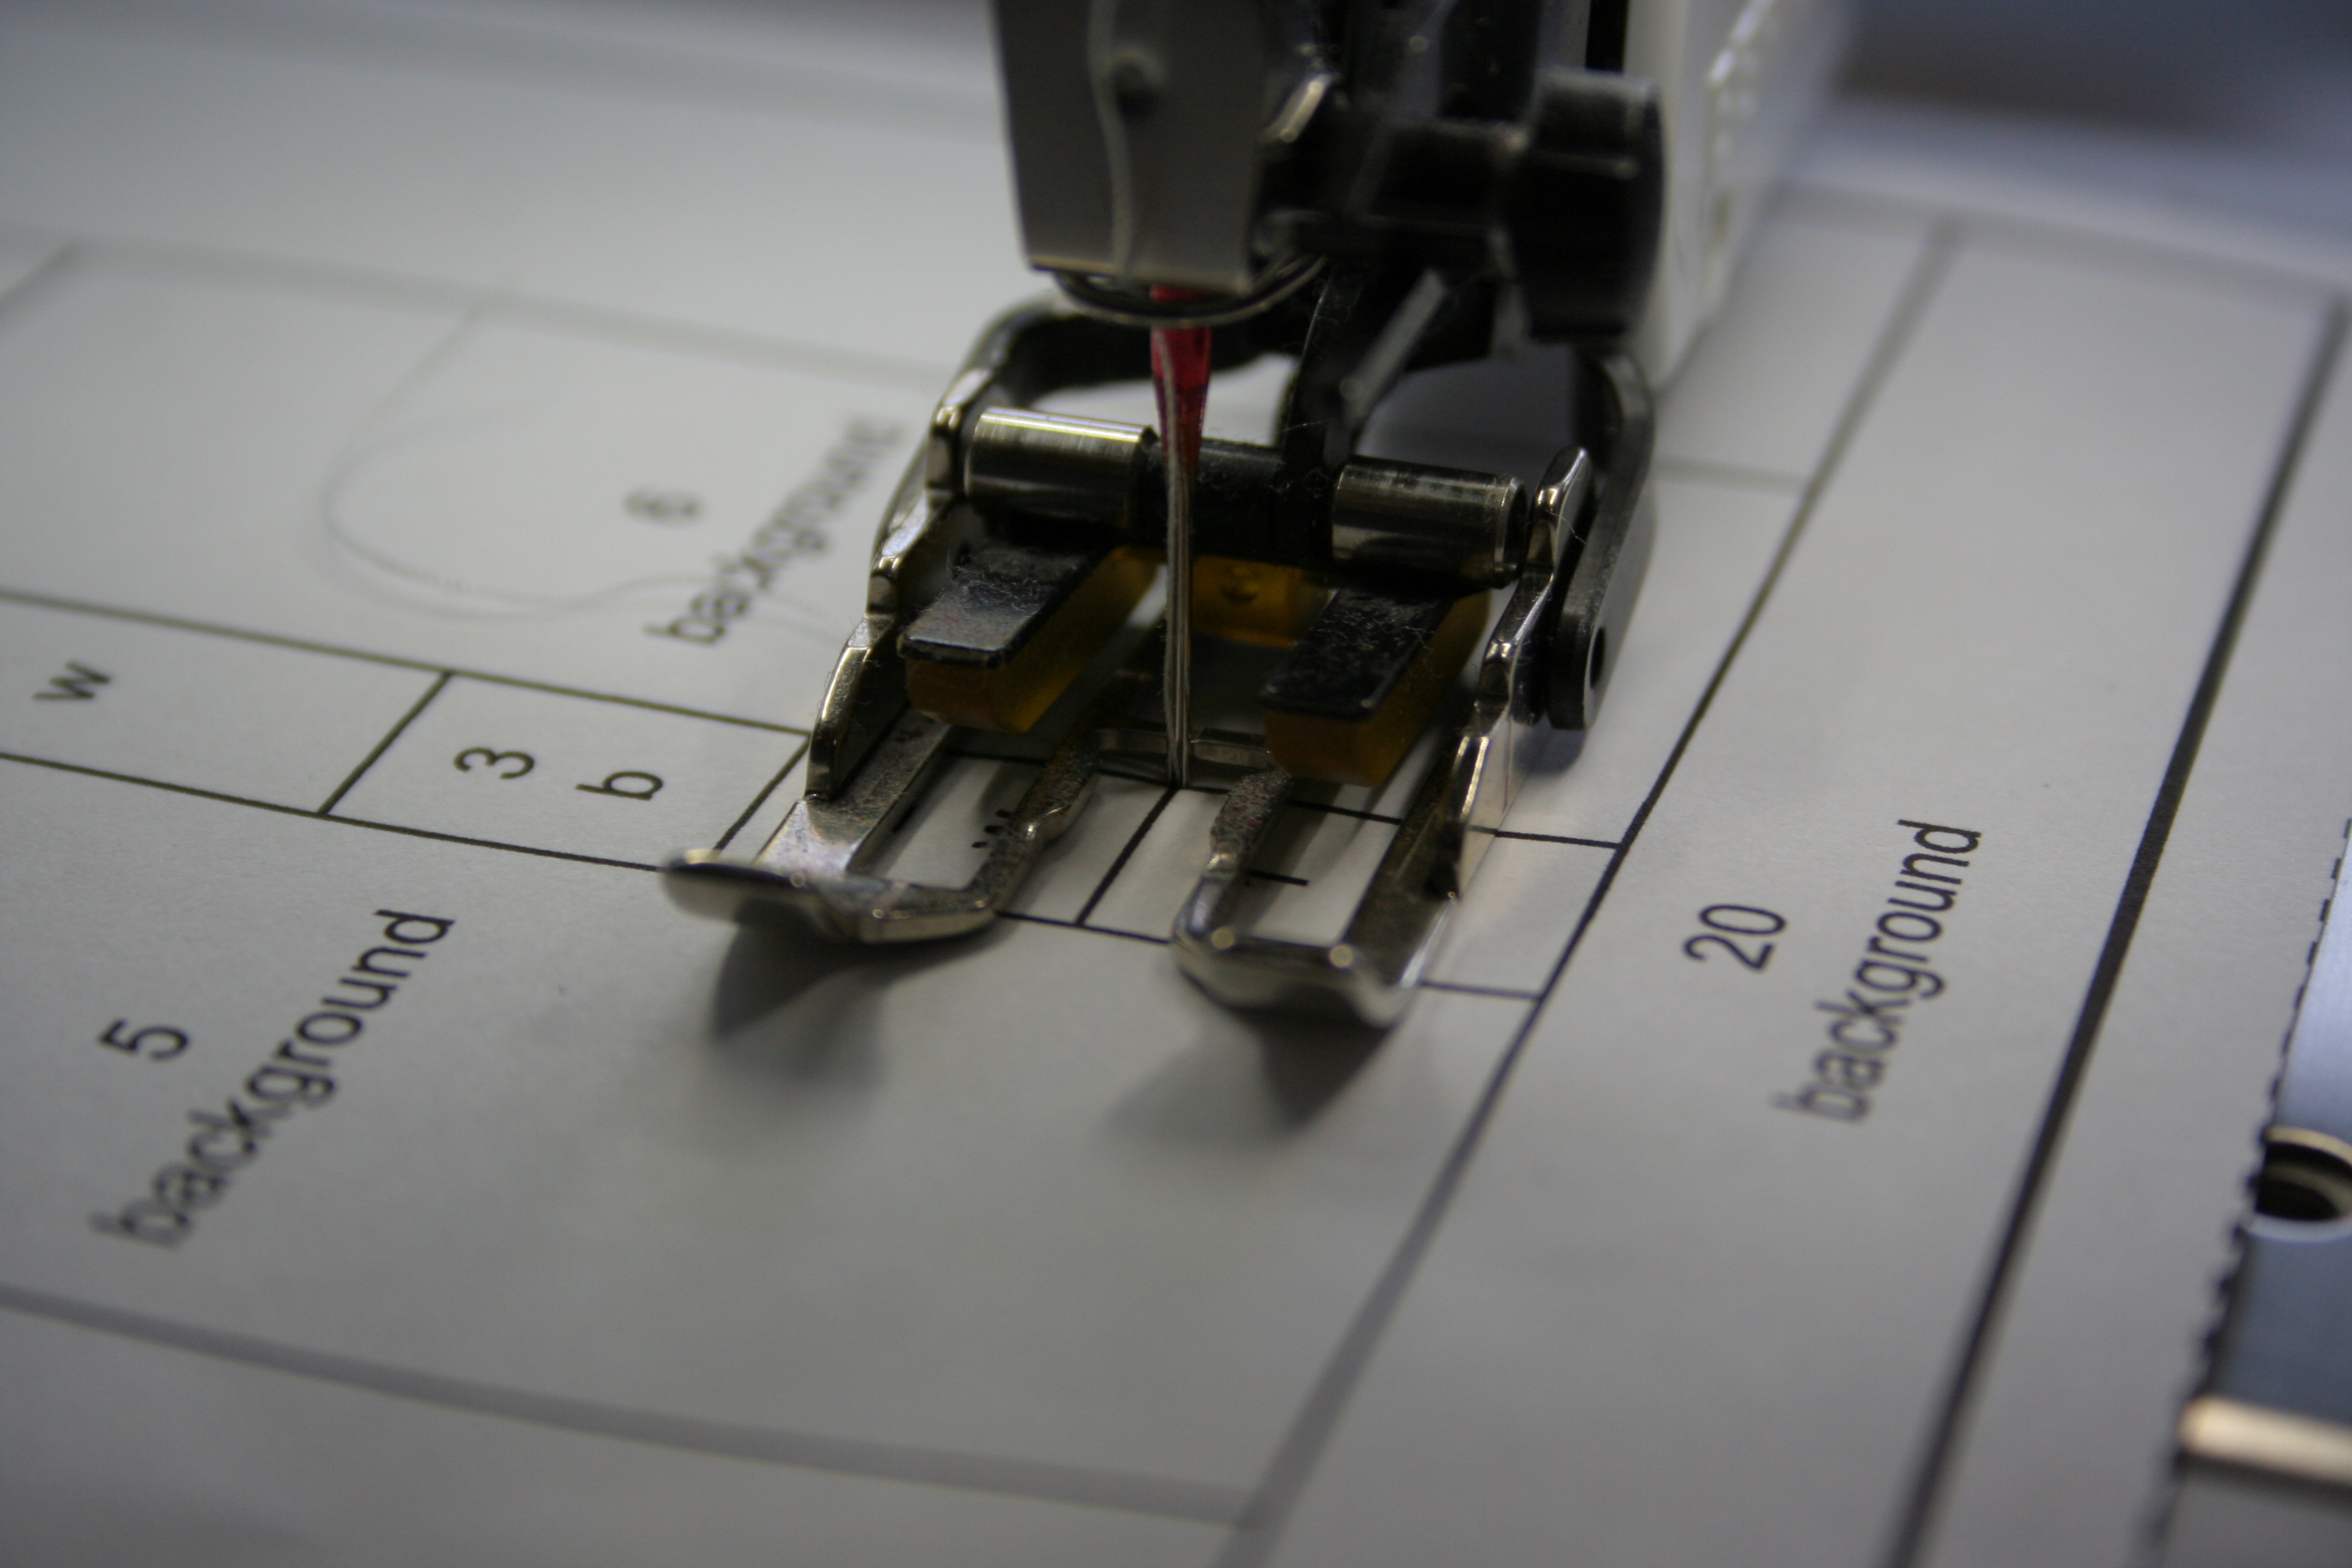
Sewing machine (zipper foot suggested but not required) – I use a Bernina 560
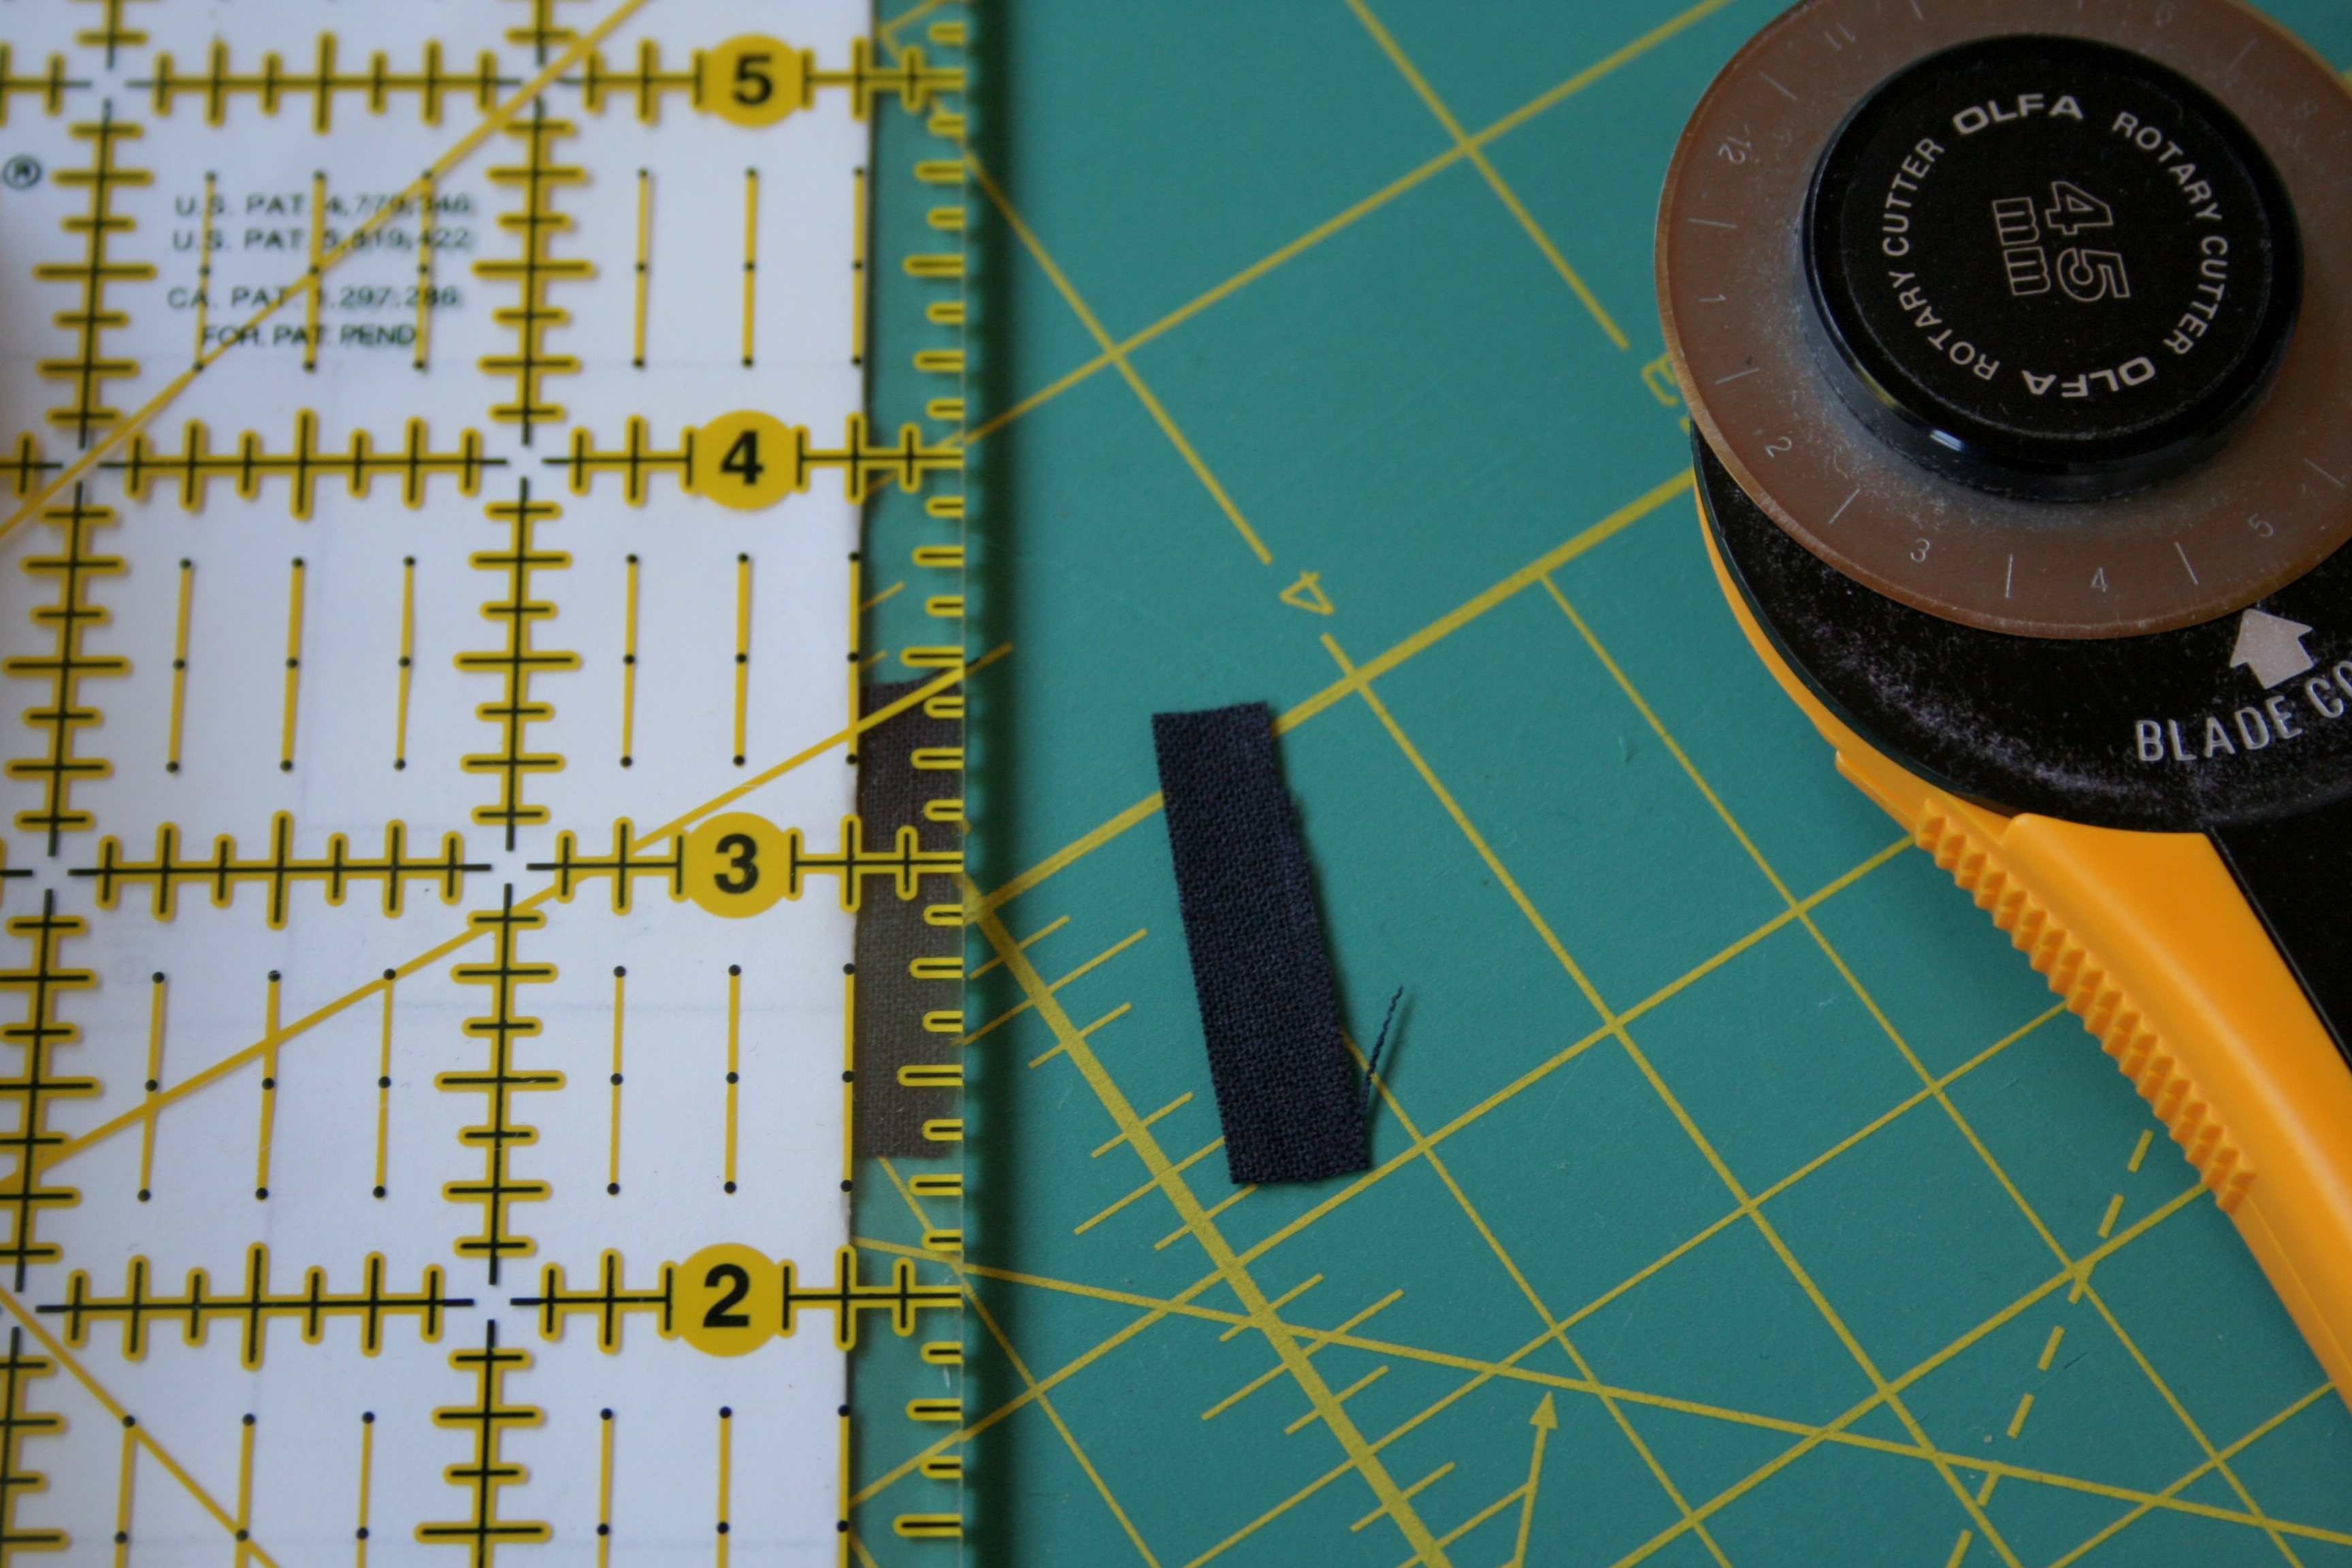
I made my beanbags using my Sizzix fabi die cutting machine and the BigZ L Circle 5″ die. You can also use any palm-sized circle item in your kitchen to trace circles on fabric for the beanbags if you don’t have a die cutting machine.
I figured since it’s nearly Halloween, it was the perfect time to use my Cotton + Steel Spellbound Collaboration charm pack. The 5″ circle die worked perfectly with the charm squares, which made my job even easier! I used my go-to thread, 50wt Aurifil 2600-Dove for all sewing.
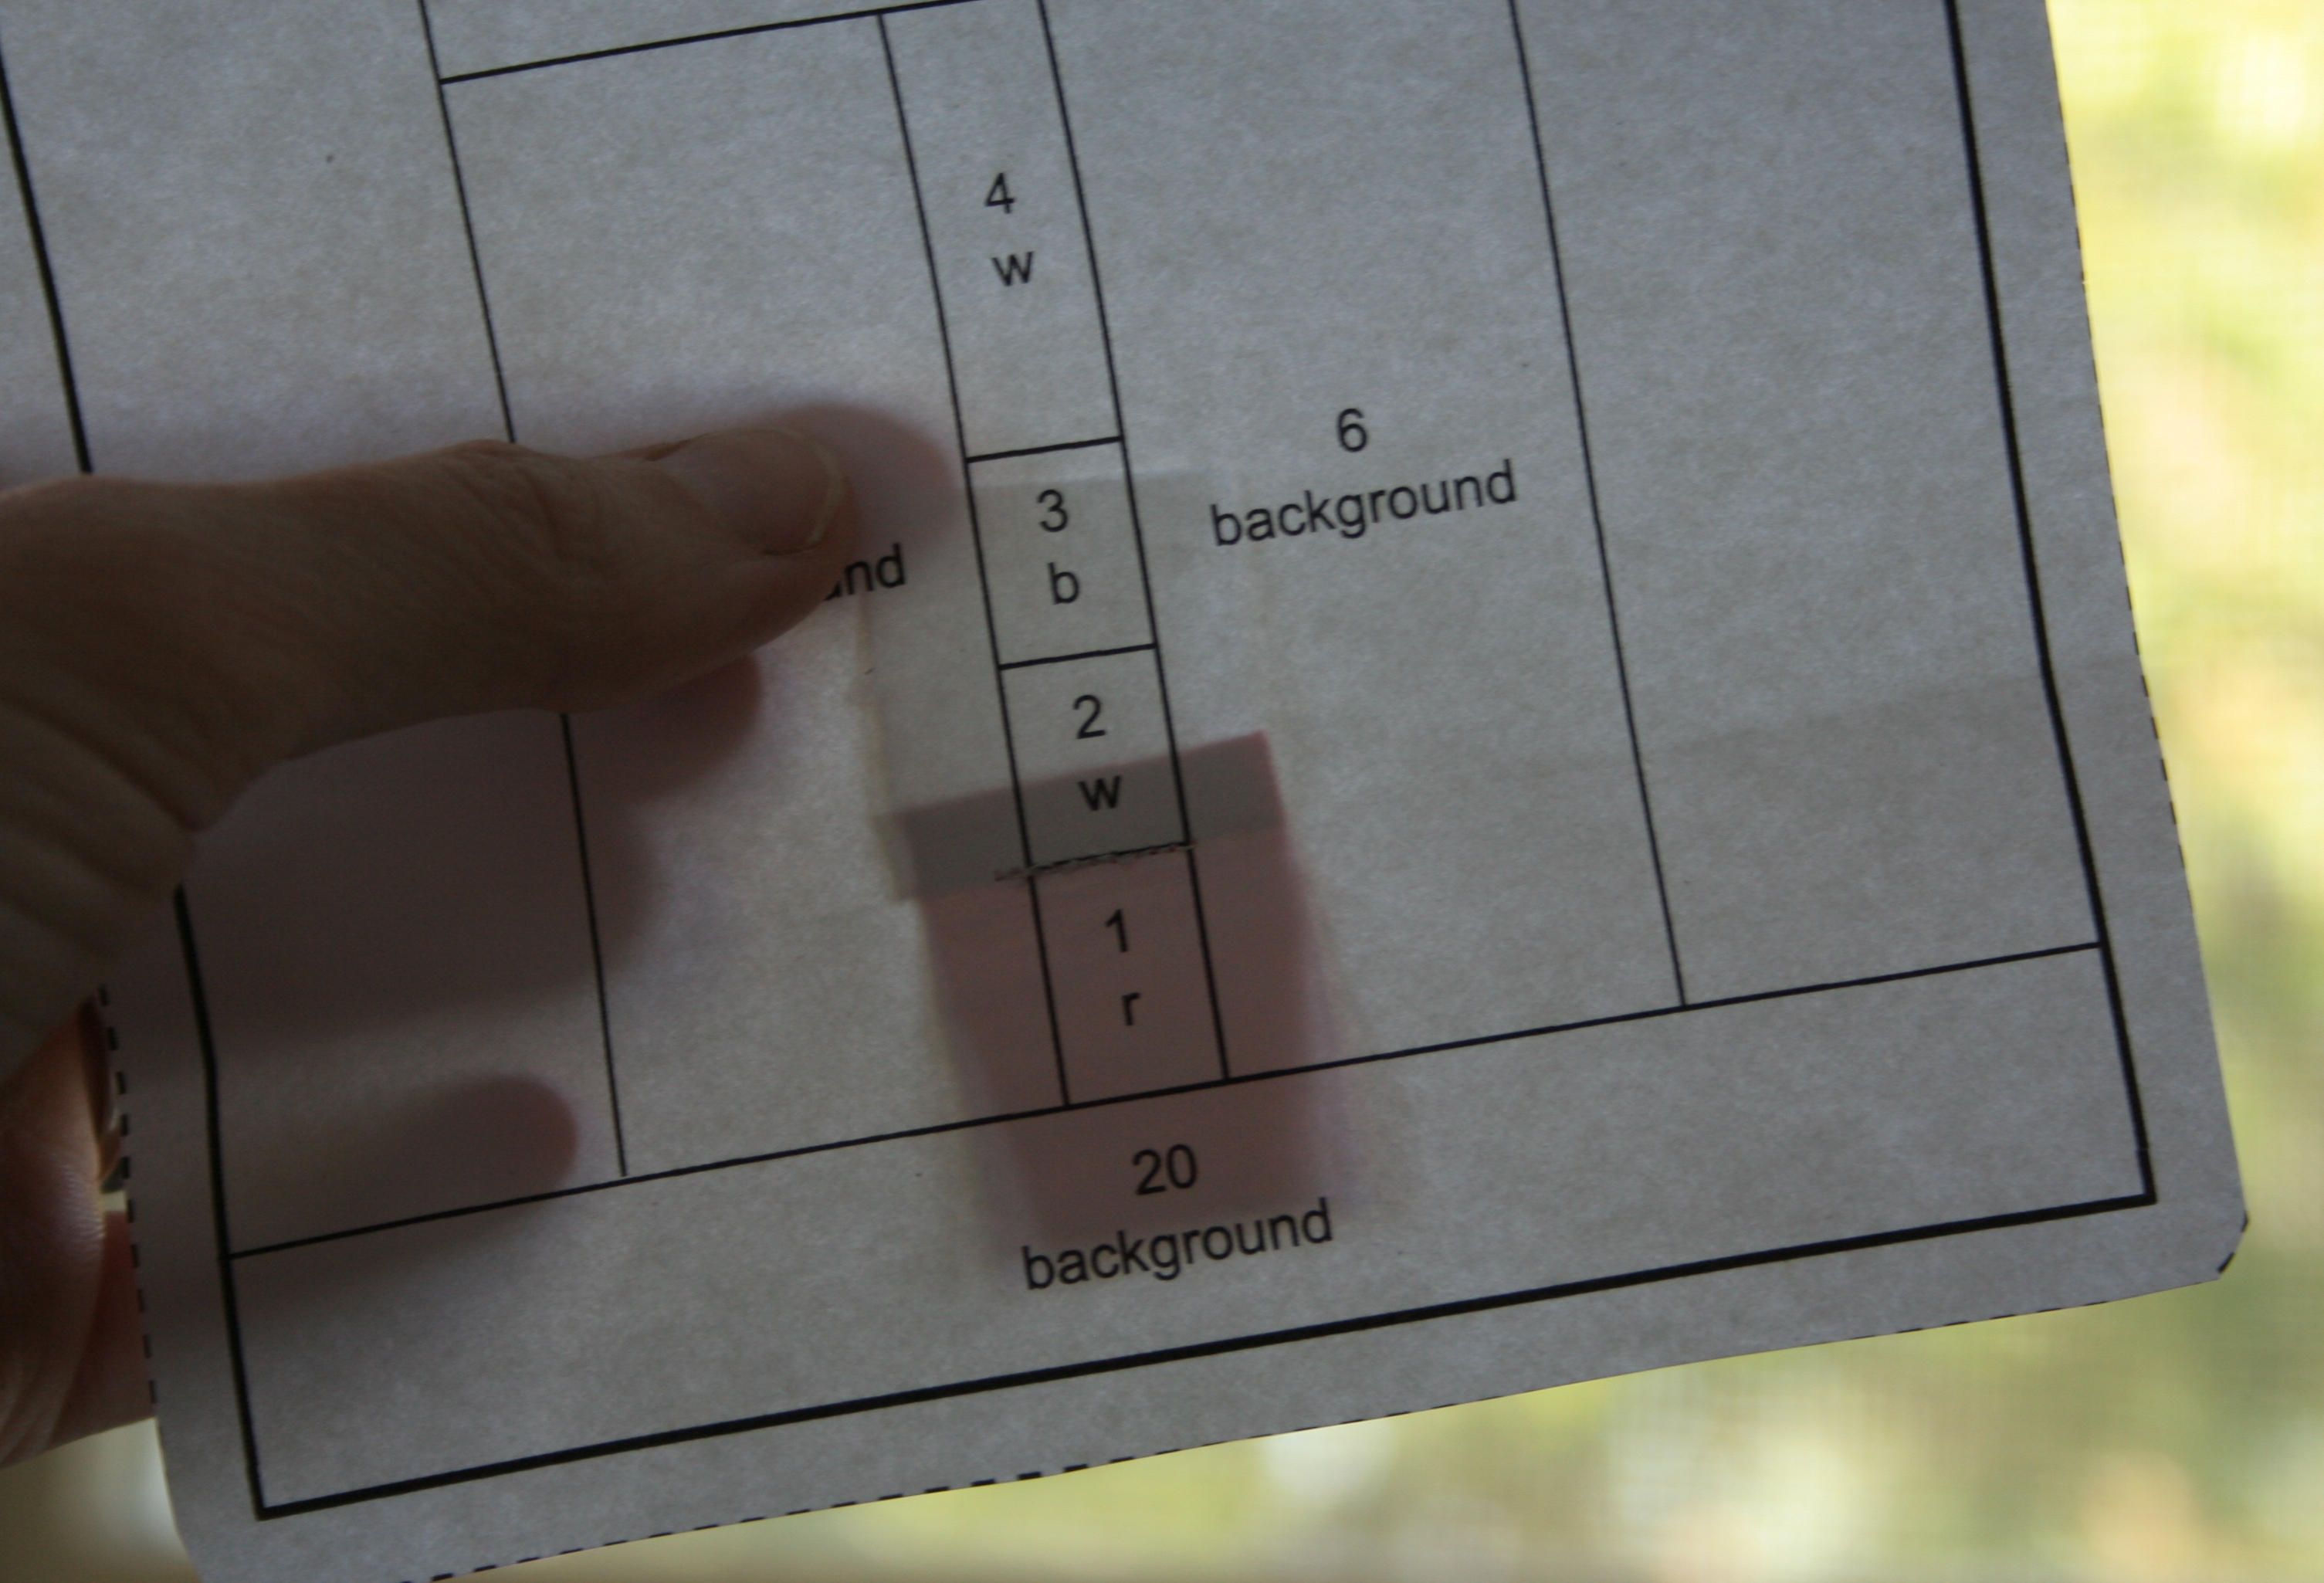
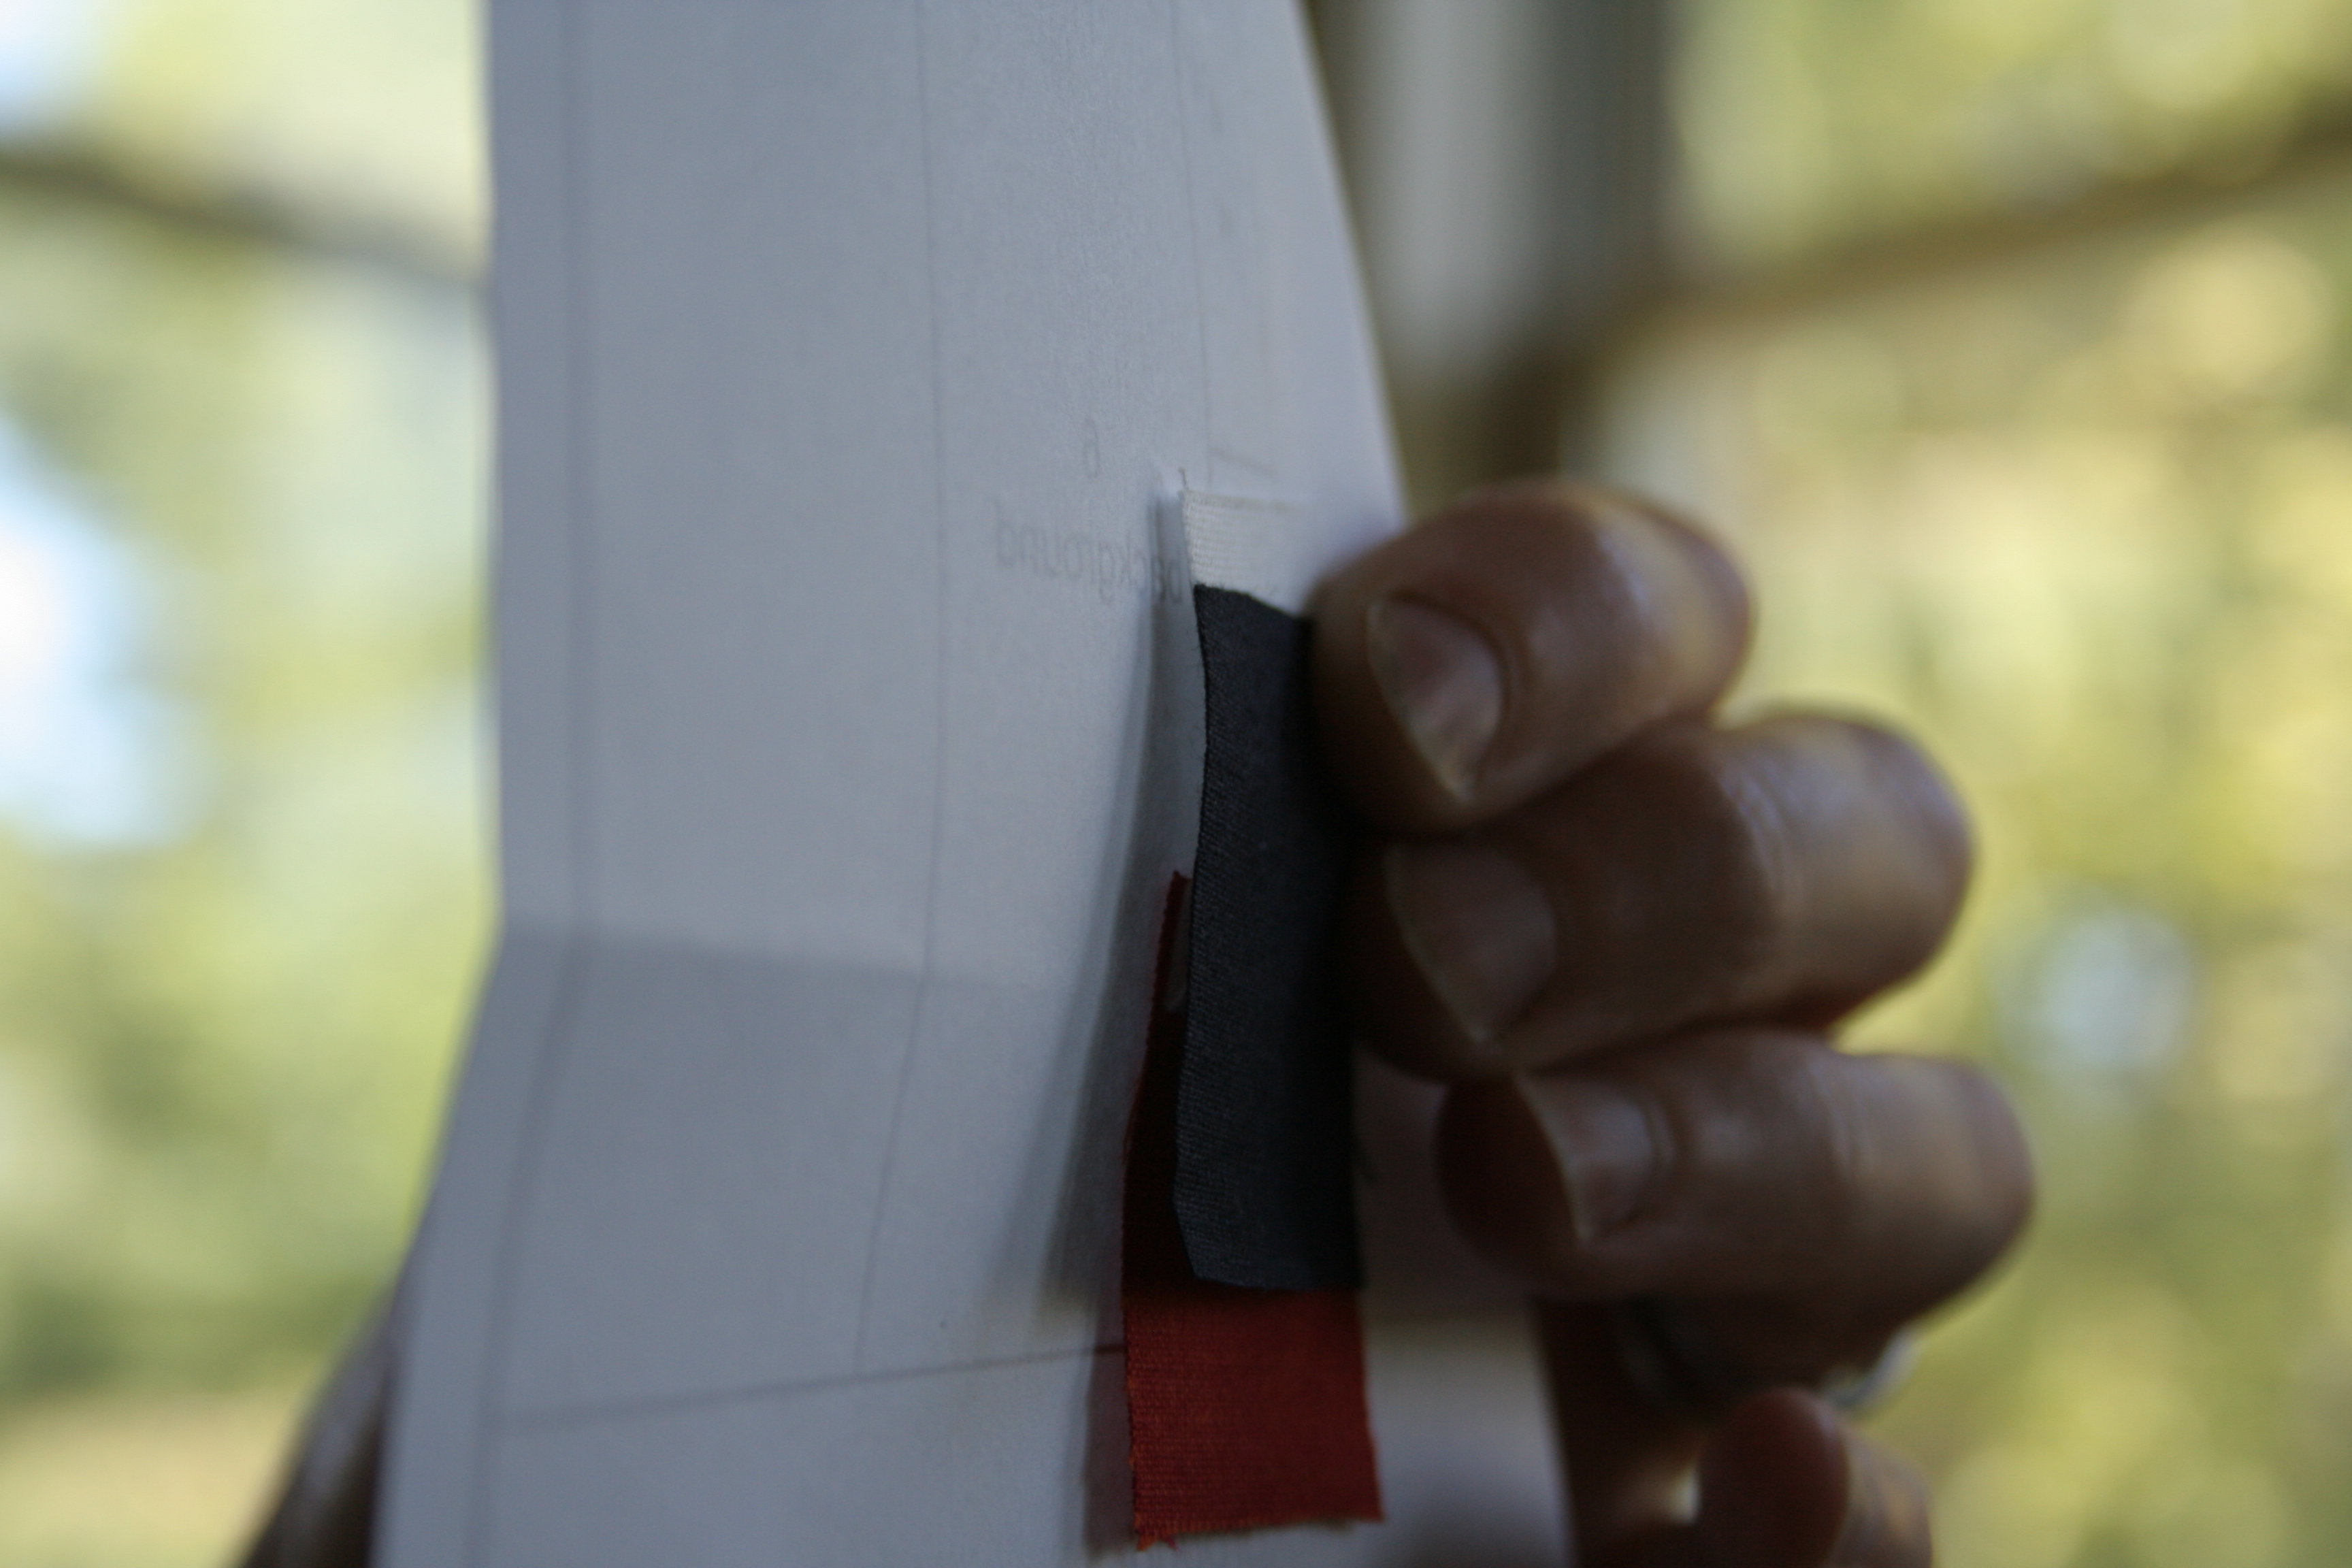
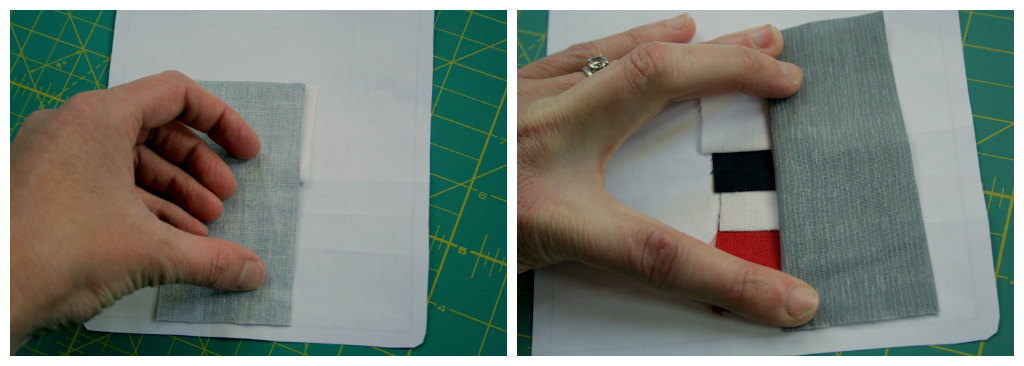
Choosing four pairs of coordinating charm squares, cut eight (8) 5″ circles, layering your Sizzix sandwich: bottom cutting pad, die with the blades facing up, fabric centered over the circle blade, and top cutting pad. All necessary circles for this project can be cut with one pass through the die cutting machine, which made this a really quick project to make with my kids.
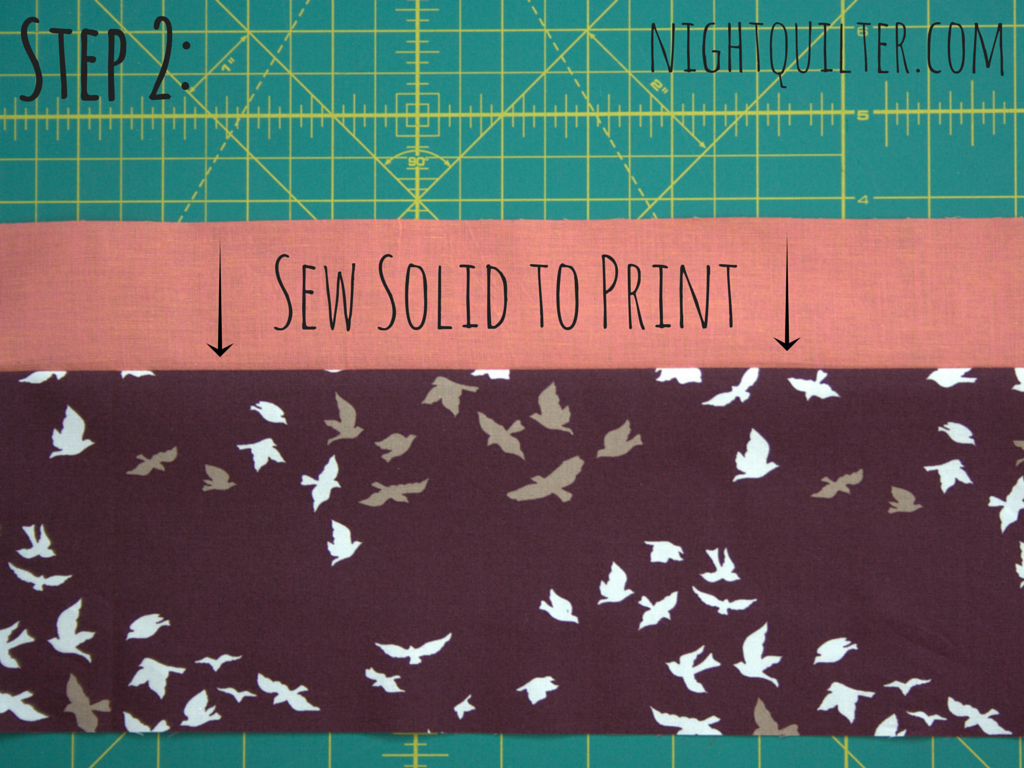
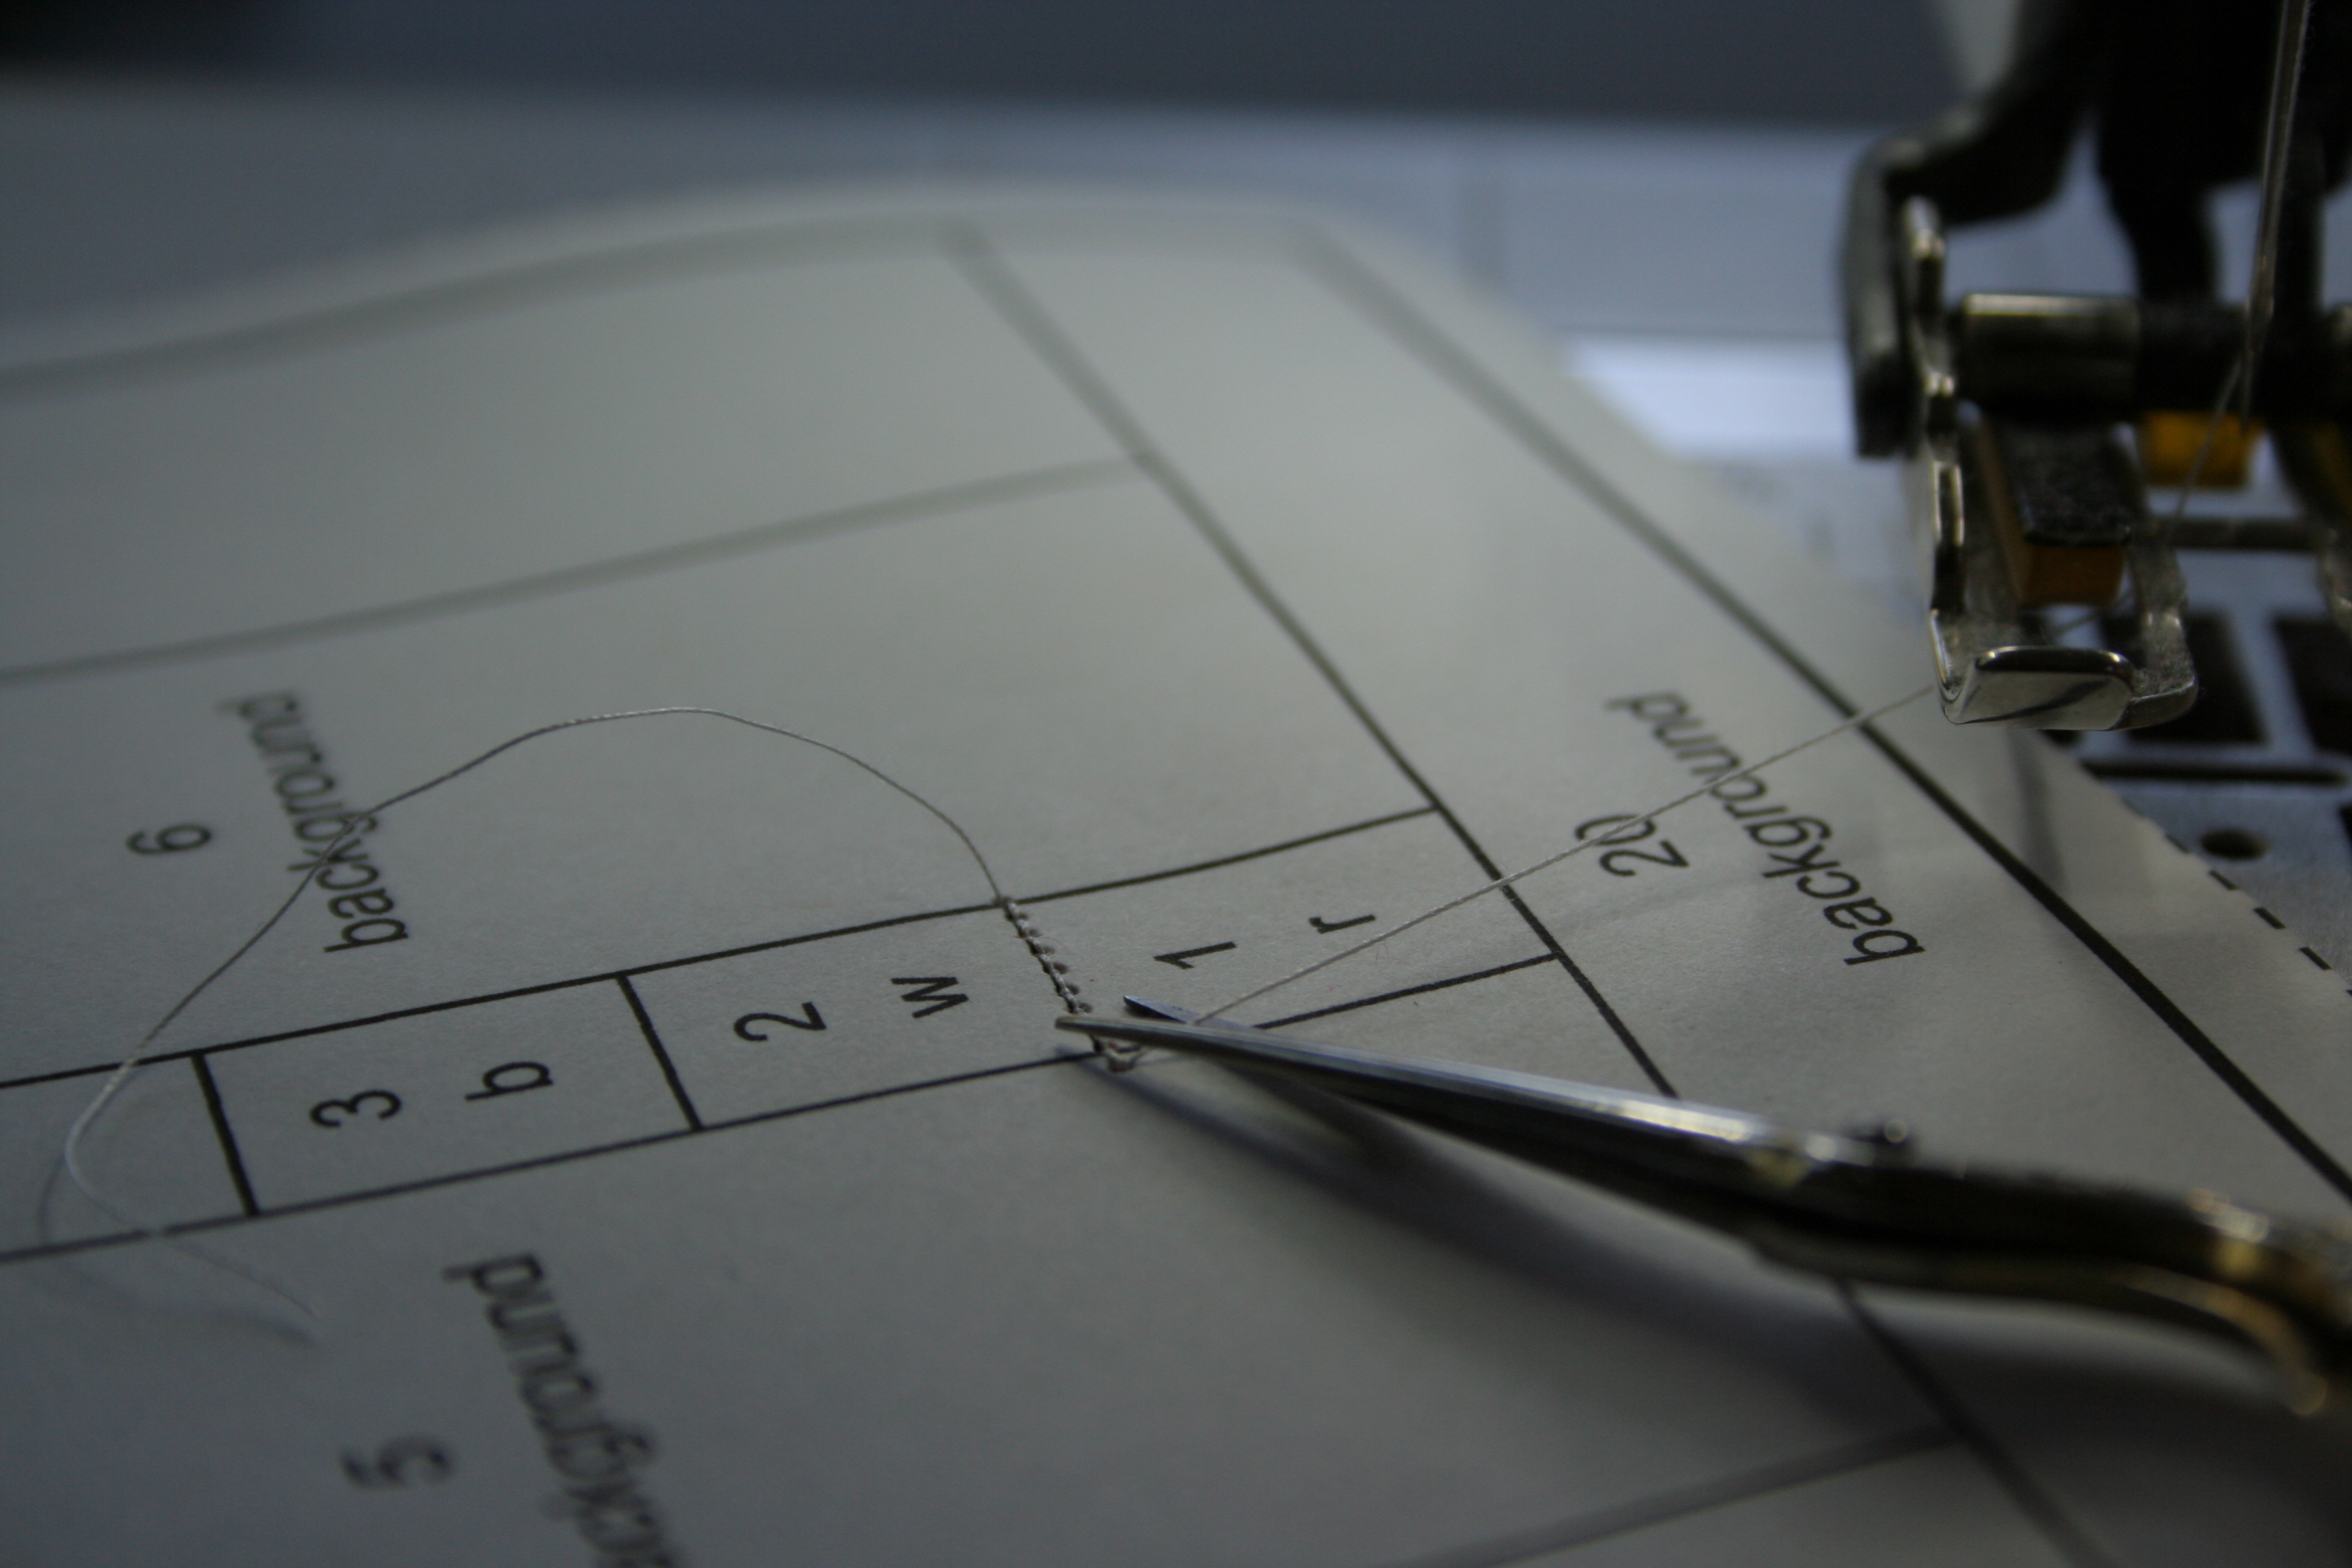
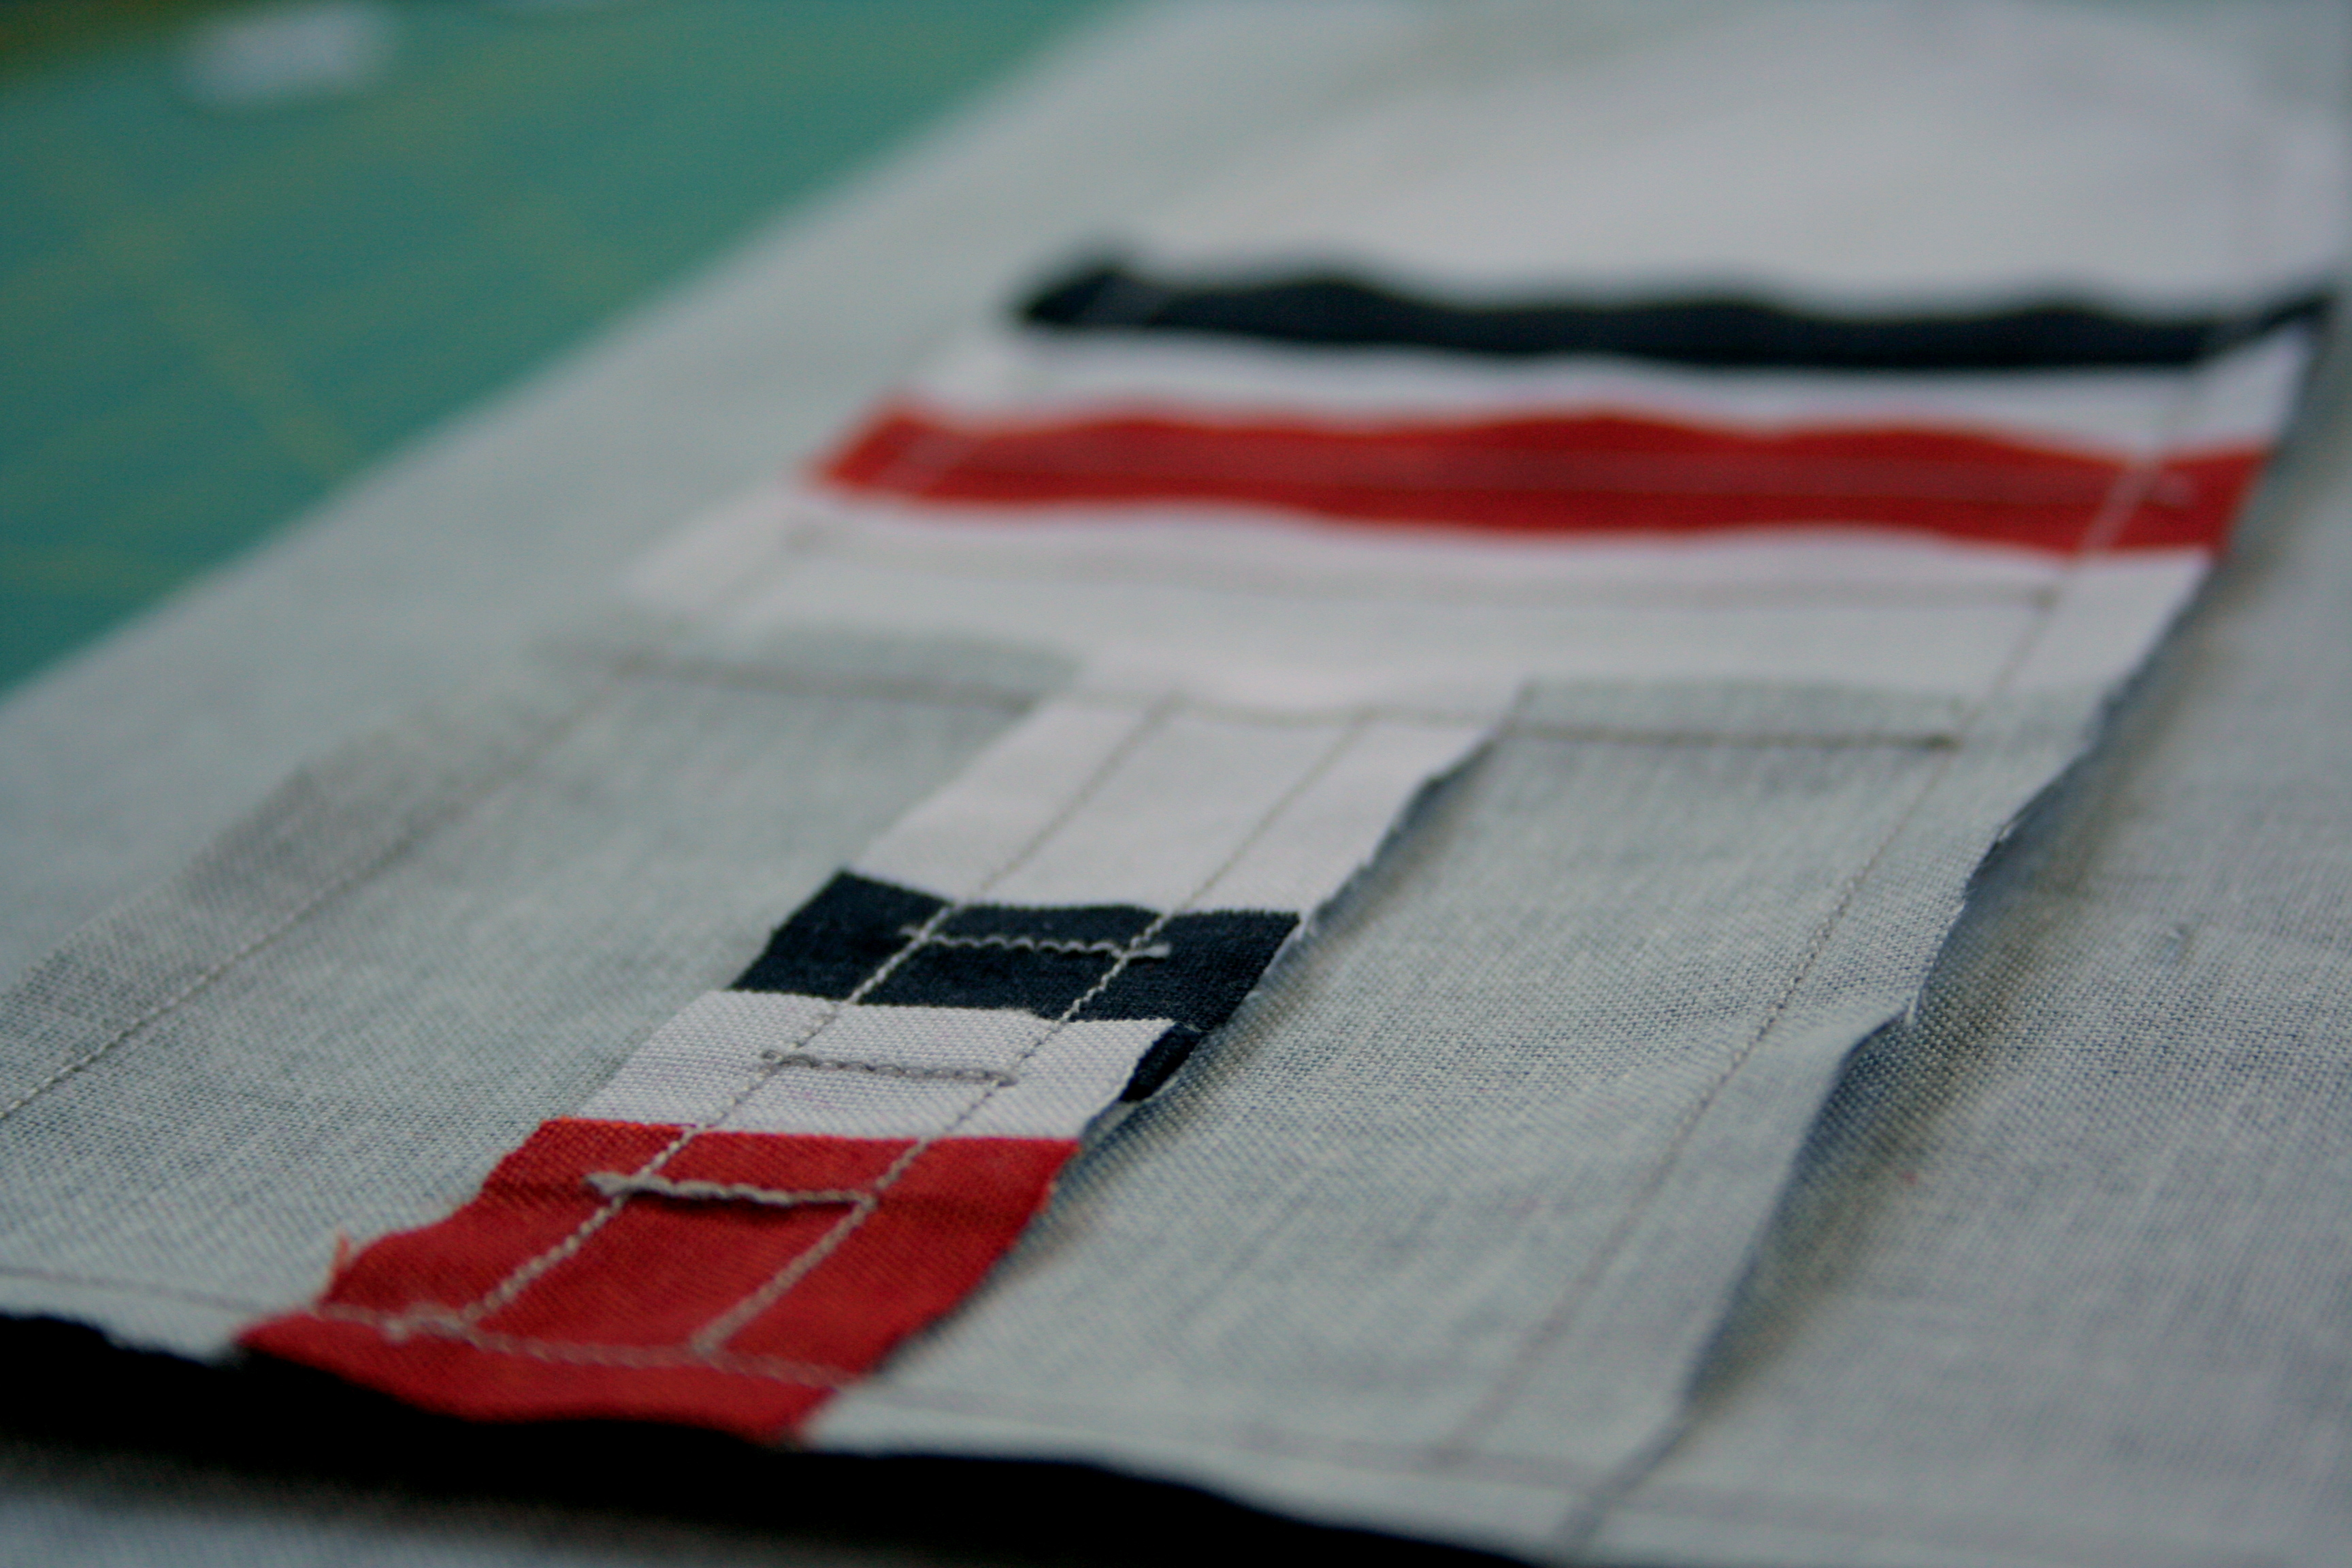
Next, pin your pairs of fabric right sides facing. I used only four pins, two of which marked a 2″ opening. With a 1/4″ seam allowance, sew the circles together, leaving 2″ open for turning and filling. Remember to backstitch at the beginning and end of each seam.
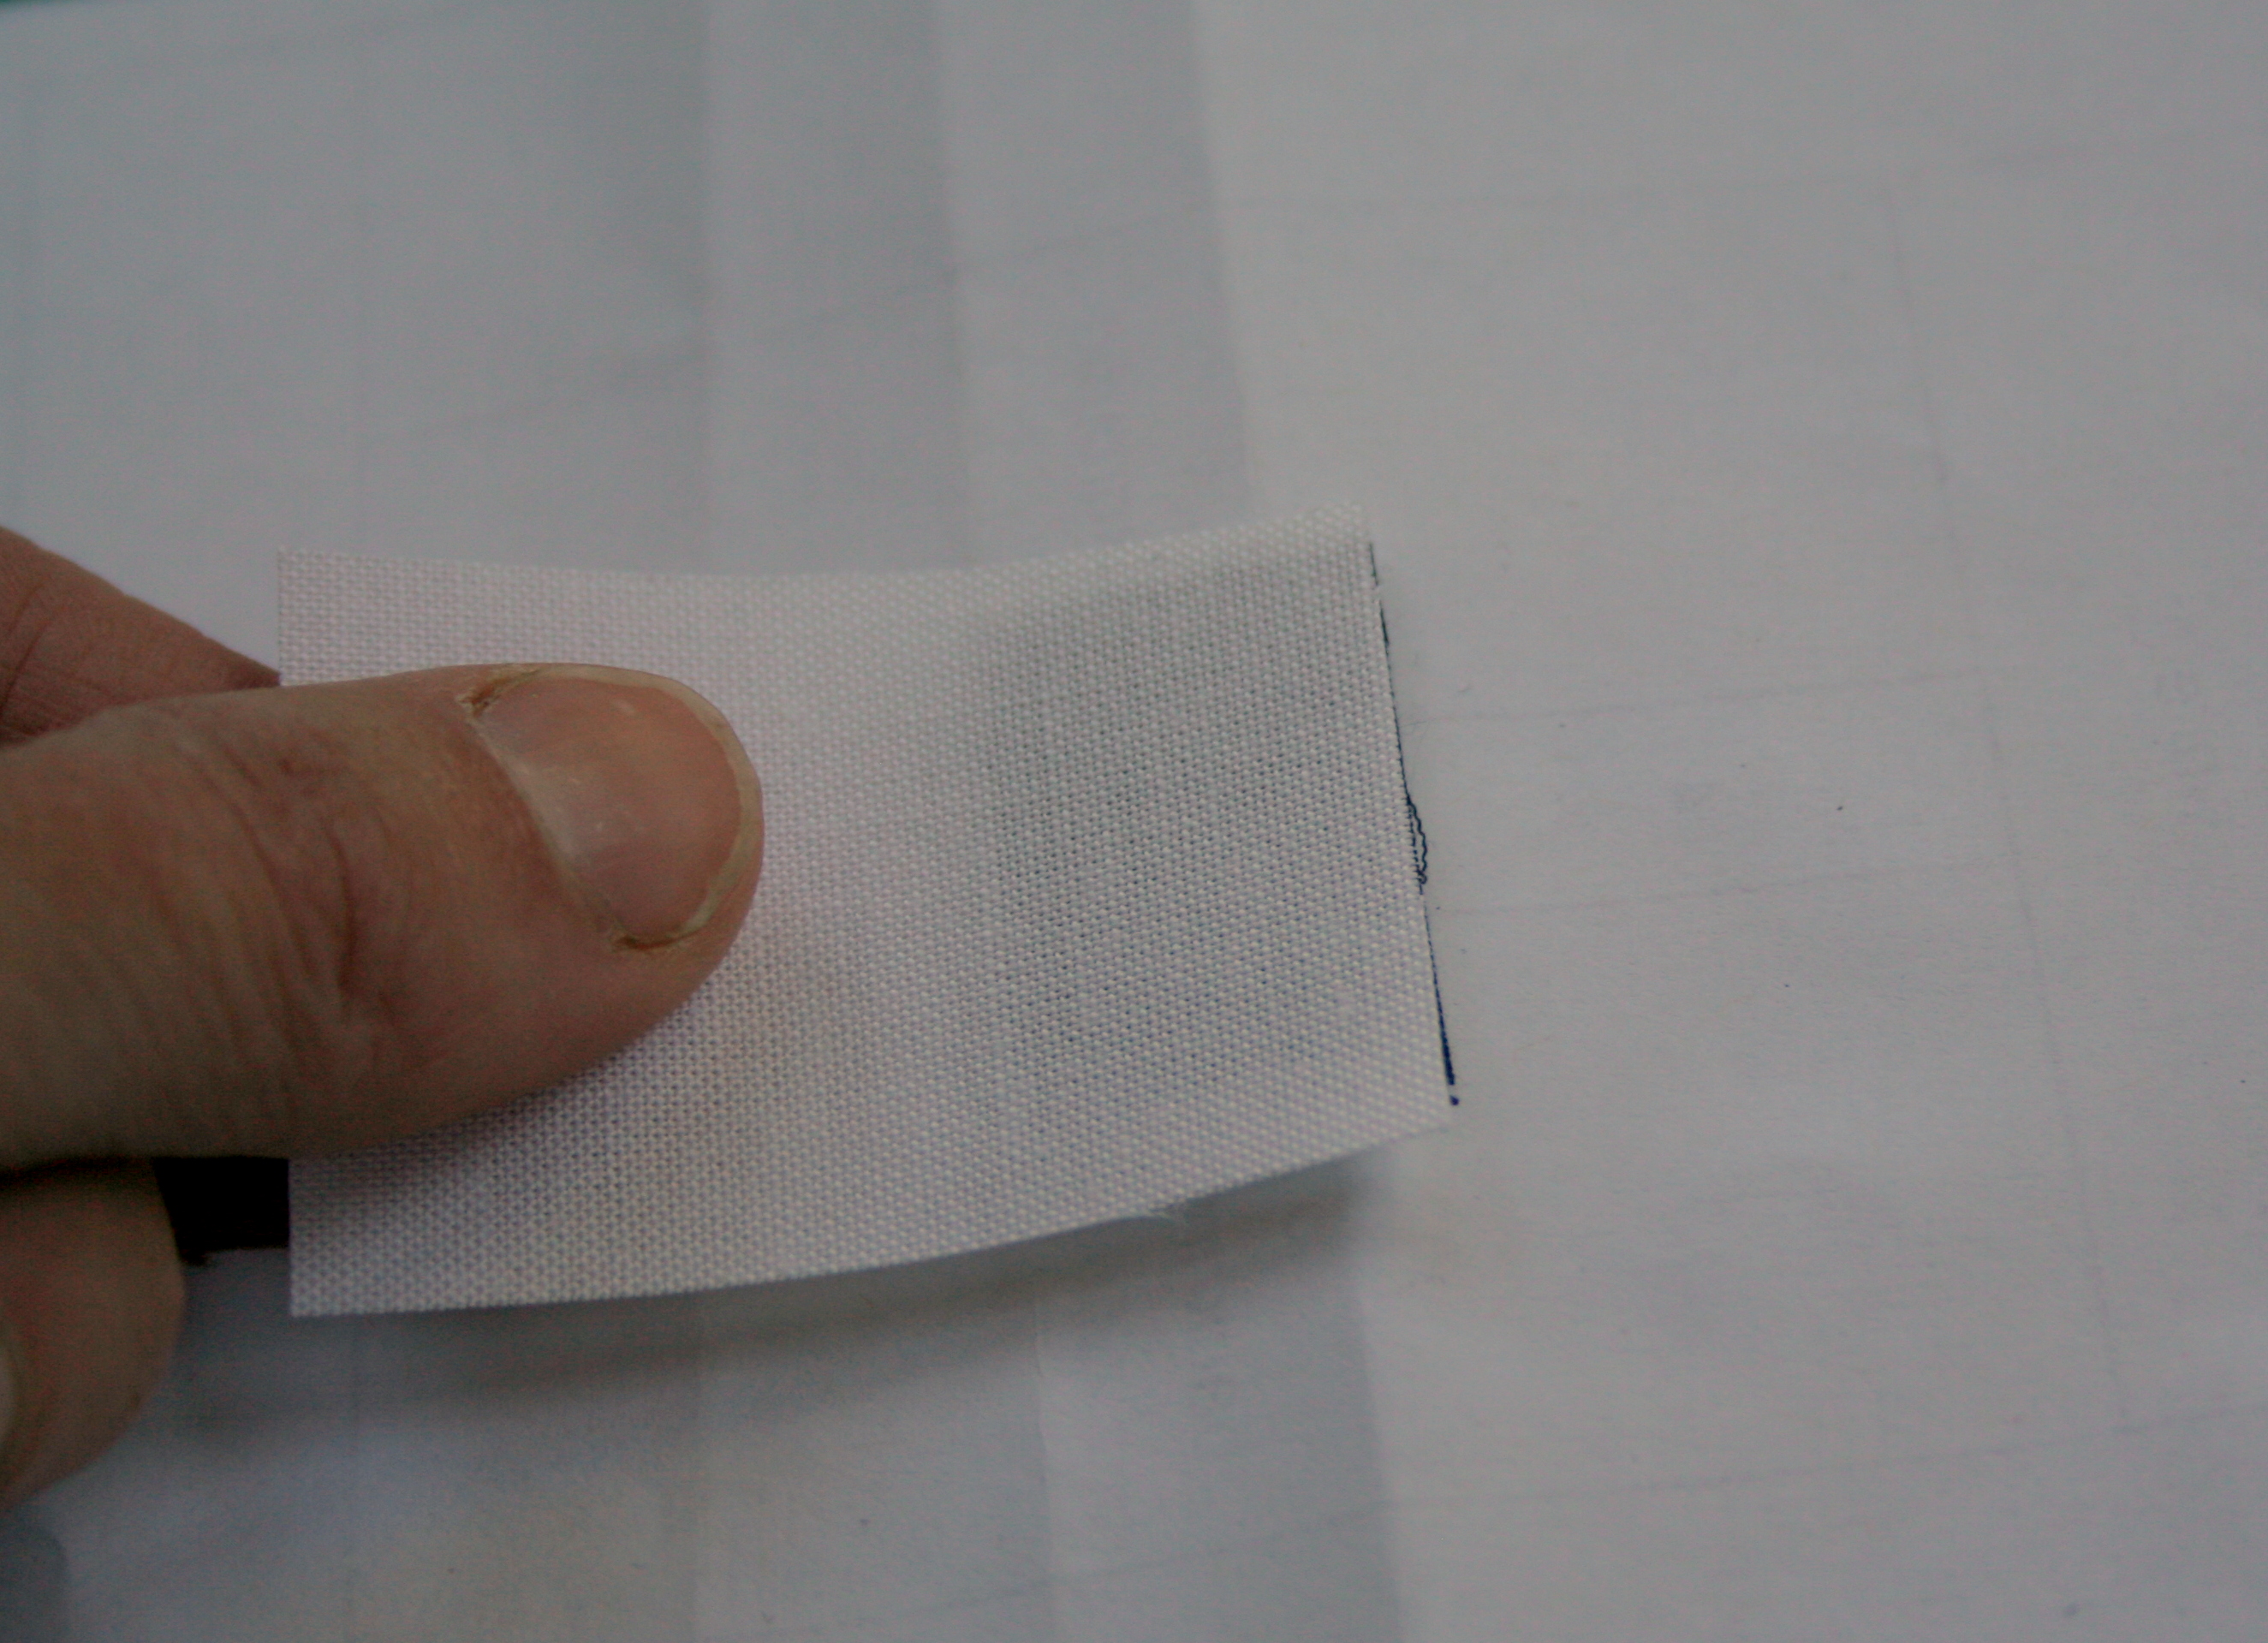
Beanbags once they have been turned. On the left are beanbags before pressing; on the right are beanbags after pressing and turning in the opening.
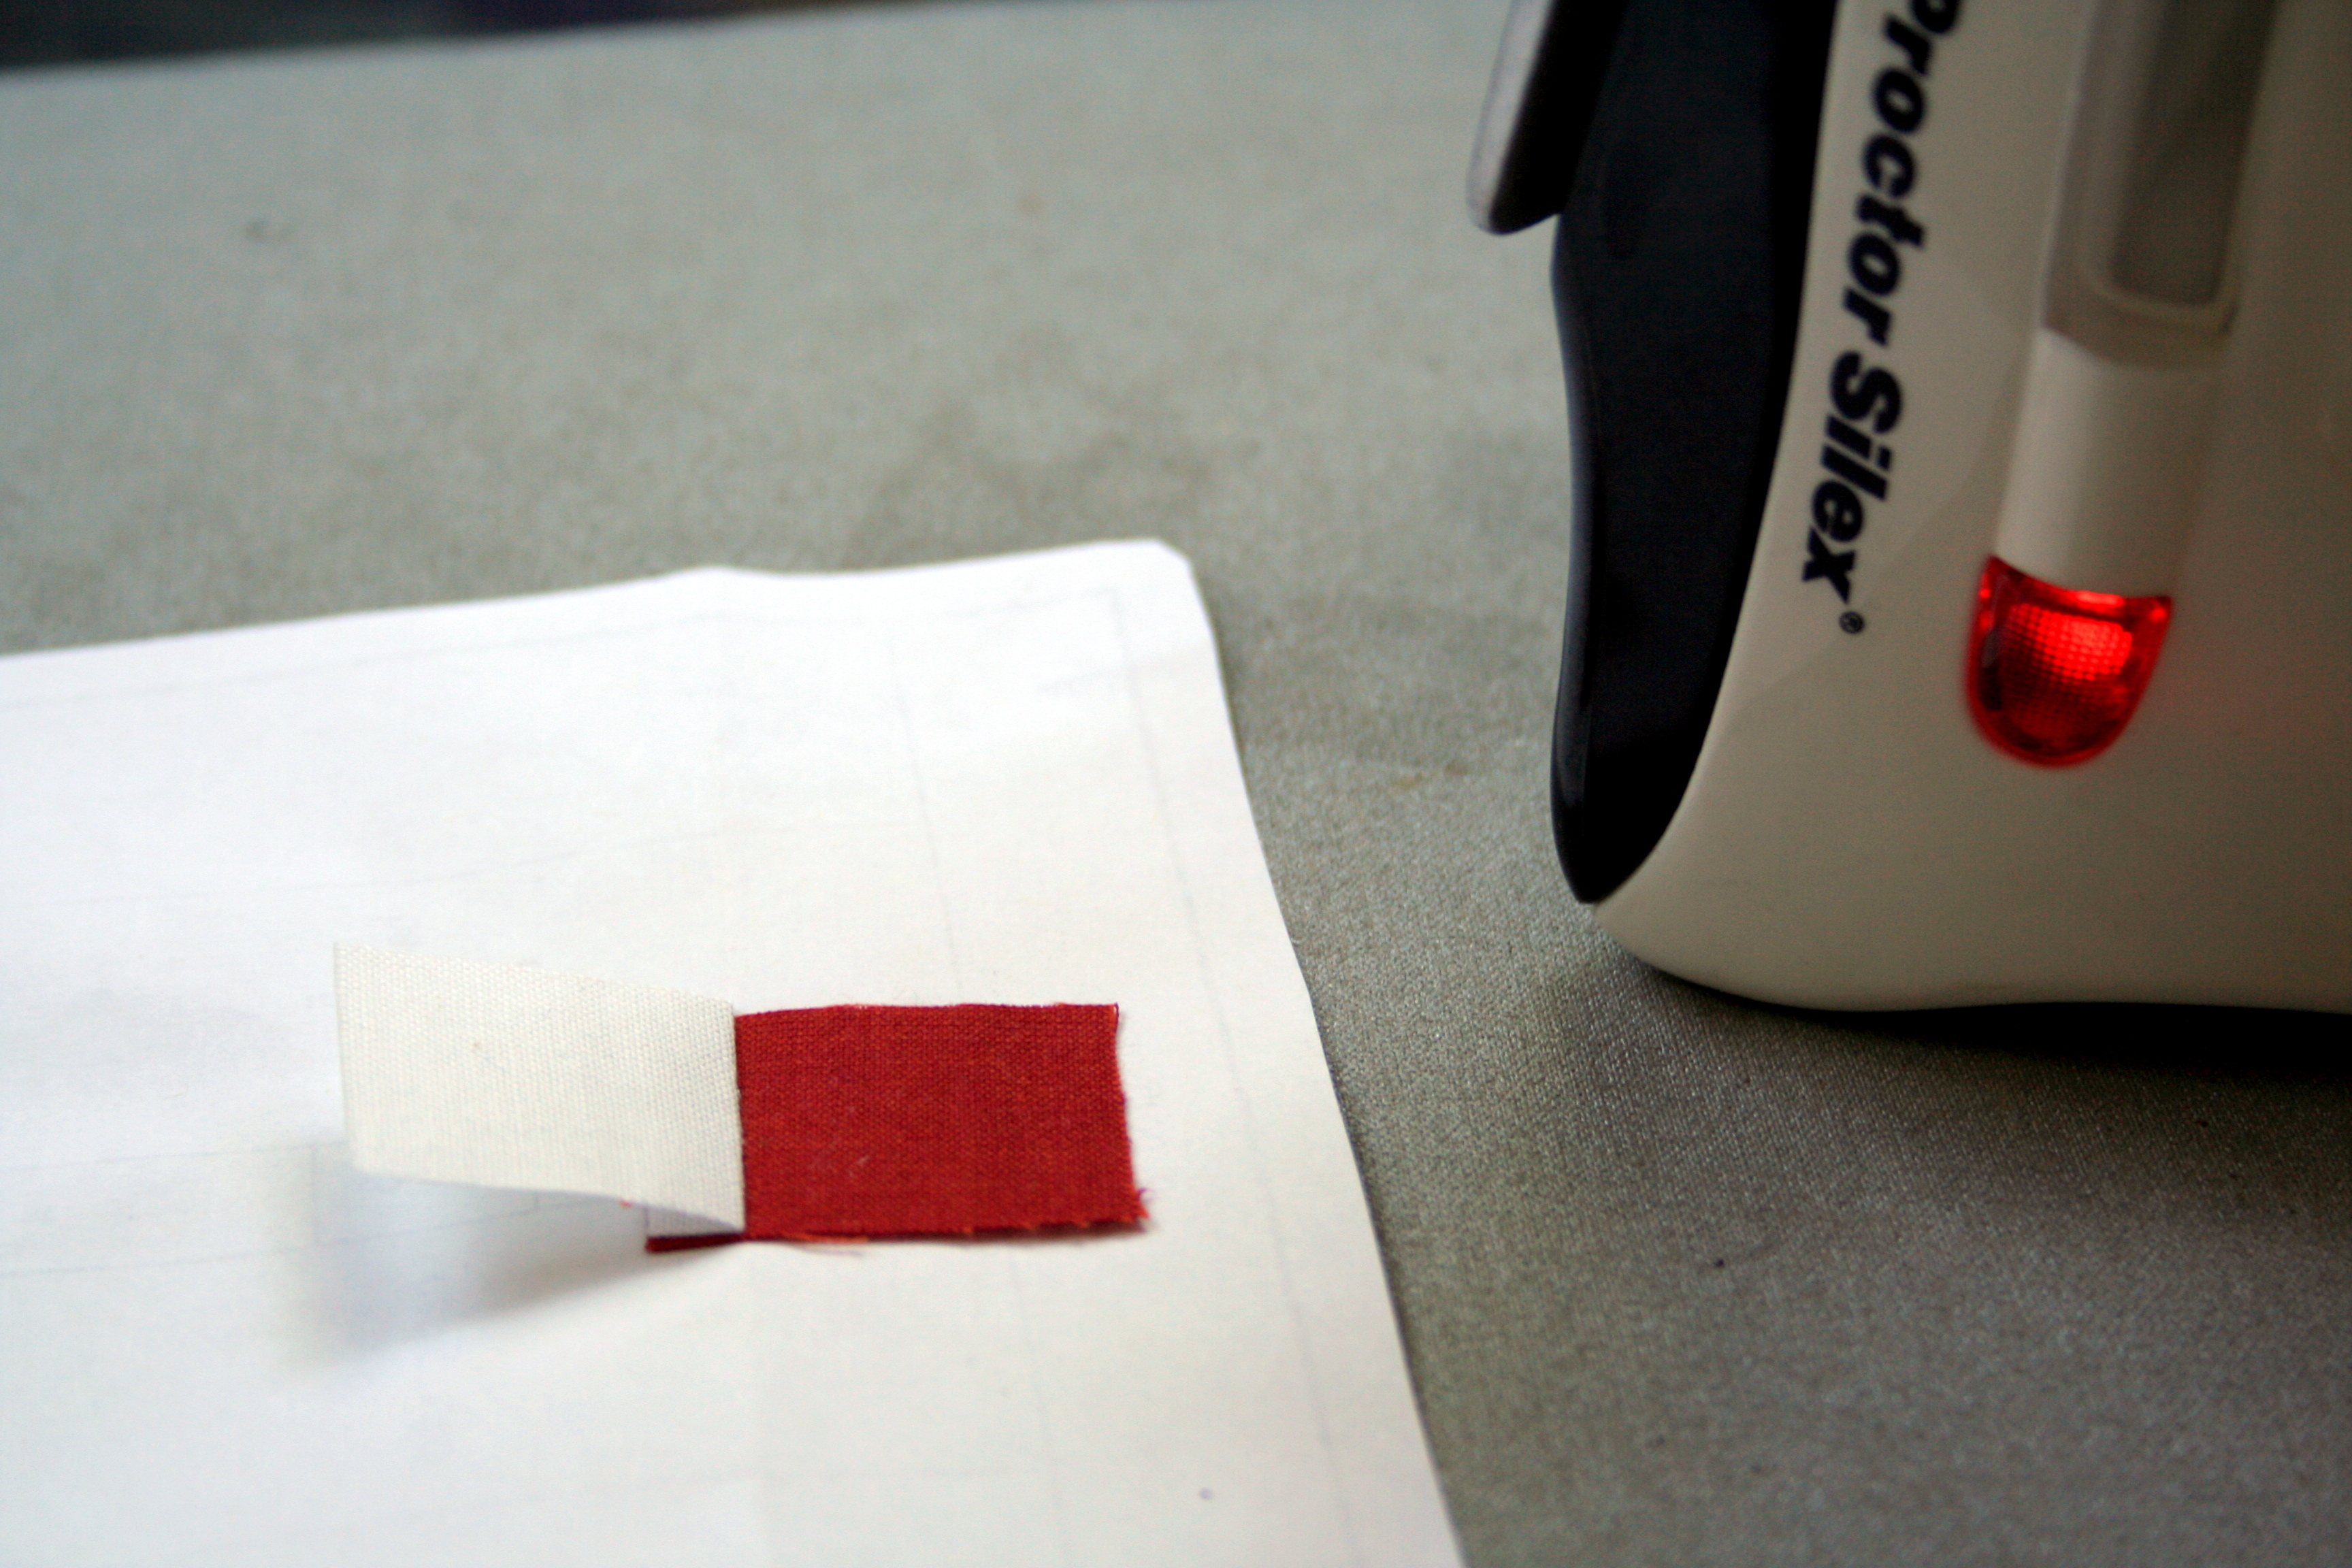
Turn beanbags right side out through the 2″ opening. Gently slide your finger along the seam from the inside to make sure the circle is fully turned. Press with a hot iron. Turn in the seam allowance around the opening and press, too, since that will make sewing the beanbags together much smoother once they are filled with dried beans. Since it’s a curve, this step is a little tricky (or at least it was a little tricky for me). Just remember what you’re making: these are going to be tossed and thrown and loved, and perfection is overrated!
Now comes the fun part! Grab some small dried beans (I used dried black beans), a funnel and/or spoon, and a couple of eager helpers.
Fill the beanbags with dried beans, leaving at least an inch of empty space at the top. Trust me here; the beanbags will seem too empty, but while you are sewing them shut and top-stitching, you will want that extra wiggle room.
We found that a combination of funnel, spoon, and simple “use your hands to put the beans in” worked well for us.
Either pin or clip the tops once the beanbags are filled (remember to leave that good inch or inch and a half of empty space in the top). This will both remind you that the beanbag is “finished filling”, and remind your kiddos not to cram any more beans into it. (We definitely took as many beans out of the beanbags as we put it. All part of the fun, right!?)
Depending on the size of your helpers, this may be a messy activity. Plan accordingly, or embrace the chaos.
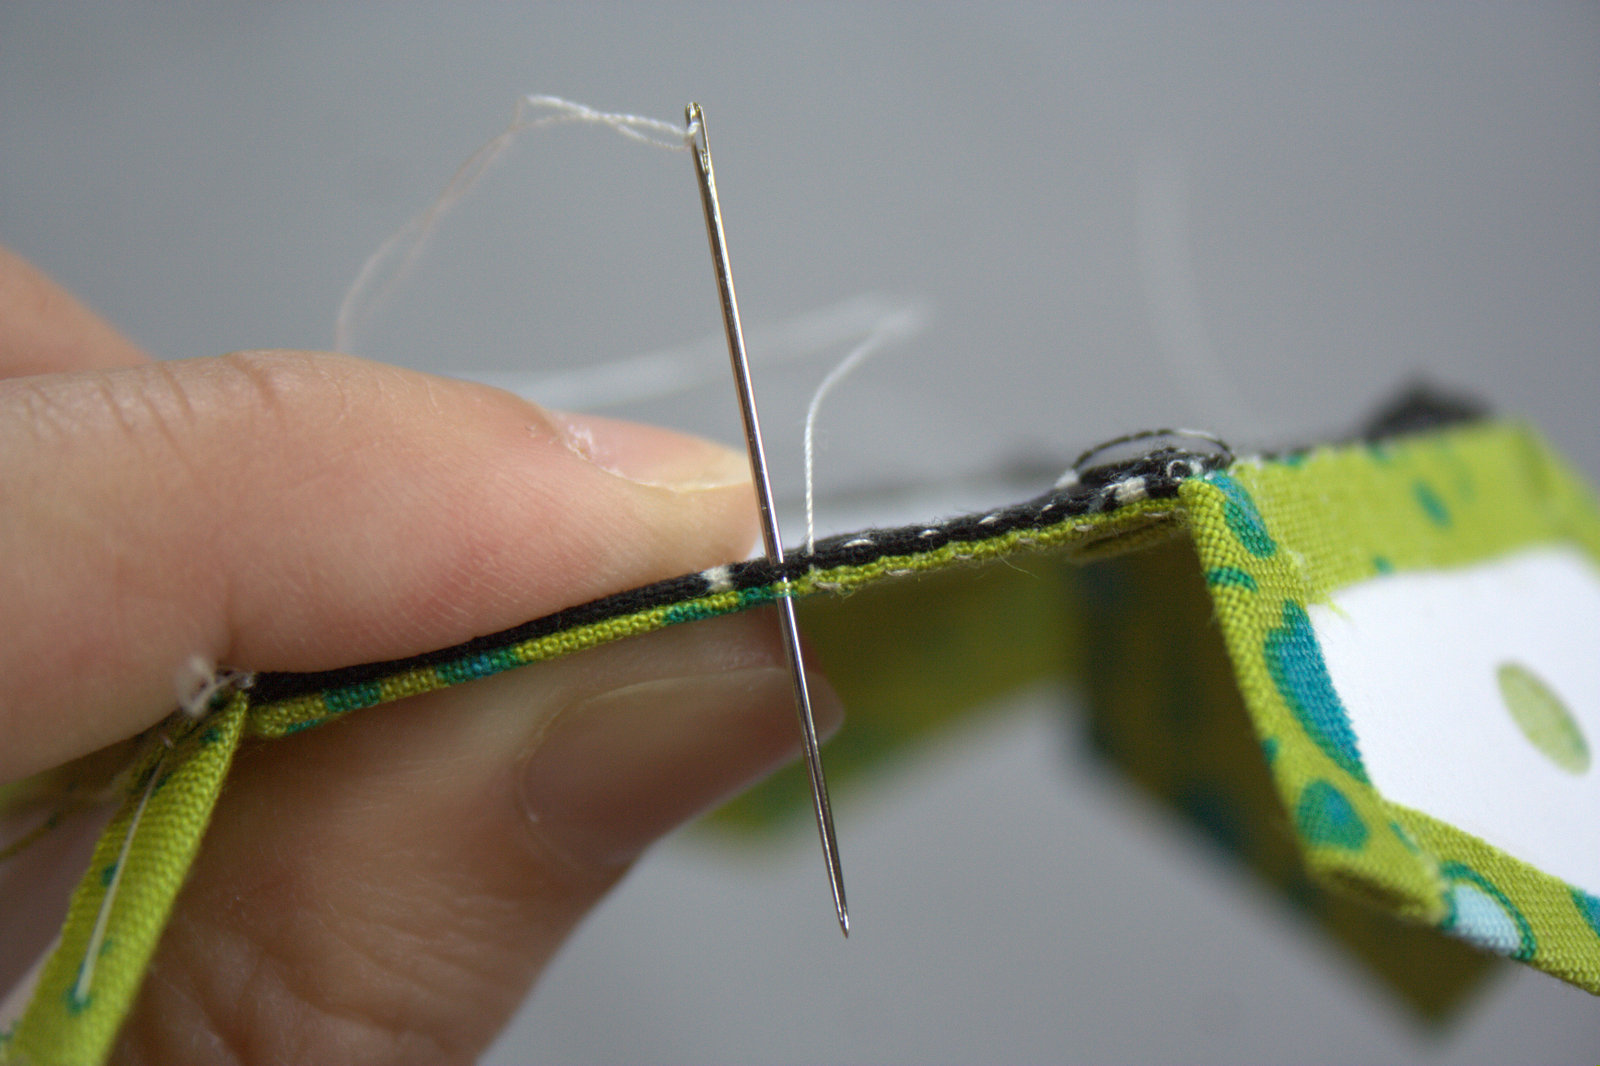
Needle between foot and beanbag.
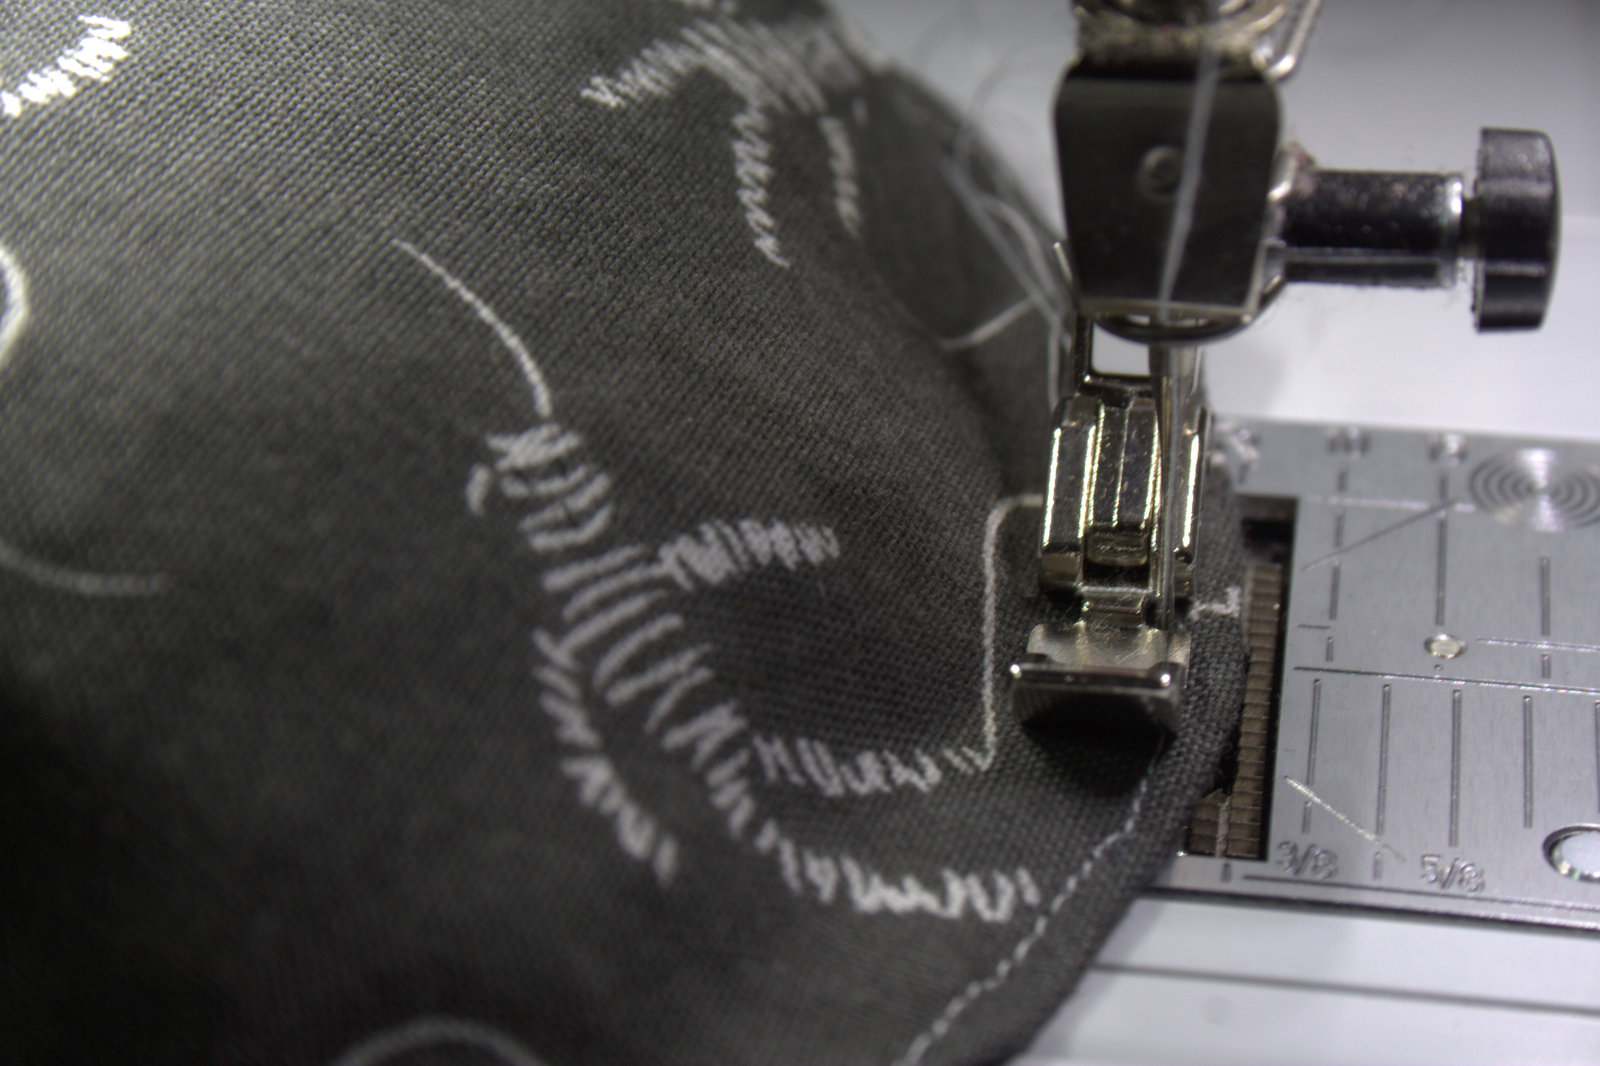
Once all of your beanbags are sufficiently filled, head back to the sewing machine and topstitch about 1/8″ inch from the edge of the beanbag, beginning by sewing the opening closed. This extra round of sewing will securely close the opening, and will also provide extra durability for the entire beanbag. I made some beanbags for my nearly-six year old when she turned two, and they are still going strong in our playroom.
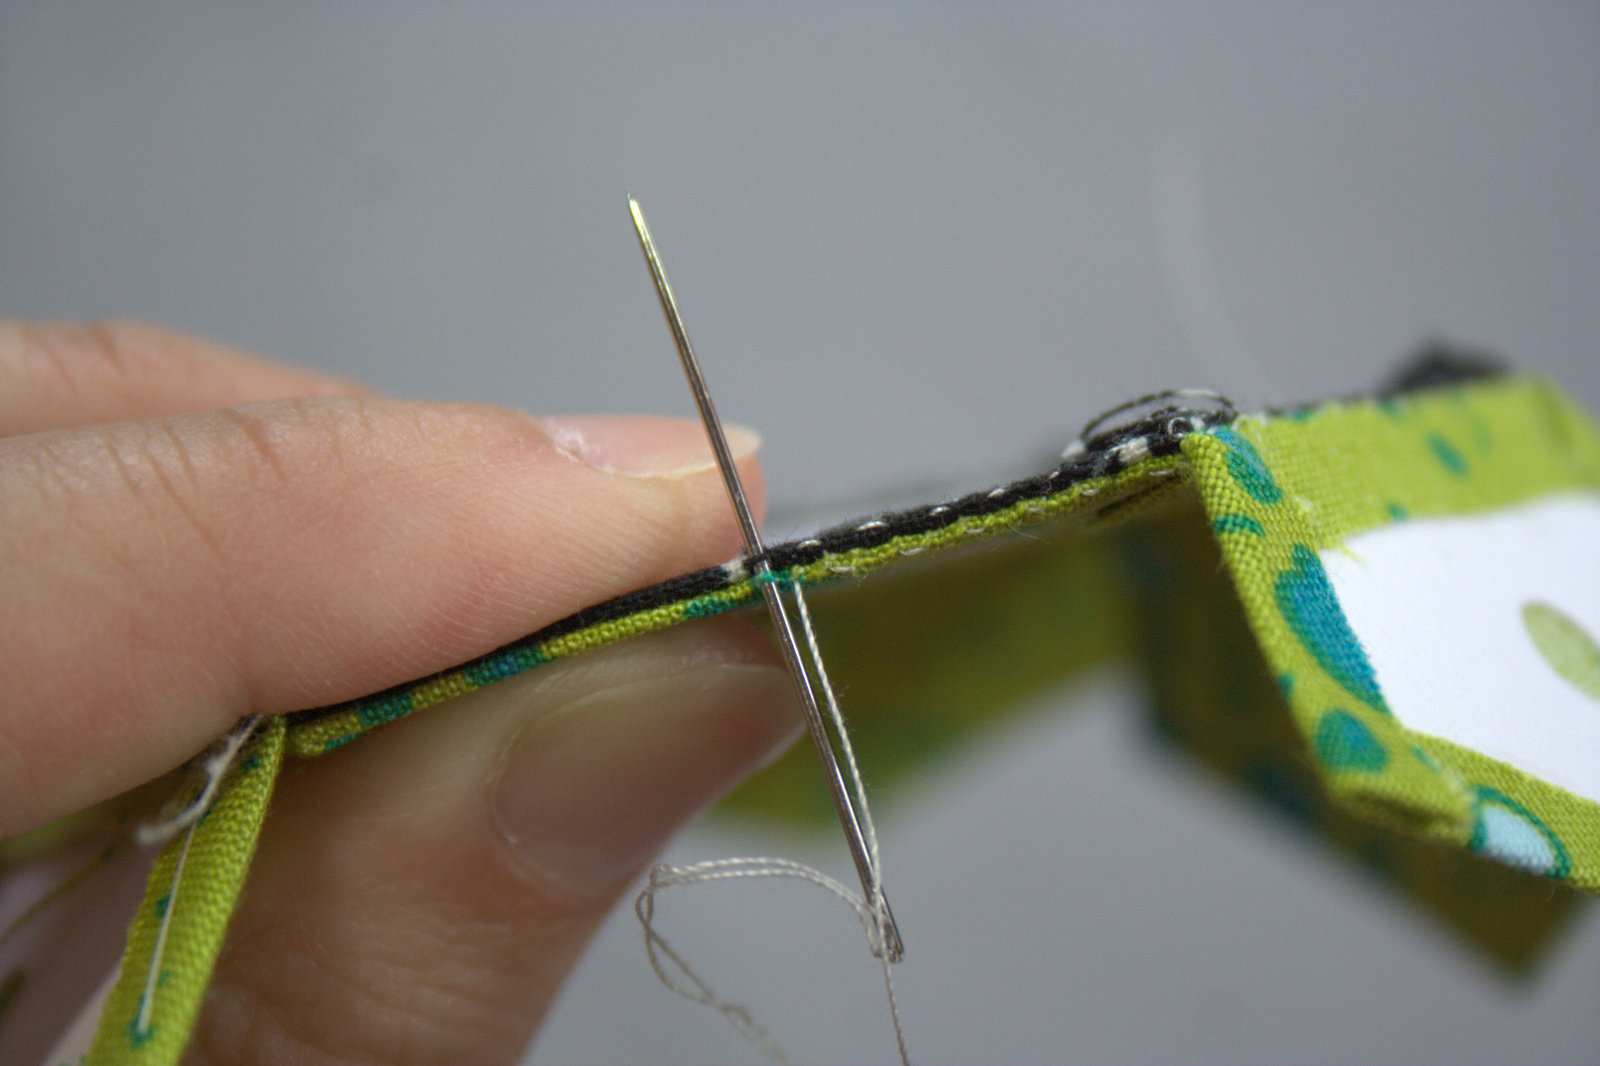
Foot between needle and beanbag = winning combination for me.
I used my zipper foot to sew these beanbags closed, and sewed most of them with the needle between the foot and the beanbag (shown in the top photo above). It proved more finicky than I remembered, so with the final beanbag, I moved the needle so that the foot was between the needle and the beanbag (shown in the photo above). This worked much more smoothly for me. As you sew around the edges of the beanbag, stop every couple inches with the needle down to reposition the beans, pushing them away from the part of the beanbag you are about to sew. Sew all the way around each beanbag.
Now you have a handful of spooktacular sturdy beanbags and you’re ready for fun! Toss them at pumpkins, into trick-or-treat buckets, or at each other (avoid faces!). Have fun!
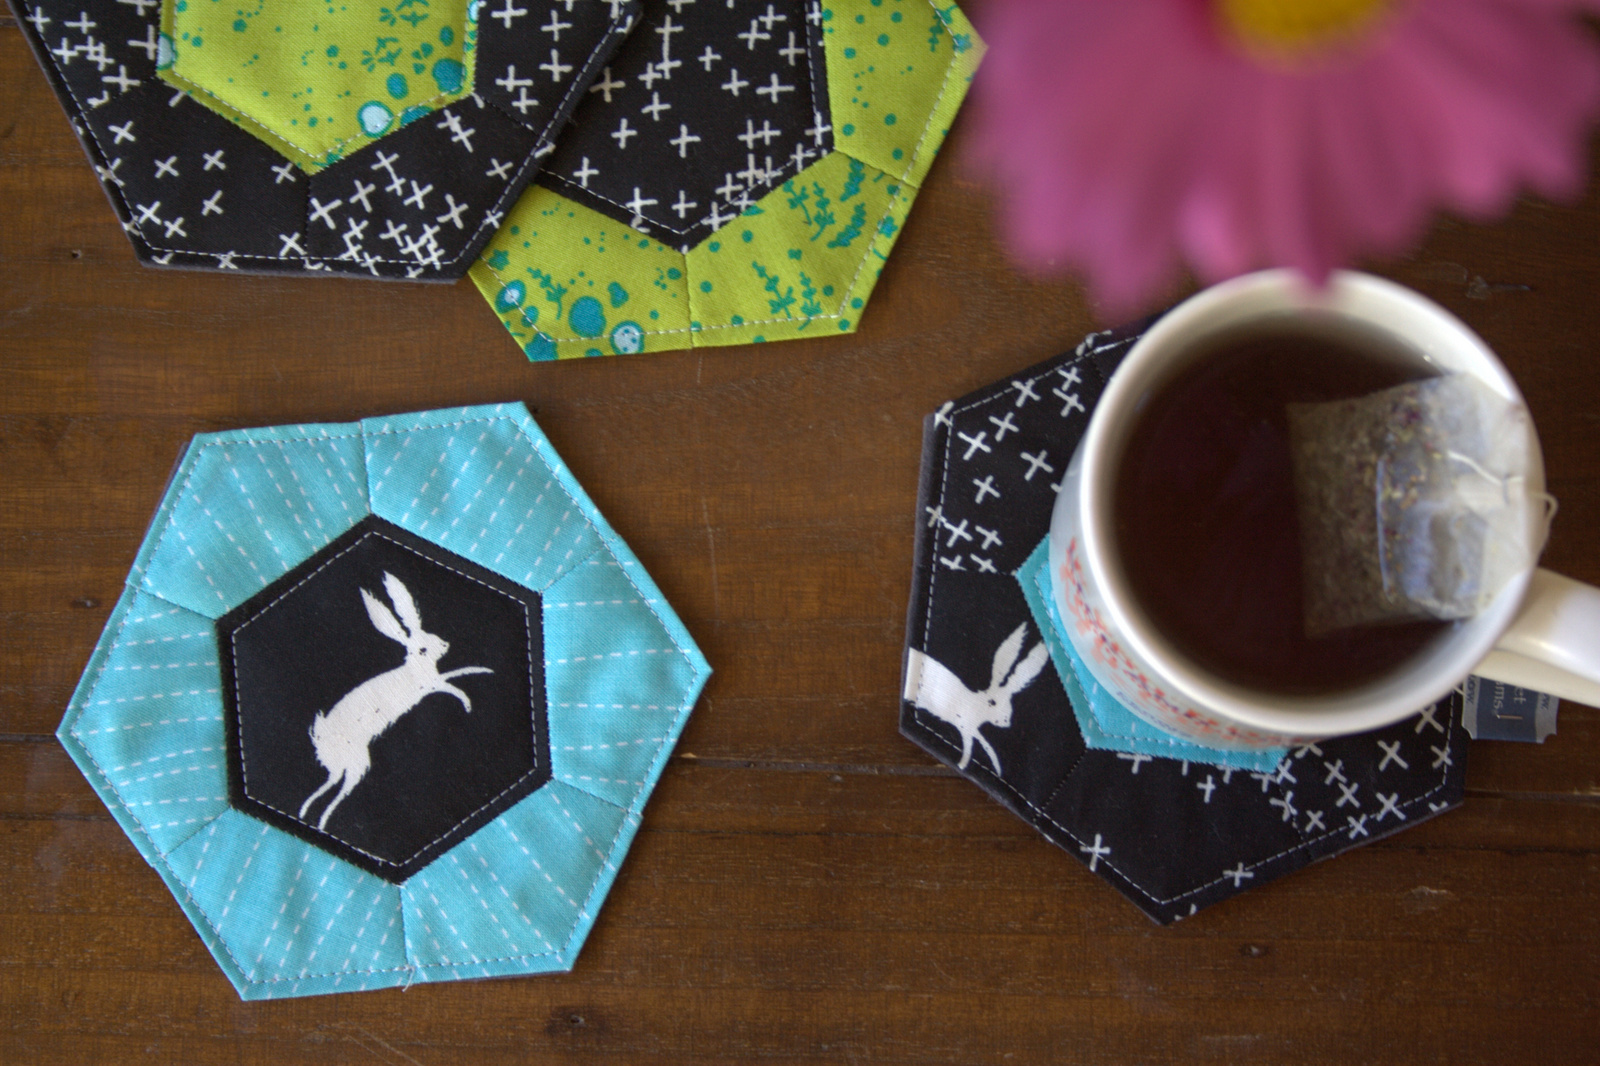
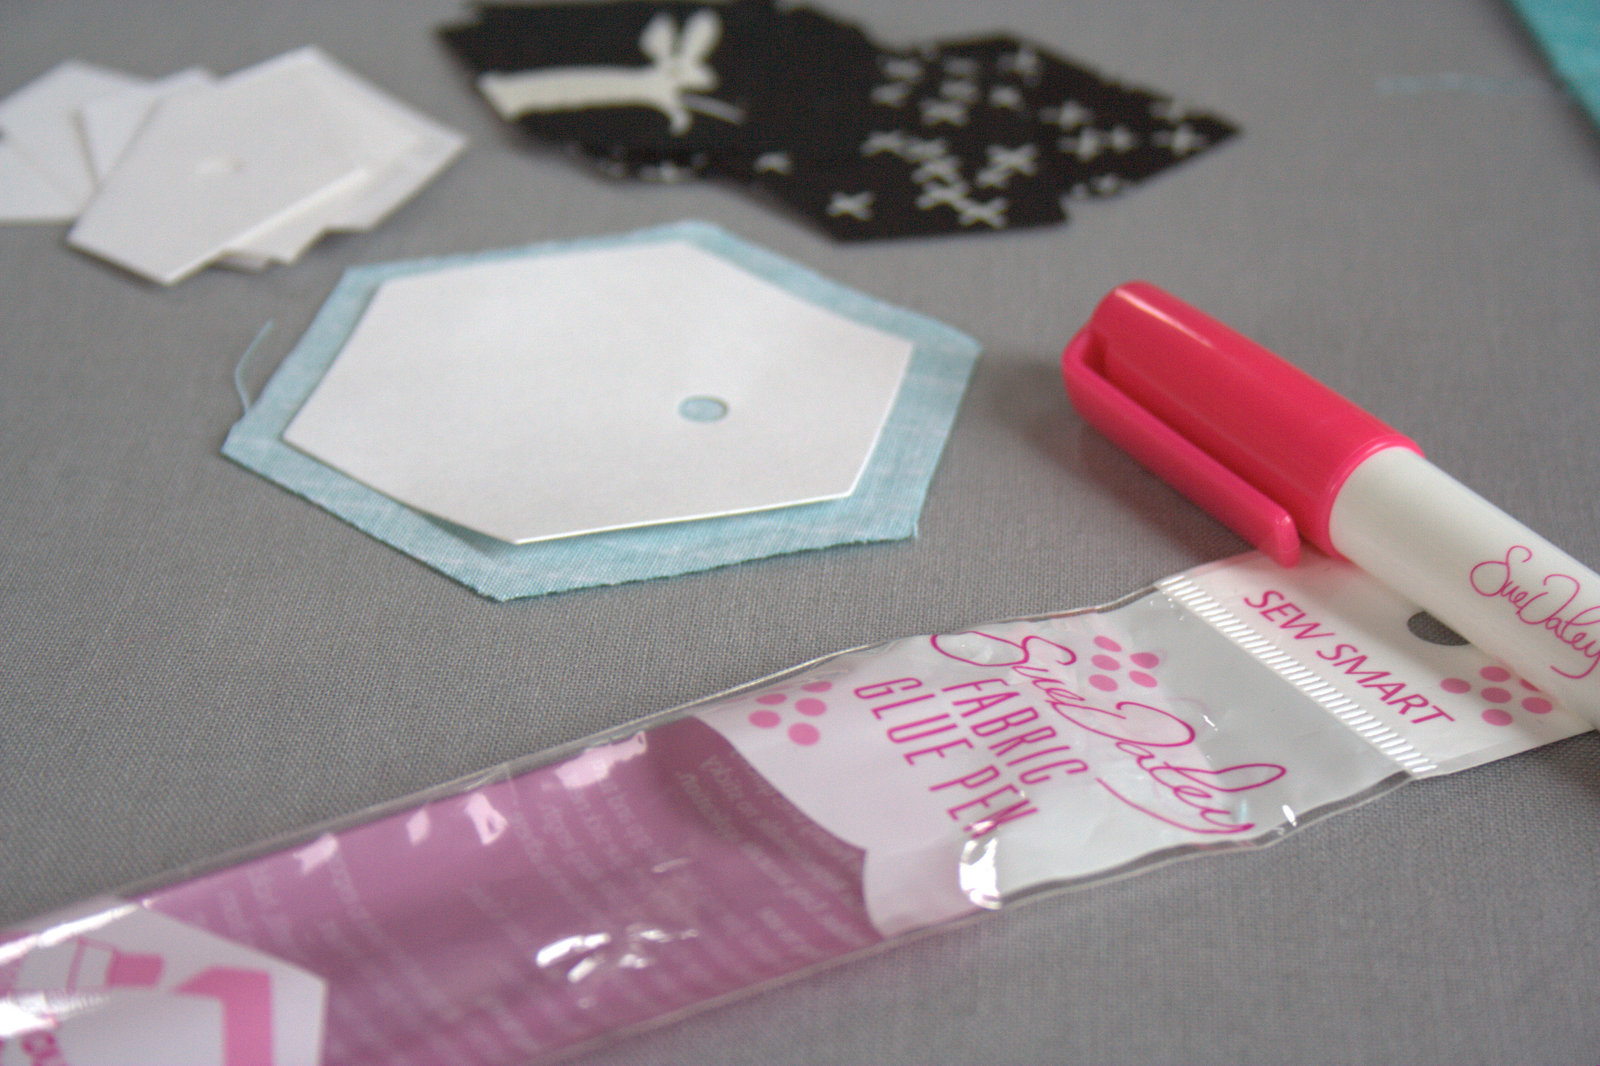
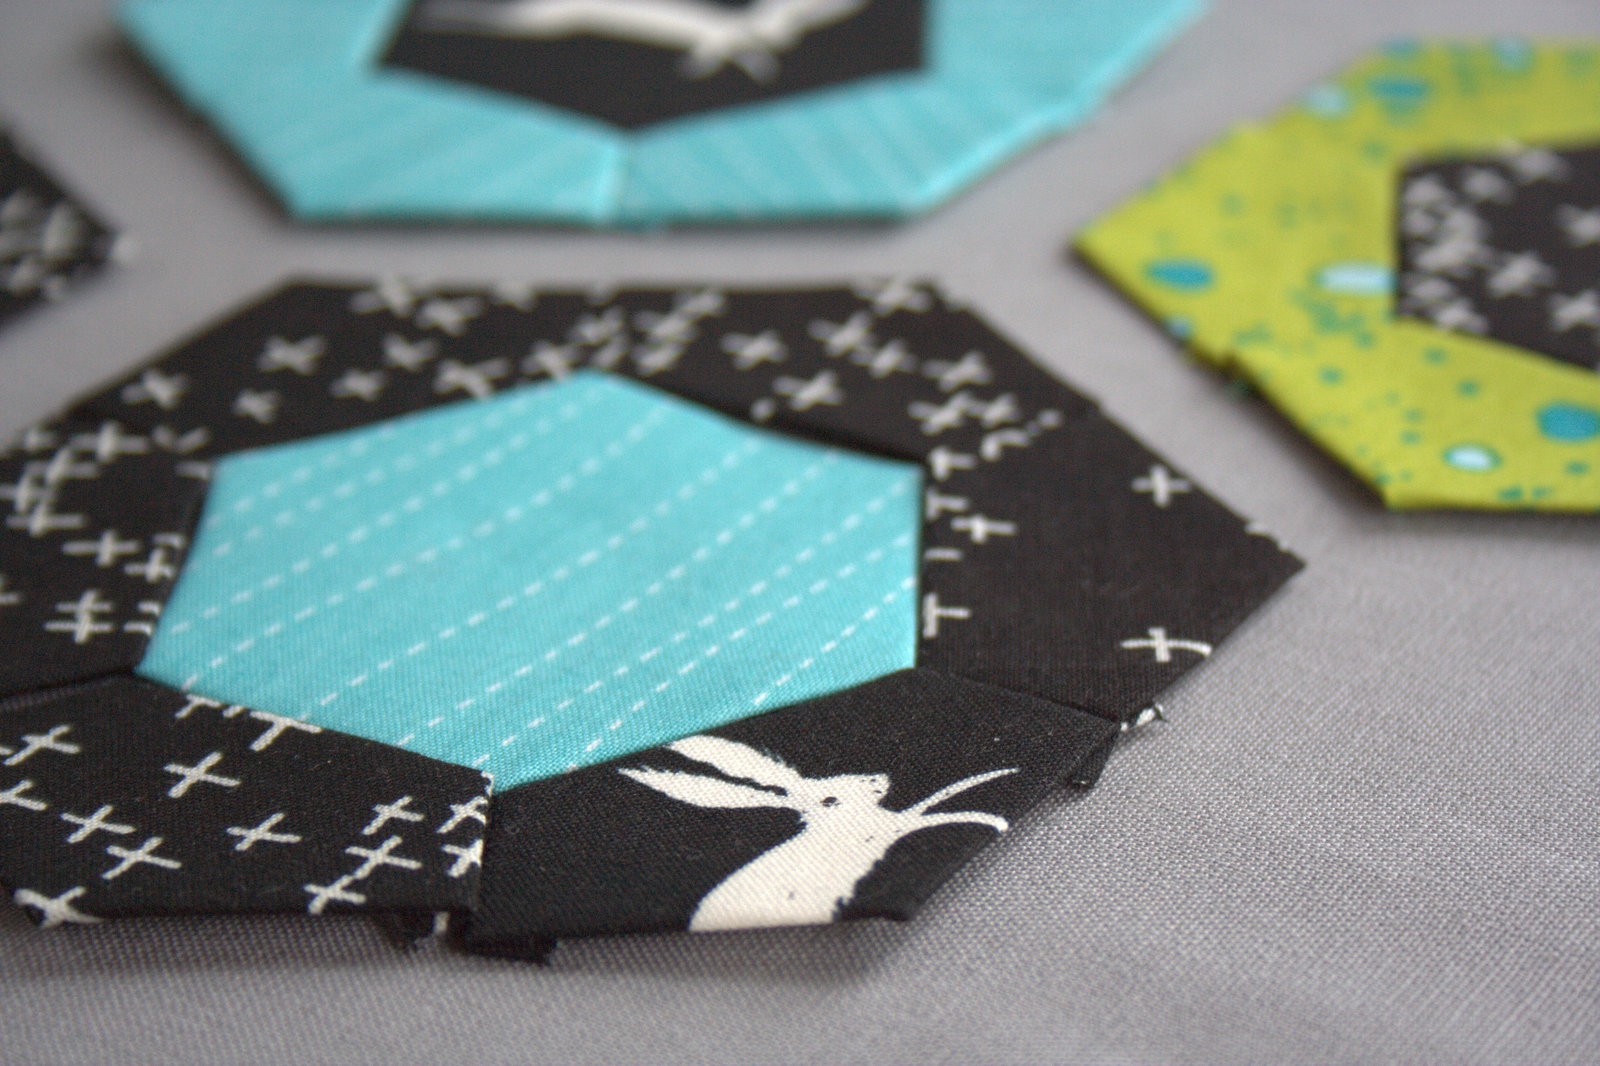
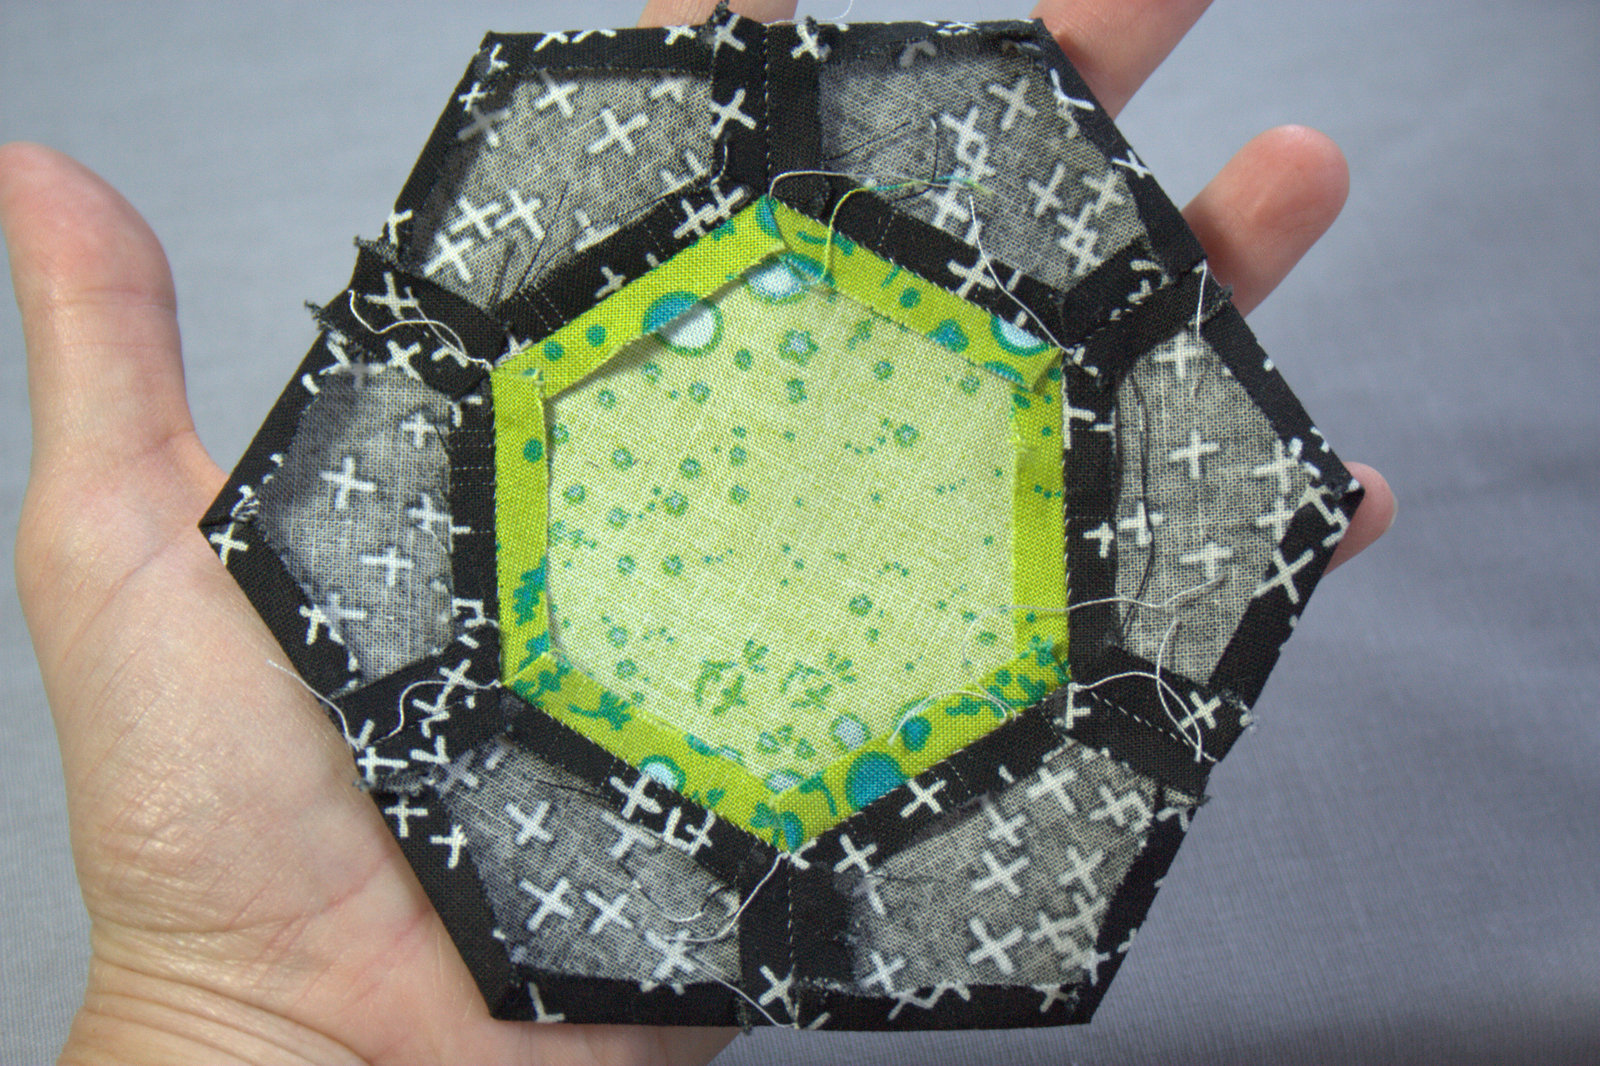
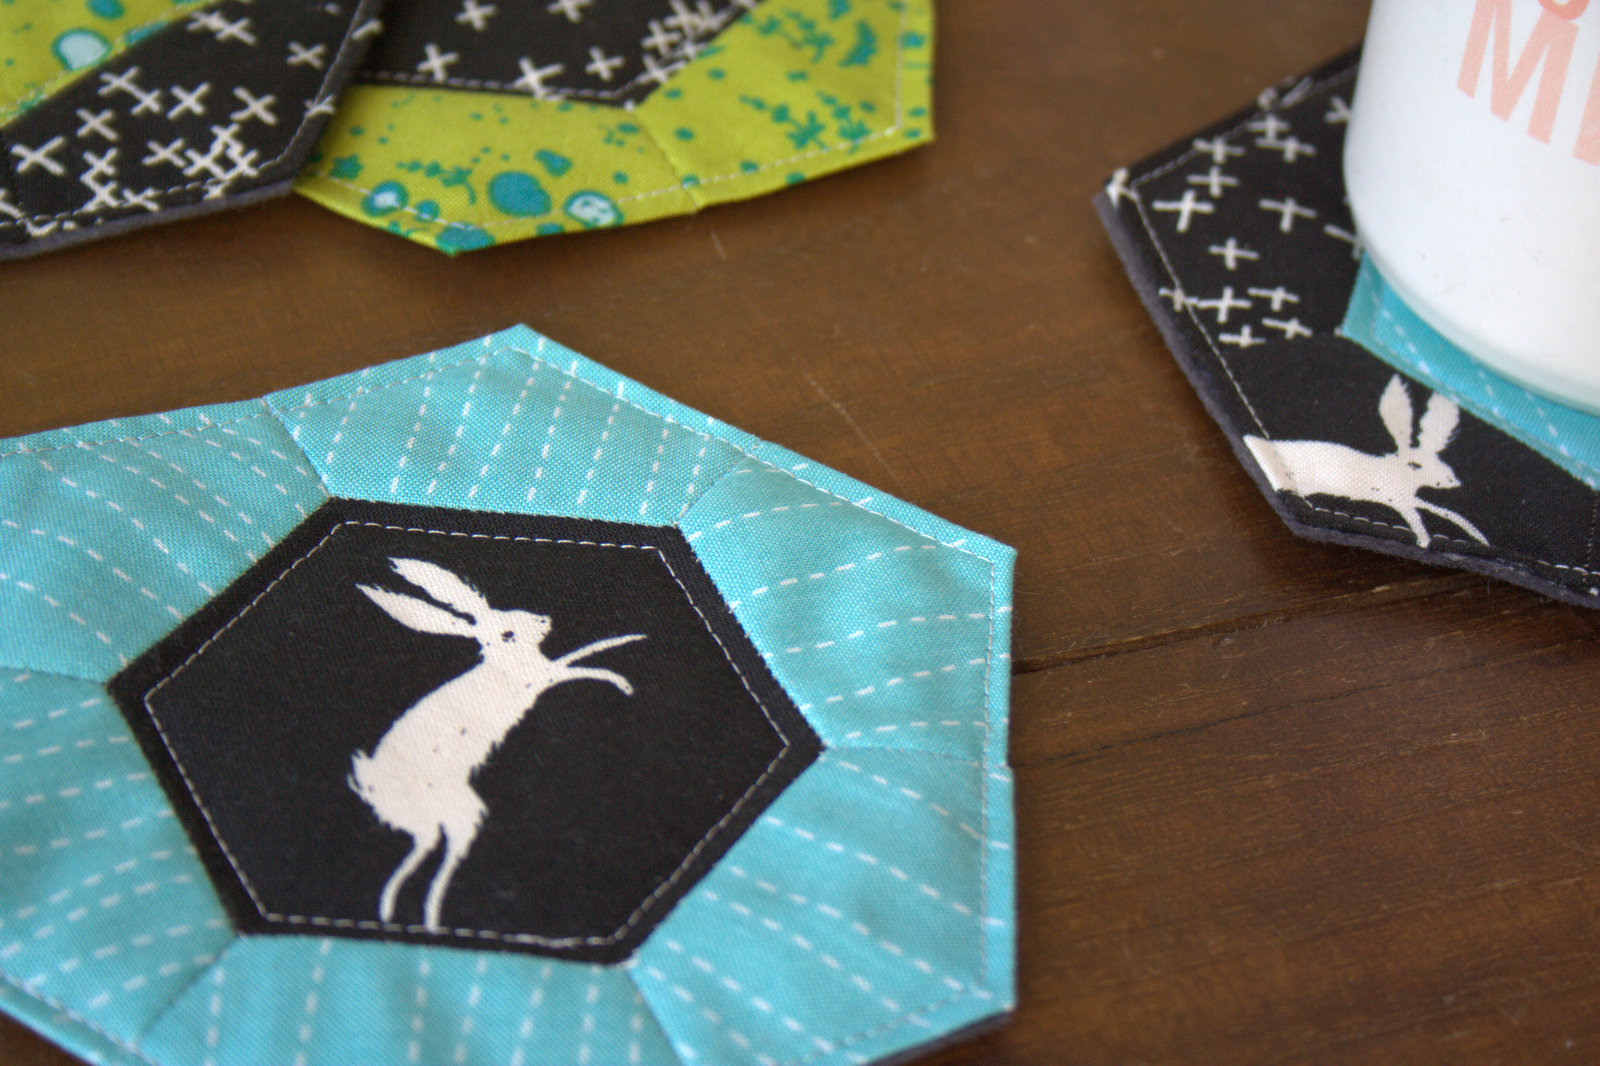
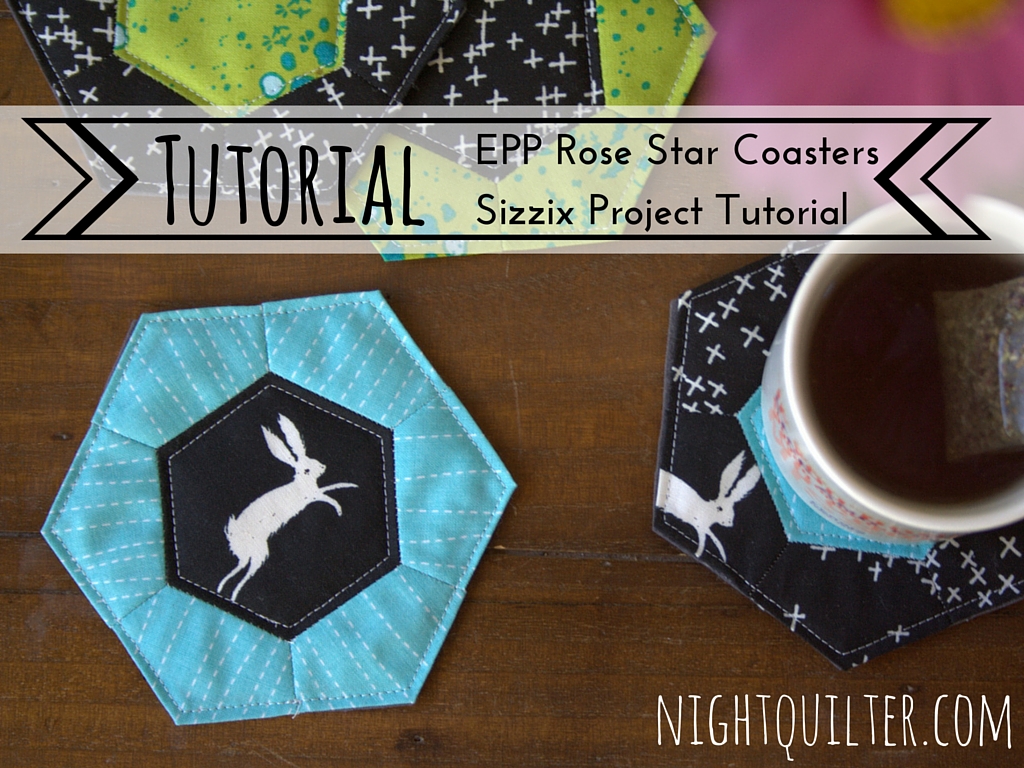
Today I’m sharing a tutorial for some quick and easy English Paper Pieced (EPP) coasters, made particularly quick and easy by use of a Sizzix fabi die cutting machine to cut all of the fabric and templates, glue basting the EPP pieces, and backing the coasters with felt (photos and instructions for all steps are included in this tutorial!). They are also a great way to showcase your hand-stitched EPP and meticulous (fussy) cutting if you so desire.
While I was planning out and putting together the mug rug I’m making for my sister using the Sizzix Rose Star die (you can see my tutorial for getting started on the mug rug on the Sizzix blog HERE), I realized that the center of the Rose Star would make a perfect hexi coaster. Of course that idea stuck and I decided to play around with fabric arrangements and make a set of coordinating coasters to go along with my sister’s mug rug. Thus, this tutorial was born.
I’ve included affiliate links throughout this post so that if you decide that you want to give the Sizzix and Rose Star die a go and click through my link, I will receive a small compensation at no cost to you. Share the love, right?
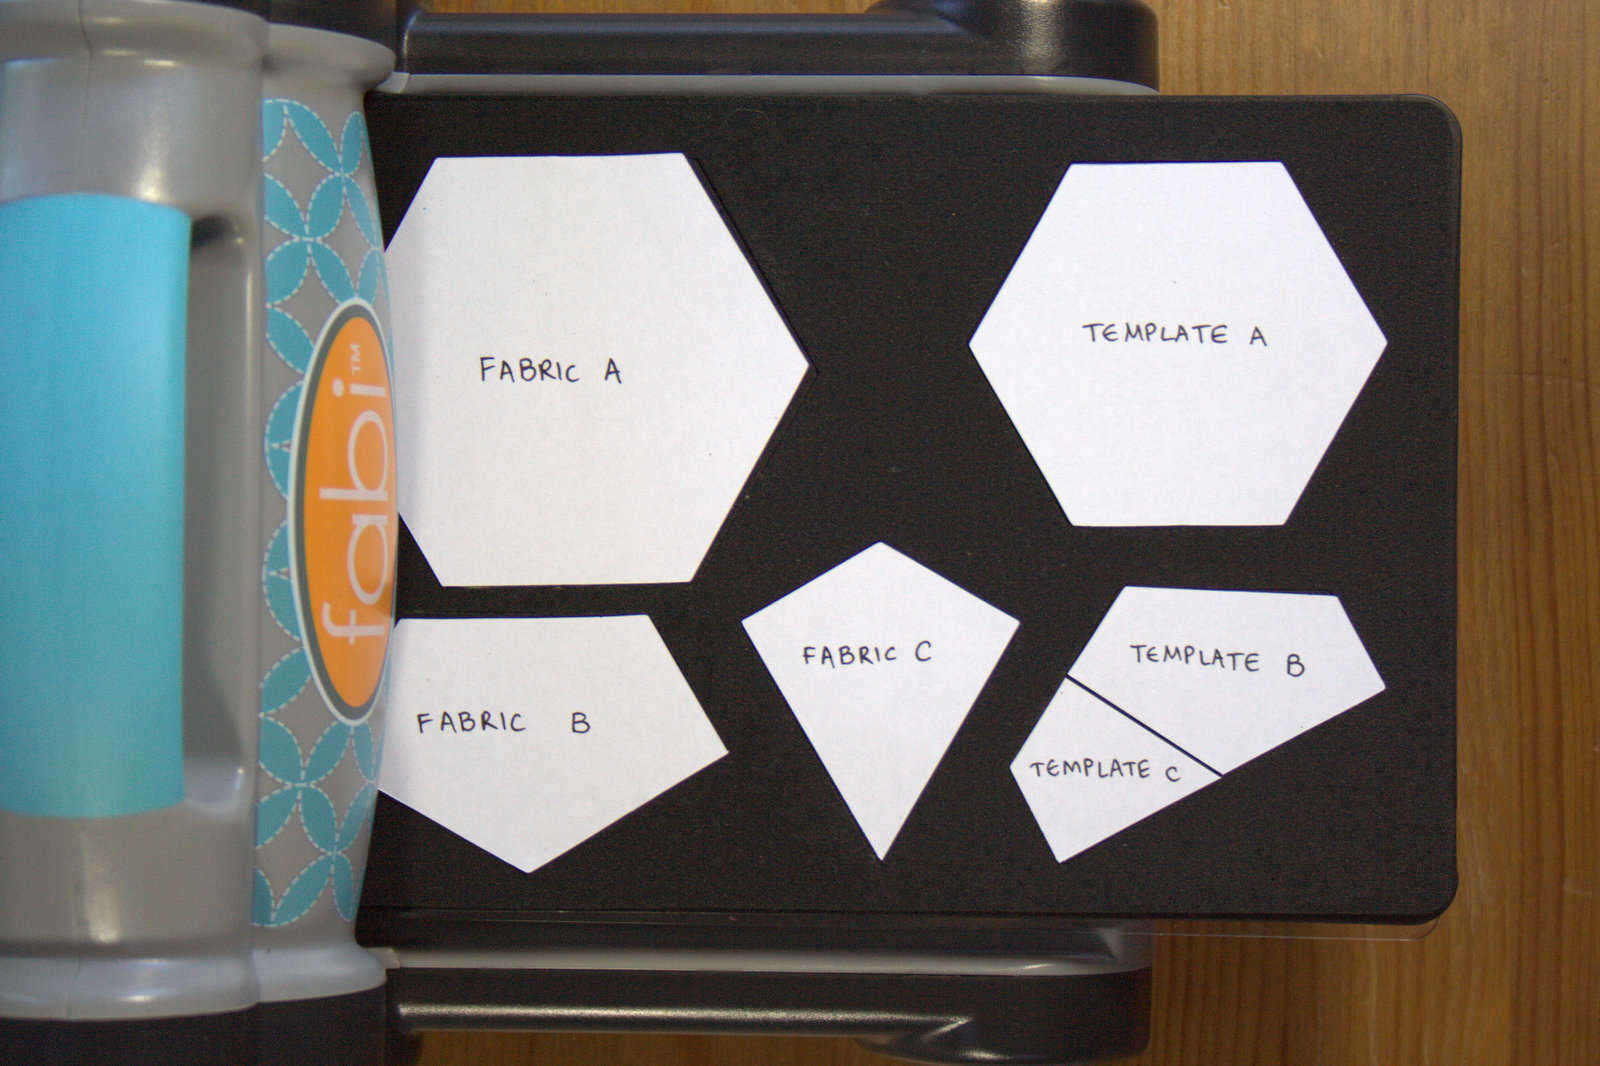
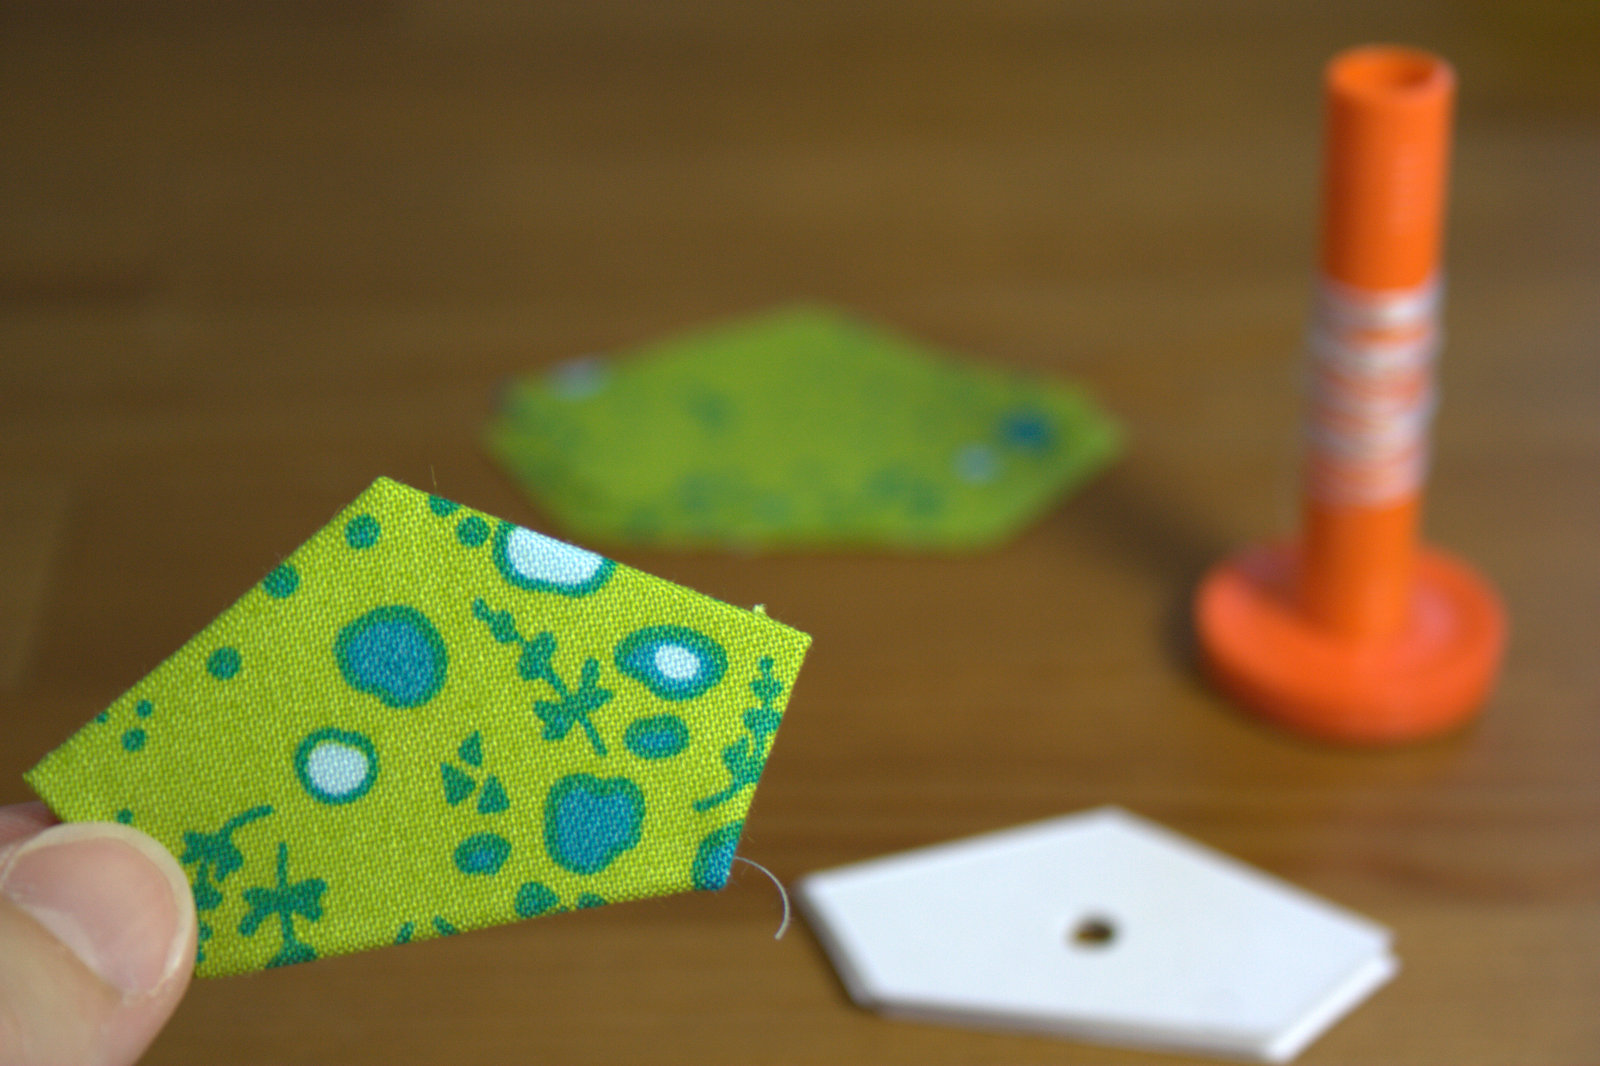
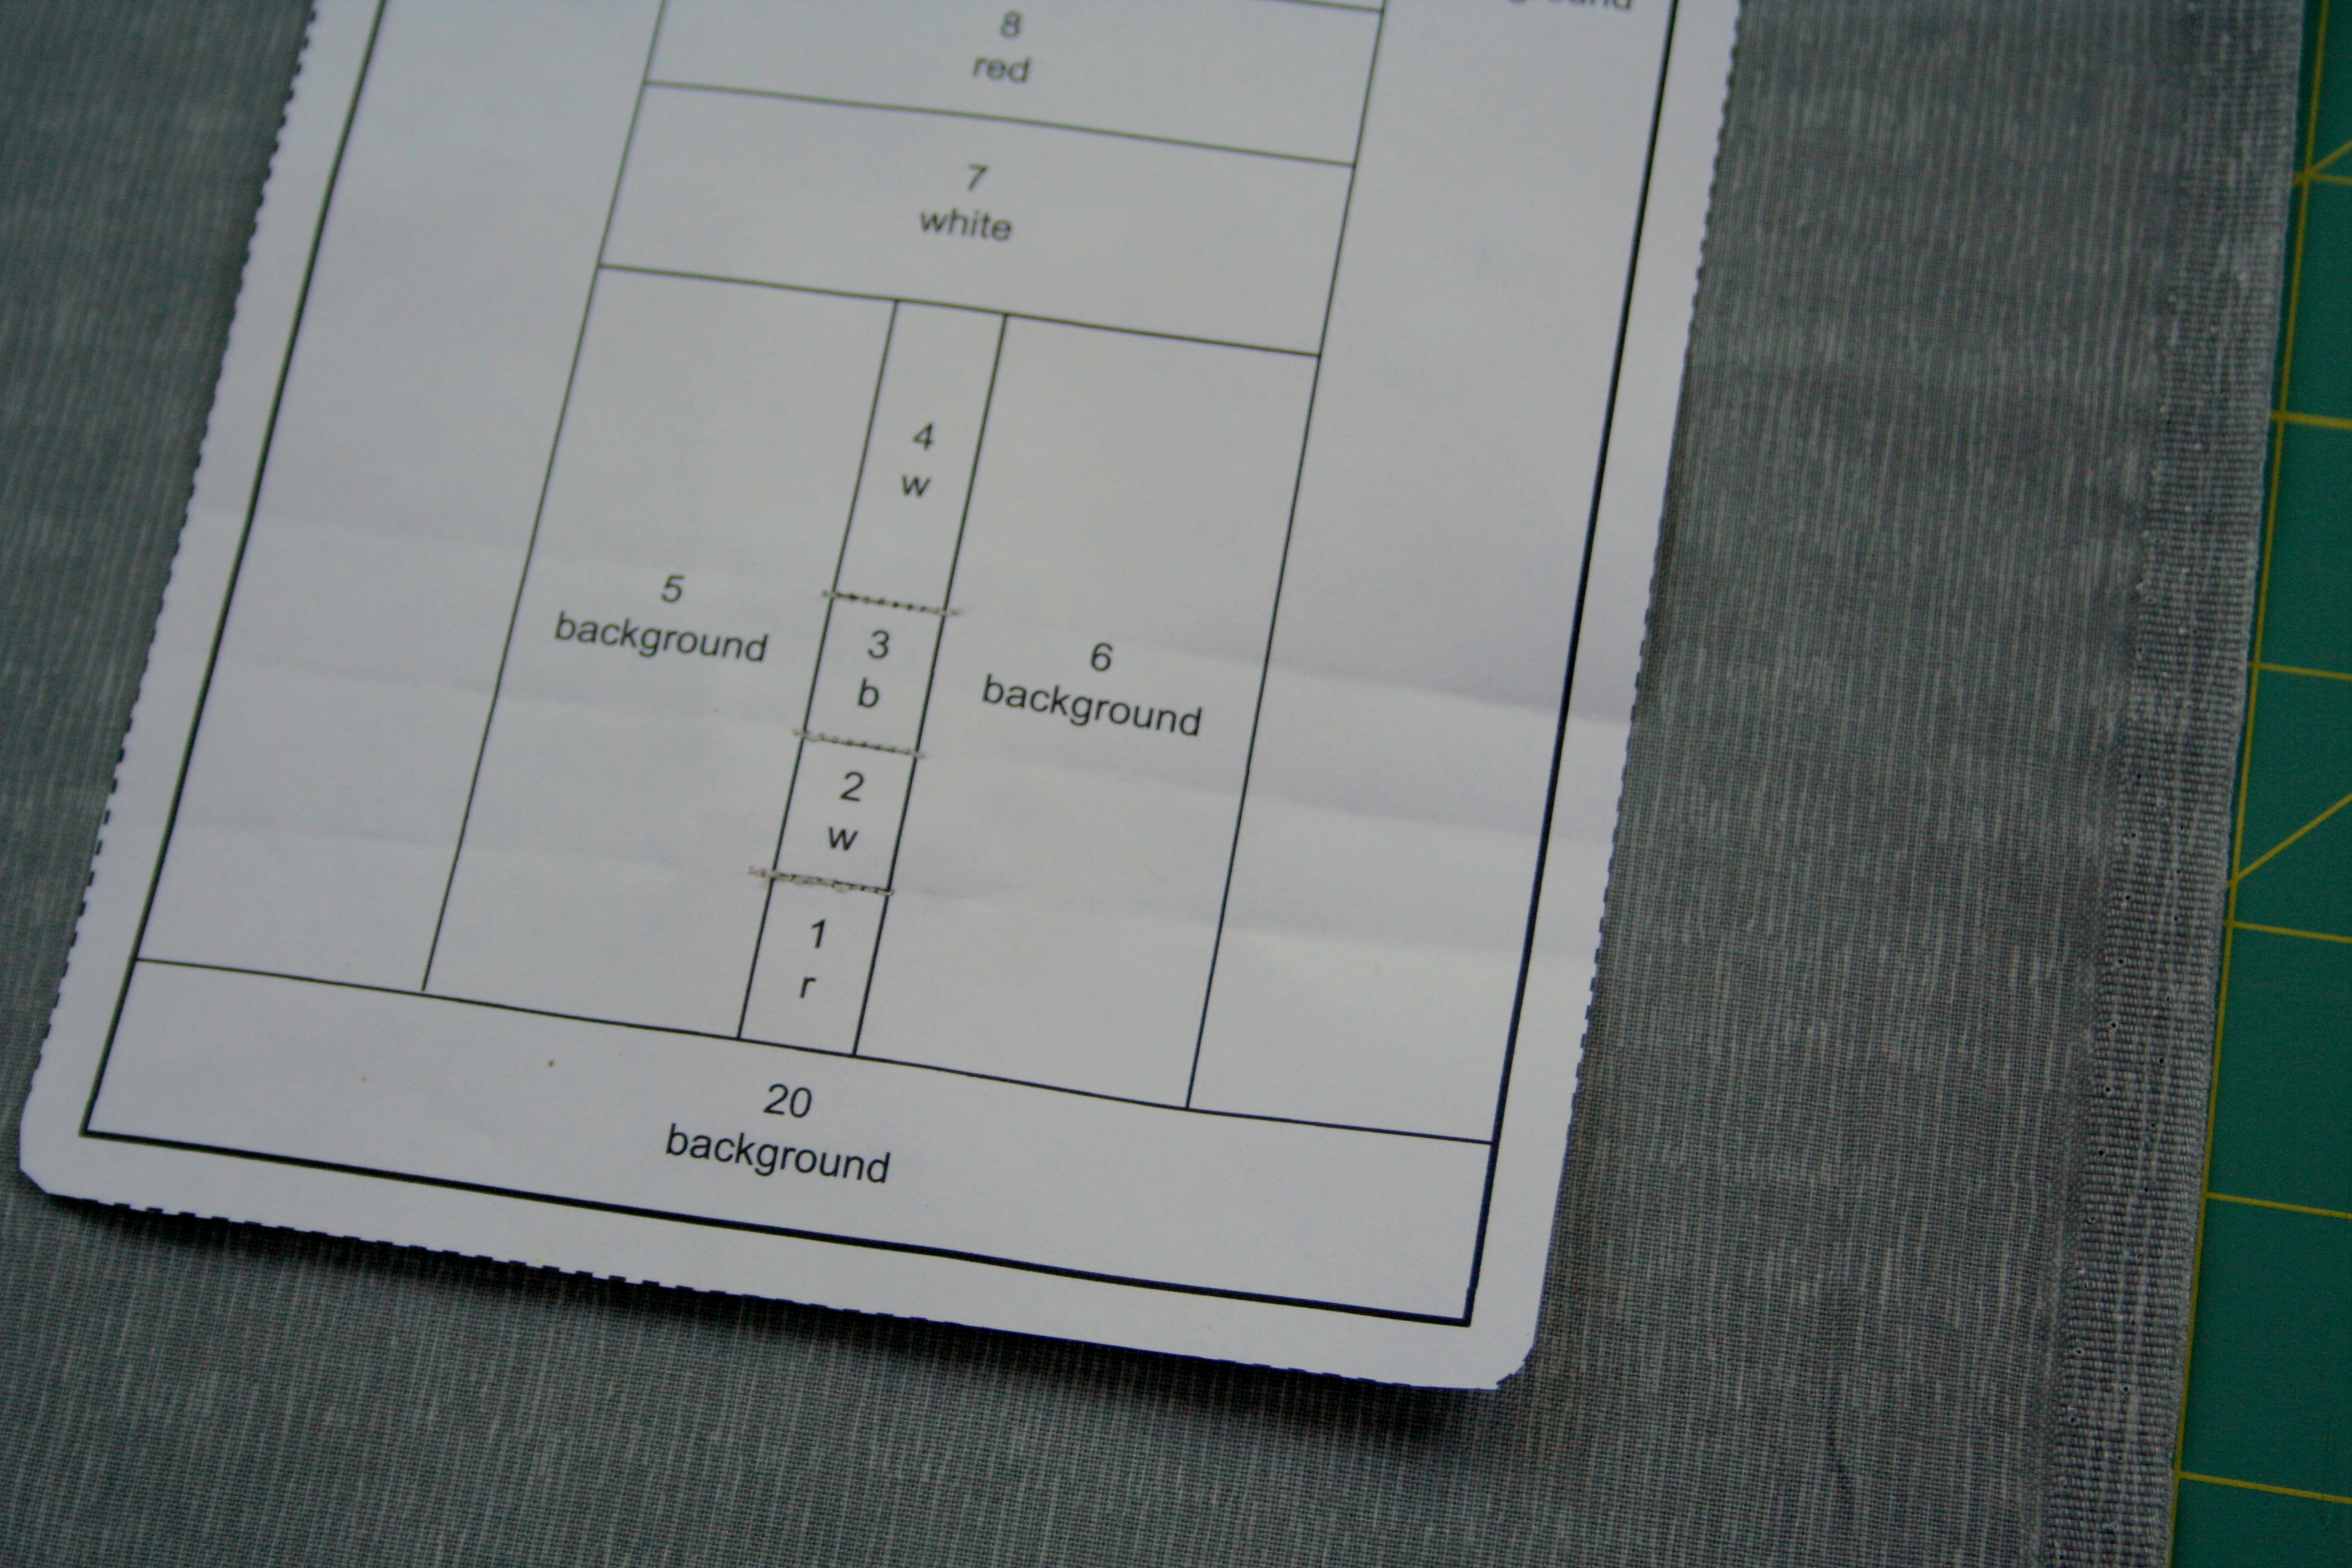
First, gather your fabric and get your die cutting machine ready. As I shared in my Sizzix mug rug tutorial, I like to pass a piece of regular printer paper through the machine, and label the pieces to help with planning. The Rose Star die is designed for EPP, so the single die can cut all of the templates and fabric needed (pretty awesome, huh?).
For this project, we will be using the A and B pieces. Begin by cutting the templates needed: 1 A and 6 B for each coaster. Since I made four (4) coasters, I cut 4 As and 24 Bs. I use cardstock for my templates, and hole punch the centers to facilitate easy removal after the stitching is complete. Use what works for you.
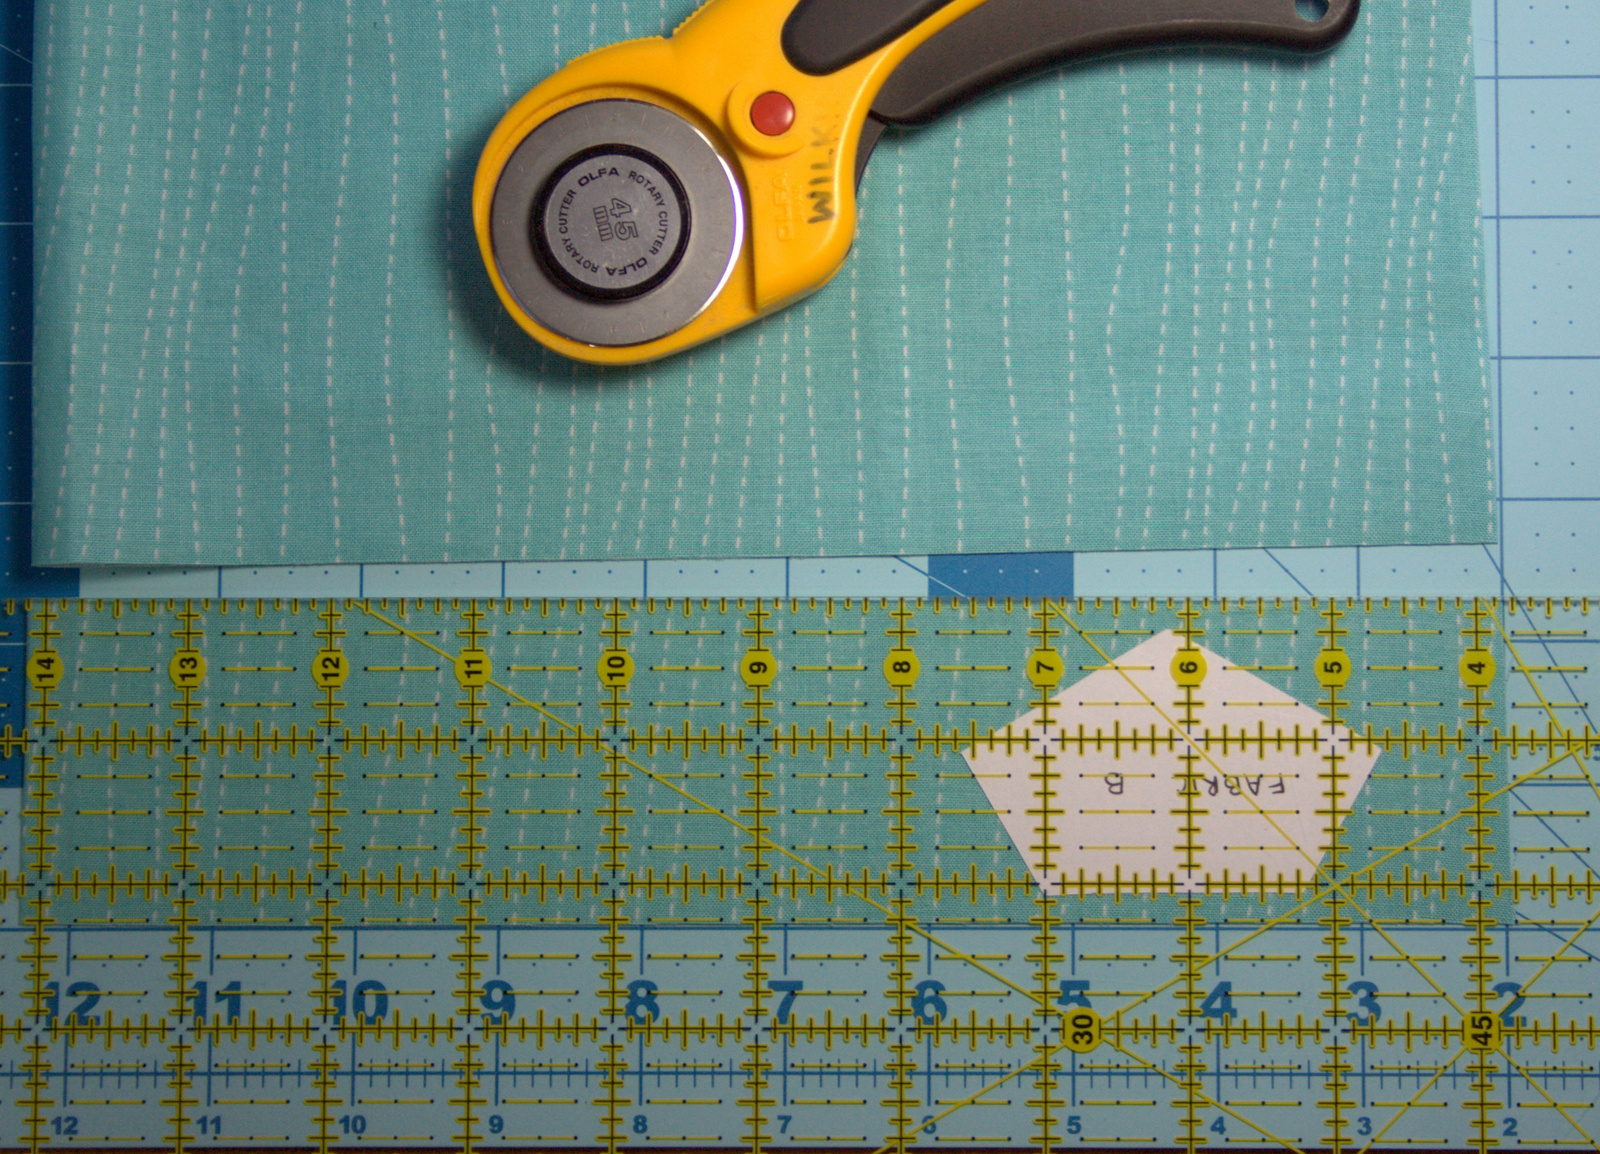
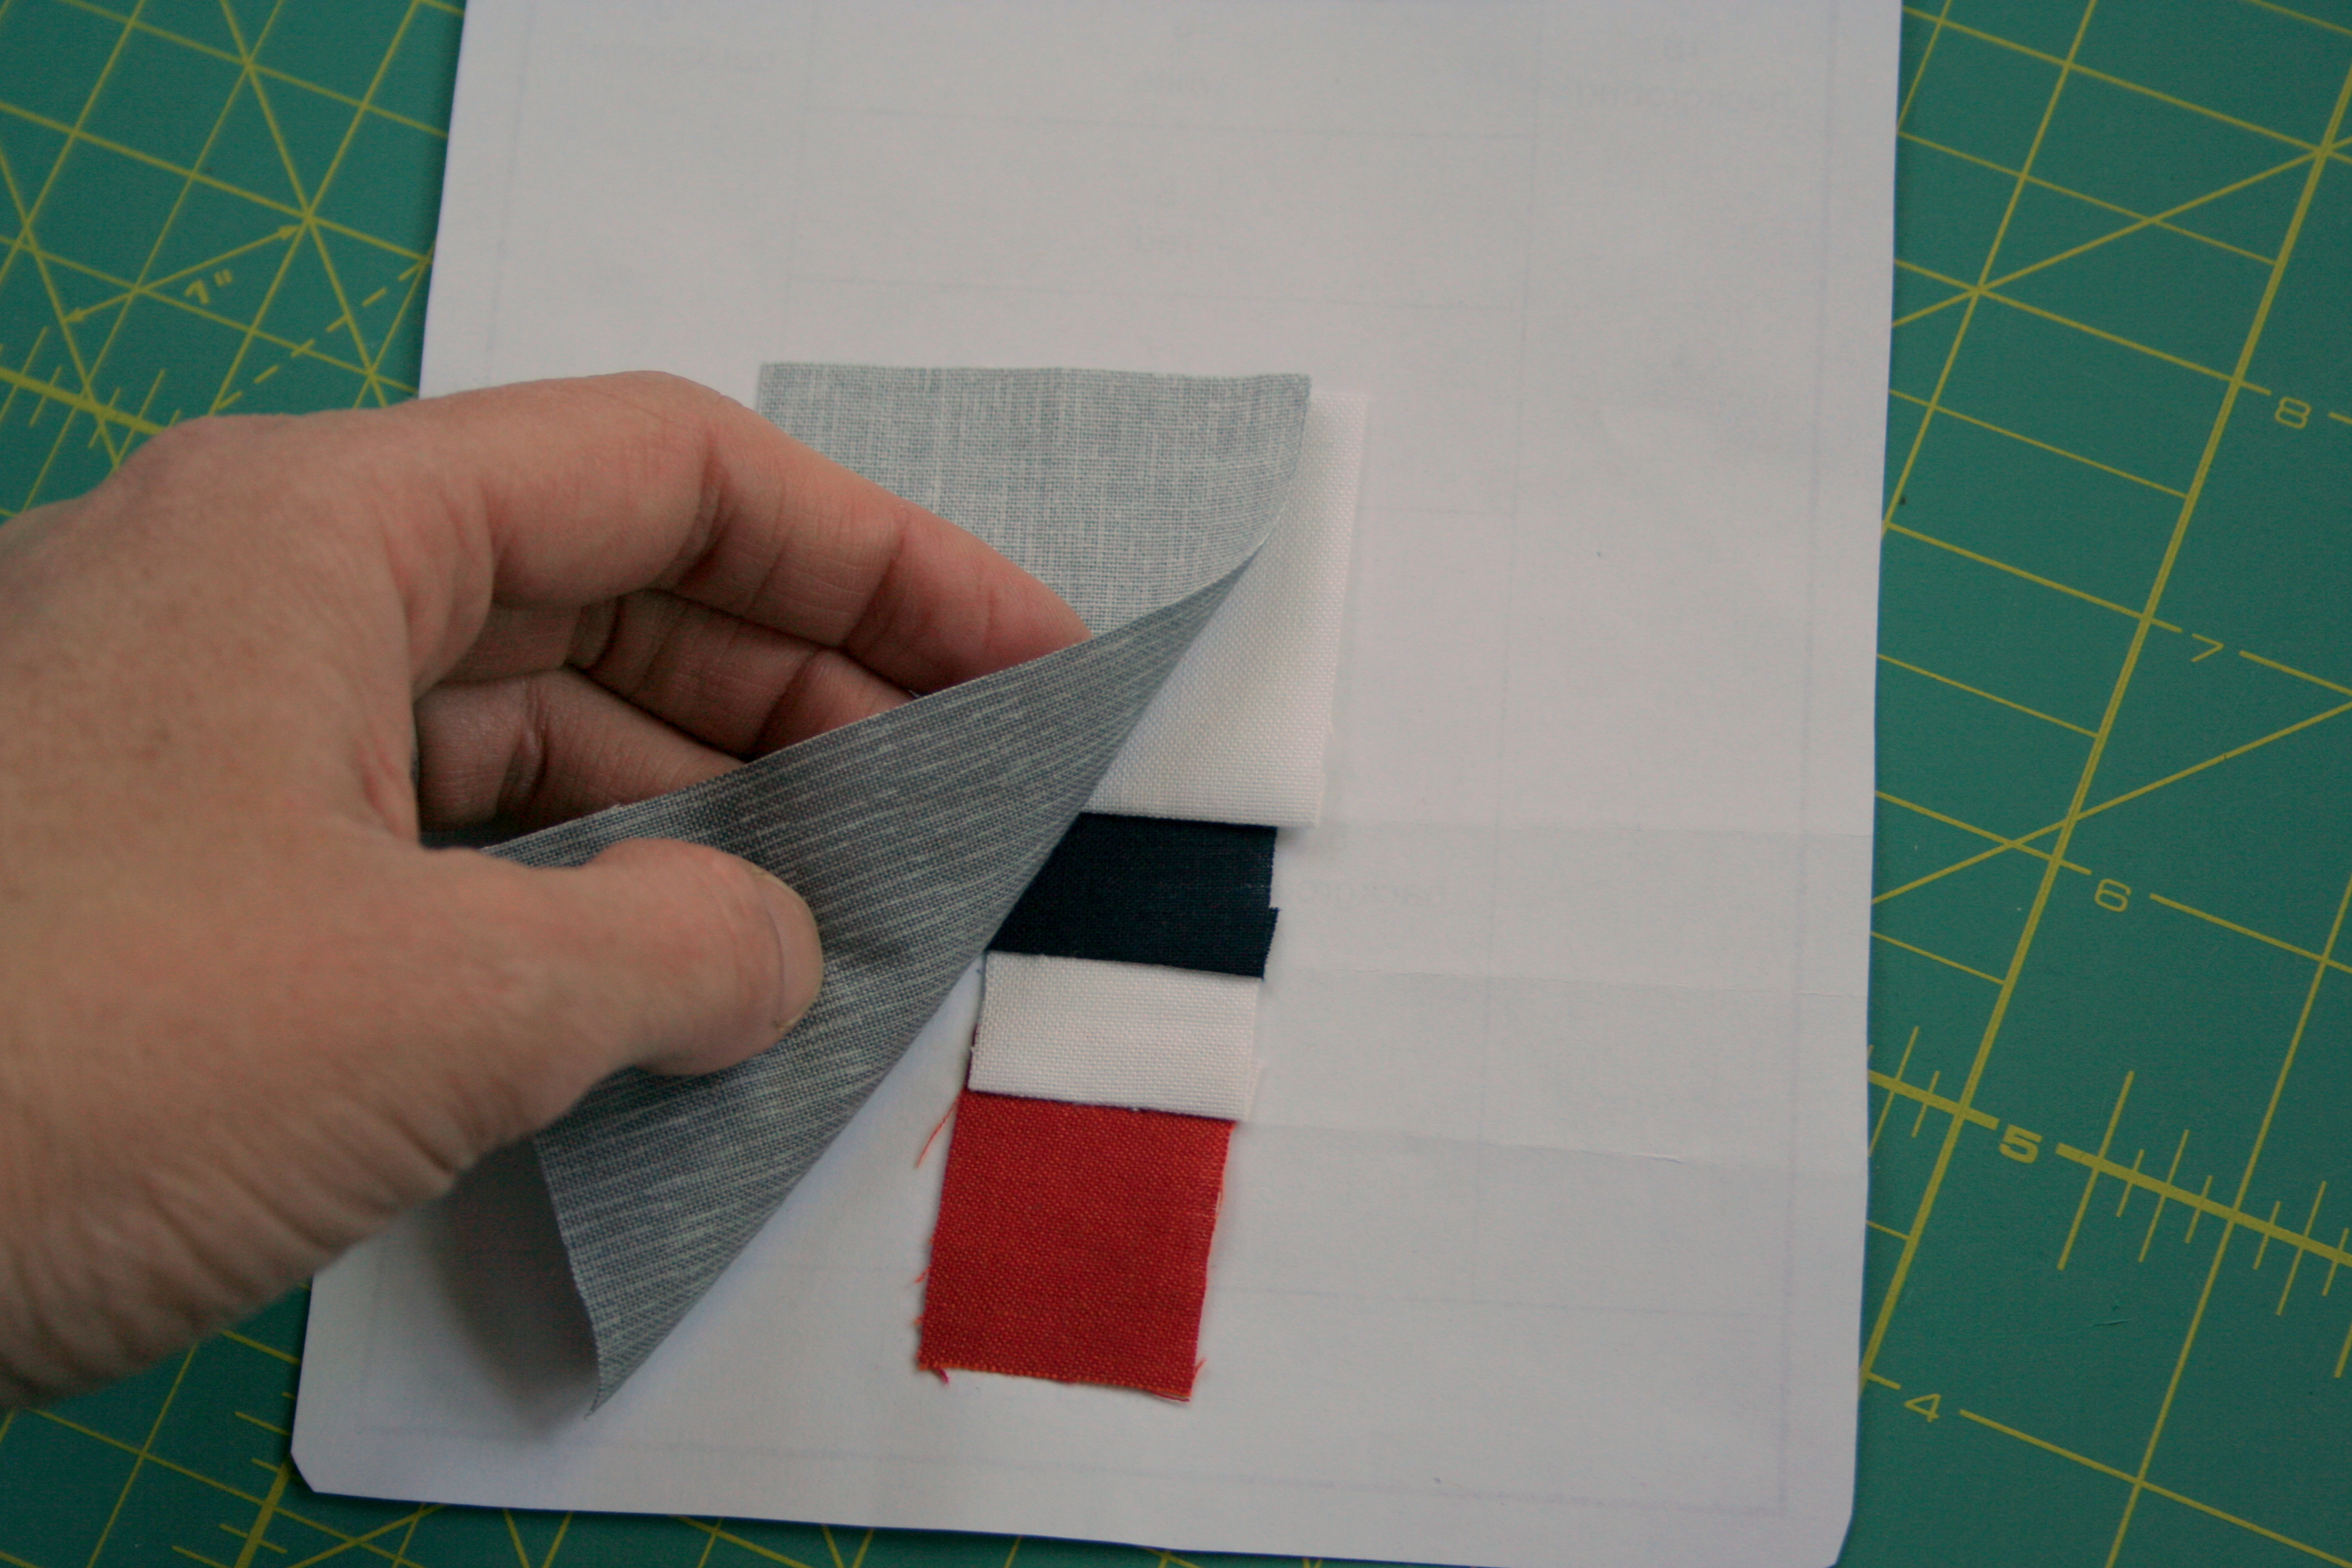
The paper practice pieces can help you save time in cutting, too. For fabric shapes needed in duplicate, use the fabric piece to determine how wide of a fabric strip you will need, then use your rotary cutter and mat to cut a strip. As you can see, I gave myself some wiggle room, but if you’re a die cutting pro, you can really save fabric by lining up the shape flush with the edges of the cut strip.
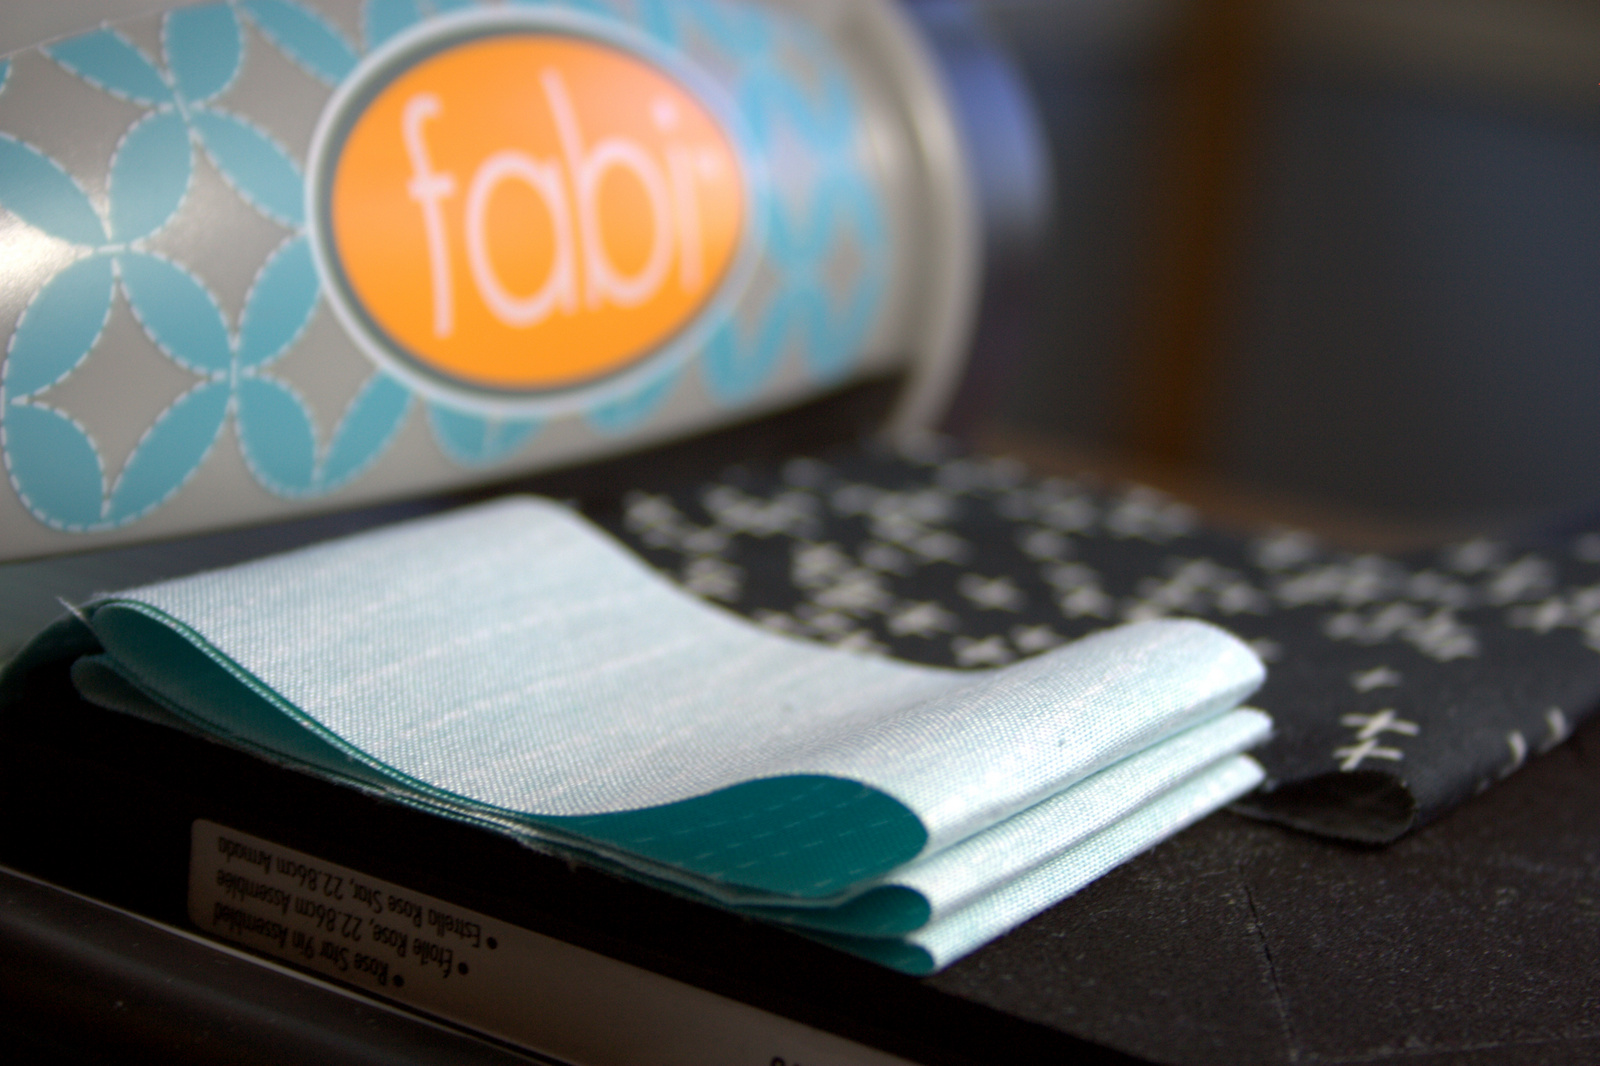
Once you have your fabric strip, fold it accordion style and position it in your Sizzix sandwich: bottom cutting pad, die with the blades facing up, fabric over the fabric blades, and top cutting pad (not shown in this photo). Pass it right through the die cutting machine (or have your three year old crank it through for you), and you’ll have all of the pieces needed for a coaster. You can cut all the fabric needed for a coaster in one pass.
Now it’s time to baste our pieces.
For this project, I decided to finally try glue basting instead of thread basting. I got a Sue Daley fabric glue pen, but any washable glue stick or pen will also work (Elmer’s, Sewline, etc.). I’ve heard so much about how glue basting saves a ton of time with EPP, so I figured if I paired it with the time saving cutting from the Sizzix fabi, I’d be golden with a fun, fast, fabulous gift idea. (Pst… I was right!)
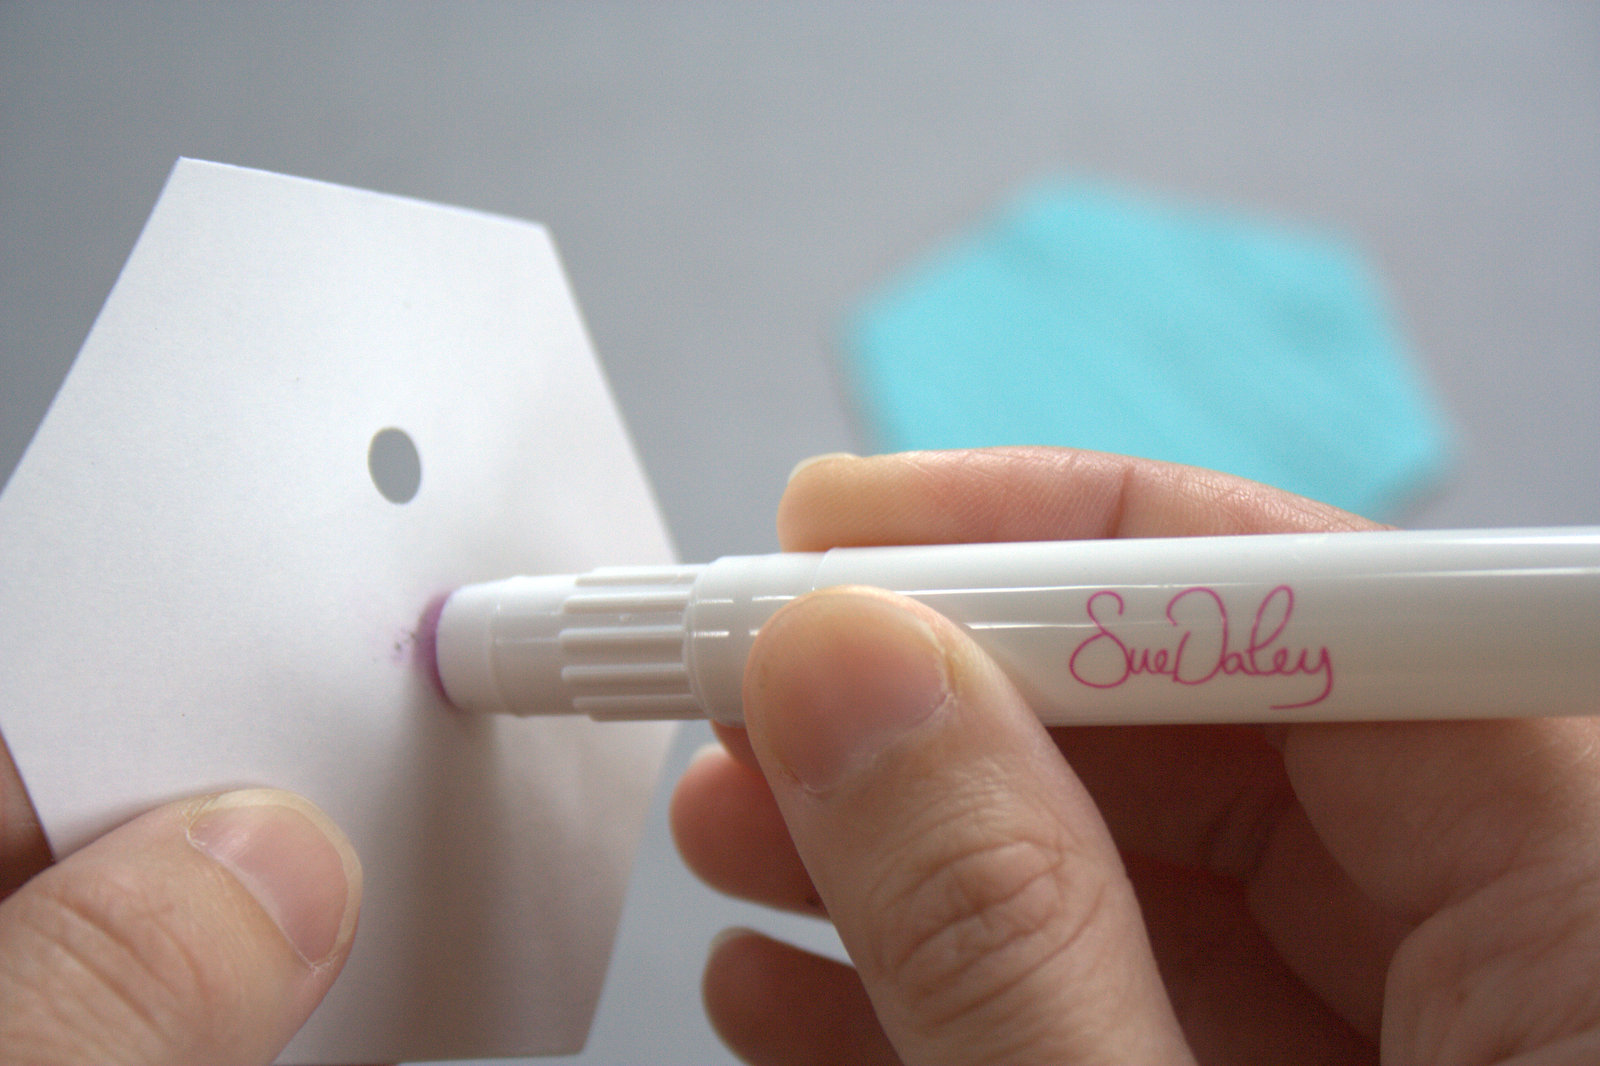
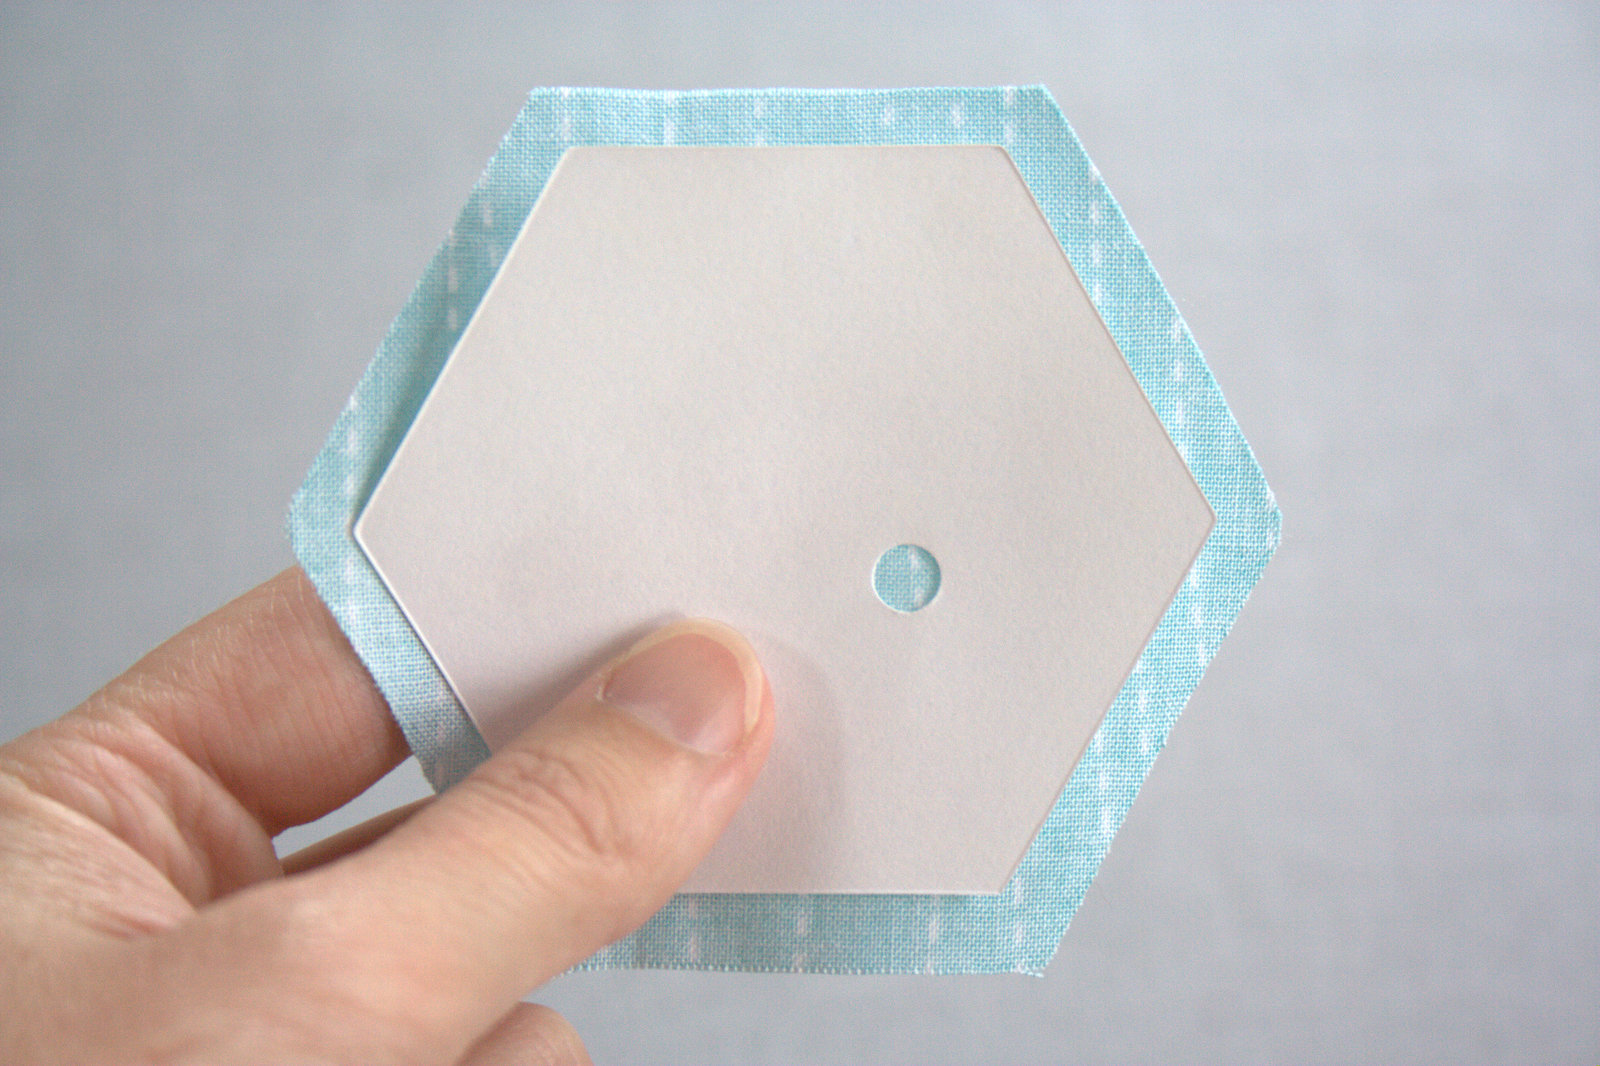
Glue basting is similar to thread basting in that you are securing the fabric around the cardstock template. With glue basting, first put a dab of glue on the center of your template and stick it to the center of the wrong side of your fabric.
Now is the time to double check any fussy cutting you did to make sure it all lines up how you want it.
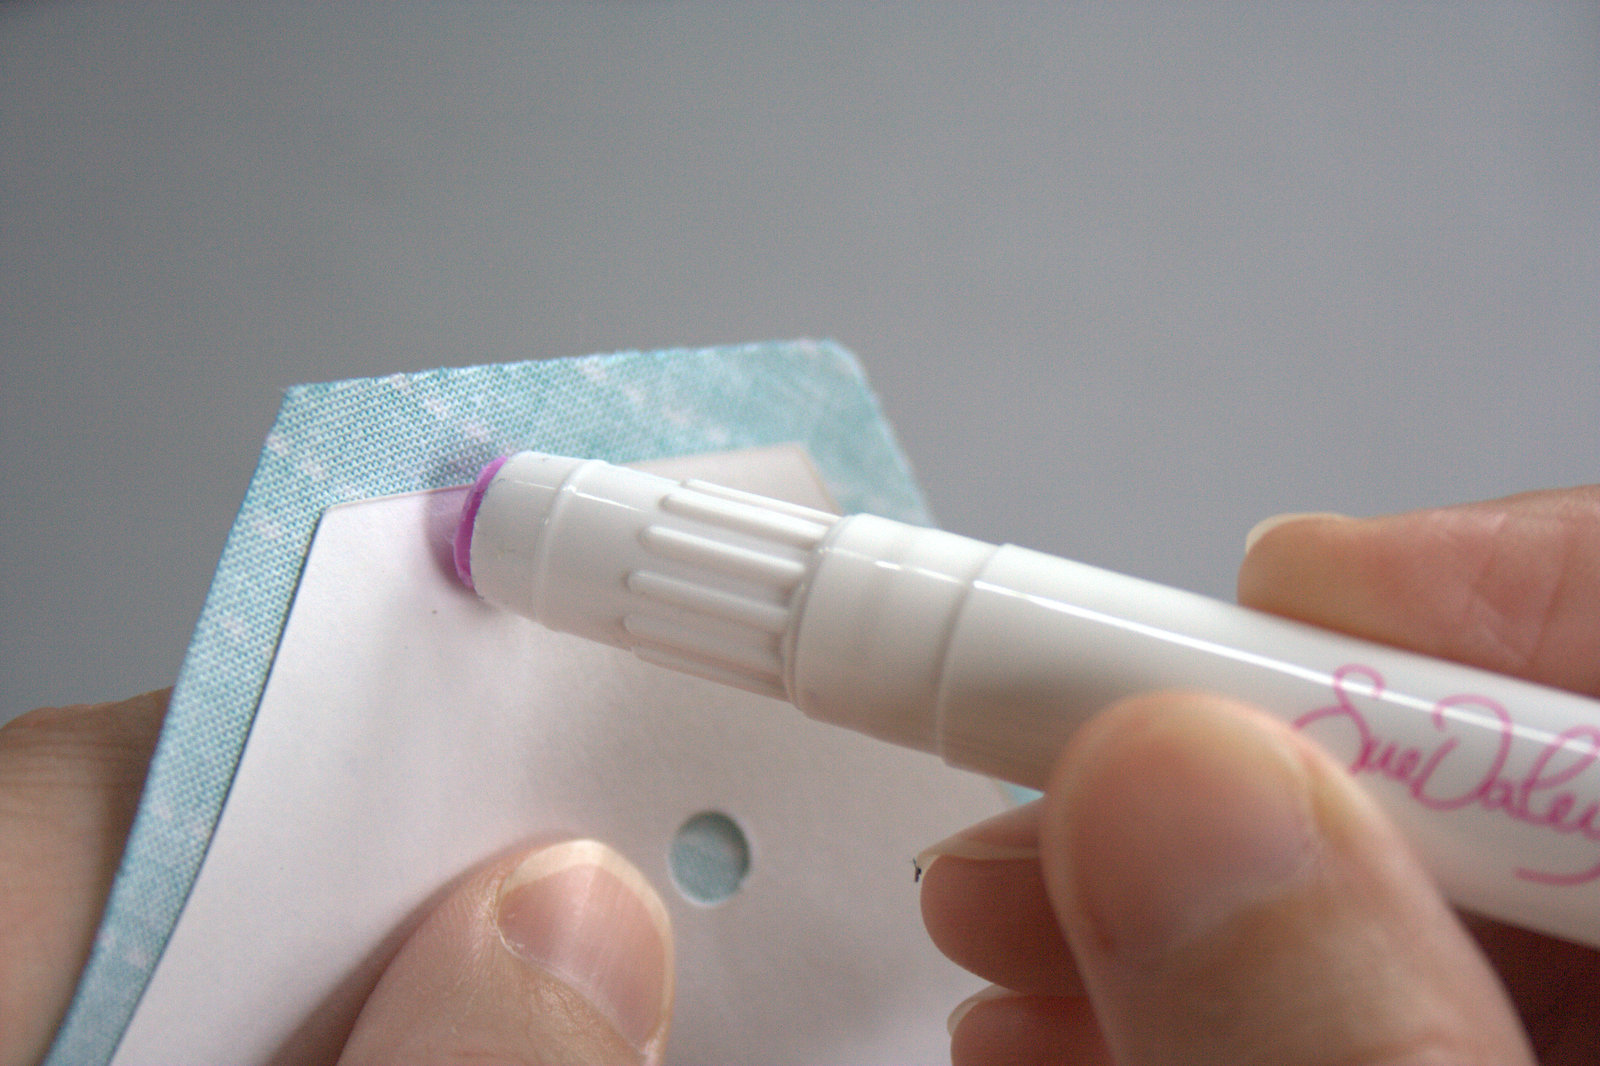
Next, apply a thin line of glue along one edge of your template. Be careful to keep the glue from getting all the way to the edge of the cardstock, since it will make it much more difficult to remove the templates once you are finished (ask me how I know).
Here’s one way glue basting differs from thread basting. Instead of working your way around the template, apply glue to opposite sides of the shape to help even out the pull of the fabric.
Before you know it, you’ll have your first piece.
Continue glue basting all of the pieces needed for your coaster. With irregular shapes, start by gluing the longest side to help make the process smoother.
Have fun with your meticulous cutting. This is a great project for using those adorable little bits of fabric you’ve been saving.
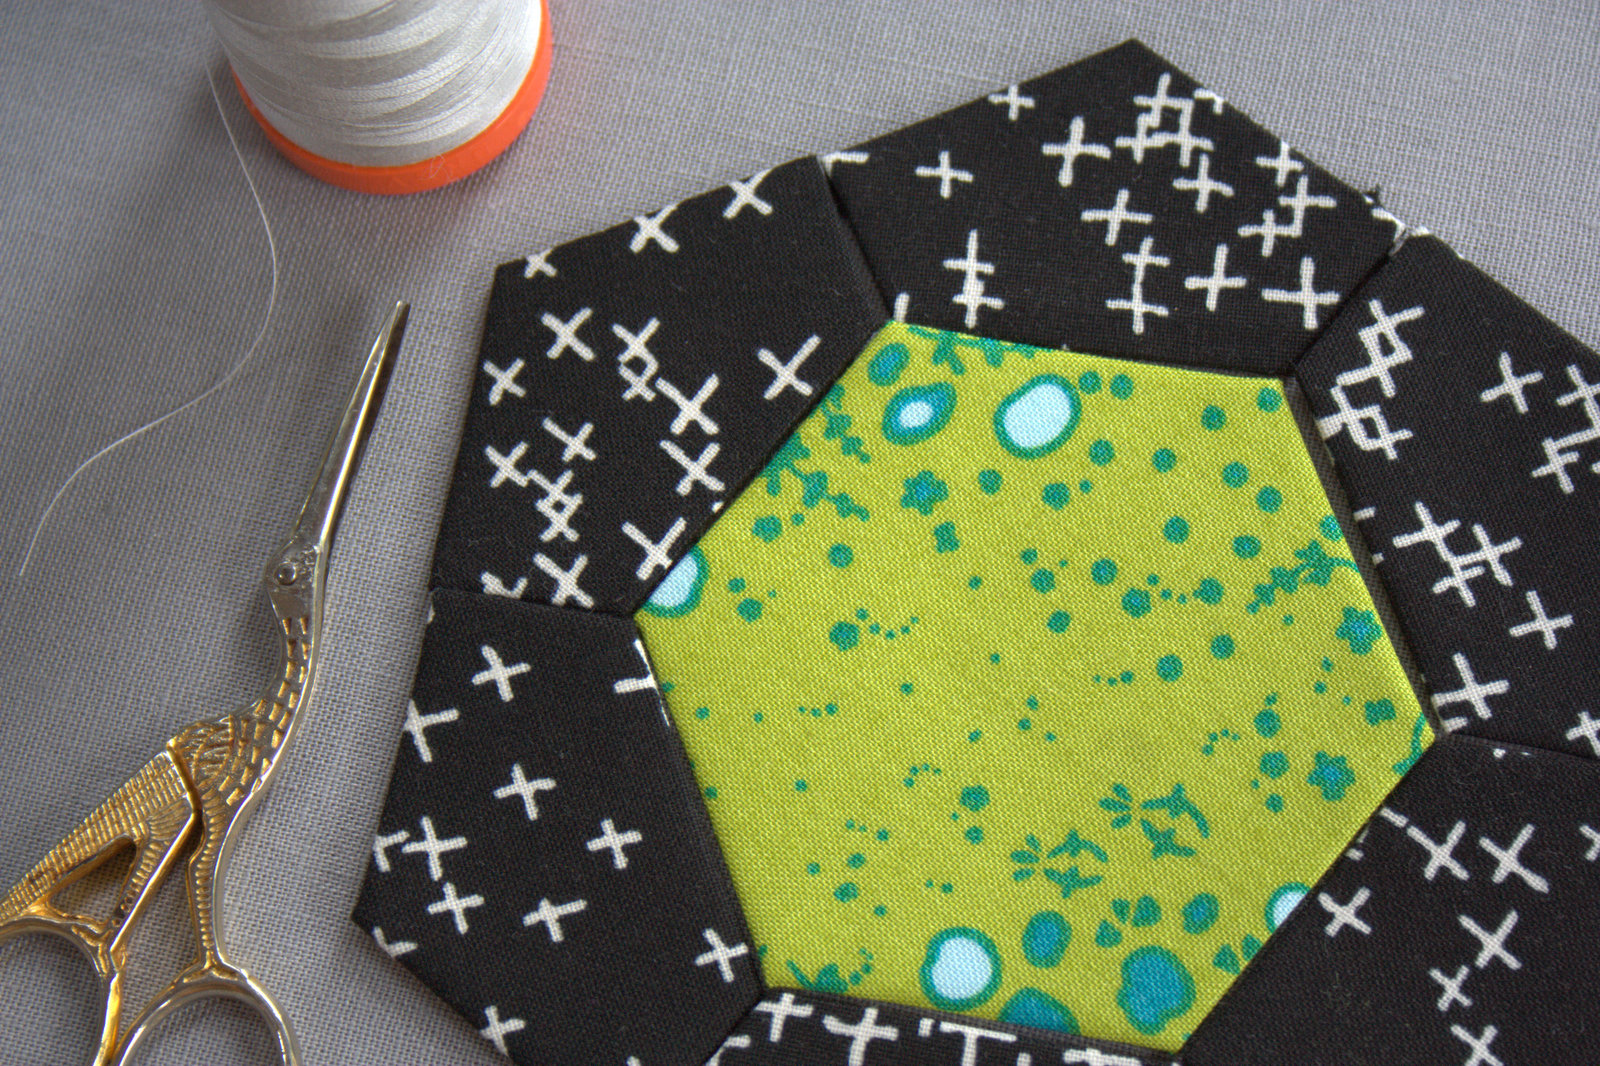
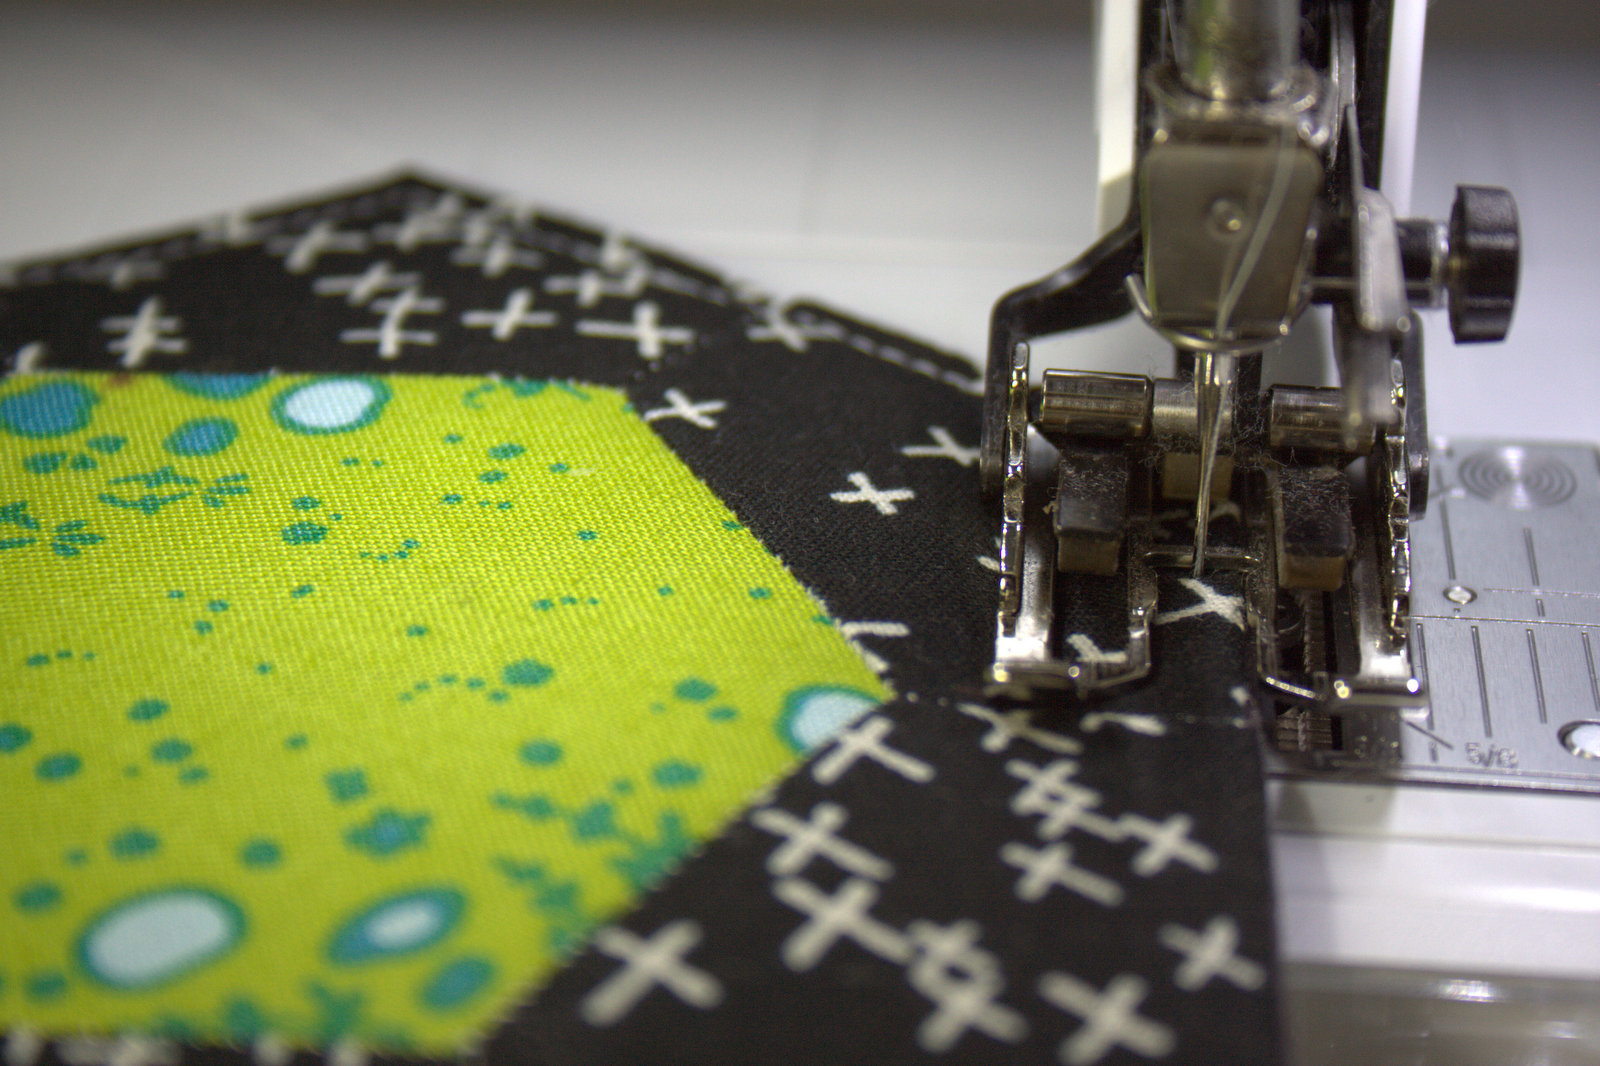
Once all of your pieces are basted, it’s time to start stitching them together! I made a set of four (4) coasters, but you can make as few or as many as you want.All you need for this step is your basted pieces, sharp scissors, a sewing needle, and some thread in a coordinating color (I love using 50wt Aurifil thread). Sometimes, when the two pieces you’re sewing together are very different colors, there is no color that coordinates with both (like in my case). You can choose one of the colors to match, or just use a neutral color thread. I didn’t have black thread (Aurifil #2692, how have you evaded me!?), so I went with a contrasting light grey (Dove #2600) since I had already decided to quilt these with the contrasting colored thread. Once you have your supplies, this is a great project to take on the go, to stitch here and there.
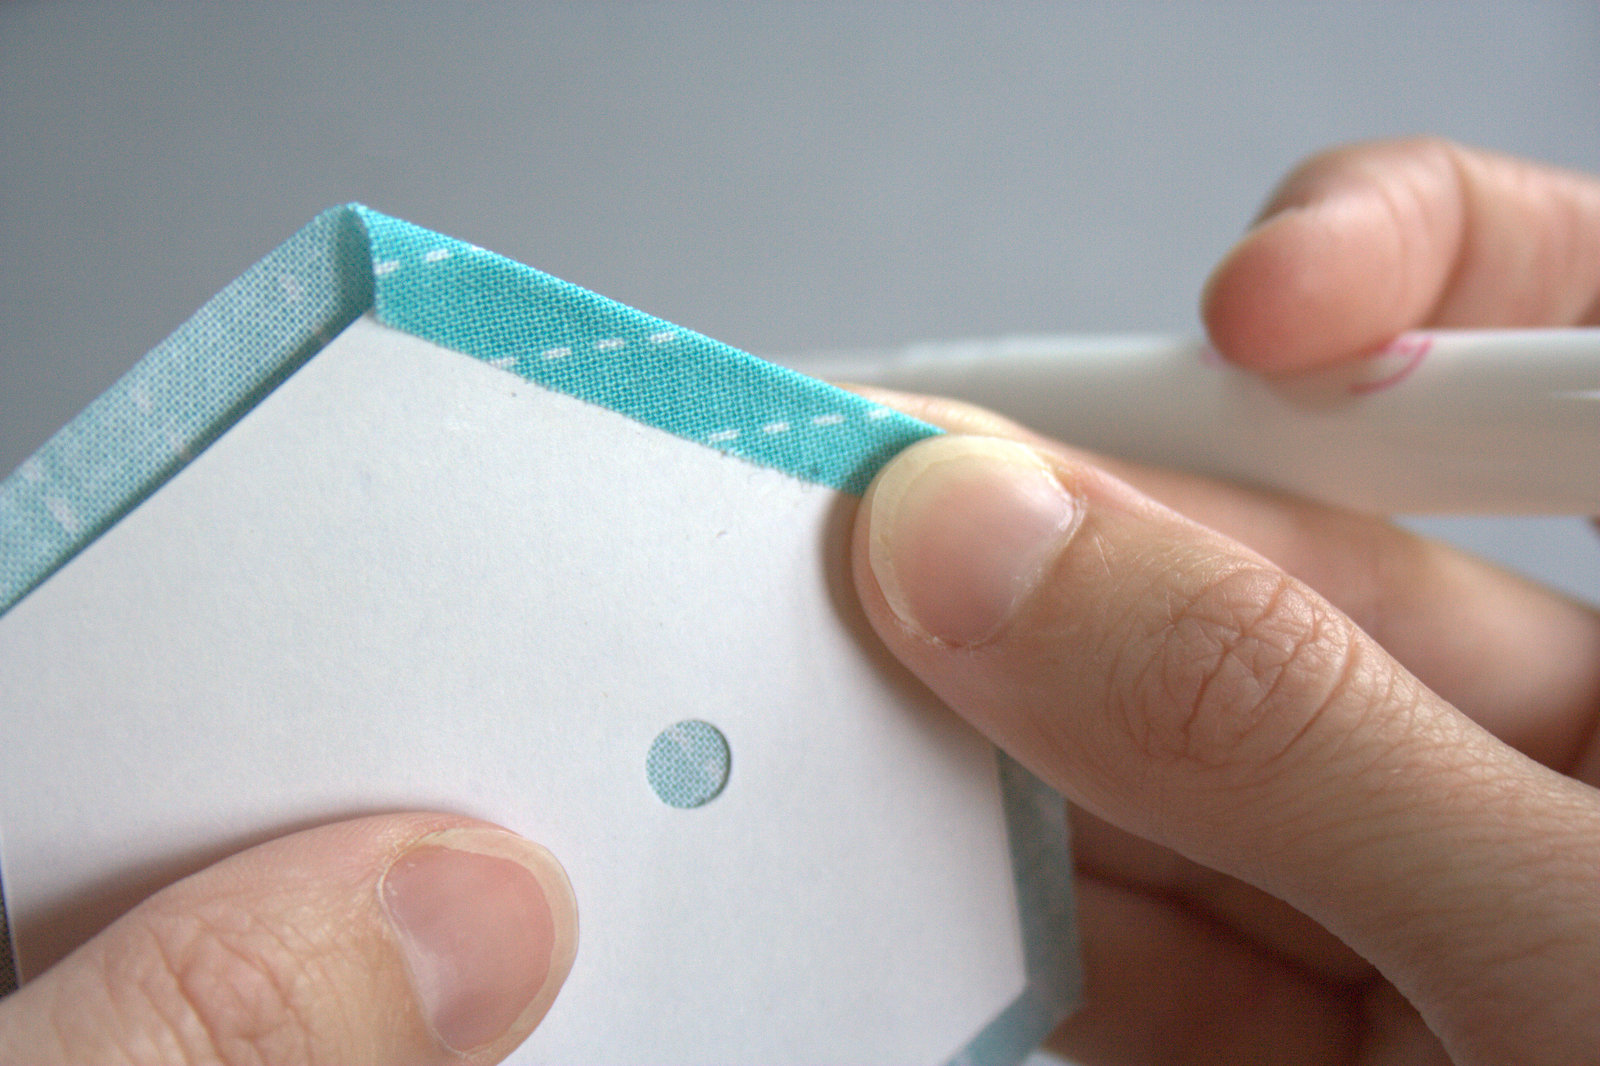
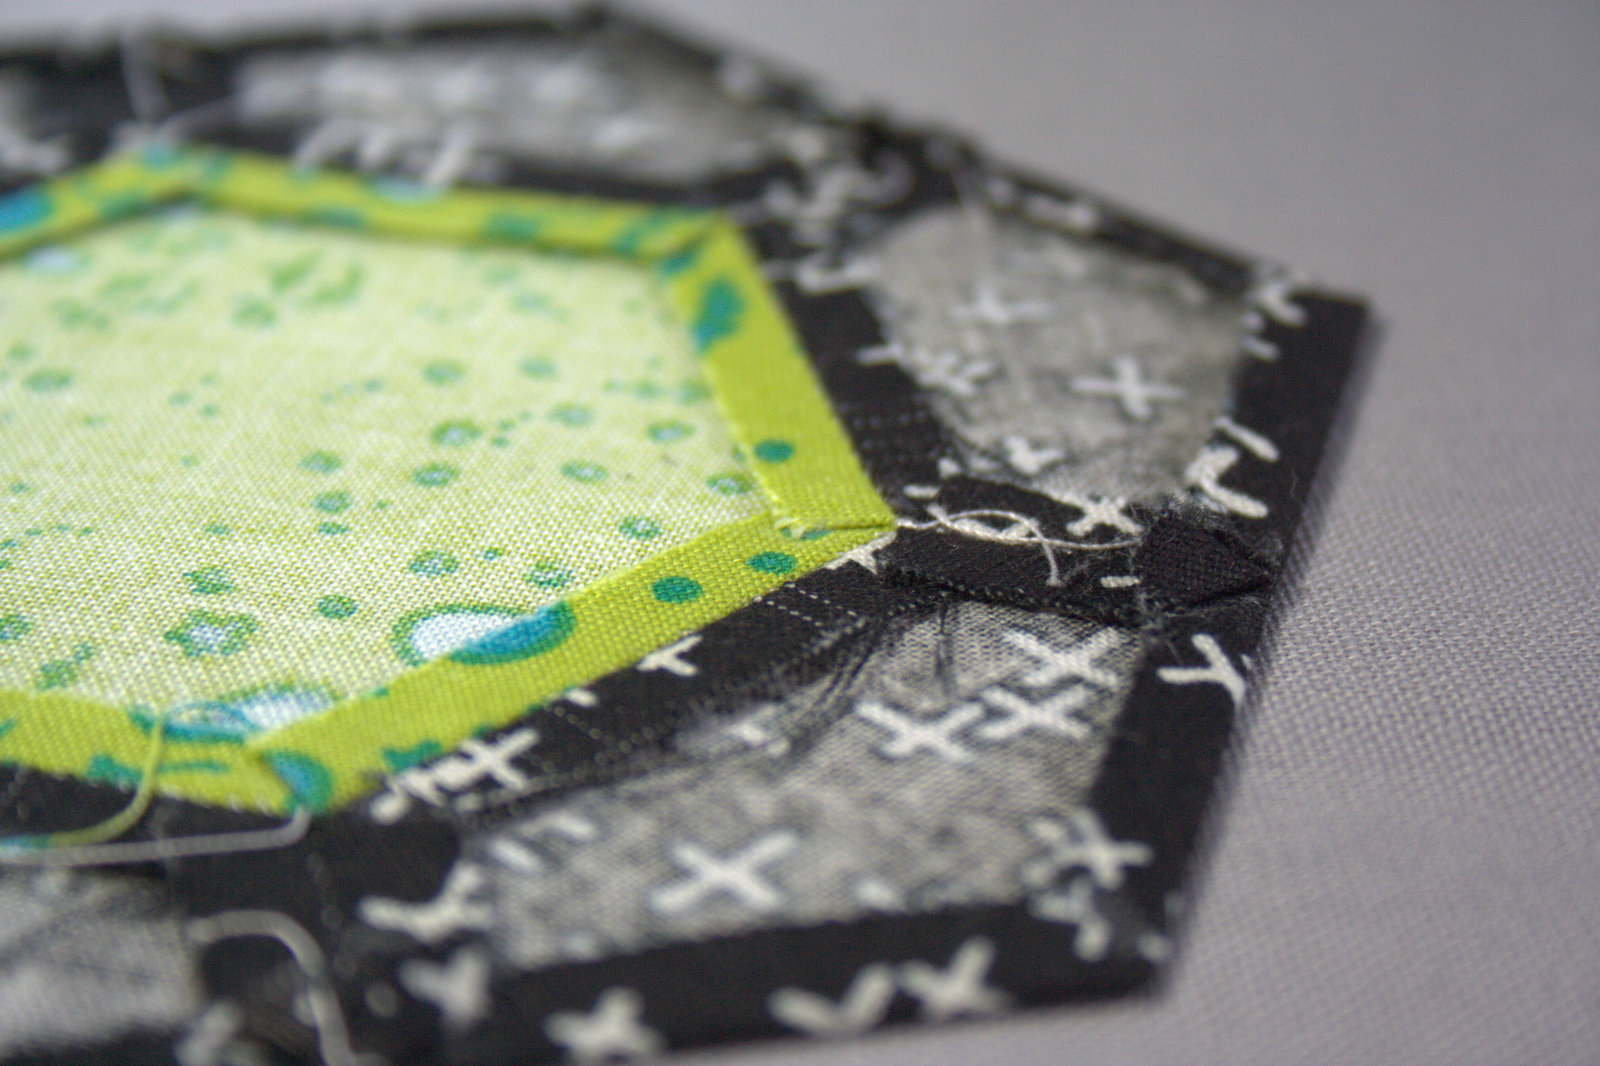
To get started sewing the pieces together, arrange your basted pieces the way you want the finished coaster to look. Flip the first piece over one edge of the center hexagon, right sides together.
With a knotted thread, beginning at one corner, carefully stitch the two pieces together. The needle should only pass through the edges of the fabric, not the cardstock template, and only needs to catch a few threads of each fabric to hold. Many people use whip stitch to hold the pieces together (shown above). Sew the edge completely, then pick up the next basted piece, hold it right sides facing the next edge of the center hexagon, and continue sewing along that joining edge. There’s no need to knot your thread after each side; continue stitching the pieces together until you either run out of thread or you get to a point where no other piece can be directly joined.
I recently saw the idea of using ladder stitch to join EPP pieces, so had to try it. I LOVED it! With ladder stitch, instead of entering the edge of the fabric from the same side every time as with whip stitch, you pass the needle from the side you’re on to the opposite side with each stitch. It may take a bit more time because of the back and forth of the needle, but I prefer it since it results in a nearly invisible join and I’m a slow and steady stitcher to begin with. Use whichever stitch works best for you and sew all seams. Don’t be afraid to fold your center template in order to get the outer seams lined up and sewn together.
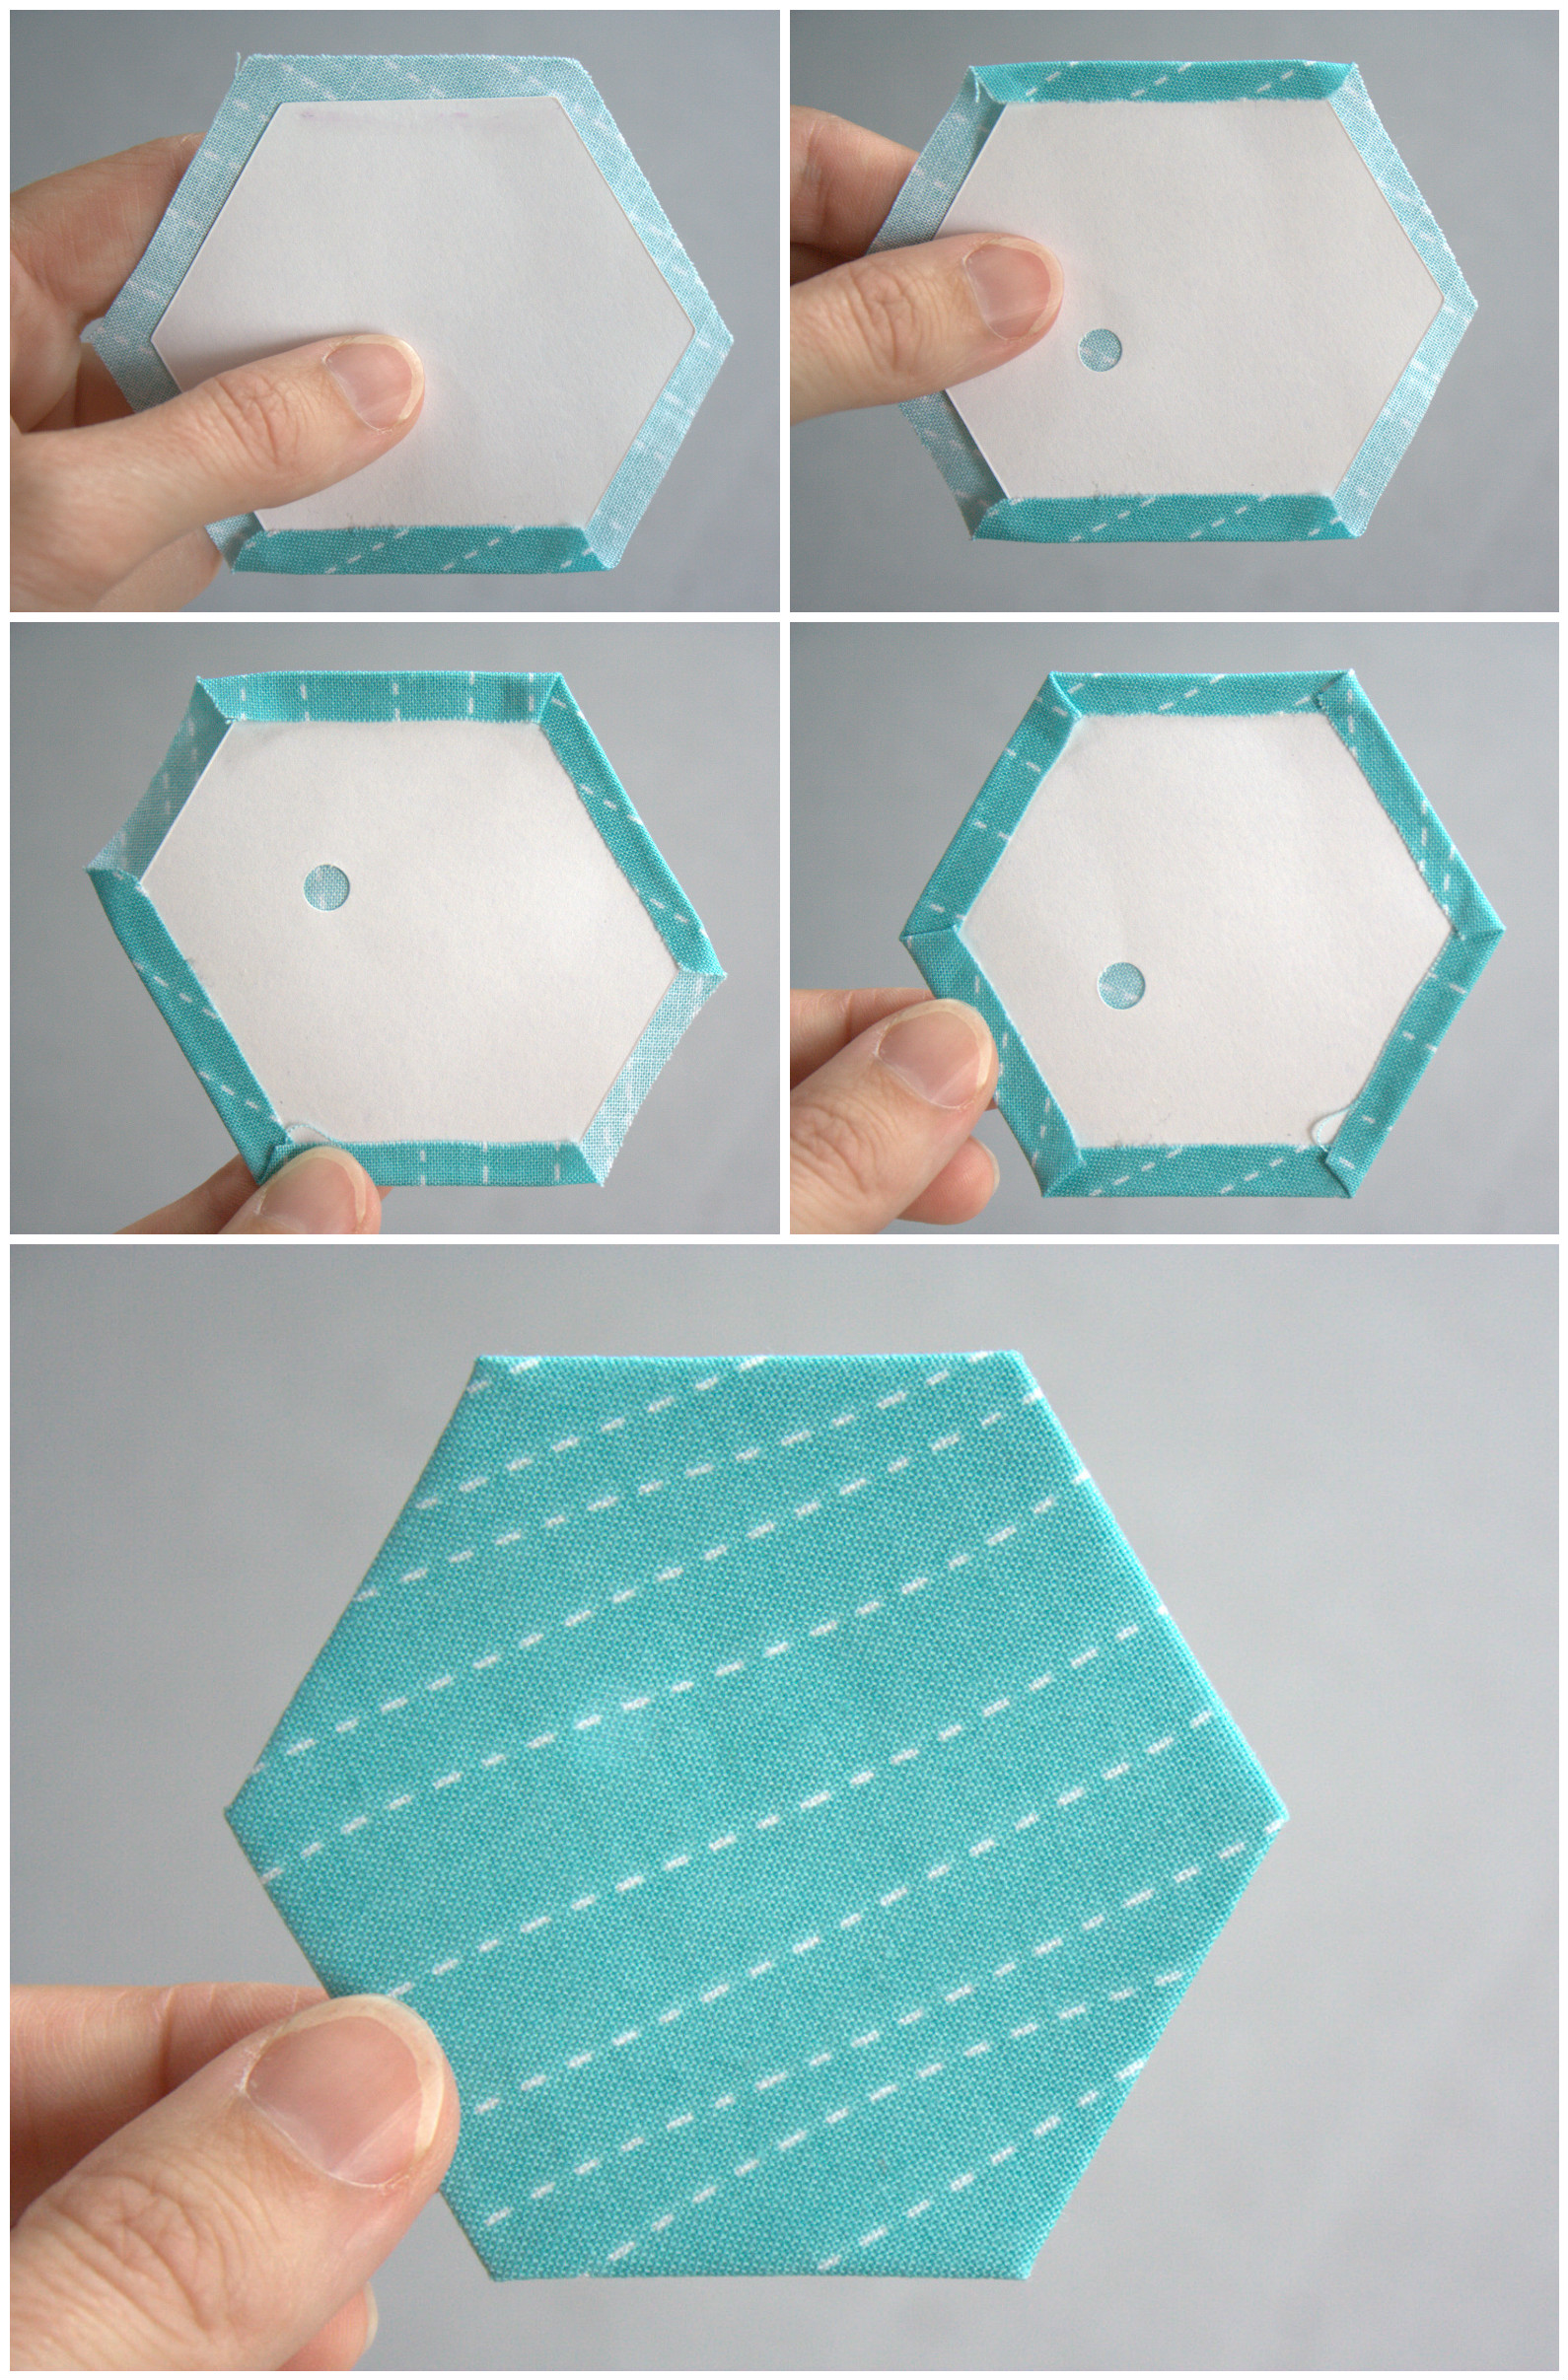
Once your coaster EPP tops are all stitched together, it’s time to assemble the coasters.
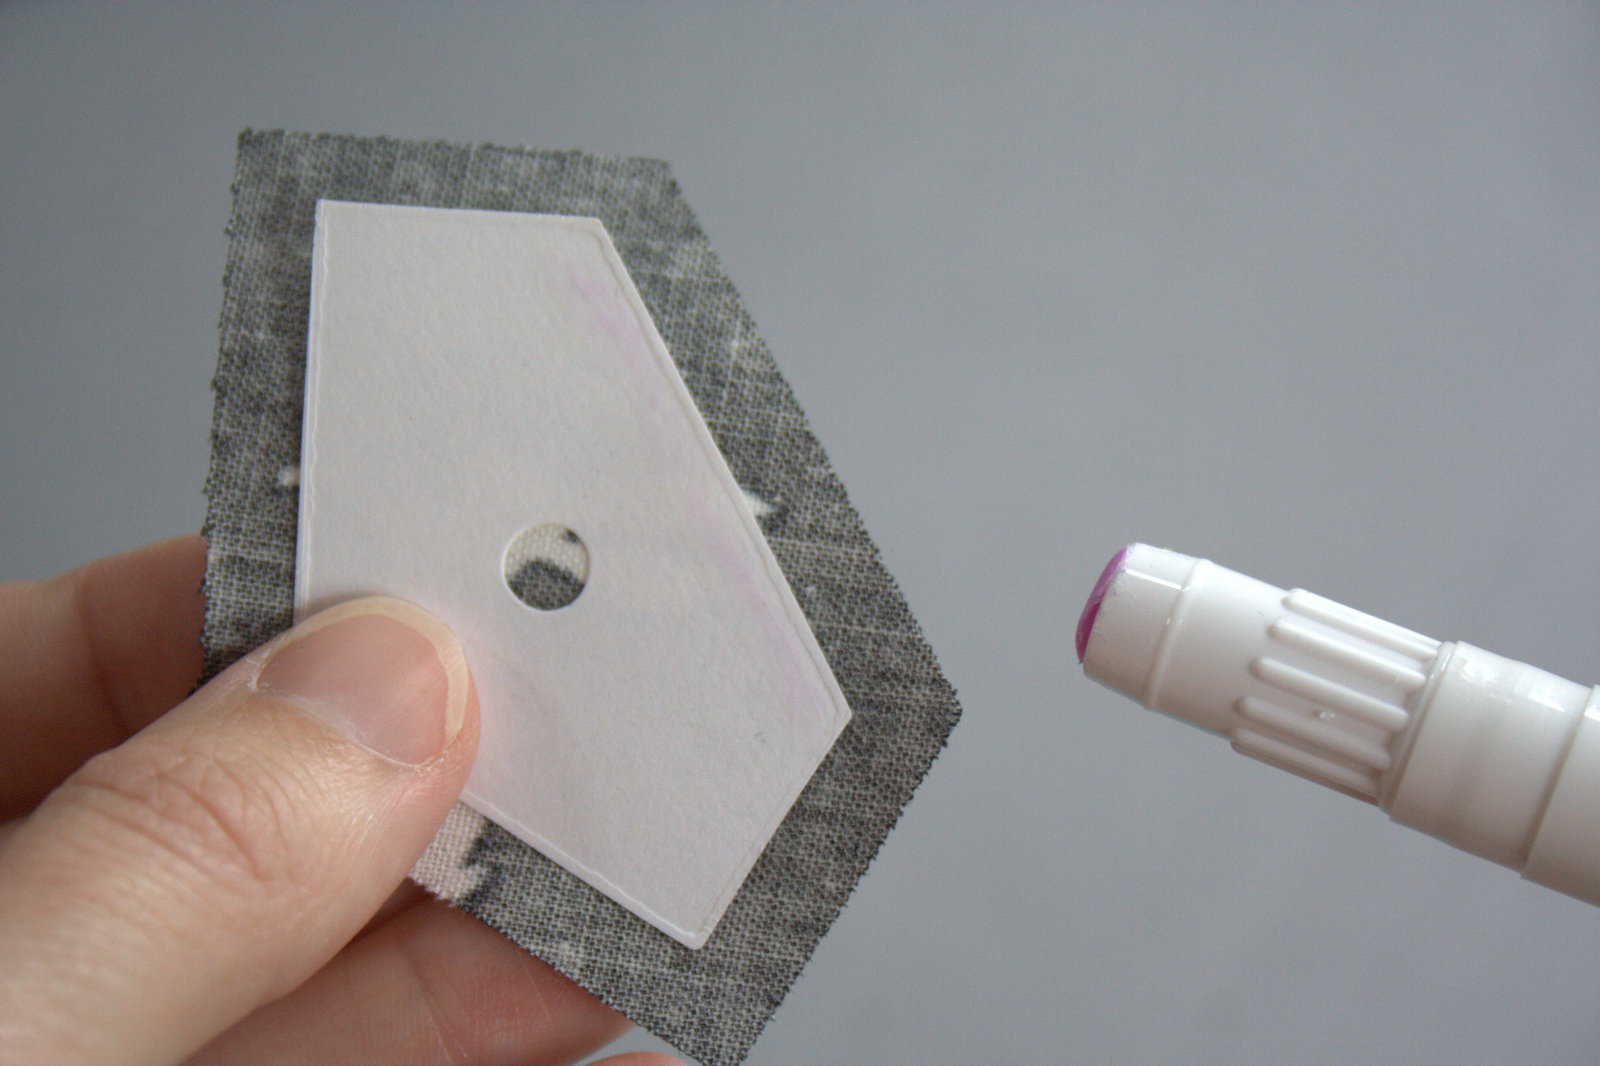
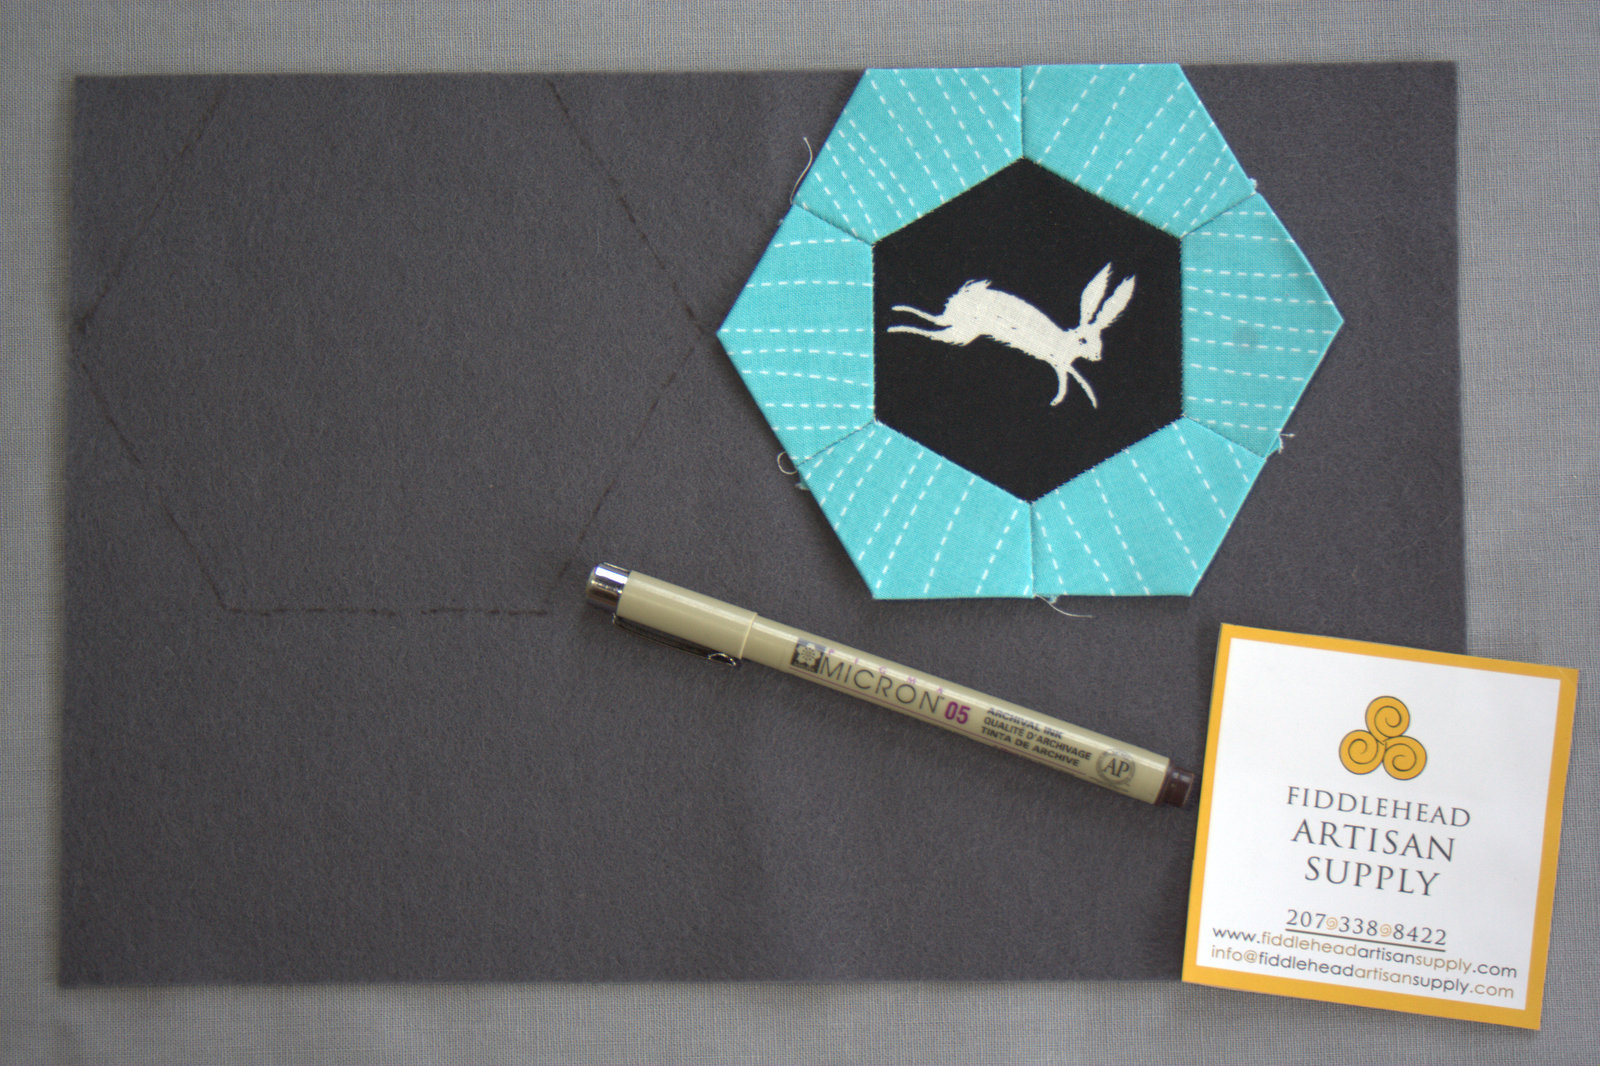
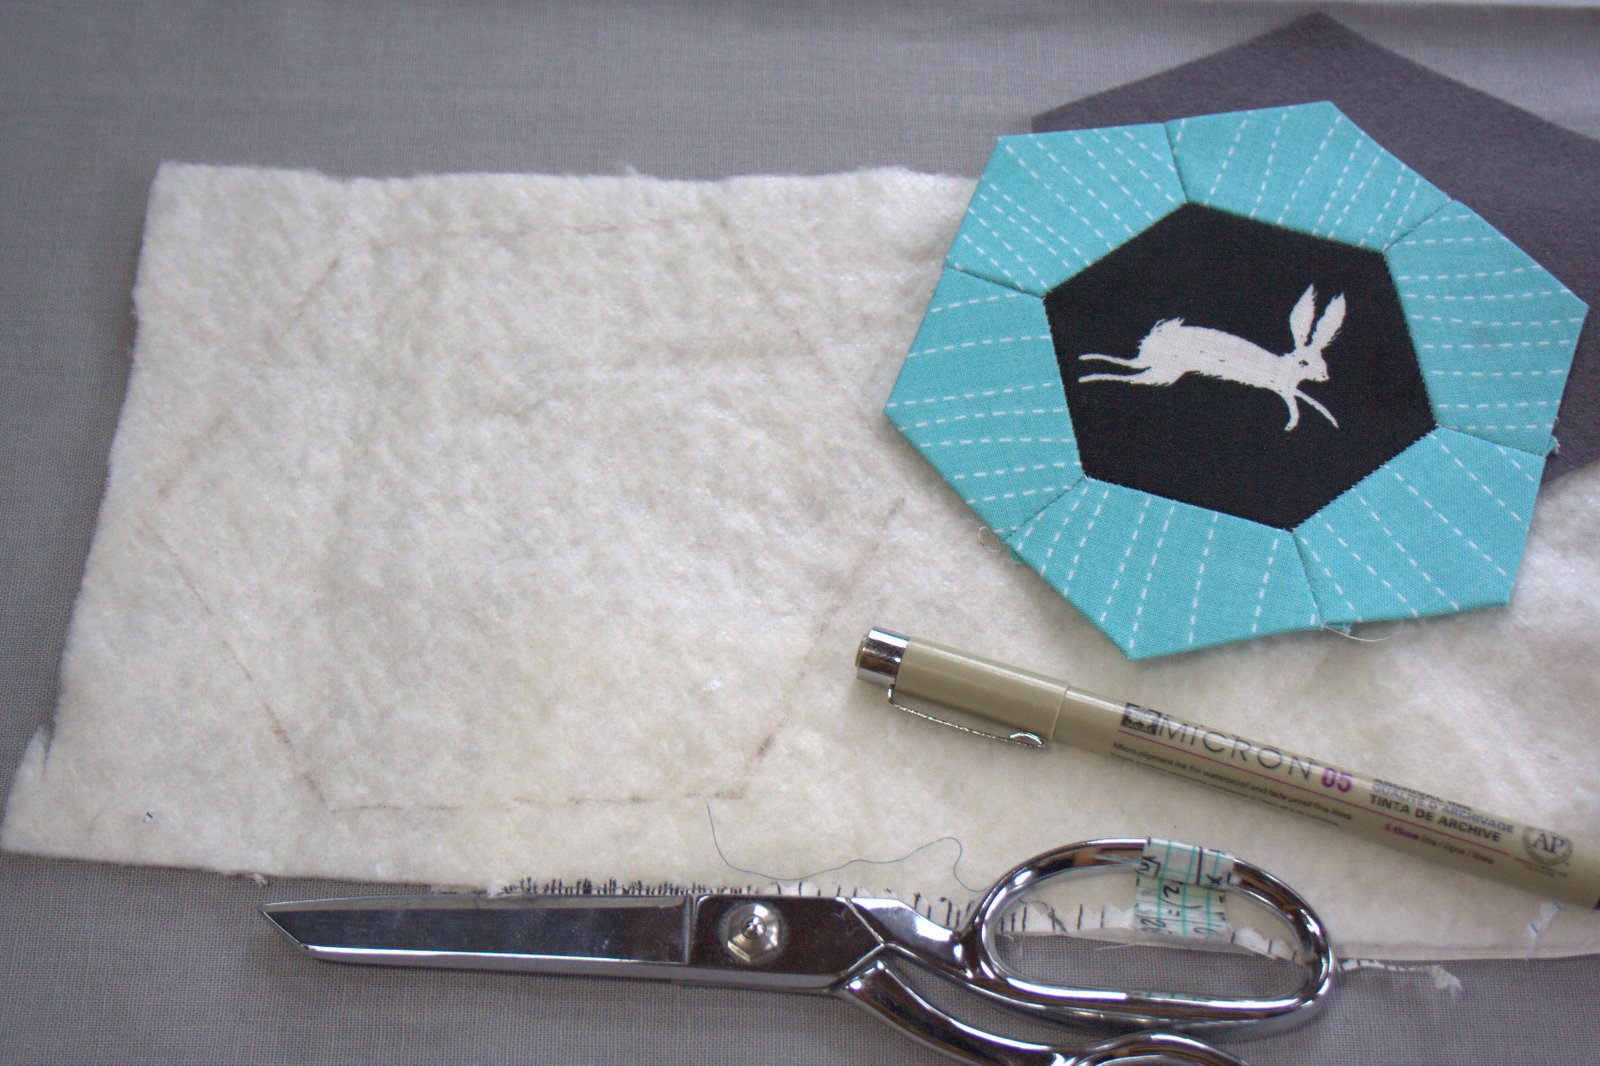
First, trace your EPP top onto a piece of 100% wool felt. I bought mine at my local quilt shop, Fiddlehead Artisan Supply, where there’s a huge wall of gorgeous wool felt from which to choose. Trace one hexagon backing for each of the coaster tops. I used a Sakura Micron pen since we are going to cut just inside the line and therefore it won’t be visible. Plus, Micron pens are the best.
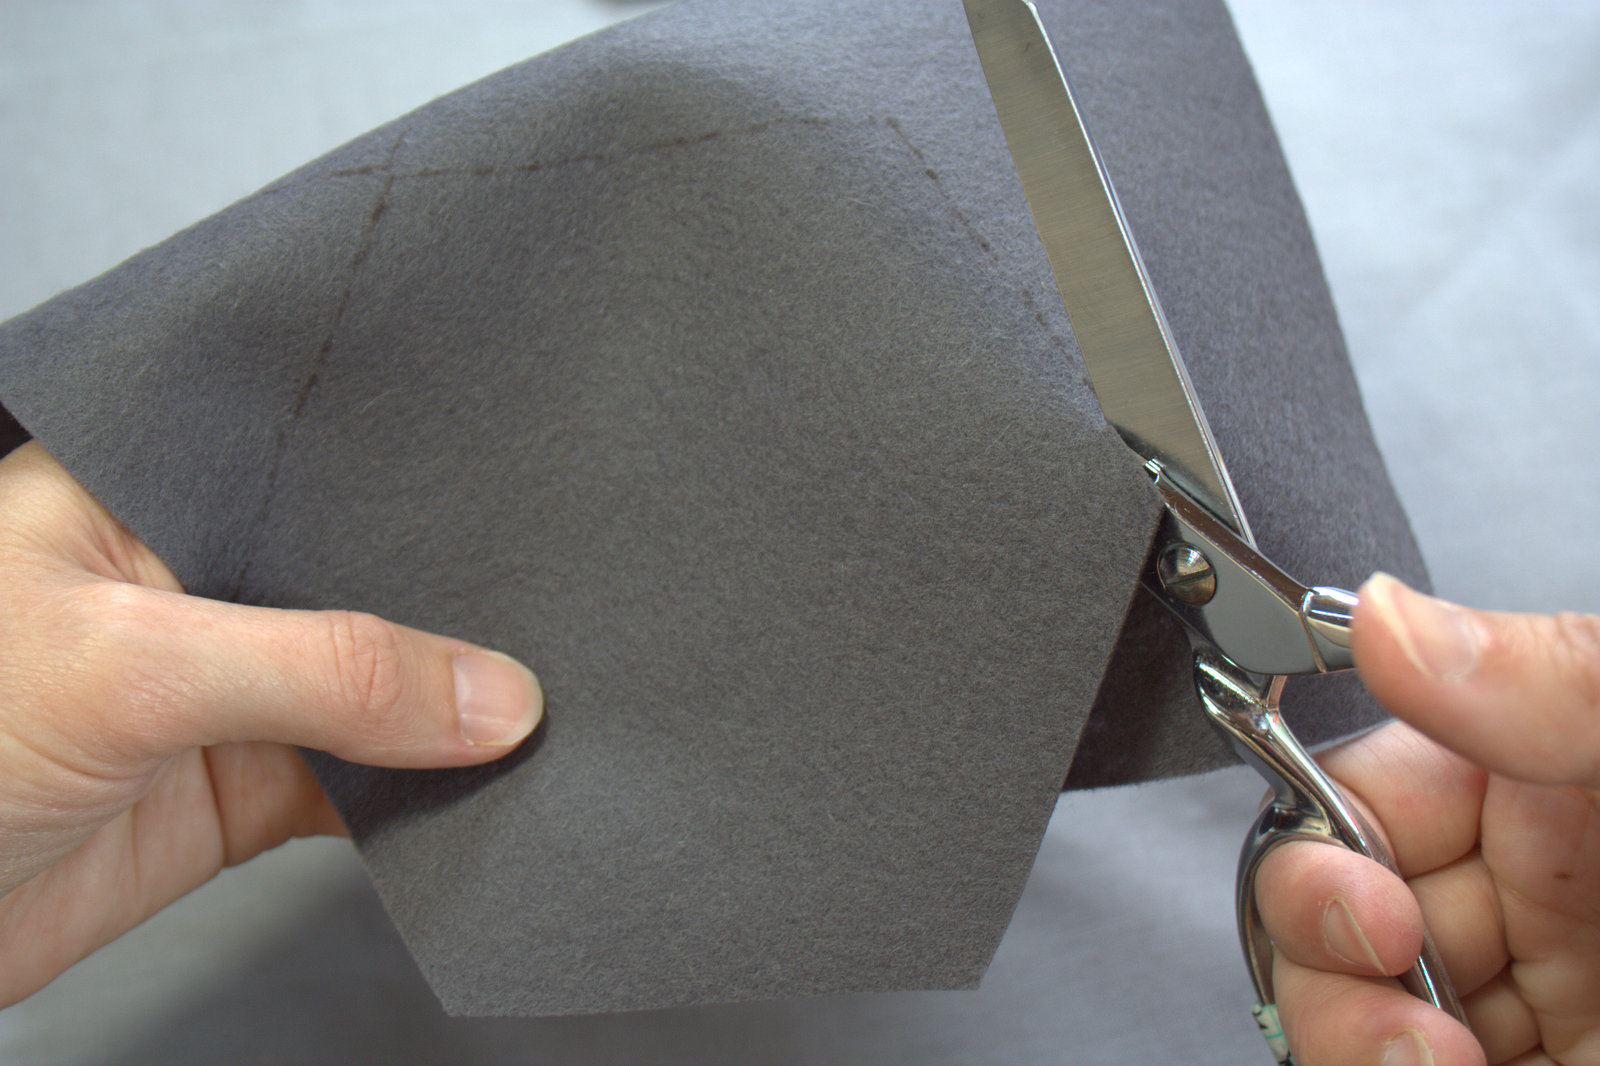
Carefully cut *just* inside the line you traced.
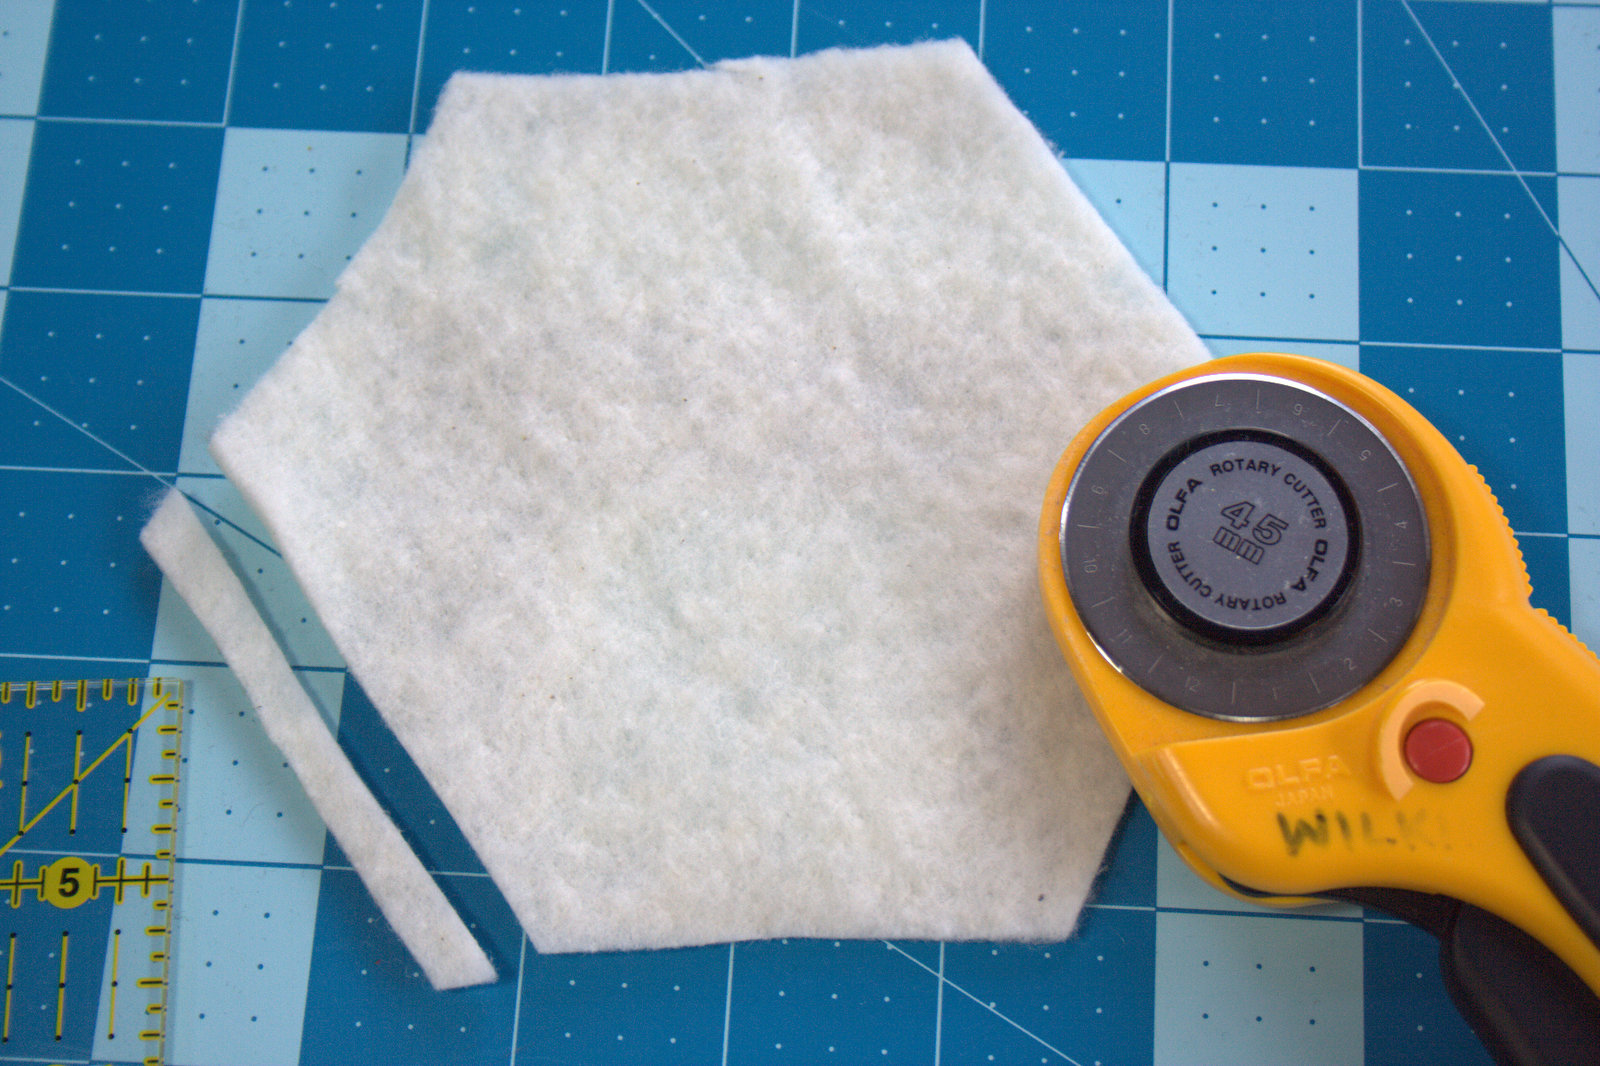
This next step is optional, but if you plan to use the coasters for hot beverages I would recommend it. Gather some batting scraps. This is a great way to use those batting trimmings you’ve cut off the edge of finished quilts. Again, trace your hexagon coaster top and cut out along the line.
Trim 1/4″ off each edge of the batting hexagon. This way, the batting won’t stick out from the edges of the assembled coaster. I used my rotary cutter and ruler, but be sure to count how many edges you trim since it’s easy to lose track. You should have six (6) trimmings after trimming each hexagon. Set your felt and batting hexagons aside.
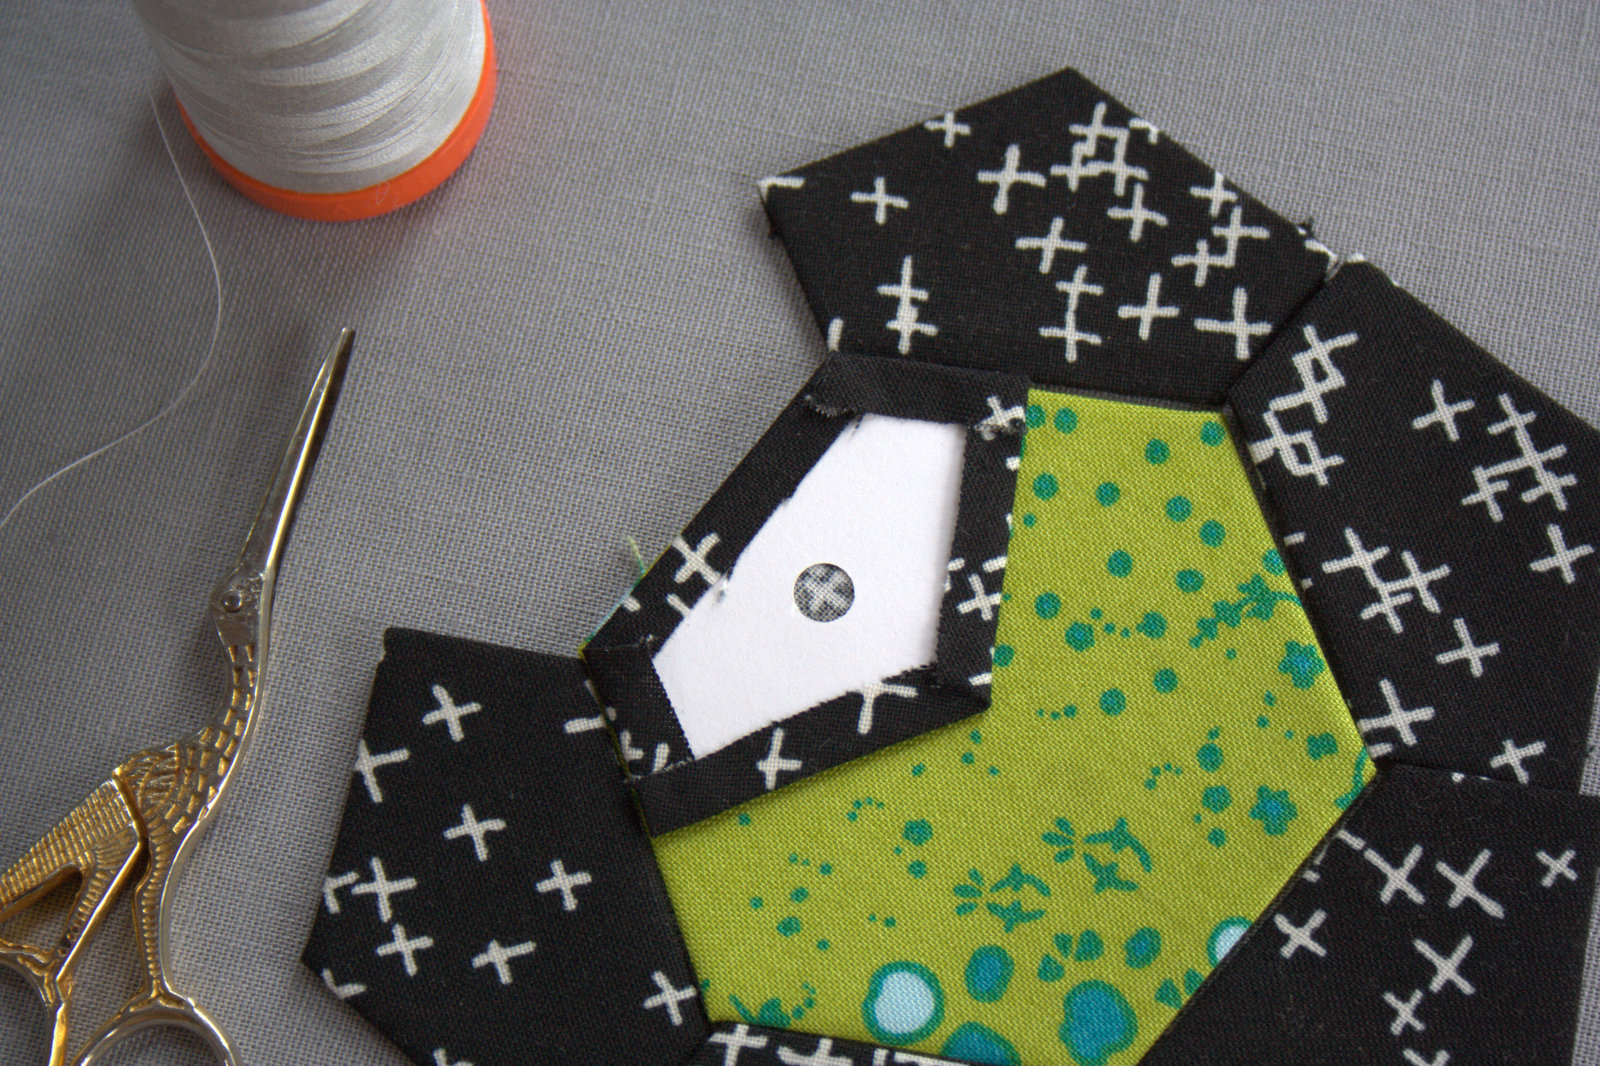
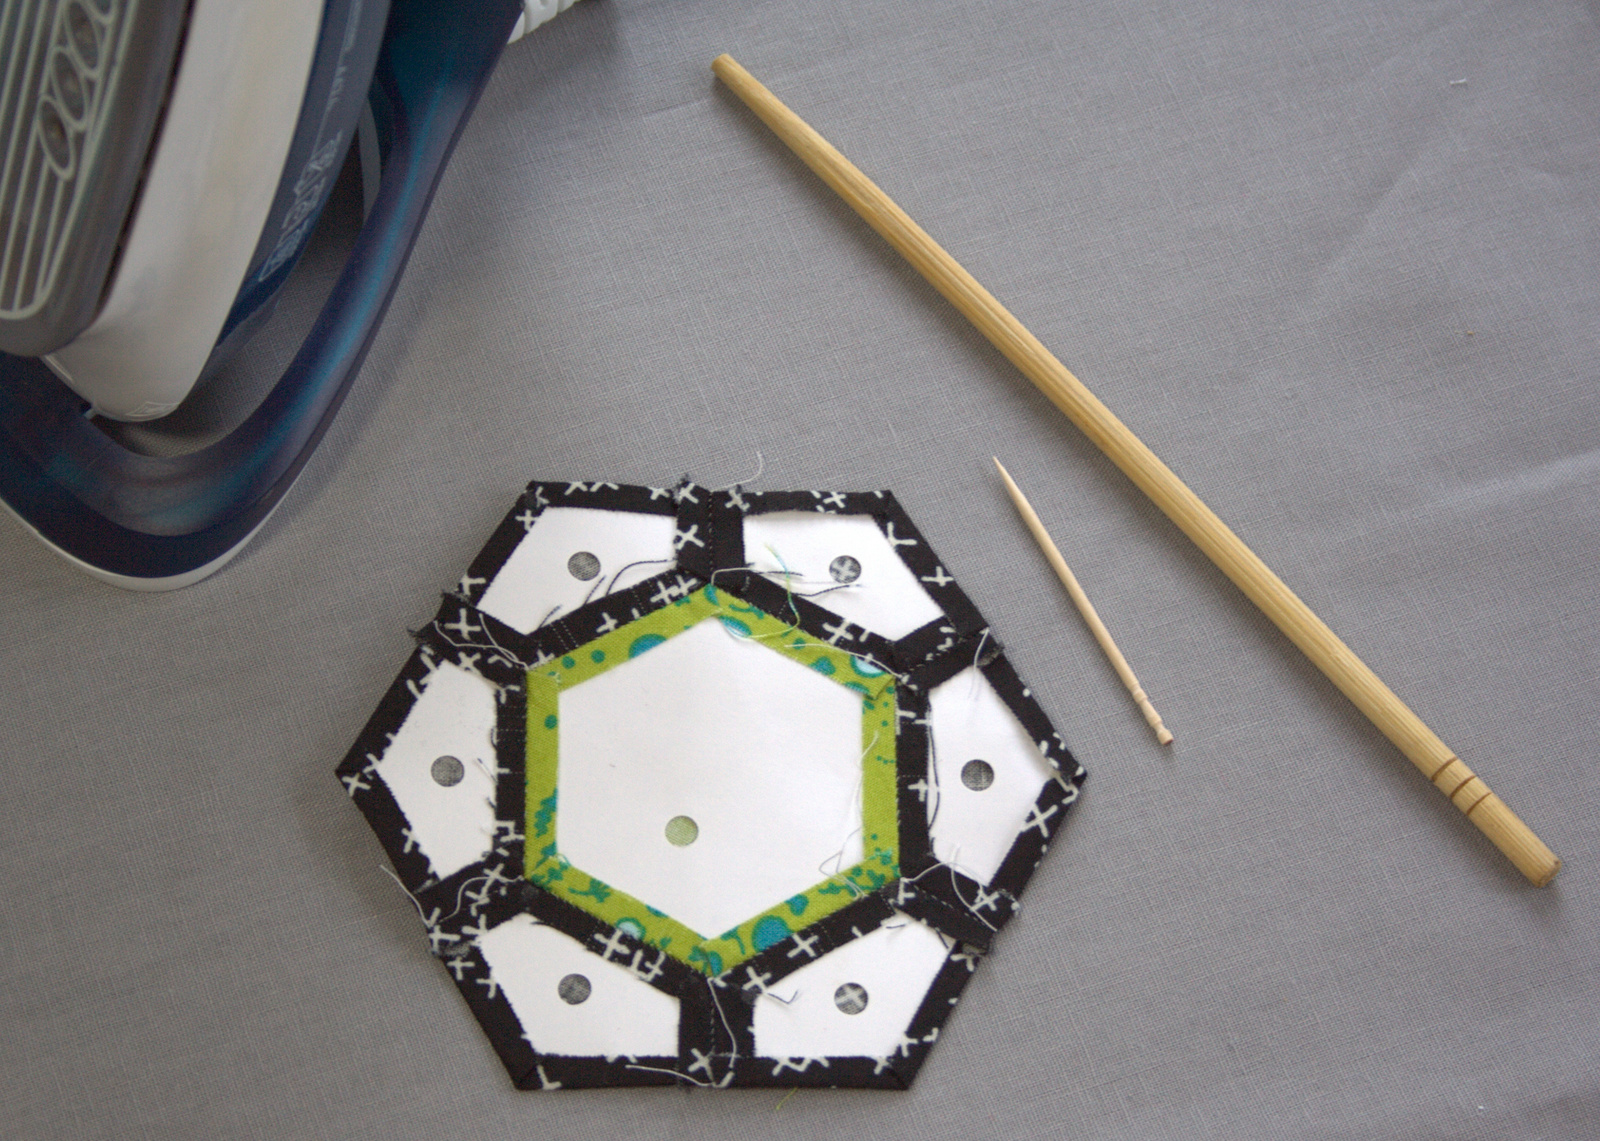
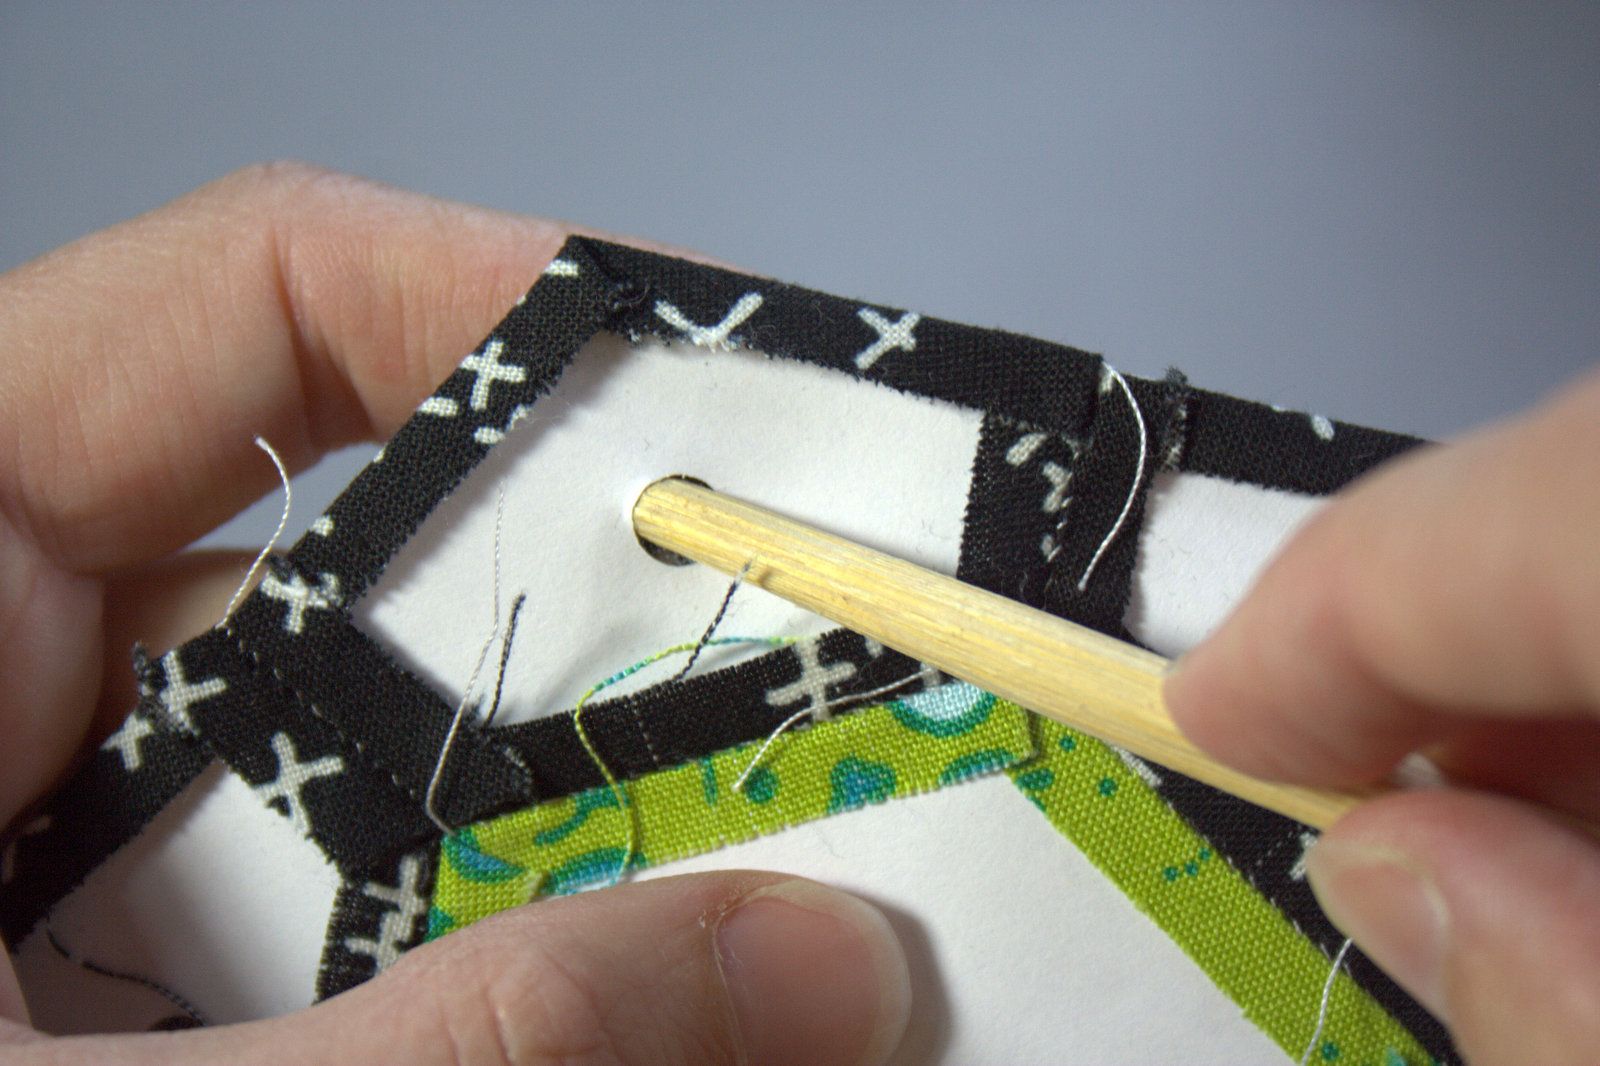
Now, back to your coaster tops. It’s time to take out those template papers! You will need your EPP coaster tops, a toothpick, a chop stick (or crochet hook), and an iron. Trust me, and no, we’re not making dinner!
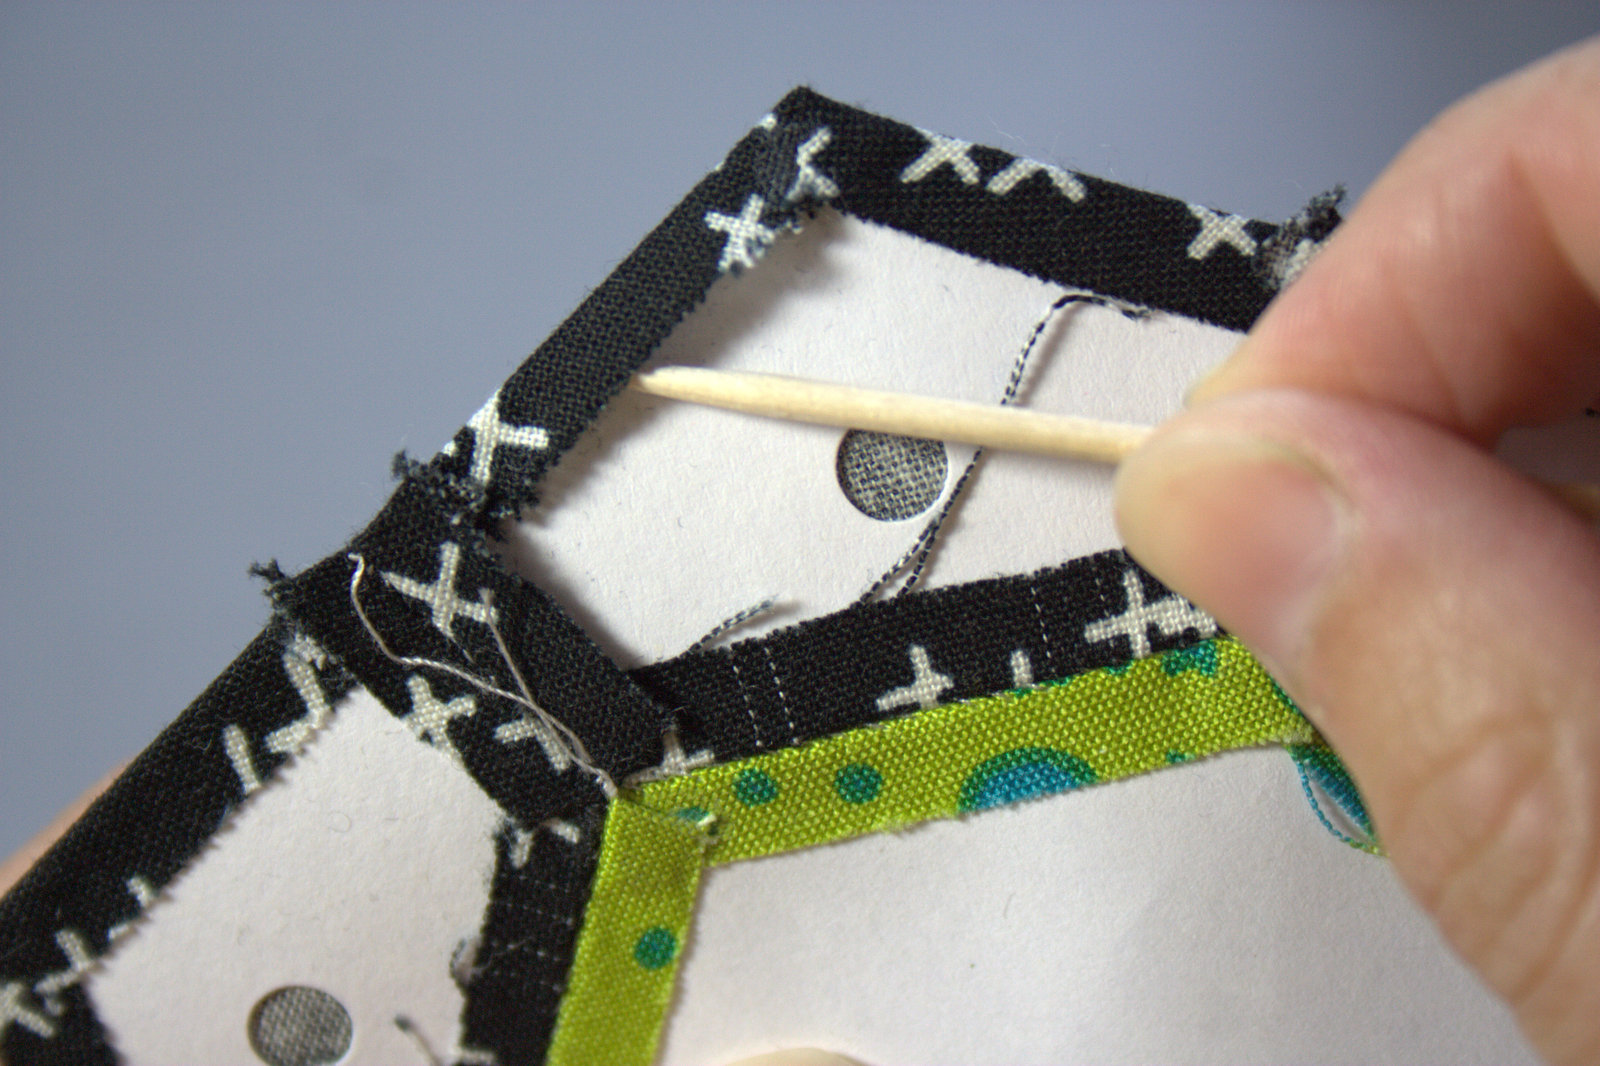
Gently slide the toothpick under the glued edges of the fabric, separating the fabric from the cardstock template. Be particularly careful around the outer edges to separate the fabric from the cardstock without pulling it out of shape too much.
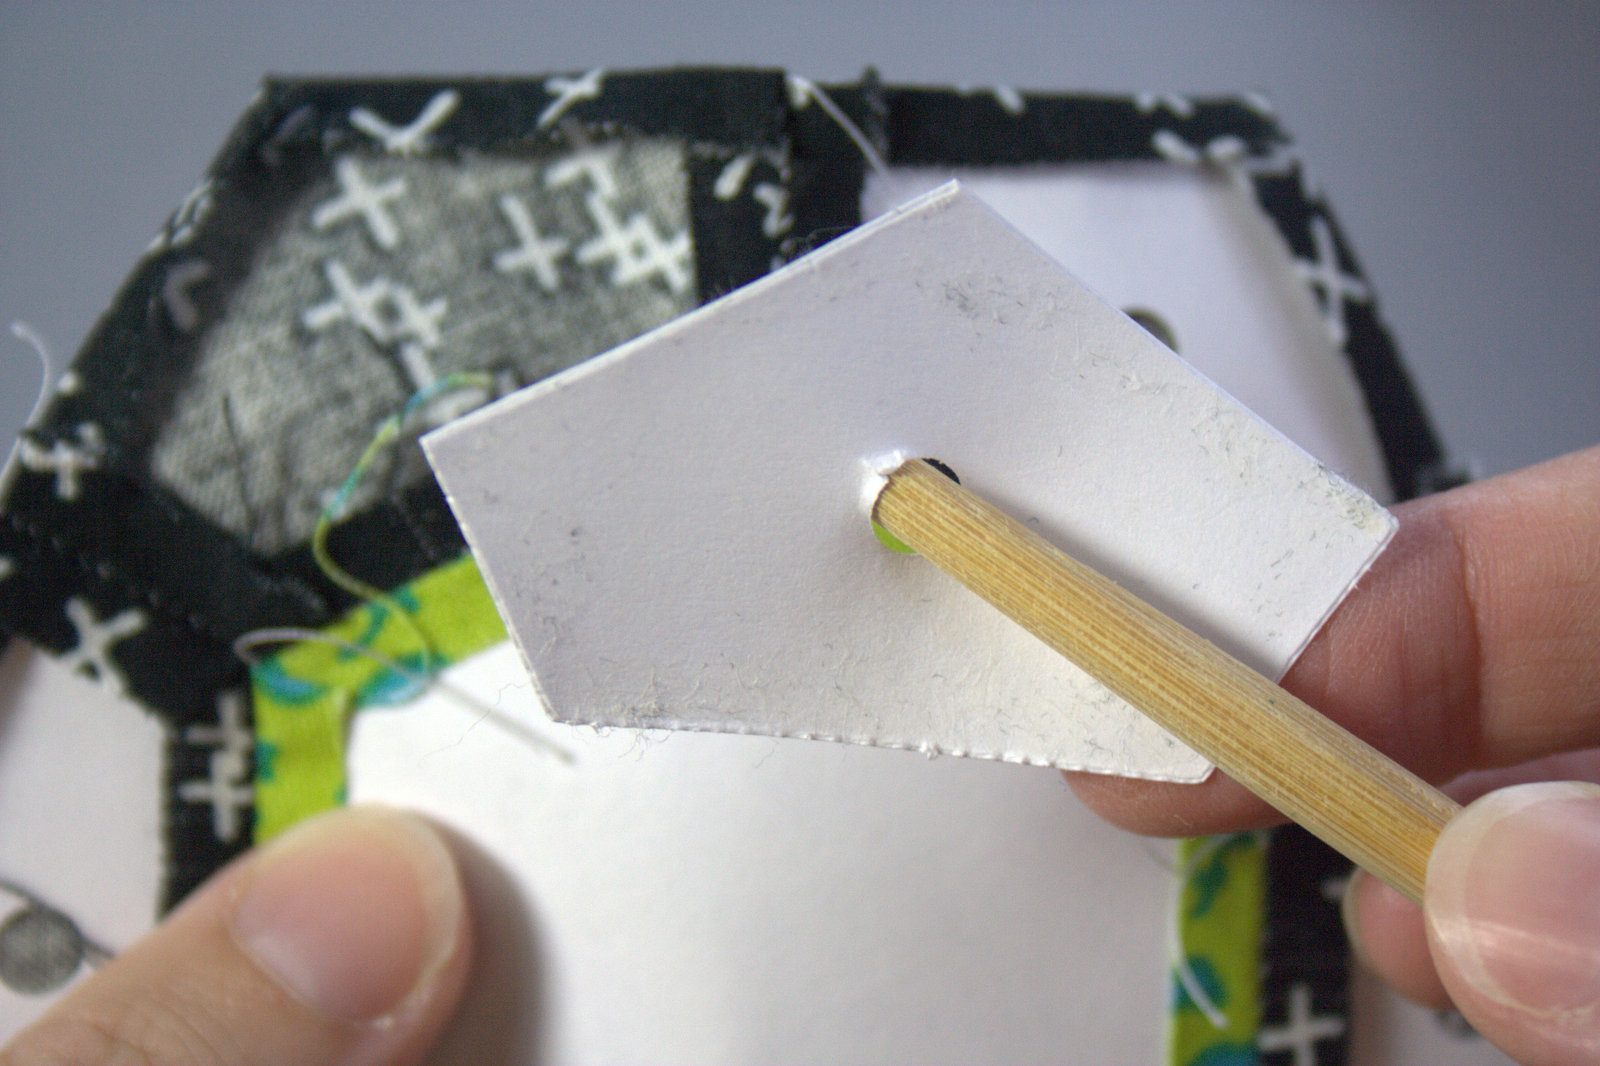
Once the fabric edges are separated from the cardstock template, grab your chopstick and stick the end of it in the hole punched hole of the template.
Gently pull the edge of the chopstick up and the cardstock template will pop right out. This chopstick removal method works much more smoothly with thread-basted EPP pieces, but as long as all of the glue spots have been unstuck, it should still smoothly remove the template. You can save the template and use it again!
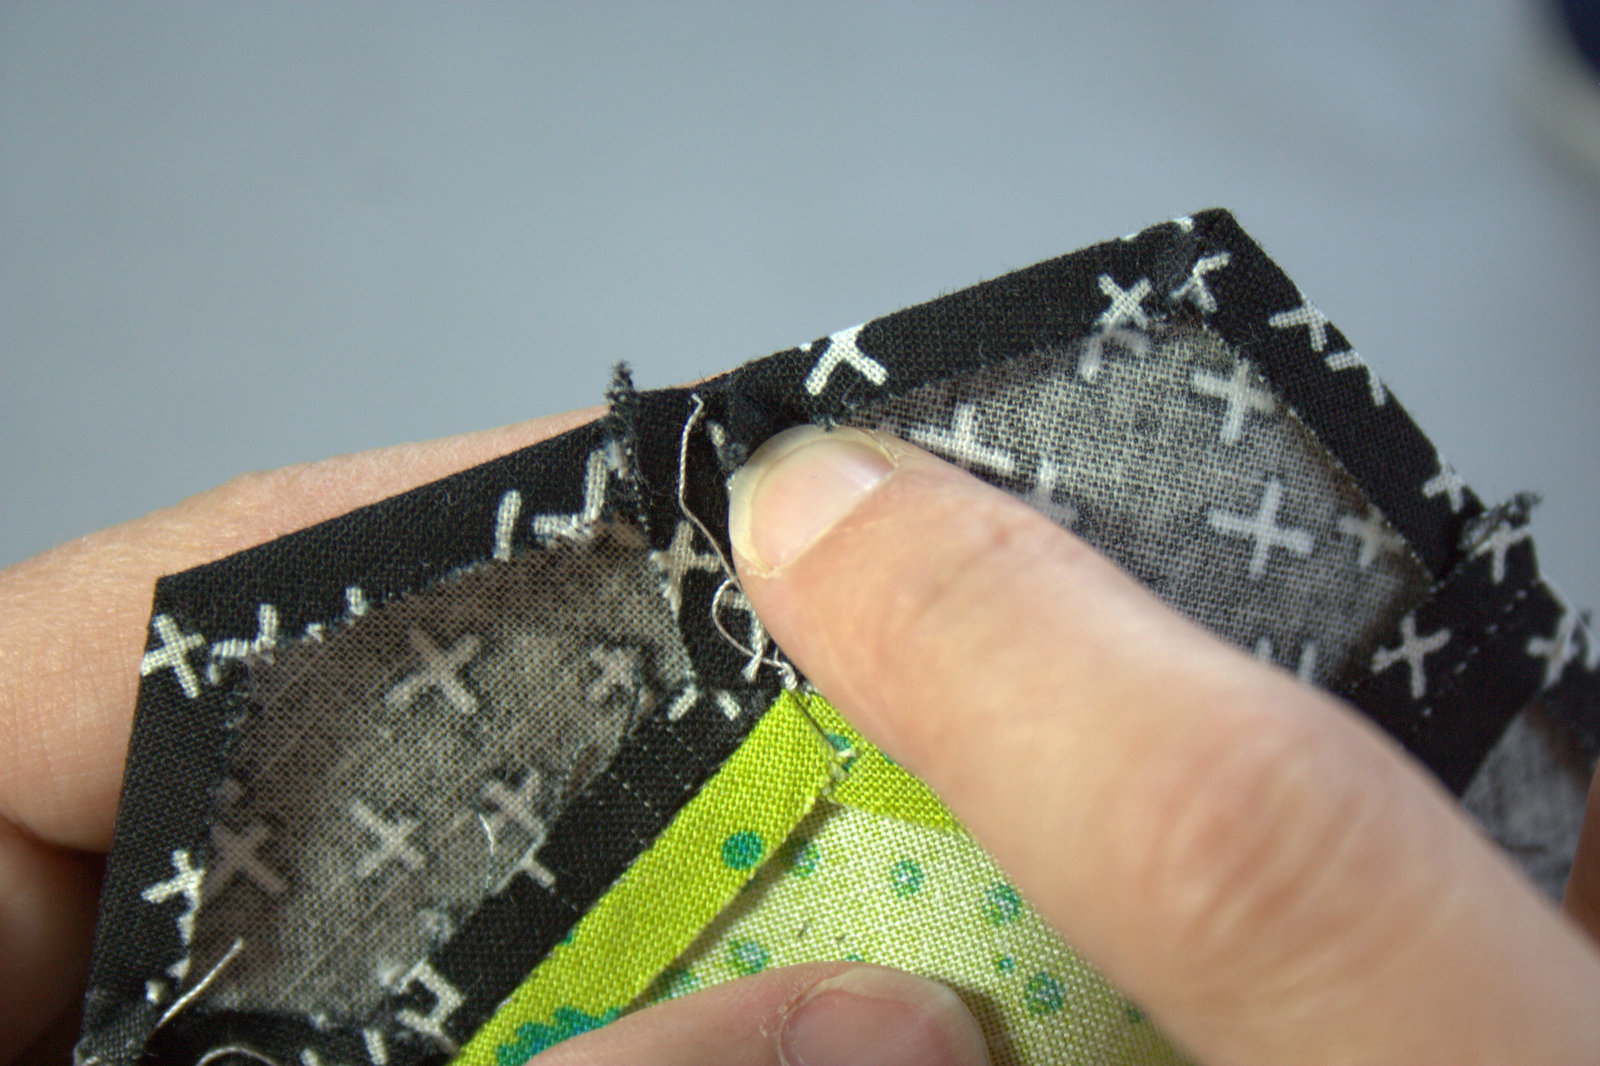
Once all of your templates have been removed, give your coaster top a good press with a hot, dry iron, ensuring that all of the outer corners are still folded in the way they should be.
While you’re pressing your coaster top, fold in the edges of your outer seams like you’re making a paper airplane and press well. This will keep them away from the edges when you sew your layers together, keeping the edges of your coaster neat and clean and free from peeking-out seams.
It should leave a nice neat edge.
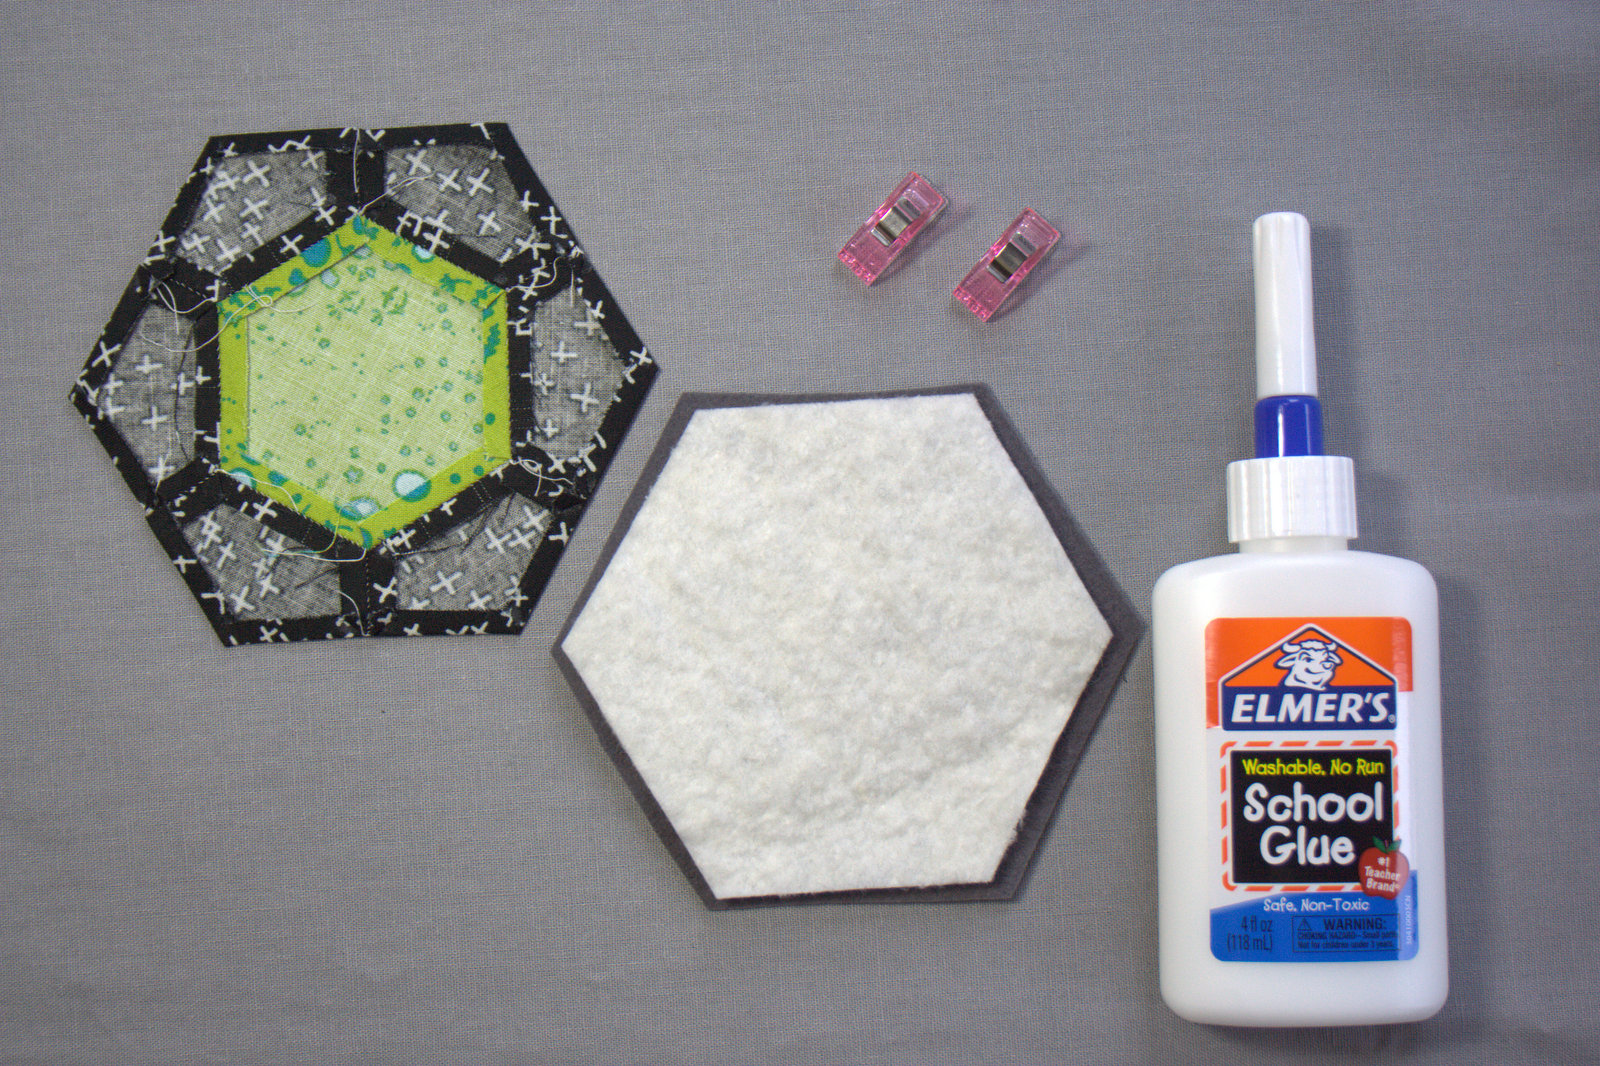
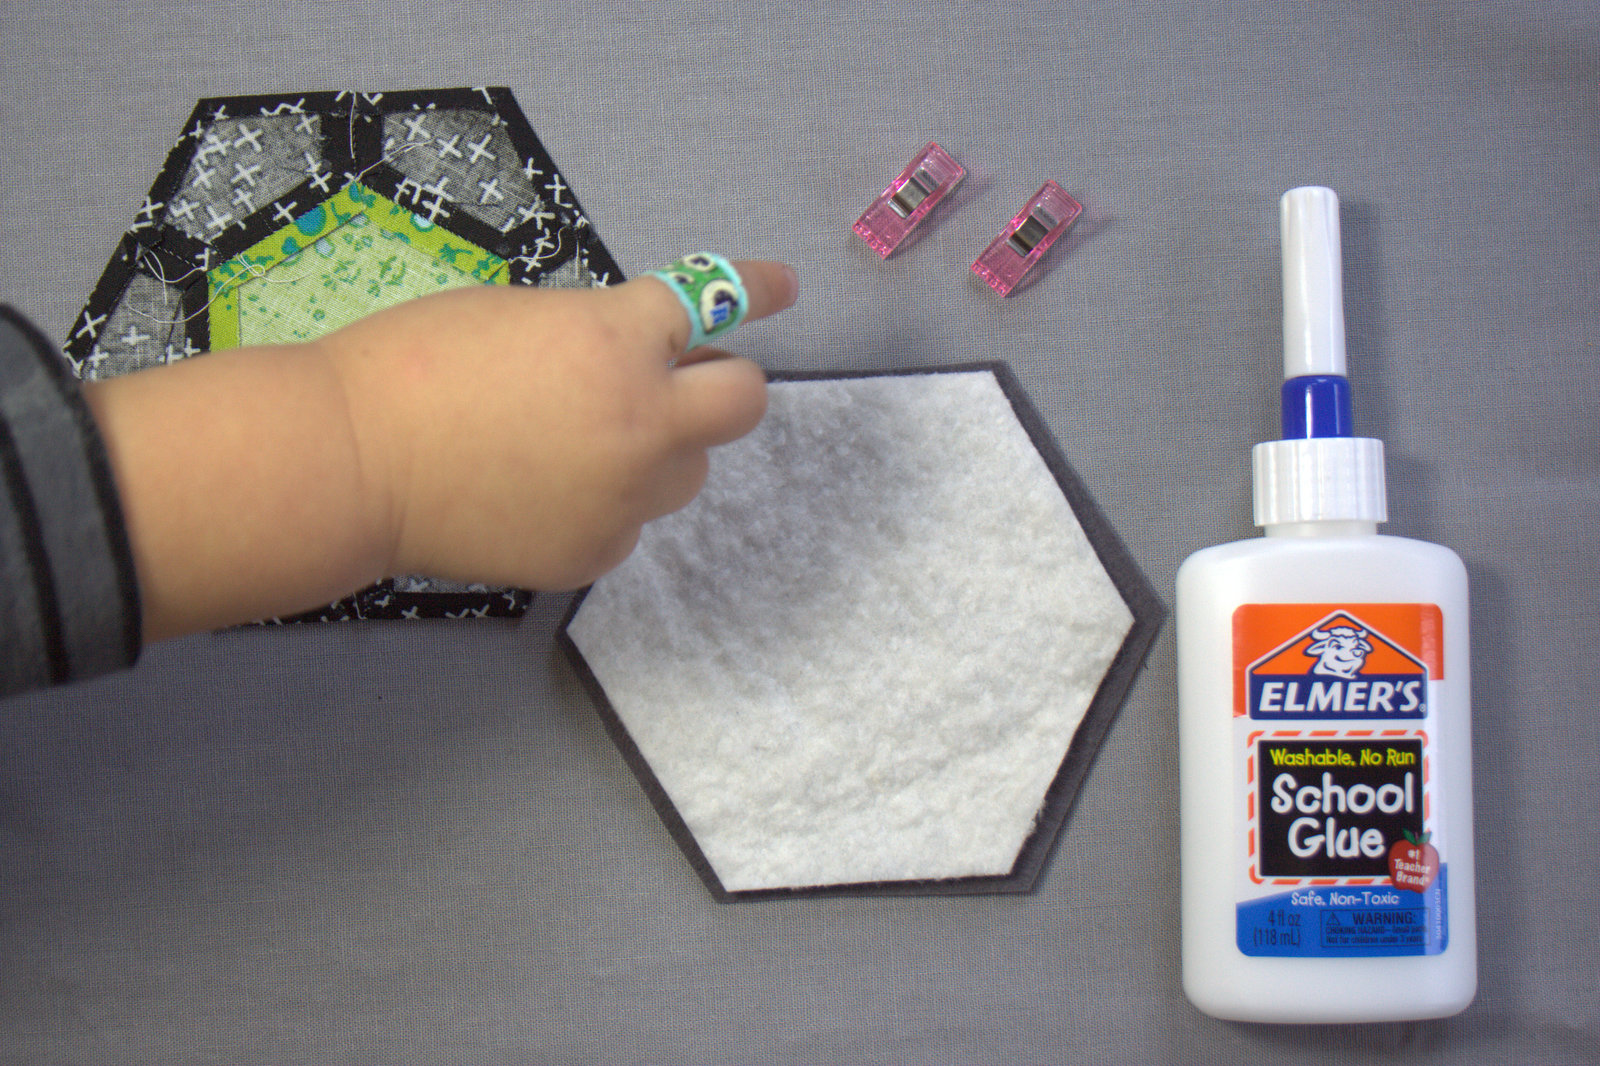
Now it’s time to assemble our coasters! You can probably just pin the layers together: felt on the bottom, then batting, then EPP coaster top, but I like to glue baste and use Clover Clips* to hold the layers together before sewing since it results in a nearly perfect alignment.
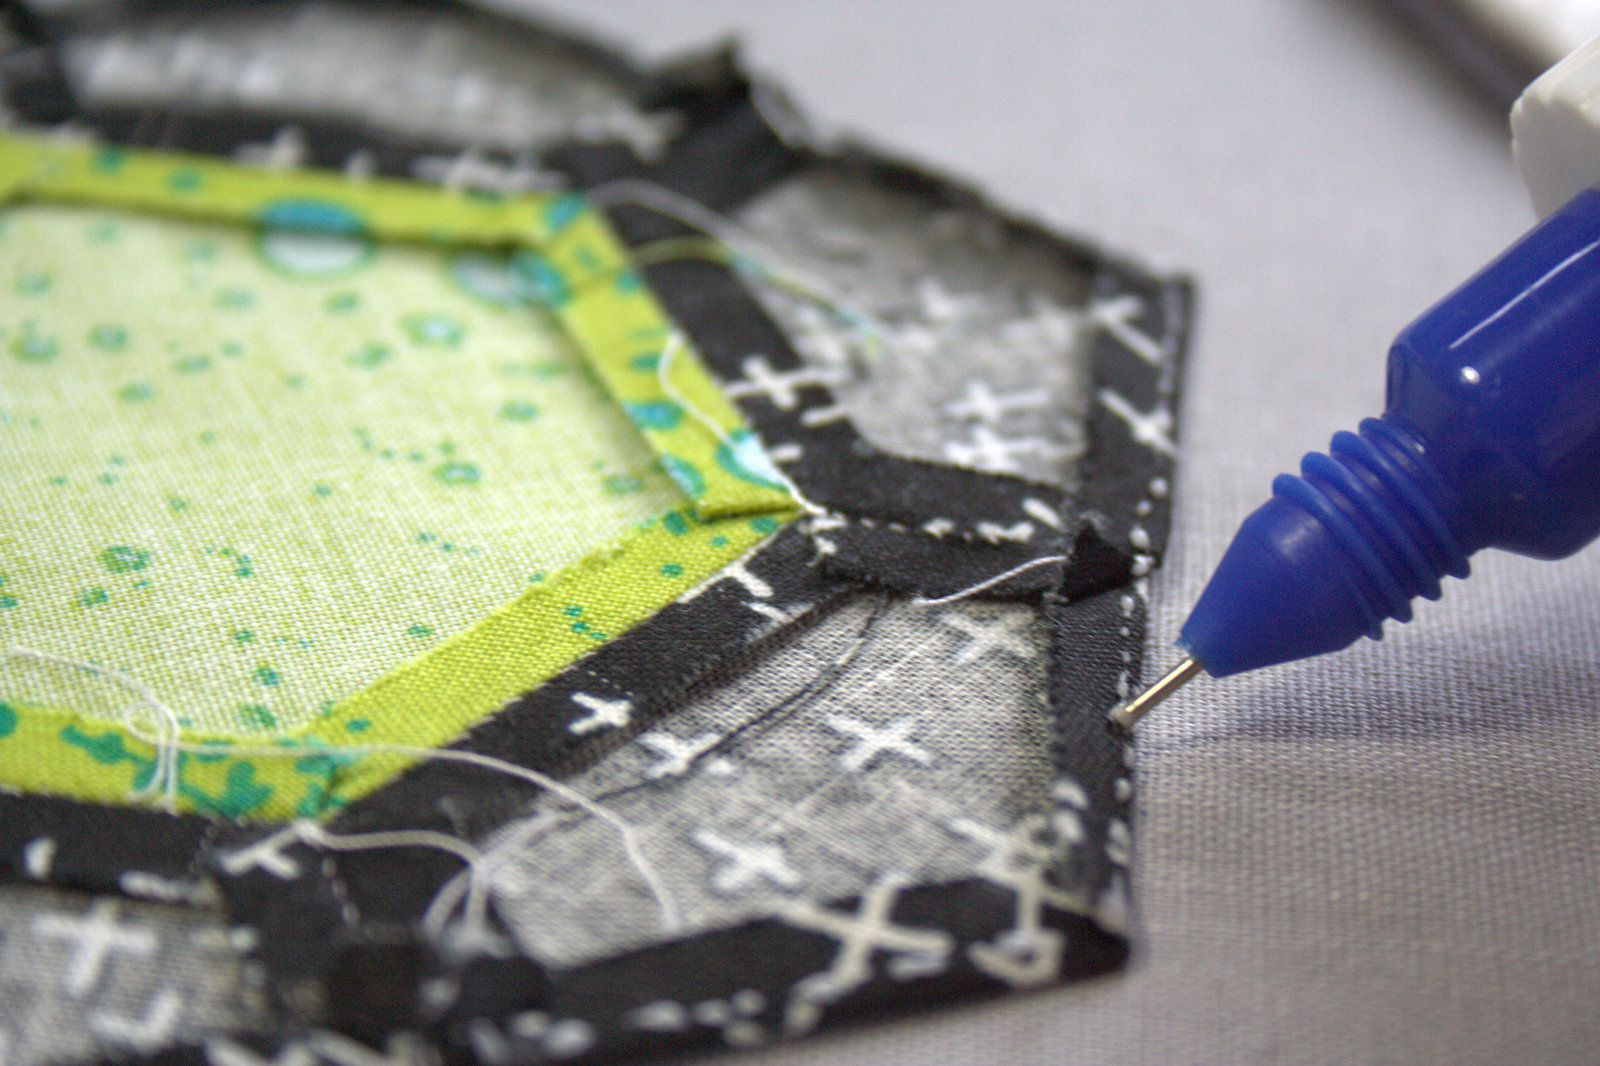
Using Elmer’s washable glue, make a tiny path of glue around the outside edge of the entire coaster. I use Fine Line Glue applicator tips provided by Pile O’ Fabric and they are fantastic. They are superfine applicators that screw onto a regular bottle of school glue, but they control the flow so that you don’t end up with gloppy globs of glue all over your project.
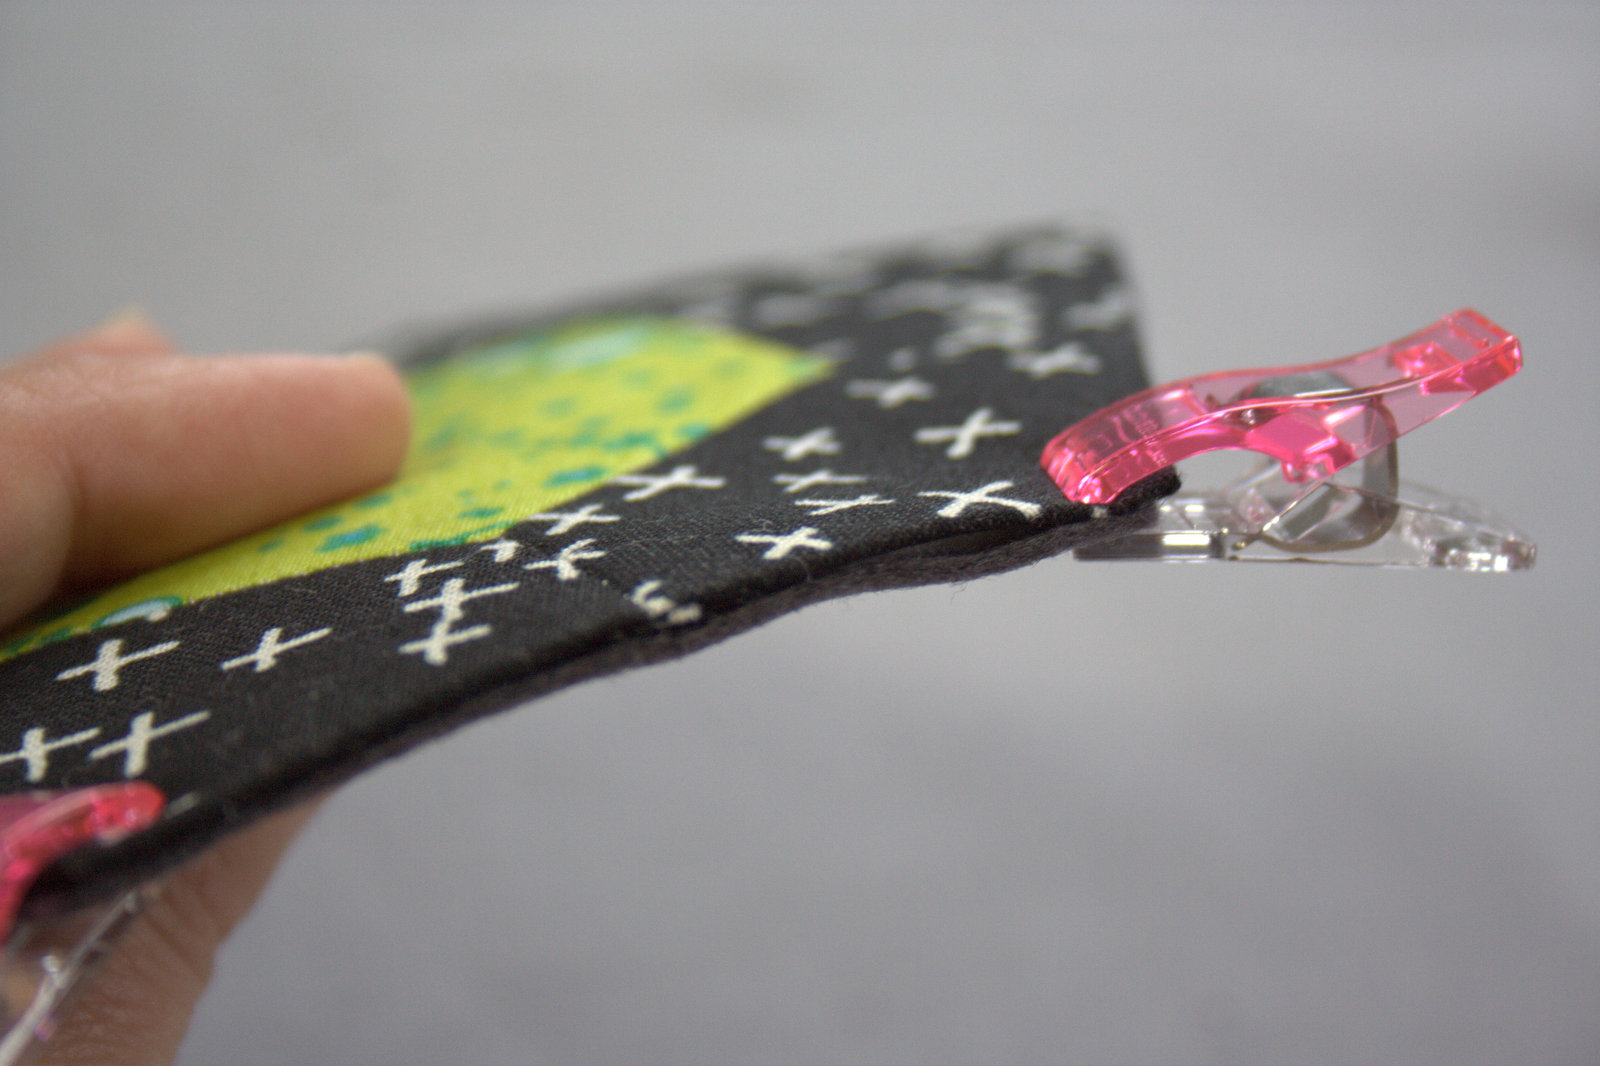
Assemble your layers: wool felt on the bottom, then batting centered within that, then EPP coaster top carefully positioned on top. Give it a gentle press with a warm iron (note that wool is now involved) to set the glue. Clover clip the edges for extra stability and head over to your sewing machine!
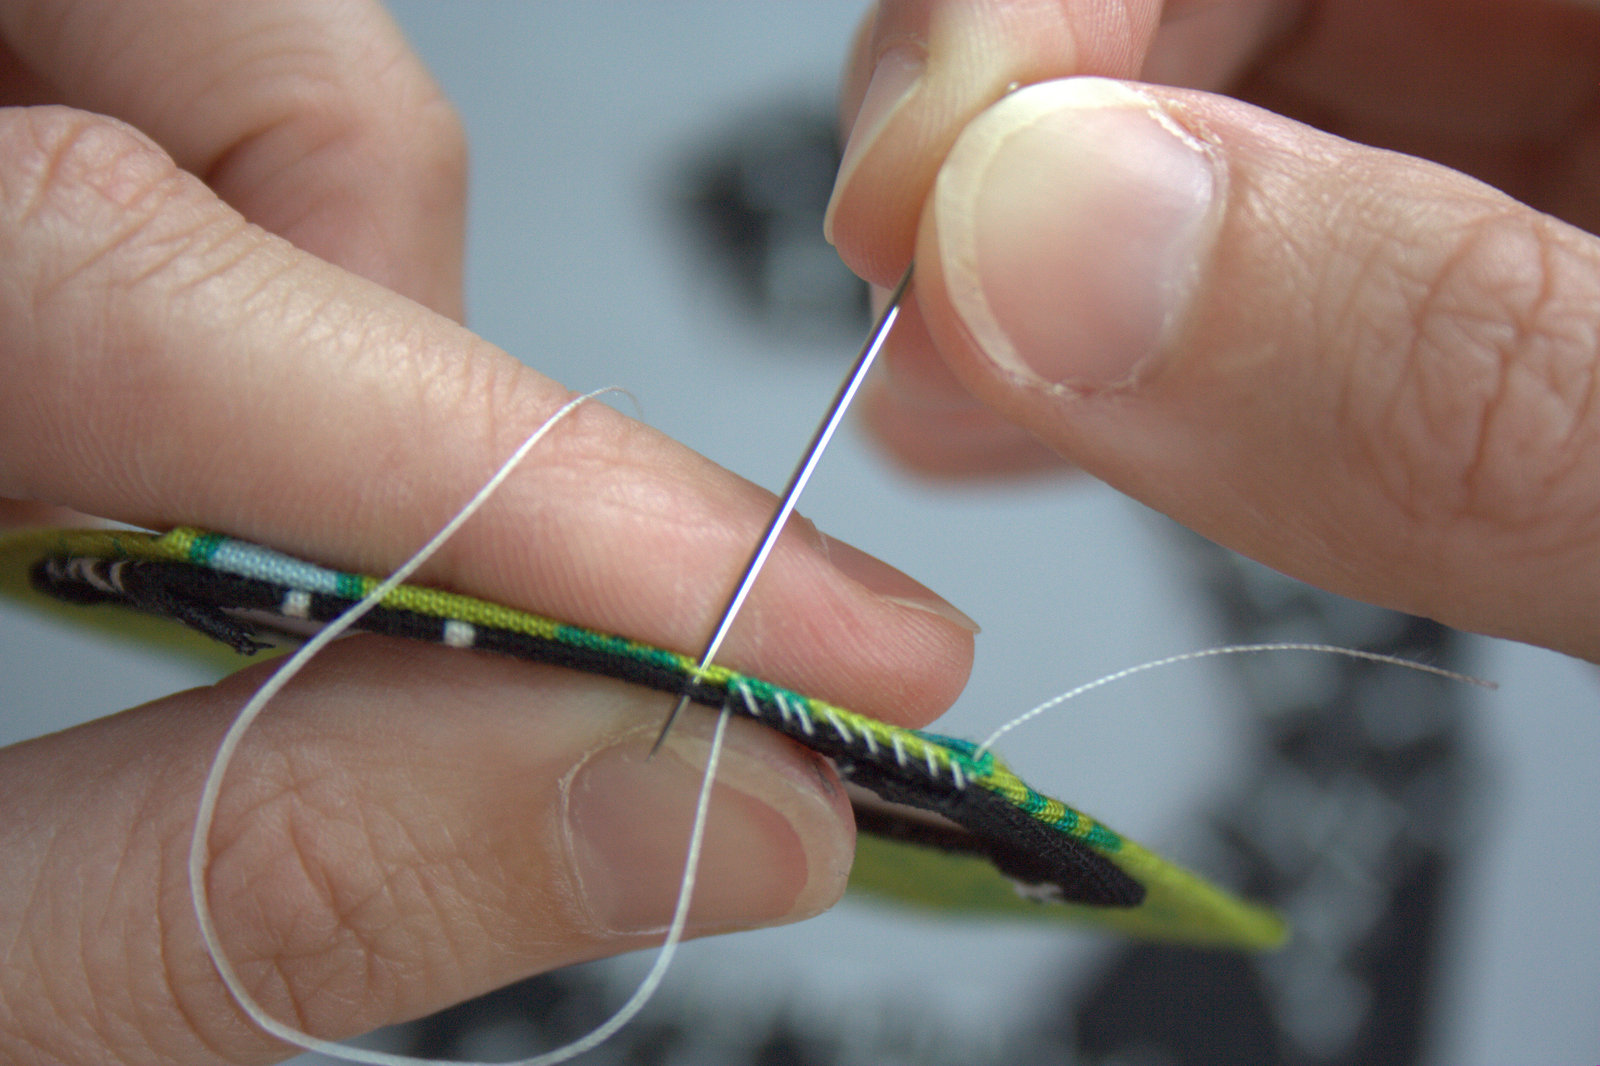
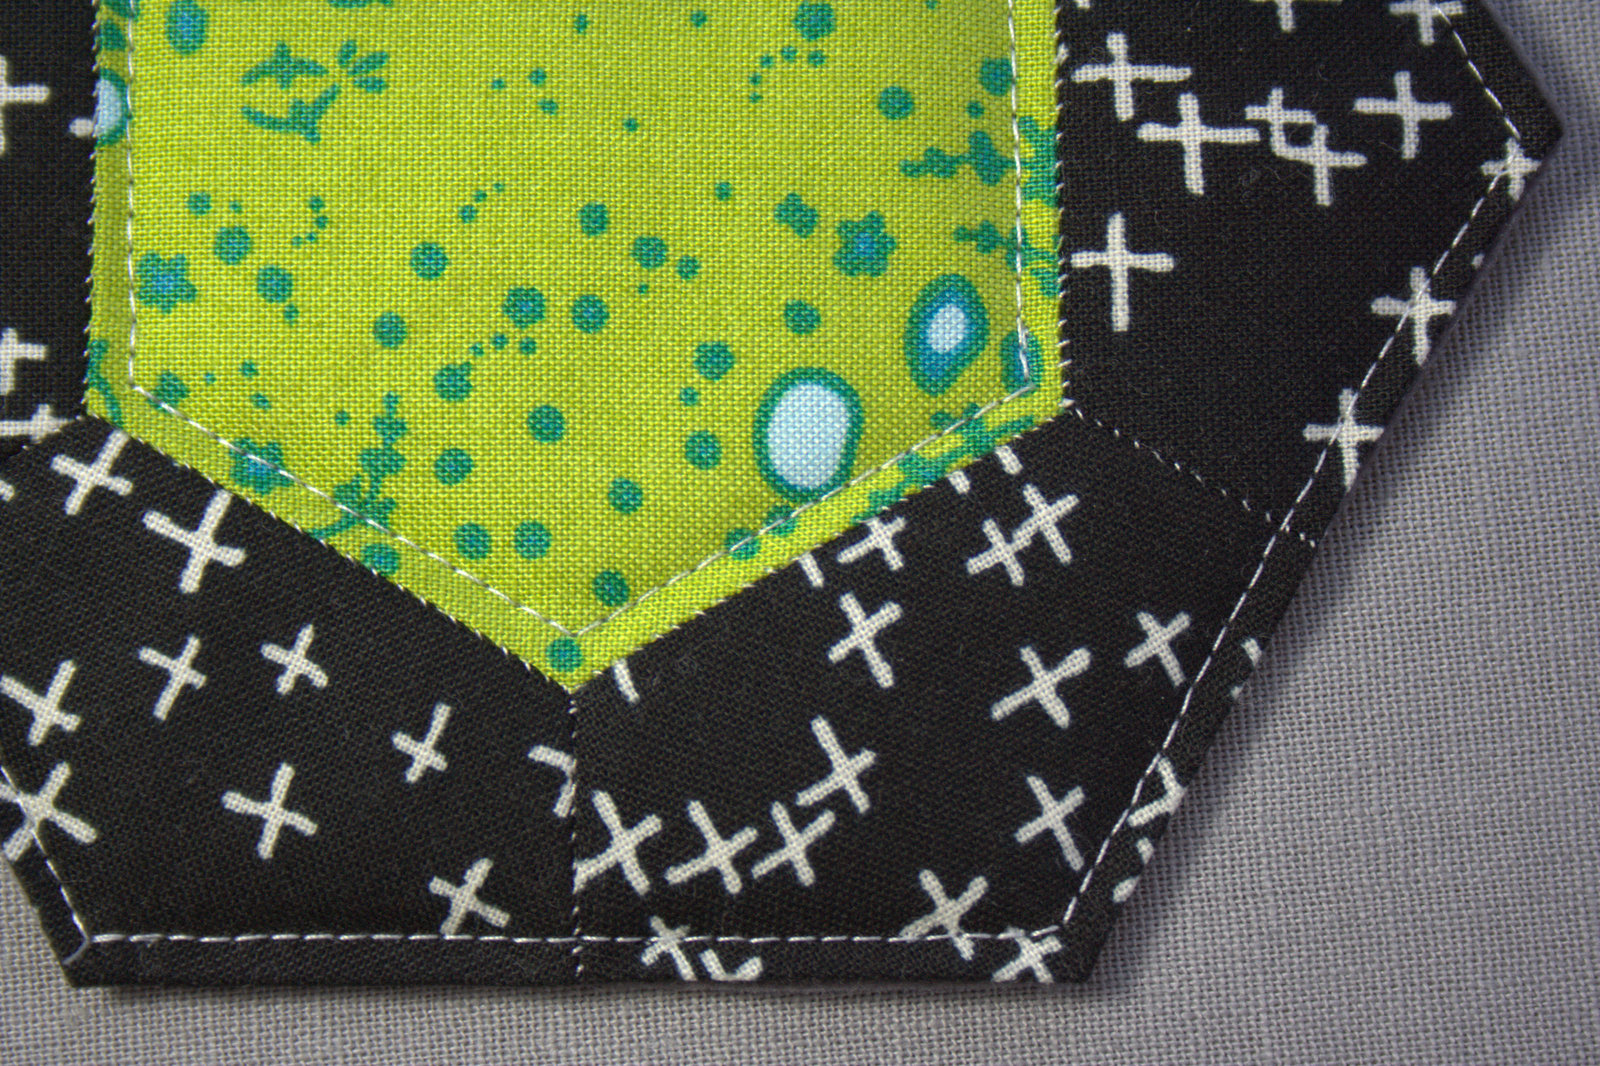
Top stitch about 1/8th inch from the edge of the entire periphery of the coaster.
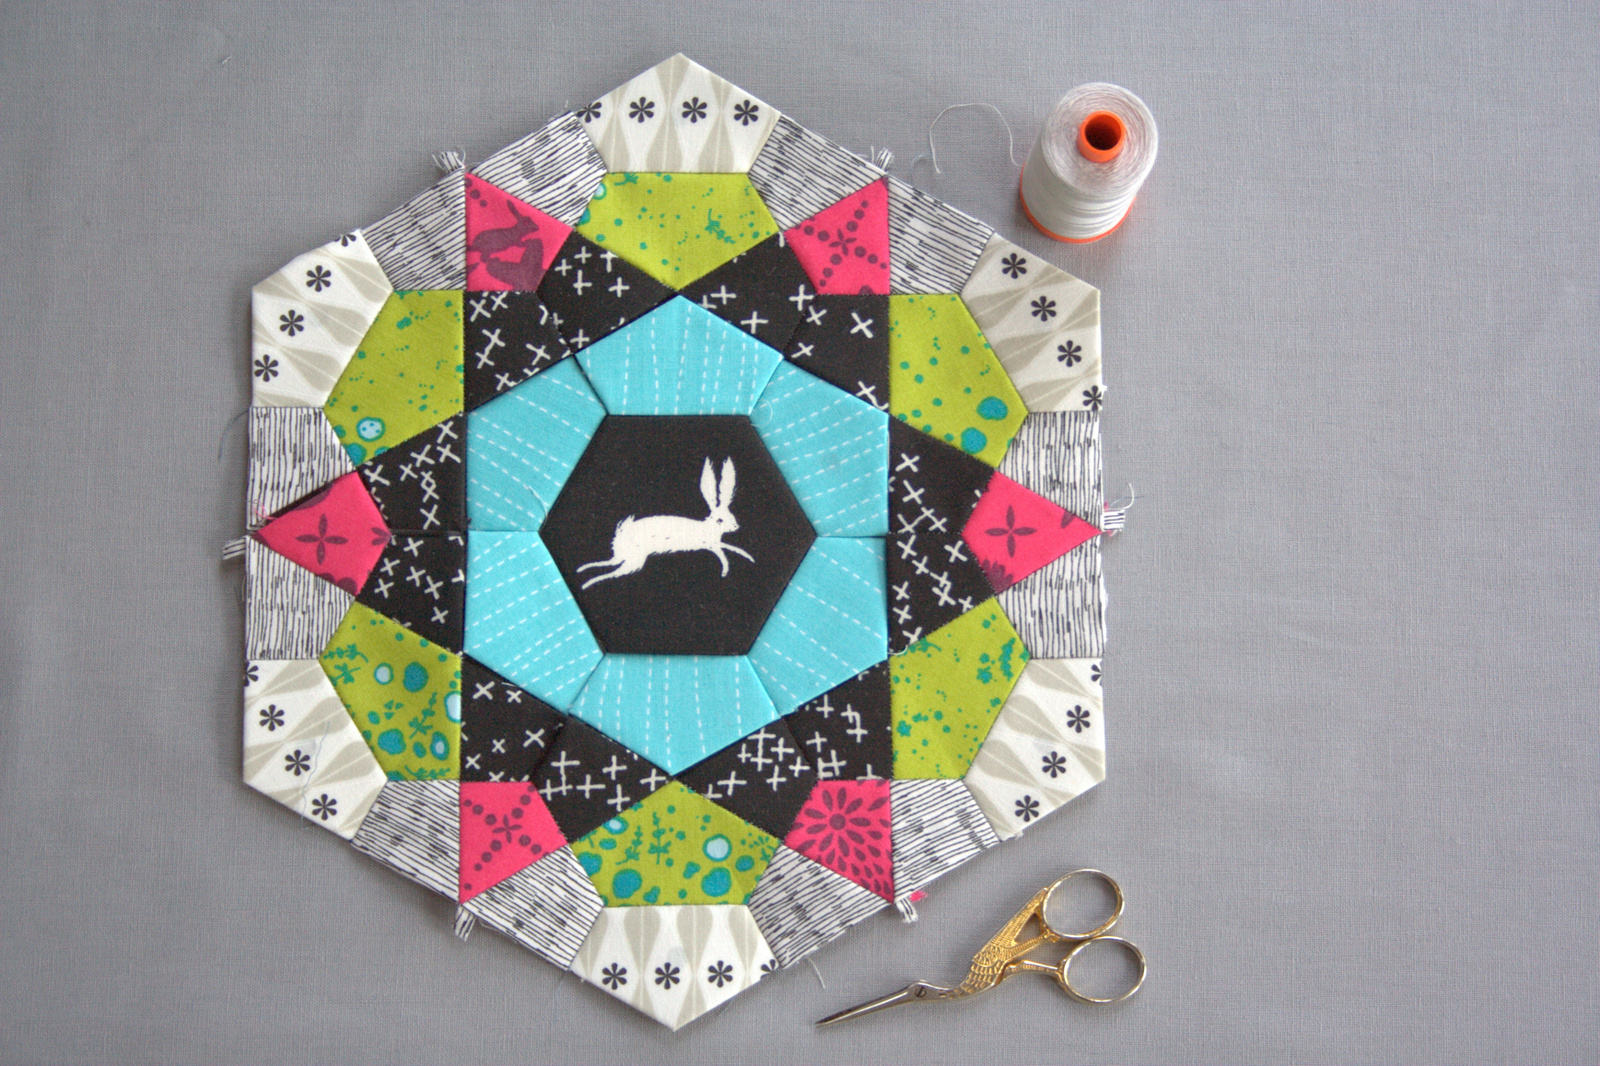
You can also add additional quilting if desired and for added durability. I added a top stitched hexagon about 1/8th inch from the edge of the inner hexagon mirroring the outer edge stitches.
Carefully trim any wool felt that extends beyond the coaster top, and admire your EPP Rose Star coasters. Weren’t those quick and easy gifts? (You can give yourself gifts, too, you know!)
Between cutting the fabric and templates with the Sizzix die cutting machine, glue basting the EPP shapes, and backing the coasters with felt, these whip up as quickly as you can stitch the top together. It’s a great introductory project to EPP since it’s a quick finish, yet is still a handmade, hand stitched gift. I’m definitely planning on making more of these, and playing around with my fussy cutting, too.
*Disclaimer: Clover Clips are a favorite treasure for most toddlers. Use with discretion and awareness that there may be a pudgy hand lurking around any corner waiting to snatch your Clover Clips away.
I’m excited to share that today is my Sizzix Design Team debut! Over on the Sizzix blog, I share a tutorial on how to get started on making an awesome English Paper Pieced (EPP) mug rug using the Rose Star die.
Did you know that there are Sizzix dies created specifically for paper piecing!? I cut all of the templates and fabric needed to piece this EPP star all from a single die! Pretty awesome.
In the tutorial, I take you step by step through the process of making and basting EPP pieces, including some helpful tips, so if you’ve been wanting to learn or brush up on your piecing, go check it out!
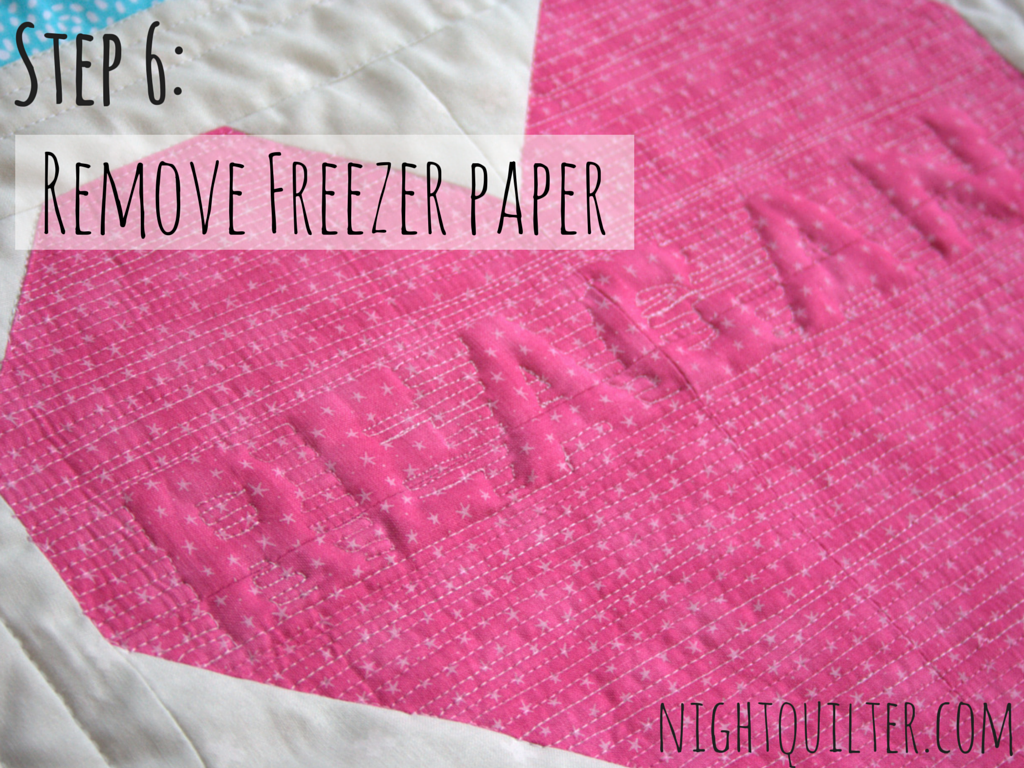
I don’t write on my quilts. I have yet to find a pen or pencil that I trust enough, so I just avoid it as much as possible. I use a Clover Hera Marker* for marking straight lines, which is fabulous since it creases the fabric without actually leaving a mark. (*Affiliate link) But when it comes to complex designs or words, I either have to eye it or just wing it.
When I thought of the idea to write baby Reagan’s name in the heart speech bubble of her Pinkalicious Hazel Hedgehog quilt, I knew there must be a way to get her name to show up accurately but subtly among the matchstick quilting I had planned within the heart. Enter: Freezer Paper. I’ve had freezer paper in my sewing space for over a year, since Grammy June told me it was a must have for paper piecing back when I was first learning. Since I really enjoy foundation paper piecing using plain old copy paper, I have yet to touch the freezer paper. Until today.
Here’s a quick little tutorial on how I used freezer paper to help quilt words in negative space.
Relief Quilting Words in Negative Space
Step 1
Gather your materials. You will need:
Freezer Paper (I’ve read high quality brands like Reynolds work better than Costo-type brands)
Pencil
Scissors
Iron
Thread for quilting (I used 50wt Aurifil variegated thread)
Your quilt!
Optional: printer paper and printer
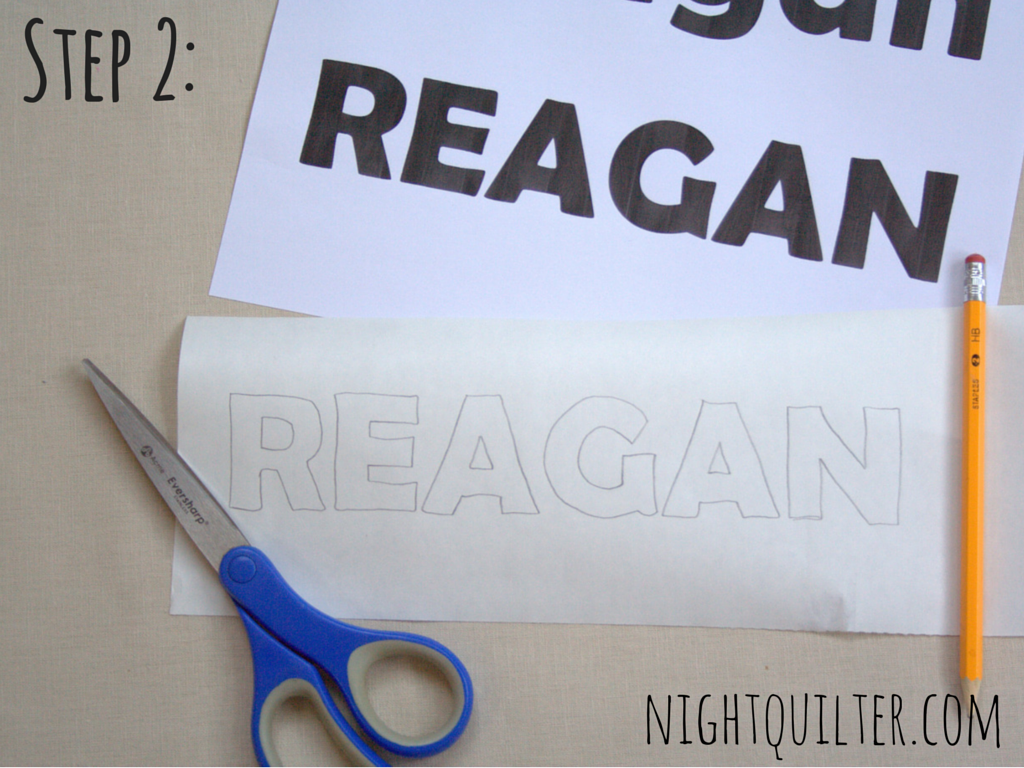
Step 2
Print a sample of the word you want to quilt, scaled to fit in the proper space. Trace onto the dull side of the freezer paper (shiny side away from you). Alternately, you could just draw the letters onto the dull side of the freezer paper–entirely up to your desired look.
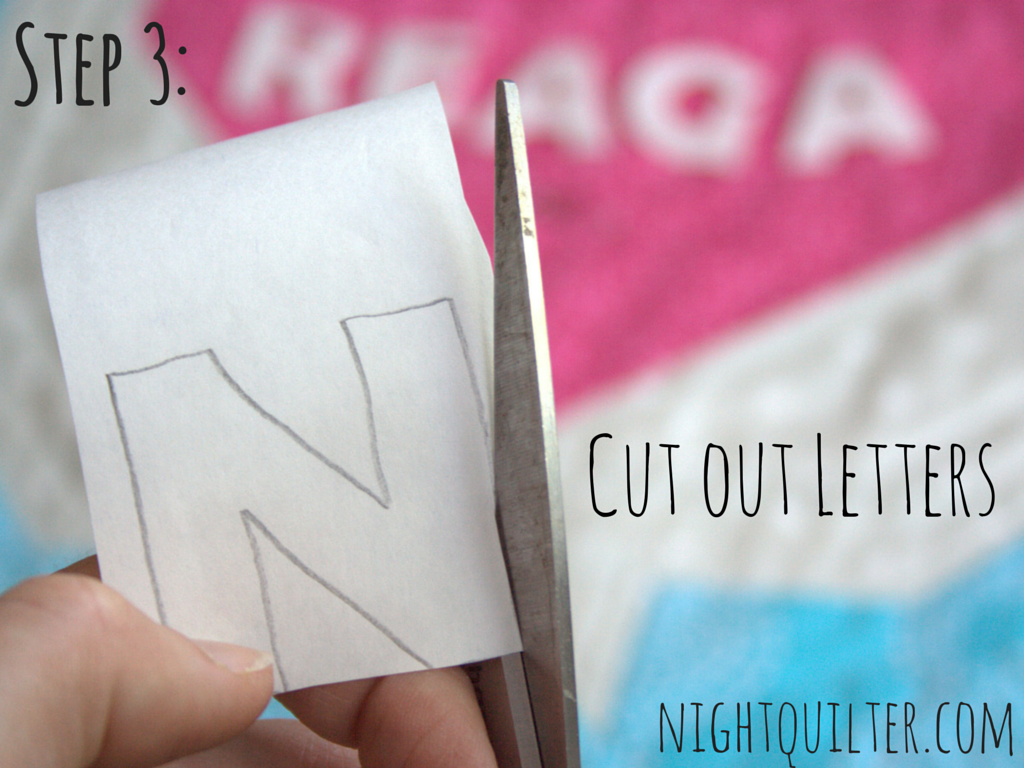
Step 3:
Cut out the letters carefully, using paper-cutting scissors (not your special fabric ones!)
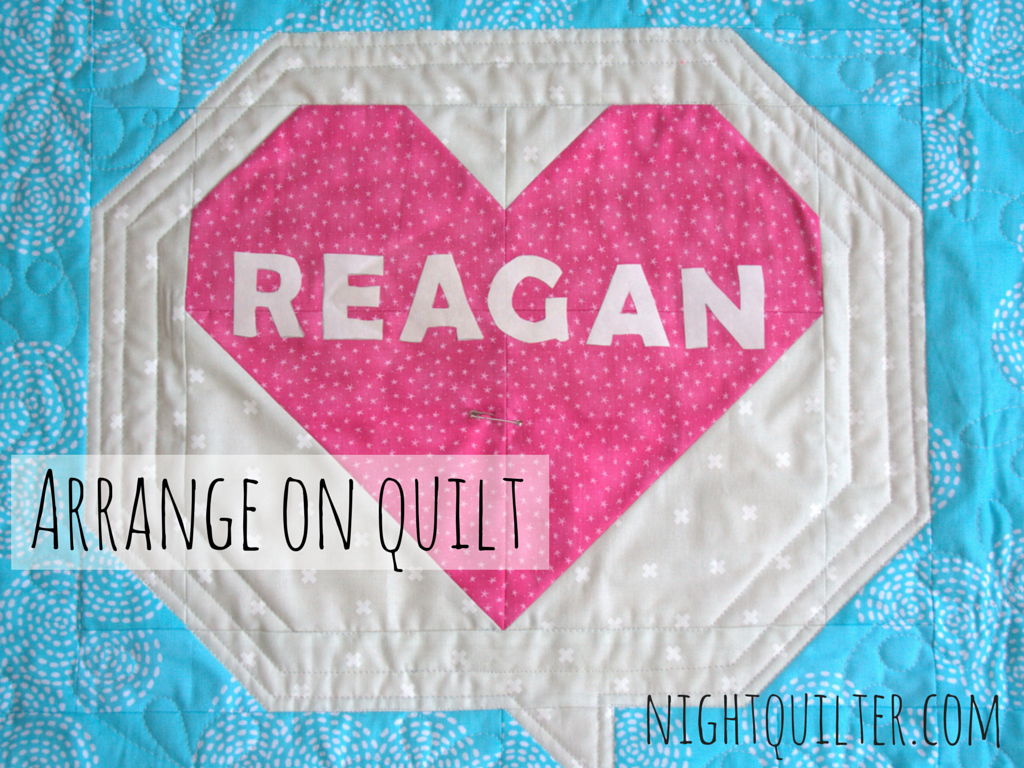
Arrange on your quilt as desired.
Step 4
(Note: before ironing your letters to your actual quilt, always test the freezer paper on a scrap of the same fabric. The freezer paper should stick to the fabric, and after cooling should be easily peeled off without leaving any mark or residue.) Iron your letters to your quilt. The shiny side of the freezer paper will stick to the fabric.
Step 5
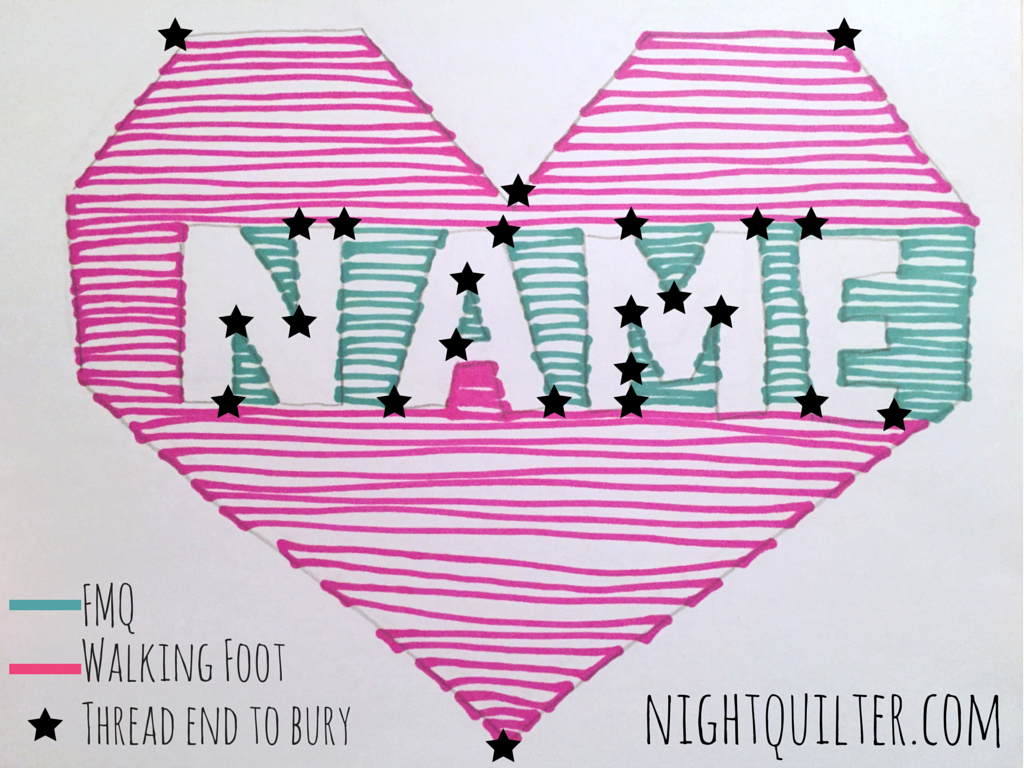
Matchstick quilt around the letters. I used Aurifil 50wt variegated Bubblegum-3660 to match the background fabric, since I wanted the name to be subtle. Use contrasting thread to make the name stand out more.
Here is a *rough* sketch of the path I took while quilting. I used my walking foot to matchstick quilt the entire background, stitching two stitches in the ditch along the outsides of the heart to travel from line to line, rather than having a *million* thread ends to bury. I actually stitched every other line backwards, holding down the “sew in reverse” button for the entire line of quilting. This was easier to me than maneuvering my entire quilt back and forth, and worked just as effectively.
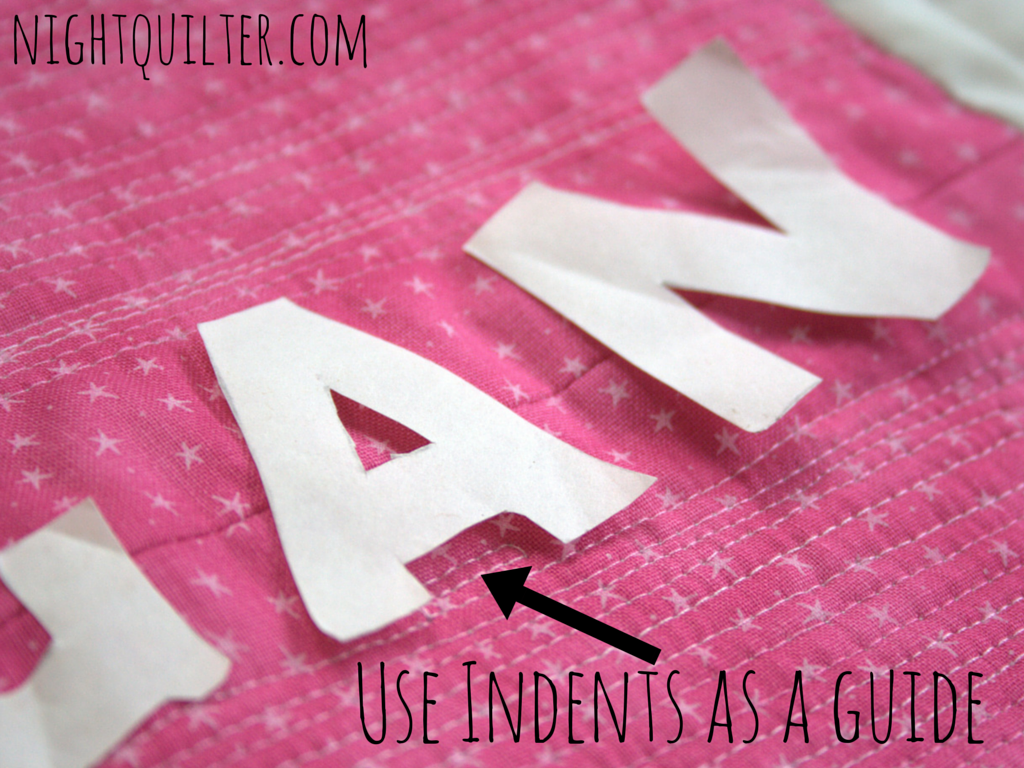
Note: After using your walking foot to matchstick quilt the background (around the periphery of the letters), some of the freezer paper letters may have come unstuck.
Iron them on again, using the little indents (if your letters had any) as a guide.
Next, free motion quilt the matchstick quilting within and between the letters, since the space is so small and back and forth quilting is much easier free motion style (you don’t have to twist and turn your entire quilt like you would using a walking foot!). Be sure not to quilt onto the freezer paper.
Step 6
Peel off the freezer paper letters. Bury any threads.
Bonnie Christine is a surface pattern designer, mother hen of the Roost Tribe and author of Going Home to Roost – a blog dedicated to living an extraordinarily creative life. She is inspired by the great outdoors and is passionate about sharing what she knows and creating community around creativity. Sing it, sister! These ribbons may seem familiar, since the coordinating fabrics in her Sweet as Honey fabric line inspired my very first wine and fabric pairing!
This line of ribbons was inspired by a love for nature and sunshine. They represent working in the garden, growing flowers and watching the bees, birds and butterflies take flight. This description embodies so much of what I hold dear, and when I saw that Bonnie Christine was looking for bloggers to help spread the word about her new line of ribbons, I knew I had to be a part of this blog tour.
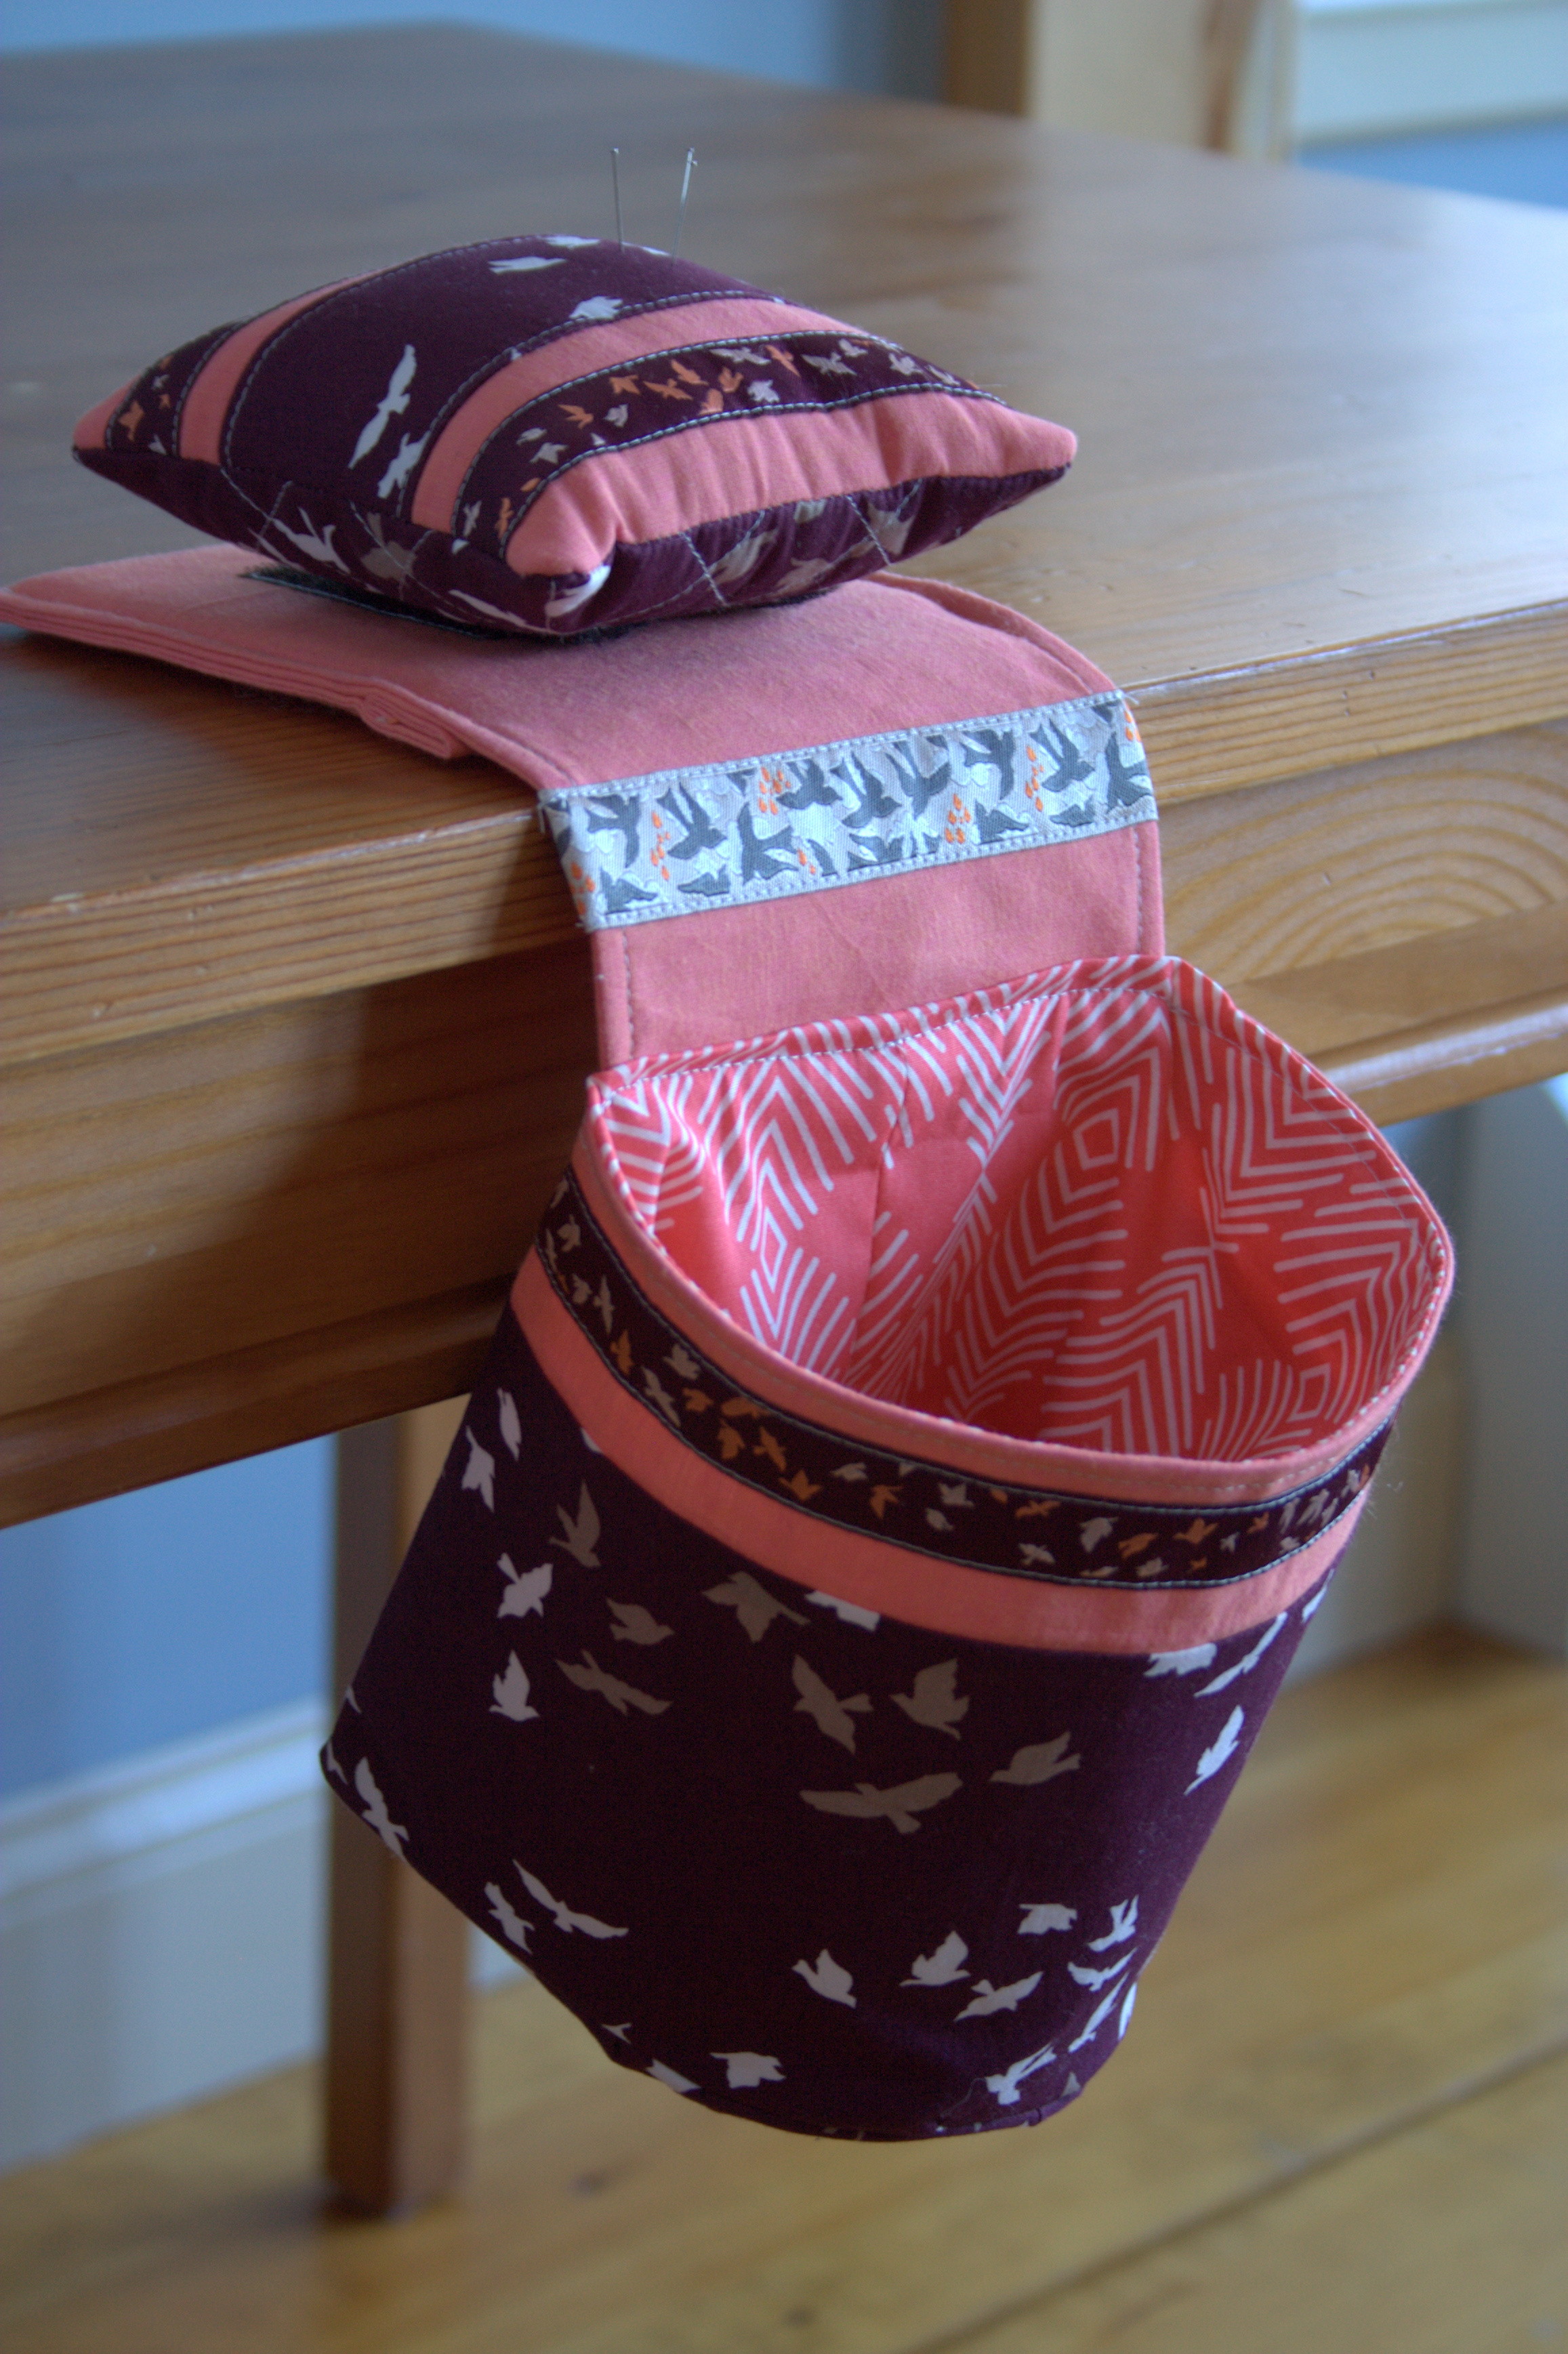
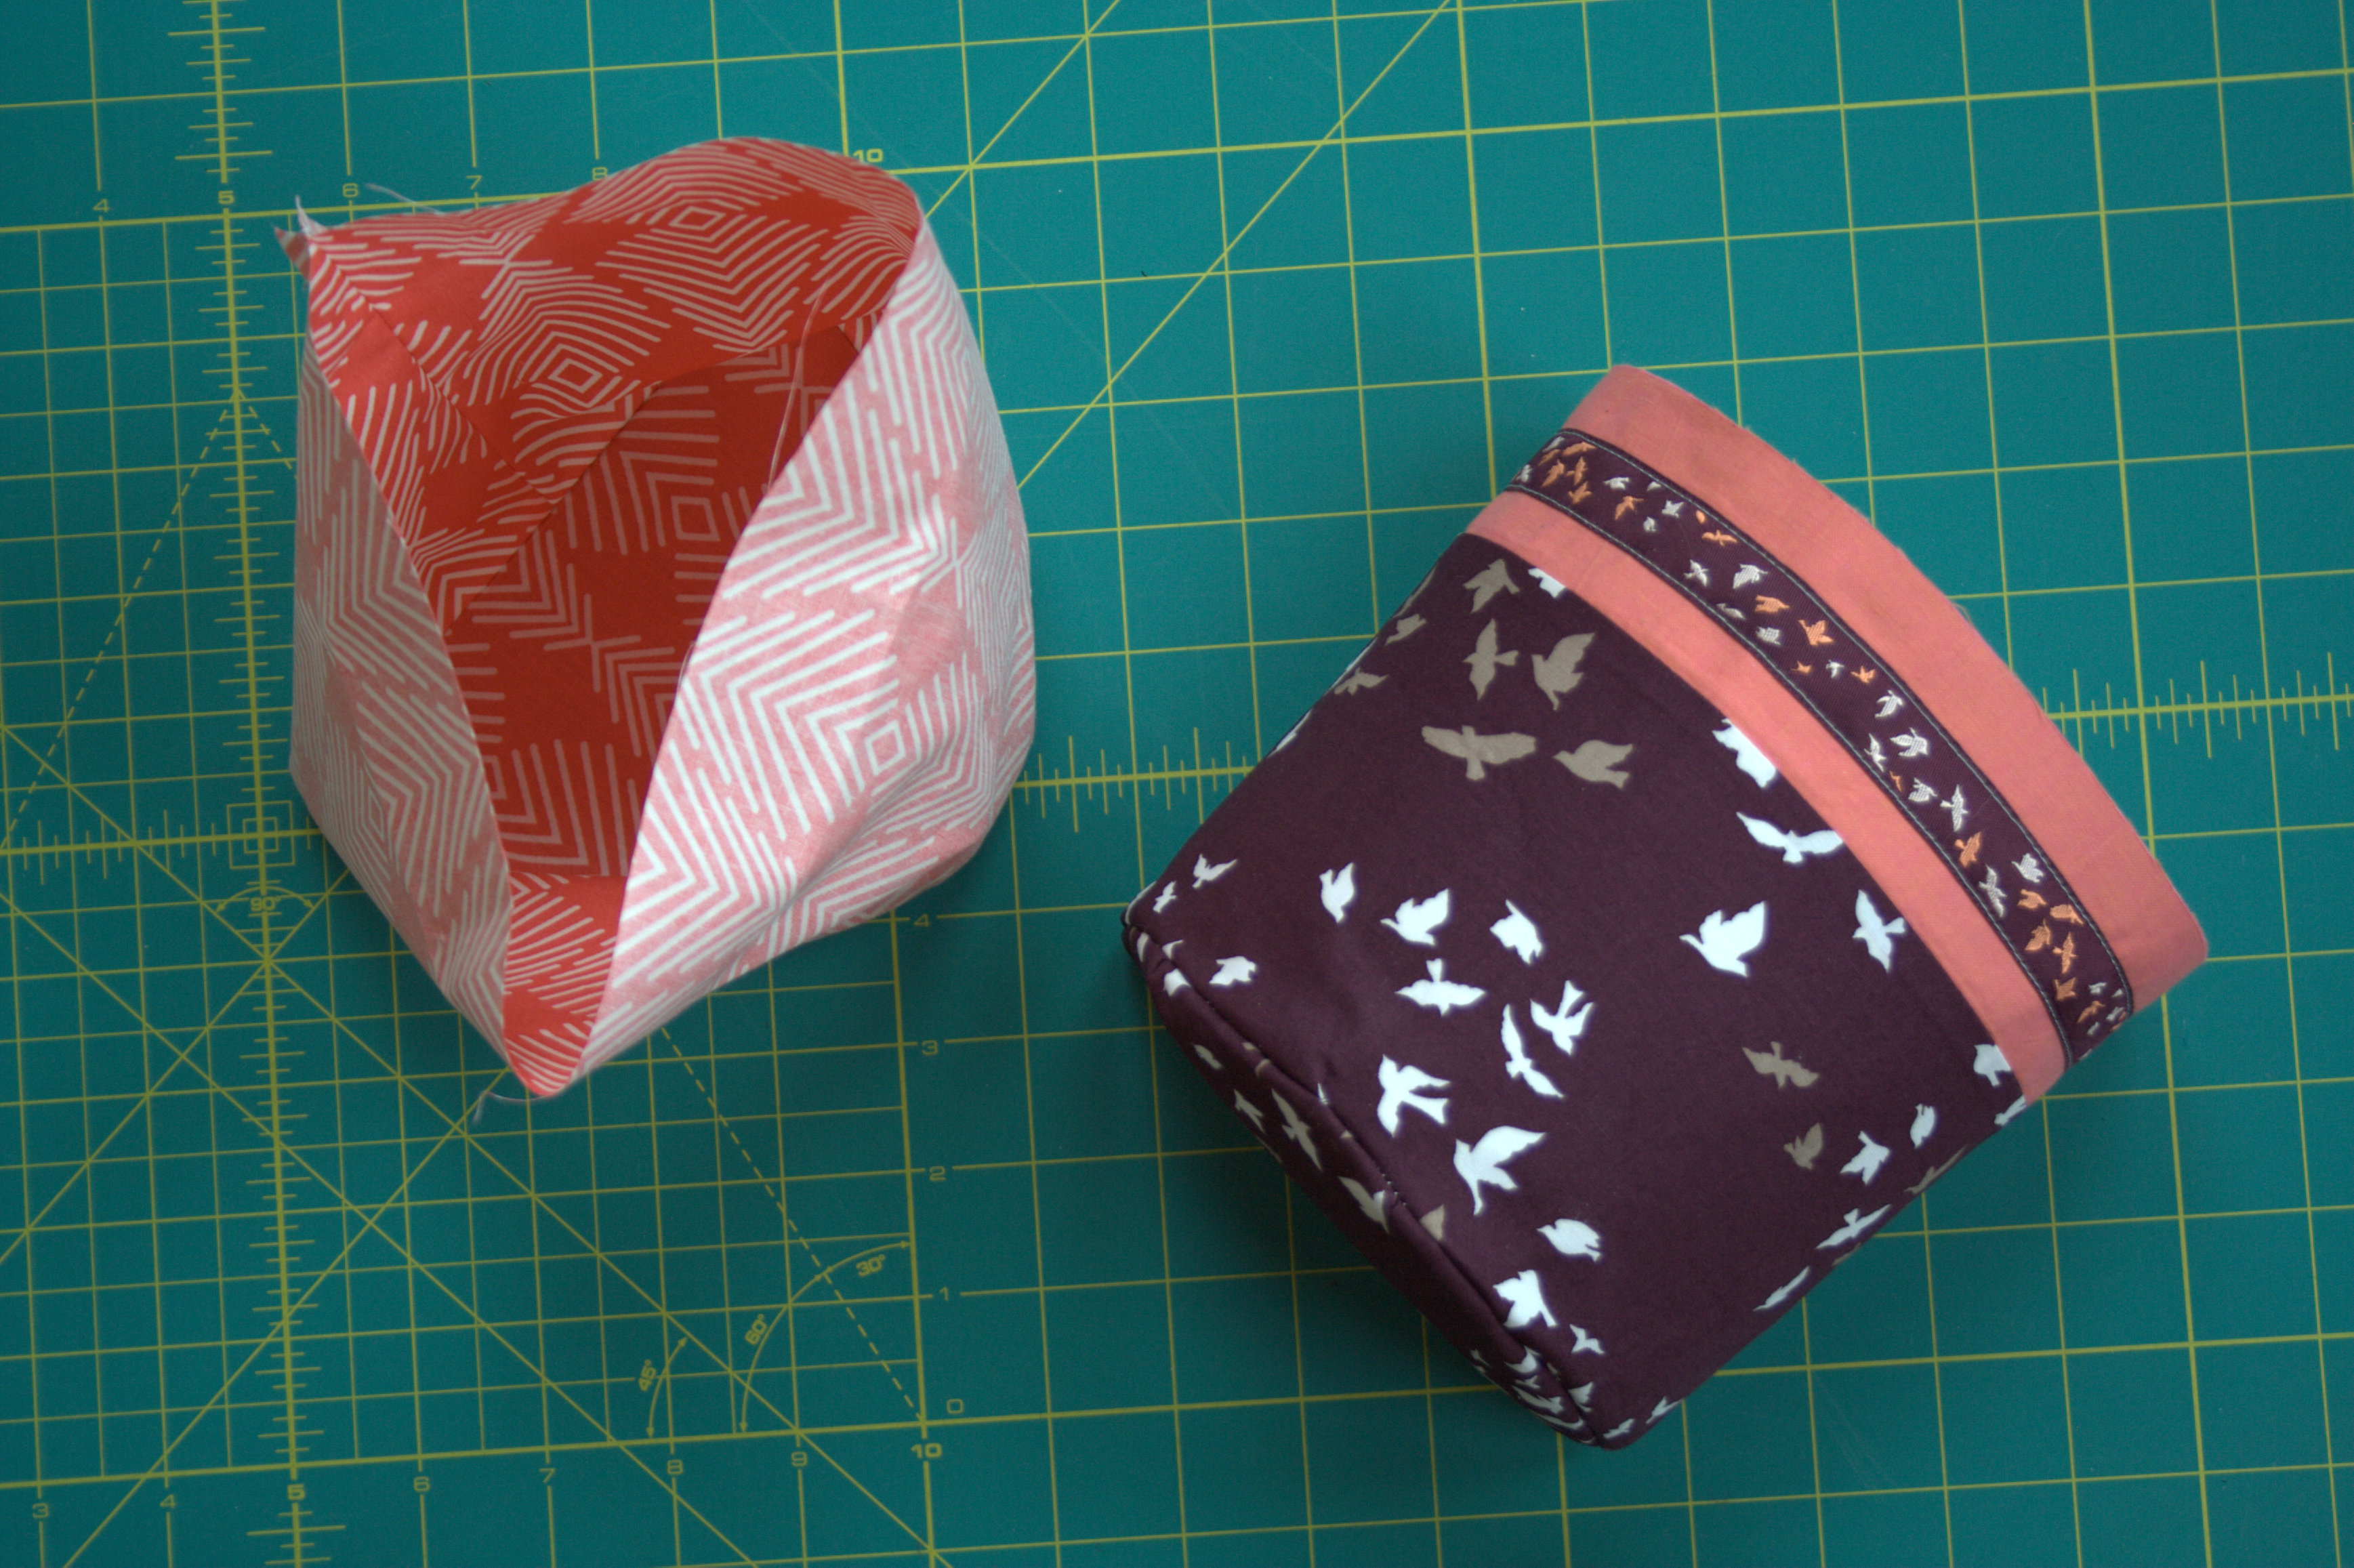
I decided to create a weighted thread catch and matching detachable pin cushion so that these ribbons and fabrics can brighten up my sewing space forever. The ribbons are silky smooth and coordinate with Bonnie’s fabric lines Winged and Sweet as Honey, but truly they coordinate with many of her fabric lines and look AWESOME paired with coordinating solids.
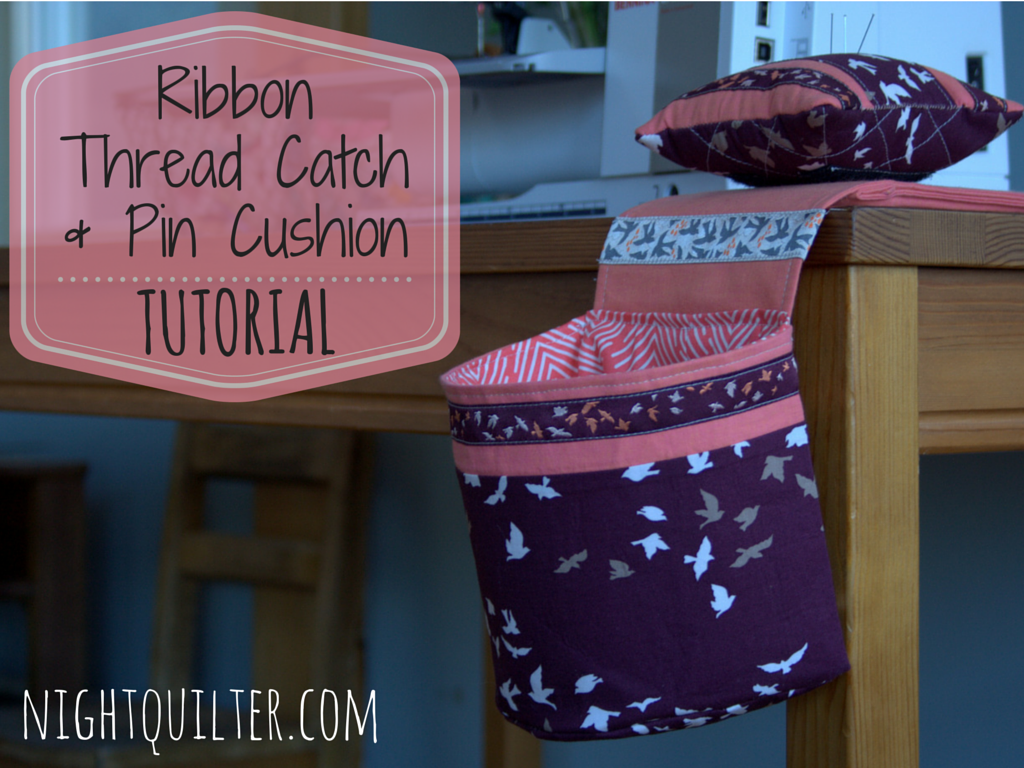
I’m super happy with how this thread catch turned out, and thought I’d share a tutorial with you so that you can make one, too! Special features of this Ribbon Thread Catch & Pin Cushion are:
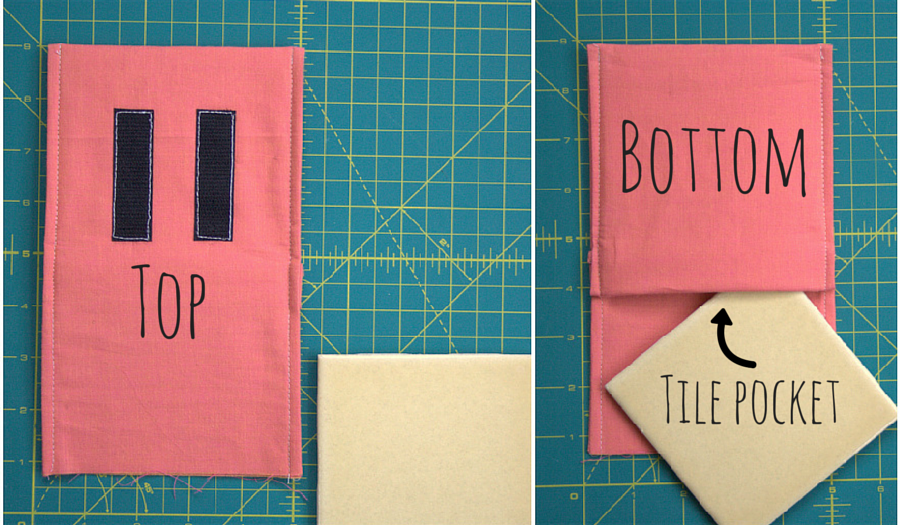
Pin cushion is removable so that you can tote it from workspace to workspace;
Tile weight is removable, meaning you can be creative with what you use to weigh down the thread catch, and/or replace the tile if broken (I have a busy nearly-3 year old, so I’m anticipating at least one broken tile in my future);
Since both the pin cushion and tile can be removed, you can position the thread catch base underneath your machine for convenience if you want; and,
Double thick interfacing and the half-moon thread catch base create a wide open, but still reasonably sized space in which to toss your threads.
If you want to use Bonnie’s ribbons, too, you can buy them at Renaissance Ribbons or at Bonnie’s mom’s quilt shop A Stitch in Time. Here we go!
Ribbon Thread Catch and Pin Cushion Tutorial
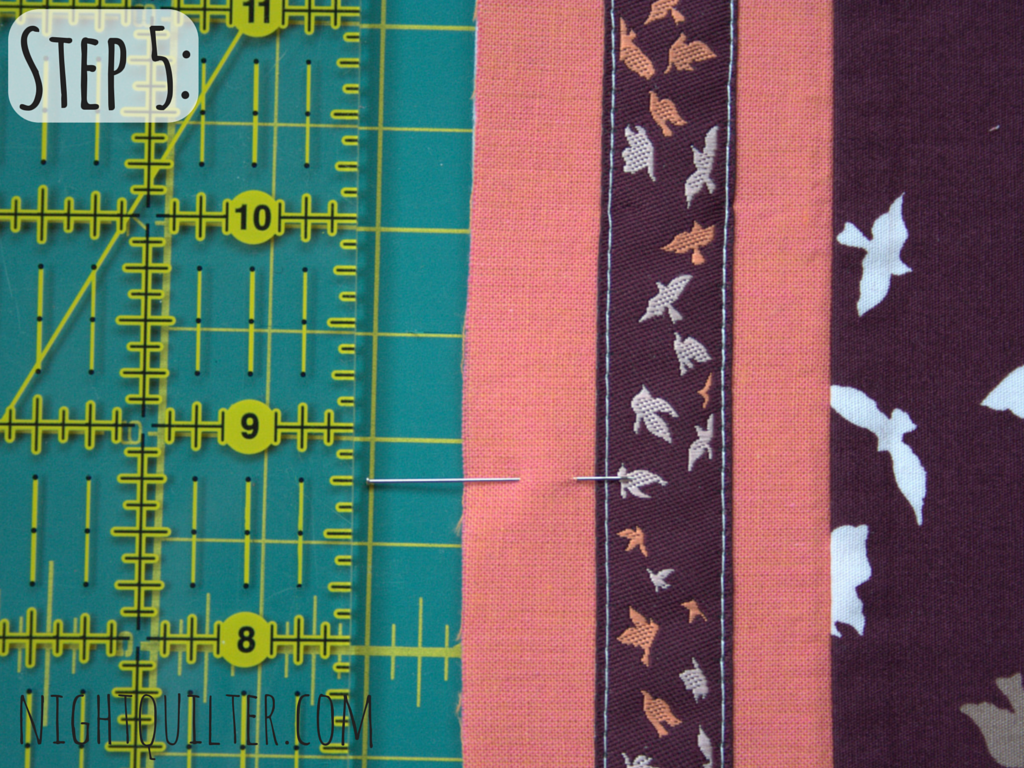
First, gather your materials. General requirements are listed first; specific materials I used are in parenthesis. You will need:
Please read all of the instructions before cutting. There are some time saving tips for working with interfacing in the “making the base and hanging tab” section.
For pincushion:
(Cut 1) 5.5″ x 5.5″ print
(Cut 1) 2.5″x5.5″ print
(Cut 2) 1.75″x5.5″ coordinating solid
(Cut 2) 5.5″ x 5.5″ batting
For base and hanging tab:
(Cut 2) 14.5″x5.5″ coordinating solid
(Cut 1) 14.5″x5.5″ stiff fusible interfacing (Pellon 808)
(Cut 1) 5.75″ accent ribbon (approximately)
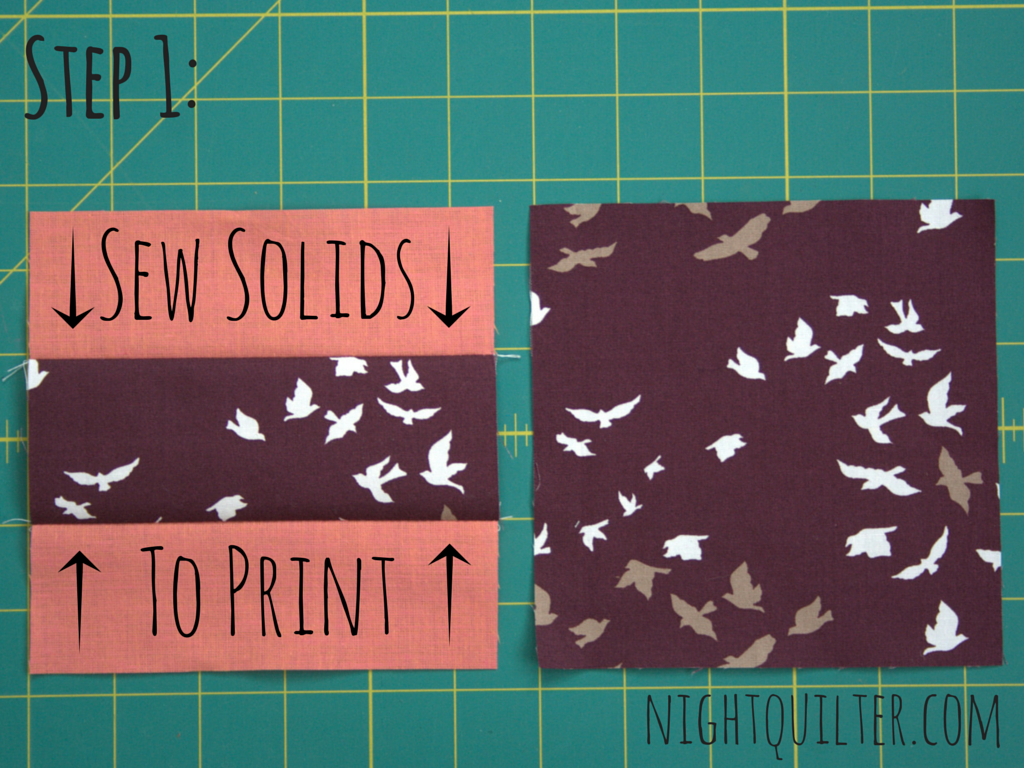
Sew 1.75″x5.5″ coordinating solid pieces to 2.5″x5.5″ print fabric as shown, pressing seams toward darker fabric. You should now have two 5.5″ squares.
Step 2
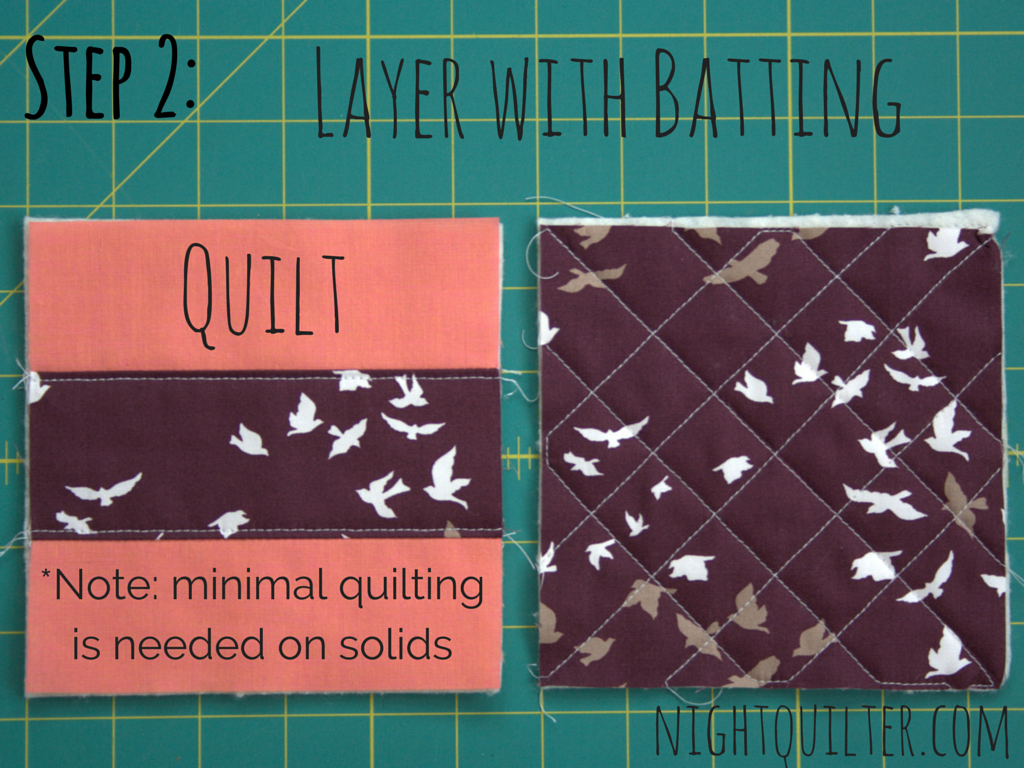
Layer each 5.5″ square with a 5.5″ square of batting and quilt as desired (Note: Do not quilt in solid fabric, or keep in mind that the ribbon will be sewn on in the next step). Quilt the bottom (5.5″ print fabric) square fairly densely to help withstand the pull of velcro once in use. The top square needs minimal quilting.
Step 3
Top stitch ribbon to both coordinating solids approximately 3/8″ away from the print fabric. Note: If you use a different width ribbon, you may want to adjust this distance. Keep in mind the 1/4″ seam allowances on the outermost edge.
Step 4
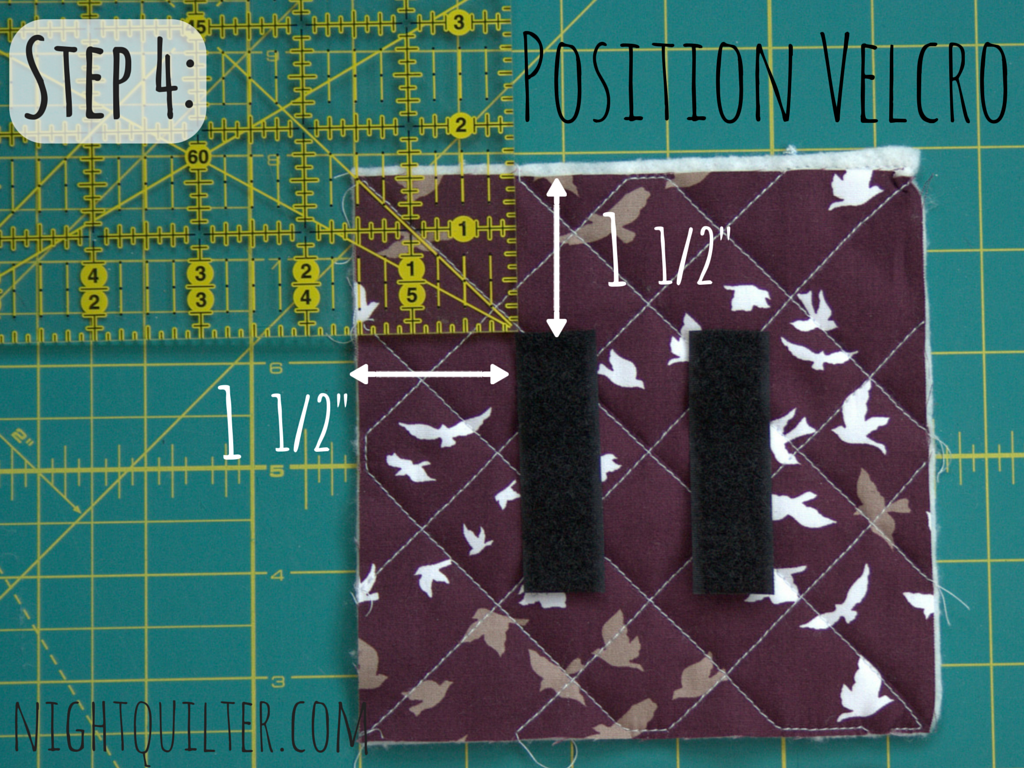
Align velcro approximately 1.5″ from each corner and top stitch securely. I stitched around each strip twice to ensure that it will withstand a lifetime of use. Note: Use the soft side of the velcro on the pincushion so that it doesn’t pick up thread and fuzz and everything when you move it around your workspace. The hooked side of the velcro will be sewn onto the base.
Step 5
Right sides facing, sew around all edges leaving a 3″ opening in one side. (Leaving the opening in the side will make for much less visible closing stitches after stuffing)
Step 6
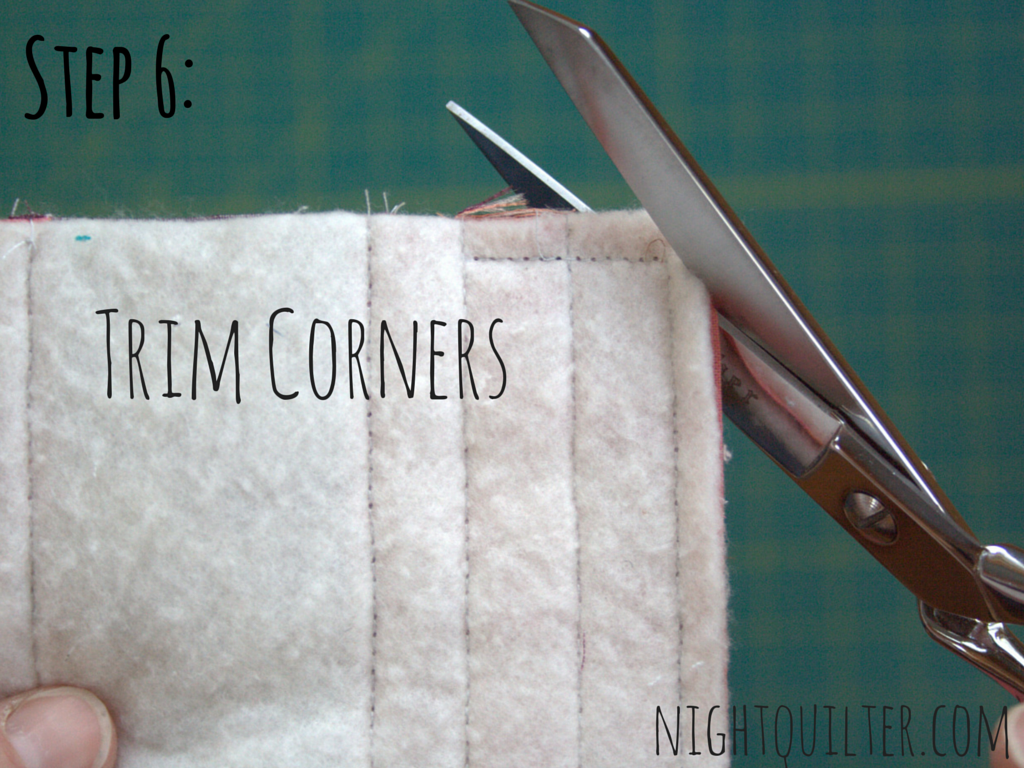
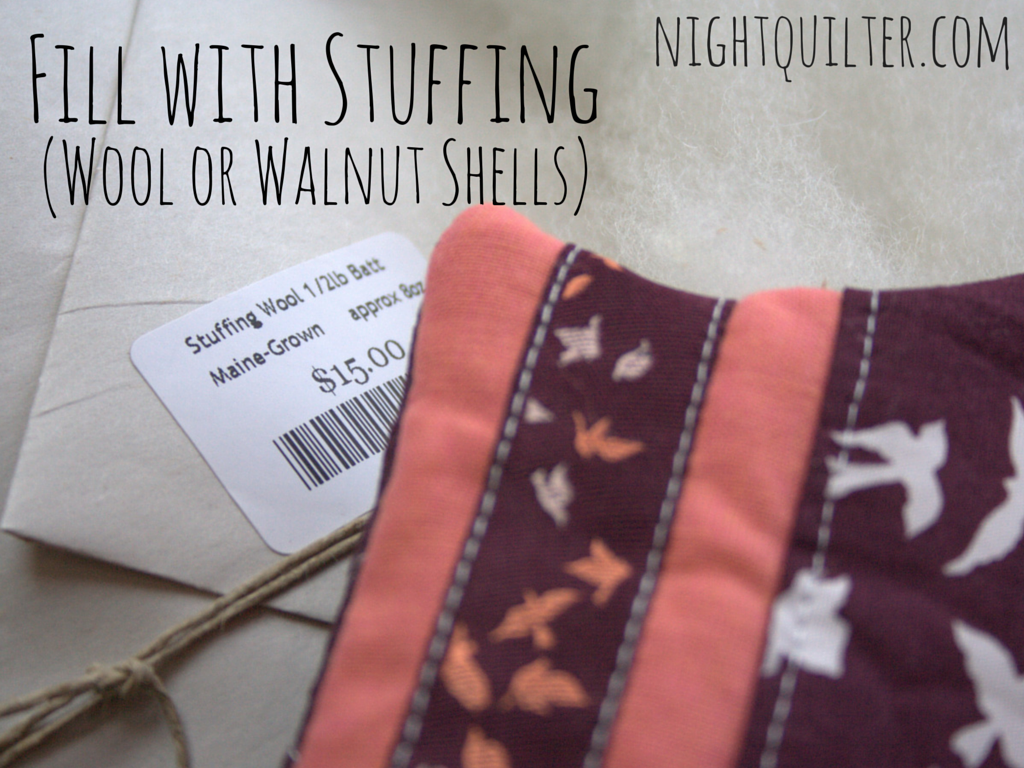
Trim corners and turn right-side out. Stuff to the gills with stuffing of choice (I recommend 100% wool batting–the stuffing kind, not batting like we use between layers of a quilt–or crushed walnut shells to help keep your pins and needles clean and rust-free).
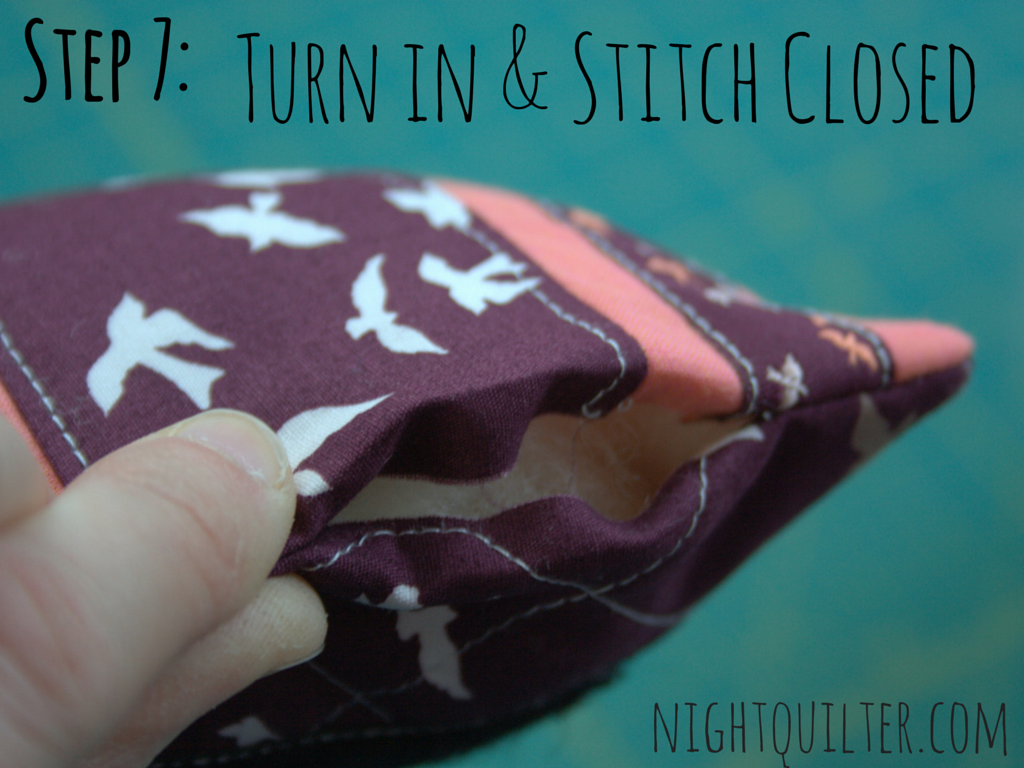
Step 7
Fold in edges around opening and pin or finger press closed. Using a blind stitch (or visible whip stitch), hand stitch closed using coordinating thread.
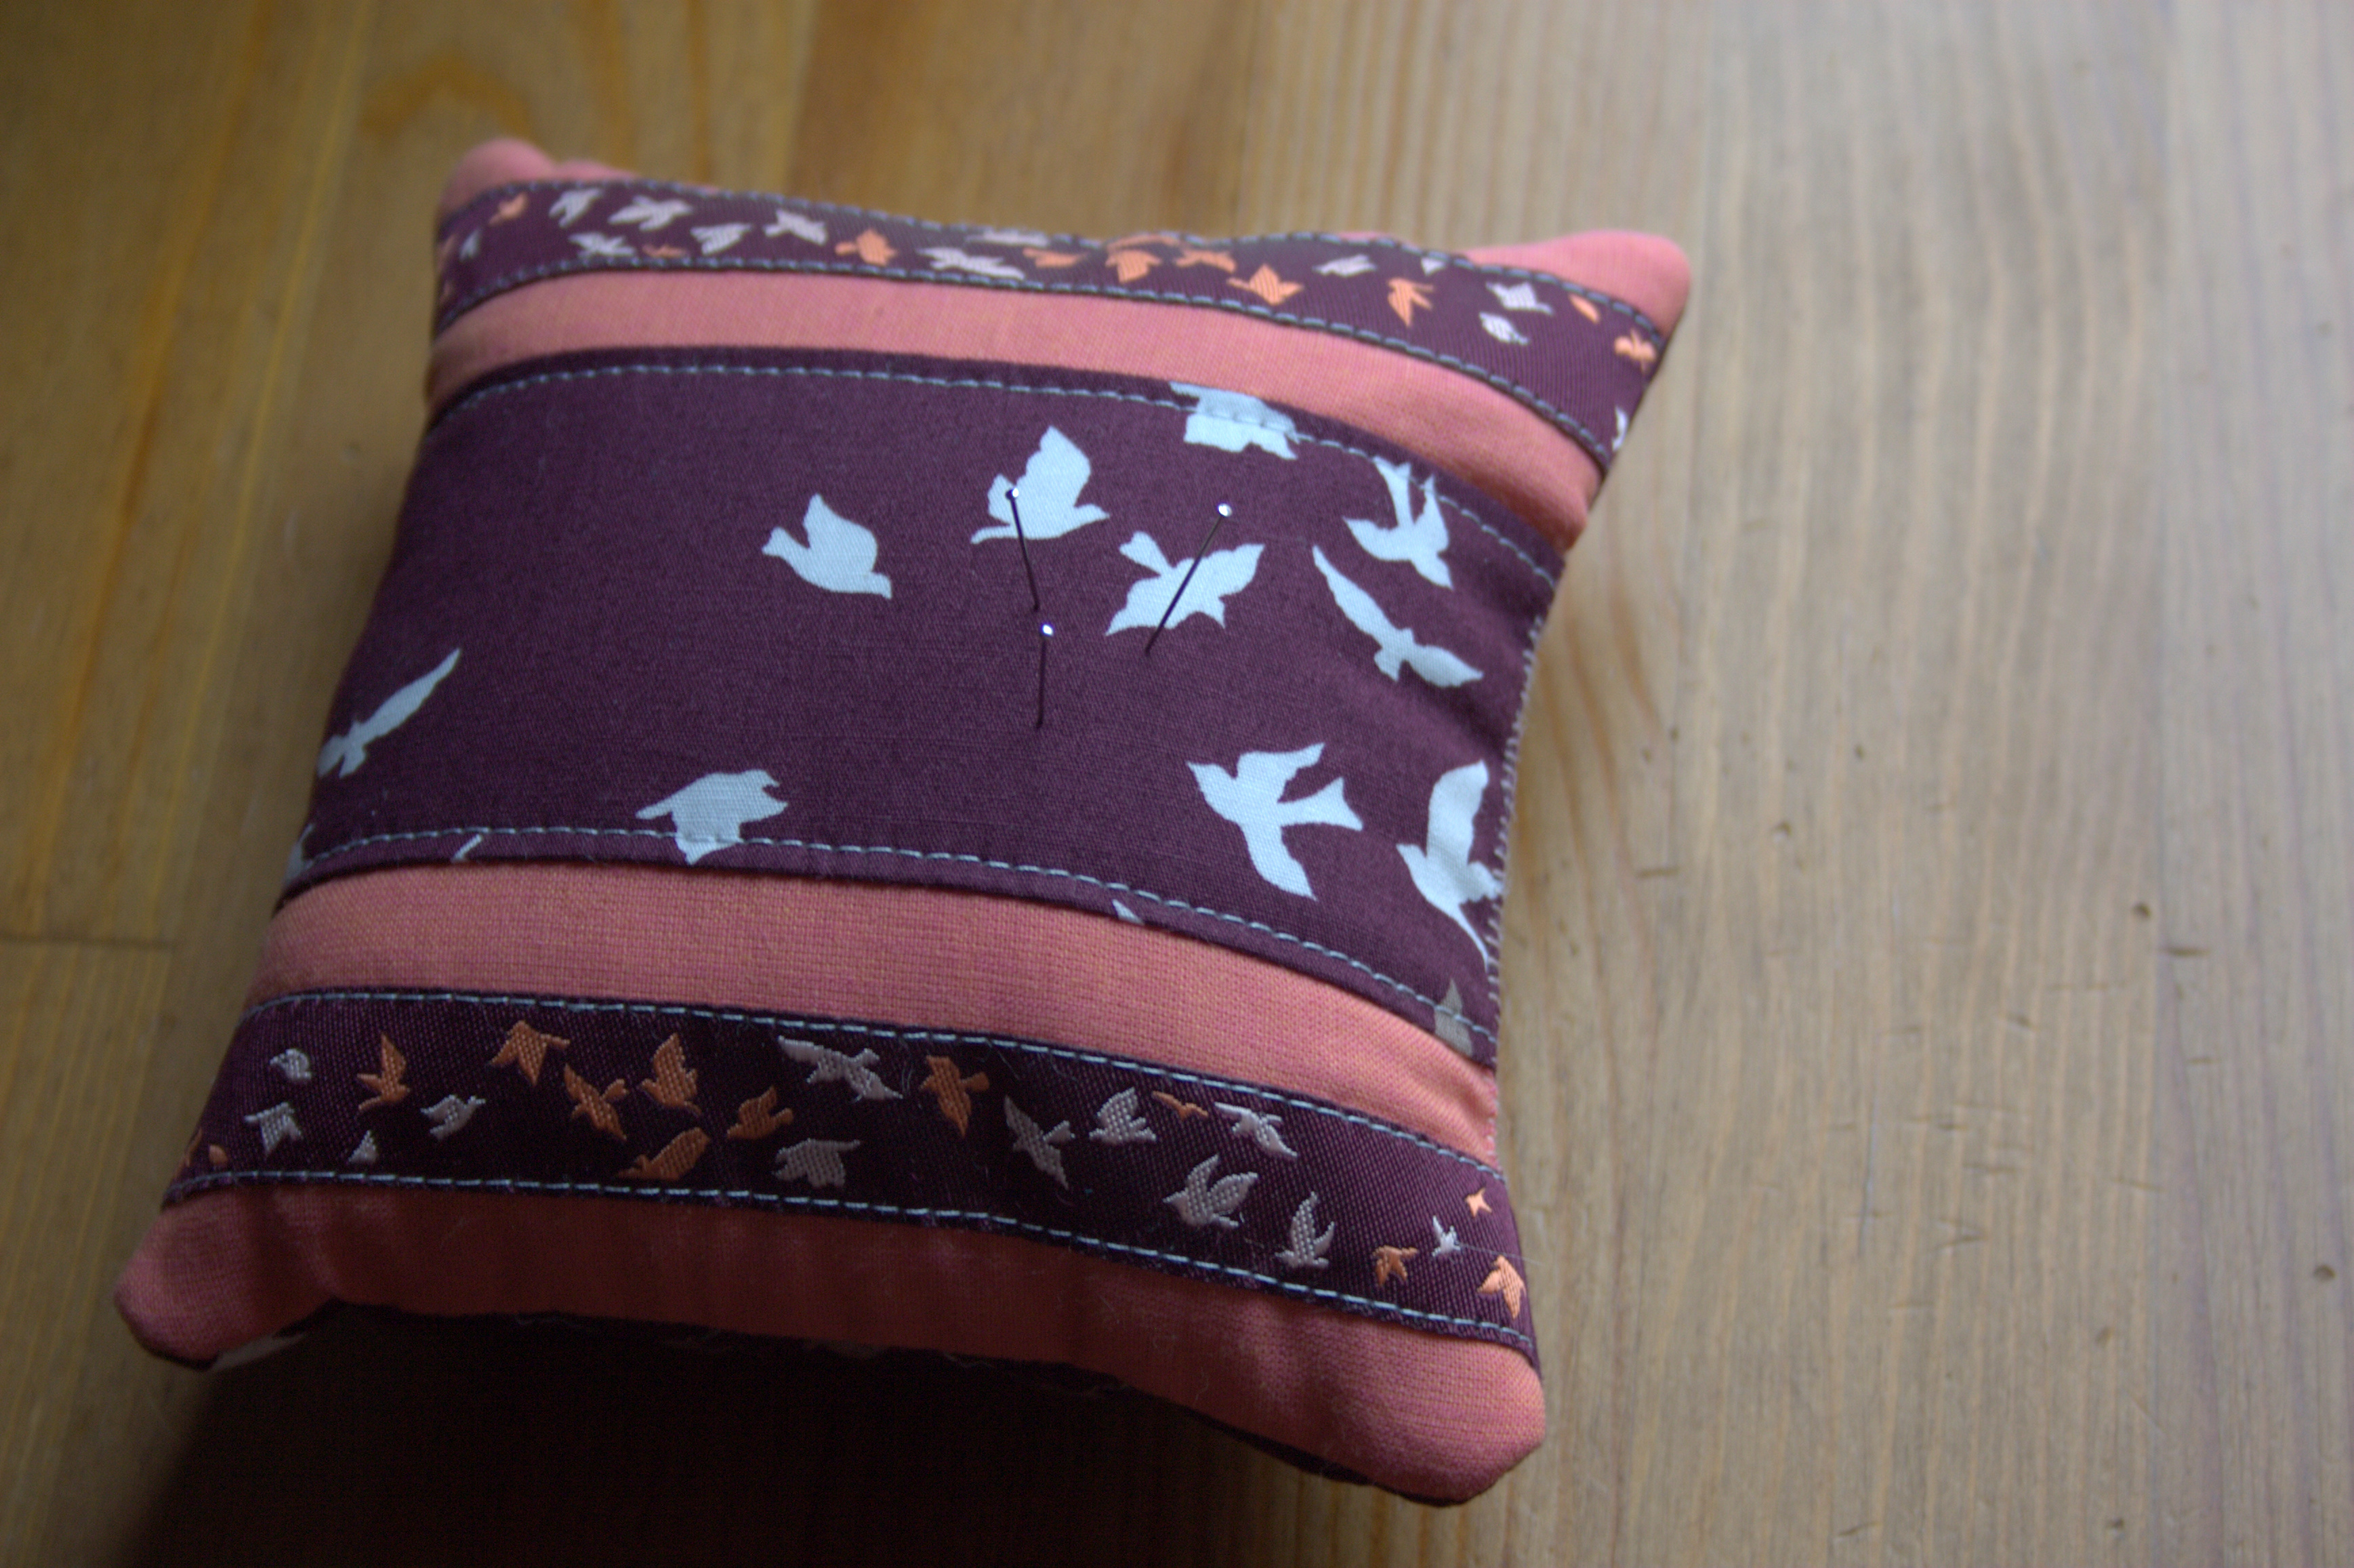
Admire your pincushion! Set aside while you make the rest of the thread catch.
Make the base and hanging tab:
Step 1 *time saving tip*
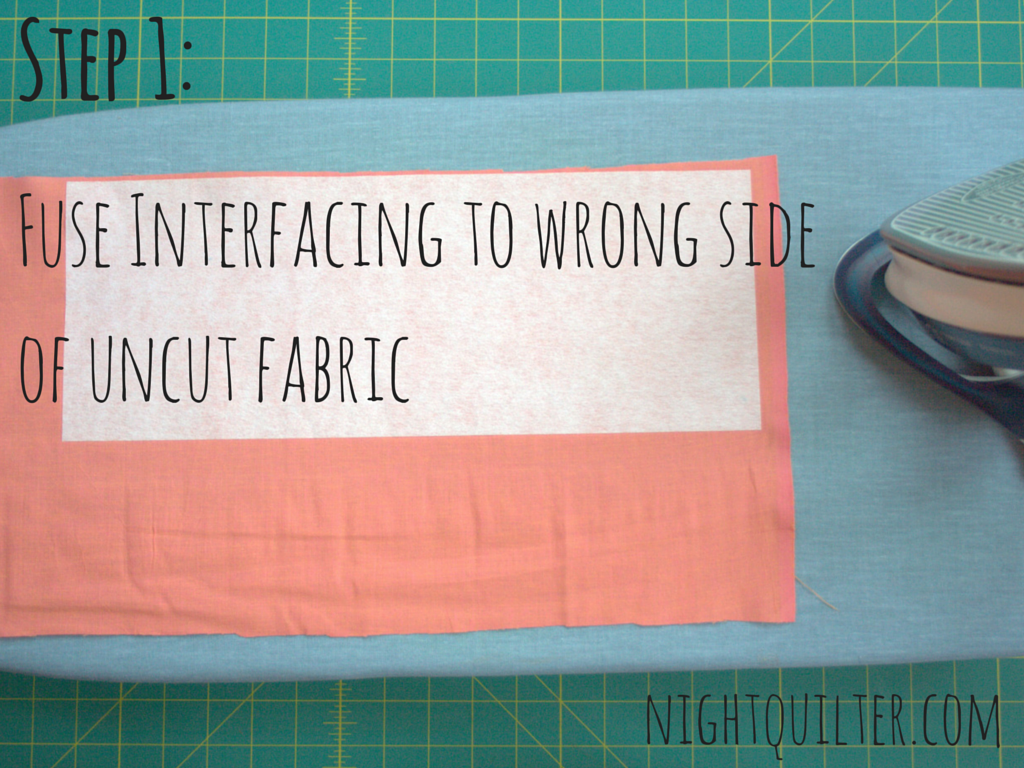
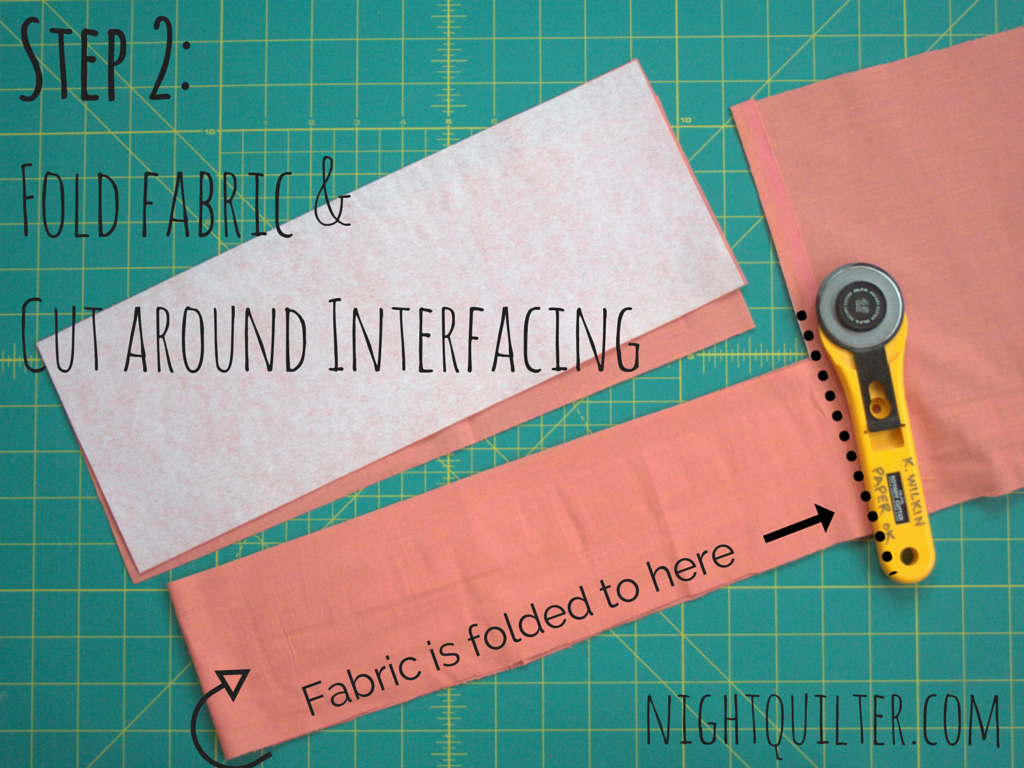
Cut the 14.5″x5.5″ piece of stiff fusible interfacing (Pellon 808). Following the instructions on the interfacing, fuse to wrong side of coordinating fabric (fabric is uncut at this point).
Step 2
Once interfacing cools, fold fabric in half and use rotary cutter and ruler to cut around the 14.5″x5.5″ interfacing. You will end up with two perfectly sized fabric pieces with the interfacing fused to one of them.
Step 3
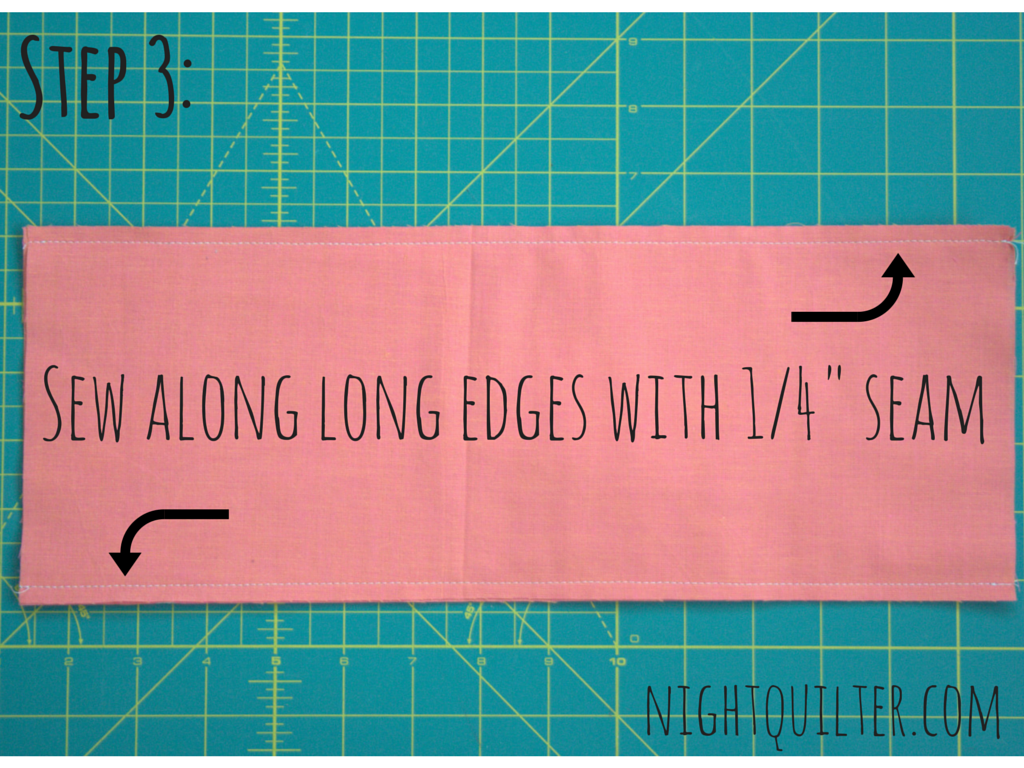
With right sides facing (interfacing out), sew along long sides with a 1/4″ seam. Set seams, turn right side out, press.
Step 4
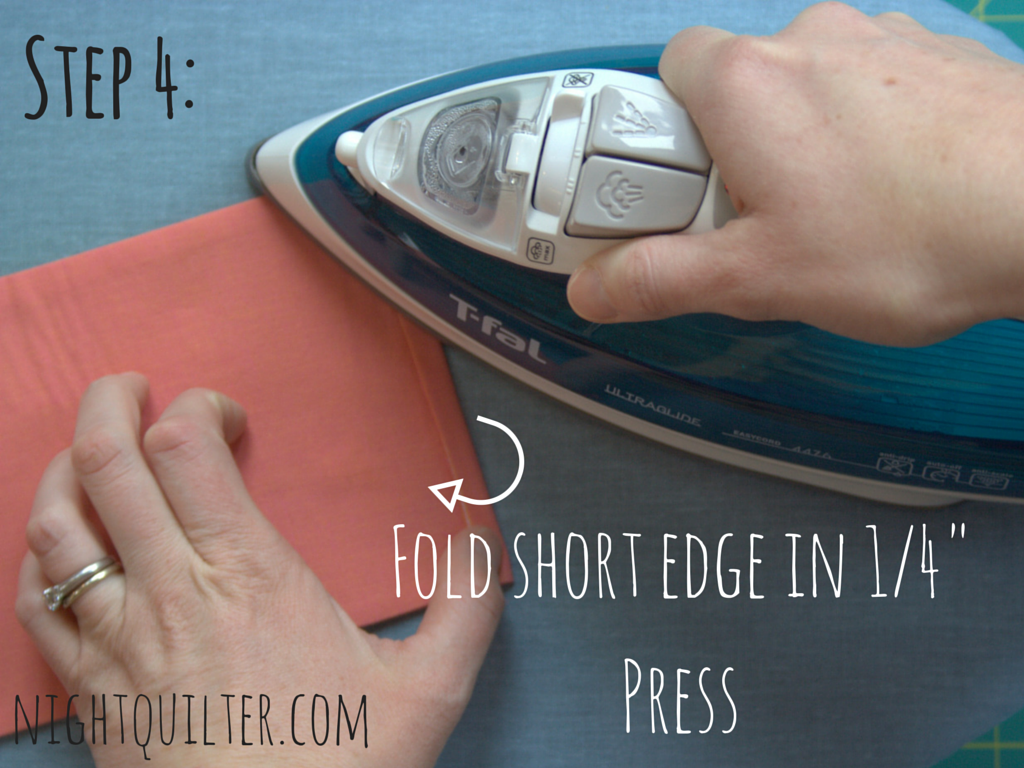
Fold in 1/4″ from one short edge. Press.
Step 5
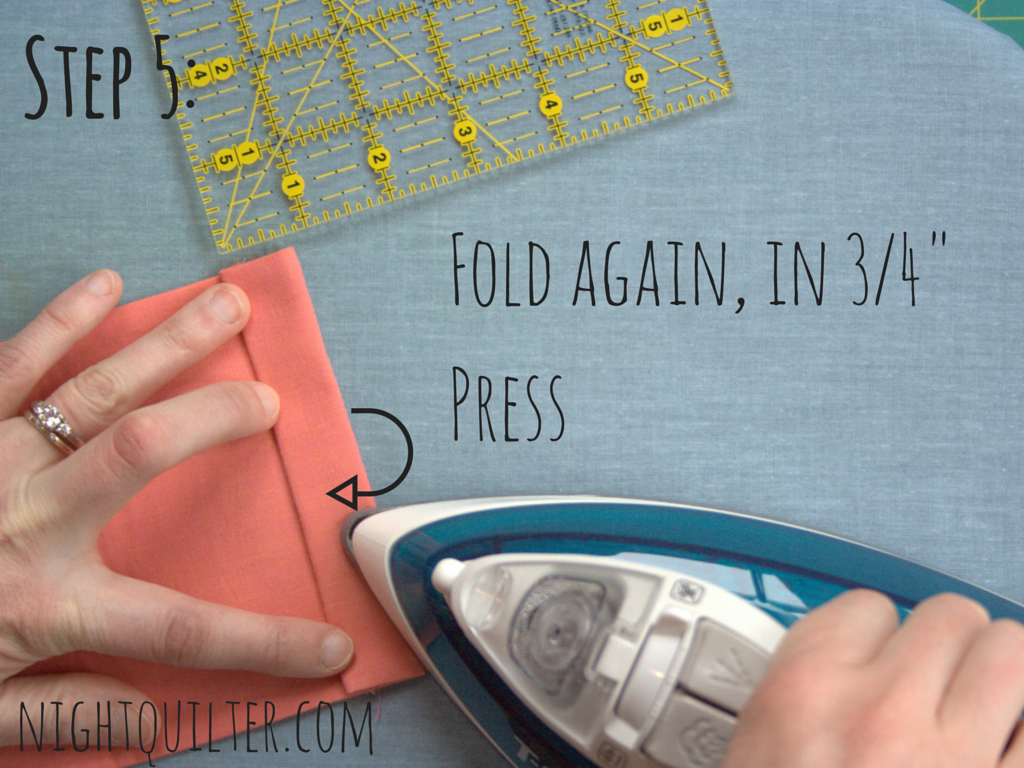
Fold in again, 3/4″. Press.
Step 6
Fold long end 5″ from pressed edge, over on top of itself. Press.
Step 7
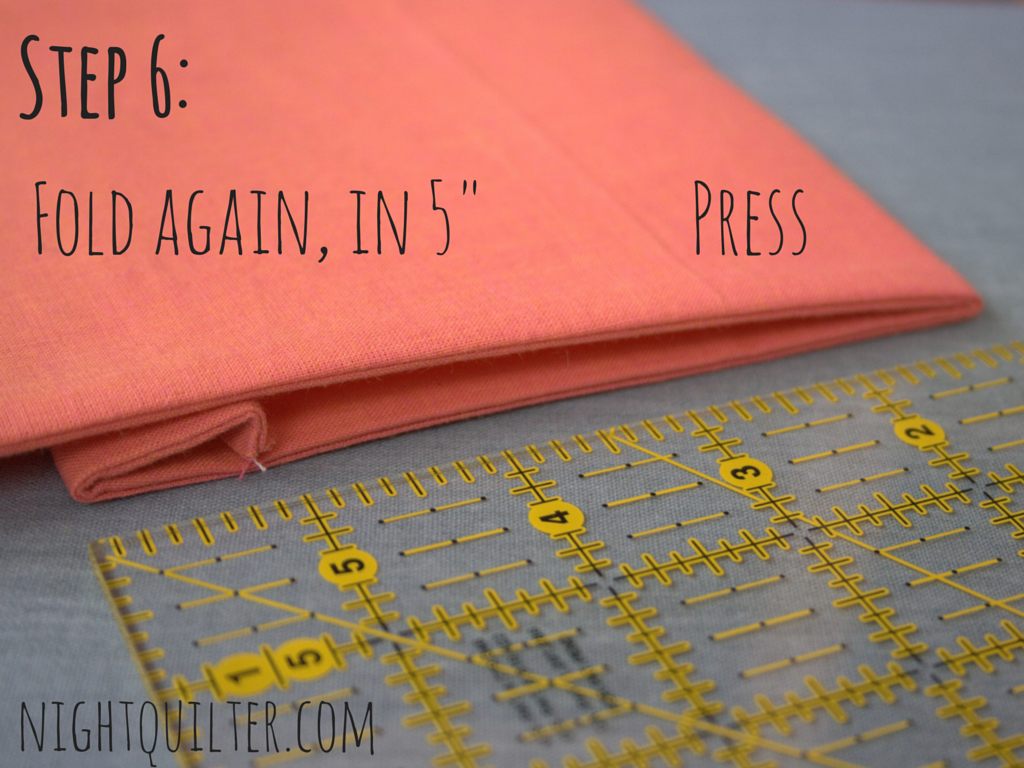
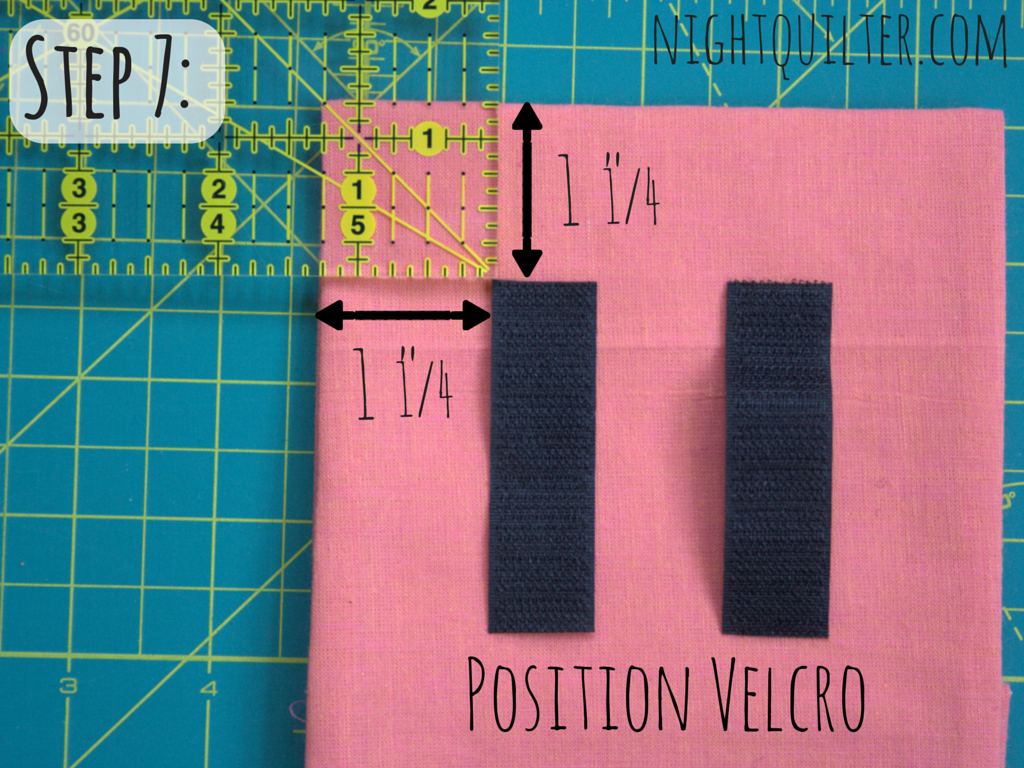
With the folded portion facing away from you, and the unfinished long end facing down, position the velcro strips 1 1/4″ from each top corner. Pin in place.
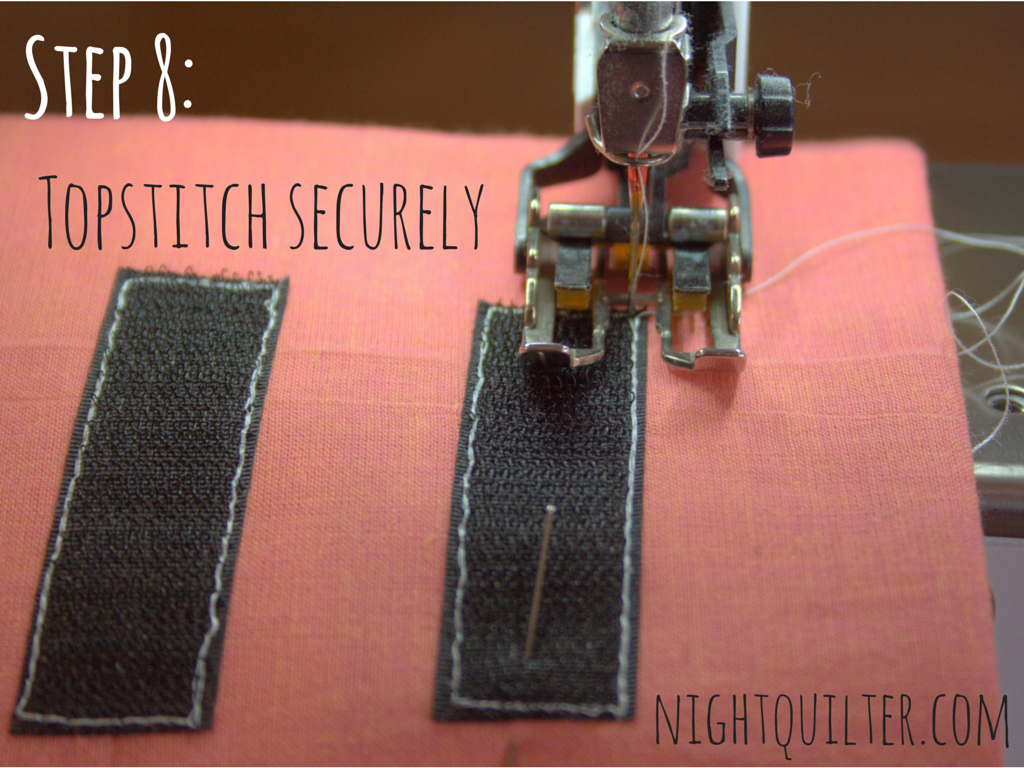
Step 8
Topstitch the velcro in place, being careful to only sew through one layer of fabric (the portion that was pressed under will be folded up out of the way.) I stitched around each velcro strip twice to ensure the velcro stays in place even with frequent use.
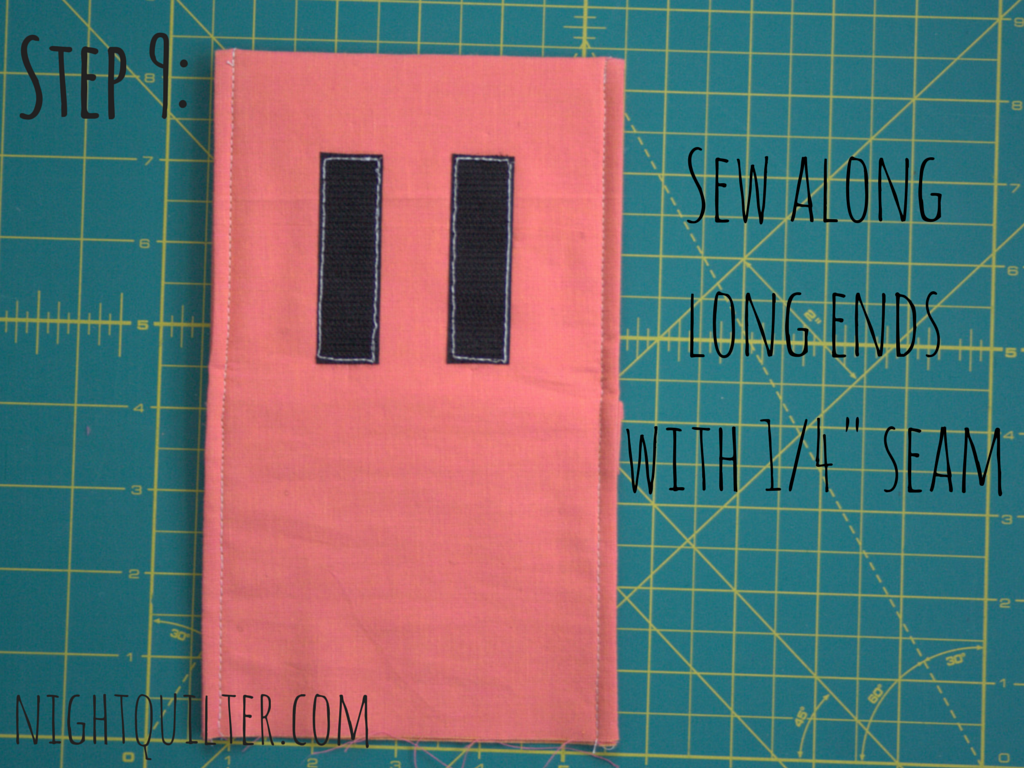
Step 9
Refold according to directions above. Sew along long edges only, using a 1/4″ seam allowance.
You have just created a tile pocket. I have seen some thread catches weighted with completely sewn-in tiles, but decided to design this with an opening where the tile can be inserted or removed as needed. This means that you can use anything you want to weigh down your thread catch, and if you have a little “helper” who happens to smash it to the ground, you can take out the tile shards and replace with a new tile. Once your tile is inserted, you can pull the little lip of fabric over the end of it to hold it in place more securely (like those fancy pillow cases). Don’t insert your tile yet–we’re still sewing! Now you know how the tile pocket will work, and hopefully can visualize where we are going with this a little better.
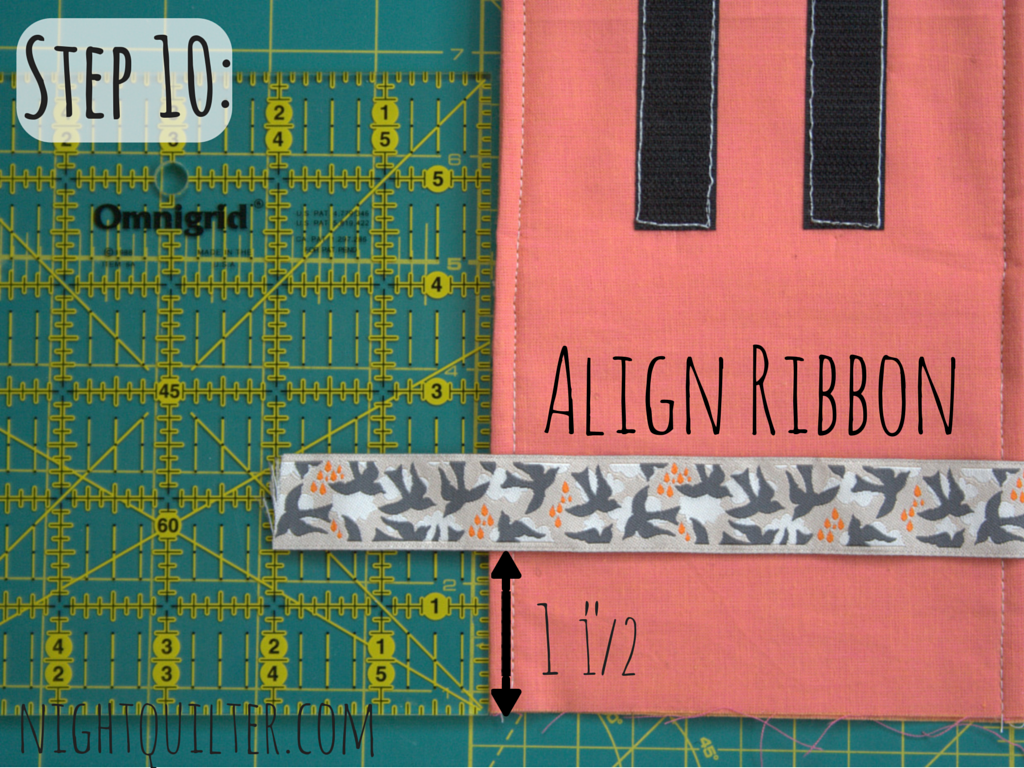
Step 10
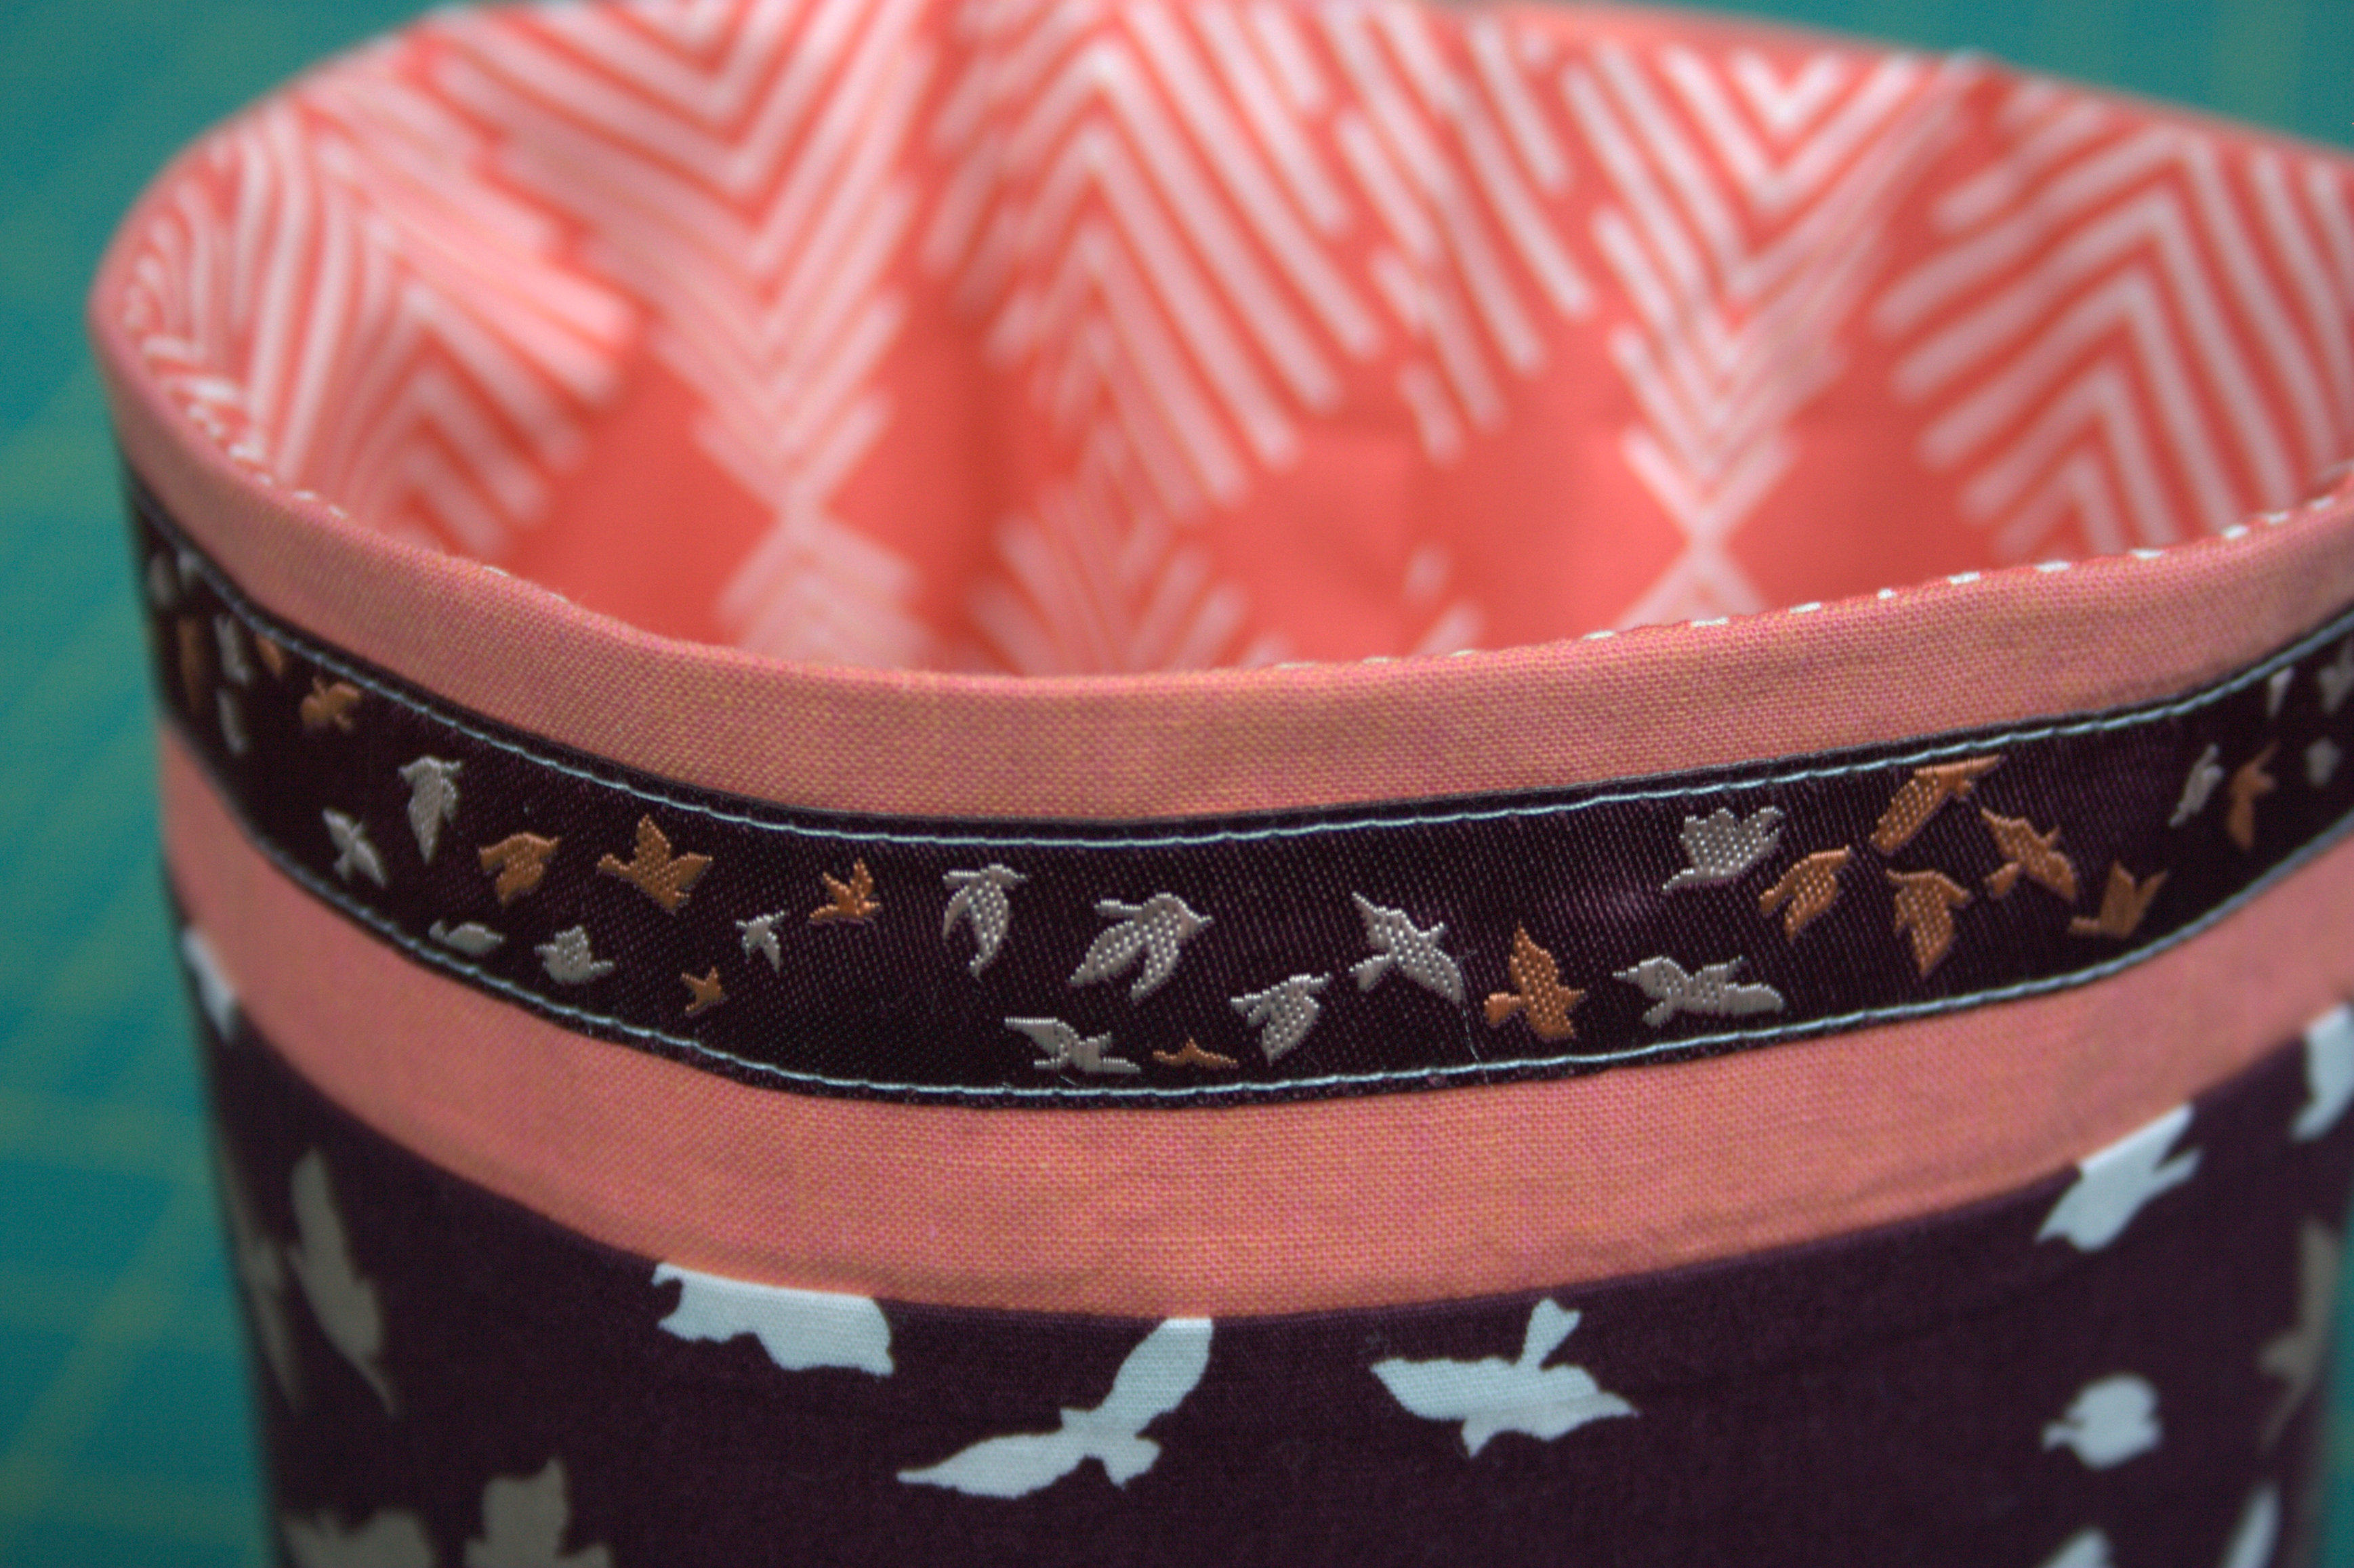
Align accent ribbon 1 1/2″ from the unfinished short edge of the top of the base. Note: The ribbon shown is longer than 5.75″ and I trimmed the edges before the next step. Yours should fit well, with a bit over 1/2″ overhang on each side.
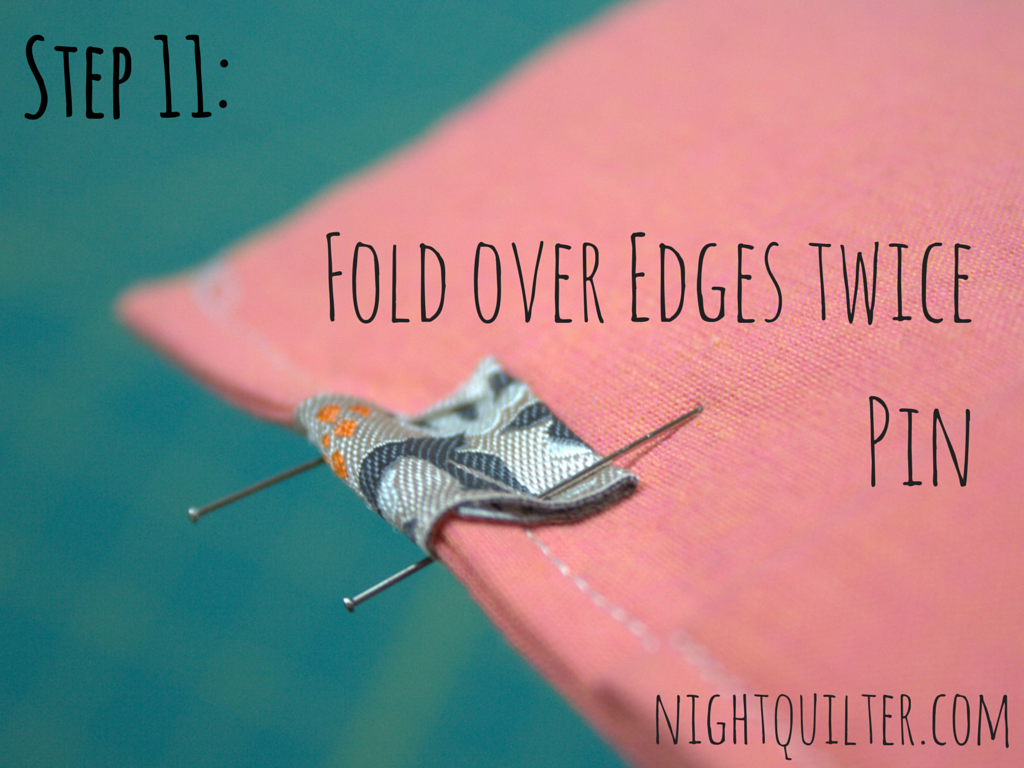
Step 11
Fold excess ribbon over the edges twice (Fold so that the cut end meets the edge of the base, and then fold over again). Pin in place.
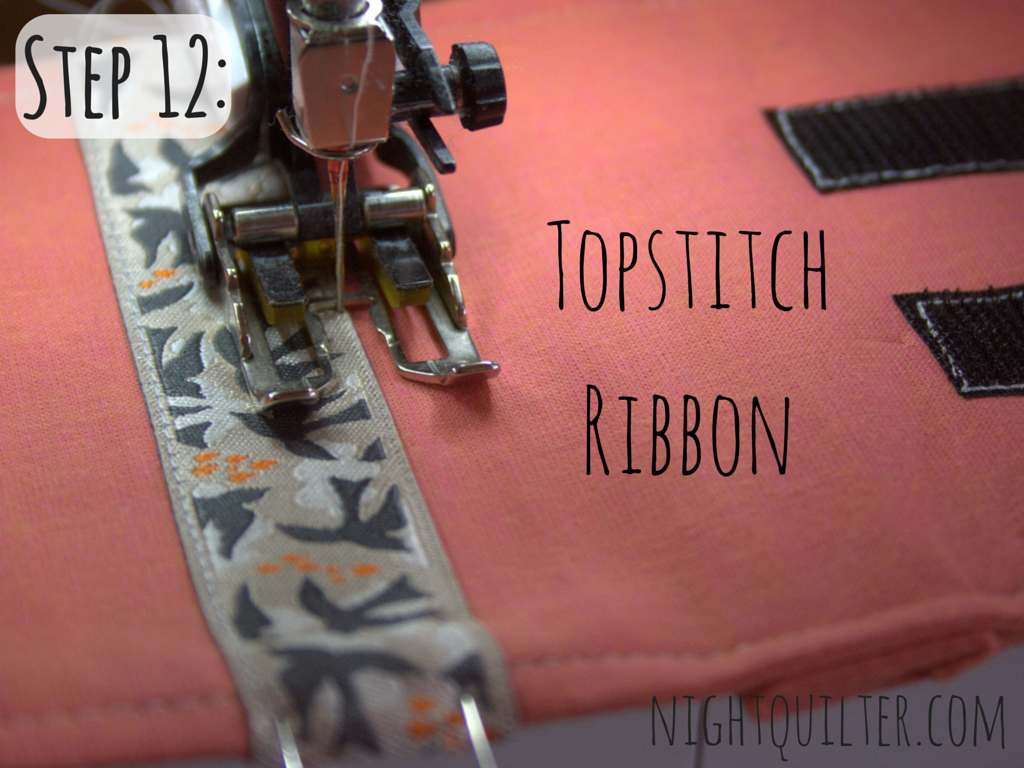
Step 12
Topstitch ribbon in place using coordinating thread. Your base is now finished, ready to attach to the thread catch basket. Set it aside while you make the thread catch.
Make the thread catch & Final Assembly:
Step 1
Gather your cut pieces and interfacing. Normally, I would suggest cutting the interfacing, pressing to fabric, and THEN cutting out the outer fabric pieces around the interfacing, but since we will be sewing the print fabric to the coordinating solid before fusing to the interfacing, I would suggest cutting it all in advance. If you want to take a little shortcut, you can use the Ribbon Thread Catch bottom template to cut out the interfacing bottom, fuse to the print fabric and then cut the fabric once the interfacing is fused.
Step 2
Sew the 2″x17.5″ coordinating solid to the 4″x17.5″ print fabric, pressing the seam toward the darker fabric. This is the outer panel of the thread catch.
Step 3
Following the instructions on the fusible interfacing, fuse both layers of interfacing to the wrong side of the outer panel, and to the thread catch bottom. Note that if using Pellon 101 and 808, you should fuse the 101 first since it calls for a damp press cloth and steam. Once fused and cool, then fuse the 808 for added structure. Note: Be sure to use a press cloth or other scrap fabric beneath and above your fabric and interfacing to protect your iron. Interfacing melted onto the iron is no fun!
Step 4
Align the ribbon 3/8″ from the print fabric and topstitch in place. Note: If you are using a different width of ribbon, you may want to adjust this distance. Keep in mind the 1/4″ seam allowance at the top of the thread catch! You can use either coordinating or contrasting thread depending on the look you’d like to achieve. I opted to use Aurifil 50wt 2015 – Aluminum for the entire project. It seems to go with everything, in my opinion!
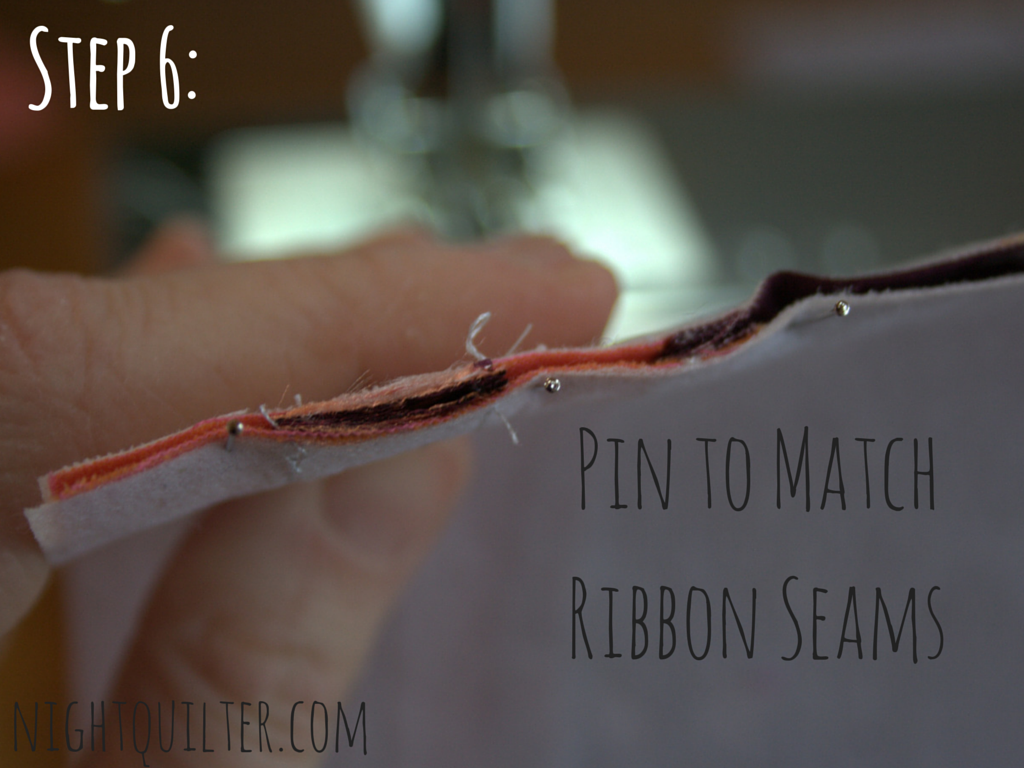
Step 5
Find the center of the outer panel (8.75″ from an edge) and pin. Note that in the photo, I pinned the top of the panel. You should pin the bottom of the panel instead. (Oops)
Step 6
Right sides together, sew short ends of the outer panel together. Be sure to line up the ribbon and seams, pinning right next to the join for accuracy. Press seam open.
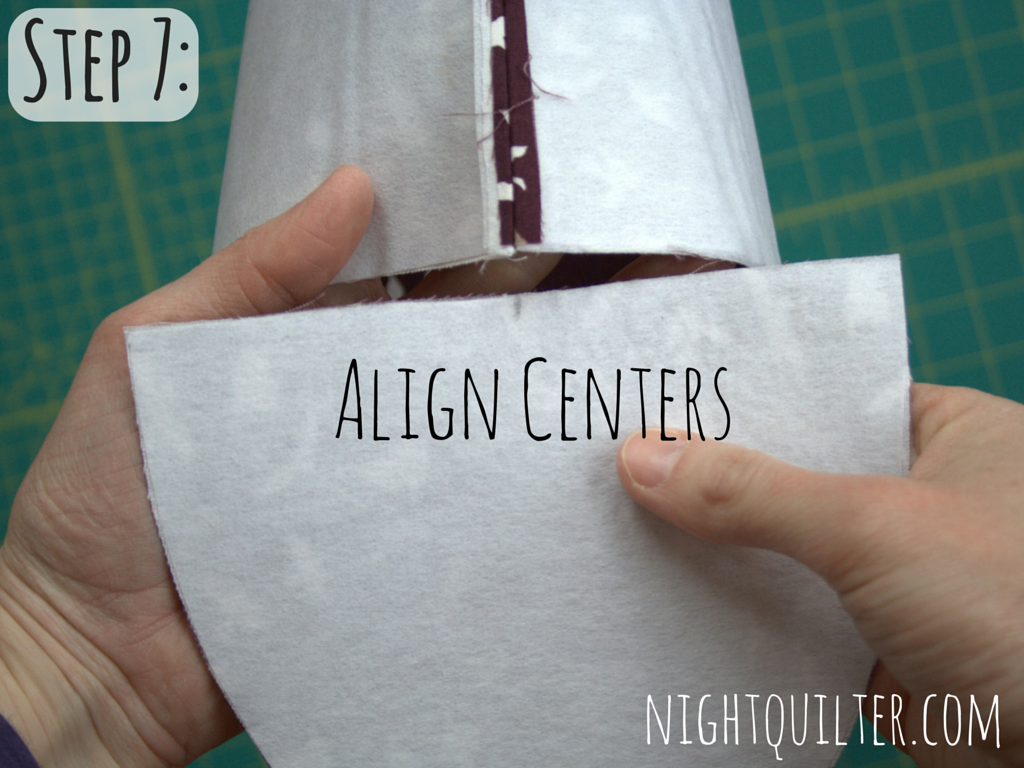
Step 7
Mark the center of your interfaced thread catch bottom (folding in half and creasing lightly to find the center point works wonderfully). Align the center of the bottom to the bottom seam of your outer panel. Be sure that right sides are facing away from you (you should be looking at a whole lot of interfacing) and also be sure that you are attaching your bottom to the bottom of the thread catch body (the ribbon is on the top).
Pin right sides together.
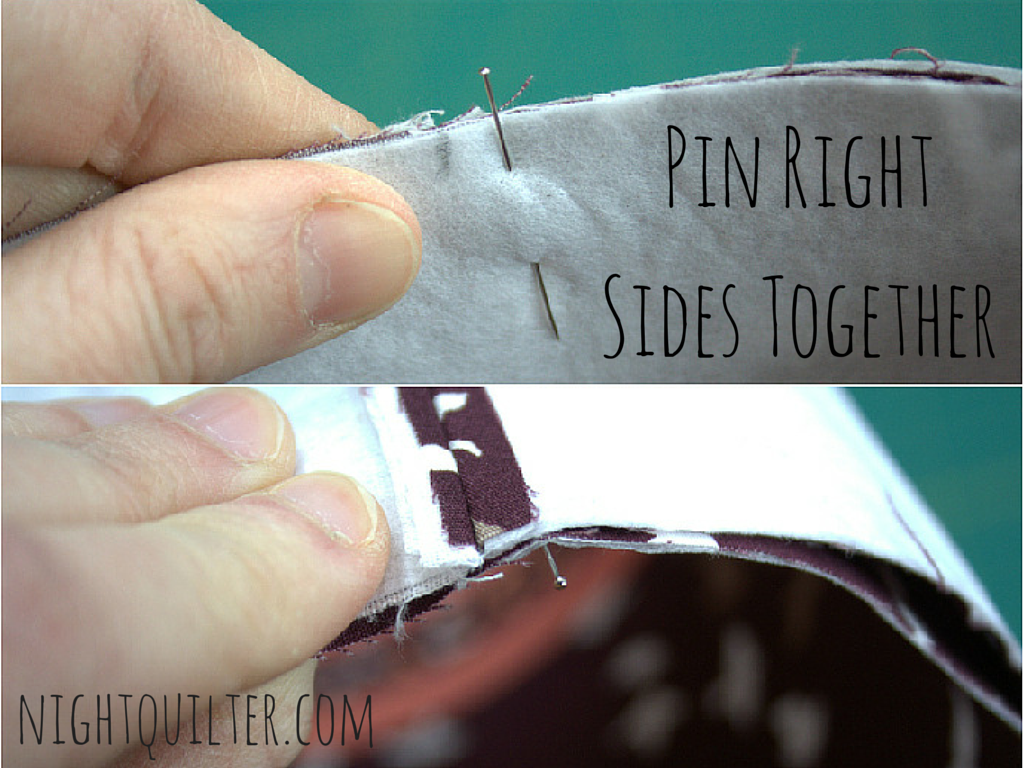
Step 8
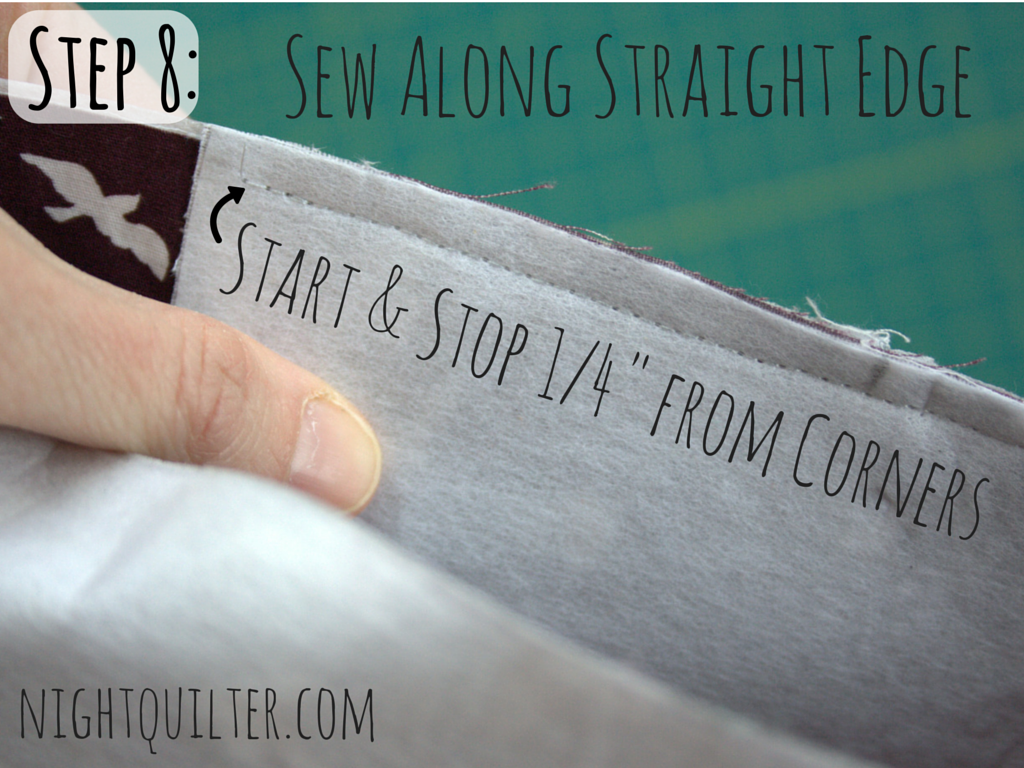
Using the bottom of the thread catch as your reference and making sure it is lined up with the outer panel, sew along the straight edge of the bottom. Be sure to start and stop 1/4″ from both corners, backstitching at the beginning and end of your stitches.
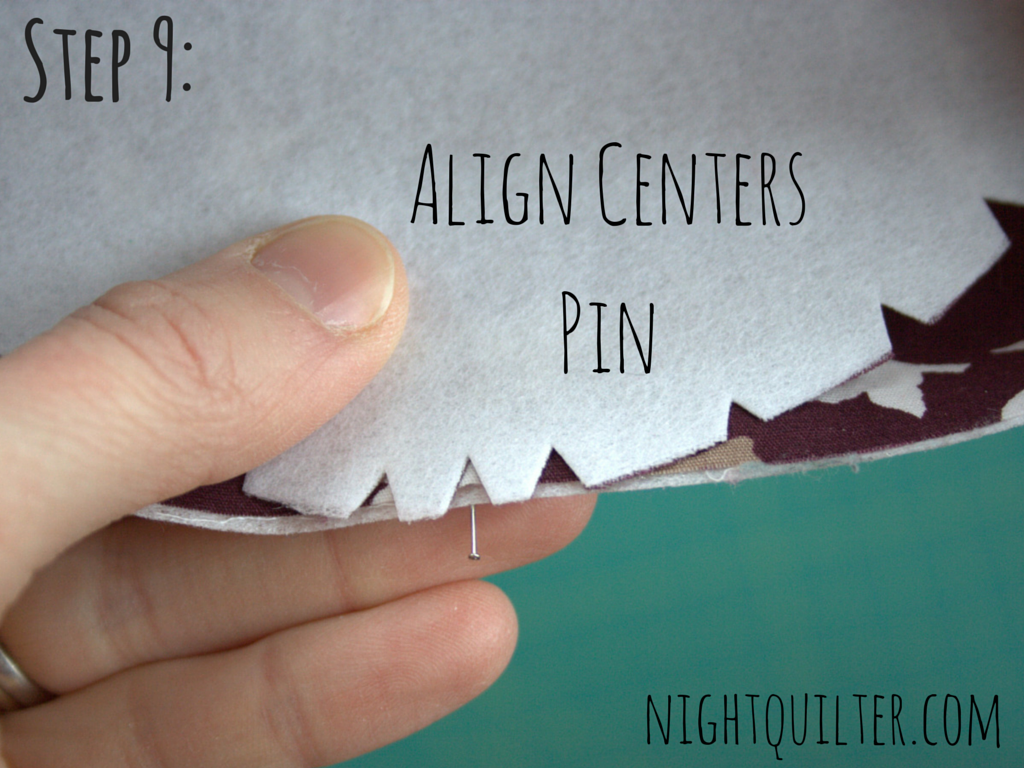
Step 9
Here’s where that center-marking pin comes in handy! First, clip the curves on the bottom. Then, align the center of the bottom with the pin marking the center of your thread catch body, right sides together. Pin.
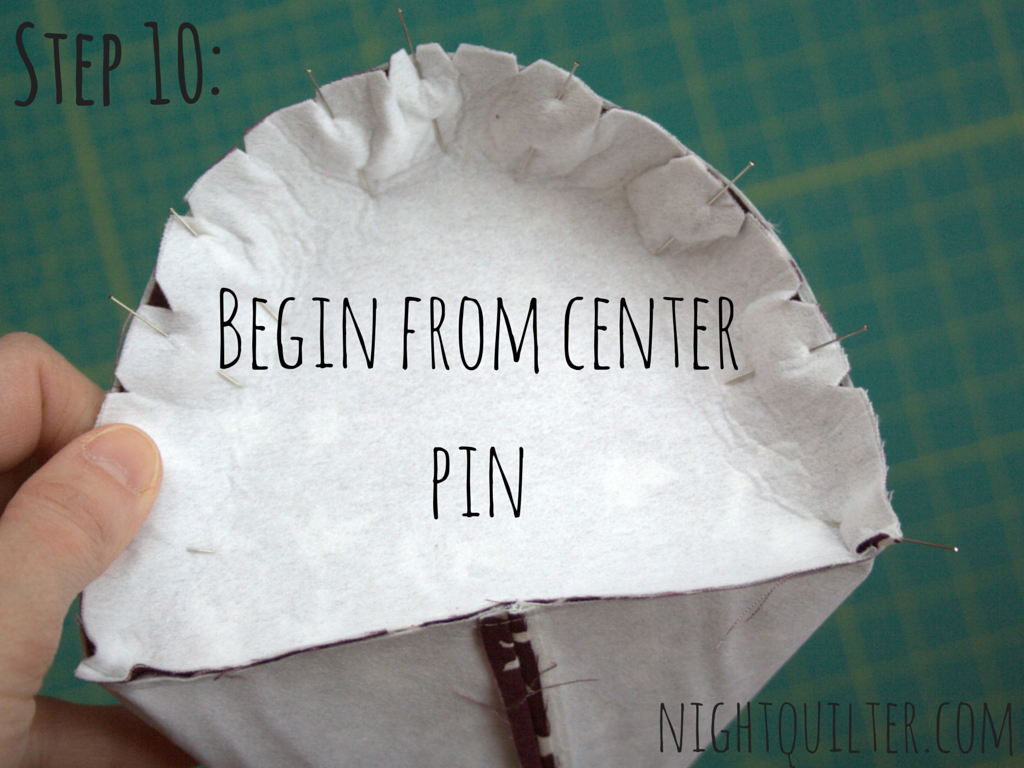
Step 10
Continue to pin the bottom to the thread catch body, working from the center out, aligning the edges as best you can.
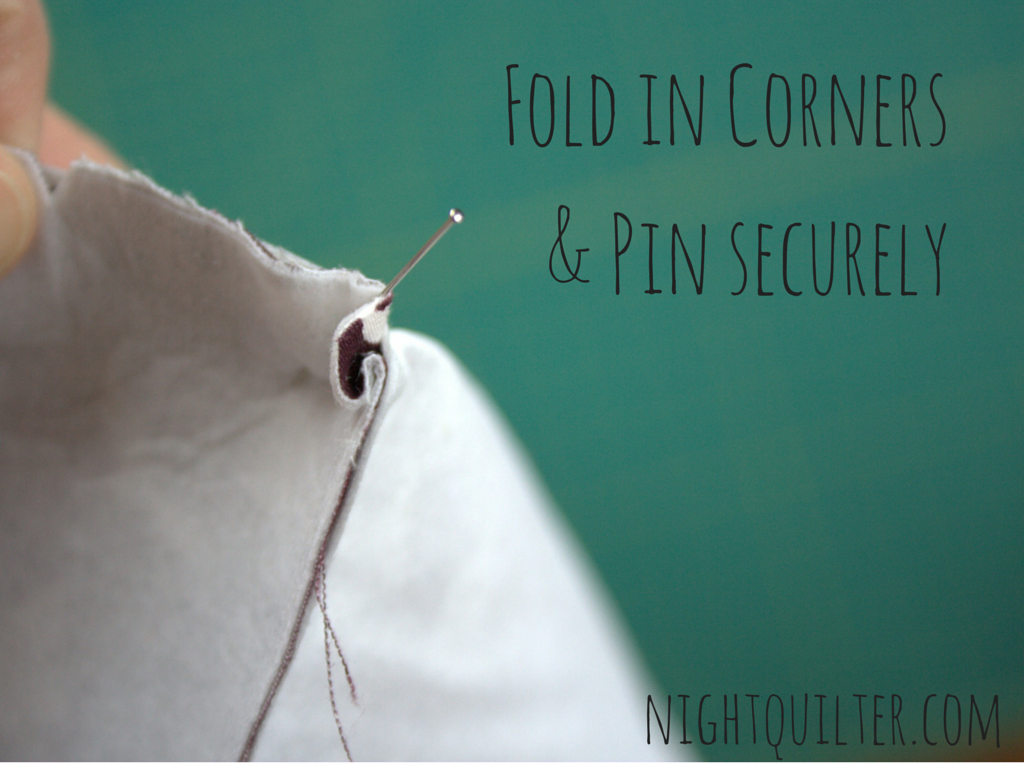
For the corners, fold as if you were turning a corner while binding, and pin securely. Sew together, beginning in the center and working out toward the corners. To keep the corners crisp, I stopped about 1″ short of each corner, backstitched, cut my thread, and began again starting in the corner, sewing out to meet the spot where I left off. If you’re a pro at curves and 3D sewing, feel free to do what works for you! Press seams toward thread catch body if possible.
Repeat steps 6-10 for thread catch lining, disregarding the ribbon-specific bits.
You will now have the fully sewn outer body and liner for the thread catch! On to the final assembly!
Step 11
Turn outer thread catch body right side out. Slip the lining over the outer thread catch body, aligning raw edges, right sides together. Line up the center seams and back panels.
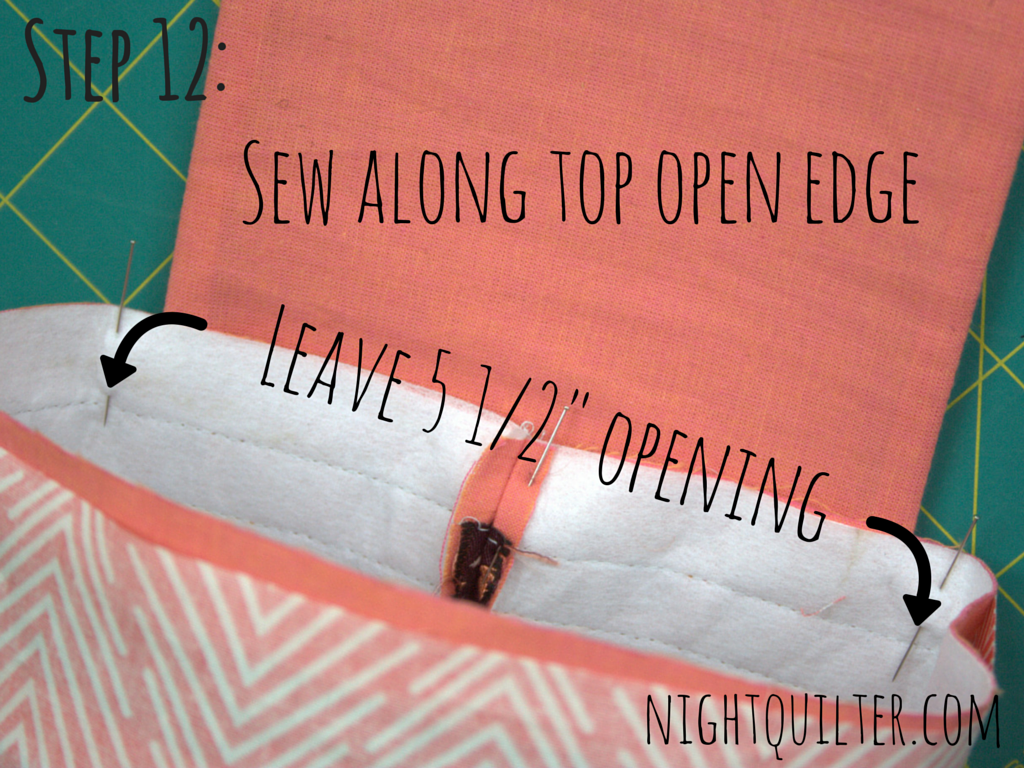
Step 12
Pin in place and sew along top open edge, leaving an opening at least 5.5″ wide along the back panel (you can use your thread catch base and hanging tab to make sure there is enough space, but remove it before sewing. I found that it was easiest to sew together with the outside facing up.) Backstitch at the start and finish of your stitching to hold stitches during turning.
Step 13
Turn right side out through the opening in the top. Push lining down into the outer body. Press top edge, tucking in raw edges of the opening and pressing well.
You now will have the thread catch body fully assembled, with an opening along the back top, flat edge.
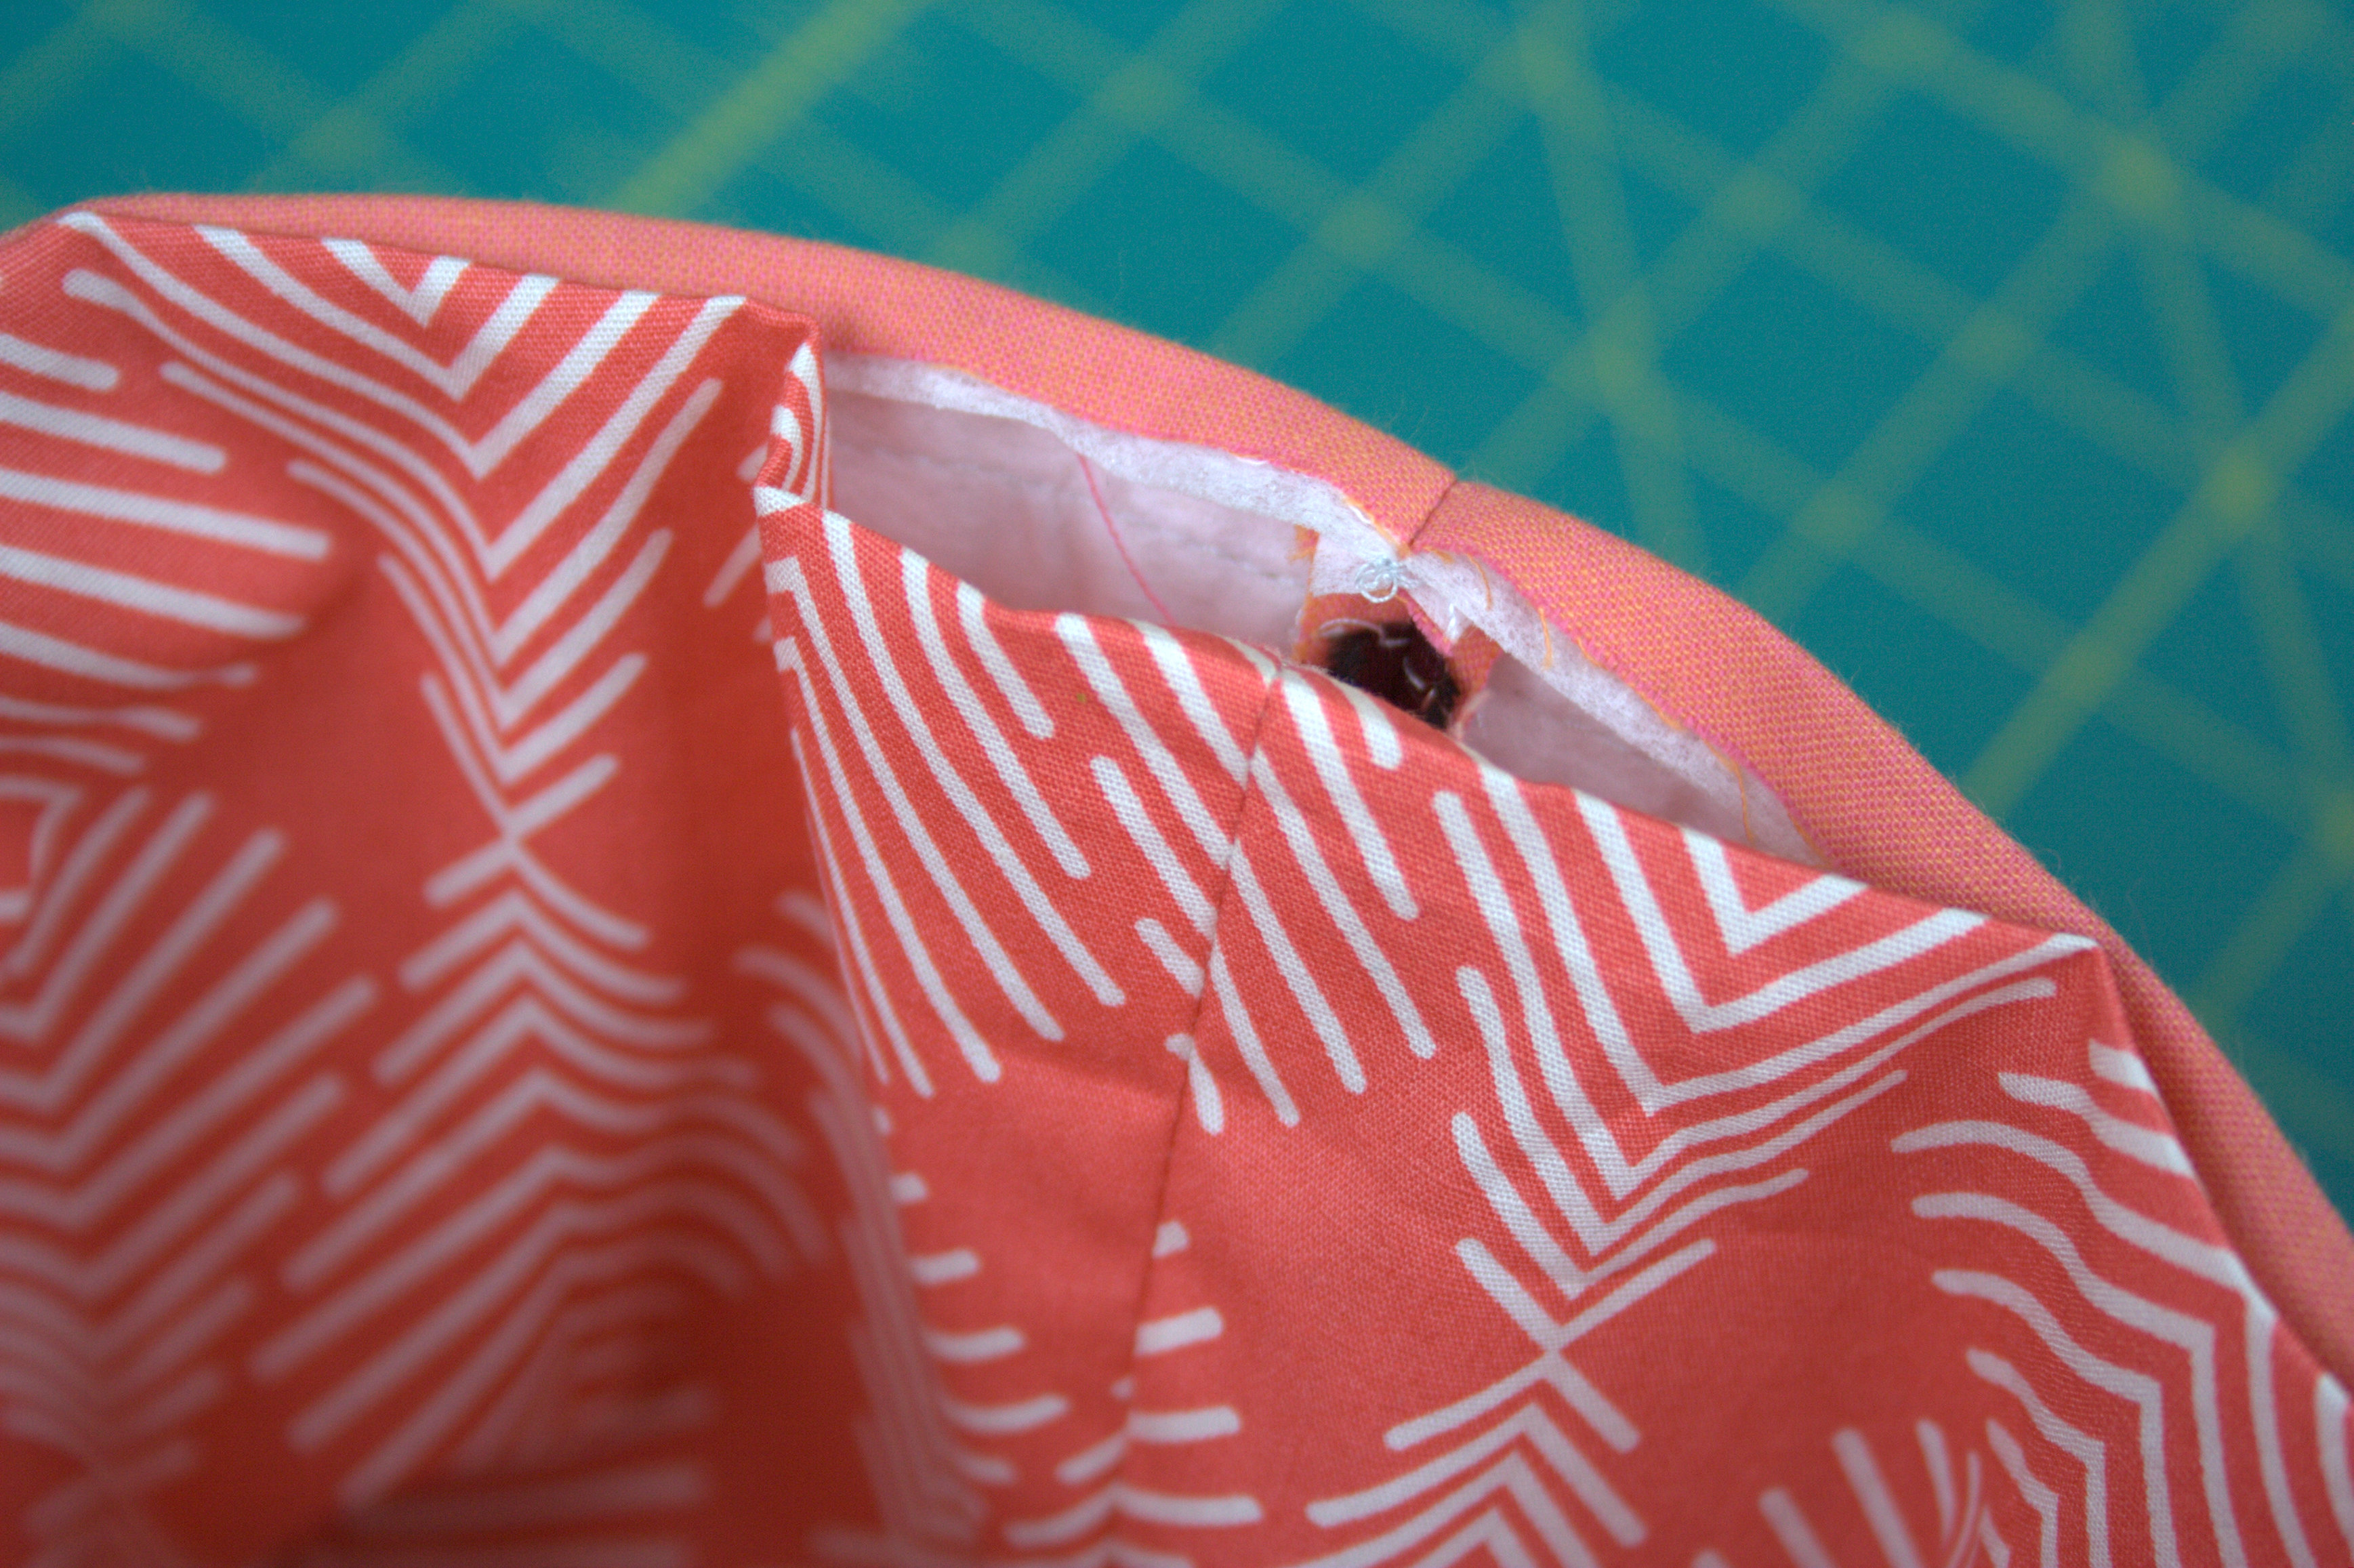
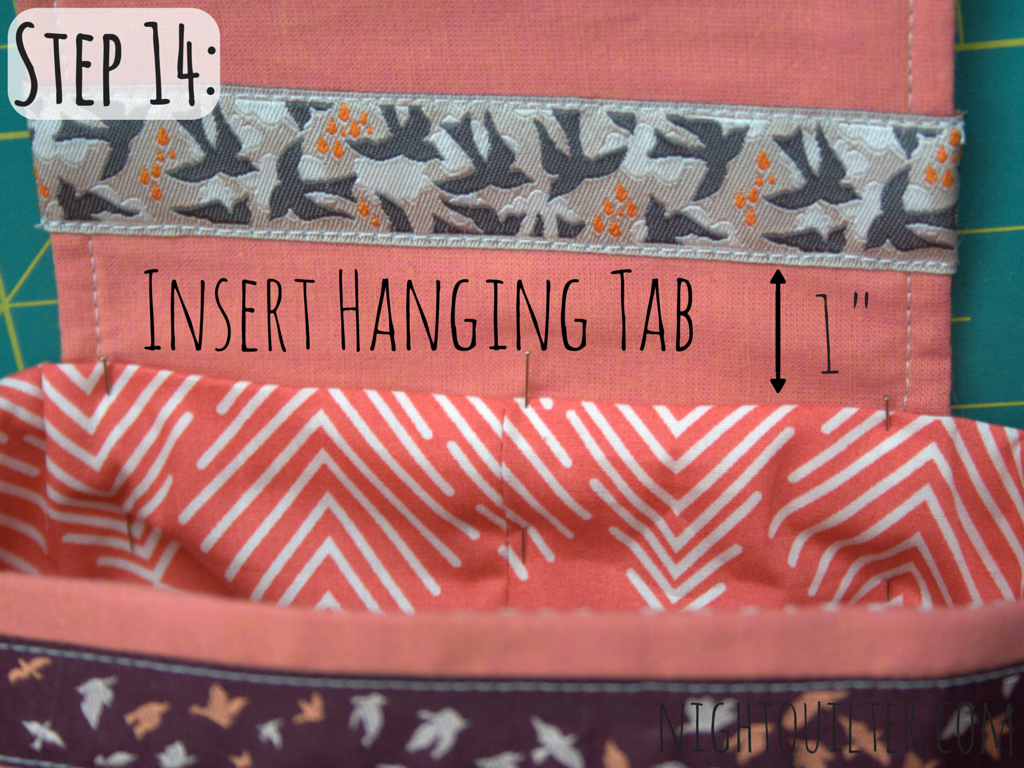
Step 14
Insert the raw edge of the thread catch base and hanging tab into the space left open in the thread catch body. It should be inserted 1/2″ into the body, leaving 1″ between the thread catch and the accent ribbon on the hanging tab. Pin.
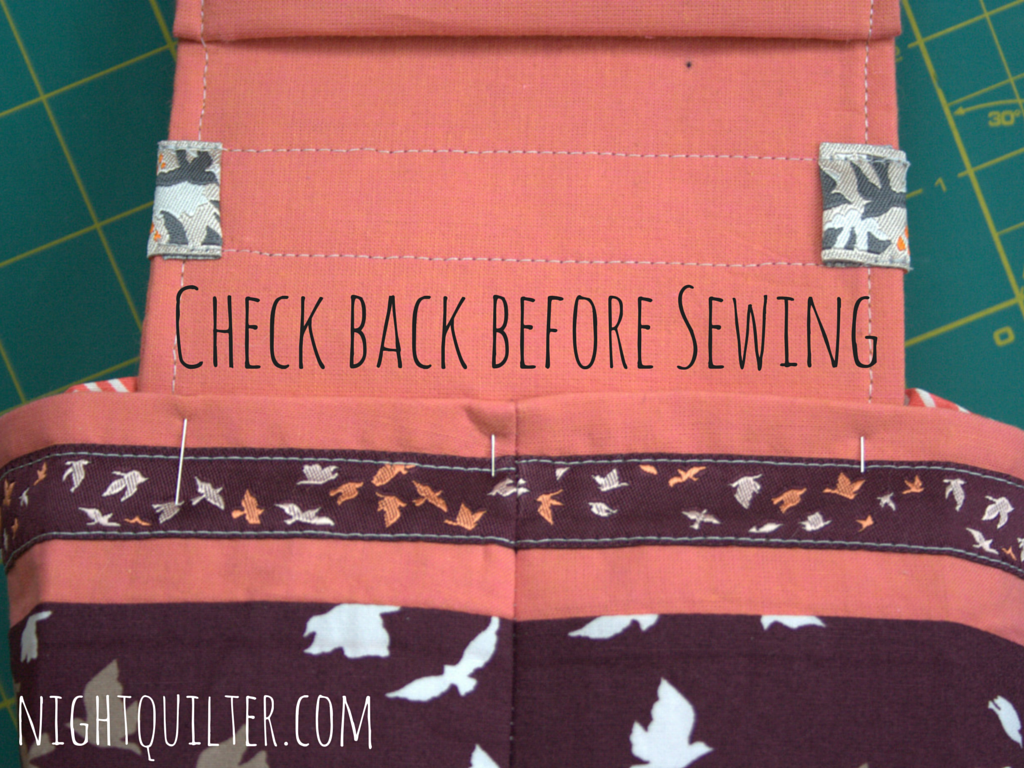
Tip: Check the back to make sure that the back raw edge is properly tucked in before sewing.
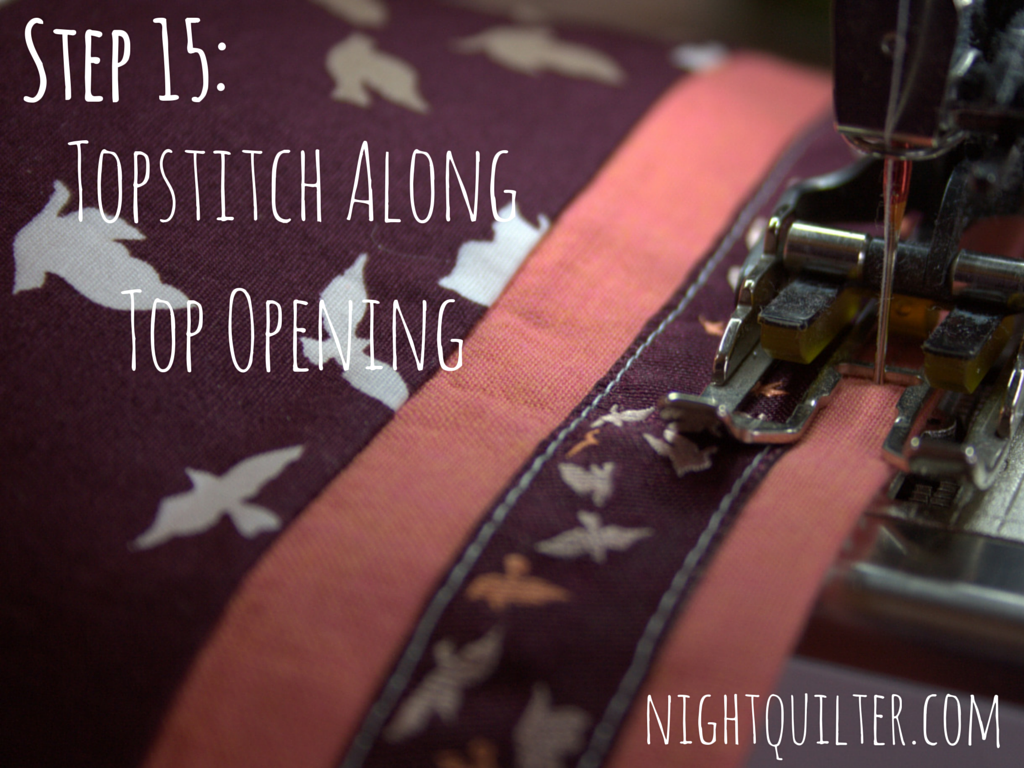
Step 15
Sew along top edge, sewing the hanging tab into the thread catch body. I sewed the opening closed (with the hanging tab inside) first, with the thread catch body & lining facing up so that my top stitches show and I could control the seam distance better.
Next, top stitch along the entire top of the thread catch opening using a scant 1/4″ seam. Once the hanging tab was securely sewn in, I backstitched and cut my thread, again flipping the thread catch the other way (outside of the thread catch facing up) so that I could ensure that my top stitches are even since they are the ones that show.
You’re finished!!
Go ahead and put your pile of threads accumulated during the making of this project into your gorgeous new thread catch!
Phew! Congratulations, you made it! I sure hope that this tutorial/pattern is clear, and please let me know if you have any questions or comments. I would love to see if you make this, too. Please tag me @nightquilter if you post on Instagram or Twitter.
Thank you so much to Bonnie Christine for including me in this blog tour, and be sure to check out Caitlin Topham’s post at Salty Oat from yesterday, and visit the final stop on the tour, Corri Sheff at The Lions Dandy tomorrow to see what gorgeousness she creates.
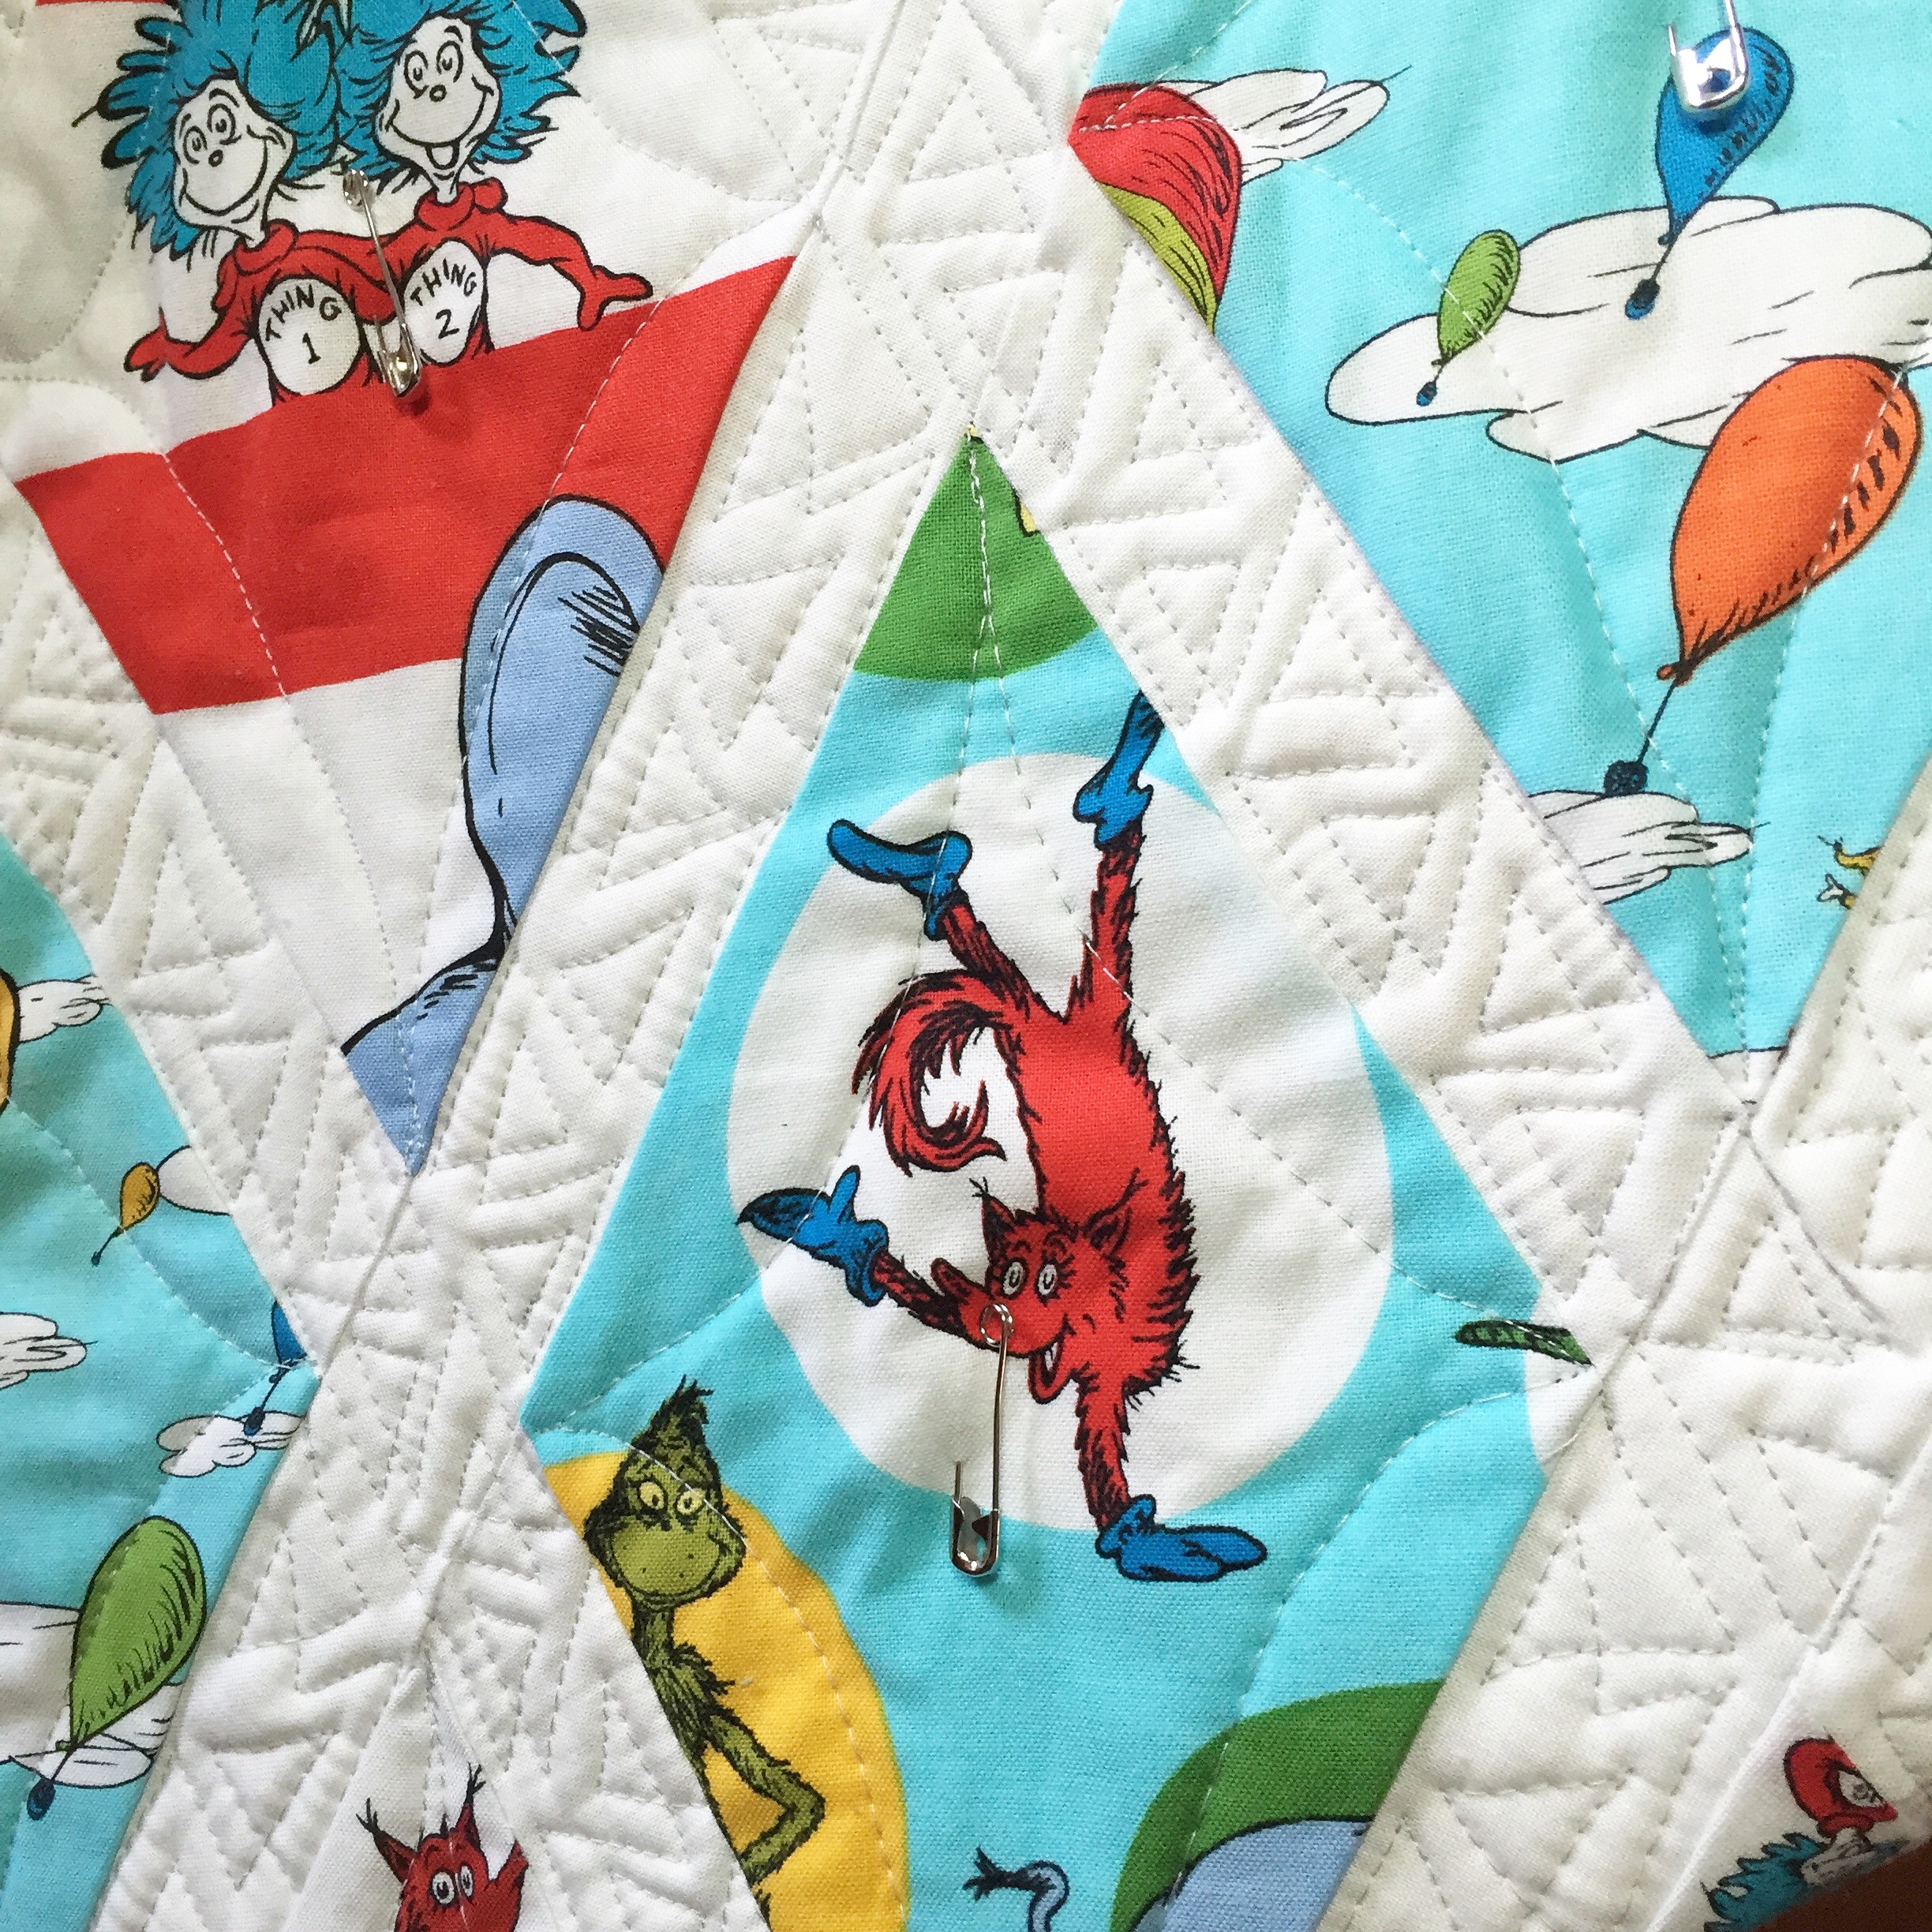
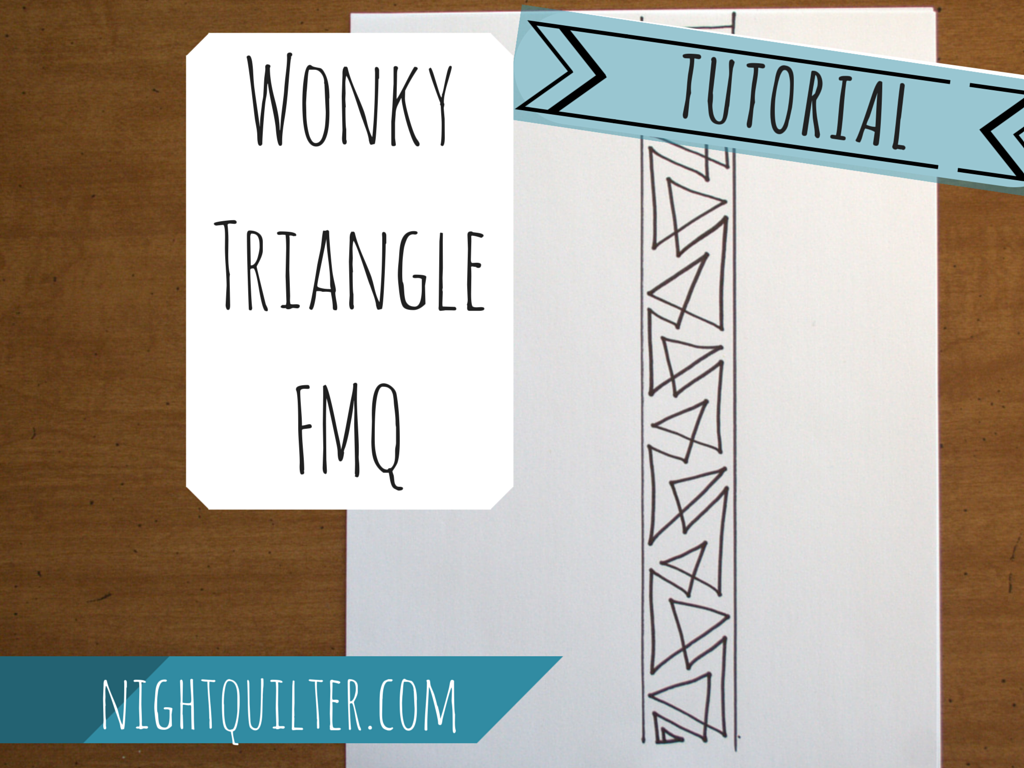
Since the wonky triangle quilting I did in the narrow 1″ sashing of my Dr. Seuss Diamonds quilt was one I didn’t find elsewhere, I thought it would be helpful to create a quick tutorial on how to quilt them.
Being “wonky” certainly helps, since it means they don’t have to be–and in fact, shouldn’t be–perfect. For a beginner free motion quilter (FMQ) like me, this is the perfect pattern to play with when there’s a quilt full of narrow sashing to quilt!
The wonky triangles are great because:
-they can be used on very narrow sashing
-being wonky, perfection is not the goal
-they cross fairly smoothly for intersecting sashings
-triangles can be sized as needed, so it’s easy to fill even smaller spaces
-it’s a simple repetitive pattern that is perfect for beginners quilting on a domestic machine (or pros on a long-arm!)
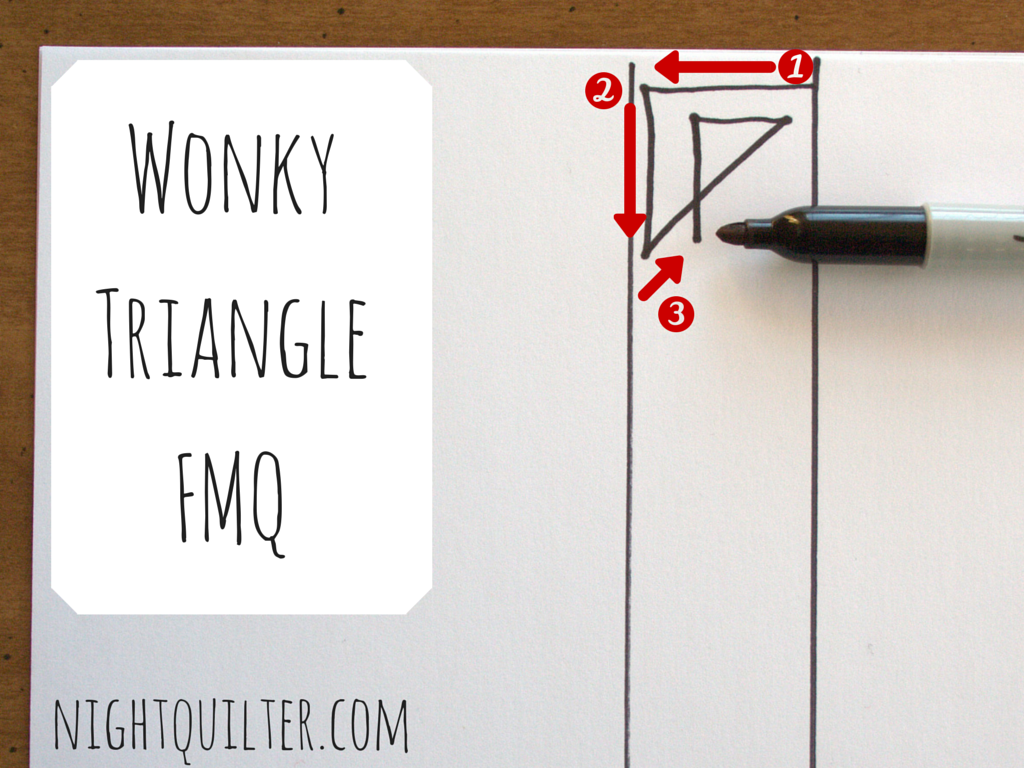
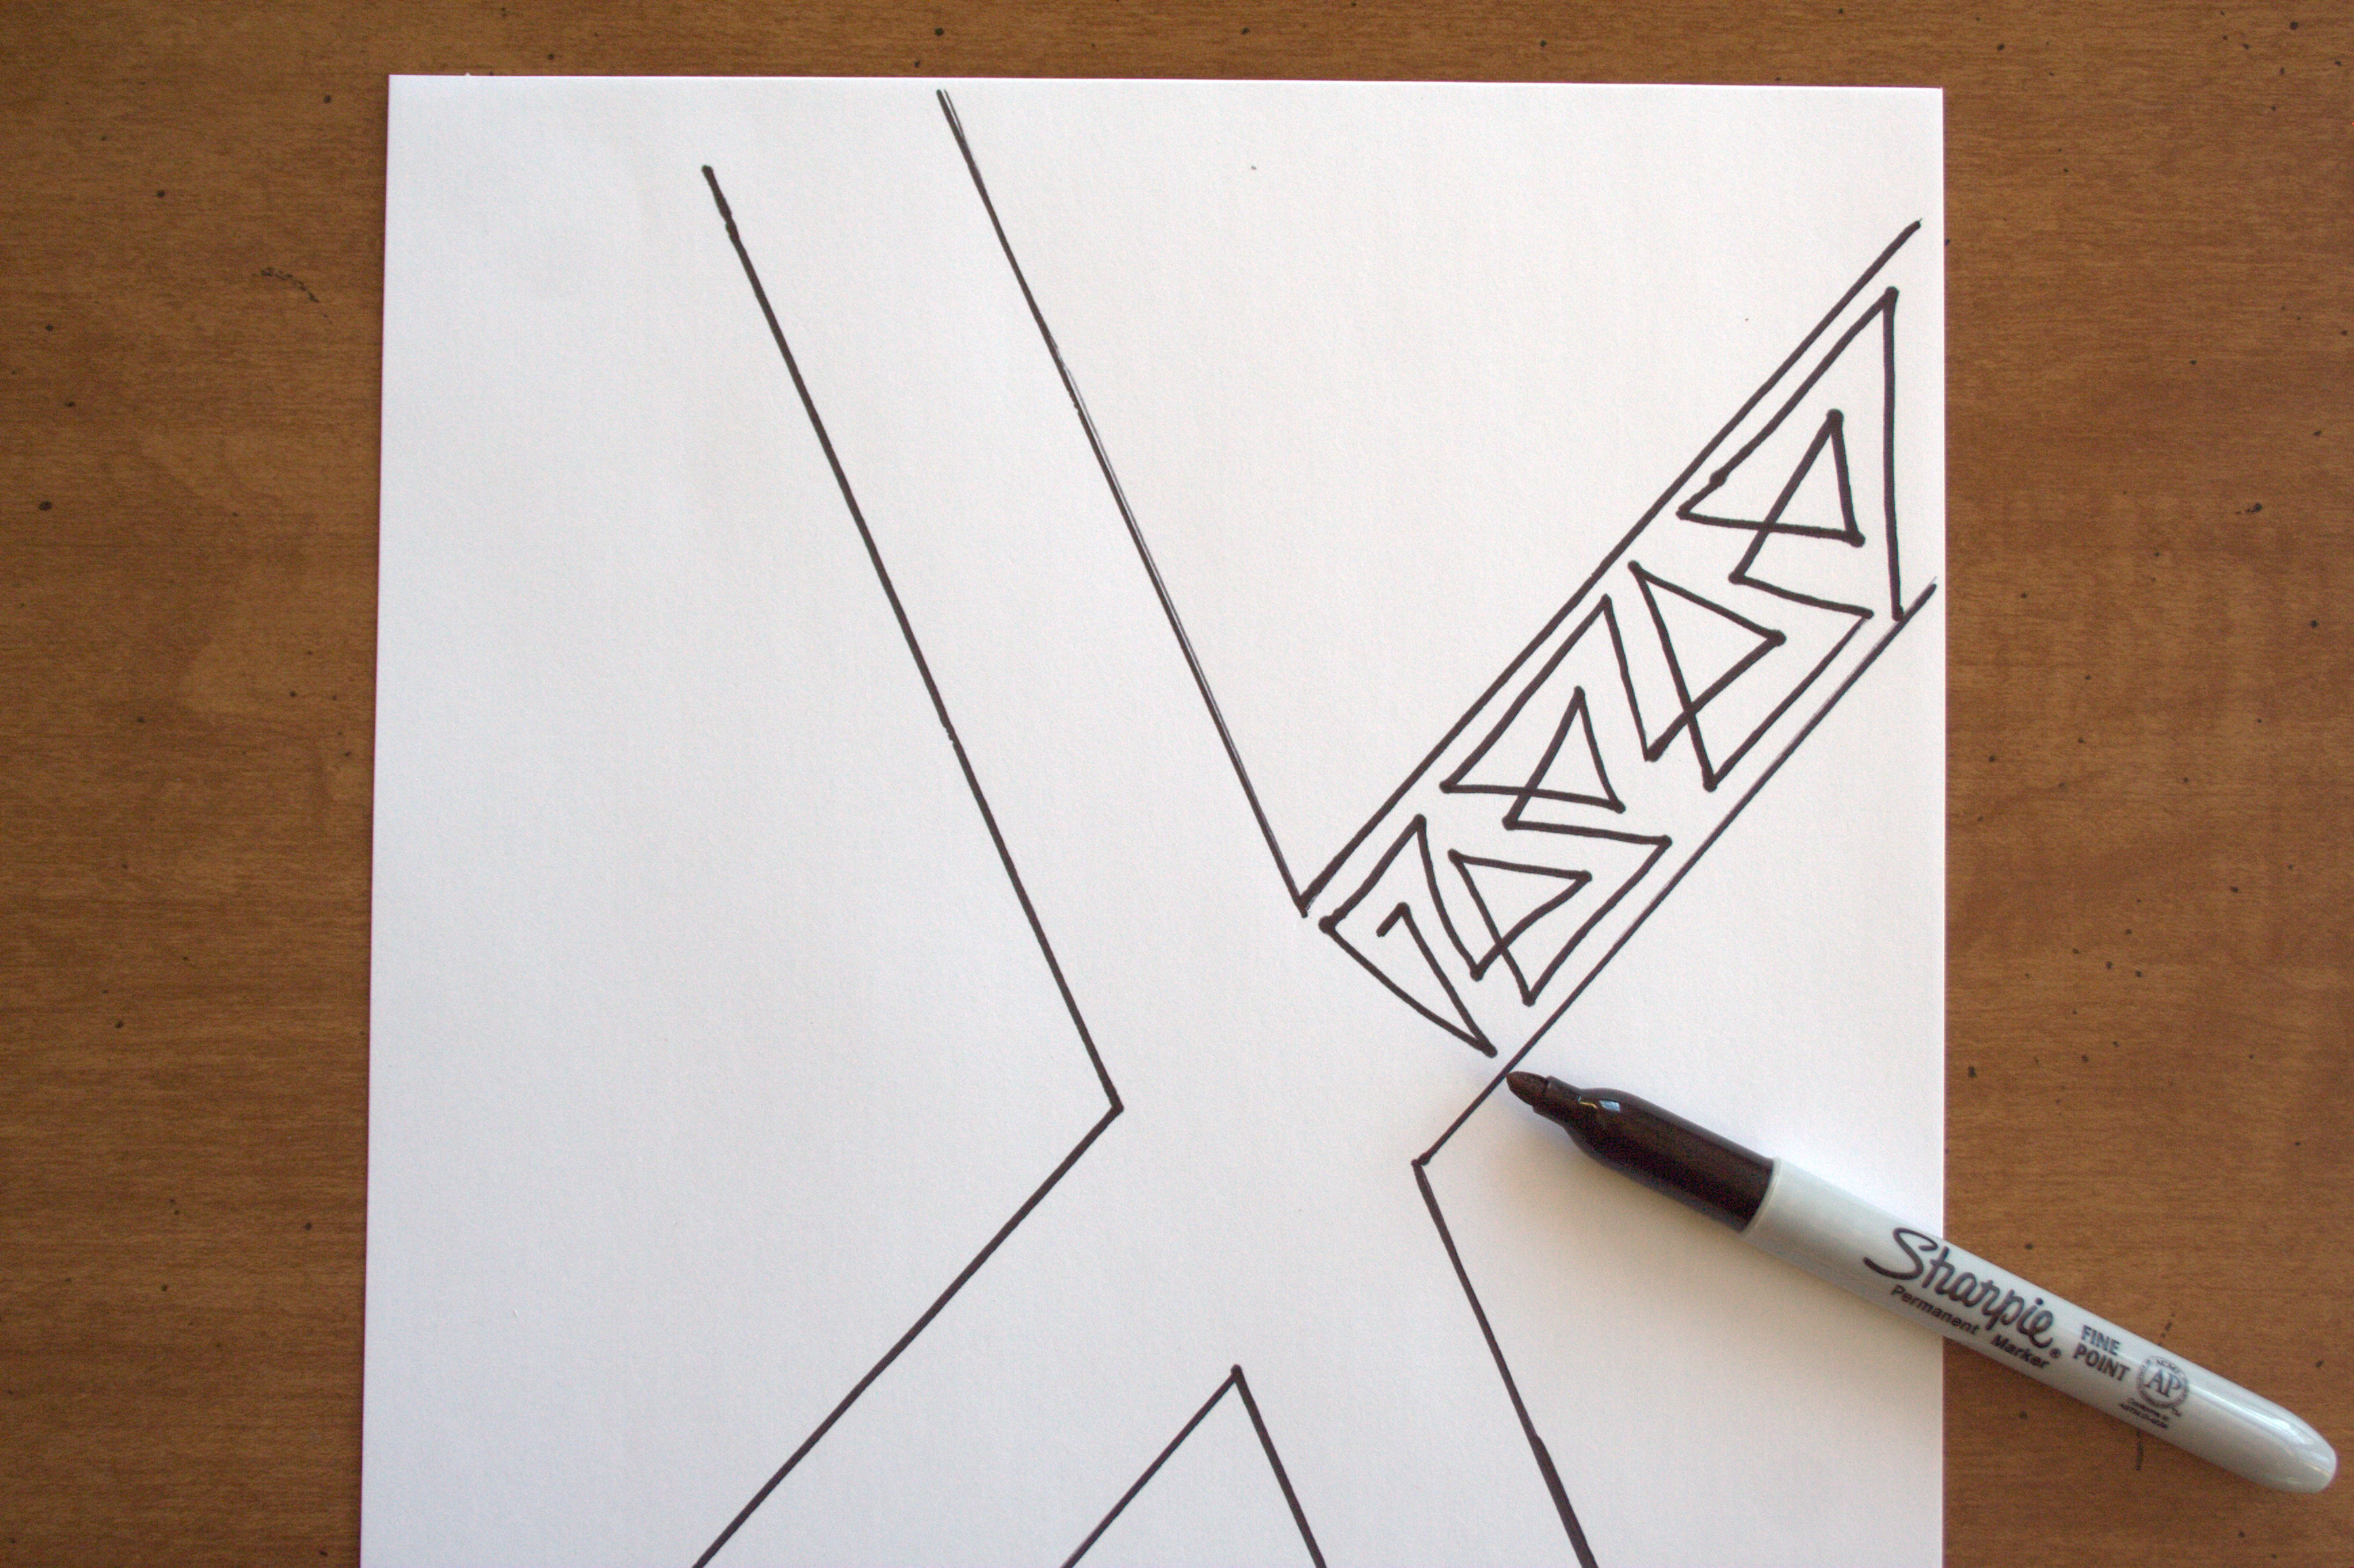
Inspired by Amy Garro of 13 Spools, I’m going to use a pen and paper to show you how to create the wonky triangle pattern. When you are quilting narrow sashing, you can use your piecing as your boundary lines. I drew black parallel lines to represent the boundaries.
Step 1
Begin at the top edge of one of your sashes. Quilt parallel to that edge (1 in diagram above), then turn along the sash boundary and quilt the second side of the triangle, approximately the same length as the width of your sashing (2 in diagram above). Since these are wonky triangles, nothing needs to be measured or perfect. Next, head back toward your starting point, creating the third side of the triangle but stopping before you actually get to the starting point (3 in diagram above). Next, quilt a little triangle inside your big one, following the same general shape. Once both nested triangles are quilted, continue your quilting line through the bigger triangle and extend a short distance.
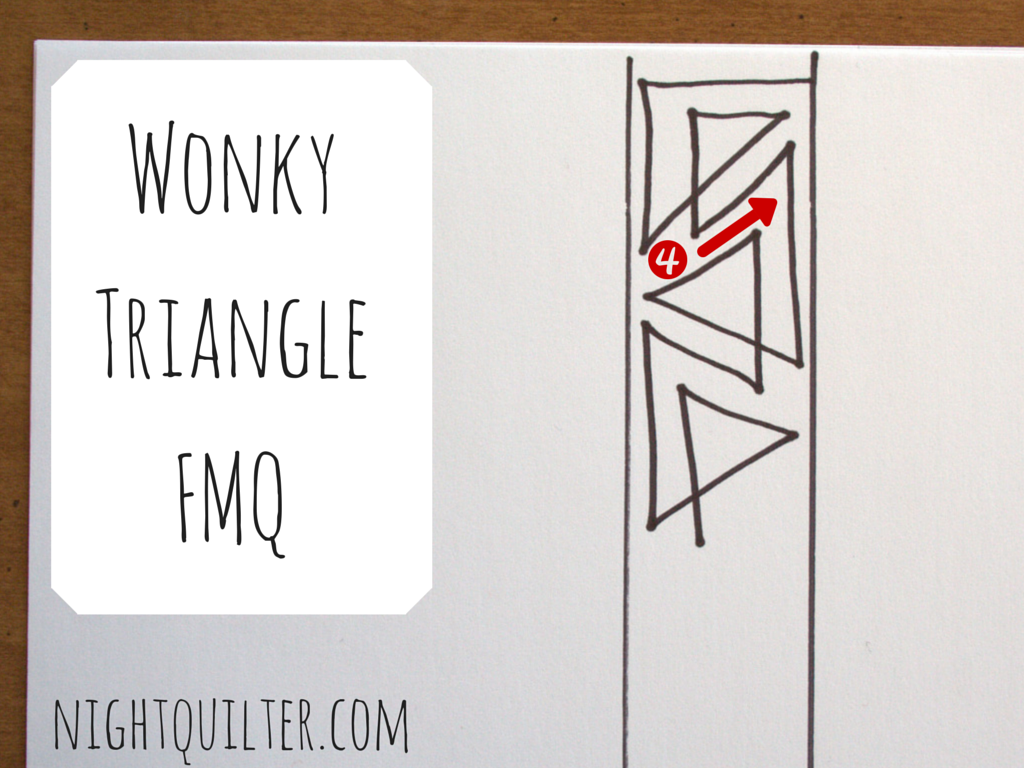
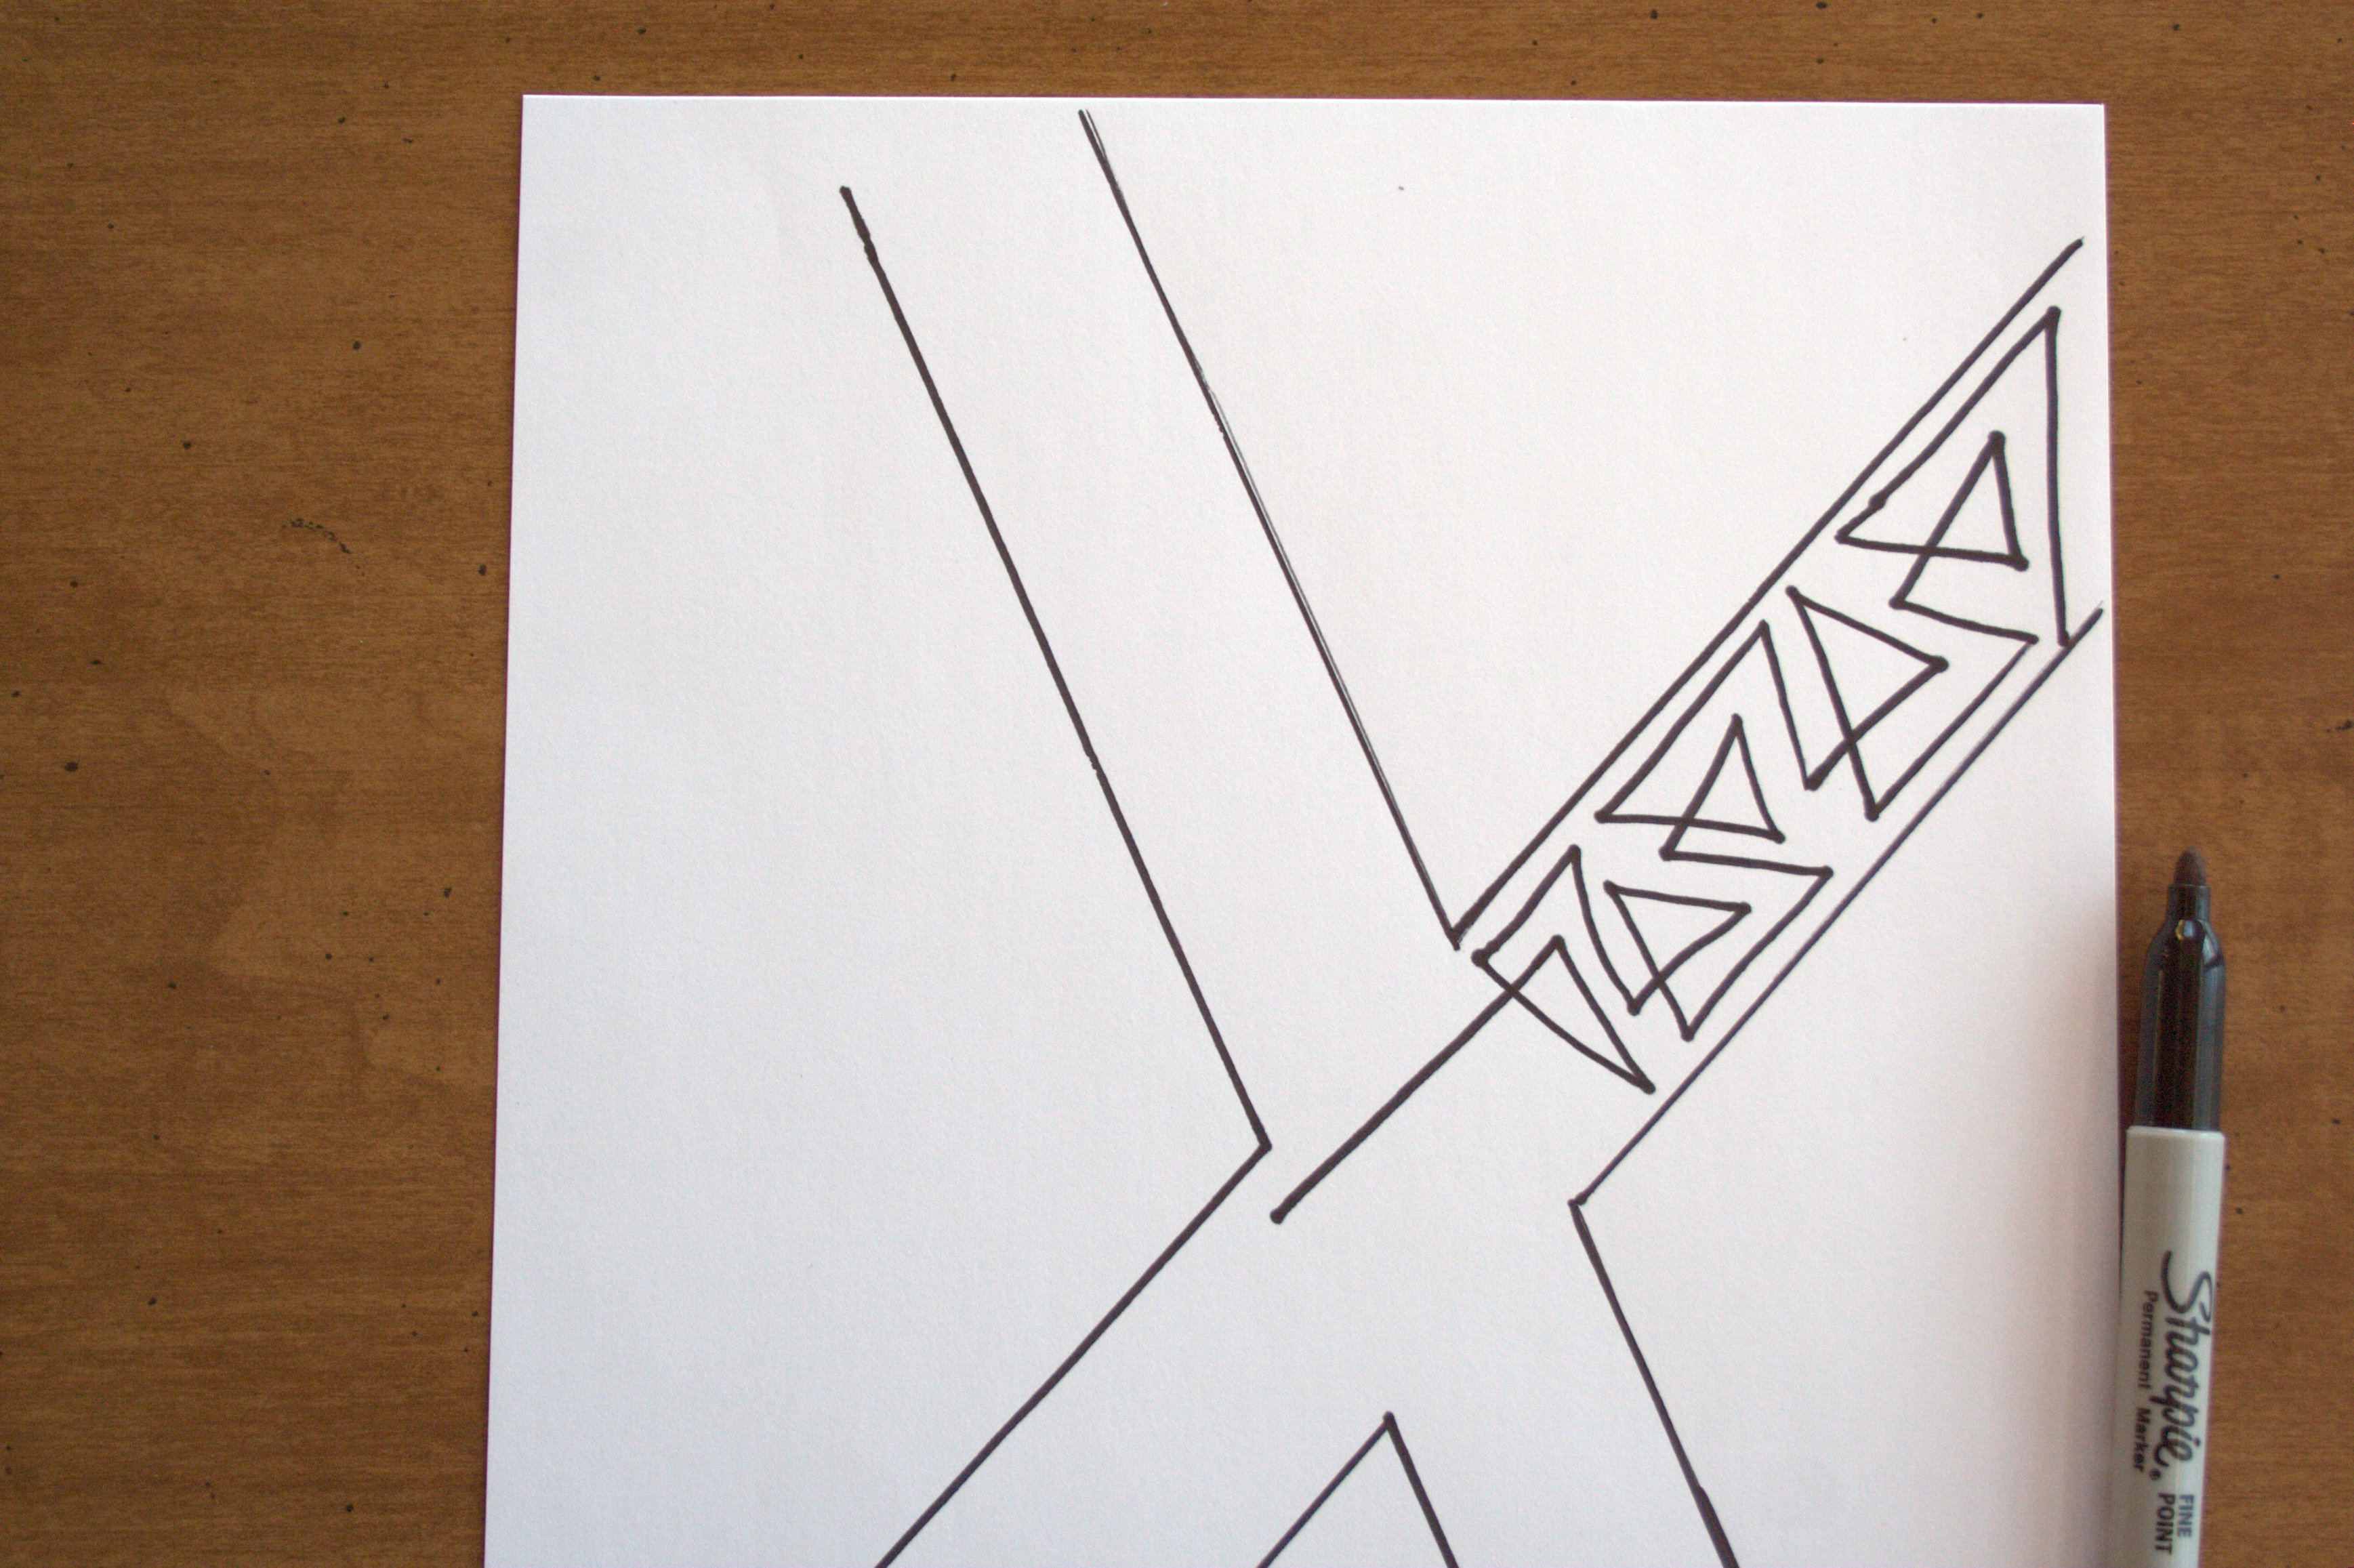
Step 2
Quilt back toward your starting point again, keeping your quilting lines evenly spaced, to begin the next triangle (4 in diagram above). This first quilting line back toward your start is the first side of your second triangle. Continue quilting the wonky nested triangles along your entire length of sashing! Just be sure to always head back along your existing quilting after emerging from a triangle and it should smoothly progress to the end.
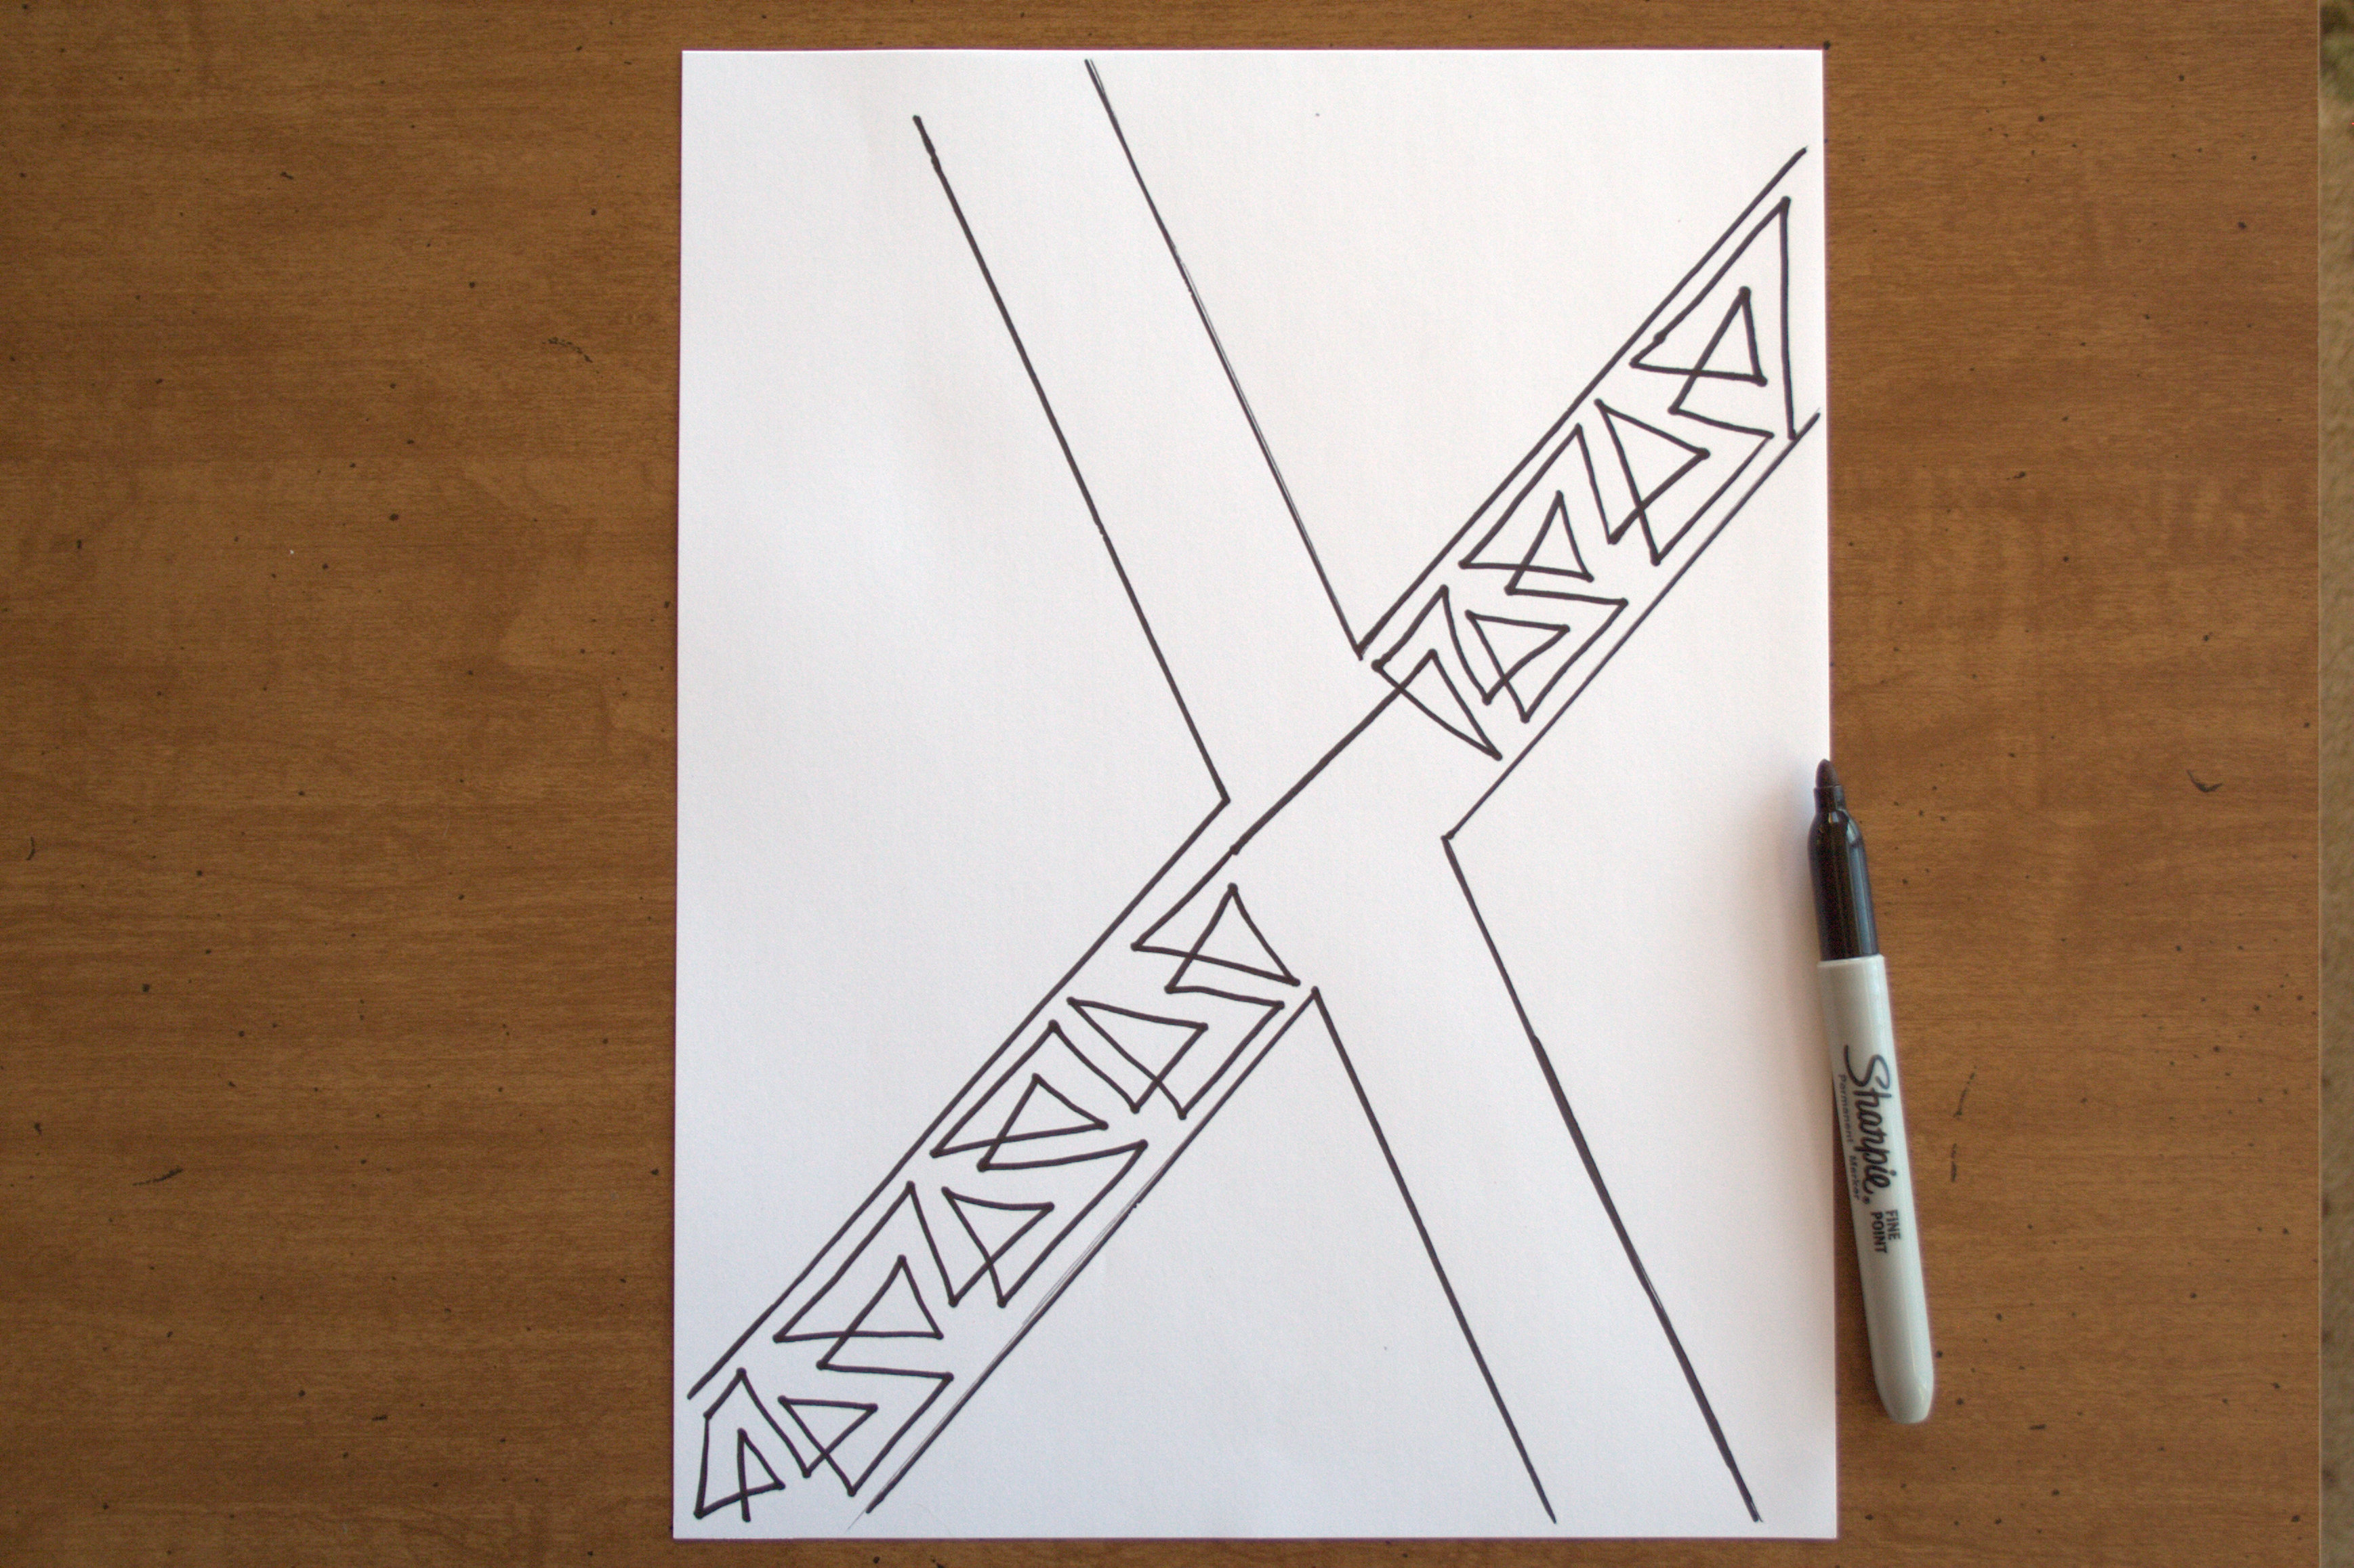
Quilting Intersections
If you are quilting sashing that intersects, here is how I crossed over. Begin quilting your first sashing line as described above.
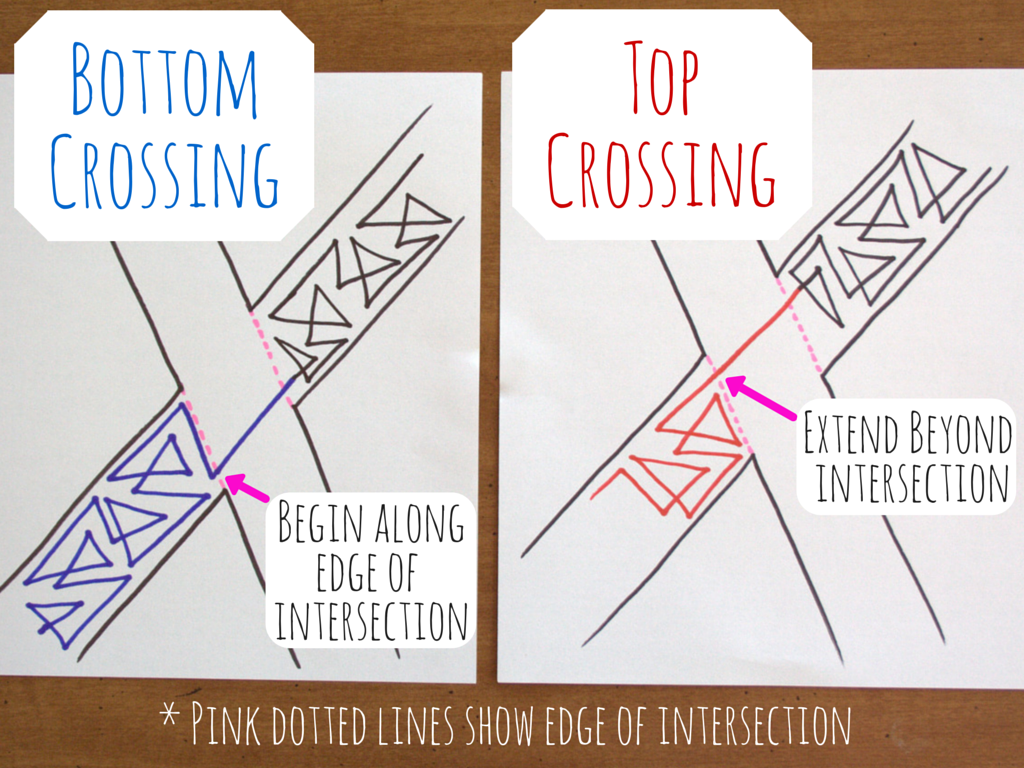
When you begin to near the intersection, adjust your triangle size and spacing a bit (if necessary) to exit a complete triangle right at the edge of the intersection.
Quilt straight across the intersection, creating a long straight line parallel to the sashing you are quilting. (Don’t worry, we will fill in when we do the crossing).
Continue your triangle quilting, crossing intersections in the same way. Quilt wonky triangles all the way to the end of the sashing.
Note: Depending on whether you are approaching the intersection crossing from the top or bottom, you will need to begin your triangles a bit differently.
After you cross the intersection, if you are on a bottom angle of the sashing, begin your first triangle line perpendicular to the crossing, along the intersection (in blue above). If you cross on the top angle of the sashing, extend beyond the intersection so that your line forms the second side of the triangle (in red above). See the diagram with step 1 above for clarification on what I mean by “the second side of the triangle”.
After quilting wonky triangles all the way to the end of the first sashing, begin quilting the intersecting sashing. As you approach the intersection, be aware of how much space you have and try to allow for a triangle to be quilted to completion right at the edge of the intersection. In my example, I cut it a bit tight, so my last triangle is on the small side.
Here’s where you have a choice, depending on both your level of skill and your desired look. If you are really good at tracing existing quilting discretely, you can use the line across the intersection as the edge of one of your crossing triangles. In that case, just trace the line as part of an outer larger triangle and continue quilting as normal.
If, like me, you are not a pro at tracing existing quilting, you can pass right through the line across the intersection as if it is another triangle edge and quilt your crossing triangles right through it. As long as you keep the distance between your quilted lines consistent, it does not change the aesthetic of the design all that much, in my opinion.
Continue your wonky triangles until all of the sashes are quilted. Easy, right!?
As with all free motion quilting, the more you practice this design, the more natural it will become to get your triangles consistent and your intersections smooth. During the learning process, don’t fret over little hiccups or half-triangles. After all, they are wonky, right? Triangles are pretty forgiving since you can make them as big or small as you need to fit in your space. As long as it has three sides and three angles, it’s a triangle!
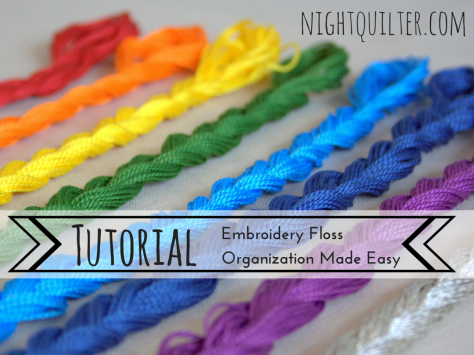
In the weeks leading up to QuiltCon (yes, I’m still talking about it), the Instagram hashtag #quiltconprep made it easy to see what others were doing to get ready for the big event. During those mad dash prep days, one of my IG friends posted a picture of a whole bunch of 2.5″ fabric squares of Carolyn Friedlander fabrics that she had cut in preparation for Carolyn’s Aerial Grove class. She noted that all she needed was a few squares of the architextures crosshatch and she’d have enough for a fully-Carolyn Friedlander aerial grove. What does this have to do with embroidery floss? I’m getting there! Long story short, I offered to give some squares to her at QuiltCon, and when she asked what she could give me in return, I said “knowledge.” I asked her to share a tip or trick that she found particularly helpful. It’s such a useful tip that I decided to share it here, with her permission, of course! Today’s tip was taught to me by Rebecca Cleaver (@cleaverr on Instagram), who learned it from Maura Ambrose (@folkfibers).
How to Organize and Store Embroidery Floss So that it’s super quick and easy to use!
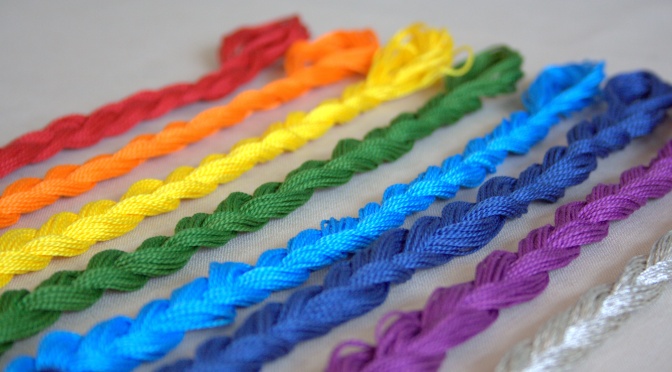
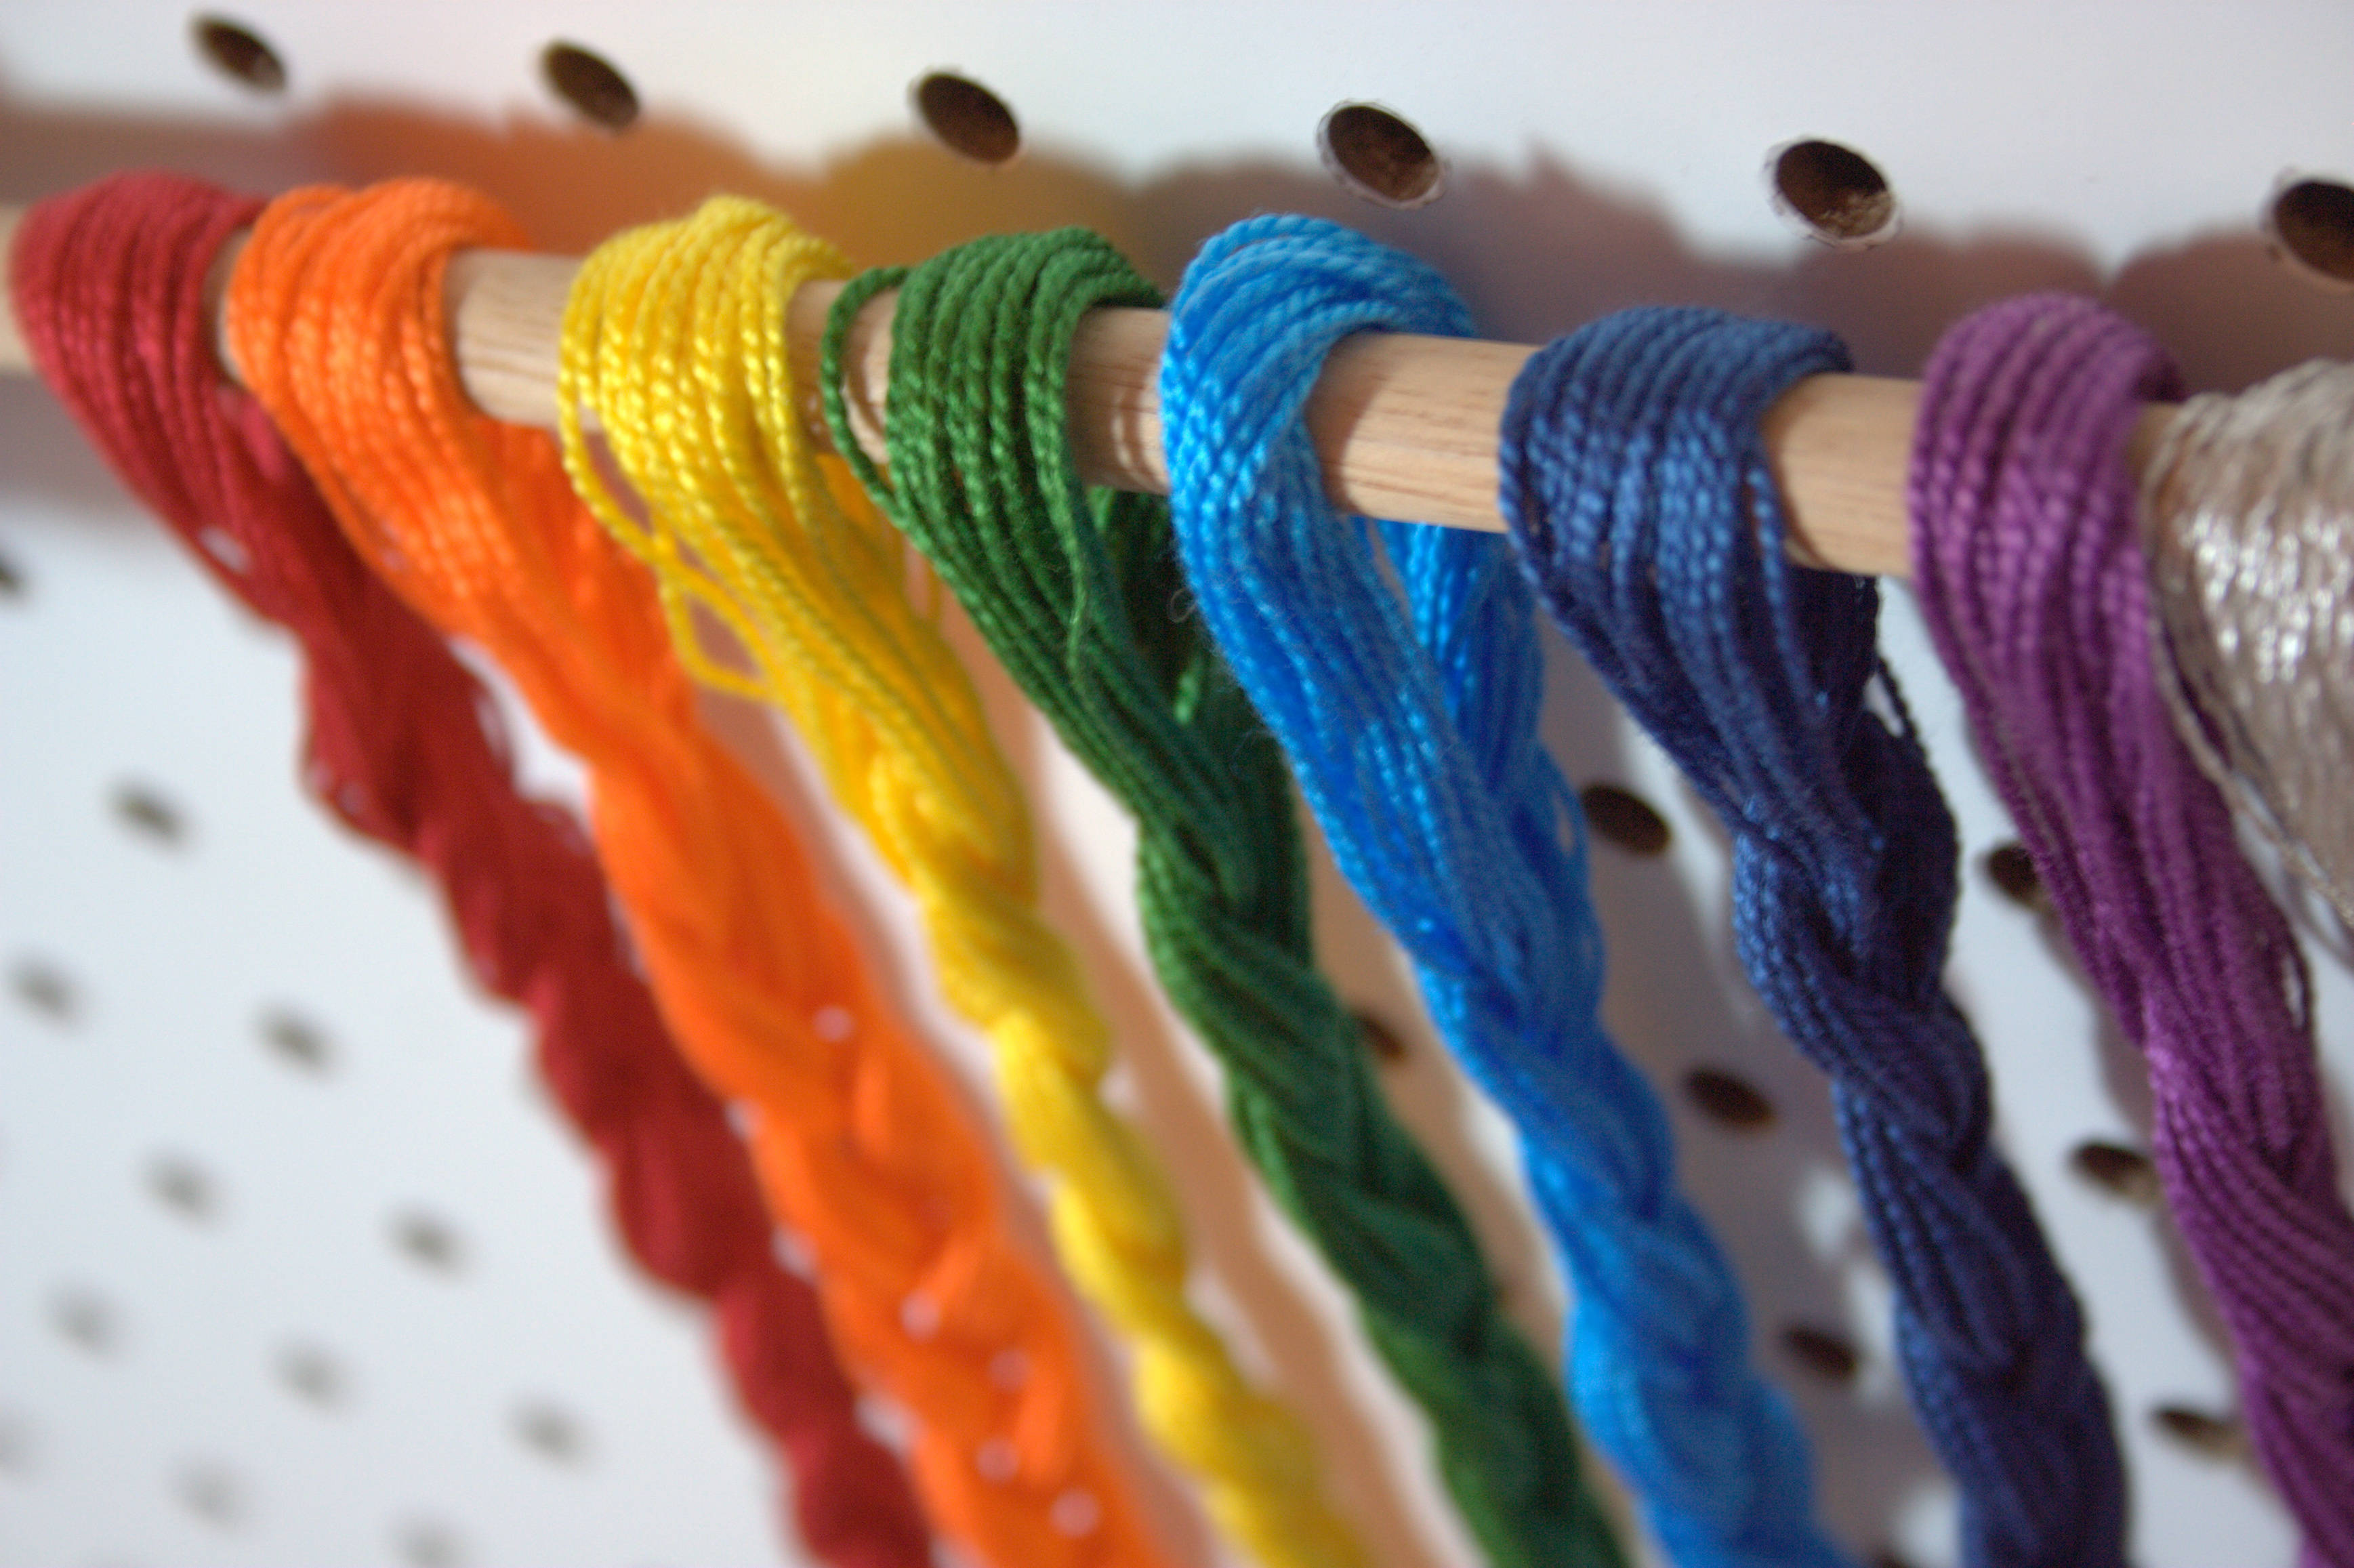
I’ve seen cringe-worthy photos of tangled piles of embroidery floss, and I admit that I am not that person. Even before learning this tip, I stored my floss on a wooden dowel, hanging in its original skein. This looked pretty, but when it was time to actually use a strand, that’s when it became tricky. I’d have to take all of the skeins off the dowel and gently and painstakingly remove a thread a tiny tug at a time (yes, I’m nutty).
Here’s a much better way.
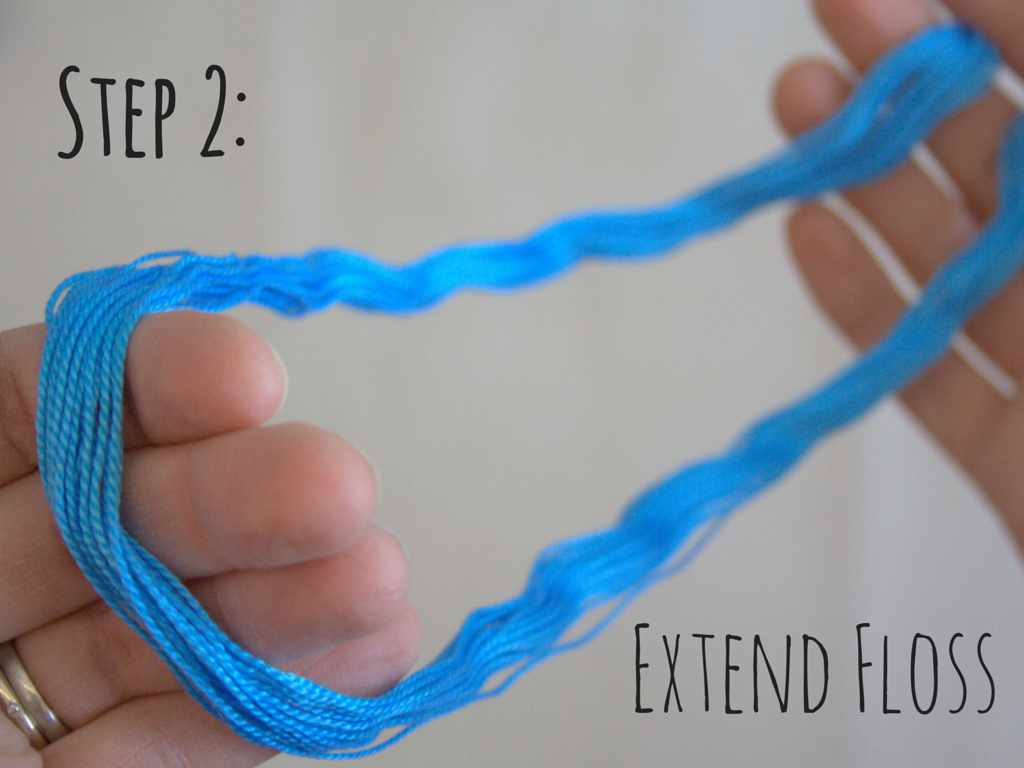
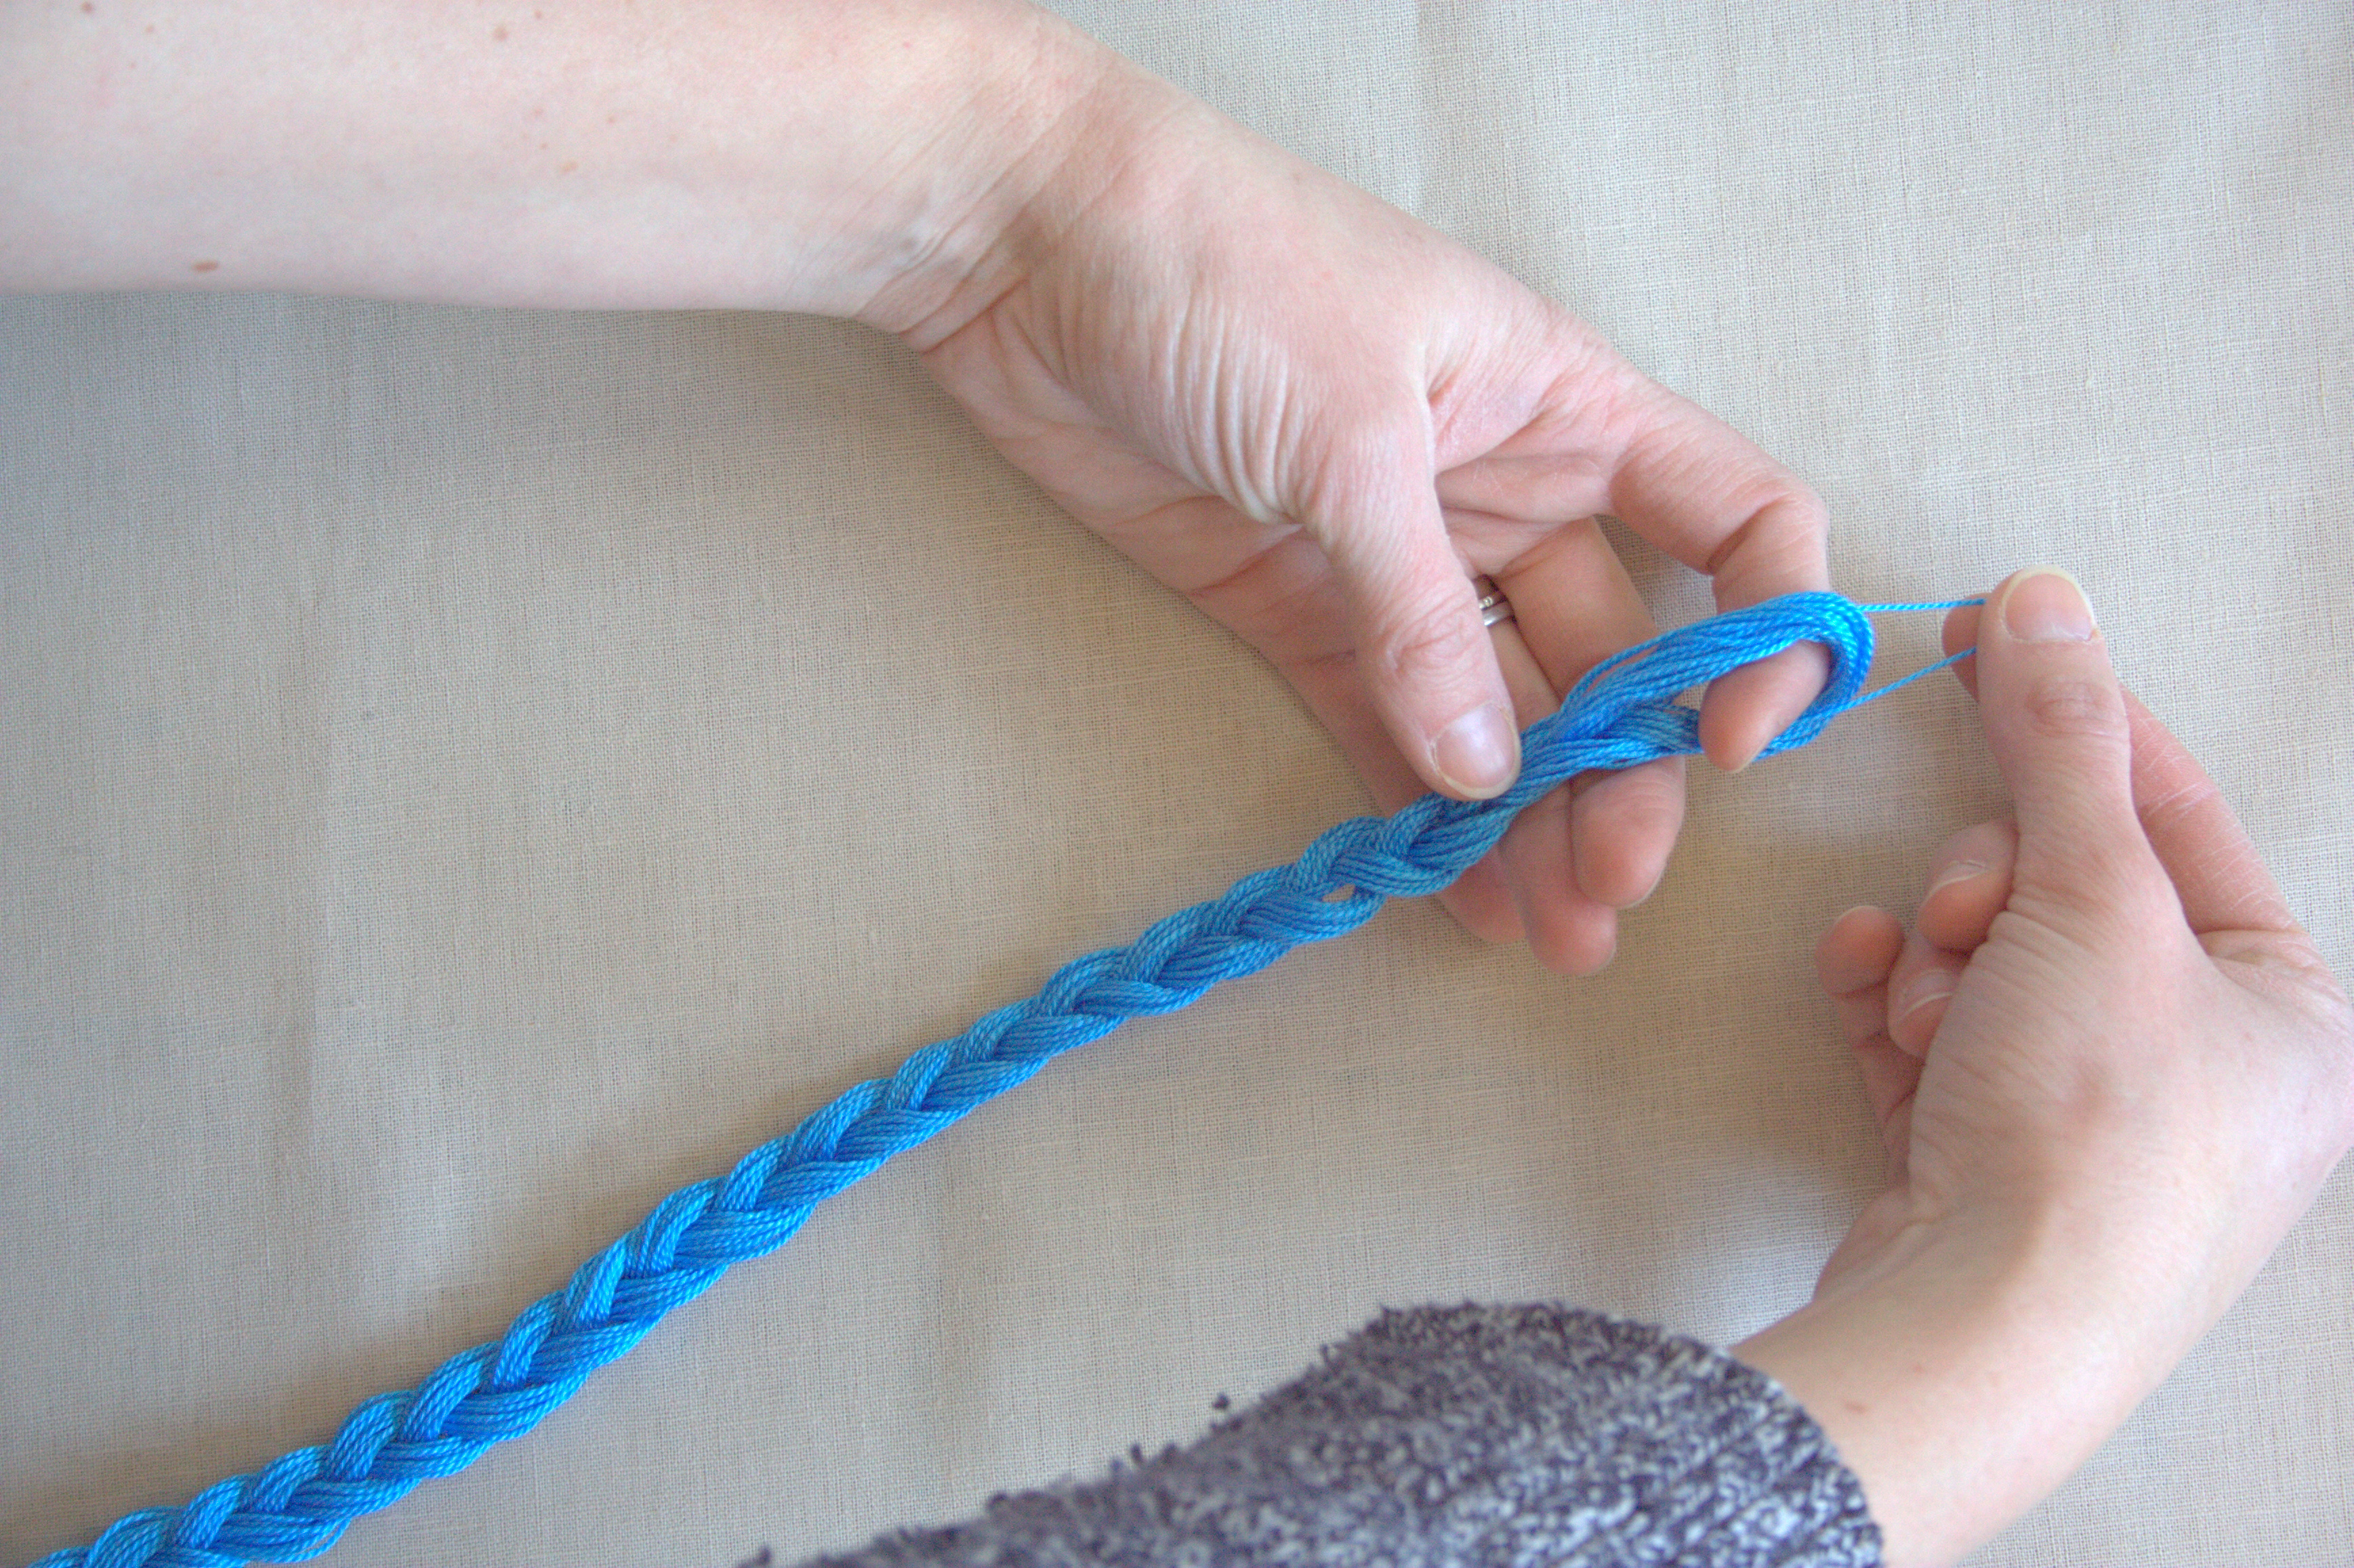
Step 1:
Carefully remove the paper holding the skein together and untwist the skein.
Step 2:
Extend the floss, holding the fully extended loop in your hands.
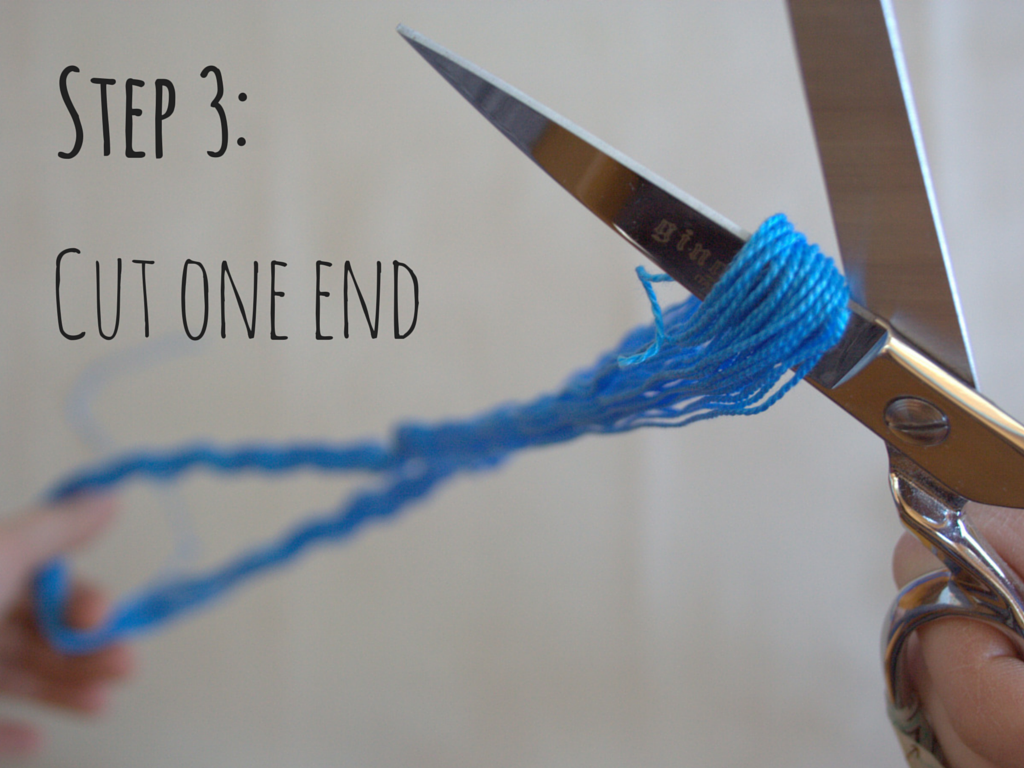
Step 3:
Cut one end, cutting through all of the embroidery floss strands.
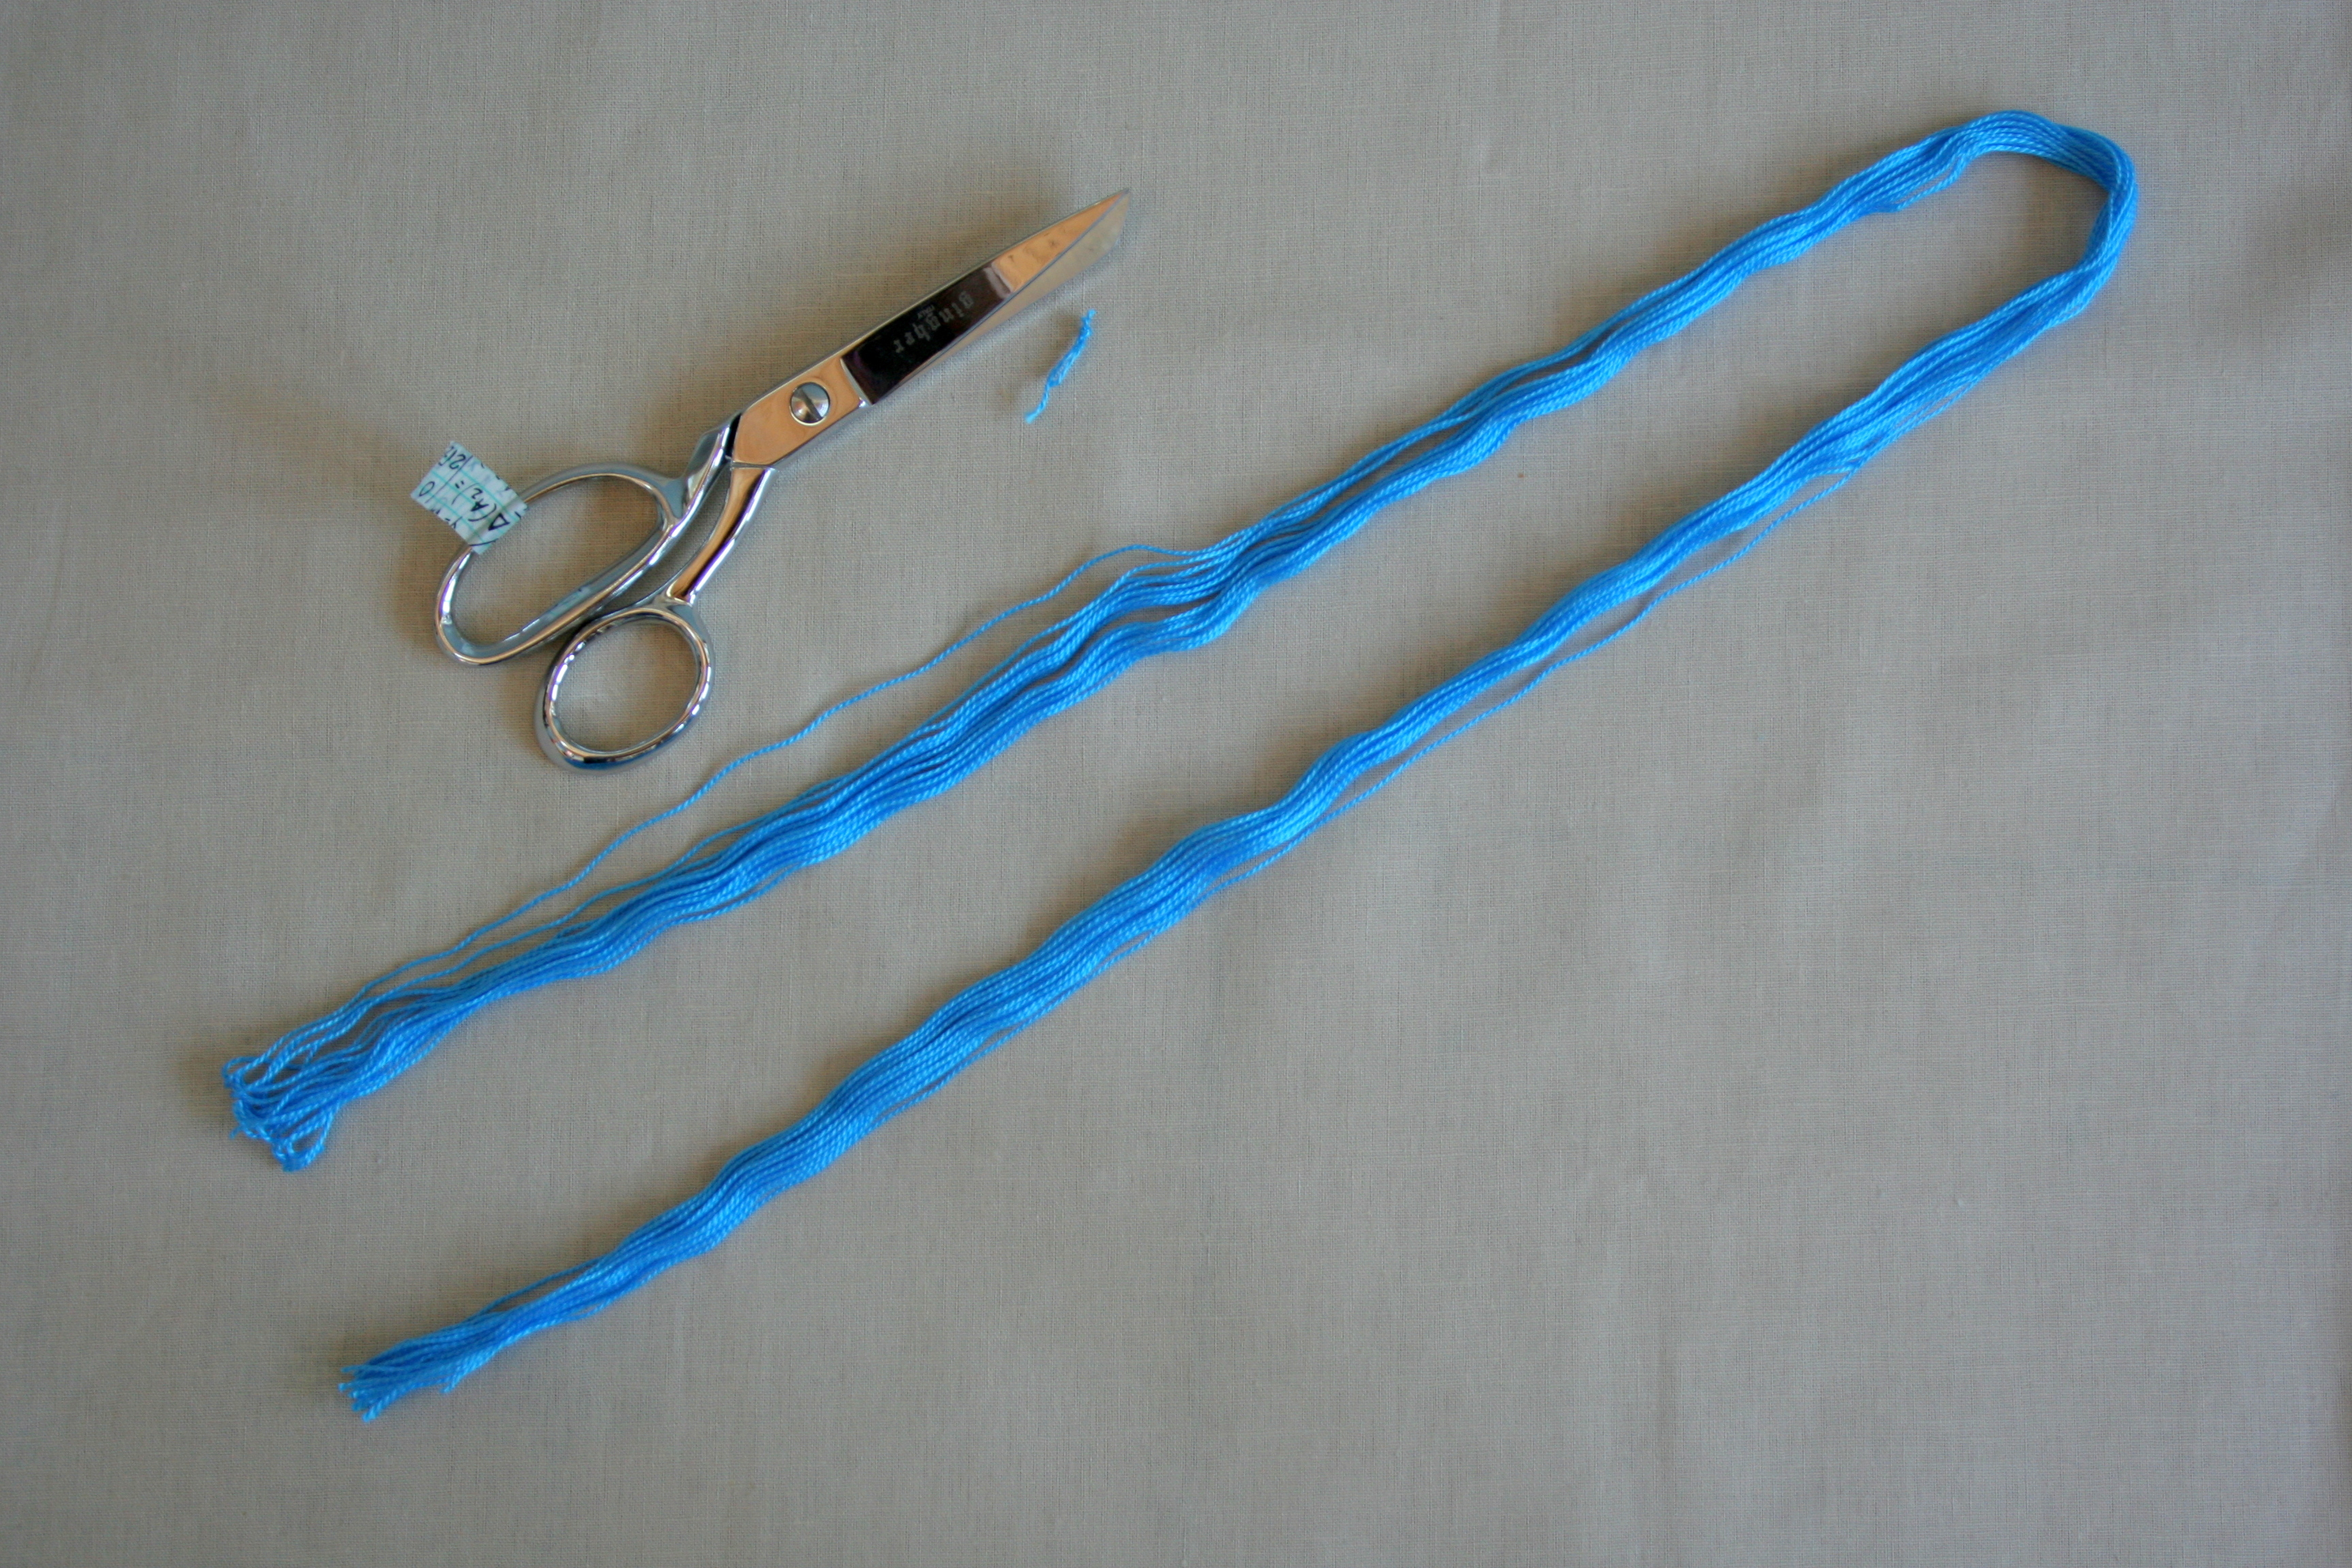
It should now look like this:
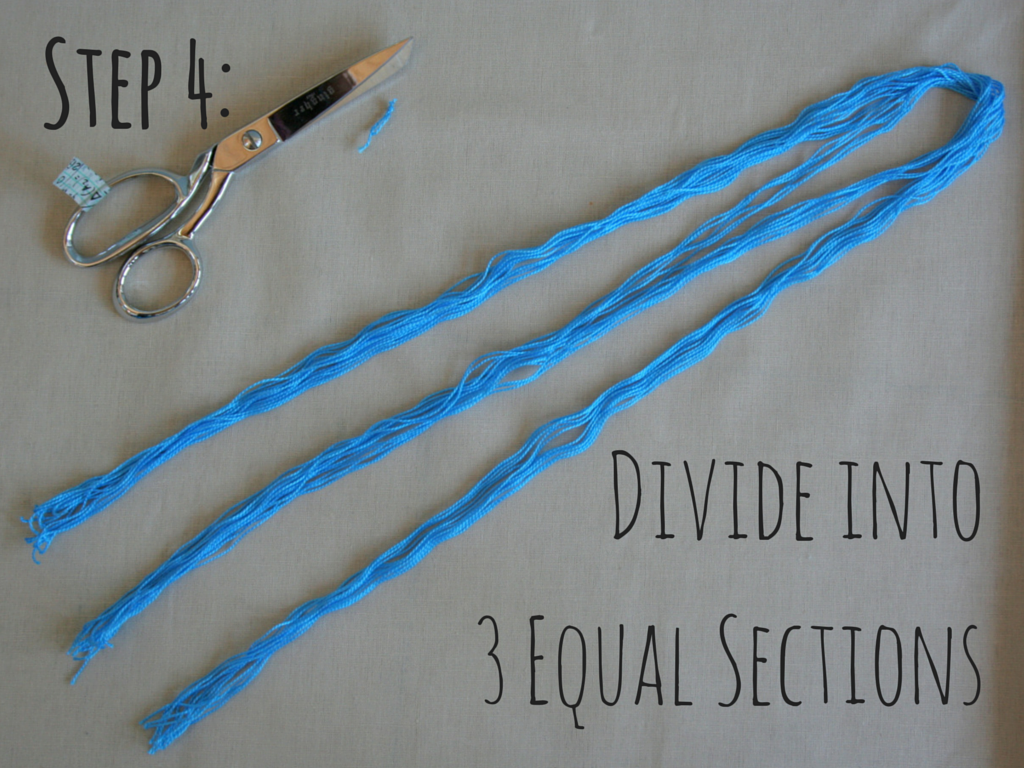
Step 4:
Divide the floss into three approximately equal sections. This doesn’t have to be perfect; I didn’t sit and count out the strands to make it perfect. If that’s your thing, then feel free to do so, but just eyeing it will be sufficient.
Step 5:
Loosely braid the three sections together. If you have a willing and capable helper, you could ask them to hold the looped end while you braid. My 2 1/2 year old was not willing today, so I used an “S” hook to hold the looped end while I braided. You can hook the “S” hook on just about anything, but I used the cuff of my jeans. Here’s a behind the scenes peek:
Step 6:
Using a separate, short length of floss, tie a knot around the end of your braid to hold it in place.
Now you have your floss, ready to hang in an aesthetically awesome, organized way, AND ready to go whenever you need a strand.
Here comes the really awesome part!
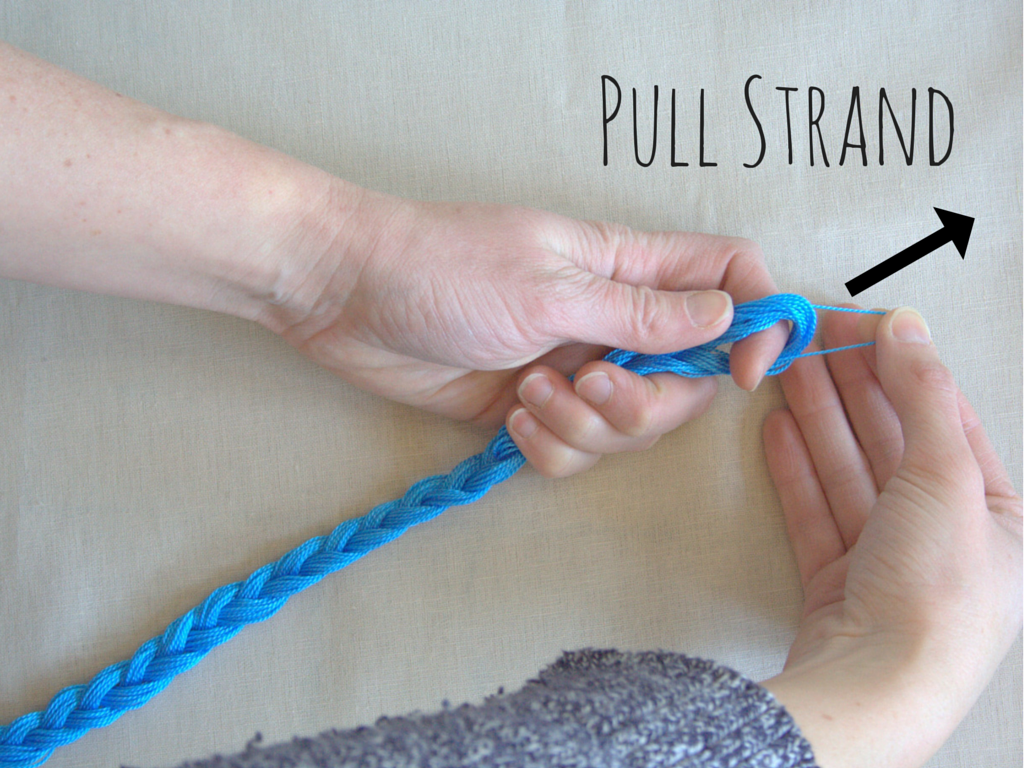
How To Remove a Strand of Floss from your Braid
Holding the top of your braid, gently pull one strand away from the rest of the loop.
Then, get a bit better grasp on the rest of the braid–no need for a vice grip, just hold it steady as you pull out the single strand–and pull the strand out completely.
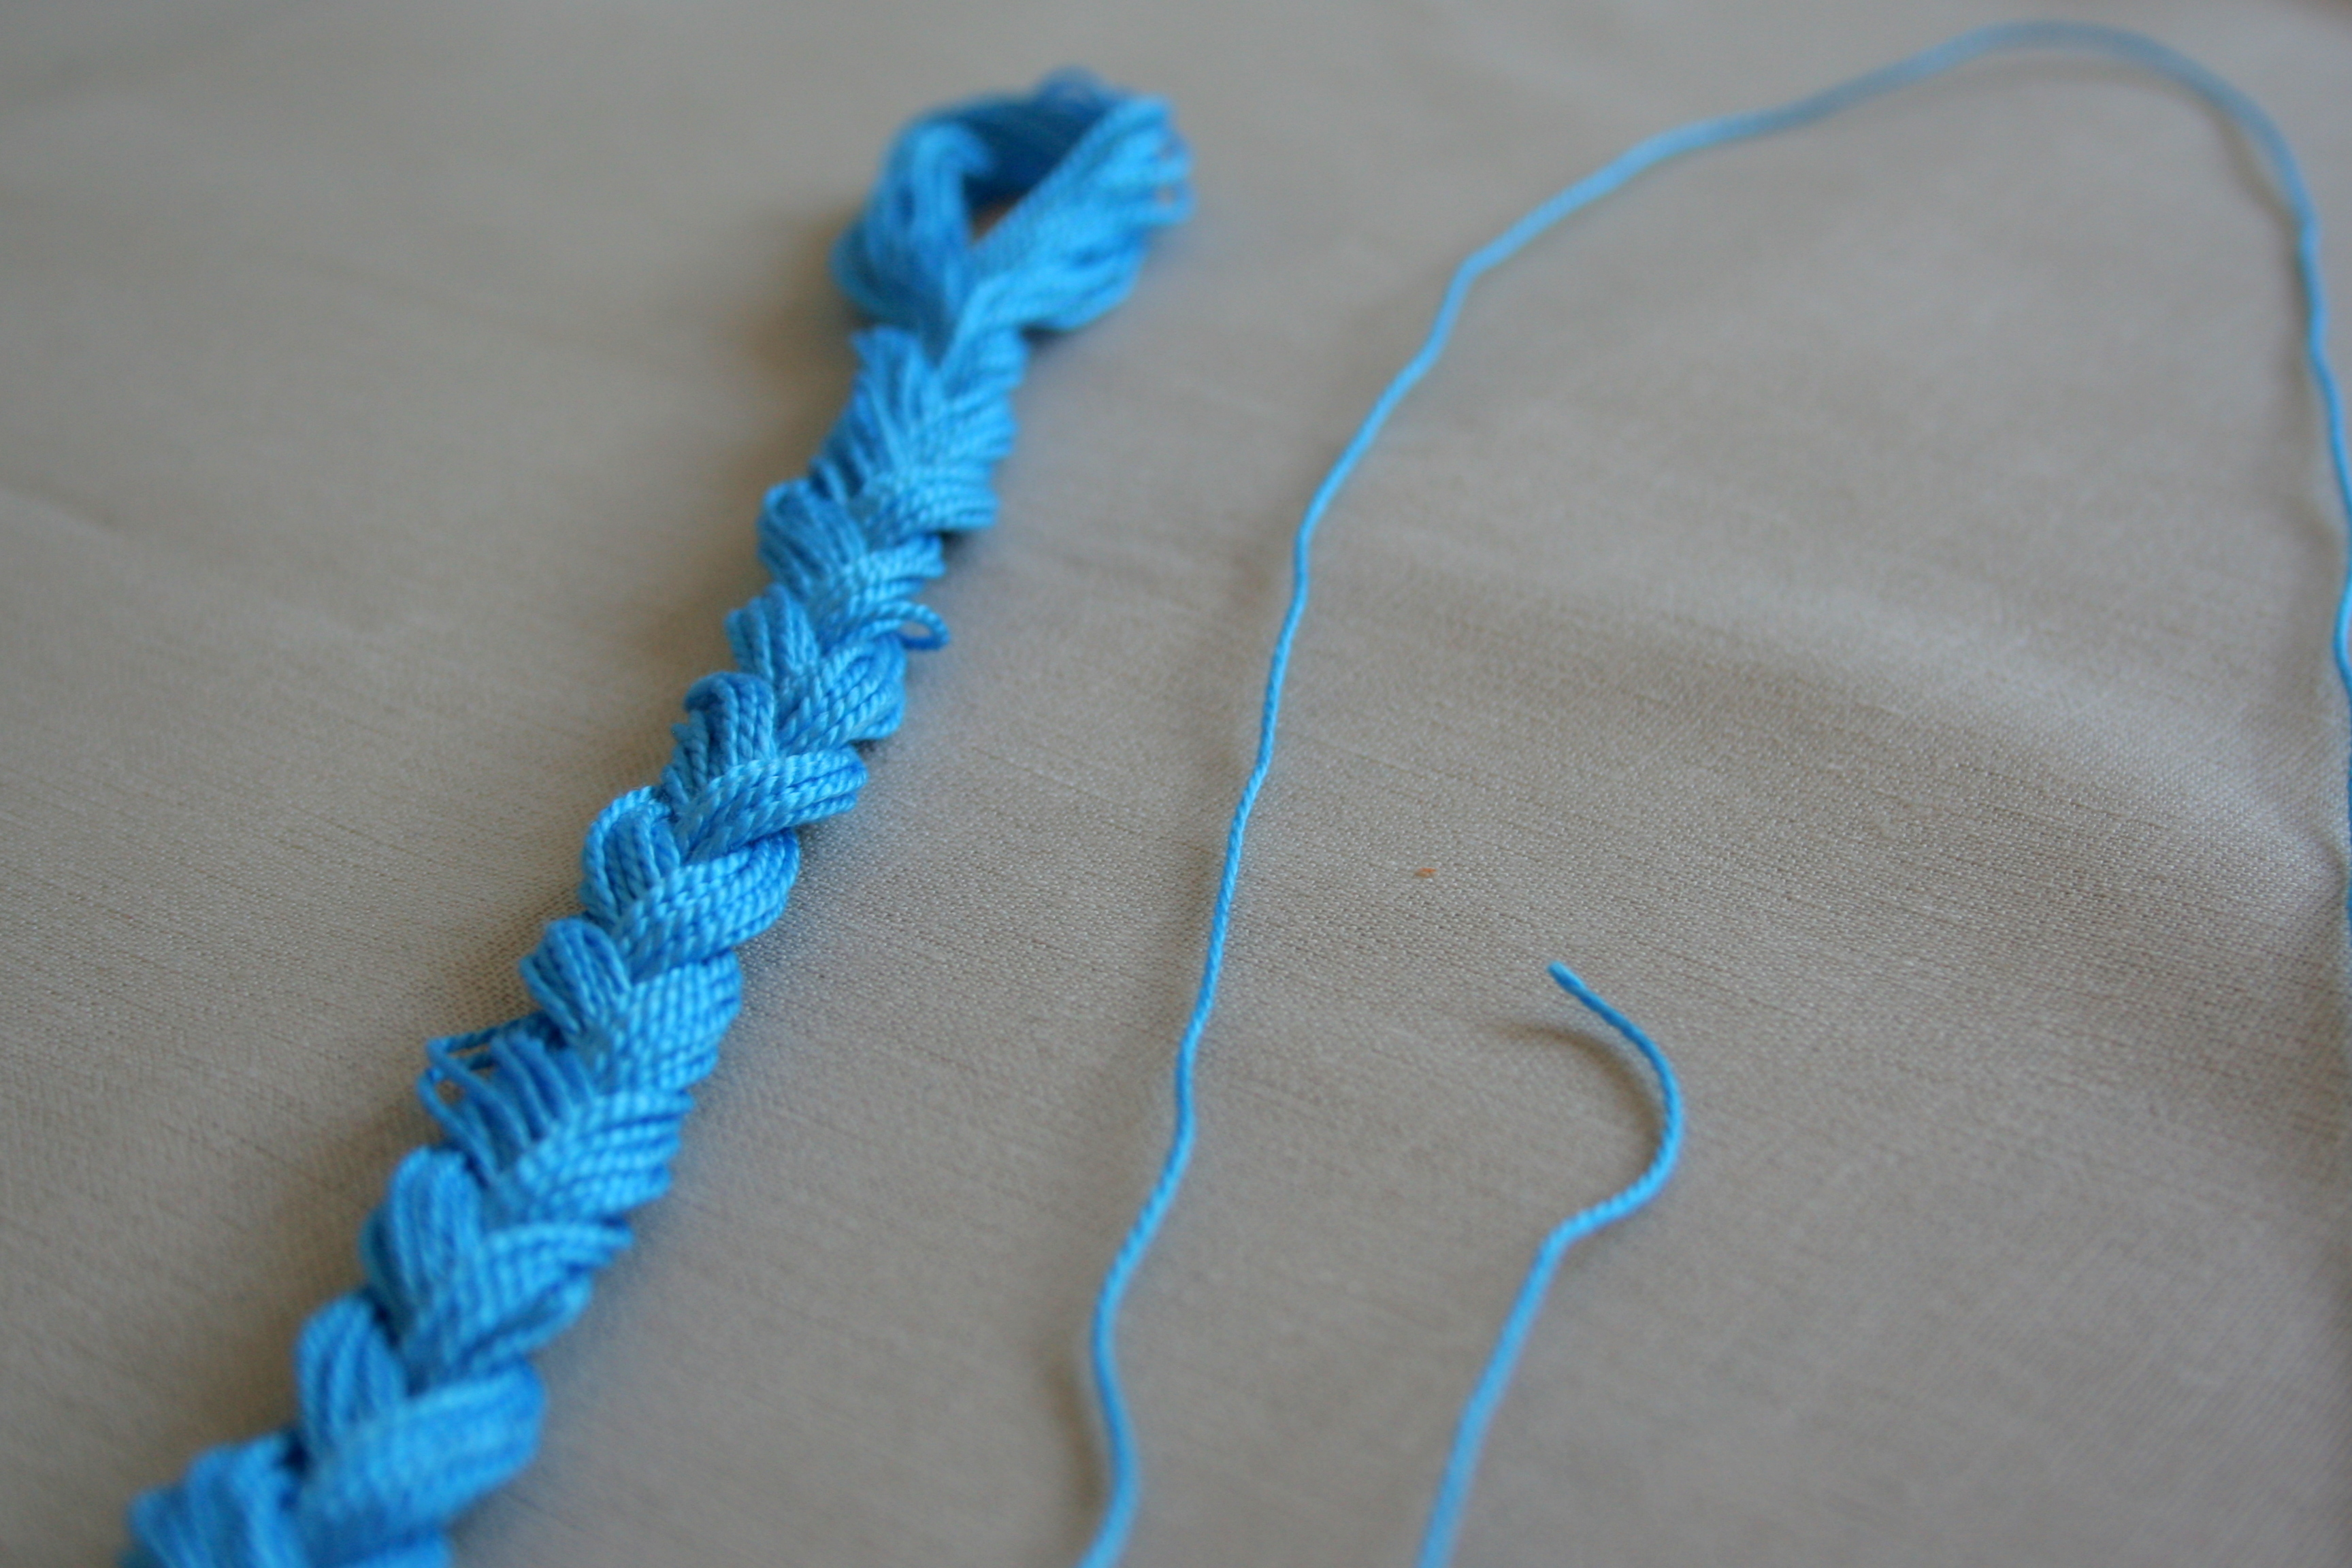
The braid will bunch up when you pull, so don’t be alarmed. Once the single strand is out, just smooth out your braid again and you’re ready to go. Your floss is the perfect length for some hand quilting or embroidery, and the rest of your floss is sitting pretty in its braid.
Go ahead and braid all of your other skeins of floss, and you will never have a tangled pile of embroidery floss again!
I think this method is genius, since now not only is my floss gorgeously organized and displayed, but I can get a single strand without even taking the braid off the wooden dowel!
I just hold the braid right below the dowel, separate a single strand, pull, and viola! No muss, no fuss.
I have had a bunch of tutorial ideas on the back burner for quite some time. Even the best ideas, without a babysitter and a day with sufficient bright light for photographing, get stuck on the back burner sometimes. My friends Stephanie and Michelle over at Late Night Quilter are kicking off a new link-up for quilter bloggers called Tips & Tutorials Tuesday, which is the perfect kick in the pants motivator to get me sharing some of those tips and tutorials I’ve been wanting to share with you for months.
Did you know that I have a few tutorials available now? If you click the “Tutorials” heading on the top toolbar of my blog, it will take you to a collection of my tutorials. Today, I thought I’d feature the tutorials I’ve created so far.
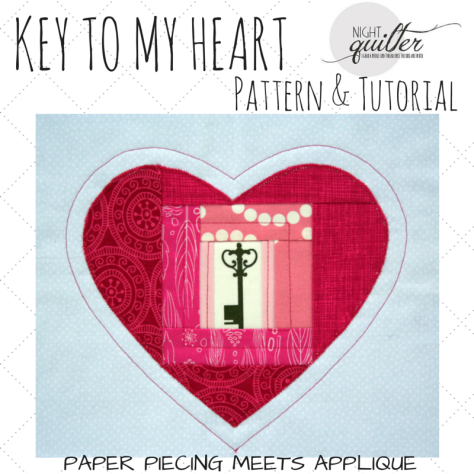
Key to My Heart
My most recent tutorial goes along with a pattern I released recently for Valentine’s Day (or any other purpose, since you can fussy cut anything you want for the center of the heart) called Key to My Heart. It’s a quick and easy pattern that includes paper piecing to help perfect the accuracy and placement of the features within the heart, and applique to make the heart-part easy peasy! The tutorial takes you through each step with photographs to help clarify the instructions.
You can find the tutorial HERE and buy the pattern for only $2 on Craftsy or Payhip. (See below for information about a killer sale I’m offering for the next week).
Basic Foundation Paper Piecing
Since I design paper piecing patterns, I thought it would be a great help to create a basic foundation paper piecing tutorial. I absolutely love the accuracy, perfection, and endless possibility of designs that paper piecing brings you, but I know that it is a struggle for some. Once I wrapped my brain around the fact that I was sewing something backwards while looking through a mirror, it all clicked. Hopefully my tutorial is helpful to those of you who perhaps want to paper piece, but don’t quite know where to begin. Here are some sneak peeks at the tutorial, which you can find HERE.
Perfect 1/4″ Seams
The third and final tutorial is more of a tip. It’s just one of the little tricks I’ve found to help sew accurate 1/4″ seams. As extraneous as it may seem, I’ve found that taking the extra few minutes to cut accurately and employ little tricks to help ensure your seams are consistent throughout your project really makes a HUGE difference with the outcome. Read the tip HERE and let me know what you think!
* * * * * * * *
Finally, since Valentine’s Day is only four days away, and in celebration of all of my new followers, I am having a flash sale for the next week: buy any three (3) patterns for only $4. Patterns usually range from $2.50-$4.50 so this is definitely a deal! Since coupon codes and open offers such as this one aren’t really compatible with Craftsy, if you buy three patterns, I will immediately refund the difference from $4, so you will be paying only $4 for three patterns of your choice. Visit my Craftsy store HERE. For interested international buyers, if you see a pattern on Craftsy that is not available in myPayhip store, email me at thenightquilter@gmail.com and I will be sure to get the pattern either up on Payhip or emailed directly to you.
I hope you find these tutorials helpful, and I’m looking forward to sharing more tips and tutorials in the future. I’m linking up with my fellow Late Night Quilters for Tips & Tutorials Tuesday. Go check out some of the other great tips, too!
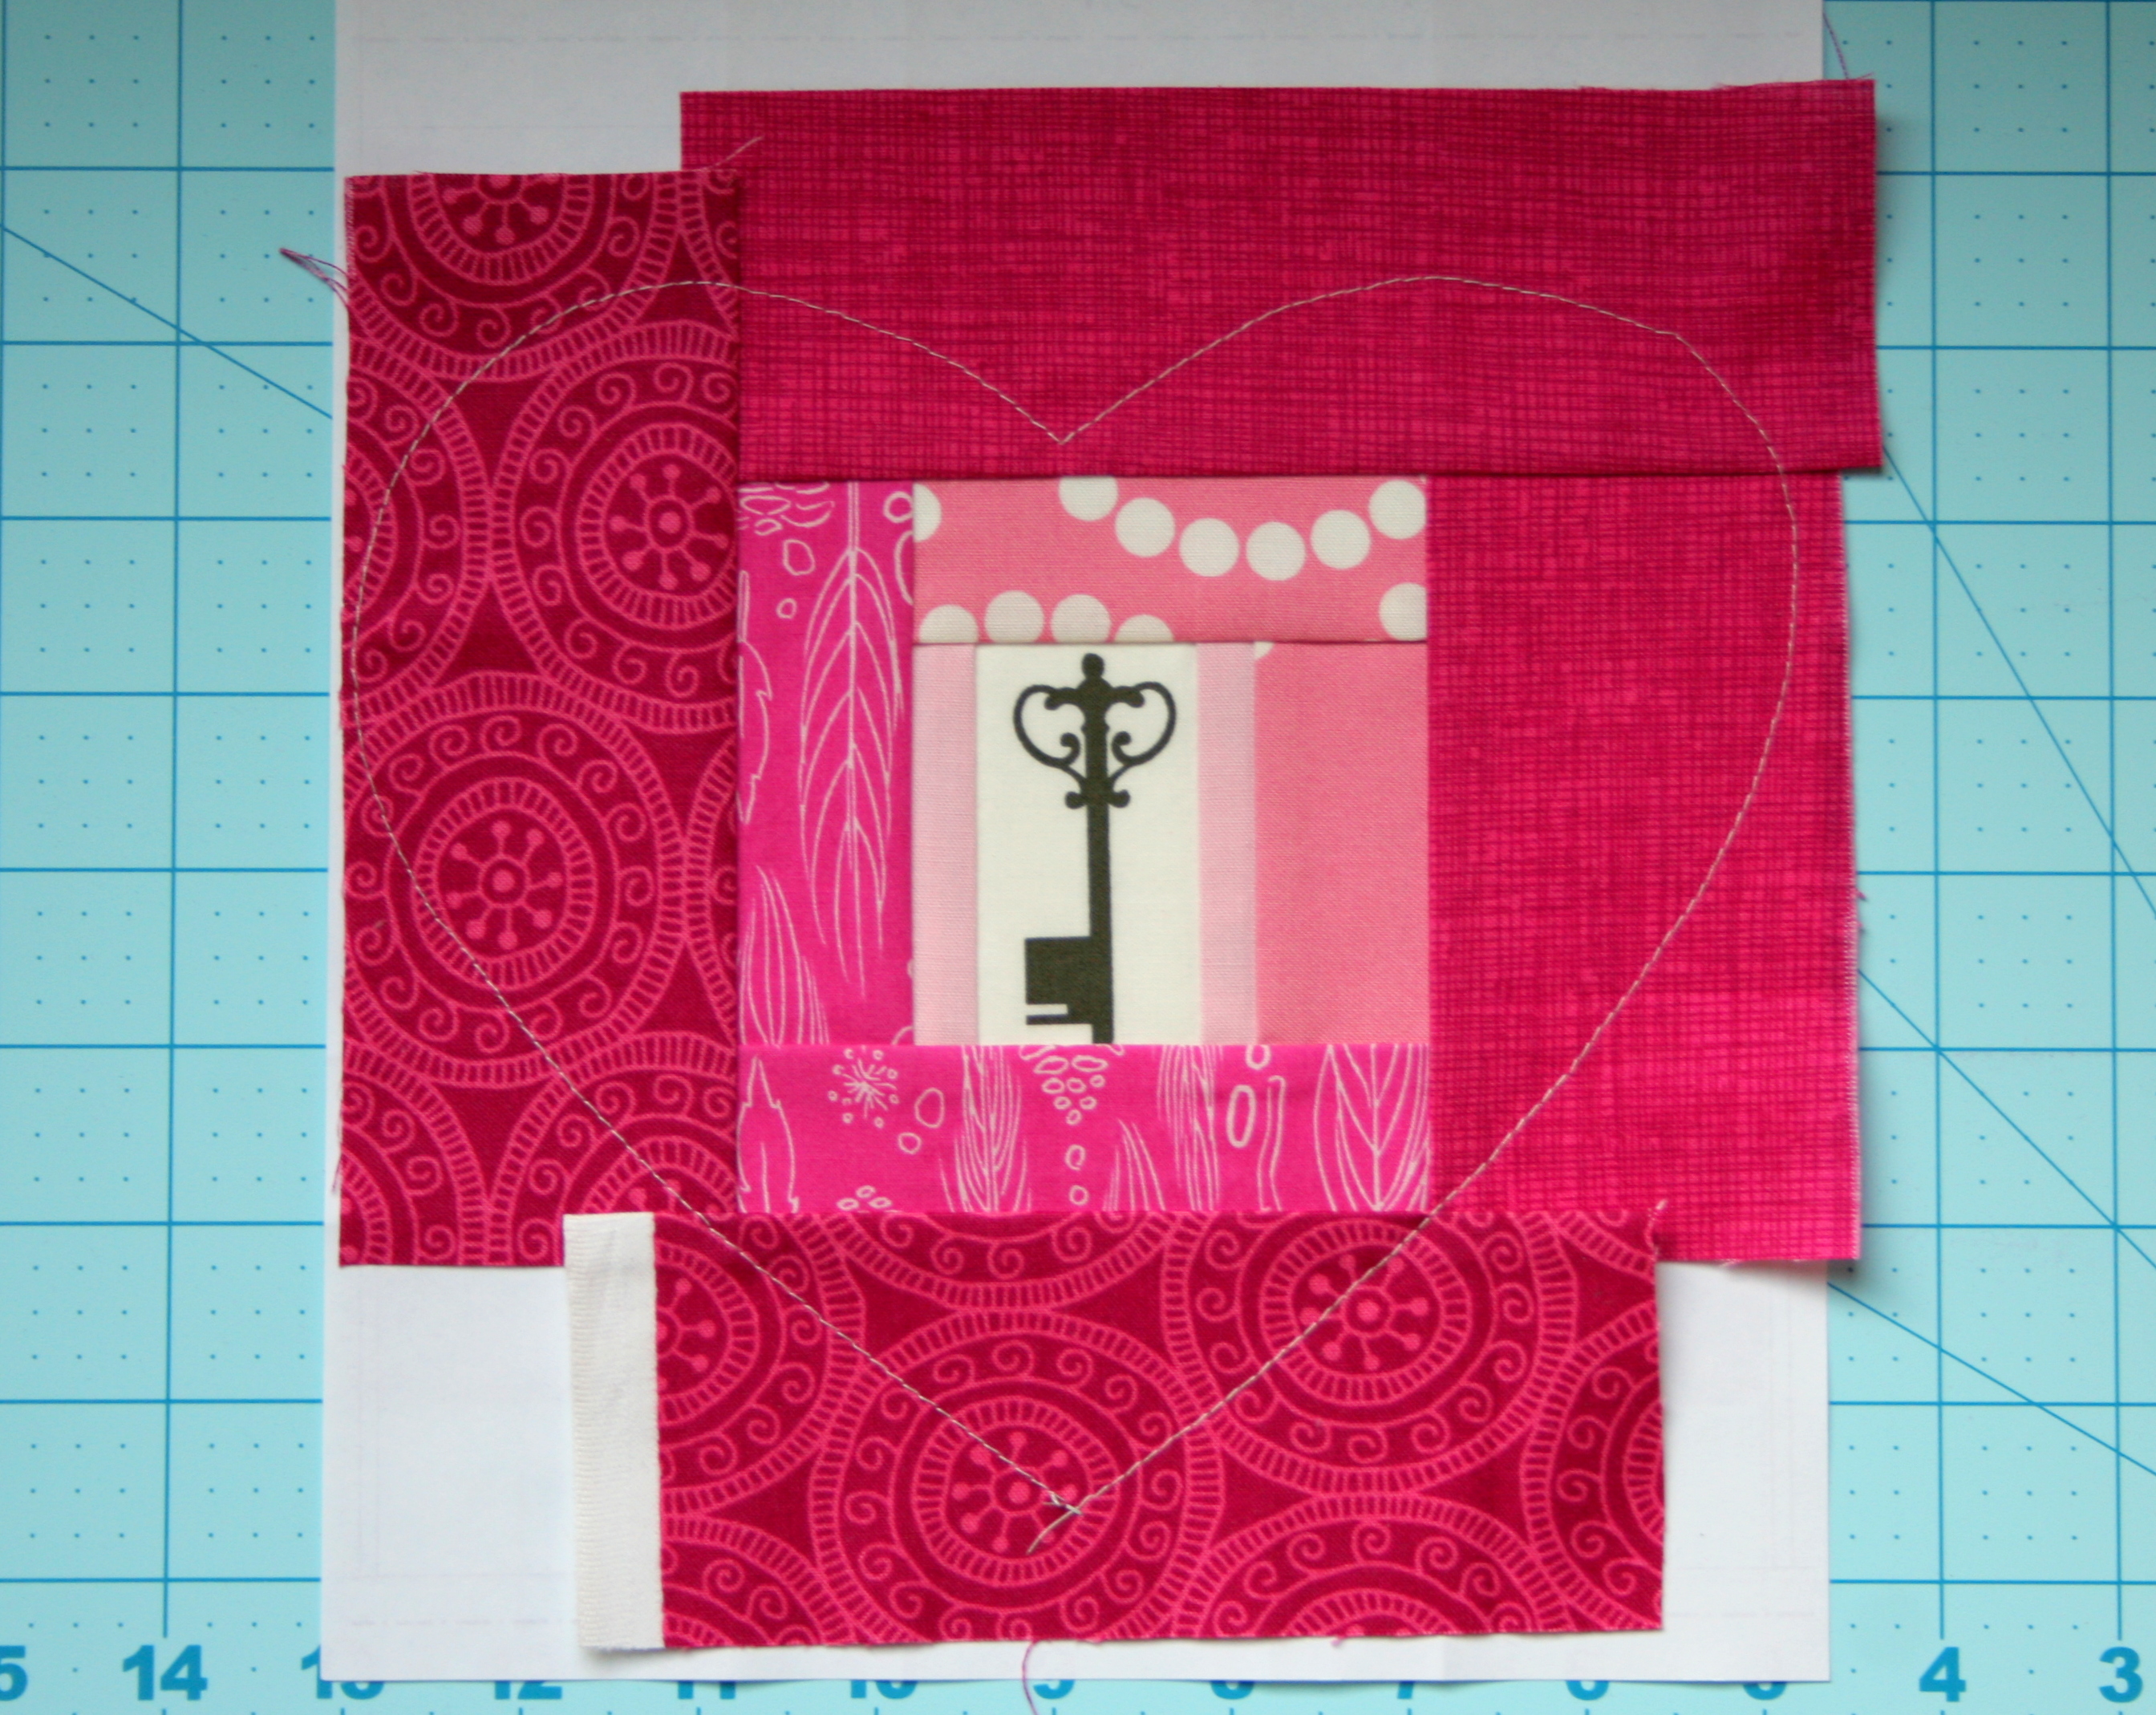
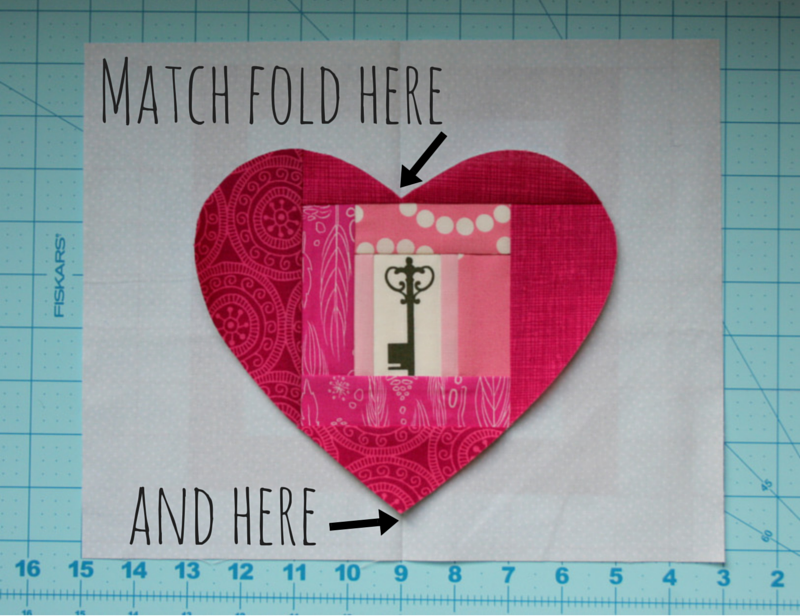
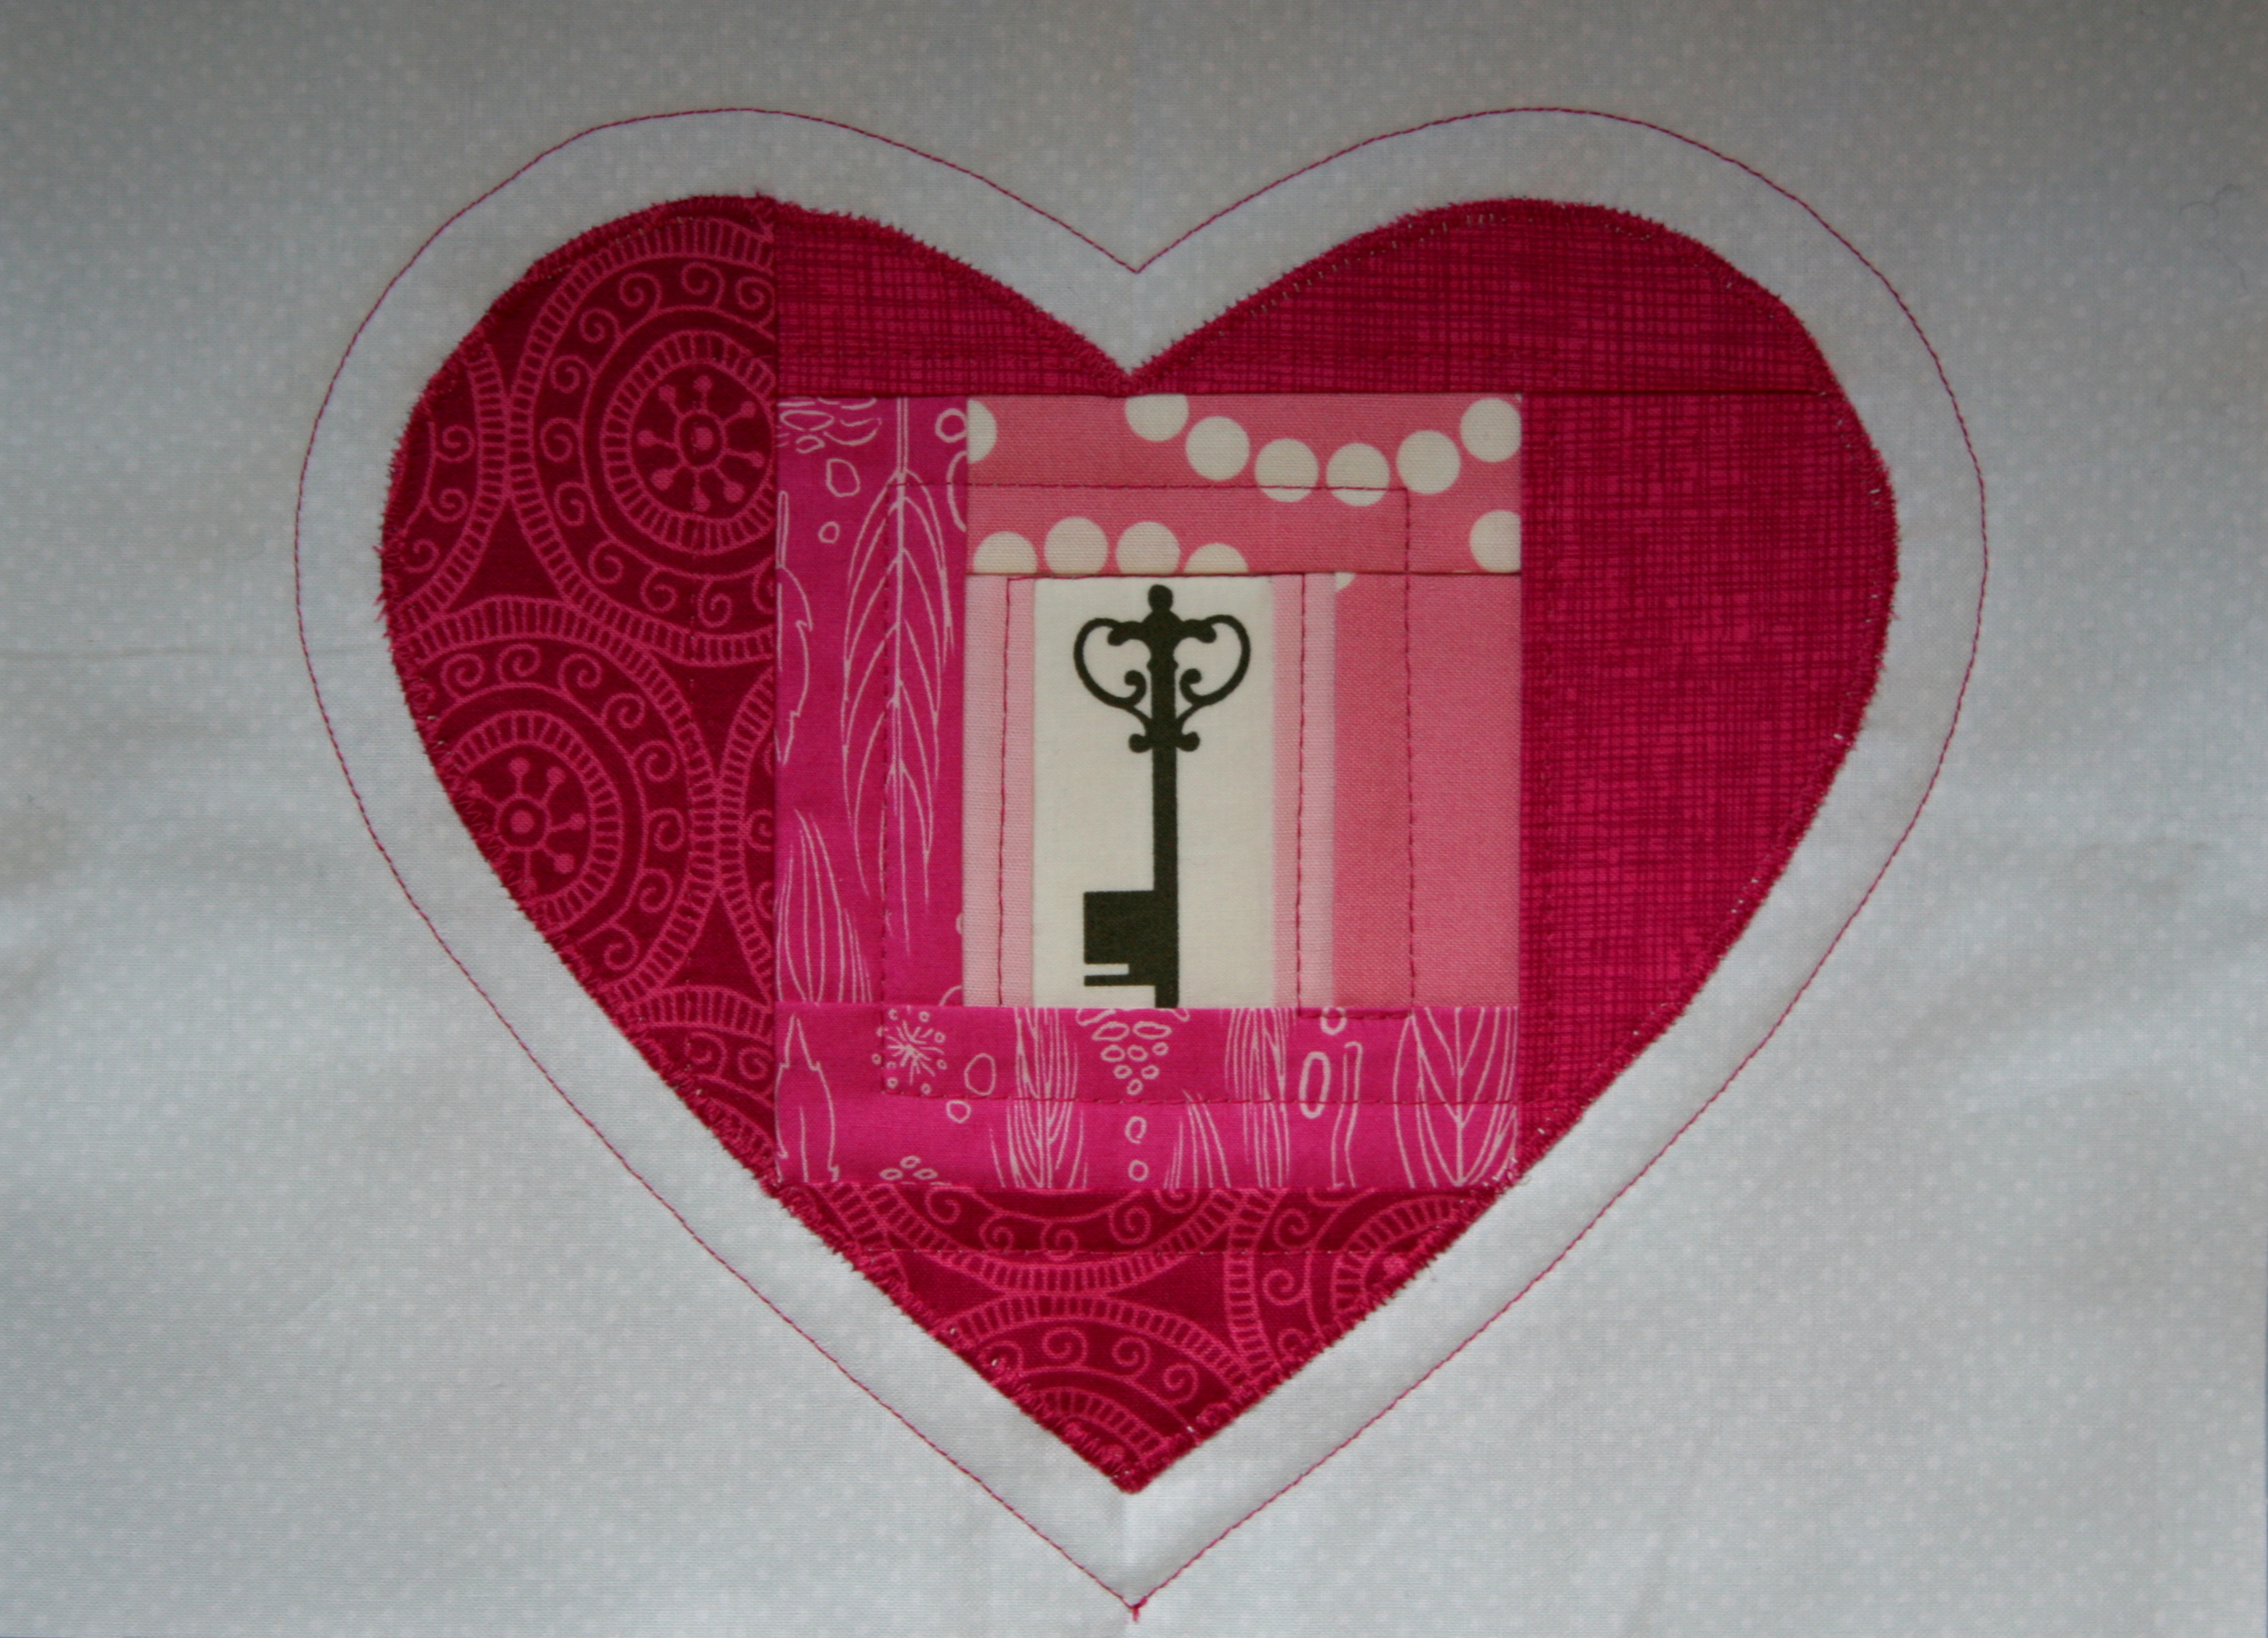
Since returning from vacation, my design wheels have been turning and cranking out ideas faster than I can create them and turn them into patterns. I did manage to finish this pattern, though, complete with a tutorial. Key to my Heart is a pattern that combines foundation paper piecing and applique to help you create a perfect log cabin-style heart on a 9″x9″ block (or a background block of your choice. The heart measures approximately 8″ wide by 7″ tall). The log cabin pattern is paper pieced for quick, “perfect” stitching, and then the heart shape is cut out and appliqued onto the background of your choice. The heart is shown on the paper piecing template so that your block is perfectly centered and ready to go.
This block would be perfect for a variety of Valentine’s Day gifts, or even just to show your love any day of the year. I plan to make my block into a tea cozy using Yvonne’s great tutorial here, but you could make yours into a mug rug, mini wall hanging, table runner, or even add it to a larger quilt.
The pattern is for sale in my Craftsy shop for those in the US, or in my Payhip shop for international folk. It is on sale for only $3.50 until February 1st, when it will be listed at the usual $4.50.
Since this pattern combines paper piecing and applique, I decided to provide a tutorial to help explain and show each step more clearly. Once you’ve printed your pattern template, you are ready to go!
Instructions
Step 1
Paper piece the log cabin portion of the block until fabric extends at least 1/4″ beyond all edges of the heart.
Notes:
*Shorten your machine’s stitch length to 1.2 to make paper removal easy.
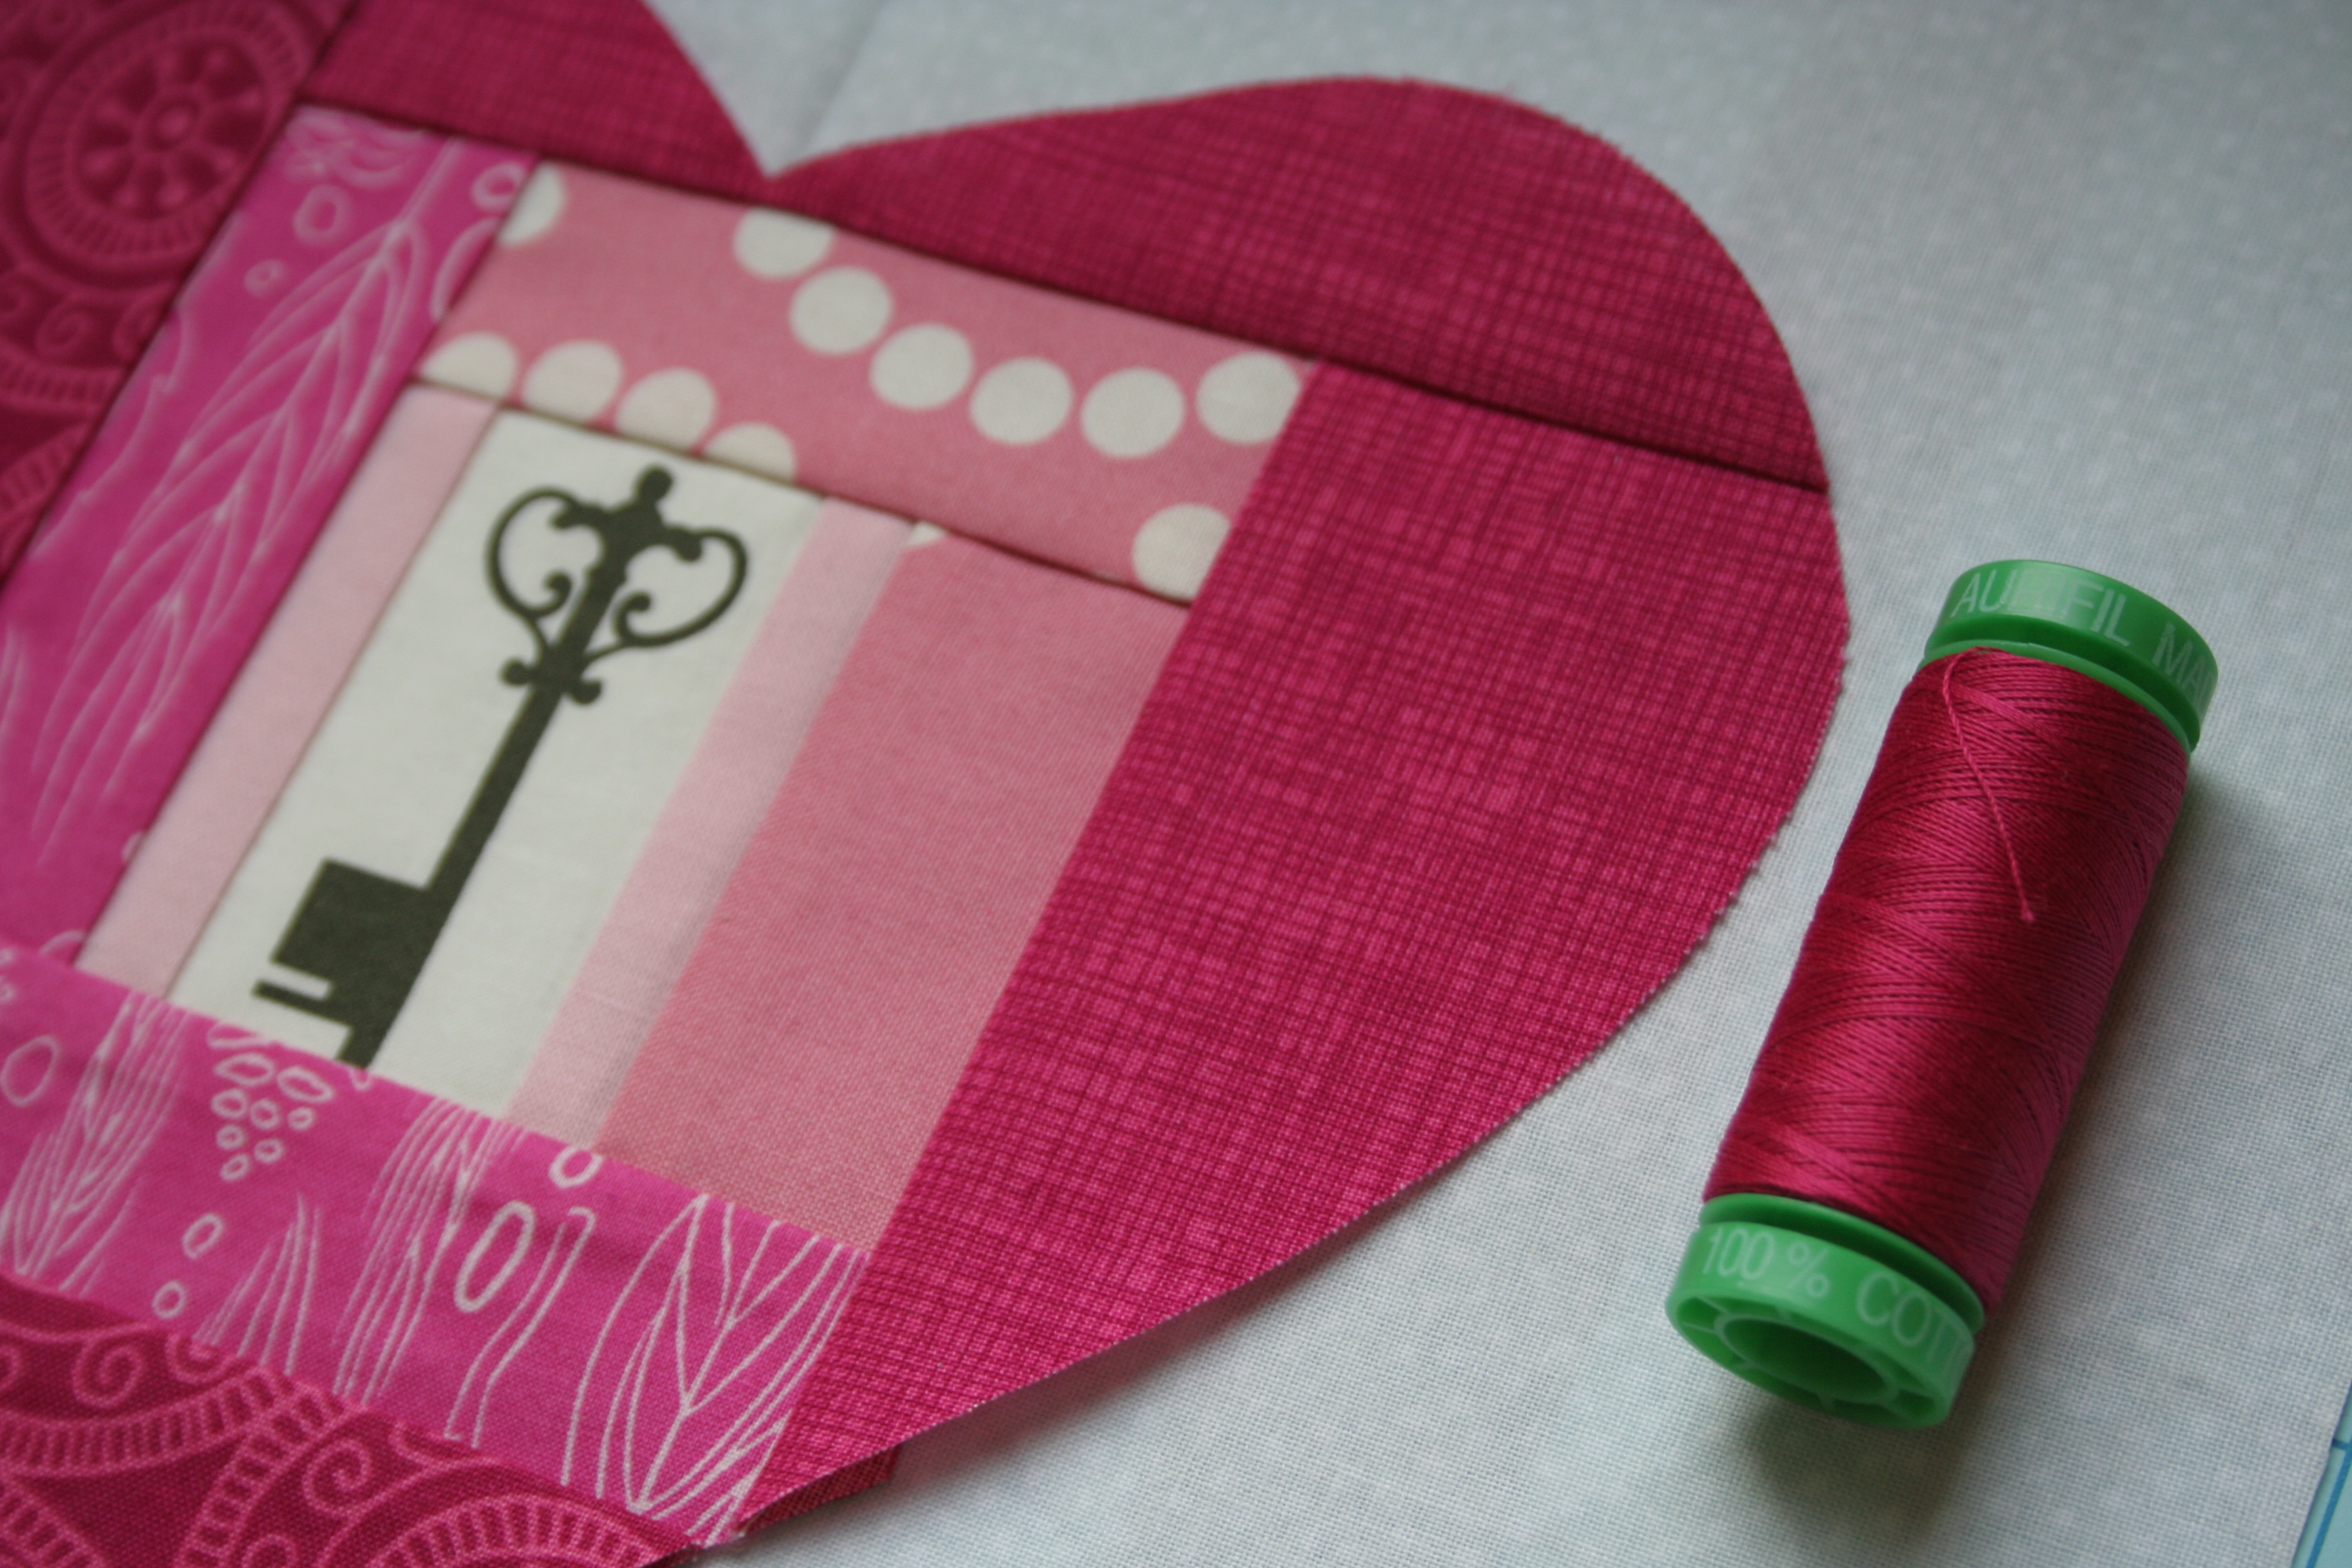
*The center square is perfect for fussy cutting! Find key fabric to share the key to your heart. Or, be creative! Do you love cats? Fussy cut a cat for the center. Love tea? Fussy cut a teapot for the center. Whatever you or the gift recipient loves can be fussy cut for the center of this heart. Tip:Hold the paper and your fussy cut square up to a bright window or lightbox to be sure your fussy cut feature is centered before sewing.
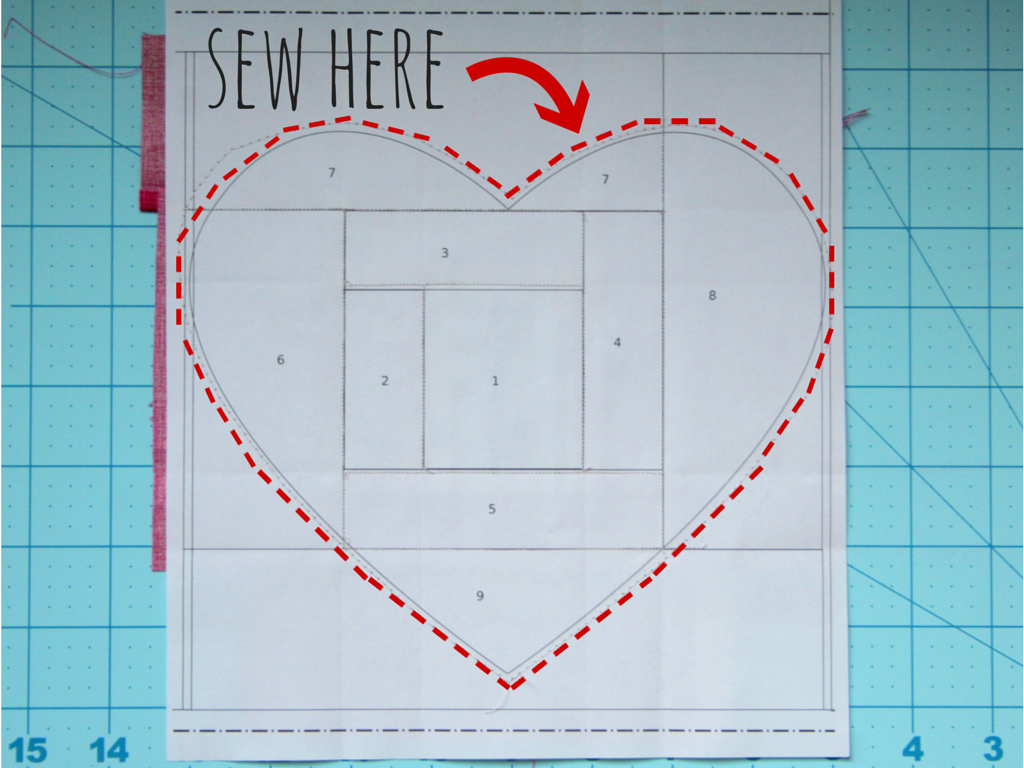
Step 2
Using a long basting stitch (2.5 or larger), sew around the outside of the heart, approximately 1/8″ from the line (this distance does not need to be perfect, nor do the stitches need to be perfect. The purpose of these stitches is to hold all of your fabric flat while cutting out the heart shape.)
Step 3
Using scissors appropriate for cutting both fabric and paper, carefully cut along the dotted heart line.
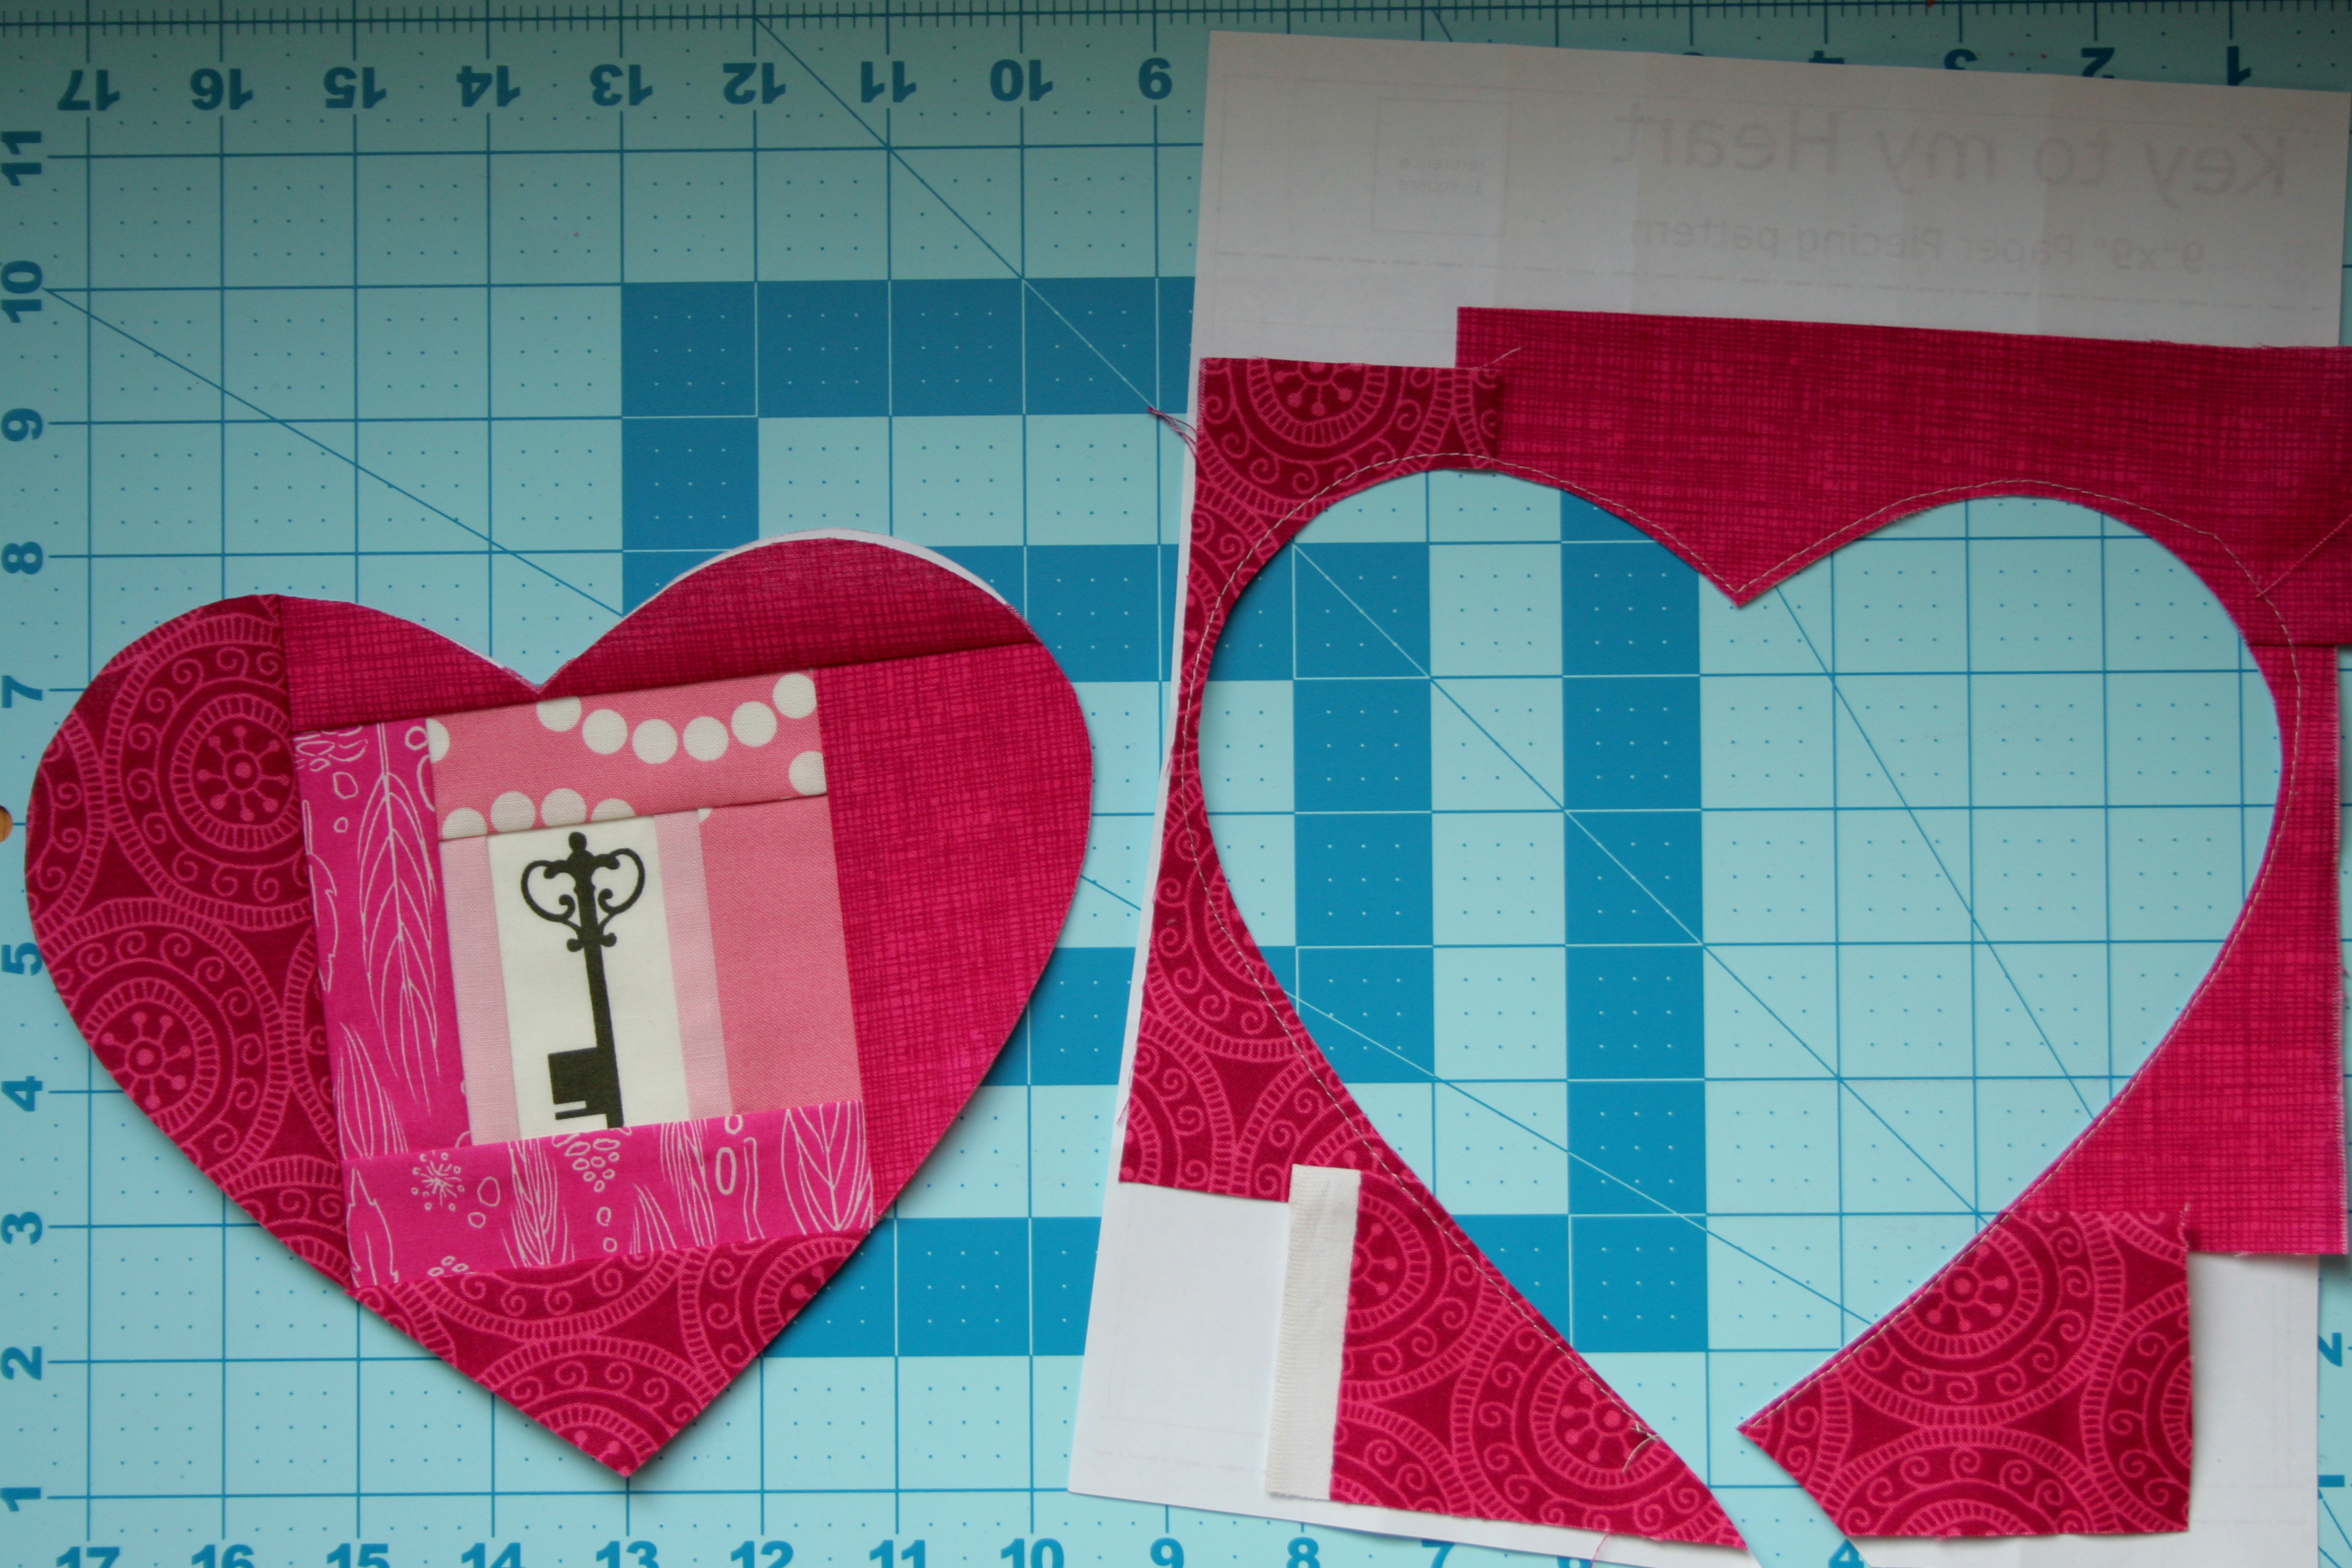
Step 4
Remove paper piecing foundation paper. Jump for joy at how easy it is since you shortened your stitch length to 1.2 before paper piecing!
Step 5
Applique your heart to the center of your background fabric using your preferred applique method.
Notes:
*To accurately center your heart, fold your background fabric in half and press lightly. With the fold running top to bottom, line up the center top and bottom of the heart with the pressed center line of the background fabric. Either measure the distance from top and bottom of the background fabric until it’s equal, or position your heart as desired.
Step 6
Find gorgeous matching thread. (I love Aurifil, and there’s almost always a perfect match!).
Step 7
Quilt and finish as desired.
I would love to see if you create this block. Photos of your finished block can be posted in my Night Quilter Creations group on Flickr found HERE, or can be added to the Craftsy page HERE. The first three (3) people to buy, complete, and upload a photo of a completed block to either the Flickr group or my Craftsy page will receive a full refund OR choice of another pattern from my shop. How about that for sharing the love!?
Want to share the love some more? Instagram your blocks and tag me @nightquilter.
Foundation Paper Piecing is one of those things that when first encountered, may seem daunting enough to send you running for the hills. But once the general concept is grasped, paper piecing opens the door to a whole new world of quilting and fabric-play. Trust me, it’s worth giving it another go. As with anything, the best way to get more comfortable with foundation paper piecing is to practice, practice, practice, and then practice some more. Today I thought I’d share my process with tips along the way, in the hopes that it helps clarify the foundation paper piecing process.
For me, once I wrapped my brain around the fact that I was sewing something backwards while looking through a mirror, it all clicked. I’m a very spatial person, so once I could visualize that the picture was being created on the BACK, I was fine. Yes, the lines along which you sew will be on the back, or wrong-side of your sewn design. Think about that for a minute, and then let’s begin. Take your time, and have FUN!
Basic Foundation Paper Piecing Tutorial
First of all, why paper piecing? The ability to create life-like pictures with fabric is what first got me hooked on foundation paper piecing. Once I got the hang of it, I realized many more benefits to paper piecing:
No other method results in such precision and accuracy when sewing. You can make two blocks that are EXACTLY the same without too much muss or fuss about seams.
It is a great way to use up scraps.
My favorite perk of paper piecing is that it gives me a way to create gorgeous gifts for family and friends without the time invested in sewing an entire quilt. Paper piecing patterns are perfect for wall hangings, table runners, tea cozies, mug rugs, pillows, bags, and even as framed art.
Convinced? Let’s get started!
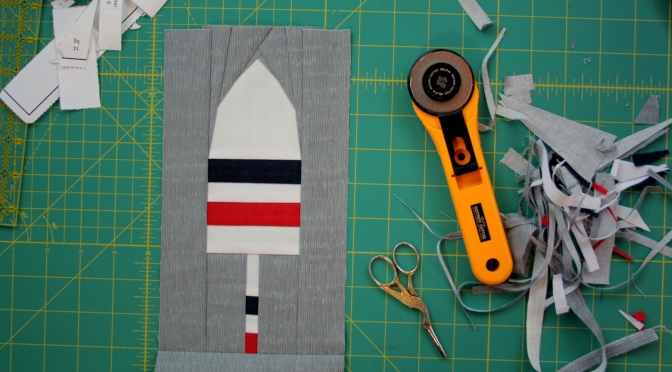
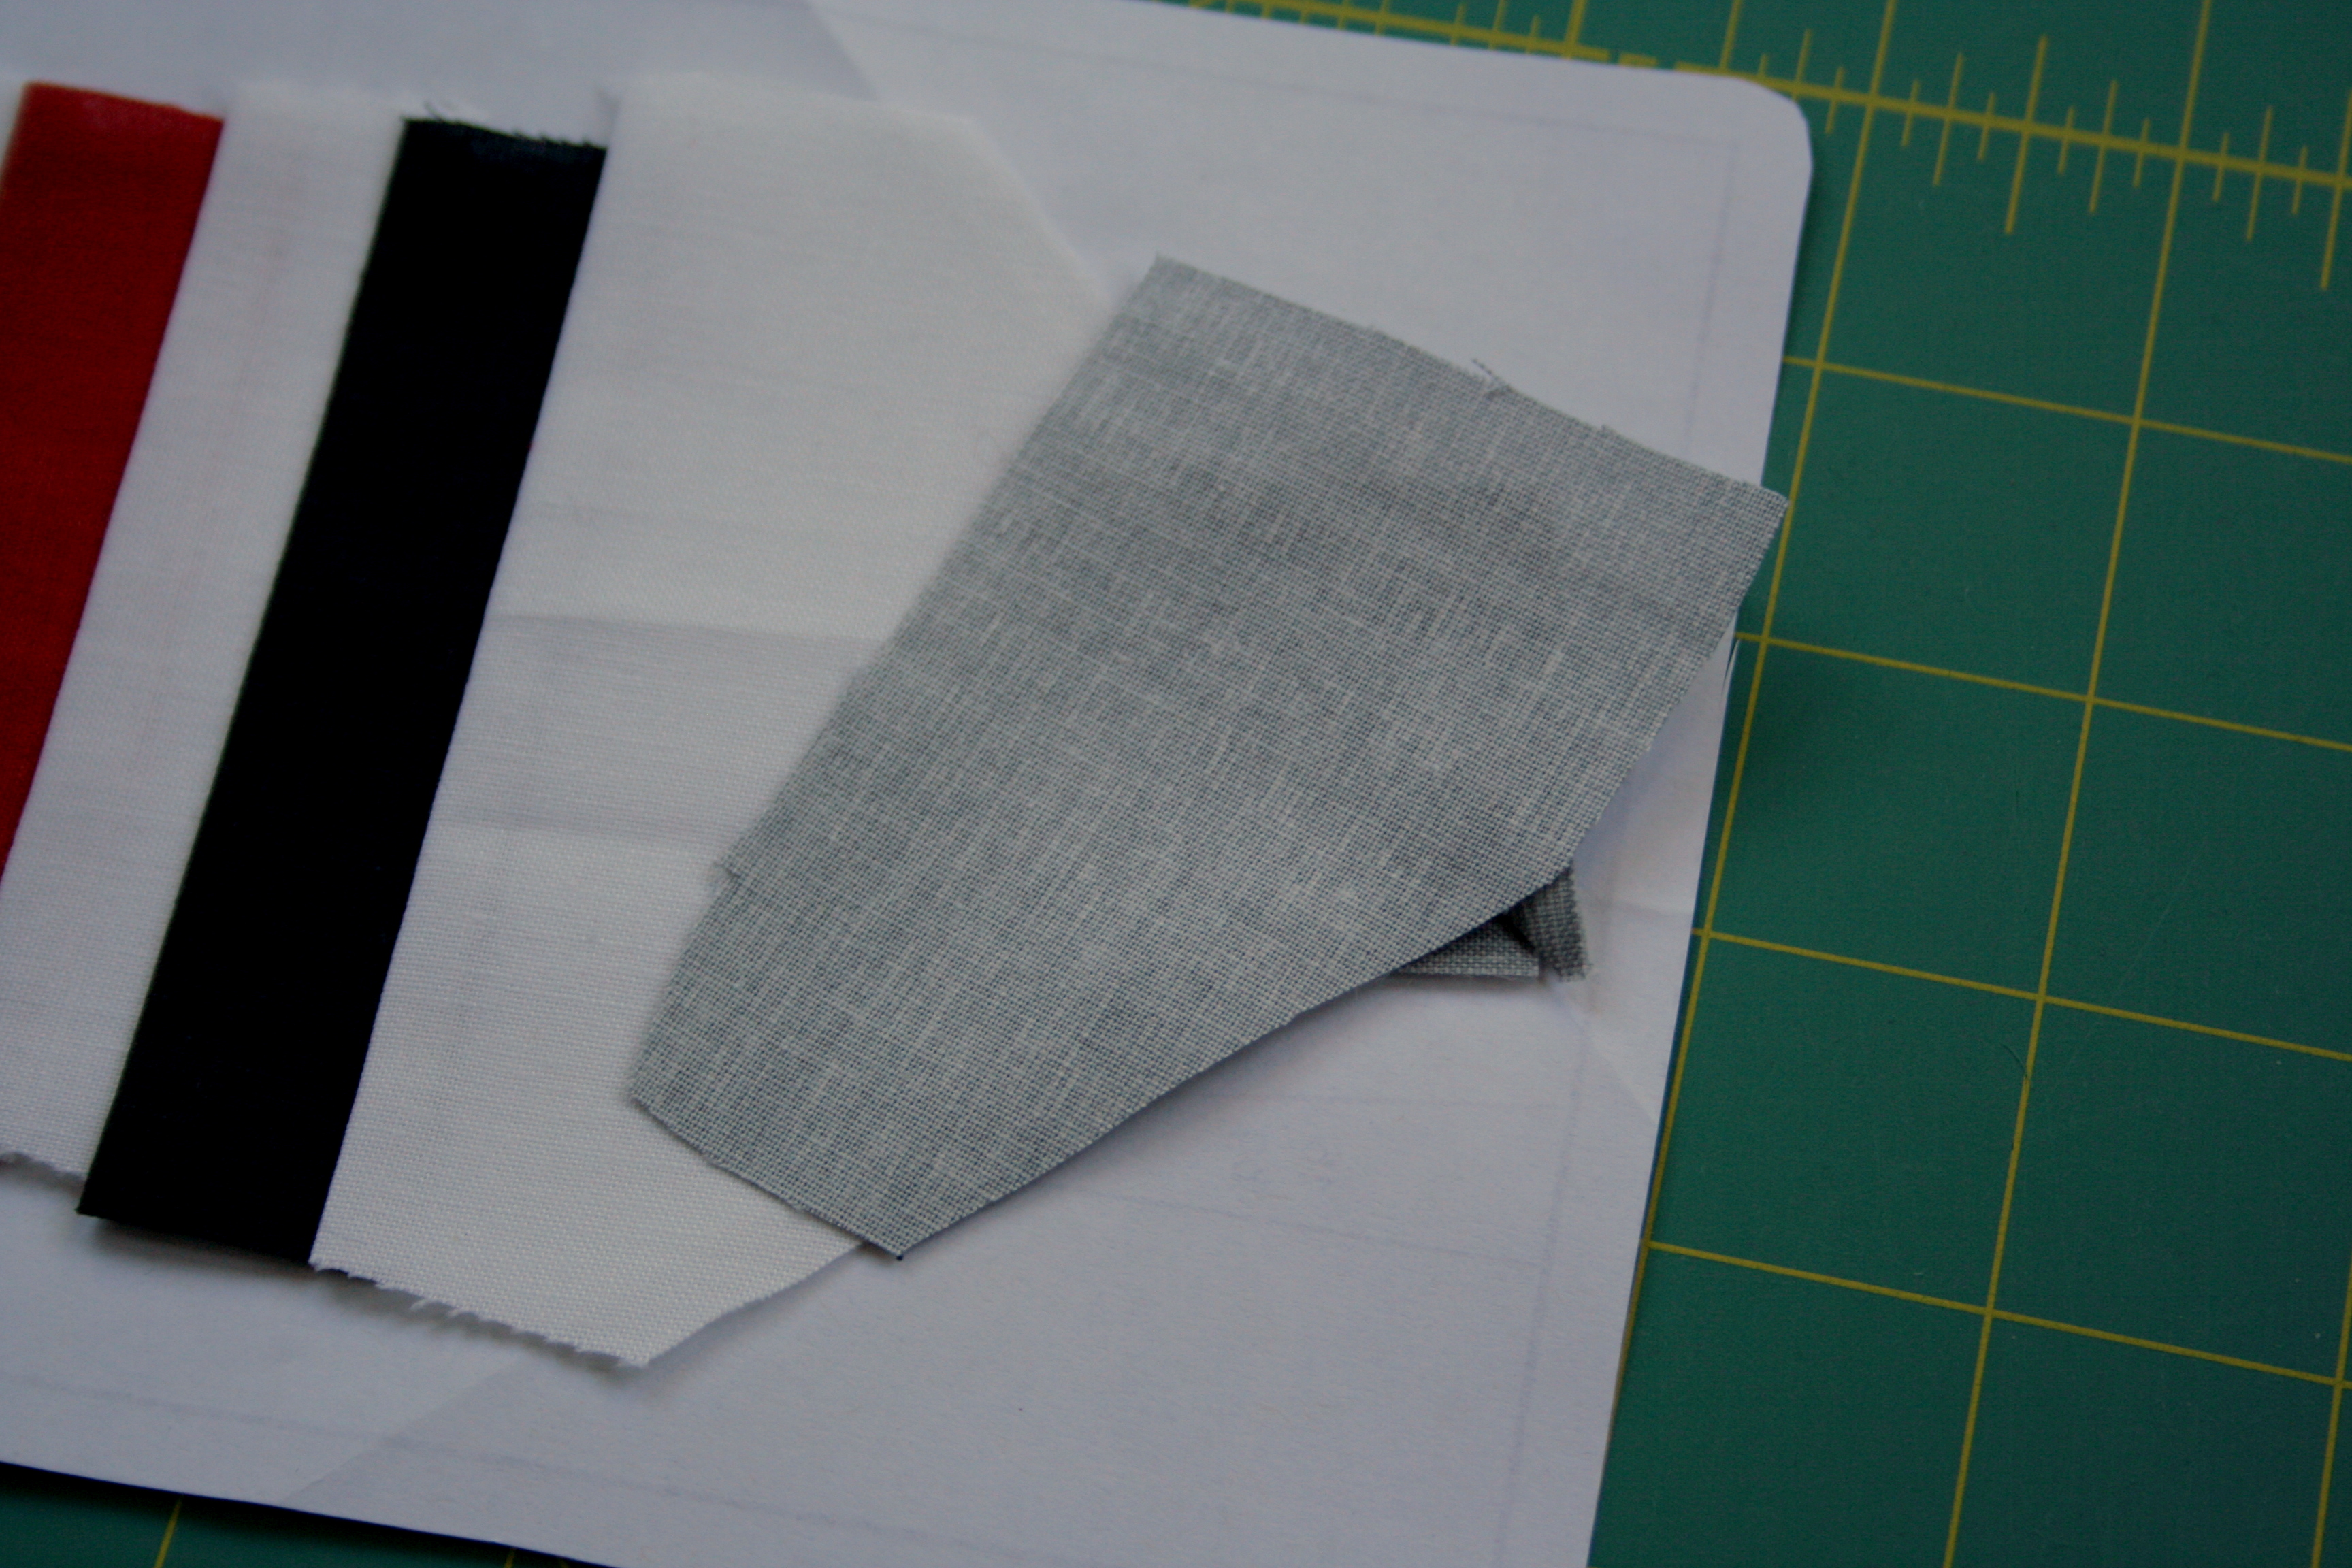
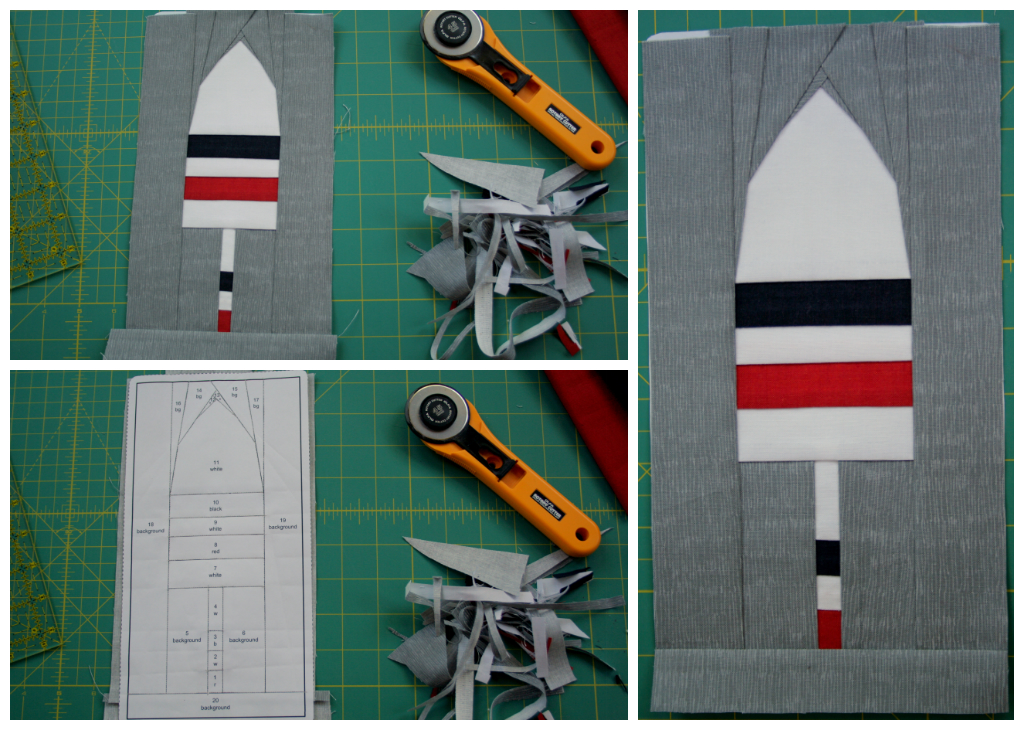
1. Choose a pattern. I am using my Buoy 1 pattern for this tutorial, since it’s fairly straightforward and consists of only one foundation piece. Summertime is calling my name, so this nautical pattern will soon become a pillow perfect for a beach house or someone’s nautical nursery. Buoy 1 used to be on Craftsy but is now no longer available, so you will need use another beginner pattern of your choosing. My available foundation paper piecing patterns are located on Payhip.
2. Assemble your tools. You will need:
– pattern & paper (I use regular printer paper. Some prefer velum or tracing paper)
– fabric & thread (I love Aurifil)
– rotary cutter and mat
– scissors (be sure to use non-fabric scissors to cut out your pattern. I suggest having fabric scissors, craft scissors, and small scissors for trimming threads)
– ruler (add a quarter rulers work well, but so do any quilting rulers with a 1/4″ measure)
– iron and pressing surface
– sewing machine
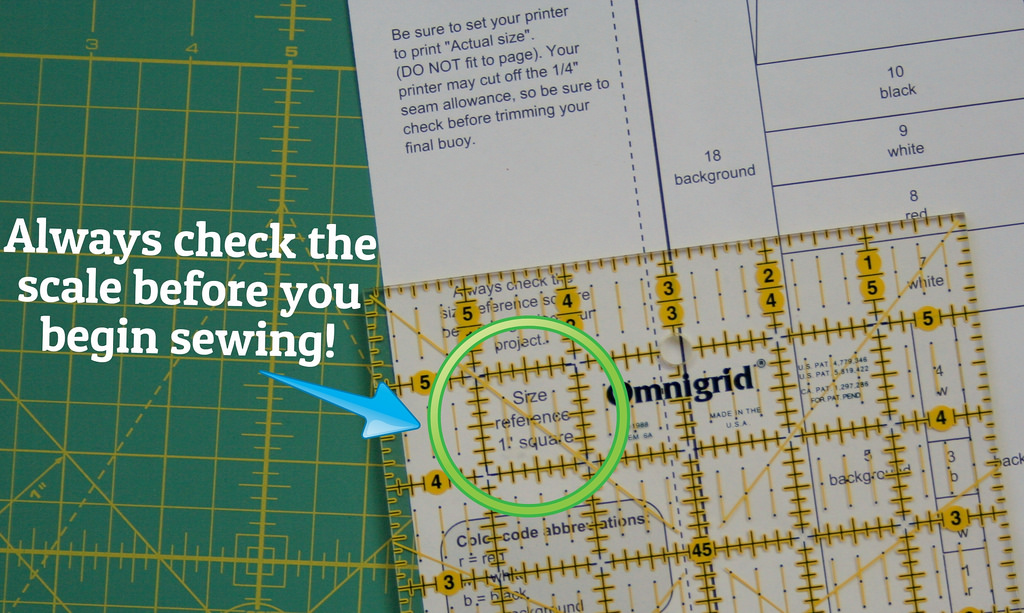
3. Print the pattern with your printer set on “Actual Size” and check the scale. ALWAYS check to make sure the pattern is printed to the correct scale before beginning to sew.
Cut out pattern using craft scissors. Many patterns have a dotted line showing a 1/4″ seam allowance on the pattern. Be sure to check that the seam allowance is included, and if it isn’t, add it on before you cut.
*Here, some people like to color their pattern with colored pencils to help with accurate fabric piecing. I only do this for complicated patterns or when I am using different fabric colors than indicated on the pattern, but you are welcome to get out the colored pencils and do some coloring here if you want!*
4. You’re ready to begin! Cut fabric pieces (or find scraps) to fit spaces 1 and 2 on the pattern. Be sure to include a 1/4″ seam allowance on all sides. Paper piecing is kind of like paint by number, but with sewing, and always in order. You start with piece 1, sew on piece 2, then piece 3, etc. *When cutting fabric for paper piecing, I am generous in my cutting. I cut pieces that are amply large enough to cover the space and seam allowance and then some–lots of wiggle room. Yes, it may waste a bit more fabric, but it makes the process a lot smoother. To me, smooth (no seam ripper required) sewing is worth more than a few tiny scraps of fabric. Also, when you trim your seam allowances, any large pieces of excess fabric can be used for other pieces of the pattern. Go big!*
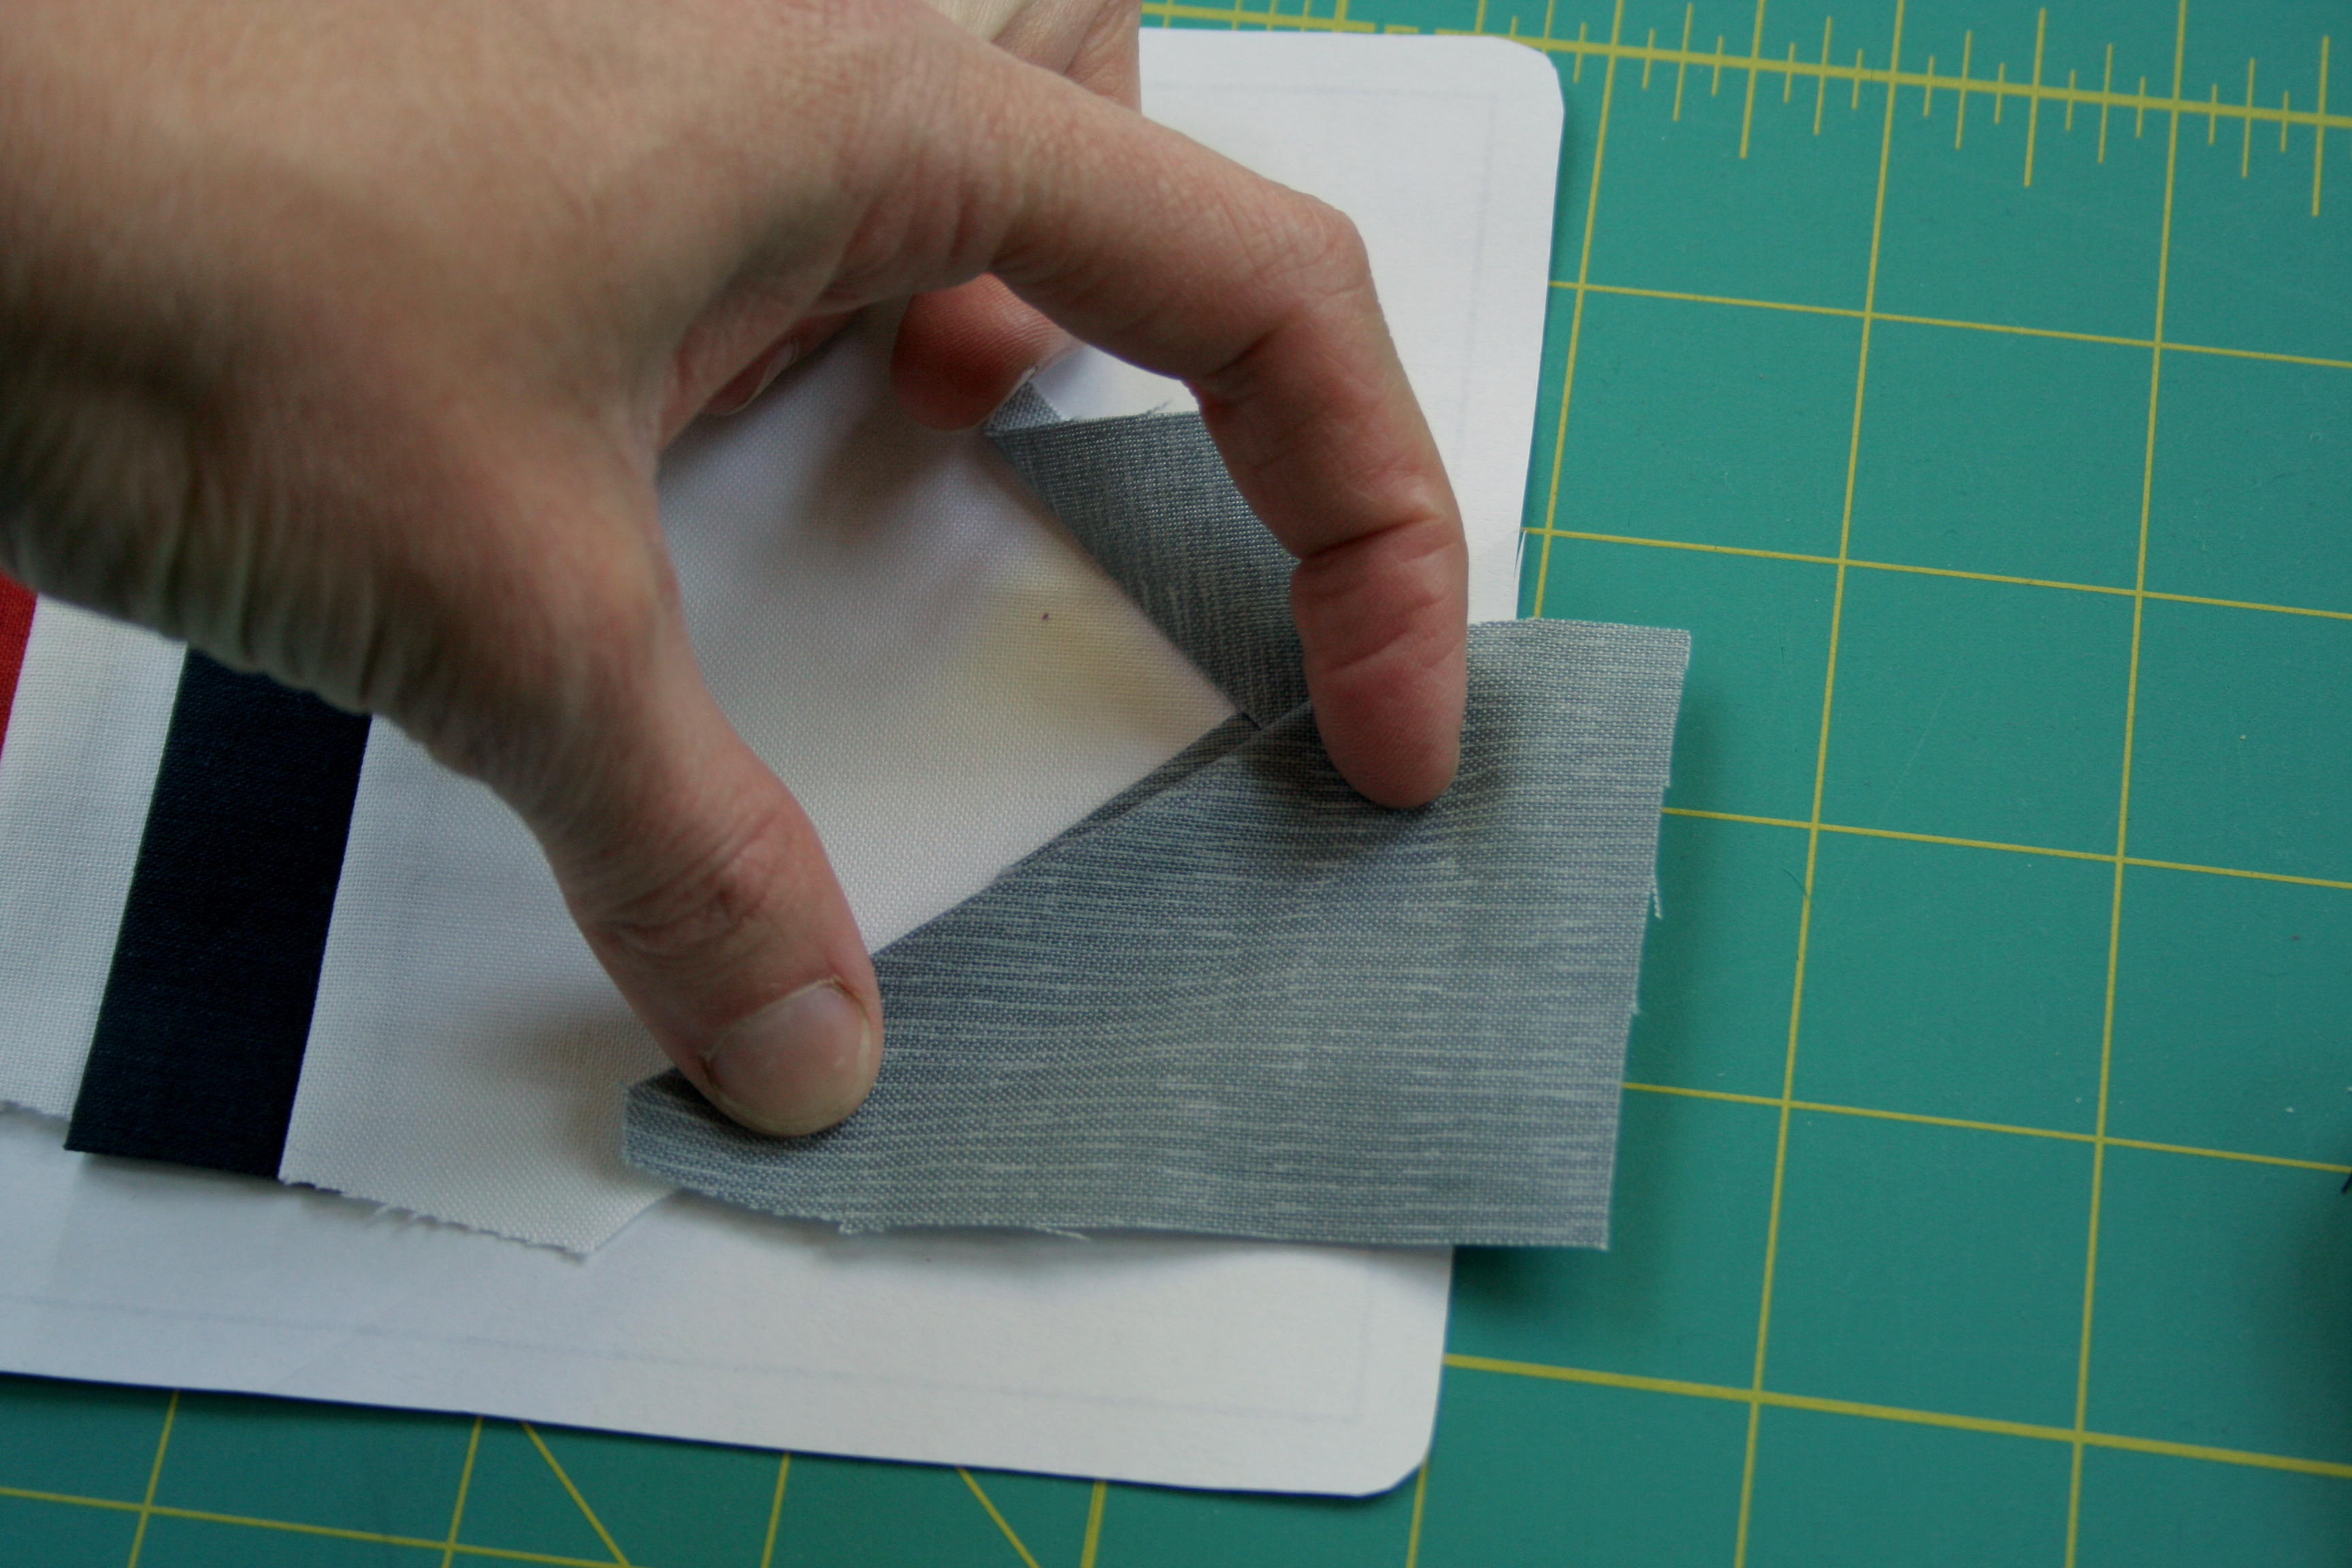
5. Here’s where the spatial part comes in, so get ready. Remember, you are using the paper foundation to help you make the pattern on the back, as if you are looking through a mirror. Ready?
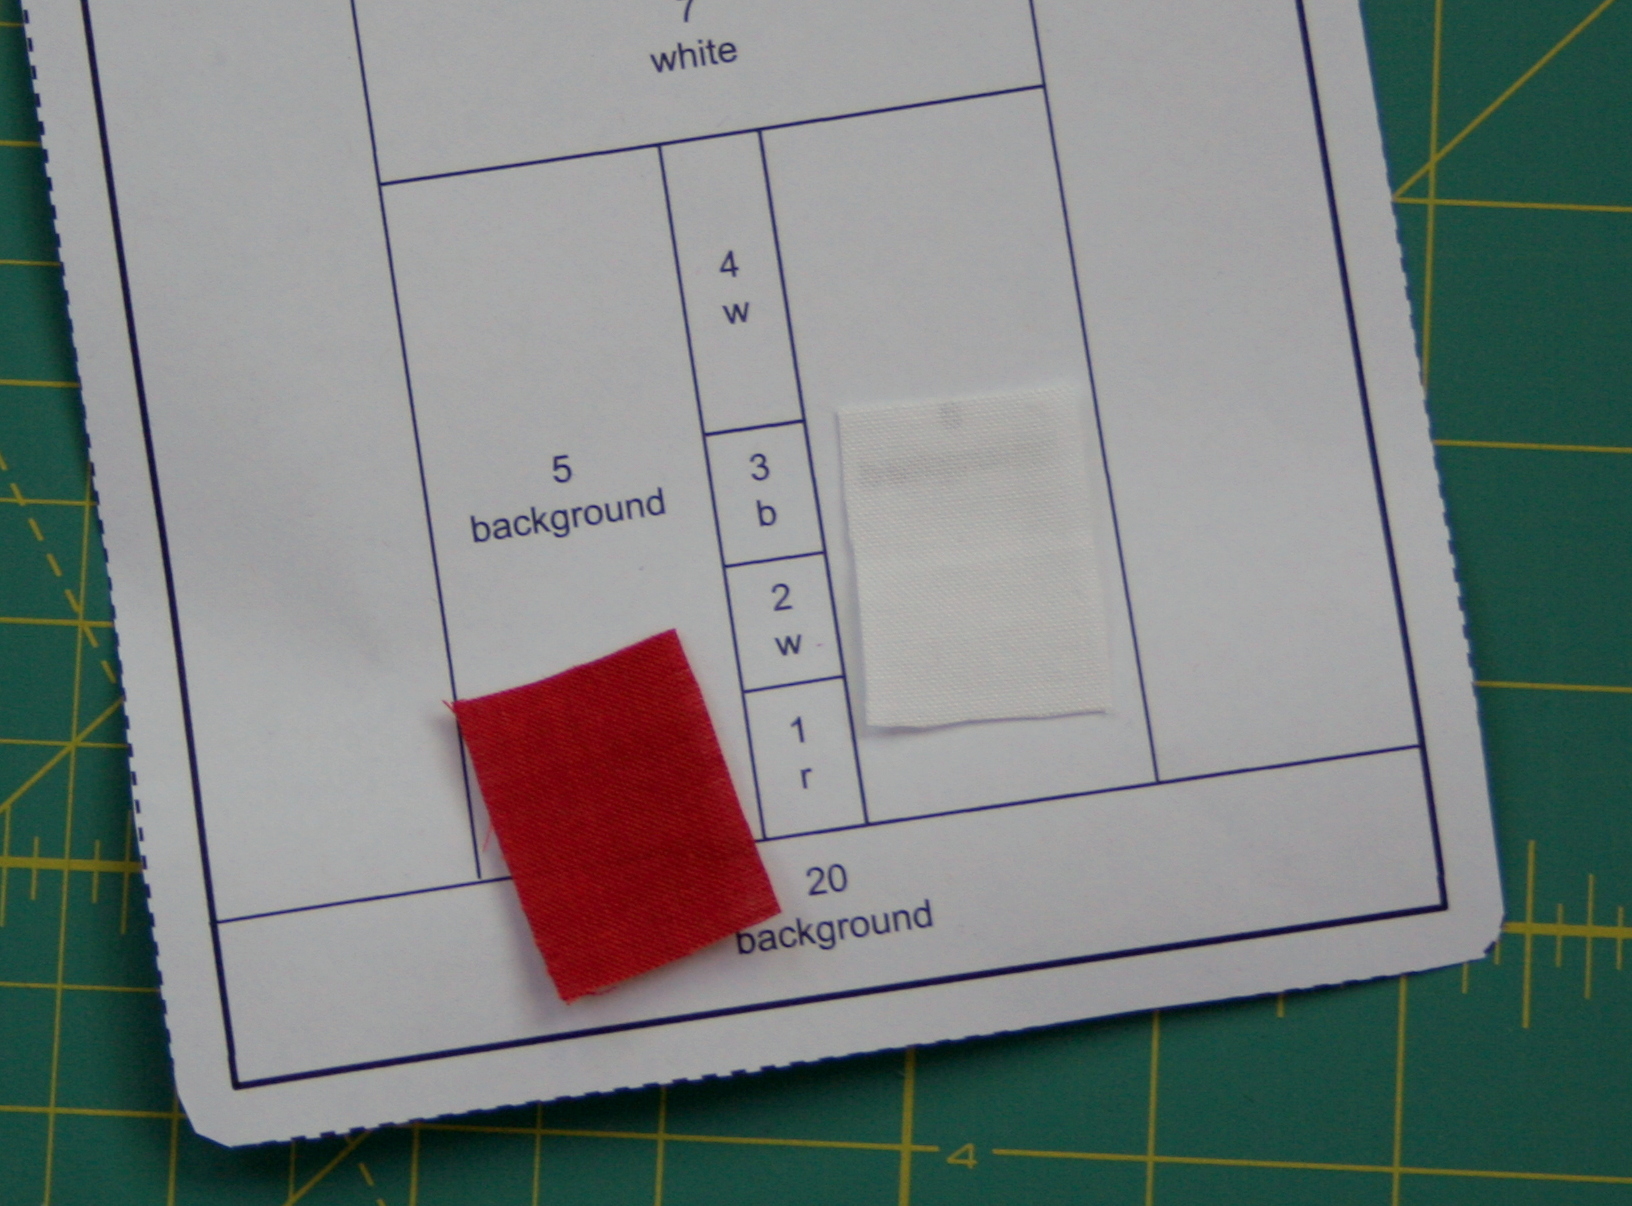
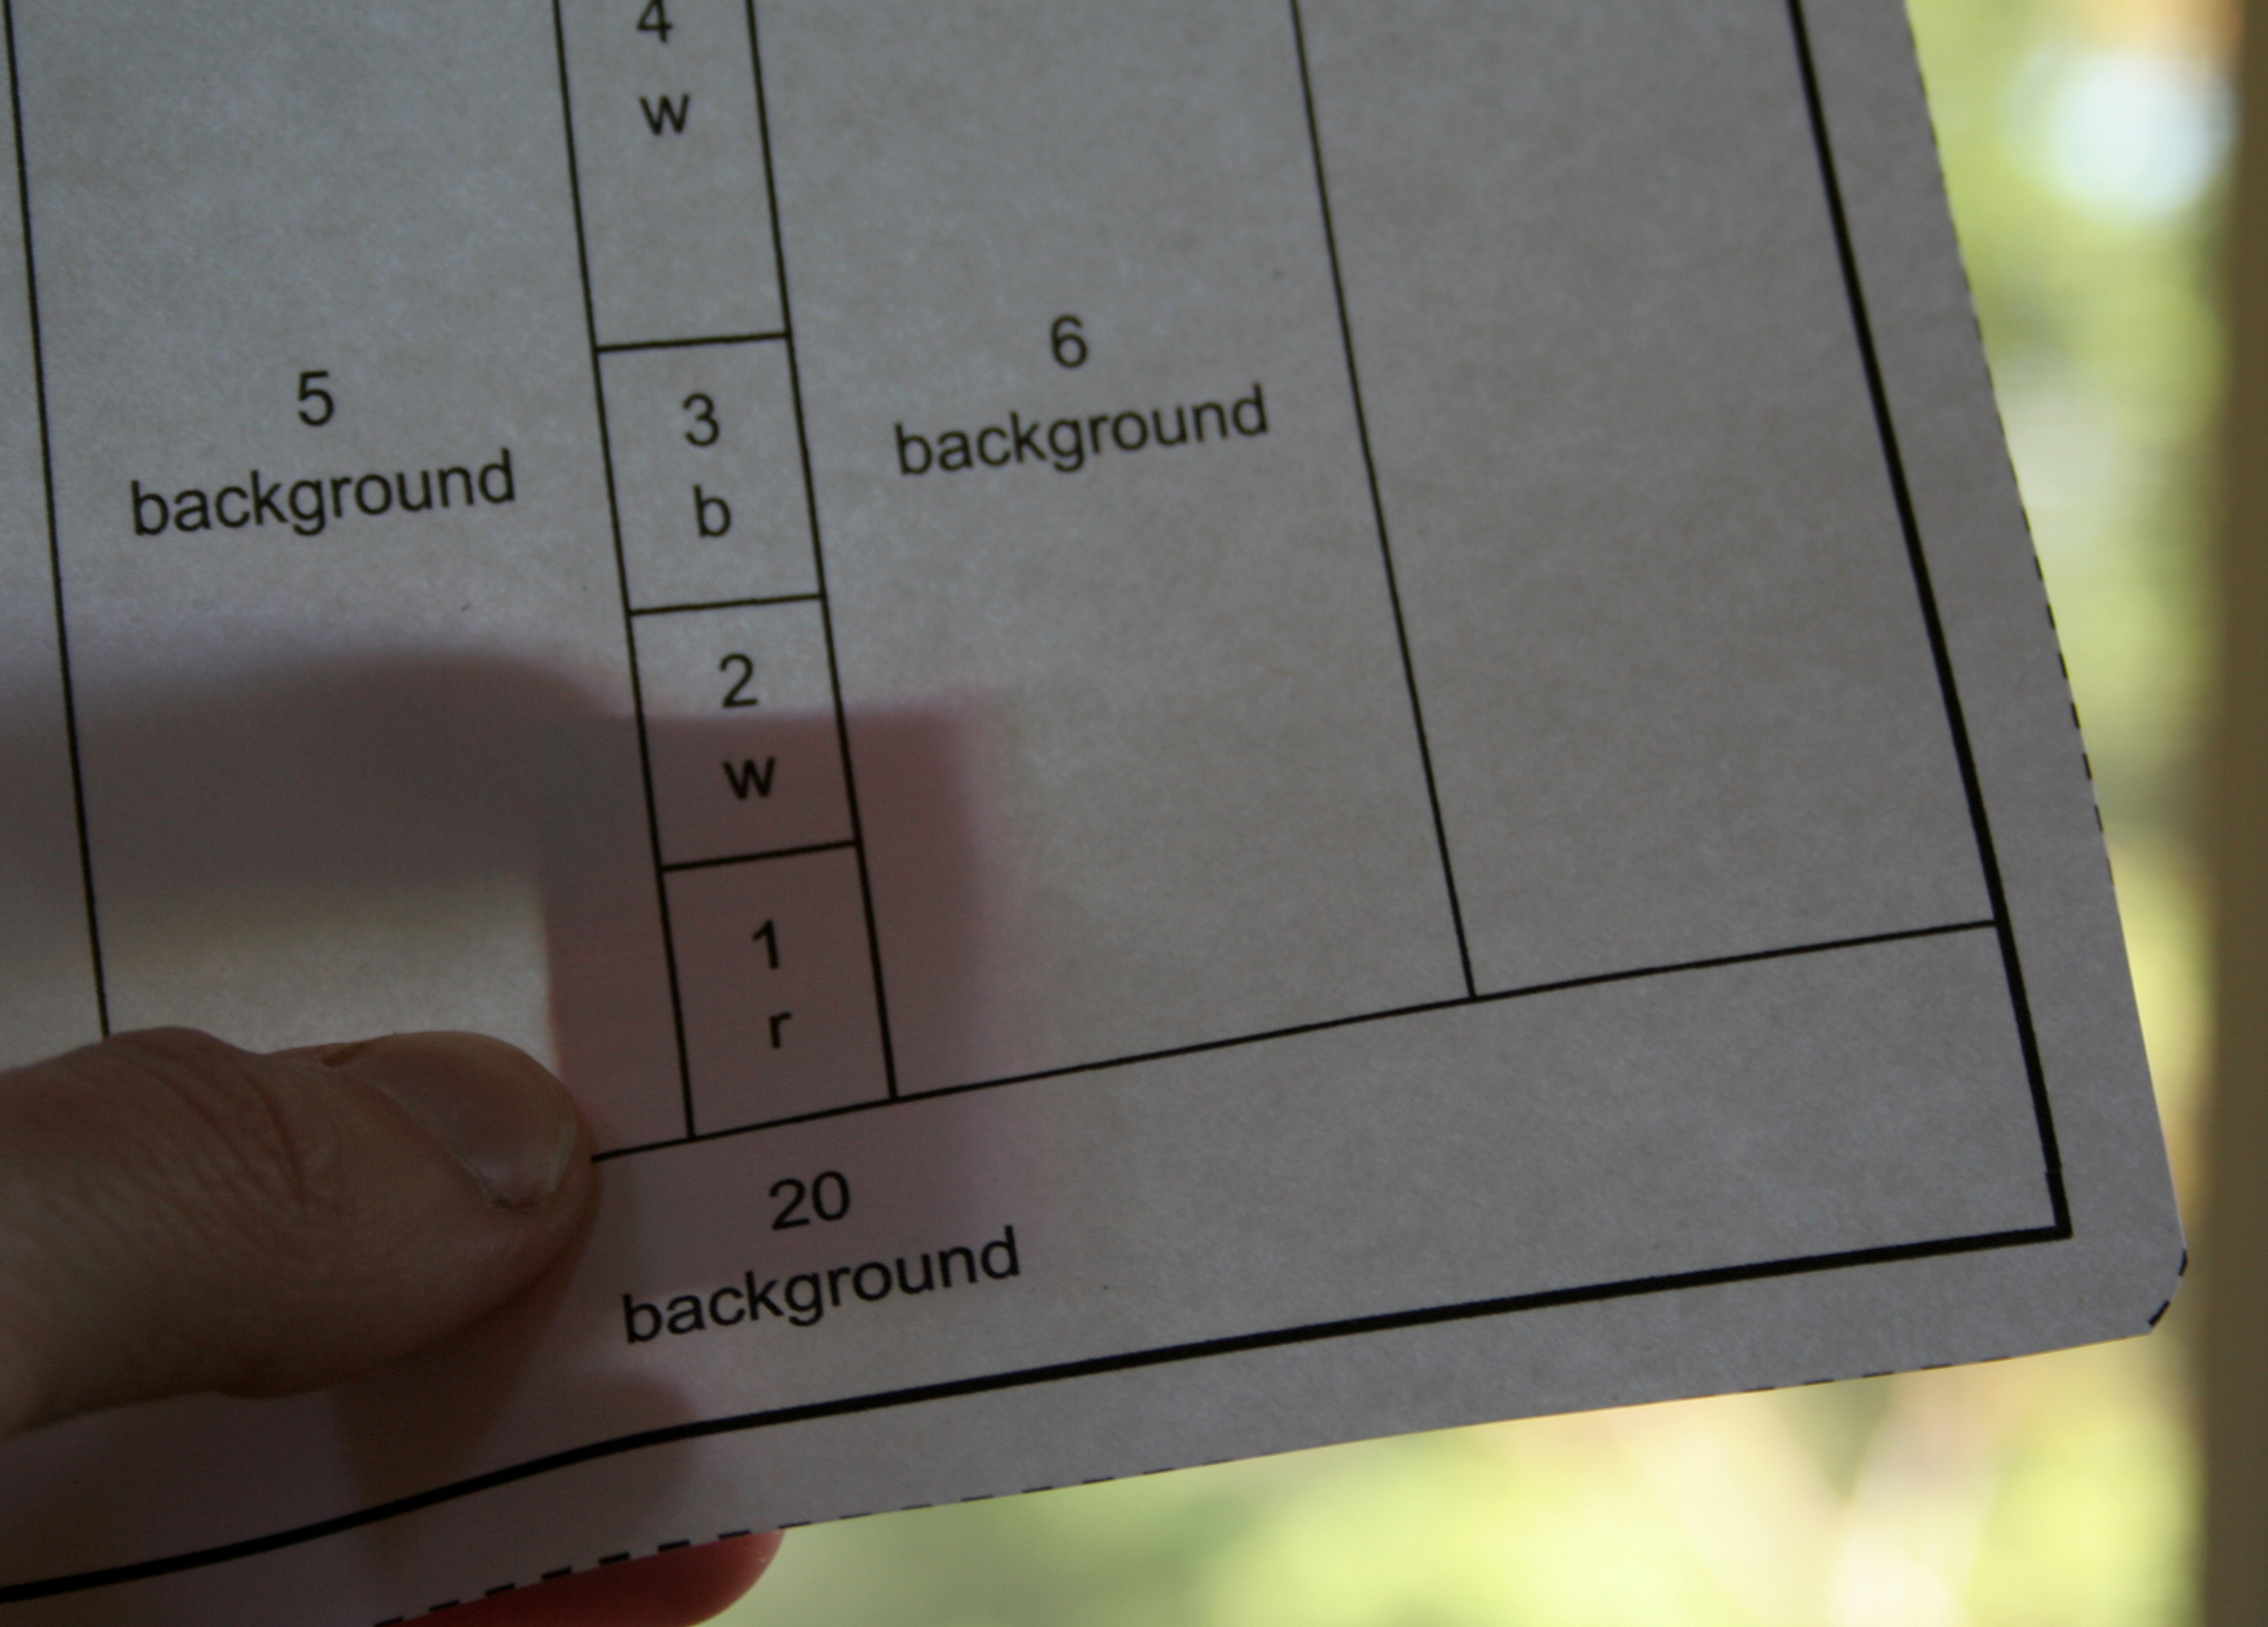
Place the fabric for piece 1 on the back of the paper, wrong side of the fabric facing you (against the paper). Hold it up to a window or a light-box to ensure the fabric fully covers the #1 space, plus seam allowances.
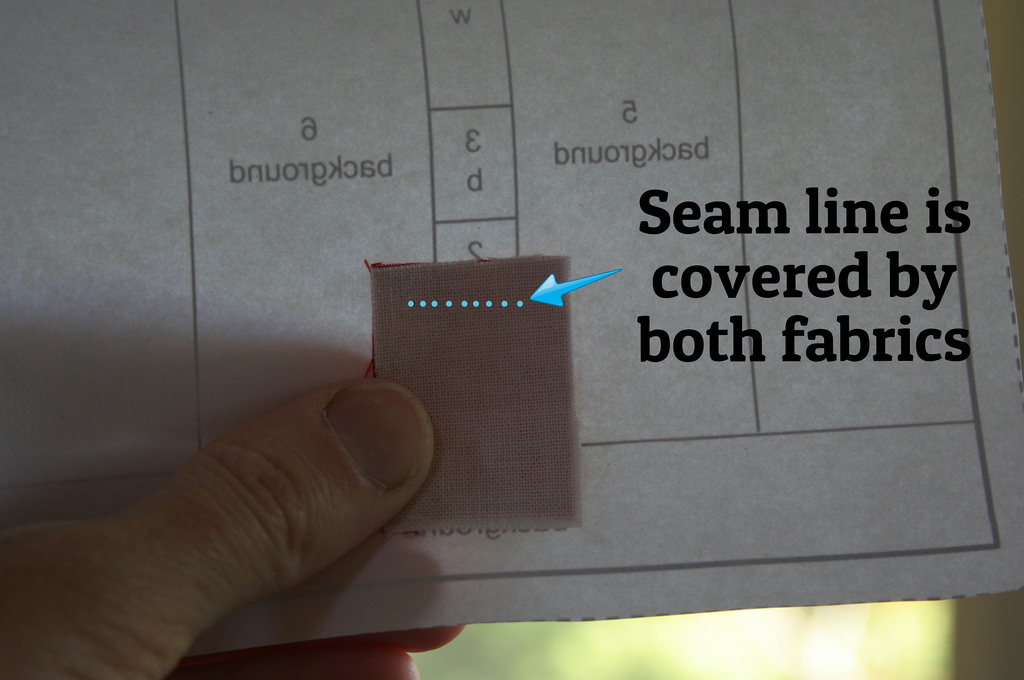
6. Holding fabric 1 in place, position the paper so that the printed side is away from you. Take the fabric scrap for space #2 and place it right side down, on top of fabric 1. Be sure the seam line between 1 and 2 is covered by both fabrics, holding up to the light if needed. The fabrics should now be right sides facing each other, and when you sew along the seam line and fold fabric 2 up, it should cover the #2 space plus seam allowances.
*Before you sew, shorten the stitch length on your sewing machine. I set mine to anywhere between 1.4 and 1.5. That way the paper is very easy to remove at the end.*
7. Holding both pieces of fabric in place, sew along the line between spaces 1 and 2, with the paper on top. Some people like to pin or even glue their pieces in place before sewing, since the fabric is underneath the paper. I personally just carefully hold them in place with my finger. I haven’t had a problem yet, and it’s one less step if that works for you.
Accuracy tip: Lower the needle by hand for the first stitch, ensuring that your sewing will be straight along the line. Back-stitch for one stitch at the end to secure your threads.
8. Trim thread ends. (If you want to make yourself a cute little thread catch, I have a free tutorial HERE!)
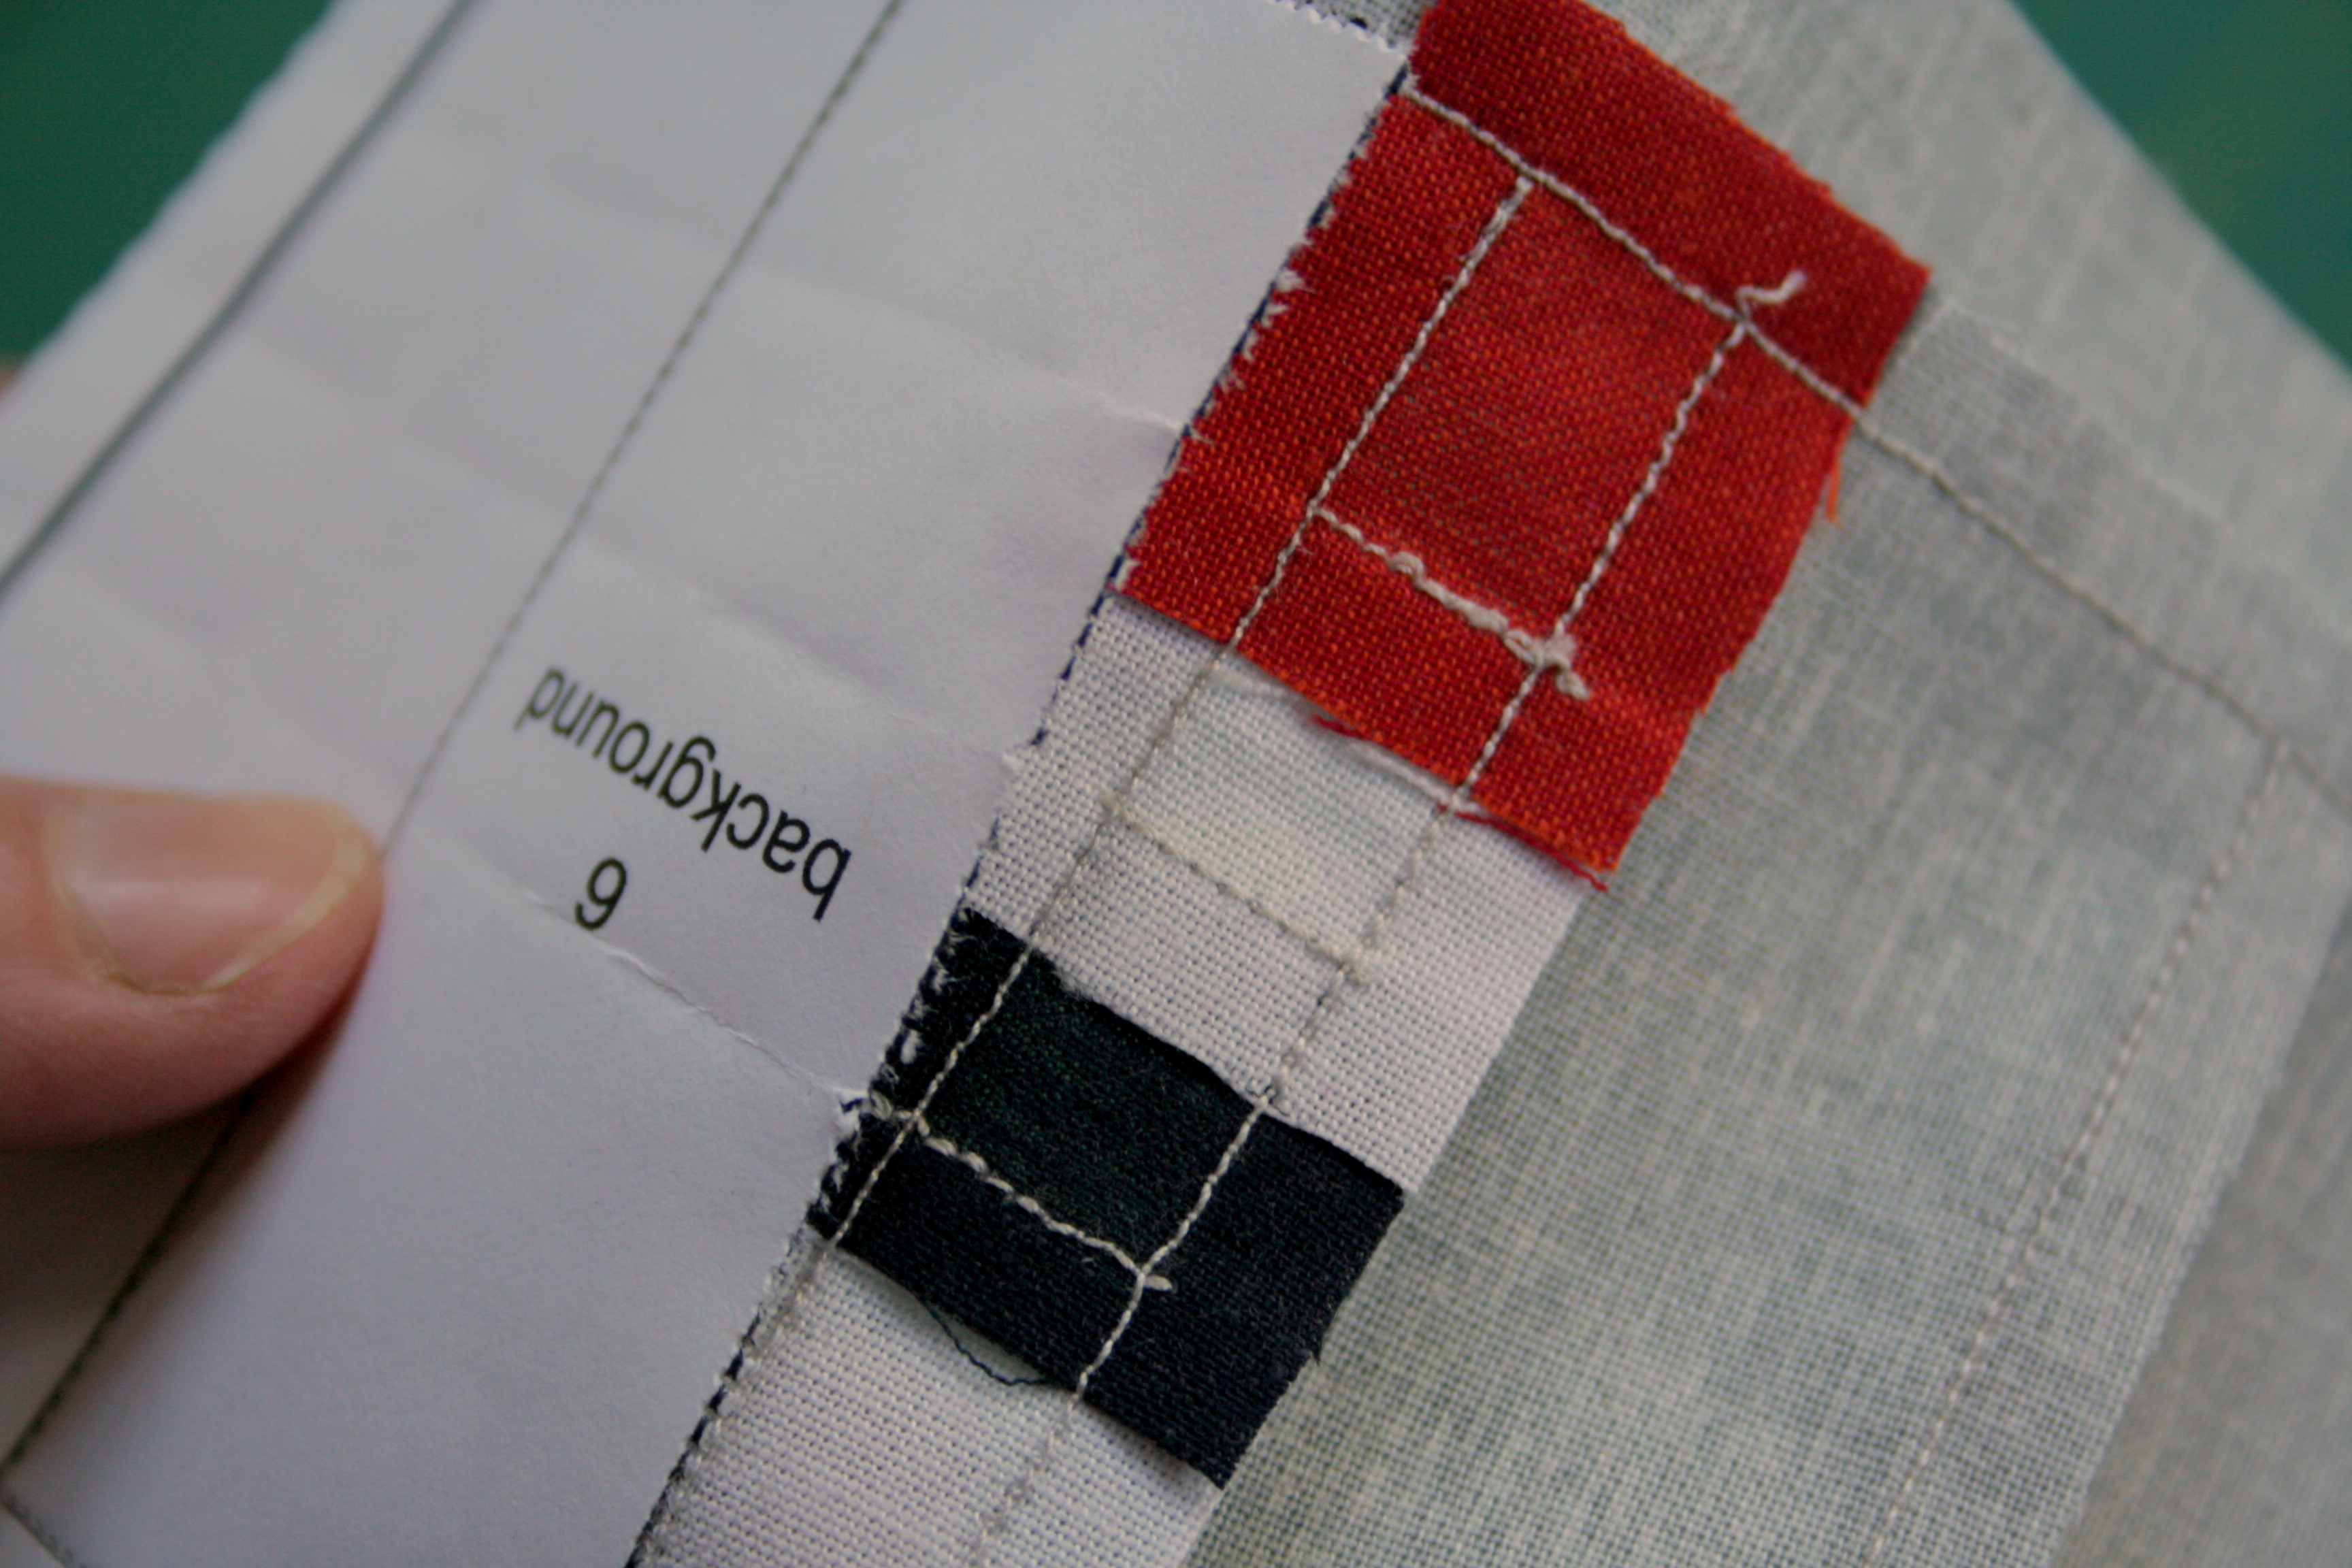
9. Fold the paper down along the seam you just sewed, and trim the fabric to 1/4″.
10. With the foundation paper flat and unfolded, press and set the seam with a hot iron (no steam). Finger press fabric 2 up to cover its space and press again.
When you hold the paper up to the light, you should see that fabric 1 covers the #1 space and fabric 2 covers the #2 space, with seam allowances.
11. Continue this method for the rest of the pattern pieces. Cut, line up, sew, fold & trim, press. Cut, line up, sew, fold & trim, press. Repeat.
Getting ready to sew on piece 3–front view.Getting ready to sew on piece 3–back view. Remember: the fabric has right side facing the pattern paper, with the seam along the top edge. Once sewn, the fabric will be pressed up so that the right side is showing.
If you’ve got the hang of it, you can skip the next few parts and just scroll down to the finishing steps. For those of you who run into tricky spots along the way, here are some additional tips to help smooth the process.
Tips for Lining Up Seams:
If you are truly generous in your fabric cutting, this tip is not as necessary since you’re bound to have enough fabric even if your seams end up being larger than 1/4″. However, if the frugal part of you just can’t cut those fabric bits ginormously, here’s a tip to get accurate 1/4″ seams to conserve fabric. Note that this works best for straight-forward seams, and not nearly as well for long, skinny, tricky angles (I’ll address those in a bit).
For this example, I have just sewn on piece 3, and I’m getting ready to sew piece 4.
First, fold the paper along the seam line between pieces 3 and 4.
With paper folded over, trim the excess of piece 3 to 1/4″ beyond the fold. This will give you an accurate edge with which to line up the edge of piece 4.
When lining up piece 4 (white) with the edge of piece 3 (black), if you match the edges, the seam will be exactly 1/4″. Note that the right side of fabric 4 is facing the right side of fabric 3. Hold in place, sew, and you’ve got as close to a perfect seam as you’re going to get!
Tips for Using Directional Fabrics:
Using fabrics without a directional flow is fairly straight-forward, but if you are using a fabric with a directional pattern that you’d like to keep consistent, it takes a bit more forethought when you cut. First, line up your pattern and your fabric to decide in what direction the fabric should go. To cut the fabric, position the pattern with the printed lines up, and the fabric wrong side facing up. This way, since you are creating your pattern on the back, the shape of the fabric piece will be accurate (note that the above photo shows the fabric right side up, before pieces were cut).
Once your piece is cut, proceed as usual, paying close attention to the direction of the fabric. Remember, right side of fabric piece is placed facing the right side of the emerging picture, on the wrong side of the foundation paper.
Until you get the hang of aligning the fabric correctly, it’s a good idea to check the direction of the fabric before sewing. Unpicking paper pieced (tiny stitches!) seams is less than desirable (trust me, I know!). To check the fabric direction, simply place the fabric wrong side down, hold along seam line, and fold back. Once you are sure the direction of the fabric is the way you want it, fold it back and sew.
Tips for Tricky Angles:
Many angles in basic paper piecing patterns are fairly straight forward. Sometimes, though, you have an angle that really makes you crunch your brain to properly line up the fabric before sewing so that it fully covers the necessary space with seam allowances. Rather than sew, unpick, sew, unpick, sew, unpick, here are some tips to help get it right the first try.
Here I’m trying to piece section 14. When cutting my fabric piece, I’ve been generous with size, and included the angle of the seam I’m about to sew. Note that the fabric is wrong side up, with my foundation paper right side up.
The fabric piece generously covers the space needed, with lots of wiggle room. The angle cut into the piece is key, since that will help align the seam correctly. If just eyeing the angle while cutting doesn’t work for you, you can put your pattern paper on top of your fabric, and using a Herra marker, deeply mark the seam line. Add 1/4-1/2″ to all sides and cut your fabric piece.
Holding it up to the light, I can see that my fabric piece covers the space, extends amply beyond the seam allowance, and that the general angle of the seam line is consistent with the angle of the fabric piece.
Here’s the tricky part. Placing your fabric right side facing the wrong side of the foundation paper, line your angled seam edge with the seam line on your block. It will look wonky, and may seem like it is headed in the wrong direction.
Fold along the seam line to ensure the fabric will cover the correct area. Once satisfied that it’s all lined up properly, fold back and sew the seam. With particularly wonky angles, I sometimes pin along the seam line, both to ensure I’m accurately checking the fold, and to hold the fabric in the proper place before sewing.
So now you’ve got the basics of foundation paper piecing! Once your entire block is pieced, square up the edges being mindful to keep the 1/4″ seam allowance around the block if you plan to sew it into a quilt, pillow, or just about anything else.
I often will leave the paper on if I plan to sew the block to another paper pieced block, since the 1/4″ seam allowance line helps me with accurate sewing. If you are already a pro at 1/4″ seams or are planning on using a single block for your project, now comes the fun part–removing the paper!
To remove the paper, gently tear away, holding the main block in place and pulling gently away and to the side, similar to how you would tear any perforated piece of paper. With your narrow stitch length, the paper should come away easily.
Once one side of the paper is off, the other side often will just pop out. Go slowly and tear gently to ensure your seams stay tight. If you end up with bits of paper stuck in the seams, carefully use blunt tweezers to remove the final bits. Alternately, I’ve heard that spraying the paper with water helps with removal. I haven’t had to try it yet, though, so can’t vouch for the method.
I just love the backs of paper pieced blocks. The precision and accuracy, all the little seams that are proof of my cut, line up, sew, fold & trim, press marathon… they make me happy. Take a good, long, admiring look at the back of your block, and then flip it over and admire your finished block. Gorgeous!
I hope this tutorial was helpful, and that you enjoy paper piecing as much as I do. Coming soon on my blog, I’ll talk about what’s next; now that you’ve made your paper pieced block, what can you do with it!?
Do you have any other tips for beginner paper piecers?
I grab a needle and thread once the kids are in bed


 Materials needed (to make 4 beanbags):
 I figured since it’s nearly Halloween, it was the perfect time to use my Cotton + Steel Spellbound Collaboration charm pack. The 5″ circle die worked perfectly with the charm squares, which made my job even easier! I used my go-to thread, 50wt Aurifil 2600-Dove for all sewing.
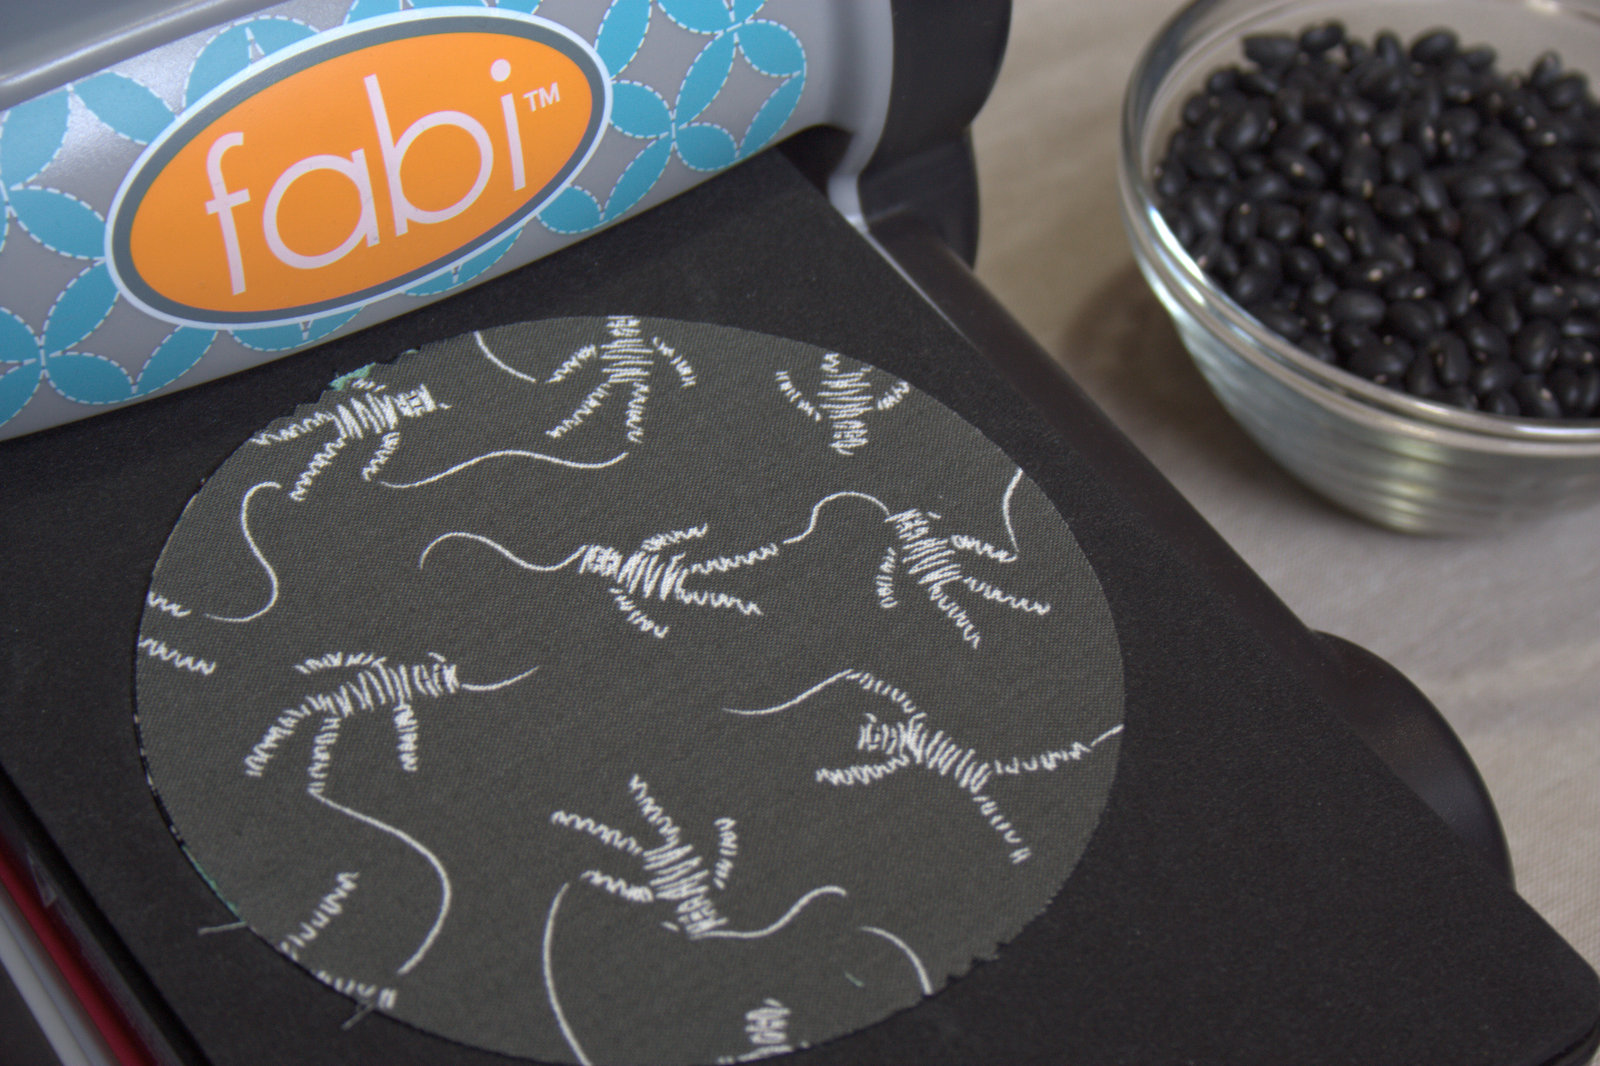 Choosing four pairs of coordinating charm squares, cut eight (8) 5″ circles, layering your Sizzix sandwich: bottom cutting pad, die with the blades facing up, fabric centered over the circle blade, and top cutting pad. All necessary circles for this project can be cut with one pass through the die cutting machine, which made this a really quick project to make with my kids.
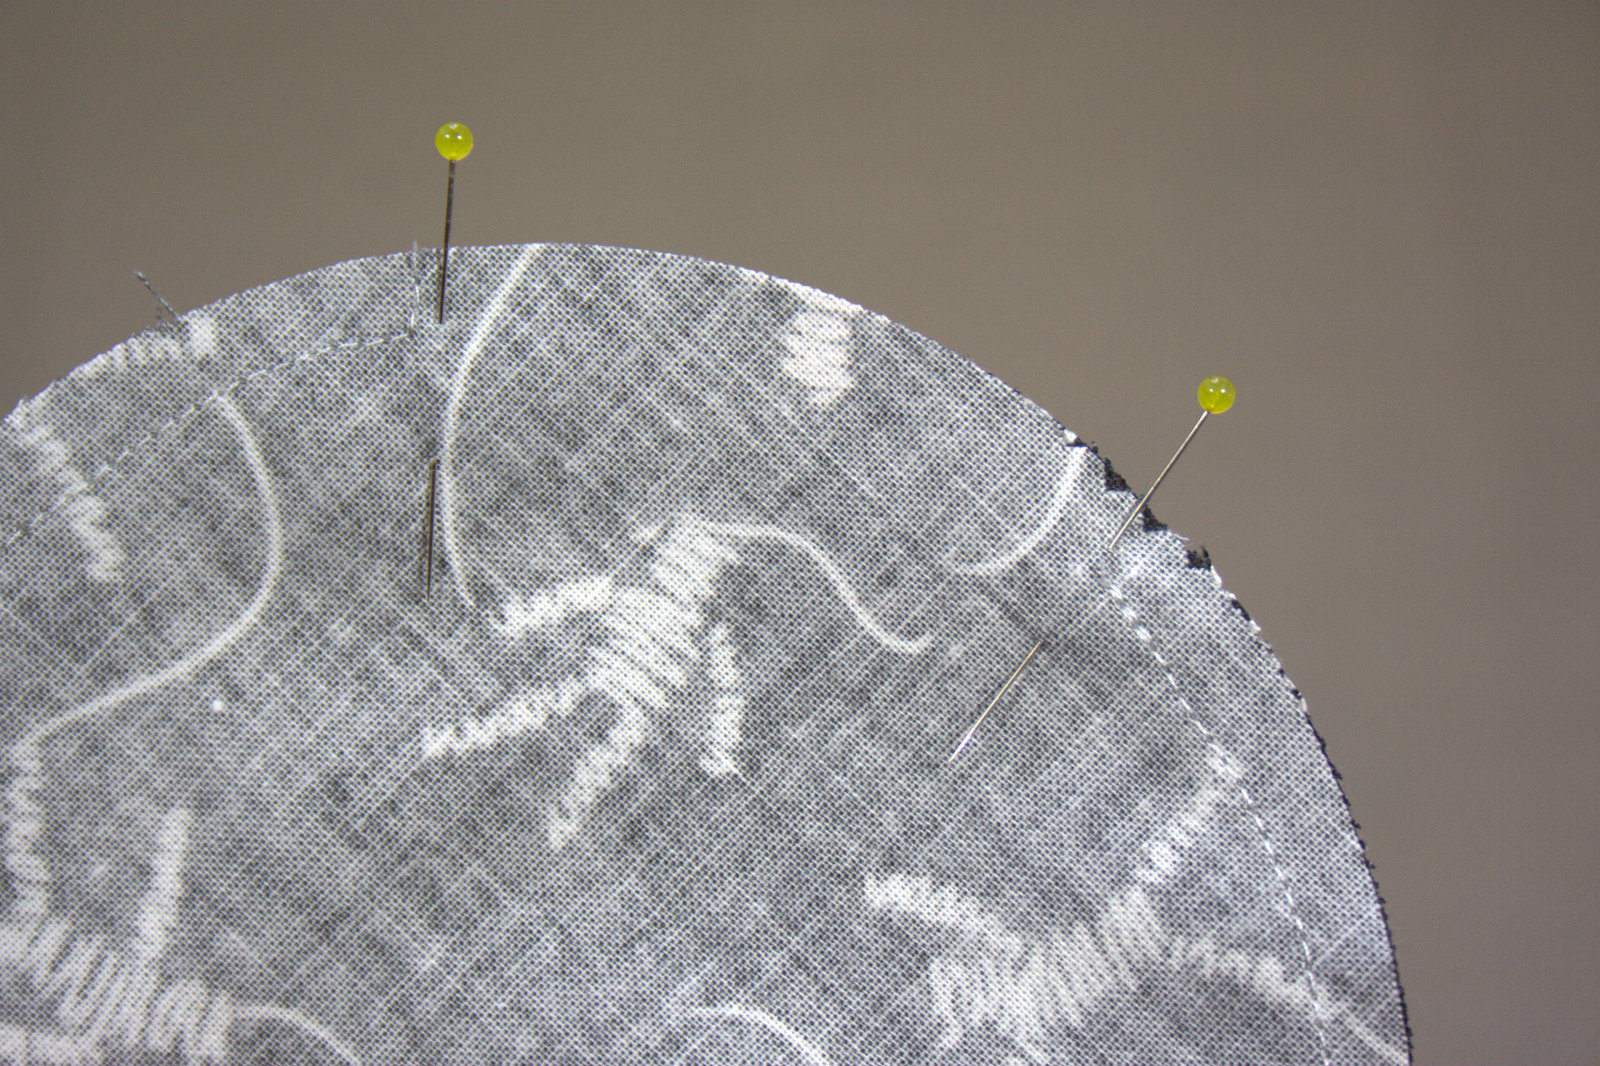 Next, pin your pairs of fabric right sides facing. I used only four pins, two of which marked a 2″ opening. With a 1/4″ seam allowance, sew the circles together, leaving 2″ open for turning and filling. Remember to backstitch at the beginning and end of each seam.
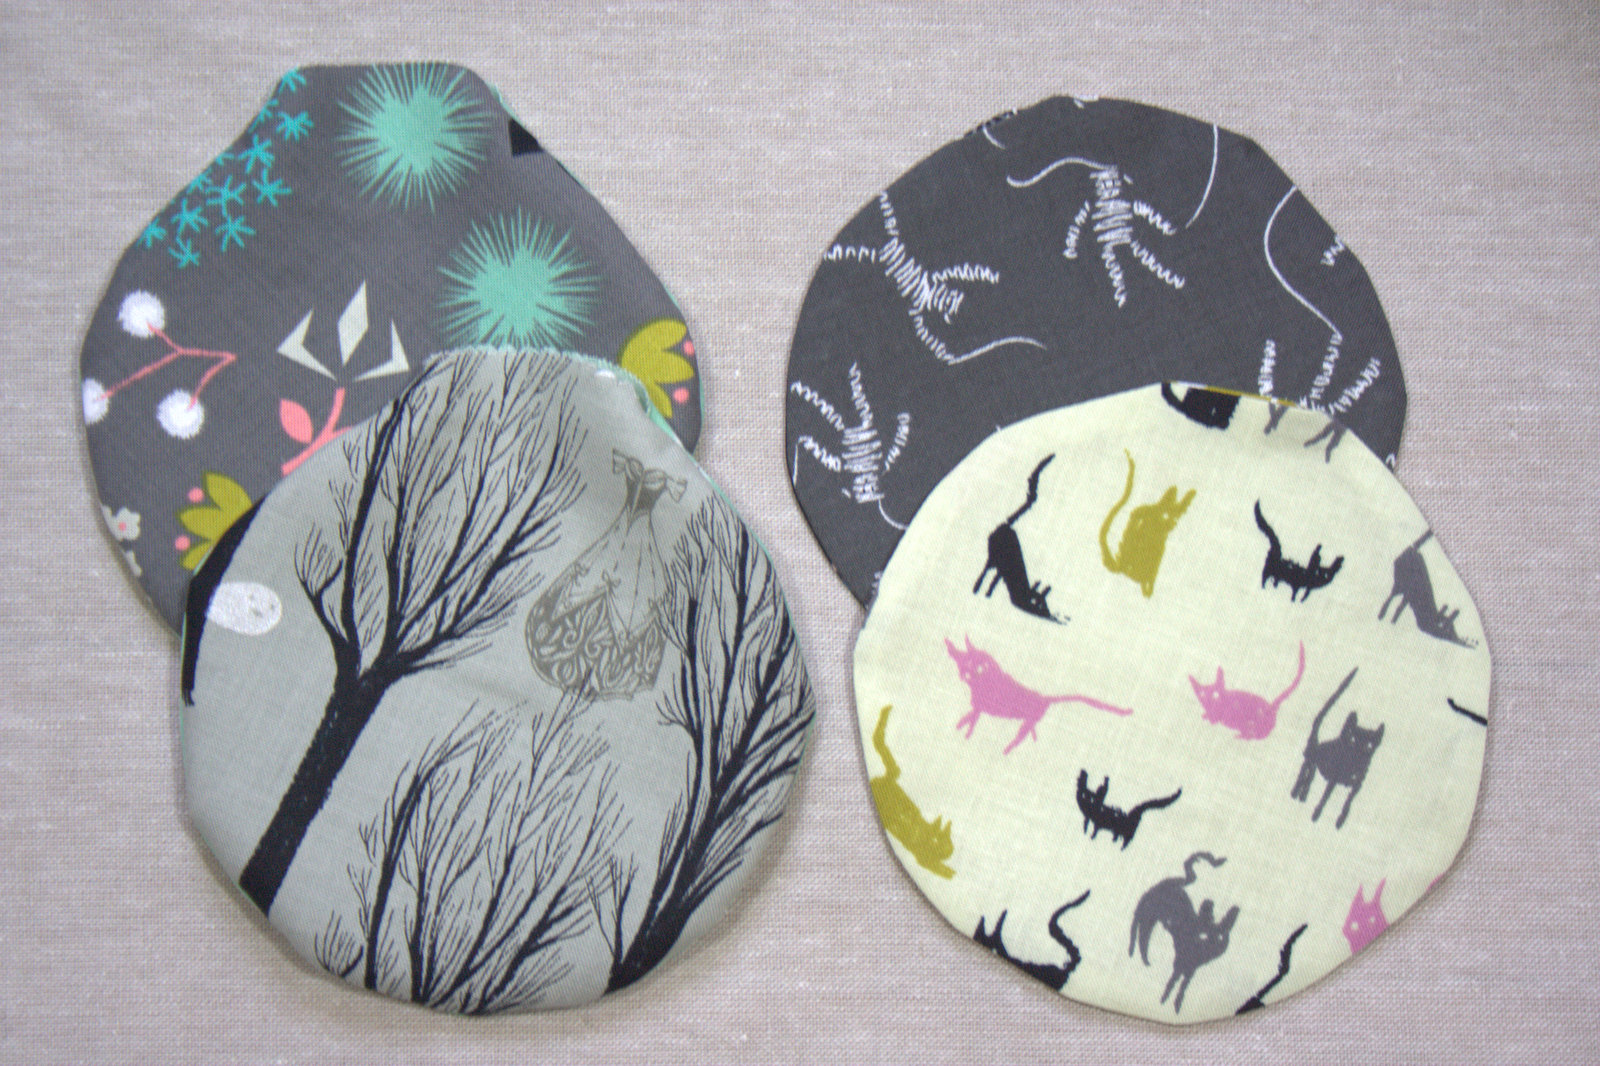
 Fill the beanbags with dried beans, leaving at least an inch of empty space at the top. Trust me here; the beanbags will seem too empty, but while you are sewing them shut and top-stitching, you will want that extra wiggle room.
 We found that a combination of funnel, spoon, and simple “use your hands to put the beans in” worked well for us.
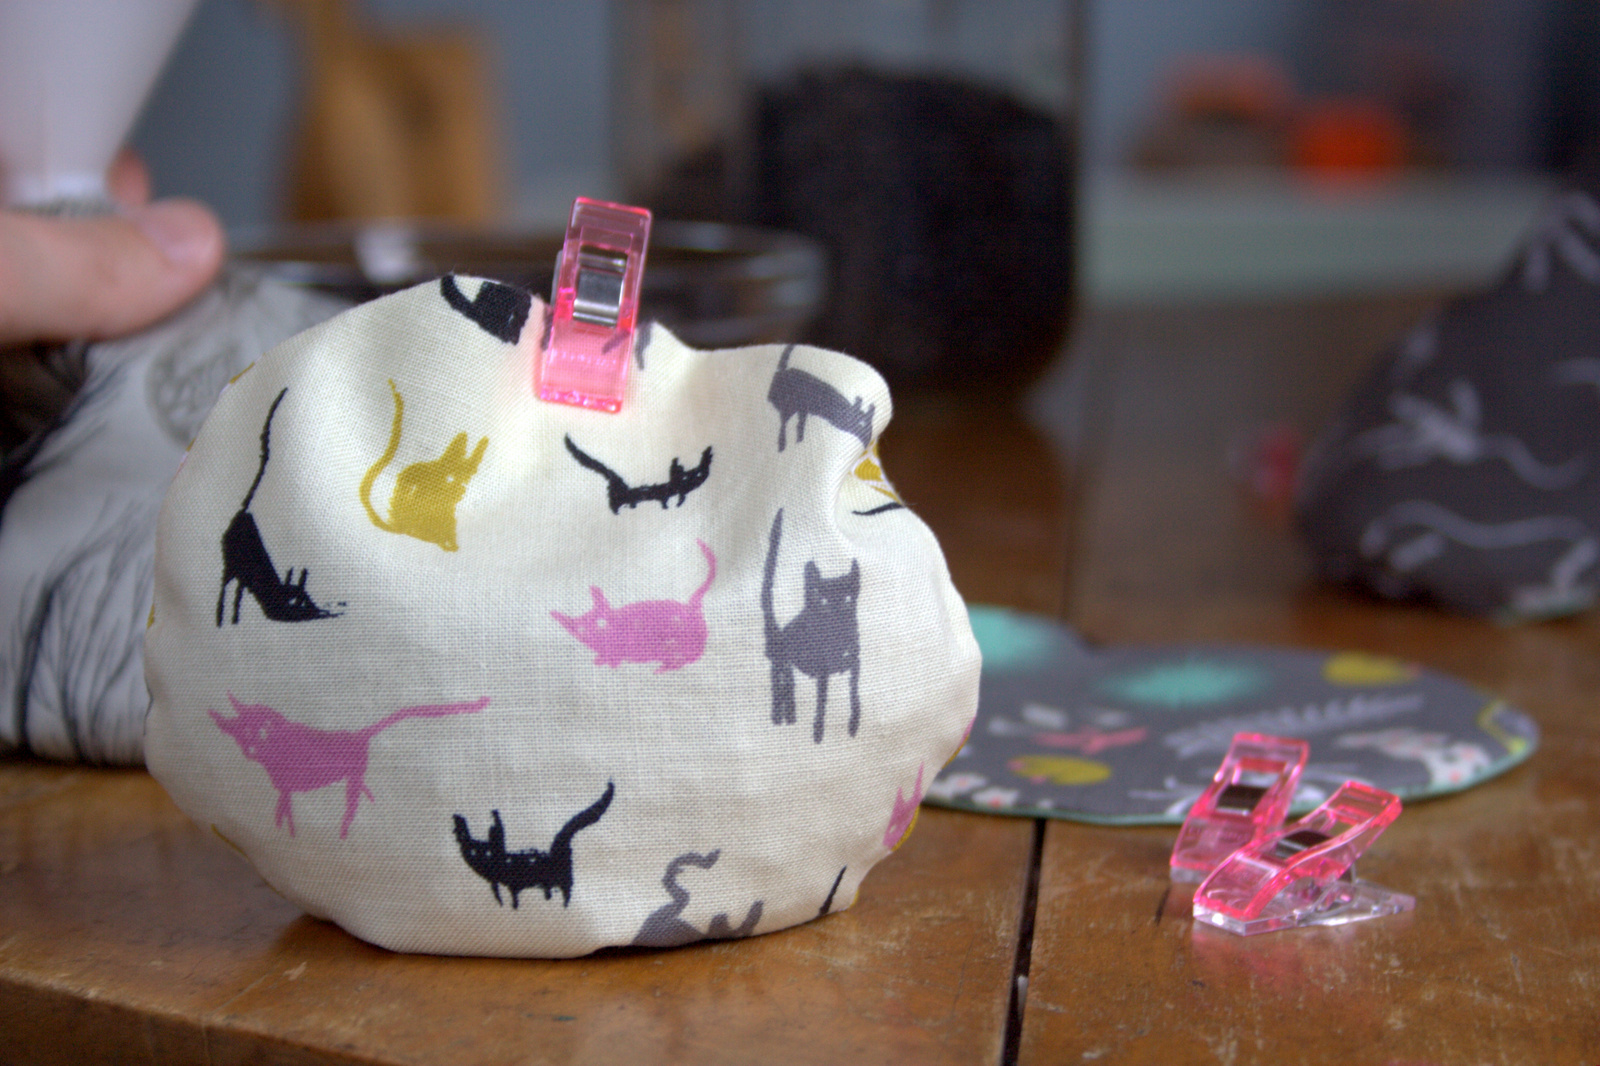 Either pin or clip the tops once the beanbags are filled (remember to leave that good inch or inch and a half of empty space in the top). This will both remind you that the beanbag is “finished filling”, and remind your kiddos not to cram any more beans into it. (We definitely took as many beans out of the beanbags as we put it. All part of the fun, right!?)
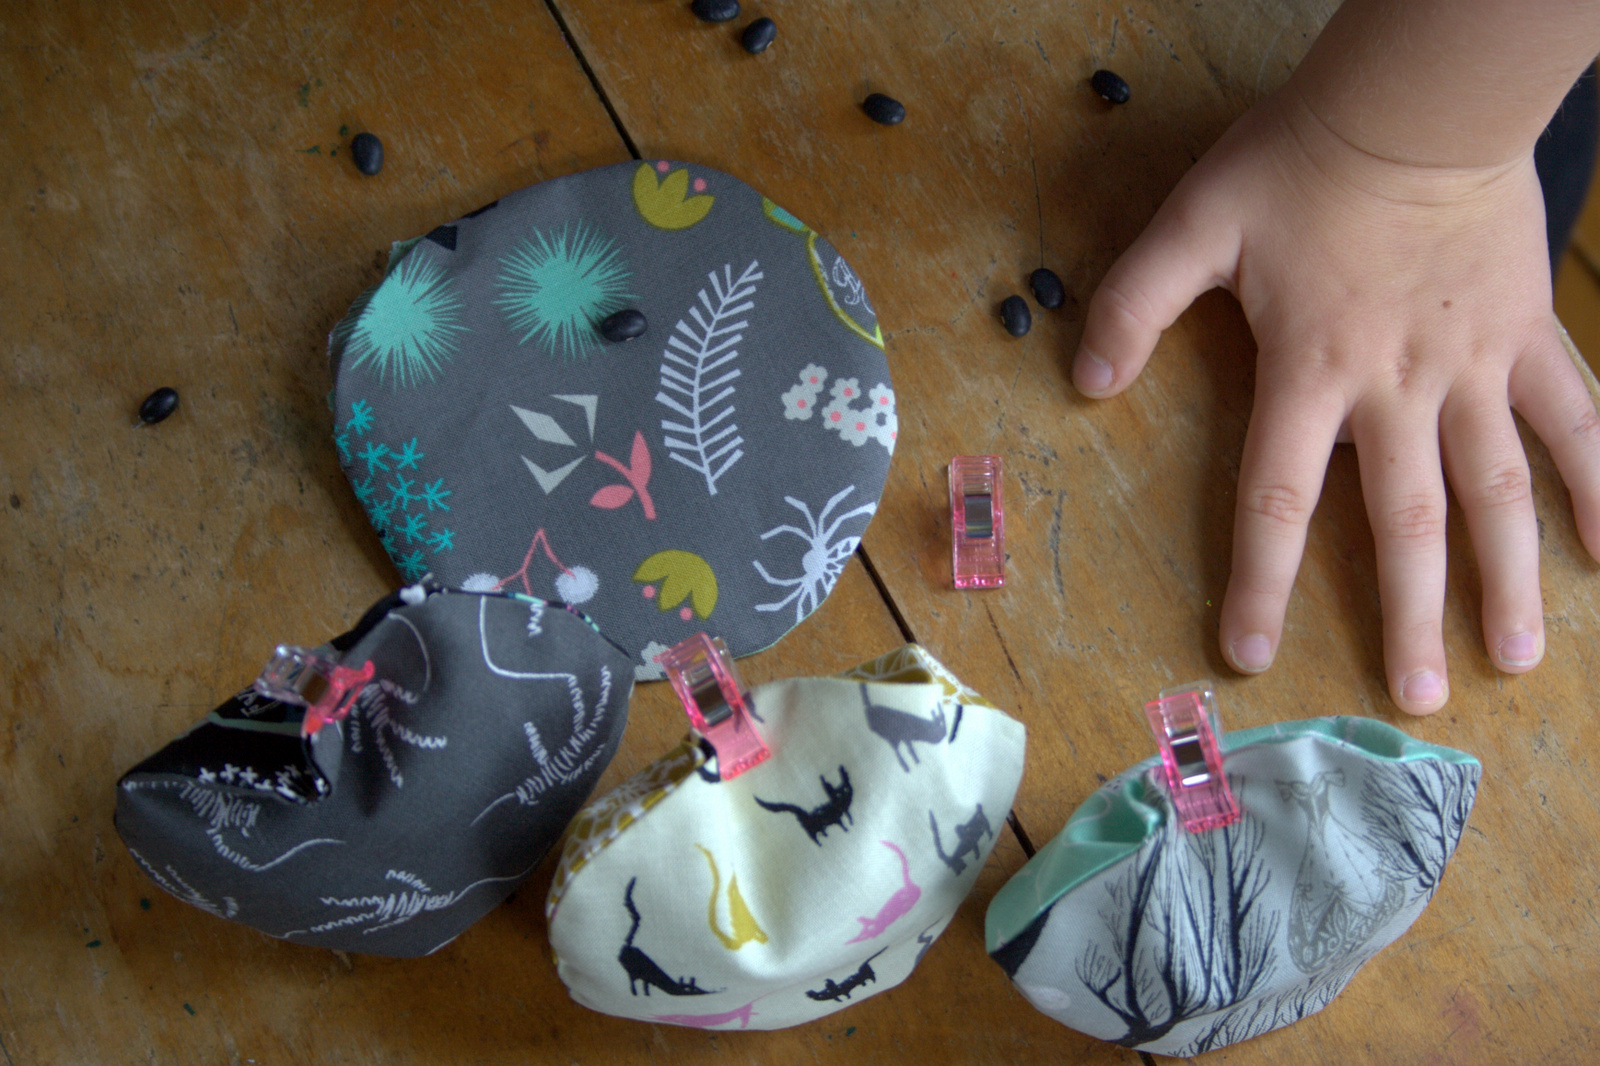 Depending on the size of your helpers, this may be a messy activity. Plan accordingly, or embrace the chaos.

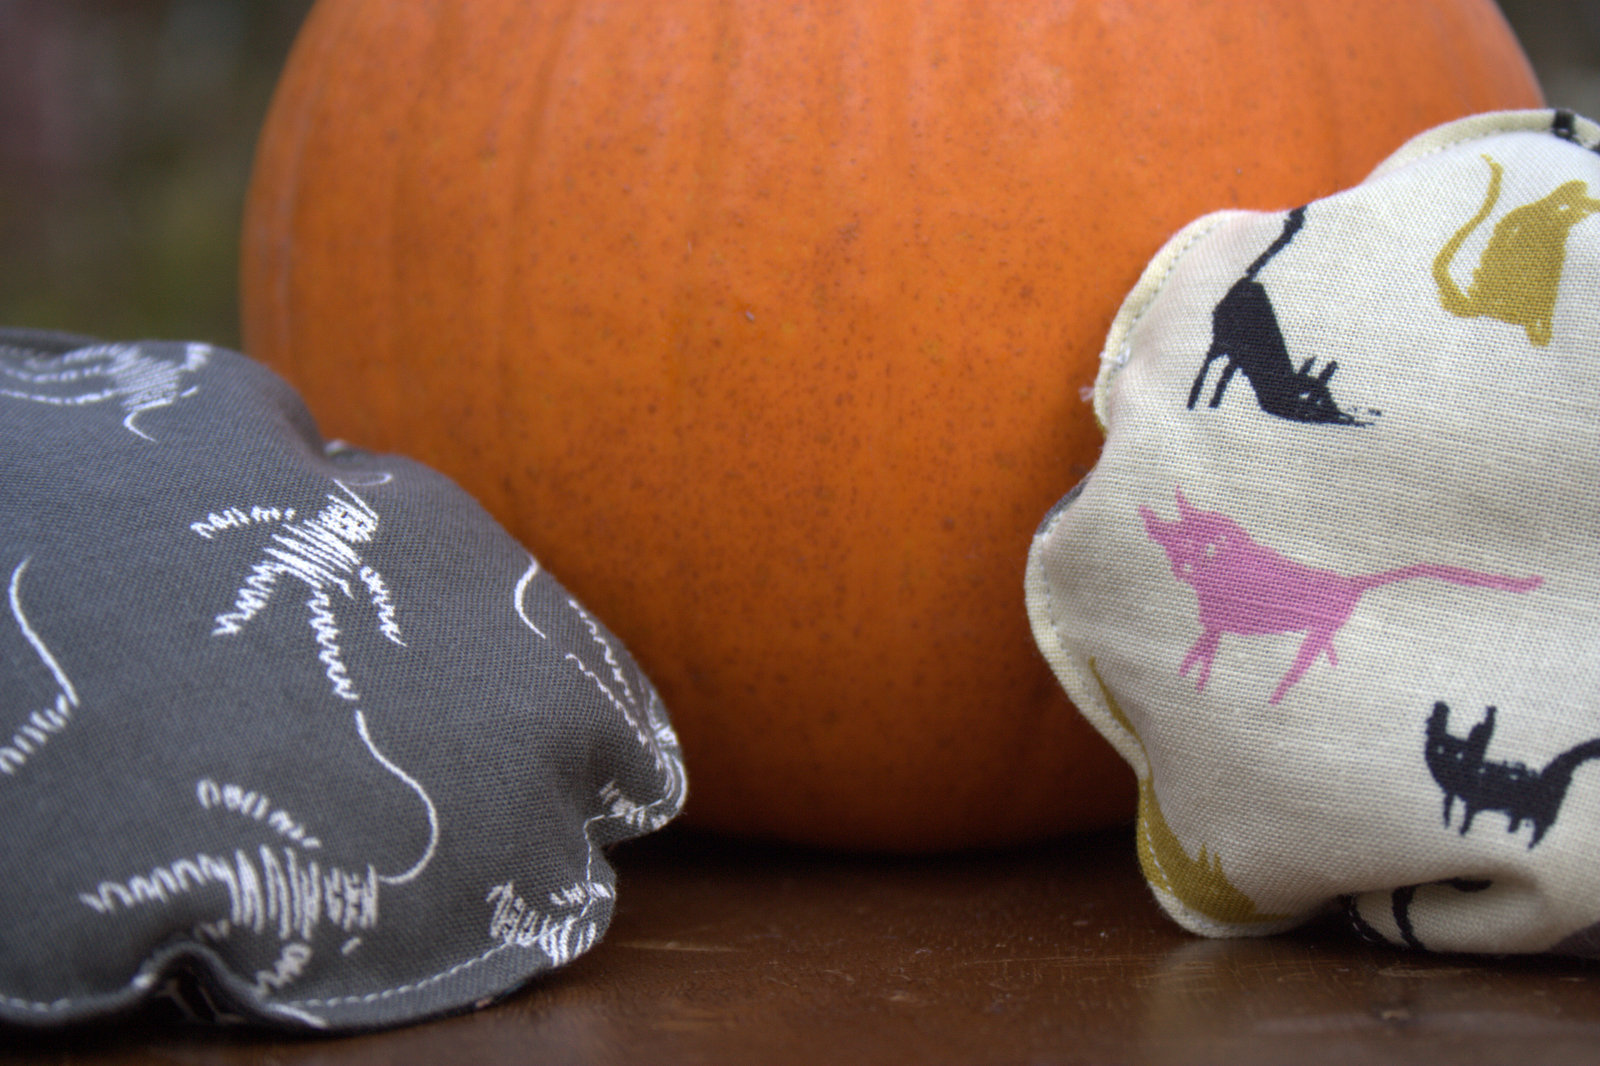 Now you have a handful of spooktacular sturdy beanbags and you’re ready for fun! Toss them at pumpkins, into trick-or-treat buckets, or at each other (avoid faces!). Have fun!