After a longer than intended lull in blogging, I’m back and eager to share my reflections, process, and creative adventures with you! I’ve said it before, but beginning is the hardest step. I got stuck in a cycle of the longer I waited, the harder it was to simply jump back into blogging. Today, that ends. What better place to begin than with community and some of the fun sew alongs and bees taking place this year, as well as my grand plan for stress-free participation in them!? Soon I will share my goals, focus, and “one word” for 2017, as well as some of the other fun projects on which I’ve been working. For now, hello!! It’s great to be back, and I’m excited to share inspiration and creativity with you again!
The online quilting community is known for its welcoming vibe and almost endless opportunities to sew together virtually if not in person. There are so many fun Sew Alongs and Quilt Bees happening at any given moment across the quilting community, it’s often hard to decide which ones to join and which ones to pass on. I’ve joined a few Sew Alongs in the past, typically the block-at-a-time style–specifically the Farmer’s Wife led by Angie at Gnome Angel, #100days100blocks also lead by Angie on Instagram, and the Quilter’s Planner 2016 Scrappy Picnic Plaid Sew Along led by yours truly on Instagram. I had a lovely time participating (and still participating) in them, but found that I often cannot keep up with the pace because of other obligations. For 2017, I think I’ve come up with a plan to address that and turn it into creative opportunity!
First, here are the Sew Alongs and Bees I’m currently committed to participating in:
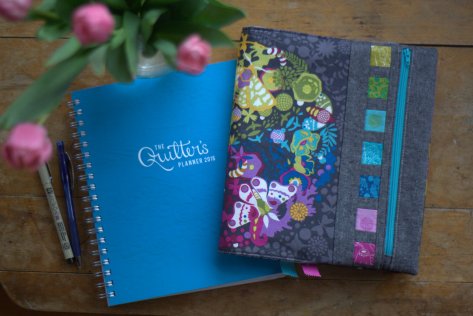
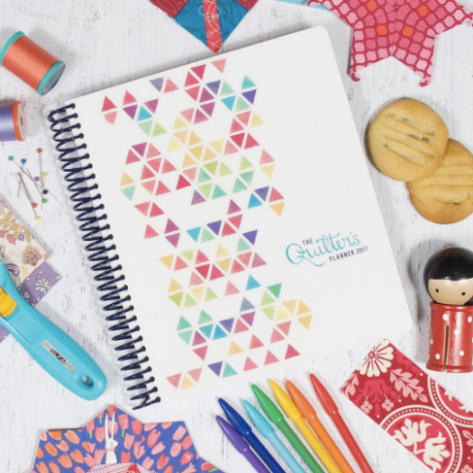 52 Weeks with the Quilter’s Planner
by Angie of Gnome Angel
#52weekswiththequiltersplanner
Hosted by the Sew Along Queen, Angie from Gnome Angel, this sew along is a given for me! Using the block instructions on each weekly spread in the 2017 Quilter’s Planner, Angie’s leading this sew along to encourage and support you to make each block each week. Visit her page HERE to read all the details, as well as to see how you can join. This is a great sew along for those looking to get into a regular sewing habit. Plus, it’s a chance to use your Quilter’s Planner to its fullest!
 The Honey Pot Bee
by Molli Sparkes
#thehoneypotbee
Molli is hosting a quilting bee that breaks all the rules–as he says, you get none of the sting, and all of the sticky goodness! I love the relaxed mentality about this bee, and it’s a little extra exciting since I’m one of the Queen Bees for April! Here are the details, straight from Molli’s announcement post:
Each month there are two queens (and/or kings, but for the sake of brevity will be called queens) who decide on The Honey Pot Bee block patterns. Each queen picks one, I announce them to the world, then each participating member (Princesses and Princes) can choose to make one of each or two of the same. Each member then keeps the blocks for themselves.
This is less of a block swap, and more of a way to find amazing block tutorials / patterns they never knew they wanted to try from other amazingly talented people. Some of the blocks will be original patterns from the queens, some will be existing tutorials from world class quilters. That will be up to the queens to choose.
The benefits for Participant Princesses and Princes:
They get to use their own fabric that they’ve been stashing
They improve and stretch their own skills
They work to their own timeline
There is no pressure
No one is disappointed if they’re late
They act as their own quality control
They meet a group of like-minded, inspiring individuals
They see the varying potential of each block
Participating with me
I love this idea since I really don’t *need* another project, but I do love the community that is built around quilt bees and sew alongs. I love that Molli encourages you to make only the blocks you love, and that there are two unique options each month. Once I came up with my 2017 grand plan (more on that below), this one definitely needed to be added to the pot! Get all the details HERE.

Garden Snail Quilt Snail Paced Slow-Along Sew-Along
by Angie of Gnome Angel
#snailday #gardensnailsquilt
This is another fun weekly sew along hosted by Angie, using Pen and Paper Pattern’s Garden Snail Quilt. I think these snails are super cute, so I am joining in the fun, but plan to make only a few snails to add to the mix of the rest of my blocks. The gist of this Sew Along is easy… you simply make one block each week and post it on social media of your choice on Snail Sundays. You can find all the details HERE.
So now… for my Grand Plan that makes all of this not only manageable, but also fun!
My Grand Plan
Ready? I plan to participate in all of these sew alongs and bees, but with NO pressure. I am not playing along for the prizes. I’m playing along for the community and the recurring “deadline” to make a block and share it. I plan to use the same fabric pull and color scheme for all three of these bees/sew alongs, and combine all of the blocks together at the end of the year into a (hopefully) queen sized quilt for our bed. This way, I can make the blocks I really love, whenever I have the time to make the block, and I won’t need to stress when either life obligations kick it up a notch, or I have another project that needs my attention. As they say in hashtag land, #winning!
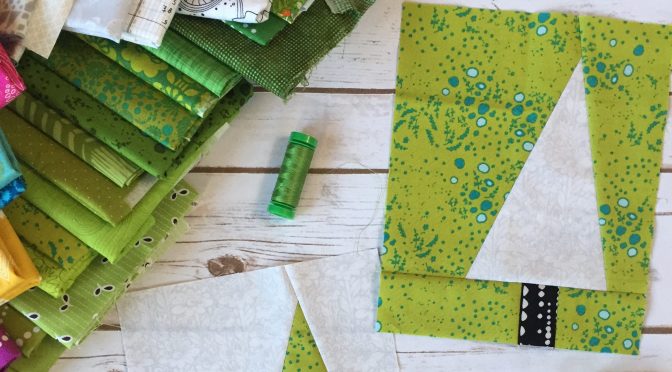
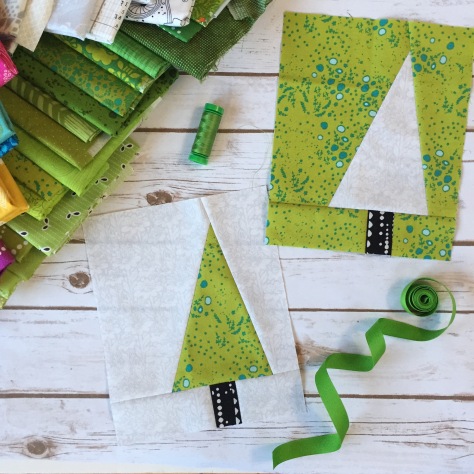 I’ll write more about this in another post, but I plan to use a color palette based upon the Pantone color of the year for 2017: Greenery. While green is not a color I’ve sewn with in large quantities before, it speaks to me on many different levels–from the freshness of the color, the vibrant hope that comes from new life in the spring, to the rich green that abounds in the environment around me–which as you know, I love dearly–, to the simple challenge of making a quilt with no final assembly pattern, and no guidelines except color. I’m both invigorated and scared at this plan, but as is my style, I’m jumping in with abandon, holding onto the hope that I can pull it all together into something epically beautiful (or at least tolerably pretty) at the end of the year.
For those of you who excel at fun and clever naming, I am trying to decide on a name for this greenery quilt project and am open to any suggestions or ideas! I want to select a name for this quilt so that I can tag all of my progress together across the bees/sew alongs, but “Kitty’s Greenery Quilt” sounds a bit flat. Maybe Night Quilter Hugs Trees and Bees? LOL #NQhugstreesandbeesquilt Uhm….
I’m looking forward to sharing my progress here, and thank you as always for following along with me on my creative journey, during waves of profuse creativity as well as lulls of relative quiet. I hope 2017 is off to a great start, and I’m looking forward to creating with a hopeful heart this year.
I’ll link up with Lorna’s Let’s Bee Social tomorrow, since I’m ready to jump back in!
 Once again, Cheryl from
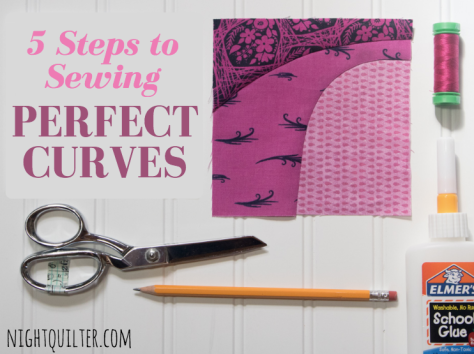
 I was also one of seven quilt designers to launch
 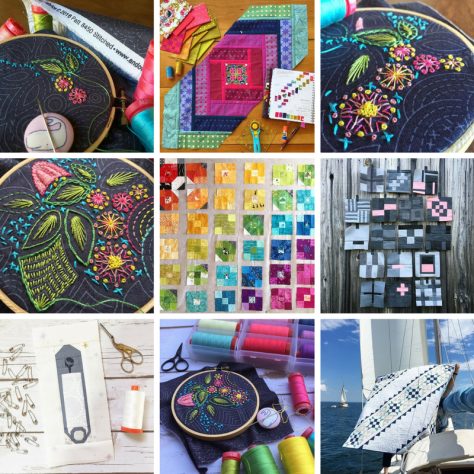 Since I love Instagram so, I would be remiss if I did not share my top viewed posts there as well. This collection is a fun one, including lots of posts about my stress-free stitch-wherever-the-wind-blows
 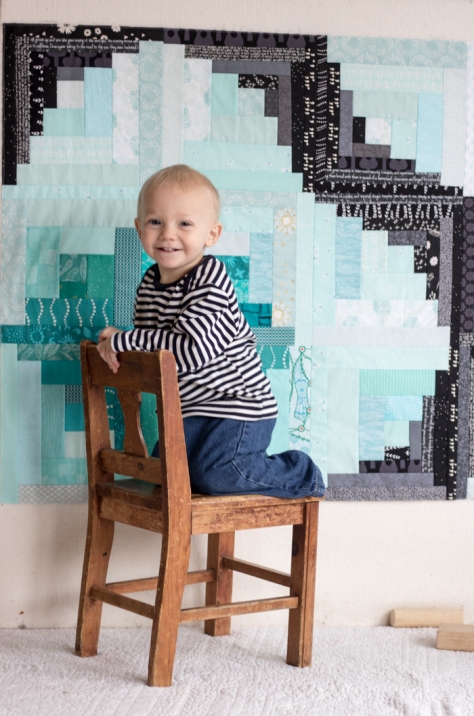 Technically this is my sixth category, but I can’t let my highlights pass without remembering the completion of the

 I’ve given a lot of thought to this pattern, since there is criticism that the safety pin is just a way for us to feel better about ourselves, or even that being such a widely known symbol, it could be used in nefarious ways. After much reflection and discussion with my husband, I decided that despite these criticisms, I think the safety pin symbol is a good thing. My intention was purely to try to spread some hope and goodness with a further reach than my little rural Maine town. Even if the act of wearing or sewing a safety pin doesn’t make any difference in and of itself, it is a conversation starter, keeping the conversation about the need to stand up for human rights and fight bigotry going, and will hopefully act as a personal reminder for those of us who are not in the minority to step up and use our privileged voices for good. We have a lot of work to do.
 The ever-talented Samarra (SammyK) is holding an amazing auction


 We are so excited to announce the kick-off of the very first Quilter’s Planner Instagram Sew-Along, taking place over on the
  This pattern is super versatile and perfect for using up scraps! Make as a holiday gift, a scrap buster, or just a fun project with your quilting friends. The Sew-Along will run now through the middle of December, giving a little extra time for the piecing and quilting steps to allow for family time around the holidays.
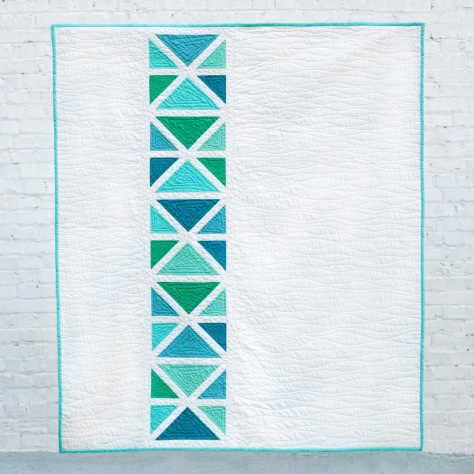
 I’m calling my block Steady On, which just seemed fitting for such a classic made-by-me block. Those of you who know me know that I cannot keep anything simple, and this is a perfect case in point. This block has double improv curves, twenty (20) tiny flying geese, an hourglass block, and quite a few points that should match *just* so, all in the 12 1/2″ unfinished square block. But fear not, this tutorial has detailed photos and instructions on how to make each component of the block, and breaking it down into manageable chunks makes this block come together quite smoothly (Spoiler: we can make some of the flying geese 4 at a time!). There’s something about the determined light colored geese headed bravely into the dark and improvy unknown that urges me to encourage them… Steady on, now! That same encouragement goes for you, since I would LOVE to see you tackle this block and come out victorious (tag
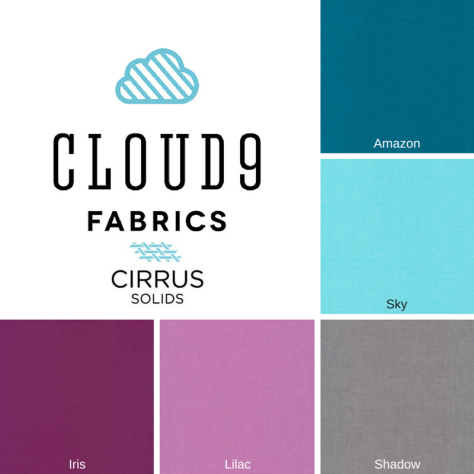

 For this step, you will need your 5 1/2″ squares of Iris, Amazon, and Sky, washable school glue and tip, a marking pen or pencil, scissors, and an iron and pressing surface. To make the double-curved quadrants for this block, follow my tutorial on easy curved piecing using a visual layering approach and glue basting
 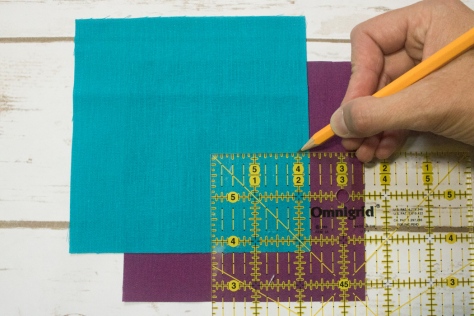 Since this method begins from the bottom up, start with Iris and Amazon. Mark the Amazon square 2 1/4″ up along both sides from the bottom right corner. Make sure your mark extends 1/4″ in from the edges before beginning the curve. This will be your sew line, not your cut line, so by measuring the 2 1/4″ we are ensuring our seams will match up, even though the flying geese are exact and the curves can be improv. (Note here that if you are using fabric with a right and wrong side, you want to be marking the wrong side of the fabric. With the Cloud9 Cirrus Solids that’s not important).
 Draw an improv curve from marked point to point, or trace a perfect curve using the edge of a small plate or glass. Make sure your curve begins and ends at your marked points 2 1/4″ up from the corner.
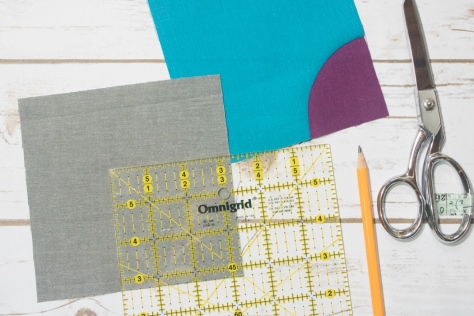 Next, grab your Shadow 5 1/2″ square and mark 3 1/4″ up both sides from the bottom right corner. Again, draw your curve as desired, connecting from marked point to marked point, and using that line as the sew line.
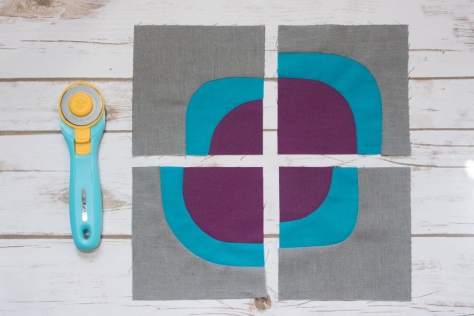 Make four quadrants, measuring 2 1/4″ up on the Amazon square and 3 1/4″ up on the Shadow square for two of them, and measuring 3 1/4″ up on the Amazon and 4 1/4″ up on the Shadow square for the other two. Admire your smooth curves, and set those blocks aside for later!
 Place two 1 7/8″ Iris squares in the top right and bottom left corners of a 3 1/4″ Sky square as shown. Using your fabric marking tool of choice, draw a diagonal line from the top right corner to the bottom left corner. I love my Hera marker since it doesn’t actually mark the fabric, but makes a clear guide line.
 Sew 1/4″ from either side of the drawn line. Press with a hot iron to set the seam (notice that I didn’t do this step? tsk tsk).
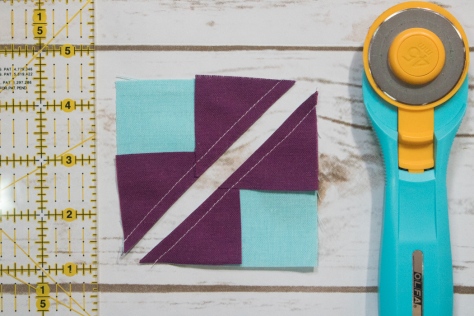 Cut along the drawn line.
 Press the small Iris triangles outward, with seams pressed toward the dark fabric. Then place another 1 7/8″ Iris square in the corner of each unit, and mark a diagonal line as shown above.
 Again, carefully sew 1/4″ from either side of the drawn line. Cut along drawn line.
 Press open, with seams toward darker fabric.
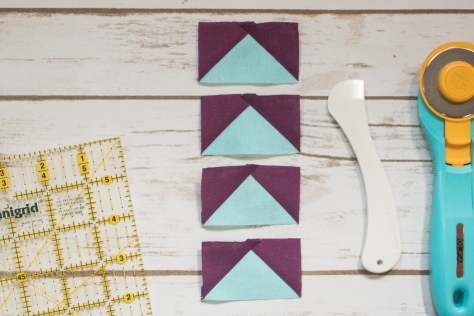 Trim to 1 1/2″ x 2 1/2″ and set aside.
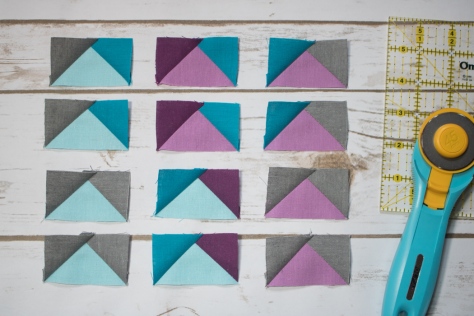 Grab your 1 1/2″ squares and 1 1/2″ x 2 1/2″ rectangles and lay them out to help plan which corners should be positioned on each rectangle. Use the finished flying geese above to help plan before you start sewing.
 To make a flying geese block (or would it be flying goose?), position a 1 1/2″ square right sides facing the right top corner of a 1 1/2″ x 2 1/2″ rectangle. Draw a diagonal line as shown above.
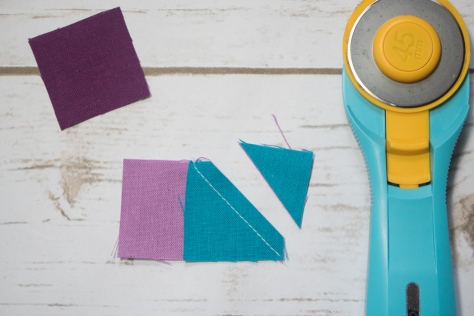 Sew along the line and then trim a 1/4″ seam allowance.
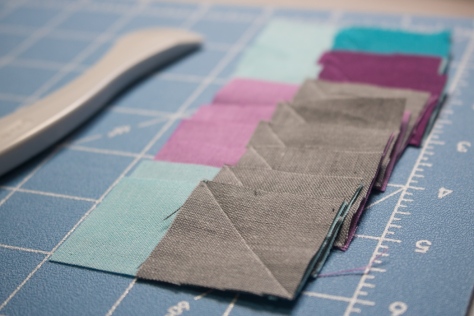 I like to get mine all paired and drawn so that I can chain piece each side.
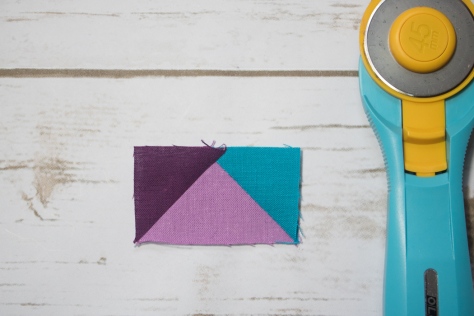 Repeat with the other 1 1/2″ square on the top left side of the block. Press seams open or up toward the corner.
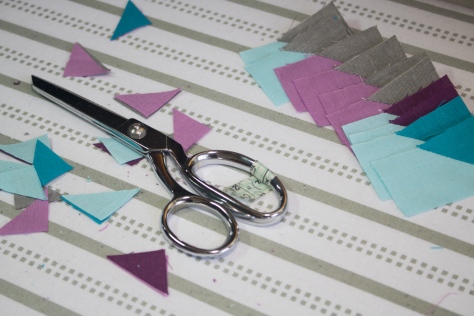 Time saving tip: I cut my 1/4″ seam allowances with scissors while pressing. As long as you are accurate with a pair of scissors, it takes much less time than rotary cutting, at least for me.
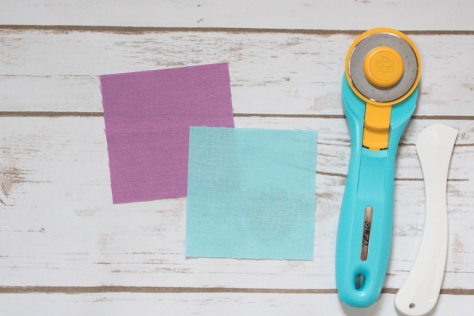 Finally, let’s make that center hourglass block. Grab your 3 1/4″ Lilac and Sky squares.
 Place right sides together and mark a diagonal line. I like to pin my pieces together since we are working with such a small scale. If you’d prefer some wiggle room, you can begin with 3 1/2″ squares and trim to size when you’re finished!
 Sew 1/4″ from either side of the drawn line. Cut along the drawn line.
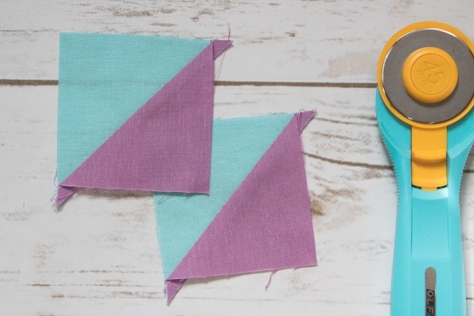 Press toward darker fabric. You will have two half square triangles (HST).
 Place HSTs right sides together, with the Lilac half of one facing the Sky half of the other, and nesting the seams.
 Draw a diagonal line perpendicular to the existing seam line, again pinning to keep the pieces in place while you sew.
 Sew 1/4″ on either side of the drawn line. Then, cut along drawn line.
 Press seams open. You will have two hourglass blocks, but will only need one for this block. Save the other one for your next Steady On block!
 Trim to 2 1/2″ square. Set aside.
 Now that you’ve made all of the components, it’s time to sew the block together! Arrange all of your pieces as shown above, paying careful attention the positioning of the flying geese in relation to the large and small curves on your curved quadrants. There should be two Iris flying geese corners next to small curves and three Iris flying geese corners next to large curves.
 Sew the top five and bottom five groupings of geese together, and sew the center horizontal strip of geese and center hourglass block together.
 Perfect points tip: When sewing the flying geese together, keep the piece with the goose point on top. As you’re sewing, make sure your sewing machine needle sews exactly through the “x” that marks the point of the goose, or if anything, slightly to the right (above) the point. This way you won’t lose any points!
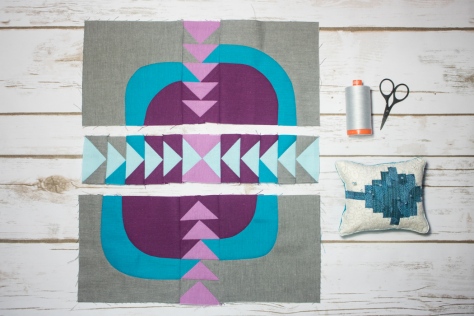
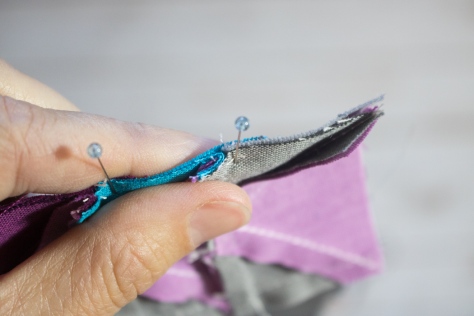 Next, sew the top left and top right curved quadrants to the top grouping of geese, pinning just after each seam that needs to match.
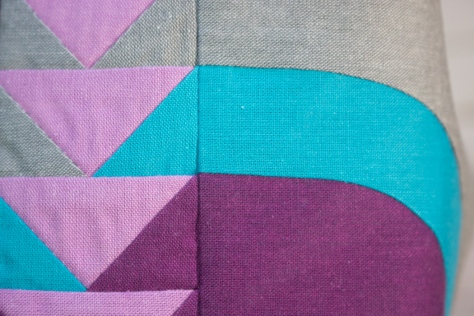 When aligned properly, the geese corners should flow into the curved piece perfectly–that’s why we so carefully marked our curve starting distances with our improv curves!
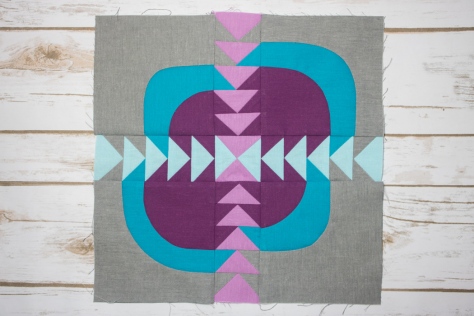 Finally, sew the top and bottom panels to the center horizontal strip, again pinning just after each important seam match. Press toward the less bulky sides (the curved quadrants), and viola! Steady on…
 So fun! Still, I resisted. Then I noticed that
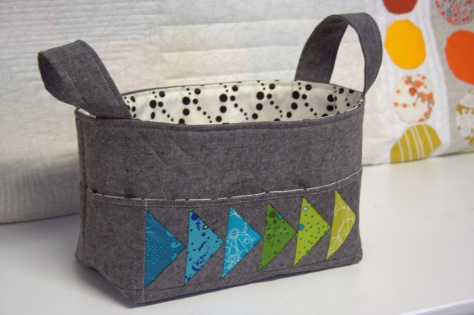
  I pulled some old worn out clothes from our toss/donation piles (a workshirt of my husband’s with elbows worn nearly through, a pair of maternity corduroys that were a hand-me-down given to me by a friend who had received them as a hand-me-down from another friend and worn bare in too many spots to mend, and a thrifted leather skirt I had bought for a project that fizzled before it really began), and hit up a local thrift shop to fill in the gaps a bit. I decided to focus on a monochromatic grey color palette, but asked my kids to choose a pop of color from the sale racks. A large pair of coral women’s capri pants fit the bill, and I’m excited at the resulting palette.

 Even if you don’t have Instagram, you can follow along with my posts and environmental tidbits by clicking

 I’m excited to be a part of the
  After petting this gorgeous bundle of organic fabric and sketching out a few block ideas, I think I’ve decided on a winner, and I can’t wait to share it with you. I will be posting my tutorial with the Wednesday crowd on September 14th, so mark your calendars!
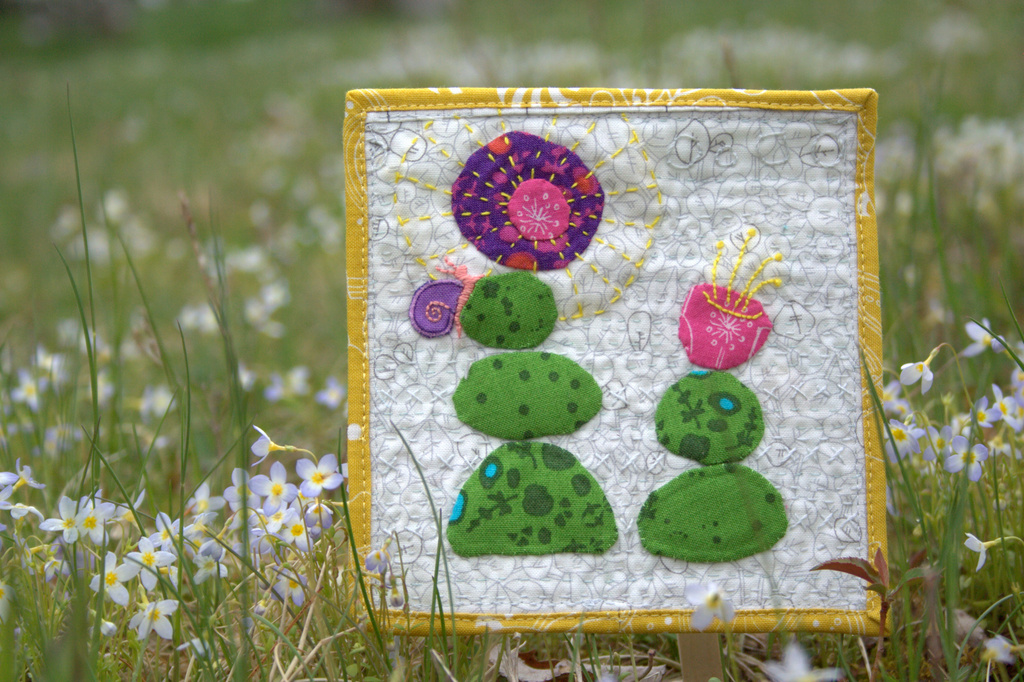
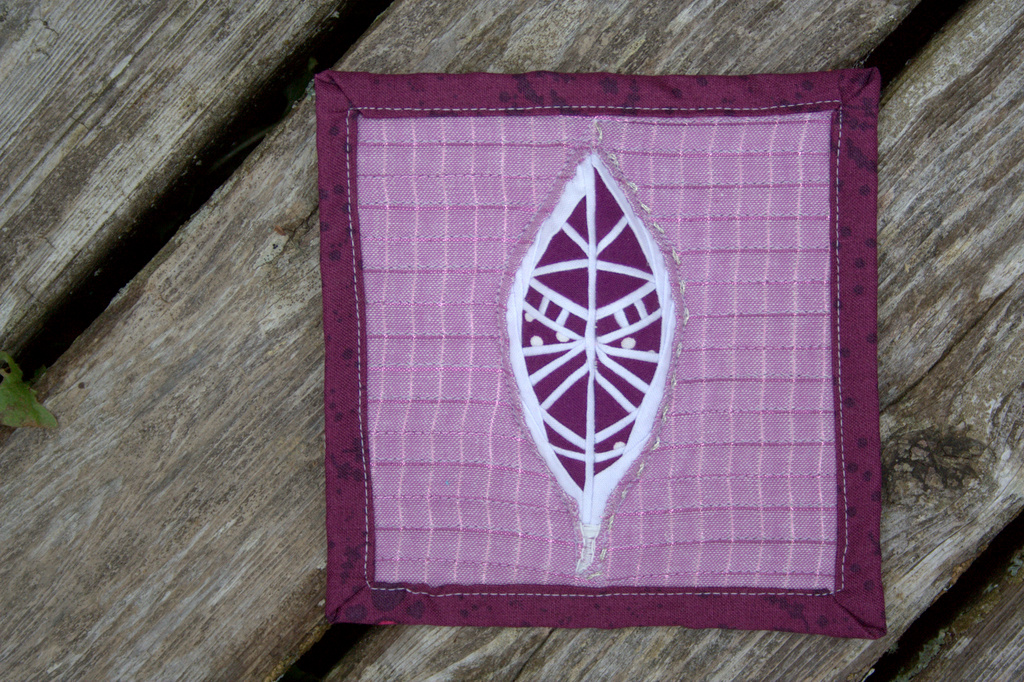
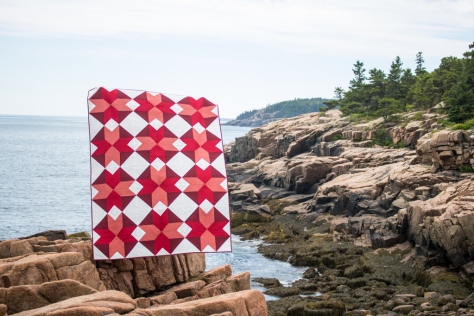
 I recently finished and gifted this mini quilt to a fellow quilting friend as part of a small private swap, and now that it has been received, I can tell you all about it! I entitled it, “Let Your Heart Shine True”, and it’s meant to be a visual representation of the fact that the goodness in your heart shines through, despite any missteps, mistakes, wrong words, or other things we personally may feel will tarnish or cloud our good intentions. It was made for Yvonne of
  This is my first attempt at a “statement quilt”, per se. My thought was that the quilt would show the large pieces on top as representing “people”, and the rippled reflection below being the public perception of the person. When mistakes are made, things are said in a not so clear way, or even just general awkward social interactions happen, those are the ripples that cause the reflection to be jarred and shaken. Yet despite the ripples and the jolted reflection, the heart remains intact and unbroken. If you lead with the heart, your good intentions ultimately must become known, no matter how many times you need to back pedal or rephrase things to clarify your meaning. I thought creating a statement quilt for Yvonne was fitting, since she has created a number of quilts as part of her
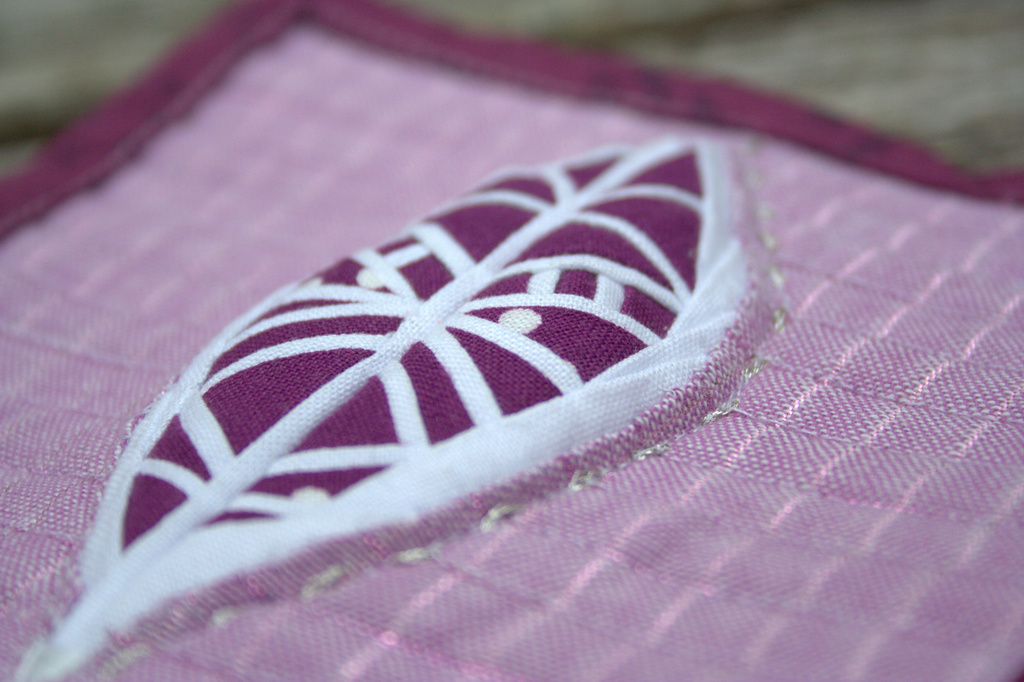
  The construction of this mini quilt was a fun multi-step process. I began by needle-turn appliquéing the rounded pieces onto panels of background fabric. I cut the bottom pieces with an identical free-style rounded top, but with much longer length since I planned to cut and resew it many times. Once they were appliquéd onto the background fabric, I cut random, varied width strips from the bottom ones, off-set it enough to wobble but not extend beyond the width of the finished panel, and resewed it. Each one was cut and re-sewn six or seven times to create the rippled effect. Let me tell you–that first cut into the needle-turned mound was a bit nerve-wracking! It was another one of those times I just had to trust that the vision in my head would translate well to reality.
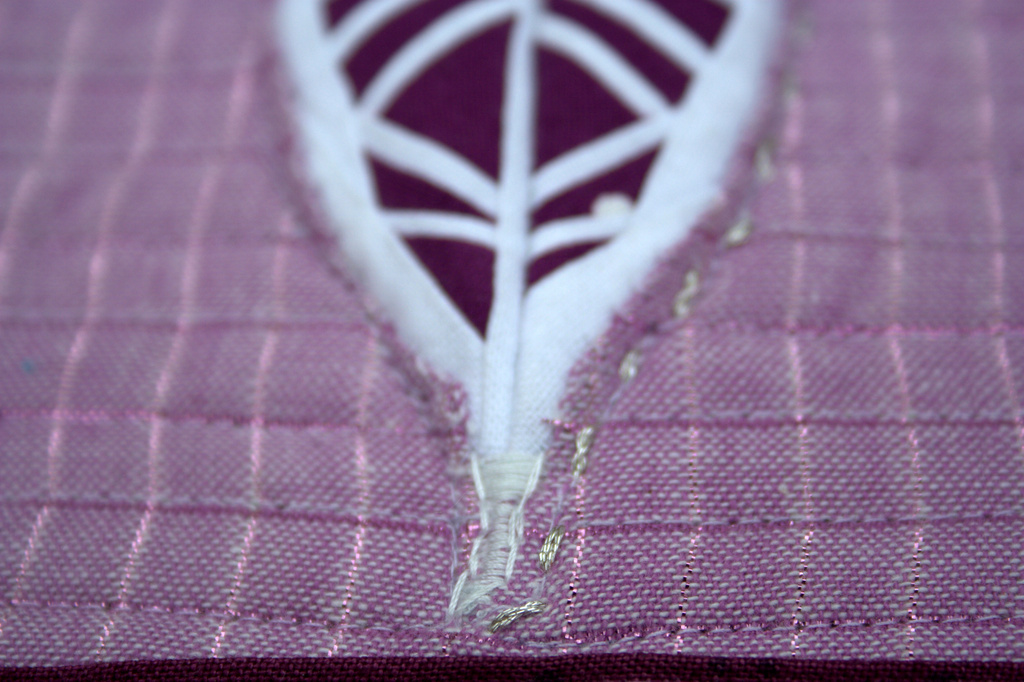
 After rippling all three reflections, I squared each panel and sewed them together creating a horizon with a very narrow, approximately 1/8″ strip of solid orange fabric (Kona Persimmon, I think!). Yvonne’s favorite colors are blue and orange, which clearly influenced my fabric selection. I used some of our mutual favorite oranges from Carolyn Friedlander, and added some sketch by Timeless Treasures and an unknown solid from my early quilting days stash. I bound it in blue Mercury by Alison Glass, including a bit of framing while adding a bit from another mutually adored fabric designer.
 After that, the quilt begged for some more quilting, so I added random rows in yellow, gold, and orange for interest (40 wt 1135-Pale Yellow, 50 wt 5022-Mustard, and 50 wt 1154-Dusty Orange respectively). Both the top and bottom ended up pretty thoroughly matchstick quilted, but I really like the addition of the yellow, gold, and orange thread in the bottom, as well as the added interest of using a slightly heavier weight thread as the yellow. It reminds me of light reflecting off the ripples in a pond, which is perfect given the intention of the quilt.


 I’m also joining in with a talented group of pattern designers to bring you a great Christmas in July pattern bundle in a couple of weeks. Mark your calendars for July 11th, since the sale will kick off at 3pm EST and will run for only 72 hours! I can assure you won’t want to miss this bundle, since it includes a great variety of both holiday themed and general purpose patterns of all sorts. I’ll be including my two best selling foundation paper pieced patterns, Lupine & Love Struck in the bundle. There will be prizes to be won, AND every person who buys the bundle from me will be entered into the running for a Quilter’s Planner 2017 Starter Kit, which includes a 2017 planner as well as pens, clips, & highlighters to help you stay organized.