

 I recently faced the demon that was my chaotic sewing space and have been organizing with the help of my dear friend Alessandra. Yesterday when I shared the above photo of my newly cleared cutting table on Instagram, there were many questions about my rainbow of skinny bins hanging along the side of it. My skinny bins were made using a tutorial I wrote for Quilt Theory years ago, for a fabulous fabric party hosted by Mathew at Mister Domestic, and I use them to sort my tiny scraps by color. You know, those scraps that are too small to fold up again, but the perfect size for some tiny piecing? As I’m cutting, I just toss them into the color-coordinating skinny bin and viola! I thought it was a great time to share the tutorial here on my blog, so today’s your day!
The following is a blast from the past–May 2017 to be exact!–and the tutorial on how to make your very own fabric skinny bins. Enjoy, and please do tag me @nightquilter and #fabricskinnybin on social media if you make one (or ten!)!
I hang my Skinny Bins from an Ikea Dignitet Curtain Wire with Riktig Clips. (affiliate link)
Fabric Skinny Bin Tutorial
When you’re designing quilt patterns or even simply selecting fabrics for a quilt, having color cards from different fabric and thread manufacturers is extremely helpful. There’s nothing like having each exact thread and fabric possibility right at your fingertips while you’re fine-tuning your colorway. Most companies offer their color cards for sale, so anyone can benefit from having a rainbow of actual fabric and thread samples at their fingertips.
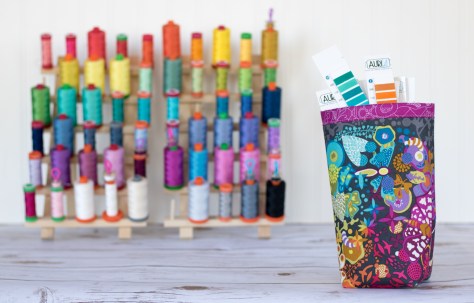
 A few weeks ago, many fabric and thread companies were kind enough to send color cards to the Quilt Theory team to help with our planning. While brainstorming different ways to store and use these color cards, I realized that a skinny fabric bin I had designed to help sort my tiny scraps would also be perfect storage for the Aurifil thread color card strips once they were cut apart. While cutting up color cards seems terrifying at first, we’ve found the amount it helps ease comparisons between different color options and selection of a perfect fabric-thread match outweighs the initial anxiety about cutting into the card. You can see many other storage options in our guest post over at Auribuzz here.
Today I’m excited to share a tutorial on how to make your very own Skinny Bin, perfect for storing your Aurifil thread color card strips. The Skinny Bins are very versatile, so you can make one even if you don’t yet have Aurifil thread color card strips; they are perfect for sorting tiny scraps or catching threads, and just happen to make a lovely wine bottle cozy, too!
Let’s get started!
Gather your materials:

- 15” x 11” fabric for outer panel
- 15” x 11” fusible fleece
- 15” x 12” fabric for lining
- Thread – we suggest 50wt Aurifil thread
- Quilting ruler
- Rotary cutter
- Scissors
- Marking pencil or tool
- Iron and pressing surface
- Sewing machine
Making the Exterior
Step 1
First, fuse the fusible fleece to the wrong side of your outer panel fabric piece, following the manufacturer’s directions.
Step 2
 Sew the short ends right sides together using a ⅜” seam allowance. You will have a tube with both ends open. Press seam open.
Step 3
 Centering your pressed seam (3 ½” of fabric should be on either side of the seam), press the tube flat, creating clear side creases.
Step 4
Sew along the bottom with a ⅜” seam allowance. Do not turn right-side out yet.
Step 5
 Measure and mark 1 ⅞” (1 ½” from the bottom seam stitch line) up and 1 ½” in from the side on each bottom corner, as illustrated above.
Step 6
 Carefully cut out the marked squares and discard.
Step 7

 Opening the bin, fold the recently cut opening so that the bottom seam and side pressed seam match, right sides facing.
 Carefully pin or hold in place, and sew along the opening with a ¼” seam. Be sure to backstitch at the beginning and end. Repeat for the other bottom corner.
 Your bin exterior should look like the photo above.
Step 8
 Turn bin right side out, press out the bottom corners, admire, and set aside the exterior of your bin.
Making the Lining
 Repeat Steps 2 through 7 with the lining fabric to create the lining of the bin.
Finishing
 With right sides out, carefully slide the lining fabric into the exterior of the bin, aligning the back seams and pressing the bottom corners into each other so that it fits snuggly. The exterior and lining should be wrong sides facing each other and the lining should extend about 1” above the top of the exterior.
 Fold the lining down toward the outside of the bin so that the raw edge of the lining meets the raw edge of the exterior (approx ½”).
 Fold again, so that the lining folds down over the exterior, with all raw edges contained inside the folds. Press carefully around the top edge of the bin so that your fold stays in place. You can pin or clip, or live on the wild side and simple feed carefully by hand as you stitch it down.
Carefully topstitch approximately ⅛” from the bottom fold of the lining around the top of the bin. Backstitch to secure threads, or knot and bury your threads. Here you can use a contrasting 12wt or 28wt thread for extra interest if you want!
 I used my Aurifil 50wt 2600-Dove and a 3.0 stitch length so that it provided a bit of interest matching the pattern on the Alison Glass Sun Print Grow in Pansy I used for the lining.
Ta da! Your first Skinny Bin is compete! Arrange your Aurifil thread card strips delightfully, channeling your inner florist vibes, or fill with scraps or a bottle of your favorite bevvy.
 Feel free to personalize the outer panel, too! Add-on exterior patterns may be available one day if the desire is high. Please use #fabricskinnybin and tag @nightquilter so that I can admire your Skinny Bins, too!
 If you don’t yet have an Aurifil thread color card, ask your local quilt shop or order from Hawthorne Threads. Then check out our guest post on Auribuzz to see all of the fun ways you can organize and store it!


 Today I’m excited to reveal the block I designed for the
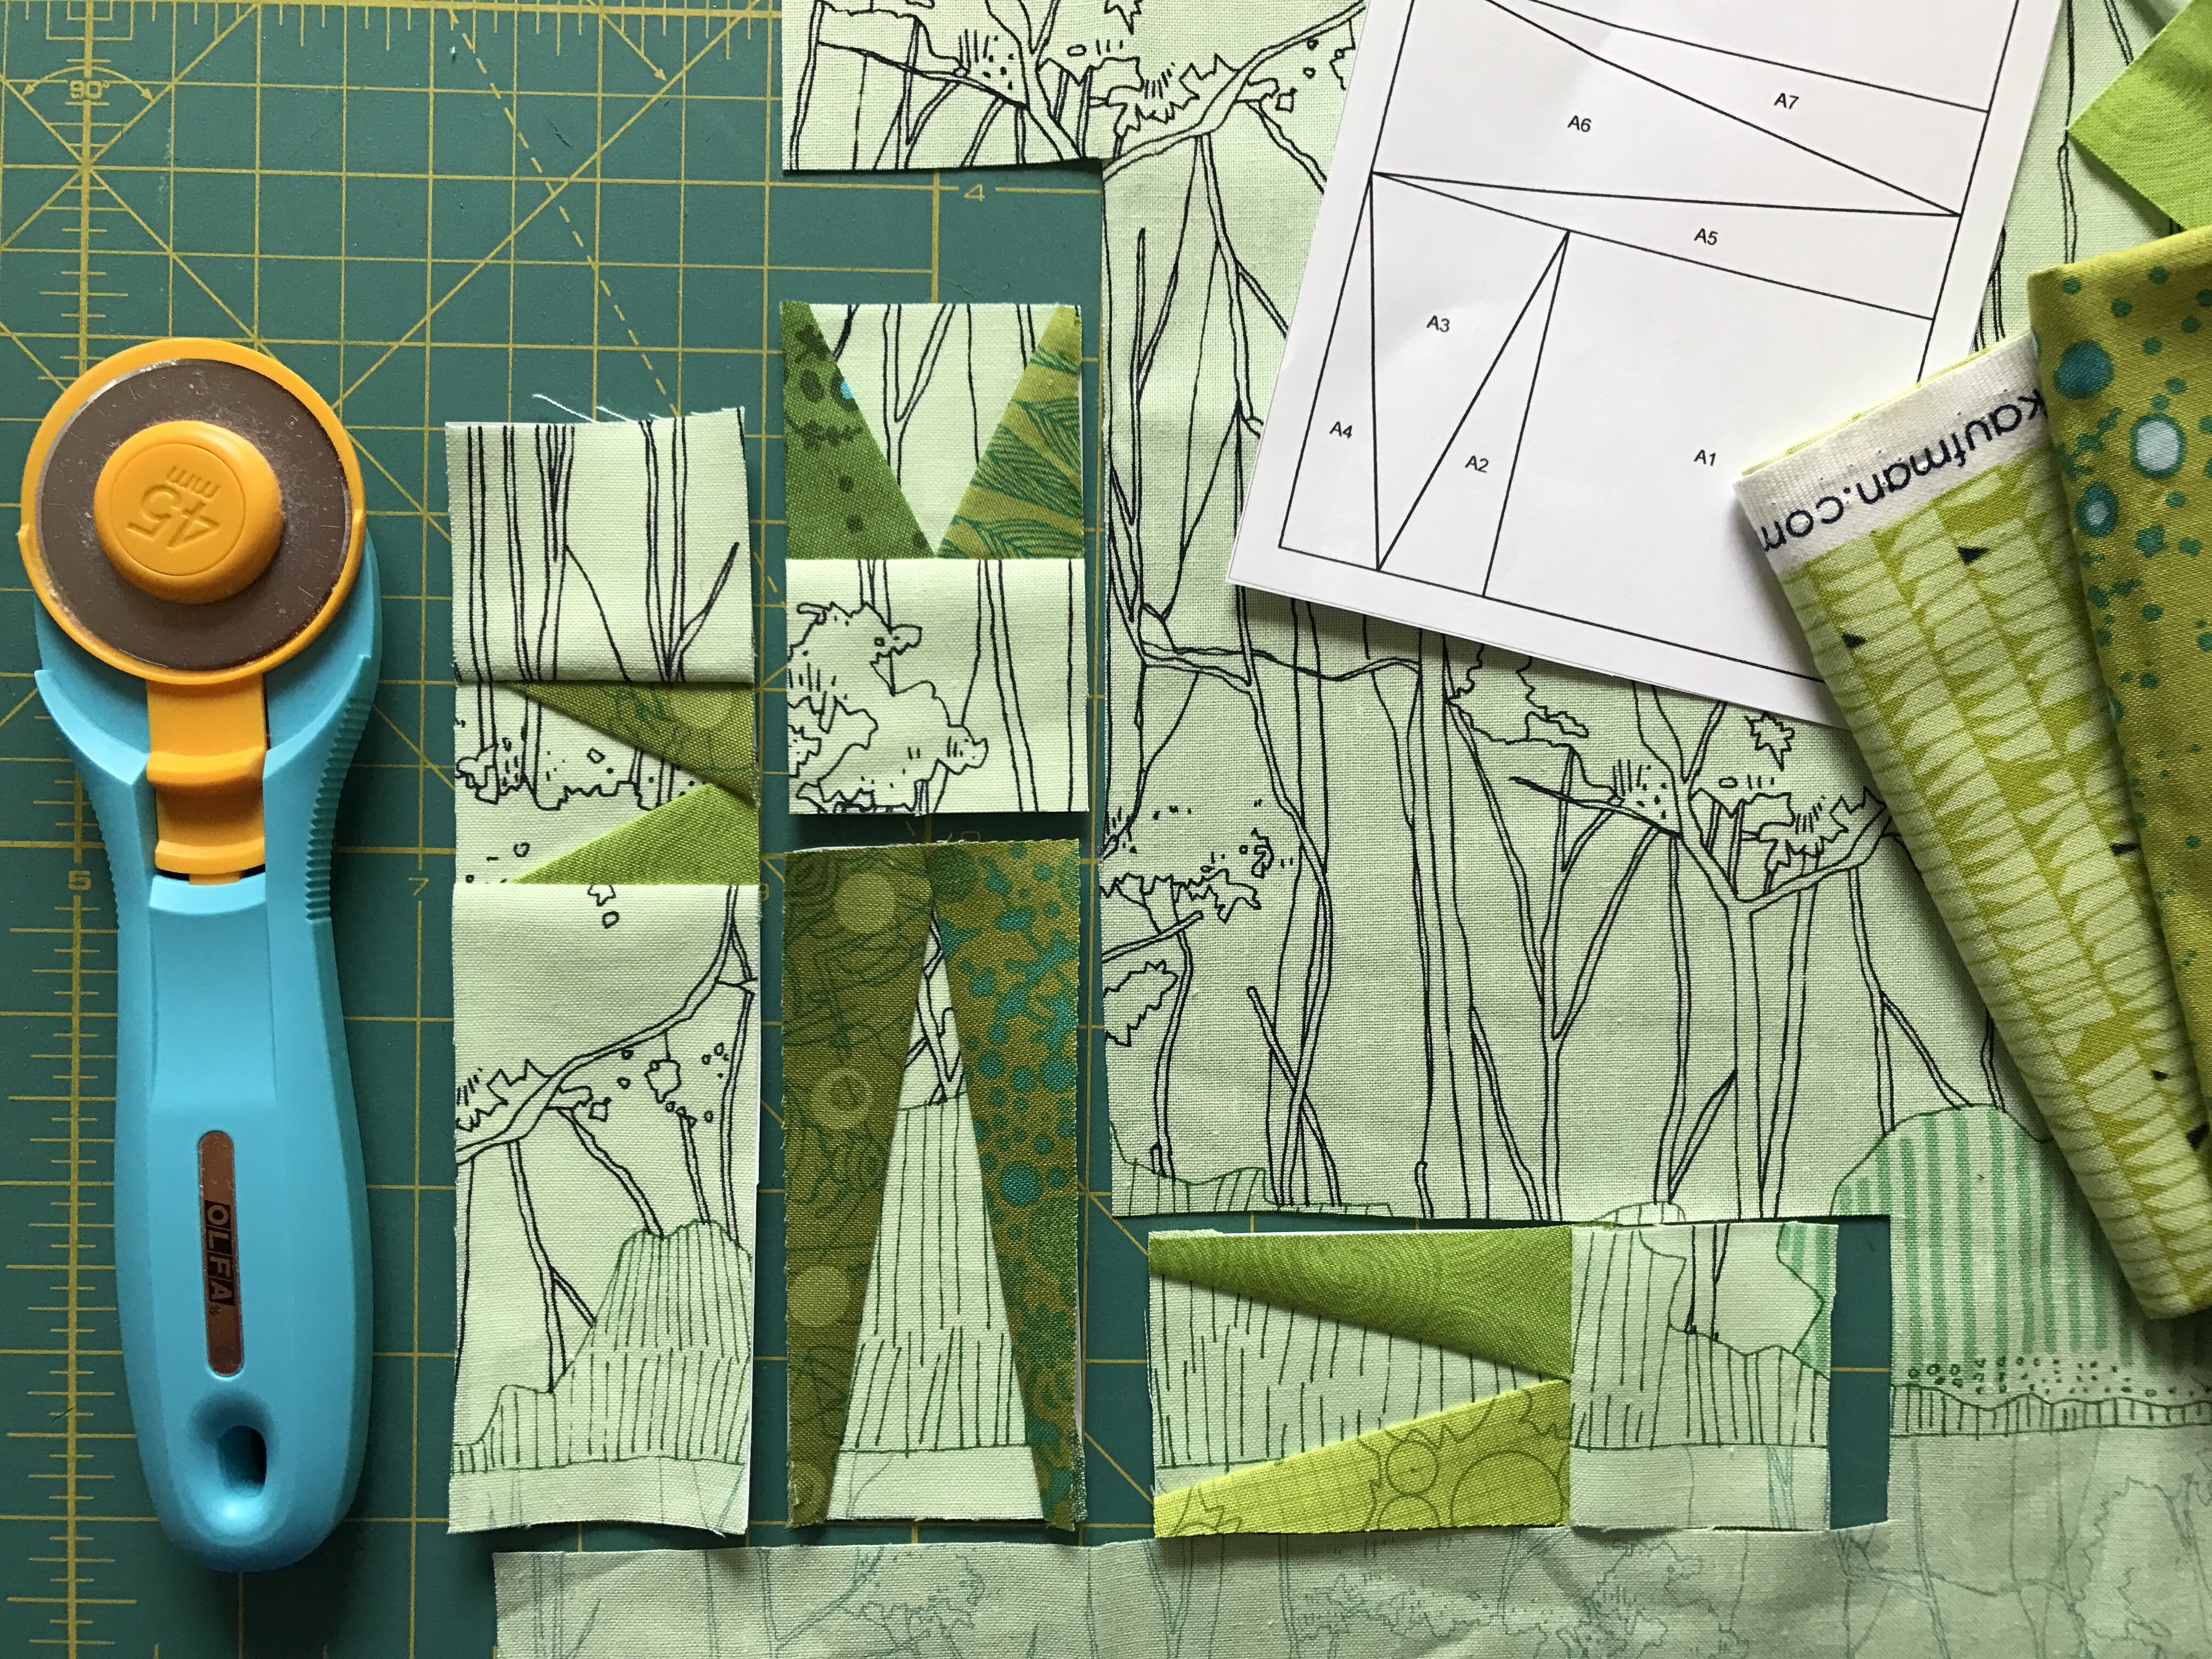
 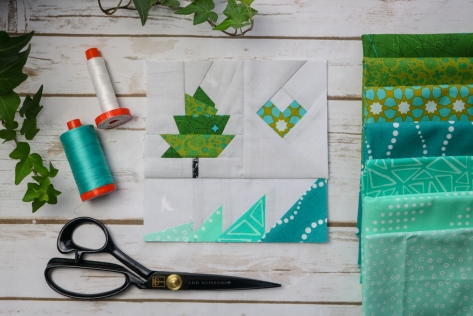 Today I am going to share 3 tips for using fussy cutting in foundation paper pieced blocks, using my Adventure Abounds block from the Splendid Sampler 2 book. If you’re new to foundation paper piecing (FPP), read my
  There are a few things you should remember before beginning FPP: First, the templates are a mirror image of the finished block, so when planning your fabric placement, visualize the right side of your fabric on the back of the template. Second, I highly recommend color coding your paper templates before starting so that you know exactly where each fabric should be. Third, don’t forget to use paper scissors to cut out and trim the templates! Your fabric scissors don’t want to go there!
 Once your fabrics are selected, your templates are cut out along the 1/4″ seam allowance line and color coded, you’re ready to dive in. Here are three tips for using fussy cutting in FPP:
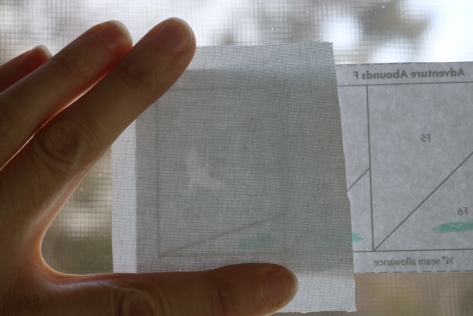 As an example of this for my Adventure Abounds block, I decided to position a subtle bird in the sky above the ocean, and held it up to a window to make sure it was positioned exactly how I wanted it. With a white on white background for my blocks, this example is subtle, but sometimes those subtle details are my favorite!
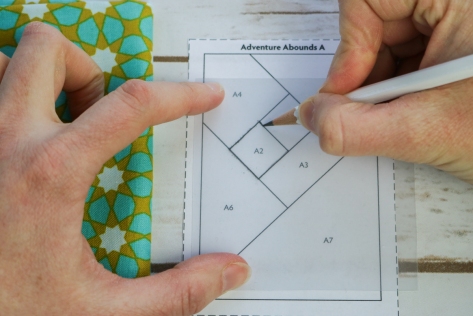 To create a template, first trace the shape from the paper foundation template onto the plastic. Be sure to label your piece, AND make note of directionality since the paper template is a mirror image.
 Once I trace the shape, I flip over the template plastic and write my notes on the opposite side, so that when I cut the fabric for that piece, I know that my notes should be legible on the right side of the fabric.
 Next, using a quilting ruler with 1/4″ measure, draw seam lines 1/4″ outside all the edges of your drawn lines.
 Cut out the template along that seam allowance line.
 For my block, I decided to fussy cut the heart so that the fabrics for the two pieces of the heart look continuous despite consisting of two fabric pieces. I decided to make a third reference template of the full heart and traced the pattern from the fabric onto the template, which I used as a reference when cutting out each individual part.
 Once you have your template positioned over the exact motif you want, carefully trace around the template with a fabric marking tool and cut out the fabric, or very carefully use a rotary cutter to cut around the template. Note that with planning templates made with template plastic or repurposed food lids, using your rotary cutter contains a good level of danger–so either purposefully live on the wild side, or use the trace and cut-with-scissors method!
 Your perfectly planned fabric piece is ready to carefully stitch onto your growing foundation paper pieced section.
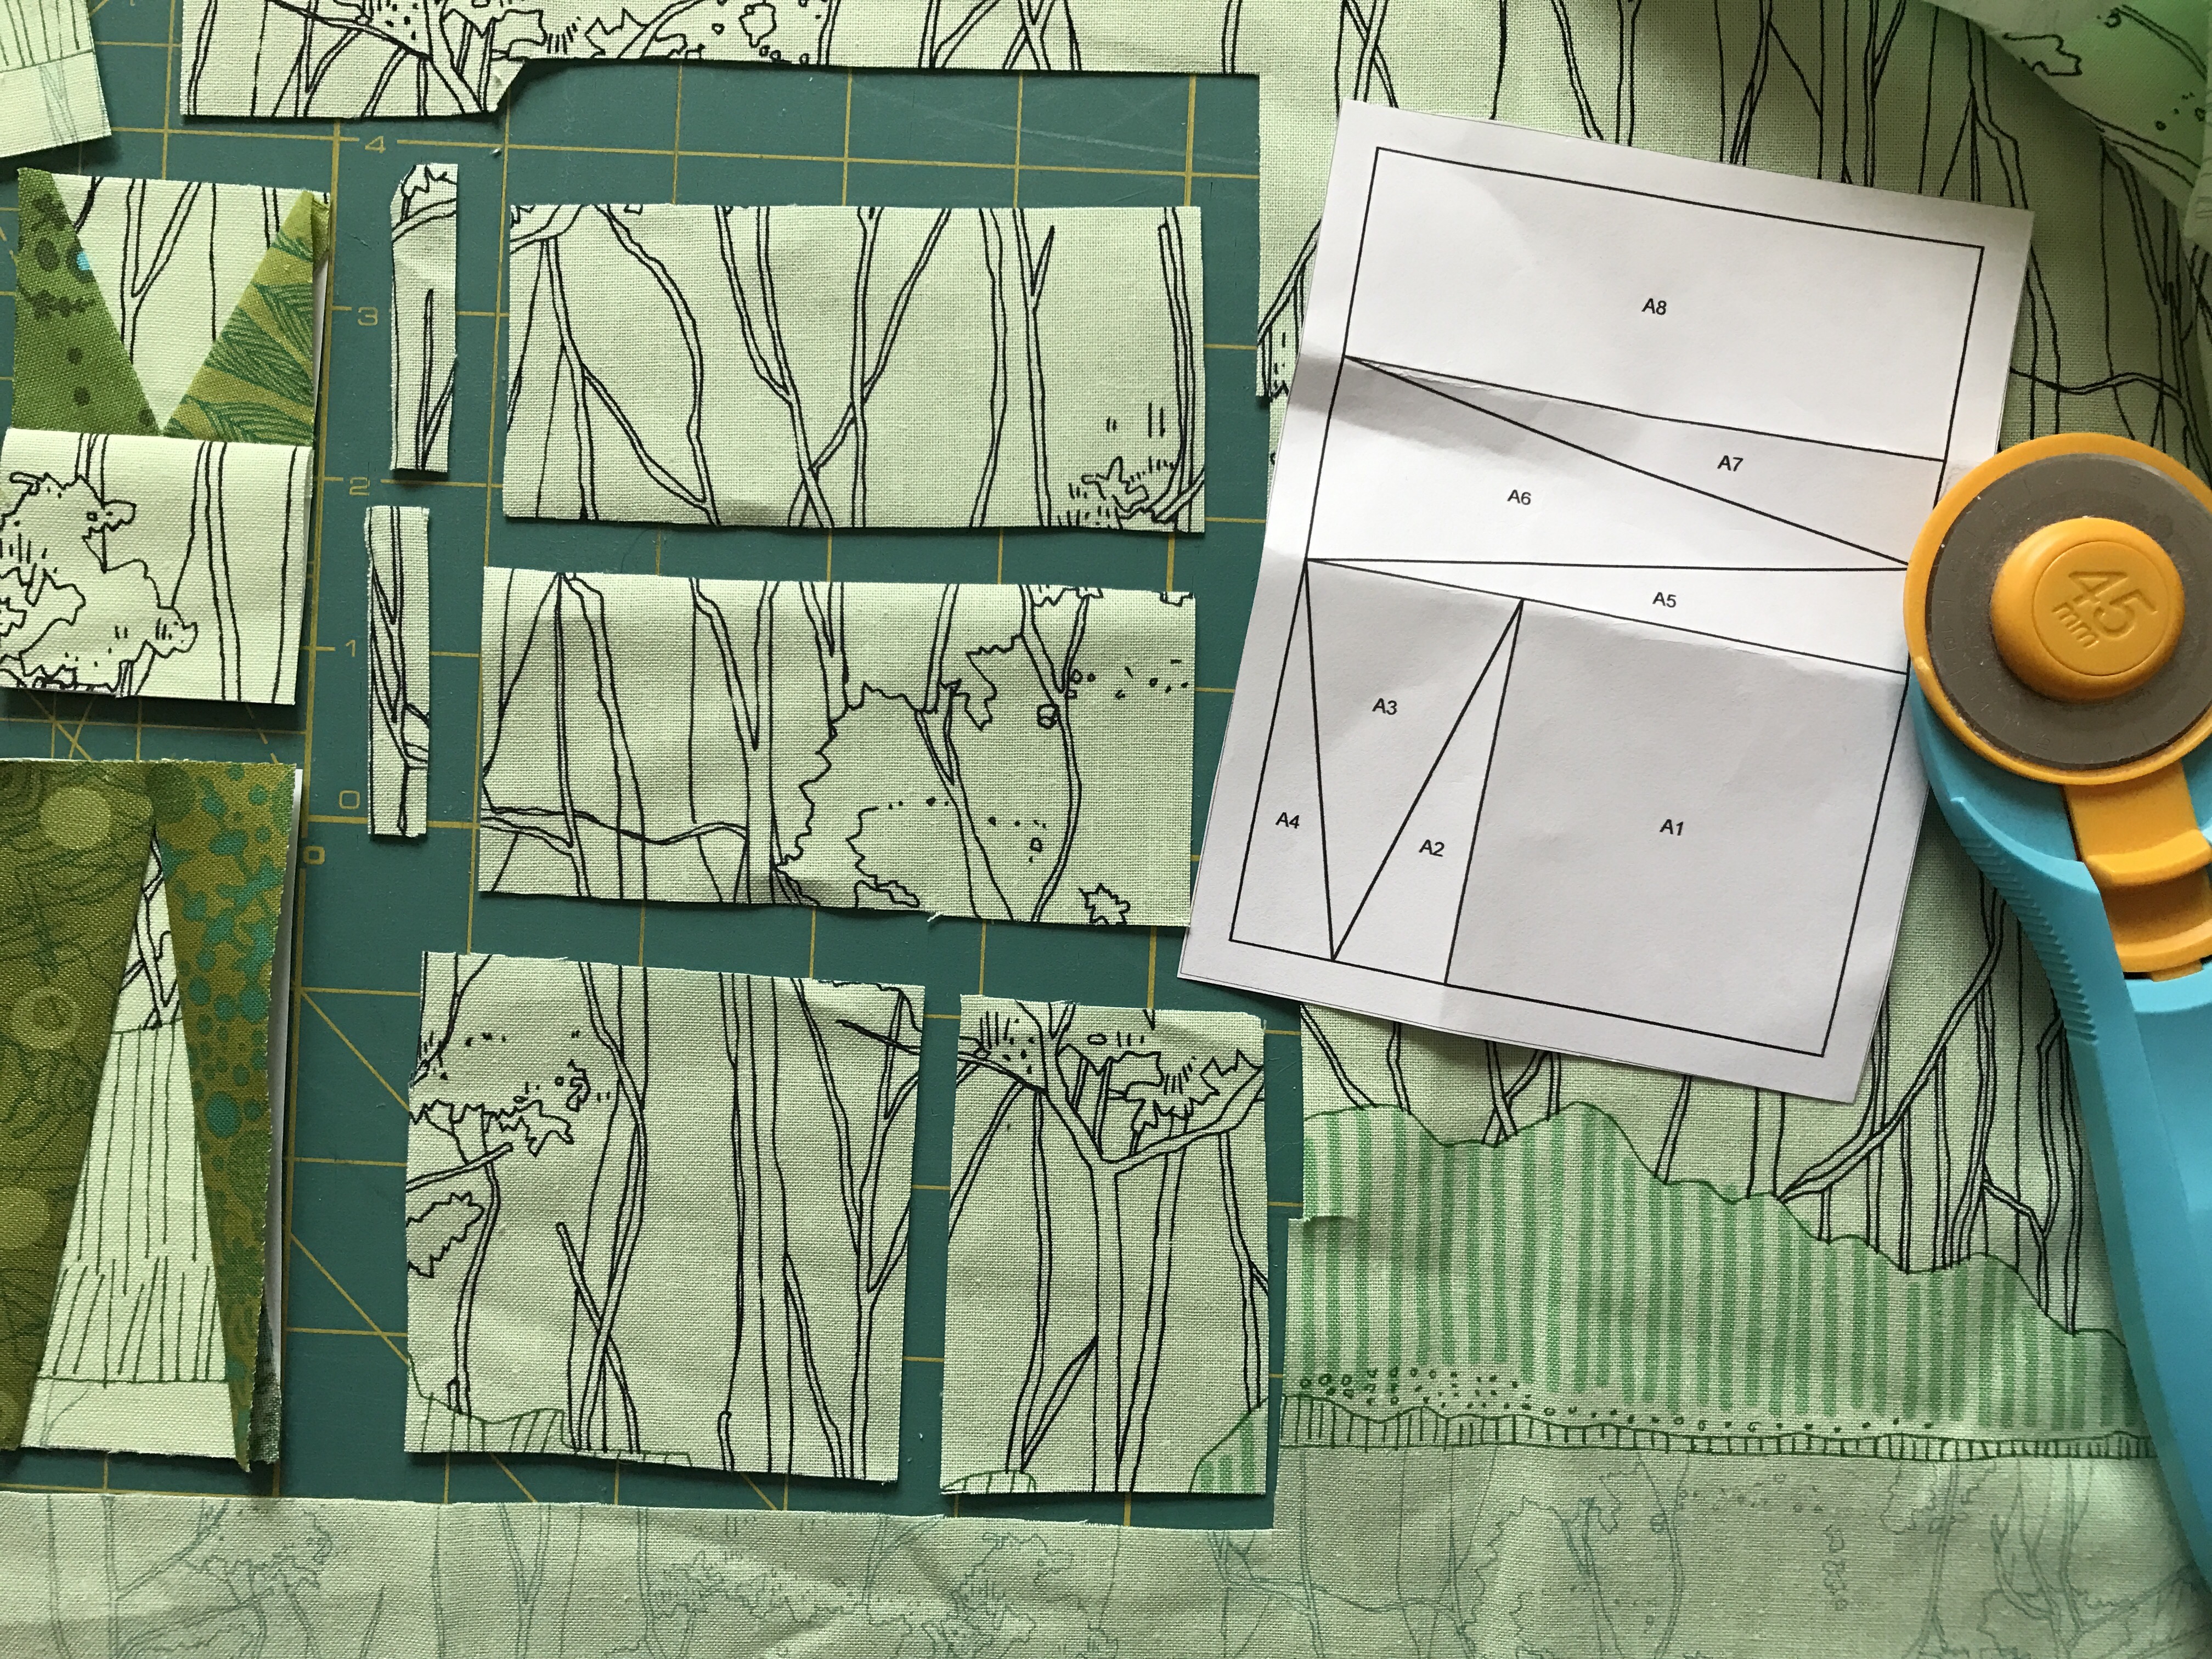
 Folding along the seam on which you are about to stitch and trimming the overhanging fabric to 1/4″ will help you line up the next piece accurately.
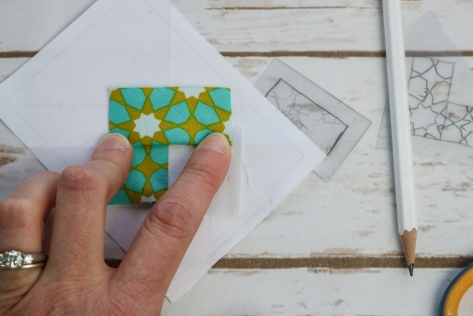 You can also fold over the piece you are about to stitch along the seam line to see how it looks before actually stitching.
 Once your fussy cut pieces are cut and stitched as desired, continue piecing your non-fussy cut pieces as you would any other FPP block.
 In the Adventure Abounds block I made for the original Splendid Sampler 2 quilt, I used this tip when piecing the text on the tree, specifically the word “love”, since the word “listen” was the first piece placed, and was therefore easy to simply glue in place and piece around. Knowing that I wanted the top of the word love to be juuust below that darker top piece, when I cut the square of fabric I carefully cut just a tad bit more than 1/4″ from that top edge of the word love. I left the rest of the rectangle of fabric a bit larger and less specific, since as long as that edge lined up properly, the rest didn’t matter.
 Whenever employing any type of meticulous cutting in your FPP, it’s always a good idea to trim your 1/4″ seam allowance before positioning and stitching your fussy cut shape. To do this, simply fold back the foundation paper along the line you are about to sew on, and using a quilting ruler with 1/4″ measure, trim the fabric 1/4″ away from the fold. (Obviously use a cutting mat underneath! This photo shows without the mat for aesthetic consistency). Once your fabric is trimmed, you have a clean line with which to line up your next meticulously placed piece.
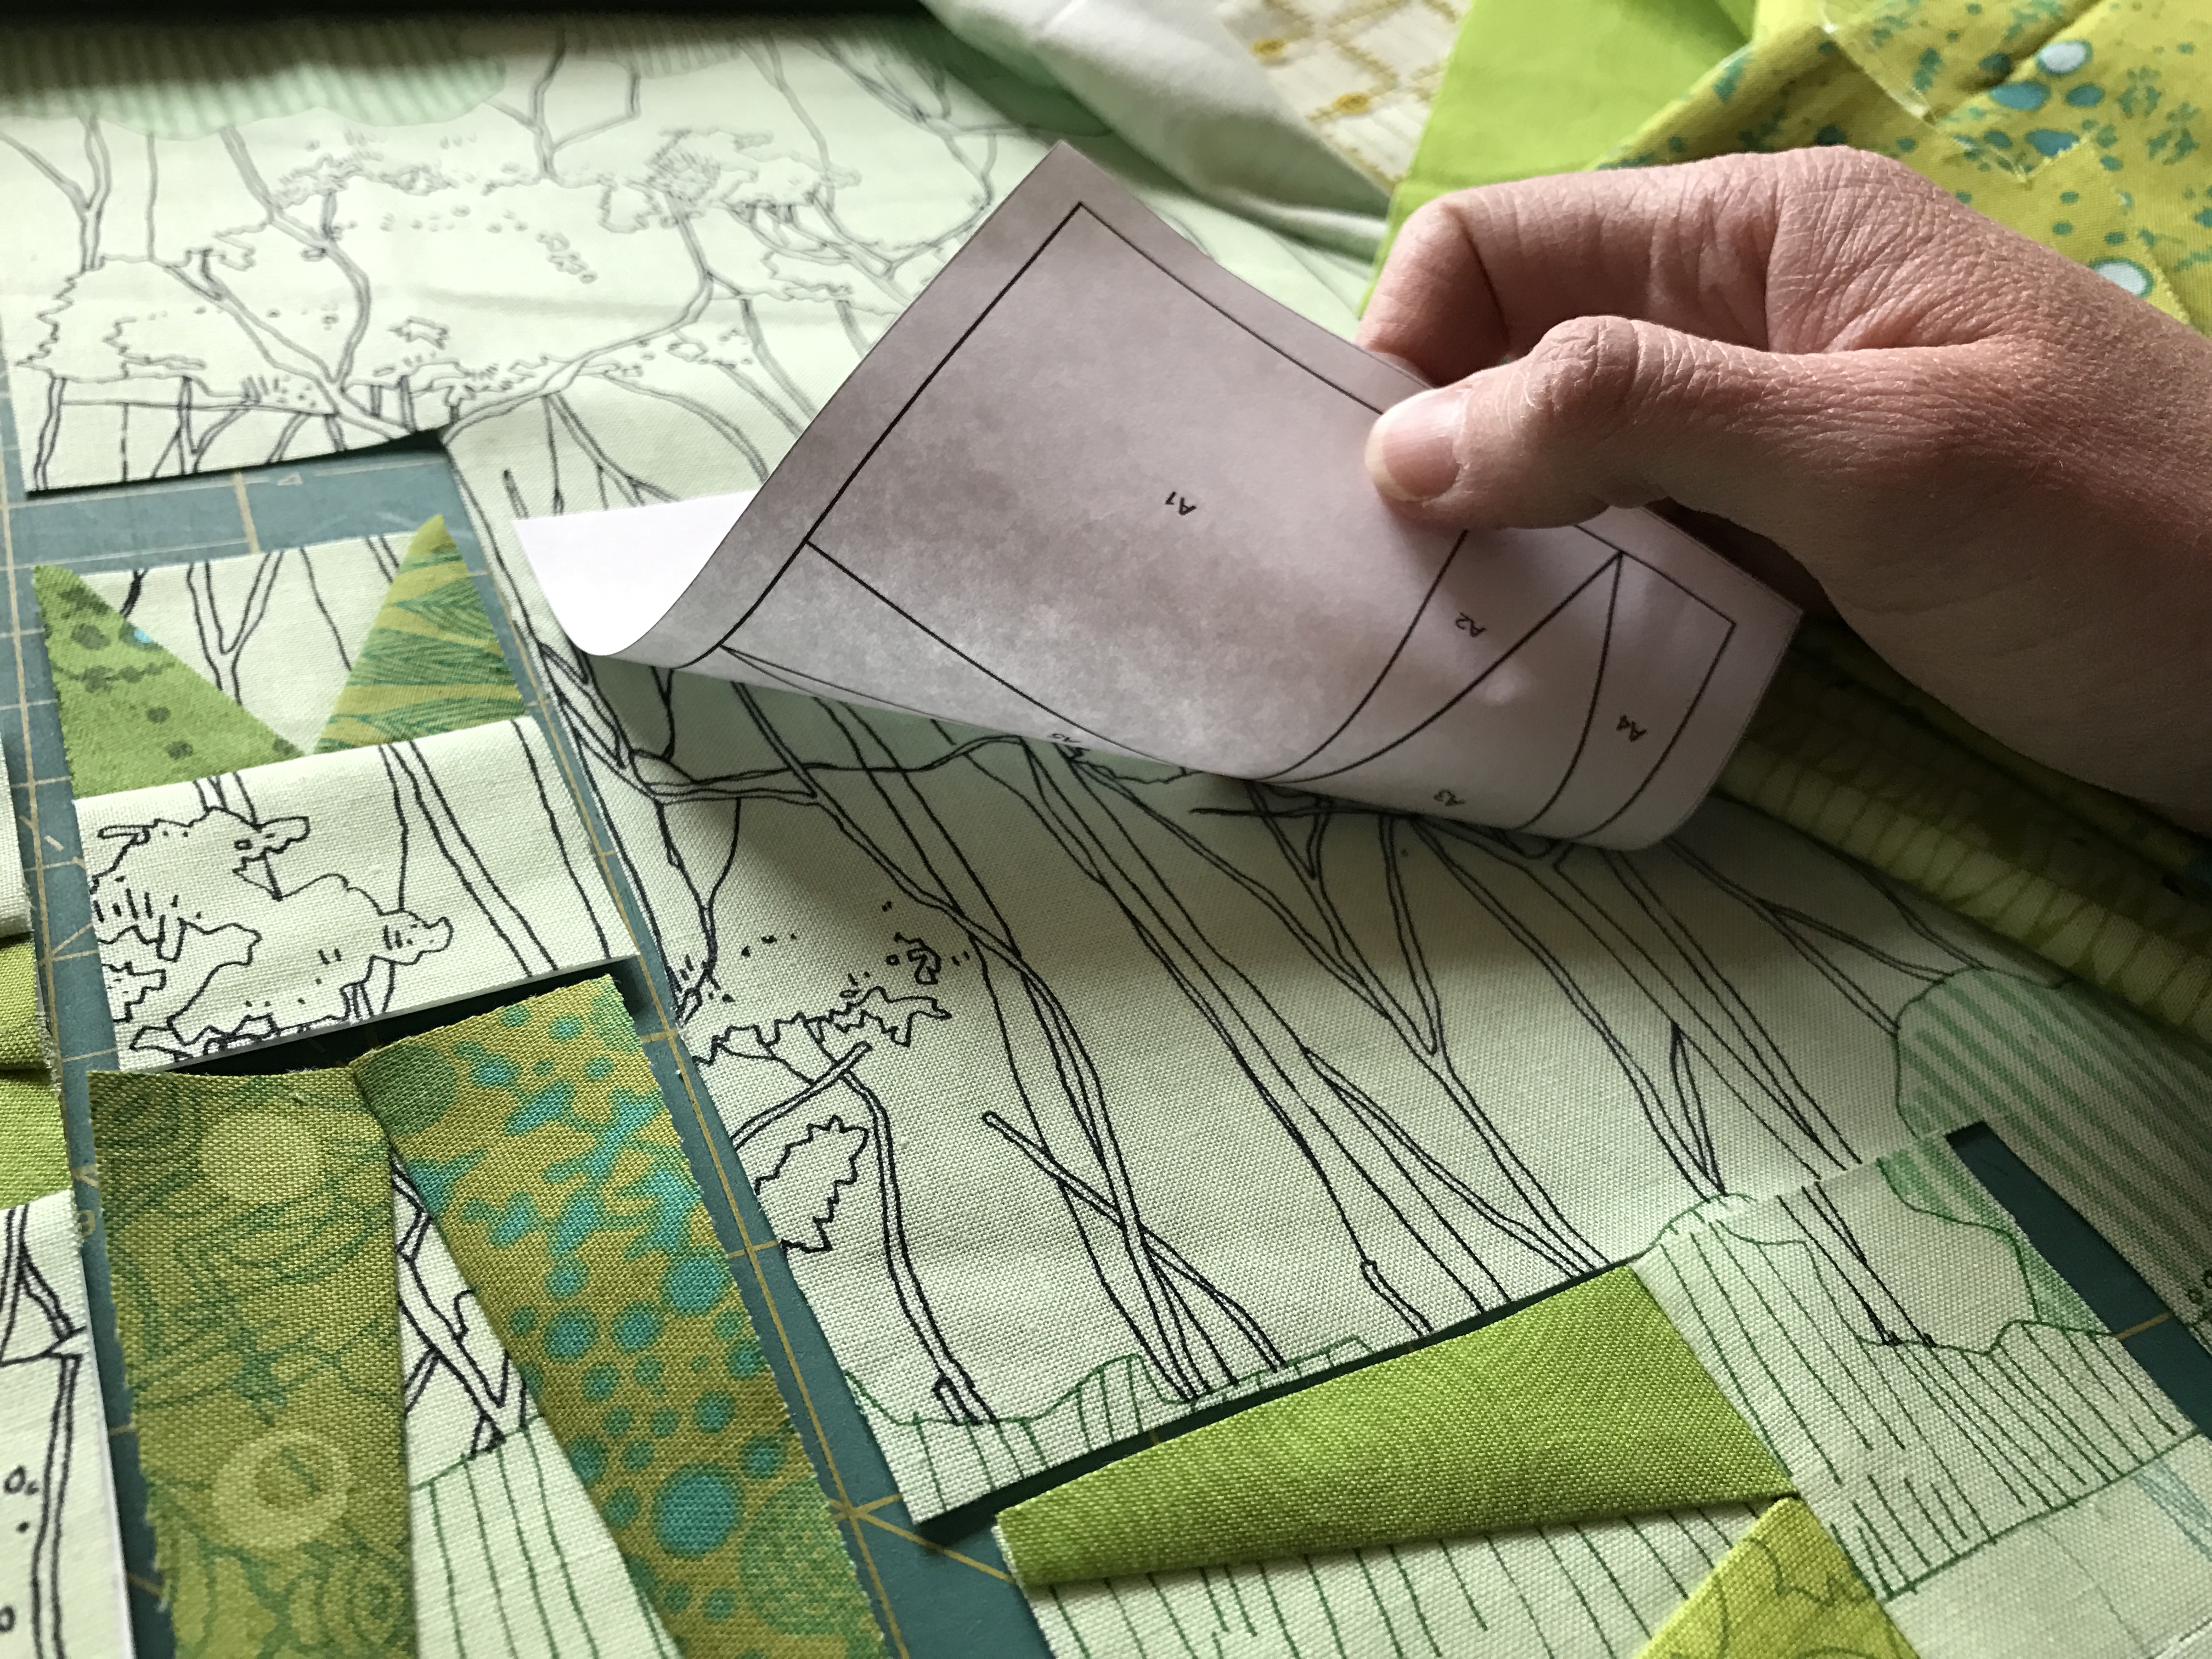
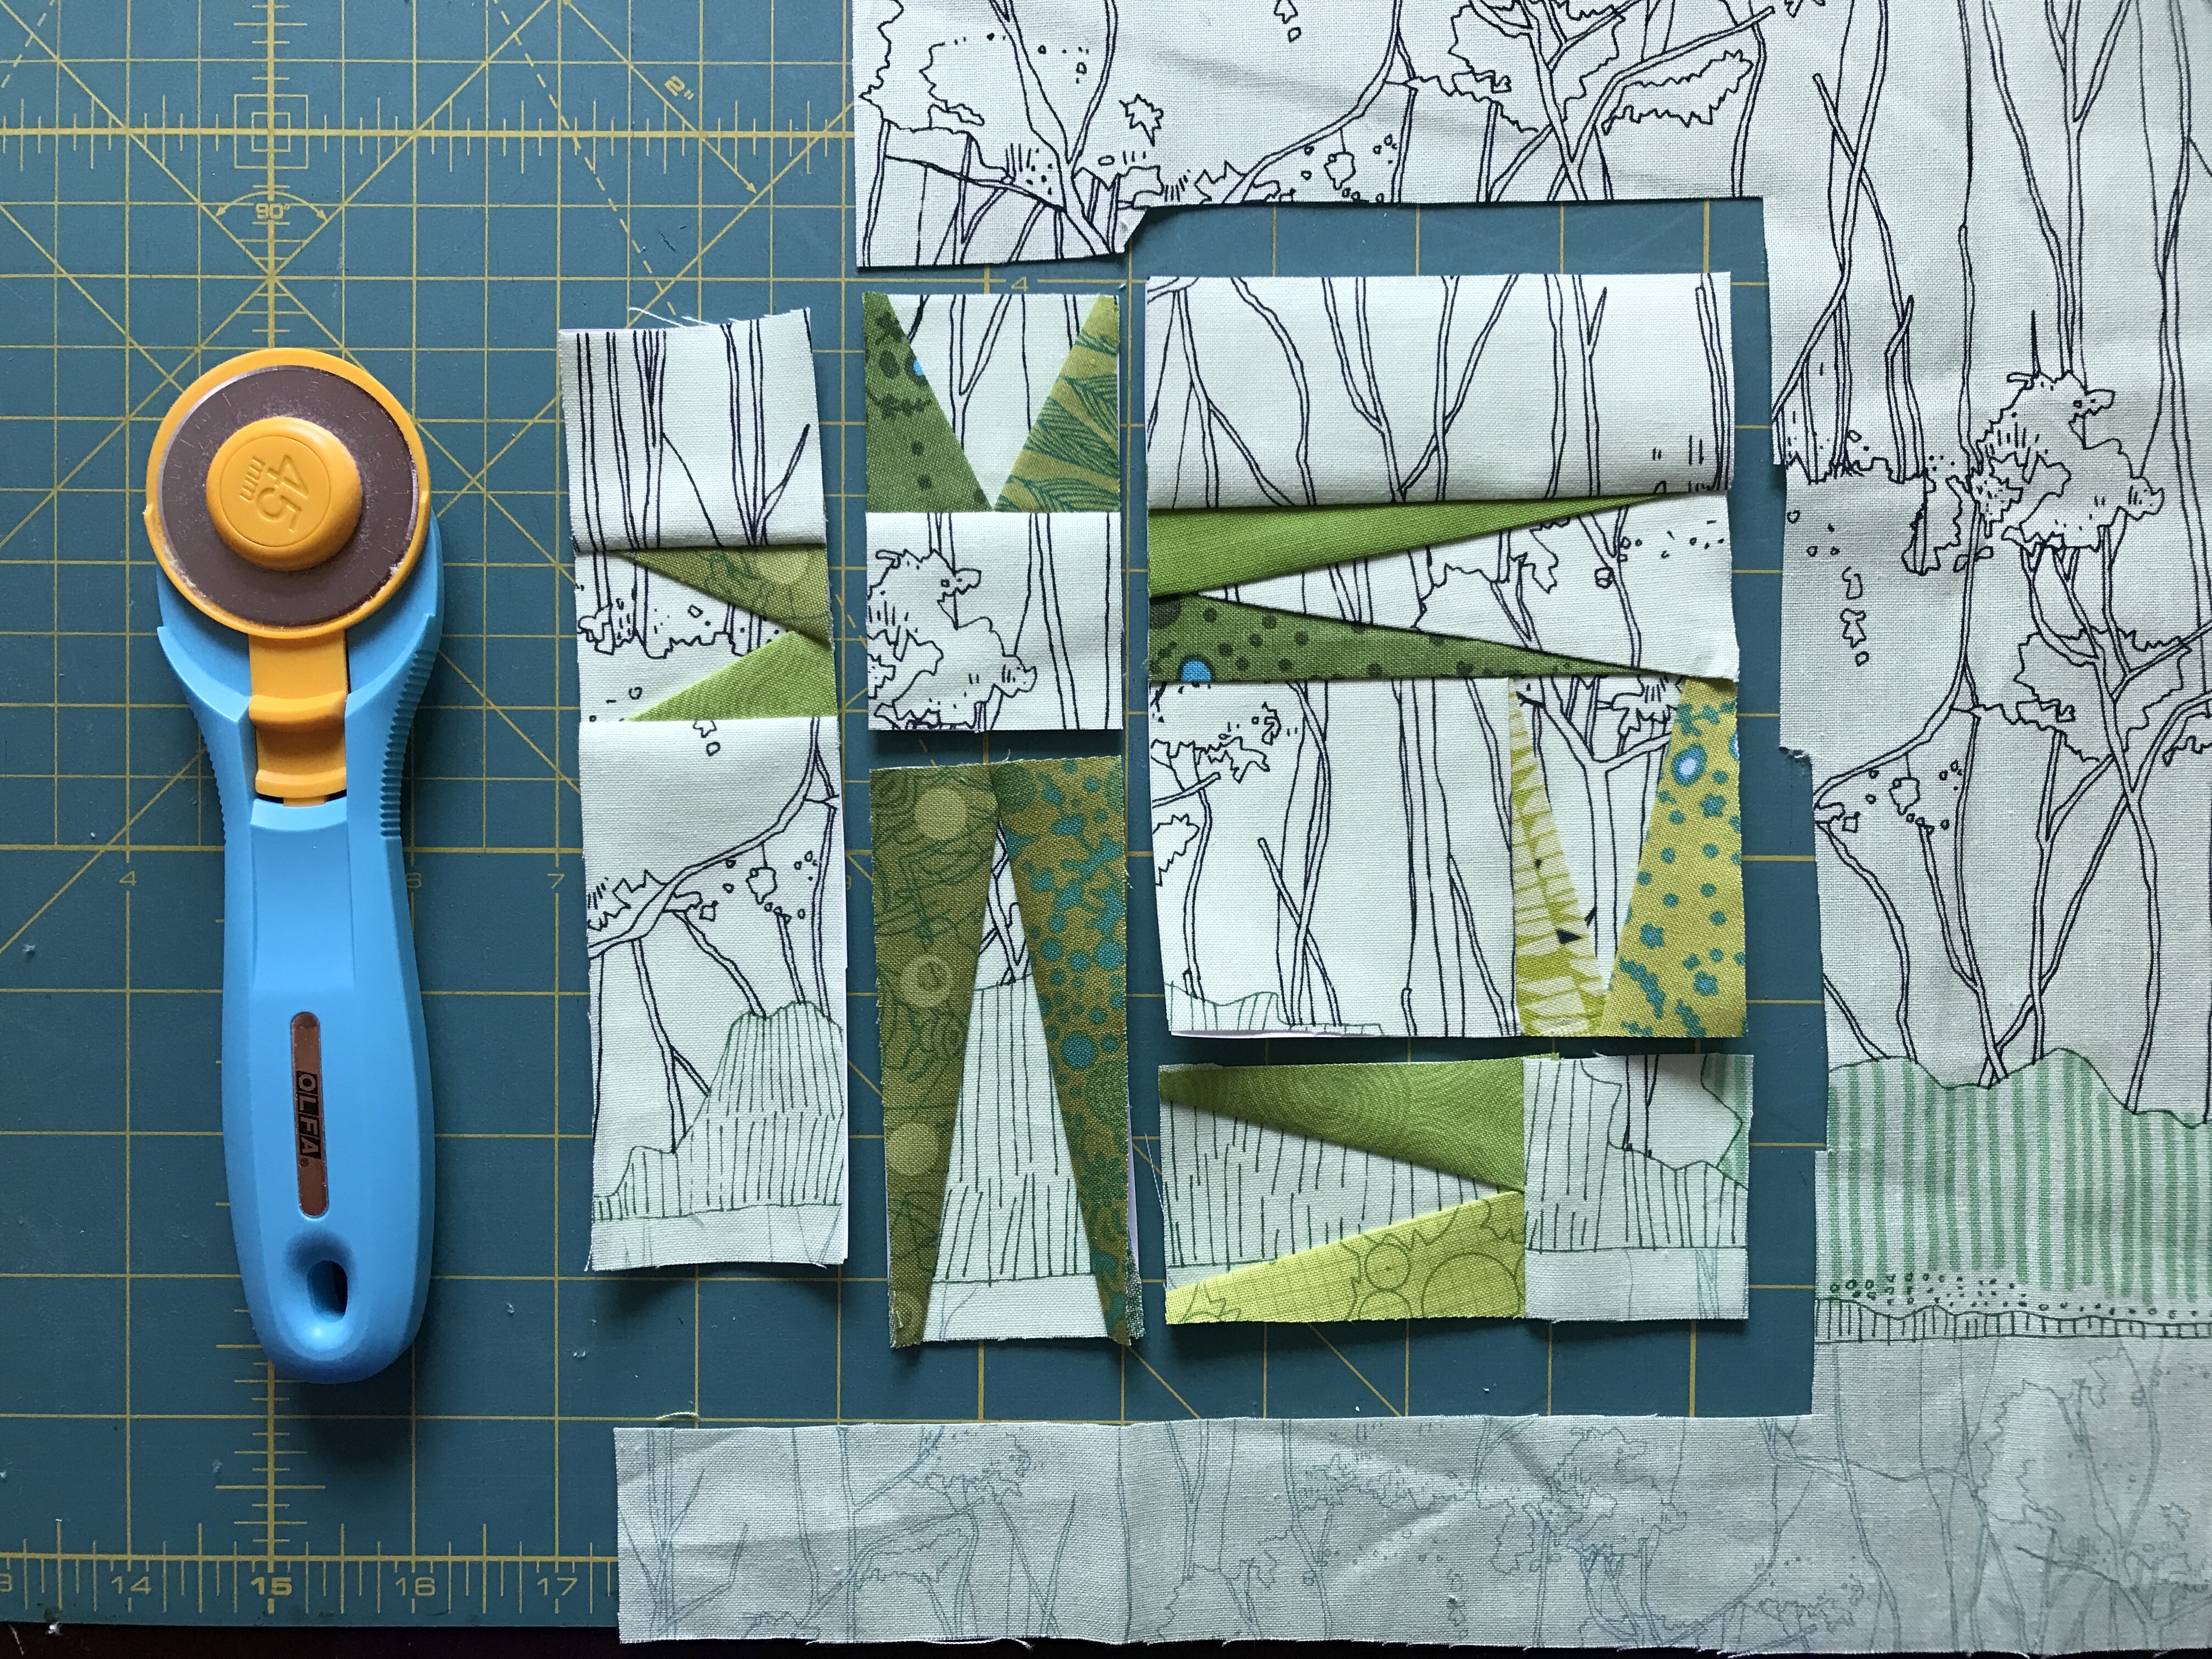
 When your paper is folded along the seam-to-be-sewn, you can place it on your next fabric (right side up) and the paper shape as folded will be exactly on top of the fabric that will end up in that space once you sew along the line. Be sure to visit
  What that means for us is that with that clear 1/4″ seam line showing us the direction we want our print to go, simply lining up the folded seam line with the directional print will ensure the pattern runs in exactly the direction we want. Fold up the edge a bit to peek under and make sure the pattern is positioned the way you want it, then without changing the position of the fabric, fold the paper back up and sew along the line.
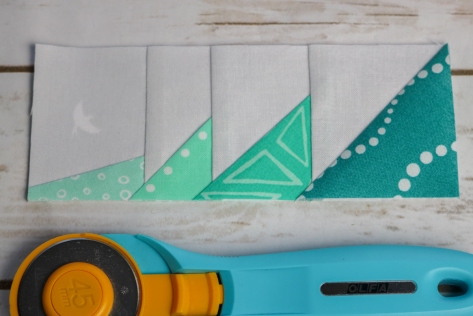 You will end up with your directional fabric meticulously positioned along the seam line, just how you wanted it. Paired with that fun bird flying over the ocean that we placed using Tip 1, these tips can help take your foundation paper piecing blocks to a whole new, intentional level.
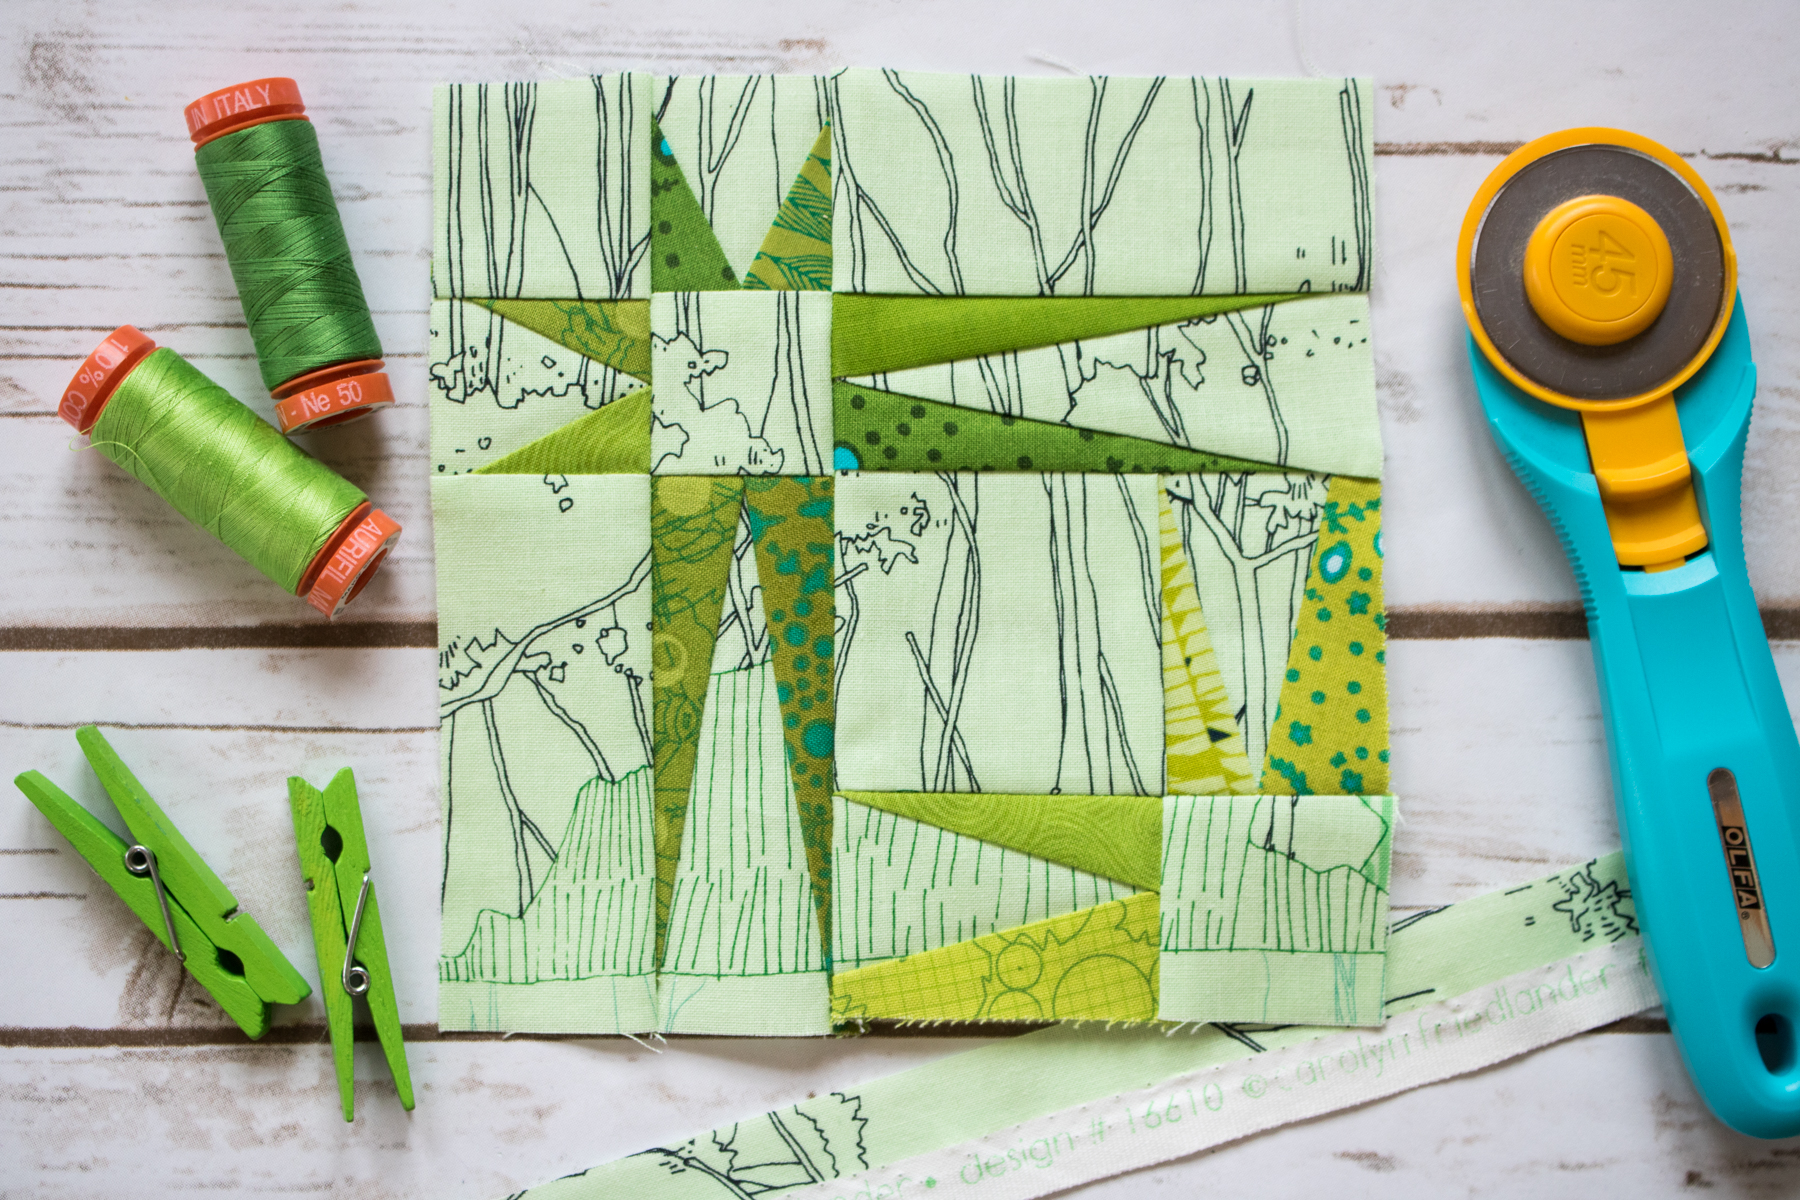
 Okay, just one peek at my planned layout and a few of my blocks so far. A full look will come in its own blog post soon, so be sure to follow this space!
 This post is a sponsored conversation written by me on behalf of Cricut. All opinions and text are my own. This Flying Geese Table Runner includes both traditional piecing and embroidery or hand quilting. If you don’t have a Cricut Maker, I’ve included cutting instructions and a pdf as well, so anyone can make it!
 Prepare your mats as instructed, smoothly spreading your fabric onto your 12″x24″ FabricGrip mat. The Cricut Maker will lead you through the entire process, so simply follow the screen instructions and let the Cricut Maker work its magic!
 The Cricut Maker will both draw the washable embroidery guide lines AND cut the larger rectangle for you!
 When I designed the drawn geese section, I designated the geese shapes as draw lines rather than cut lines and ATTACHED them to a larger cut background rectangle, about 11 1/2″ x 13 1/2″ in size so that they would be easier to embroider. For those of you designing for your Cricut Maker, this is key to remember when you want to combine both cut lines and drawn lines! Also, many thanks to
  The Cricut Maker will also prompt you to cut squares of your focal fabric, small squares of background fabric, and some background rectangles. Once the fabric is cut, carefully remove the excess fabric, revealing your perfectly cut shapes. Carefully remove the fabric from the mats, and then get ready to sew!
 The embroidered accent geese are meant to add some subtle accent interest to your table runner, since hand stitching of any kind (in my mind) adds a special touch. Especially with a project that will be seen often, those hand stitches can echo the sharp aesthetic of the pieced flying geese.
 Gather your embroidery hoop, background fabric with your flying geese drawn on, and a thick 12wt thread, embroidery floss, or perle cotton in a coordinating color. I chose to use
  You can use the drawn embroidery guides to do any type of embroidery you want. I chose to do a simple running stitch around each flying goose, but feel free to get creative! Chain stitch would me another fun stitch to use to outline each goose, you could echo the stitching inside each goose as well, or even fill the geese with french knots!
 Once you’ve finished embroidering your geese, carefully trim the panel into two rows of geese, cutting 1/2″ away from the side points of each row. Do not cut the top or bottom of each row of flying geese. You should now have two embroidered geese panels measuring 5″ x 13 1/2″.
 With your fabric pieces cut perfectly by the Cricut Maker, or as specified above, piece your flying geese using the four at a time method. I used the Reference section of my
  Make twelve geese total and sew them into two strips of six as shown above. See how they are mirrored by the embroidered strips? Note that your embroidered strips should be cut apart by this step.
 When sewing two geese together, position the point of the goose on top and make sure your stitch line passes exactly through the stitched point of your goose.
 This way, you will be sure to never chop off the point of a flying goose ever again!
 Once your flying geese rows of six are assembled, sew a 1 1/4″x 4″ piece of background fabric to the top and bottom of each strip. Align with your 13 1/2″ embroidered geese strips, and trim the pieced flying geese strips to 13 1/2″ if needed, being sure that your embroidered geese align with your sewn geese before trimming. There is a little bit of wiggle room included in the top and bottom background rectangles to allow for those who sew scant or generous 1/4″ seams, so trim as needed.
 First sew together the flying geese panels of the table runner. I’ve arranged mine on top of my backing fabric so that you can clearly see the different pieces being sewn together. With geese facing the same direction, sew the embroidered flying geese section to the pieced flying geese section. Then sew to the 2 1/2″ x 13 1/2″ background rectangle. Make two.
 Assemble the table runner top by sewing the sections together as shown above: Note that the embroidered flying geese panels should be sewn to the center background piece on both ends.
 Once your table runner top is pieced, position the runner top and batting in the center of your chosen backing fabric, right sides facing away from each other. In other words, layer and baste your table runner and prepare for quilting!
 I chose to use Aurifil 50wt 2479- Medium Orchid to quilt my Flying Geese Table Runner with a dense free motion quilting pattern in the center, simple outlines of the pieced flying geese, and dense free motion quilted switchbacks in Aurifil 2021-Natural White between both the pieced and embroidered geese. I wanted the texture but not the visual distraction from my hand stitching.
 I’m certainly not a free motion quilting pro, but I am pretty happy with my over-all heart-flower free motion quilting motif! Plus, how fabulously do those tulips go with the BariJ Sage fabric backing!?
 Once your table runner is quilted as desired, carefully fold back the backing fabric and trim the batting *just* outside the top of your table runner top. I gave myself a little less than 1/8″ around the edge of my table runner.
 Be extra careful not to cut your backing fabric during this step!
 A full tutorial for how to bind your quilt with the backing fabric can be found
  I wanted my binding to be slightly slimmer, so I cut mine 3/4″ from the edge of the table runner top instead of 1″, but choose whichever you prefer.
 Ta da! Your table runner is nearly finished! All that remains is to wash out the washable fabric marker lines. I’ve found that the Cricut Washable Fabric Pen easily washes out with a bit of soap and cold water. Note that if you prewash your fabrics, you can wash out the fabric pen before trimming and piecing the embroidery panels into your table runner. I don’t prewash my fabrics, so I opted to wash it all at once after it was completely finished.
 After giving my table runner its first wash, and in looking at these photos, I think I will go back and hand quilt within those embroidered flying geese to give them a bit more texture.
 Enjoy, and I hope you’ll share a photo of your Flying Geese Table Runner if you make one! You can tag me on social media
 As I mentioned in my post a few week ago, the list of use ideas for this tall and skinny fabric bin just keeps growing. From sorting tiny fabric scraps to housing your favorite adult beverage bottle, the sky’s the limit.
 Today I’m also sharing one such use over on
  Head on over to the

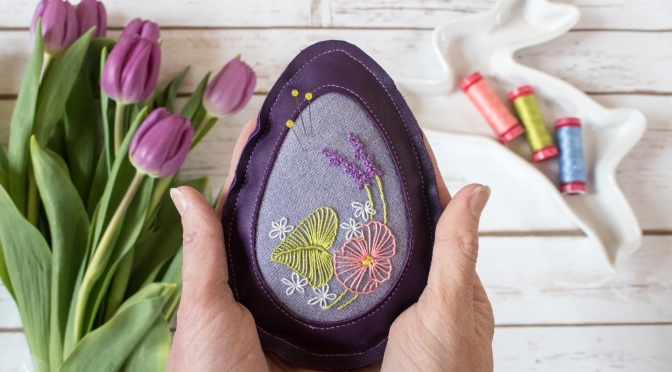

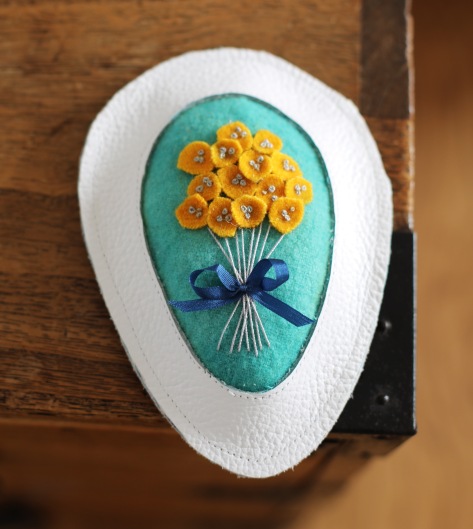
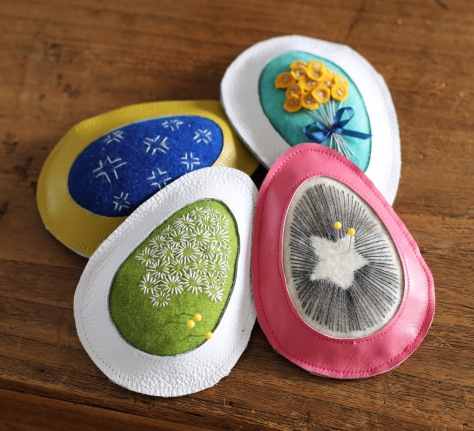 In this tutorial we give everyone some guidelines but the emphasis is on PLAY and MAKING THIS PROJECT YOUR OWN. Don’t celebrate Easter? No biggie, make a similar pincushion in another shape. We will be following on Instagram so please tag your makes
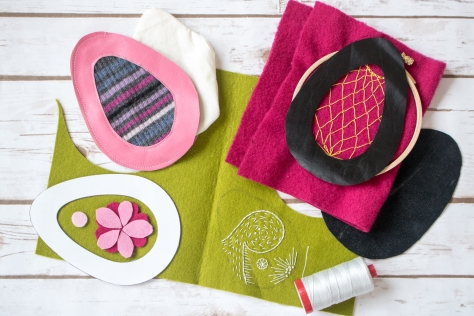
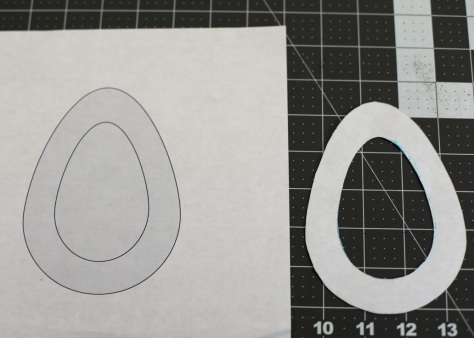 Print the
 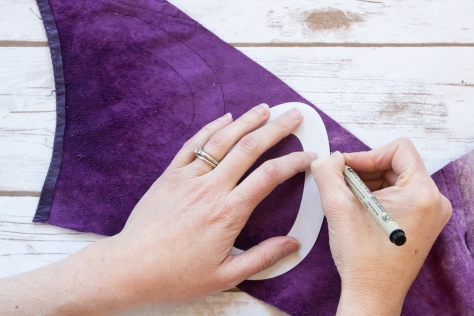 Trace the template onto the wrong side of the leather, marking out two eggs–one with only the outline and one with both the inner and outer lines drawn.
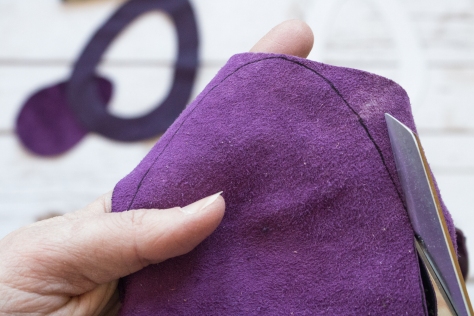 Carefully cut along the marked lines, remembering to cut one piece along only the outer egg outline and cut the other piece along both the inner and outer egg outlines.
 Set your leather pieces aside.
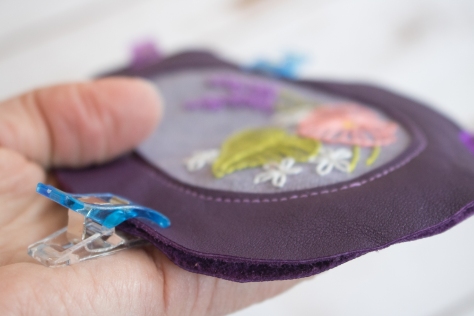
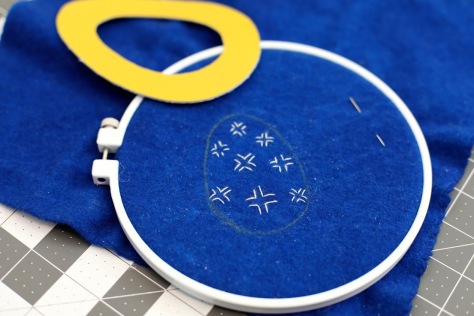 Using chalk or water soluble marker, trace the inner egg outline onto your embroidery surface (felt, velvet, jeans, etc) so you will know the limitations of your embroidery design.
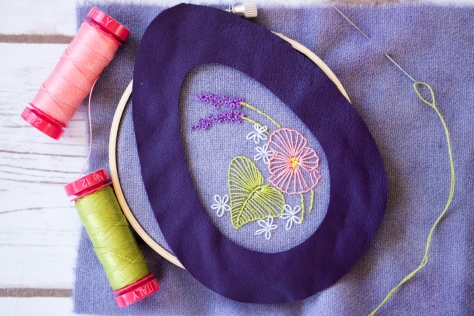 Adorn at your heart’s desire with embroidery, applique, etc. You are welcome to copy our experiments but please feel free to try your own ideas.
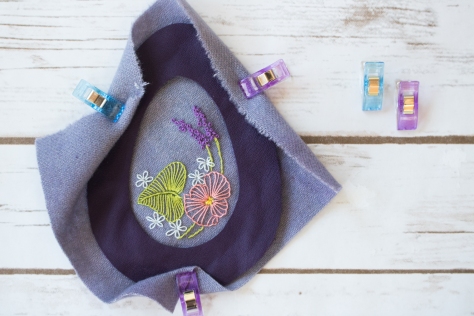 Align your embroidered material so that the embellishments fit within the window of your leather upper (the egg with the hole cut out of the middle).
 Secure the right side of your embroidery to the wrong side of your leather upper with double sided tape, glue, clips, or other method.
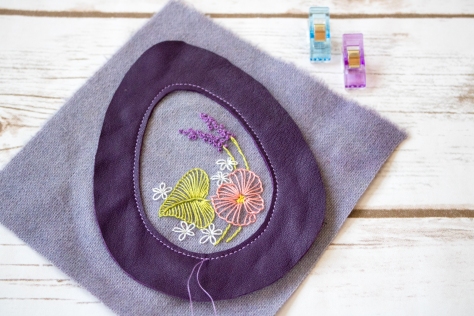
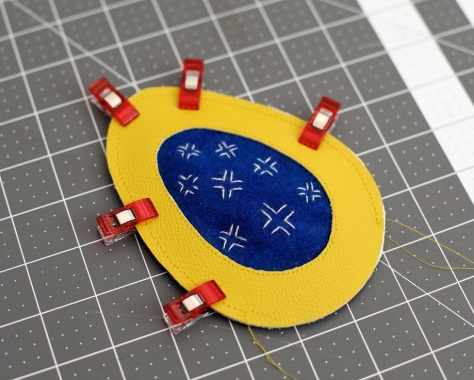
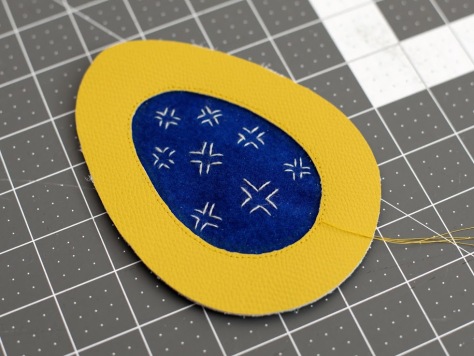 Then, using a ¼ or ⅛ inch seam allowance, top stitch the two together along the inner egg as shown.
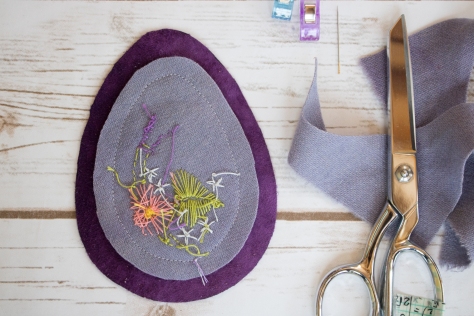
 Finally, if possible, trim the seam allowance of your embroidered material carefully about ½” away from the stitched line so that it remains easily inside the outer margins of the egg.
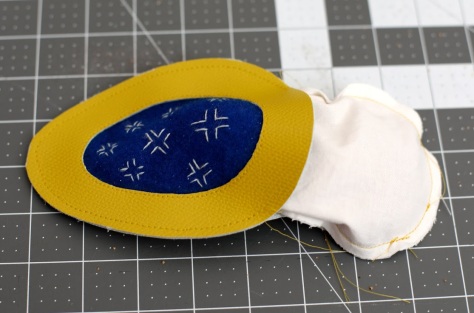
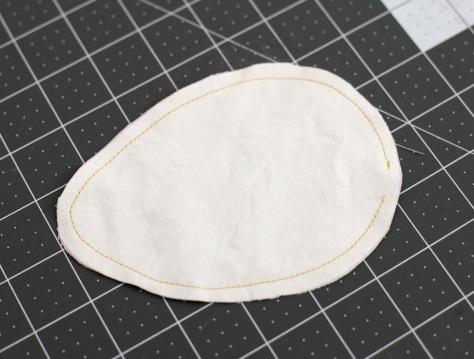 Using only the outer margin of your Egg Template, trace and cut two pieces of muslin. Sew the two pieces together using a ¼ inch seam allowance, leaving a small opening to use for filling.

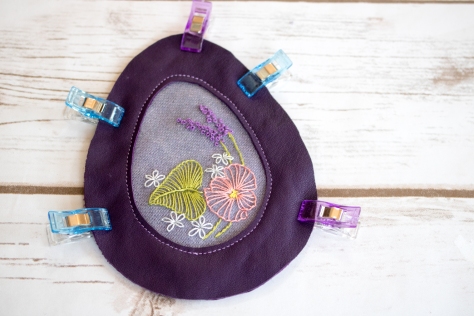
 Place the two leather egg pieces wrong sides together and secure with clips. (Note that pinning will create visible holes in the leather–use clips!) Sew around the outer margin of the egg using a ¼ seam allowance, leaving an opening at least 3 inches long unsewn.
 Stuff your filled and fully closed inner pincushion through this opening. Ensuring the inner pincushion remains entirely inside, top stitch the remaining way around the outer edge of the egg.
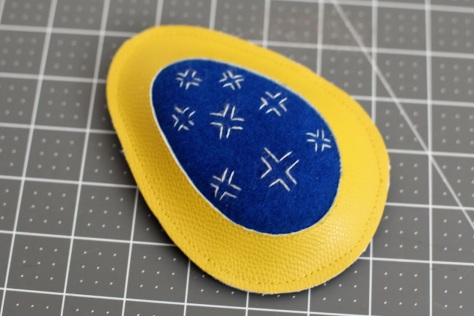 Thread the top threads to the back of the piece, tie all loose ends together and trim or bury.


 Each of these Farmer’s Wife blocks manage to pack quite a punch in the little 6 1/2″ space. My method of attack when deciding how to piece each block has been consistent: how can I piece this with as little muss and fuss as possible? With Sylvia, at first I was thinking chain piecing would be the way to go, since it would help minimize the teeny tiny pieces in the inner borders I’d need to cut and sew. Looking at it more closely, I decided that with this block, even chain piecing would require piecing TINY bits, cutting, and then piecing again. Plus, sixteenths of an inch!? No thank you! Finally, I decided that foundation paper piecing was the way to go, since:
 Ready to get sewing? Make sure you have a grasp on how to foundation paper piece, and let’s make Sylvia!
 As soon as I saw this block, I knew that I wanted to meticulously cut the center square. I’m arranging my blocks on point, so be mindful of your own plans before meticulously cutting your fabric! (I call “fussy cutting” meticulous cutting, and you can read why
  Mark the specific piece you want to meticulously cut. I went a little overboard on marking mine for the sake of clarity here. I circled the number but also traced just outside the line of the particular piece, both with bright pink sharpie. Simply circling the number would probably suffice!
 Cut out the center of the piece, creating a window that is exactly the size of the piece you want.
 Draw a 3/8″ seam allowance around the window. I used a green micron pen for this example to ensure the line didn’t get confused with the printed lines on the paper.
 Cut along the line you drew.
 You should how have a planning template to help you cut your fabric for fussy cutting. Notice that I placed my planning template onto the fabric upside down. This is because in foundation paper piecing, we are sewing the block on the reverse side of the template. It did not matter too much for this particular piece, since it’s a square, but always be mindful of directionality of the fabric as well as wrong side-right side. If need be, mark your planning template with “right side up” or “wrong side up” so that your fabric is cut properly!
 Between sewing the fabric on the reverse side of the paper, having the block broken into sometimes odd sections before sewing, and the many pieces involved in most foundation paper piecing patterns, it is in your best interest to color code your paper template before beginning to sew. This way, you can be sure you sew each fabric in the proper place.
 Especially when first getting started with foundation paper piecing, one of the biggest tips I can offer is to be generous with your fabric pieces. It’s better to have to trim a bit more off than to be short and have to rip stitches! For my bright blue squares on Sylvia, I cut the fabric into 1 1/2″ squares, which as you can see includes ample overhang.
 This tip goes for bag-making as well: just because there is a template created for a perfectly rectangular piece, it doesn’t mean you can’t use your rotary cutter and ruler! The outer pieces of Sylvia can be easily cut using a rotary cutter and ruler, which will save time with paper removal at the end. Since these pieces are not easily measured (let’s avoid using sixteenths of an inch if we can help it!) simply cut out the foundation paper piece templates and use them as a guide when rotary cutting. Use the foundation paper piecing method to piece the center portion, then add the D, E, H, and I rectangles using traditional piecing methods. Easy peasy!
 And there you have it. Sylvia, in all her glory.
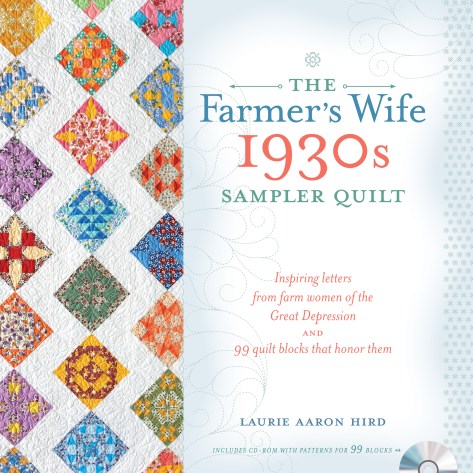

 I’m calling my block Steady On, which just seemed fitting for such a classic made-by-me block. Those of you who know me know that I cannot keep anything simple, and this is a perfect case in point. This block has double improv curves, twenty (20) tiny flying geese, an hourglass block, and quite a few points that should match *just* so, all in the 12 1/2″ unfinished square block. But fear not, this tutorial has detailed photos and instructions on how to make each component of the block, and breaking it down into manageable chunks makes this block come together quite smoothly (Spoiler: we can make some of the flying geese 4 at a time!). There’s something about the determined light colored geese headed bravely into the dark and improvy unknown that urges me to encourage them… Steady on, now! That same encouragement goes for you, since I would LOVE to see you tackle this block and come out victorious (tag

 For this step, you will need your 5 1/2″ squares of Iris, Amazon, and Sky, washable school glue and tip, a marking pen or pencil, scissors, and an iron and pressing surface. To make the double-curved quadrants for this block, follow my tutorial on easy curved piecing using a visual layering approach and glue basting
 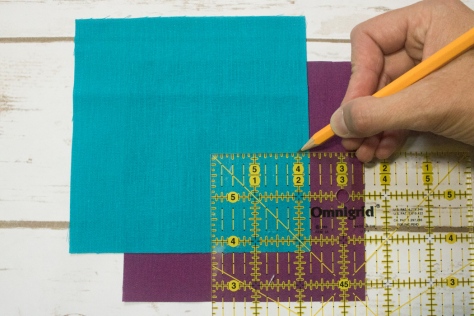 Since this method begins from the bottom up, start with Iris and Amazon. Mark the Amazon square 2 1/4″ up along both sides from the bottom right corner. Make sure your mark extends 1/4″ in from the edges before beginning the curve. This will be your sew line, not your cut line, so by measuring the 2 1/4″ we are ensuring our seams will match up, even though the flying geese are exact and the curves can be improv. (Note here that if you are using fabric with a right and wrong side, you want to be marking the wrong side of the fabric. With the Cloud9 Cirrus Solids that’s not important).
 Draw an improv curve from marked point to point, or trace a perfect curve using the edge of a small plate or glass. Make sure your curve begins and ends at your marked points 2 1/4″ up from the corner.
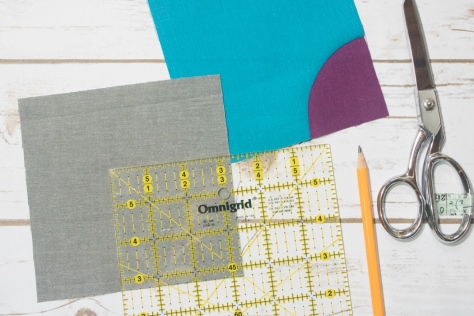 Next, grab your Shadow 5 1/2″ square and mark 3 1/4″ up both sides from the bottom right corner. Again, draw your curve as desired, connecting from marked point to marked point, and using that line as the sew line.
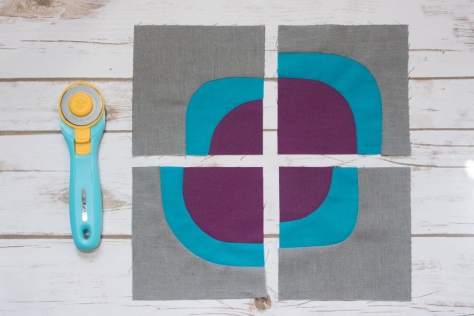 Make four quadrants, measuring 2 1/4″ up on the Amazon square and 3 1/4″ up on the Shadow square for two of them, and measuring 3 1/4″ up on the Amazon and 4 1/4″ up on the Shadow square for the other two. Admire your smooth curves, and set those blocks aside for later!
 Place two 1 7/8″ Iris squares in the top right and bottom left corners of a 3 1/4″ Sky square as shown. Using your fabric marking tool of choice, draw a diagonal line from the top right corner to the bottom left corner. I love my Hera marker since it doesn’t actually mark the fabric, but makes a clear guide line.
 Sew 1/4″ from either side of the drawn line. Press with a hot iron to set the seam (notice that I didn’t do this step? tsk tsk).
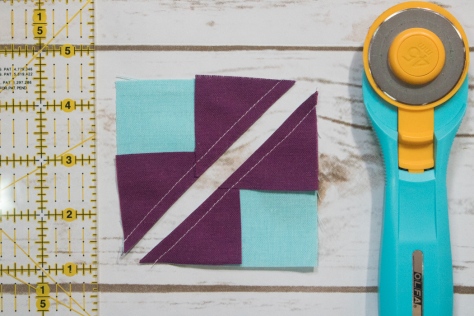 Cut along the drawn line.
 Press the small Iris triangles outward, with seams pressed toward the dark fabric. Then place another 1 7/8″ Iris square in the corner of each unit, and mark a diagonal line as shown above.
 Again, carefully sew 1/4″ from either side of the drawn line. Cut along drawn line.
 Press open, with seams toward darker fabric.
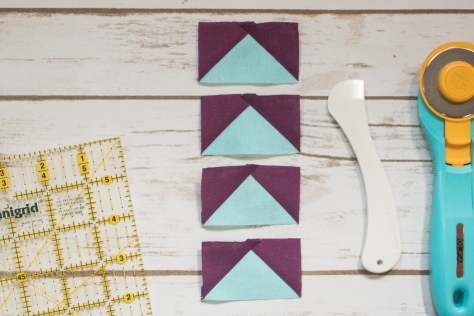 Trim to 1 1/2″ x 2 1/2″ and set aside.
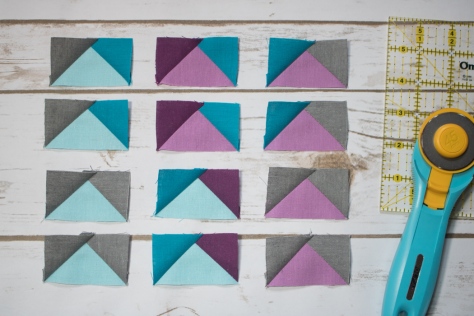 Grab your 1 1/2″ squares and 1 1/2″ x 2 1/2″ rectangles and lay them out to help plan which corners should be positioned on each rectangle. Use the finished flying geese above to help plan before you start sewing.
 To make a flying geese block (or would it be flying goose?), position a 1 1/2″ square right sides facing the right top corner of a 1 1/2″ x 2 1/2″ rectangle. Draw a diagonal line as shown above.
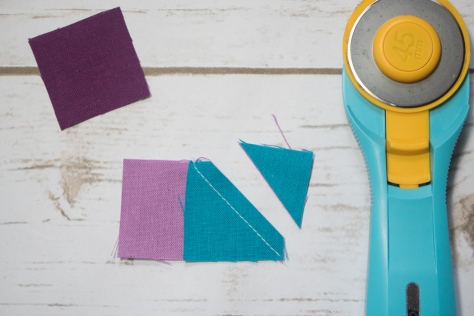 Sew along the line and then trim a 1/4″ seam allowance.
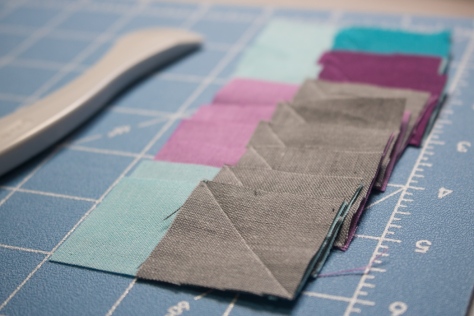 I like to get mine all paired and drawn so that I can chain piece each side.
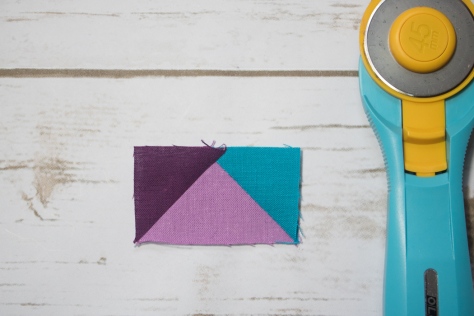 Repeat with the other 1 1/2″ square on the top left side of the block. Press seams open or up toward the corner.
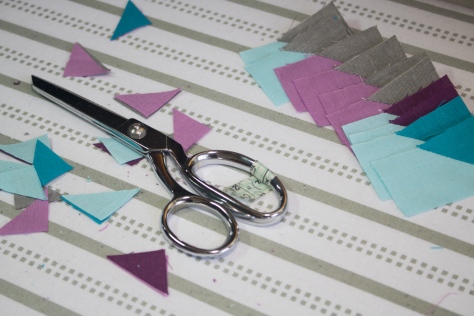 Time saving tip: I cut my 1/4″ seam allowances with scissors while pressing. As long as you are accurate with a pair of scissors, it takes much less time than rotary cutting, at least for me.
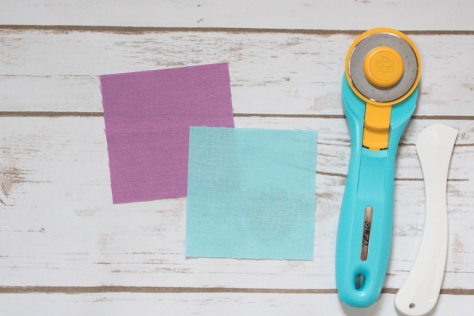 Finally, let’s make that center hourglass block. Grab your 3 1/4″ Lilac and Sky squares.
 Place right sides together and mark a diagonal line. I like to pin my pieces together since we are working with such a small scale. If you’d prefer some wiggle room, you can begin with 3 1/2″ squares and trim to size when you’re finished!
 Sew 1/4″ from either side of the drawn line. Cut along the drawn line.
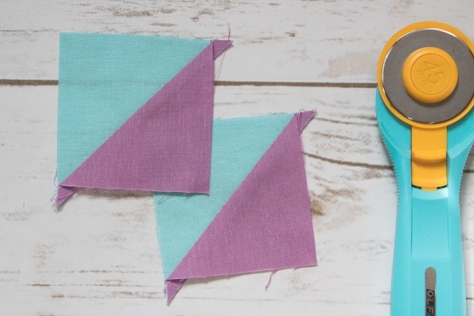 Press toward darker fabric. You will have two half square triangles (HST).
 Place HSTs right sides together, with the Lilac half of one facing the Sky half of the other, and nesting the seams.
 Draw a diagonal line perpendicular to the existing seam line, again pinning to keep the pieces in place while you sew.
 Sew 1/4″ on either side of the drawn line. Then, cut along drawn line.
 Press seams open. You will have two hourglass blocks, but will only need one for this block. Save the other one for your next Steady On block!
 Trim to 2 1/2″ square. Set aside.
 Now that you’ve made all of the components, it’s time to sew the block together! Arrange all of your pieces as shown above, paying careful attention the positioning of the flying geese in relation to the large and small curves on your curved quadrants. There should be two Iris flying geese corners next to small curves and three Iris flying geese corners next to large curves.
 Sew the top five and bottom five groupings of geese together, and sew the center horizontal strip of geese and center hourglass block together.
 Perfect points tip: When sewing the flying geese together, keep the piece with the goose point on top. As you’re sewing, make sure your sewing machine needle sews exactly through the “x” that marks the point of the goose, or if anything, slightly to the right (above) the point. This way you won’t lose any points!
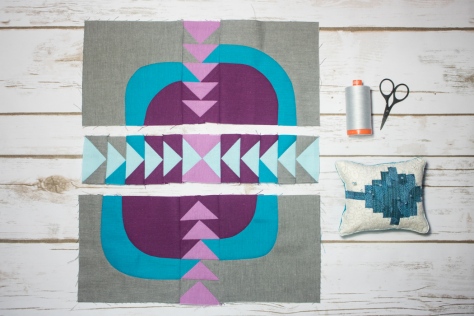
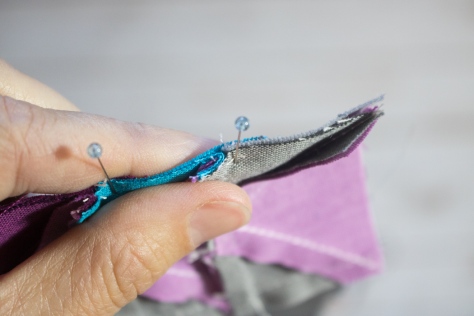 Next, sew the top left and top right curved quadrants to the top grouping of geese, pinning just after each seam that needs to match.
 When aligned properly, the geese corners should flow into the curved piece perfectly–that’s why we so carefully marked our curve starting distances with our improv curves!
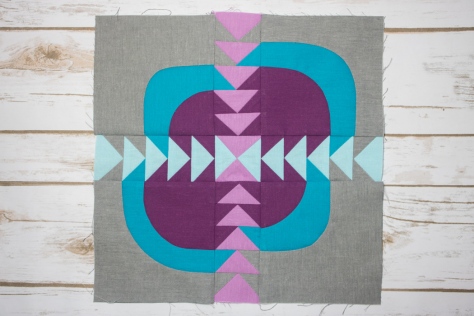 Finally, sew the top and bottom panels to the center horizontal strip, again pinning just after each important seam match. Press toward the less bulky sides (the curved quadrants), and viola! Steady on…
 I first saw this method being used by
 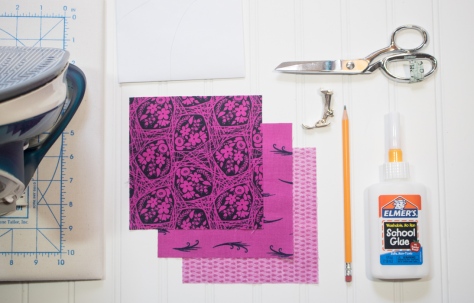 So let’s get started! First, gather your supplies. You will need:
 Before you begin, decide generally how you want your curves to look. I like to sketch mine out on paper more for a visual than for an exact plan. Think of your fabrics in terms of layers: the bottom is the inside of the curve, moving upward and outward. Keep in mind that if you want to have a convex curve next to a concave curve, simply switch the way you view your “top” and “bottom” layers. The inside of the curve is always the bottom, and work from the bottom up.
 Draw your curve on the wrong side of your top (or in this case, middle) fabric with a pencil or other light fabric marking pen. If you want your curve to be exact, you can trace the line from your paper sketch by holding the fabric and paper up to a window or other light source. Be sure that the right sides of both the paper and fabric are facing away from you, since you want the line drawn on the wrong side of your fabric, but also want the curve to go in the proper direction.
 Next, cut between 1/4″ and 3/8″ away from the inside edge of your drawn line. This is your seam allowance.
 Clip your curves to help make your curve smooth. Be sure to cut only halfway to the drawn line, not all the way to the drawn line.
 Next, carefully press the seam allowance along your drawn line. Take your time here to make sure your curve is pressed smoothly and exactly along your drawn curve.
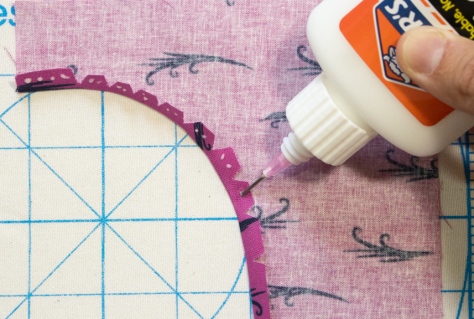 Now it’s time to glue baste this curve onto your bottom layer. Using a fine glue tip and washable school glue, create a small beaded line of glue along the seam allowance. Carefully lining up the outer corners of your squares, layer the middle fabric (with right side facing up and your cut, pressed, and glued seam allowance tucked under) on top of the bottom piece of fabric. This step is why I like to begin with three squares that are the same size. It makes positioning my curves as easy as pie!
 Press with your fingers, making sure the seam allowance is in the right spot and fully folded under. Press with a hot iron to set the glue. Admire your perfect curve… but it’s not sewn yet! Just one more step.
 Once the glue has been set and fabric cooled off, carefully lift up the top layer of fabric to expose the seam allowance. I use my zipper foot with my needle moved all the way to the left, since the narrow foot helps ease around tight turns. Carefully and slowly sew along your drawn line.
 As you sew around the curves, carefully move the top fabric out of the way, being sure not to allow folds or puckers to form under the needle. Backstitch a bit at the beginning and end of your sewn line to secure the stitches.
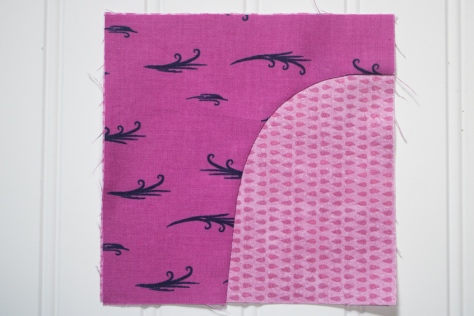 Viola! Press again and you have a perfectly sewn curve!
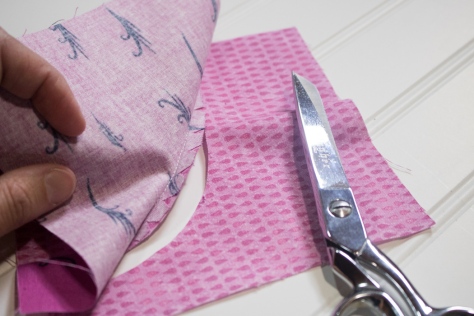 Trim away the bottom fabric that extends beyond the seam allowance, and save for your next scrappy project.
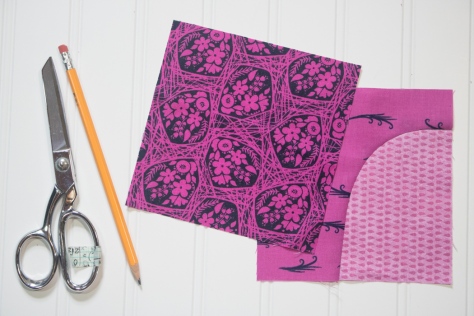 Repeat those five easy steps for your other layers: Draw, Cut, Press, Glue Baste, Sew.
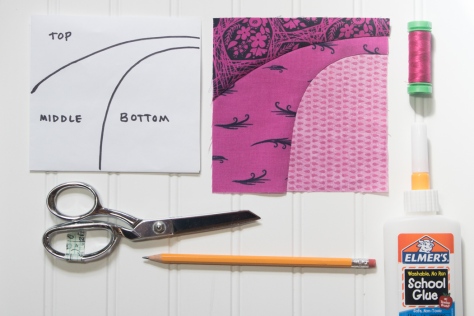 There you have it. Smooth curves, either traced and perfect, or free cut and improv.