
I’ve finally decided that the day isn’t going to arrive when I have a window of “free” time where I’m just sitting around wondering what I could do. The past few months have been really busy and exciting with a lot of new opportunities and projects, and while a lot of big projects are finally wrapped up–the photography for the Quilter’s Planner is complete and the amazing planner is now available for sale, Quilt Theory has been announced and our premier line of pattern cards have been released, I just finished and mailed a quilt sample for a pattern that will appear in the February 2017 issue of Love, Patchwork & Quilting magazine, I’m manning the Quilter’s Planner Instagram feed and leading its (and my) very first Sew Along–there seems to always be one more thing. I’ve finally decided that I’m going to make time to work on little side projects, AND I’m going to make time to blog regularly again so that I can share my projects, process, and inspiration with you. You can hold me accountable for taking time to sew for me, okay?
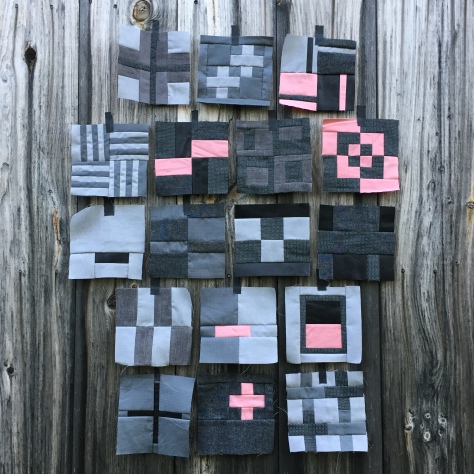 To kick off this new resolution of making time for my own sewing on top of my more business-directed projects, I made three more blocks as part of the #100days100blocks challenge hosted by Angie from Gnome Angel. I think I left off around block 22 and the challenge is now heading into the 80s, but as I do with most projects, I set my goal low and I’m happy with just picking up again and making whatever blocks I can. As you may or may not remember, I am making my blocks entirely out of old and worn or thrifted garments, including a black leather skirt, some wool slacks, some cotton-poly blend men’s shirts, and an old pair of corduroy maternity pants. It has been *really* fun sewing with different materials, and with a mostly grey-scale color palette, I’m really focusing on textures within the blocks.
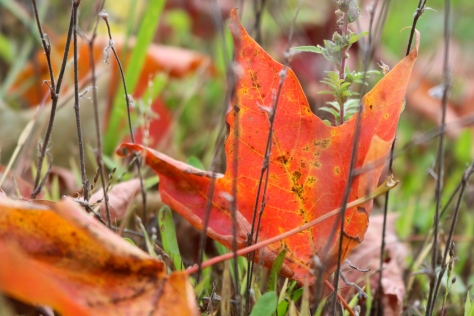
The environmental impact of our actions and the philosophy promoted through Sherri Lynn Wood’s #makedoquilt project are a large part of what spurred me to use only thrifted materials in these blocks, and so I’m presenting each block on Instagram photographed with some plant or natural phenomenon. In each description, I am sharing some information about the species or some interesting fact about its relationship with the rest of the environment. My hope is that by learning more about the world around you, you will feel more invested in preserving and improving it, or at the very least, minimizing damage done to it. This is truly a fun project that combines three of my passions: quilting, the environment, and photography. Since it has been far too long since I’ve shared my creative process with you, I thought I’d share my three latest blocks and descriptions here, too. All blocks are from Tula Pink’s City Sampler, 100 Modern Quilt Blocks book, and so I’m calling my quilt the Thrifted City Sampler (#thriftedcitysampler).
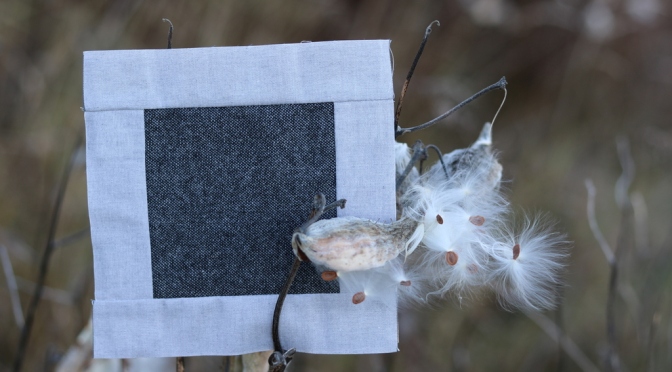
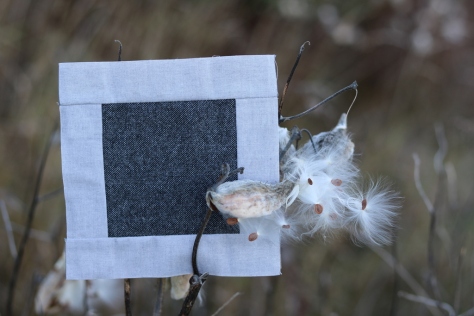 Block 73: old wool trousers, thrifted cotton-poly men’s shirt
Remember the milkweed from Block 15? Well here it is in all its seed dispersing glory! After a fun chat with Sharon from Sharon Holland Designs the other day about the amazing seed dispersal technique of jewelweed, I decided to make these next posts all about seed dispersal. As with any organism, the continuation of the species is an extremely important aspect–almost THE main purpose–of life. Since plants can’t move, they’ve developed some really clever ways to ensure their potential offspring (aka seeds) get spread far and wide and/or have a good chance of success.
Milkweed seeds are attached to a thick, light weight fluff tuft that, once matured, emerges from the dried, cracked open seed pod and is carried by the wind. Wind dispersal!! This helps spread the species into new areas, giving the species as a whole a greater chance to survive and thrive. Can you name another common plant that uses wind seed dispersal??
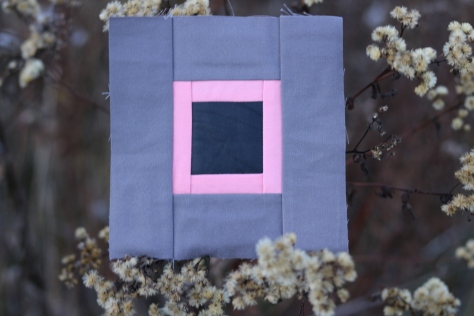 Block 72: thrifted black leather skirt, pink cotton women’s capris, my husband’s worn-through 100% cotton slacks.
We are fully in the most drab time of year in Maine. The gorgeous leaves are mostly brown and dropped, the flowers are in their winter form or gone, everything is finding dormancy. But plant identification is still not only possible, but fun! I hope you enjoy finding the beauty in winter weeds with me.
These asters have a small tuft that allows for wind dispersal, but they also use power in numbers to their advantage. A super hardy weed, asters produce many flowers, approximately 300 individual flowers per flower head, with many seeds resulting. The sheer number of seeds helps promote the success of their species. Paired with the wind, it’s no wonder there are asters everywhere!
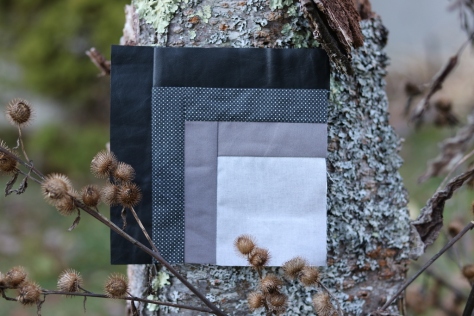 Block 77: thrifted cotton-poly men’s shirt, old cotton slacks, worn men’s shirt, black leather skirt.
Another fun installment in the “amazing seed dispersal” adventure is burdock. Burdock (Arctium) is equipped with hooks and spines that latch onto any creature passing by too closely (just like Velcro). The creature continues walking until the spikey, itchy seed pod irritates him enough, spurring him to remove it and toss it aside, hopefully (for the burdock) on fertile ground. This allows the seeds to spread far, far further than a stationary plant could reach. While this is a super cool seed dispersal trait, anyone who has “fixed” her children’s coat, hair, and wool mittens after the child has discovered a burdock plant fully understands the annoyance the poor deer, bear, foxes, coyotes, and other creatures must feel toward this and similar plants! (Note that I was VERY careful not to let my block touch the seeds when taking this photo. Those barbs are sharp and definitely would result in pulls in the fabric.)
I hope you’ve enjoyed seeing these blocks and their accompanying environmental tidbits. I’m looking forward to updating you on the other small side projects I’ve been working on between deadline projects, AND hope to even finish some of the many (oh, embarrassingly many) works in progress that are stuck in the “soooo close to finished but temporarily abandoned pile”. I have so much fun to share with you! Hope you’ve been well, and I’m looking forward to being more present in this space again.

 Here’s where you might spot some
  Scrappy Geese Quilt, the back of our postcard, and Michelle, so you know who you’re looking for at Market!
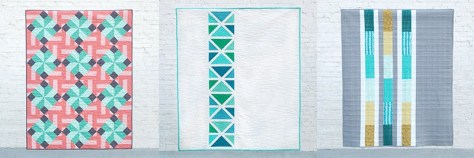 Tiled Parquet, Ocean Path, and Strip It Down will be at Checker Distributors
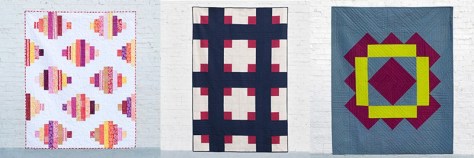 Jelly Lanterns, Cross Cabins, and Highland Tile will be at Quilt Festival


 We are so excited to announce the kick-off of the very first Quilter’s Planner Instagram Sew-Along, taking place over on the
  This pattern is super versatile and perfect for using up scraps! Make as a holiday gift, a scrap buster, or just a fun project with your quilting friends. The Sew-Along will run now through the middle of December, giving a little extra time for the piecing and quilting steps to allow for family time around the holidays.
 First, I’d like to introduce you to
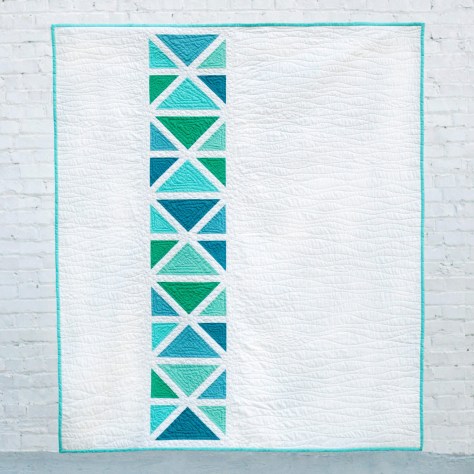
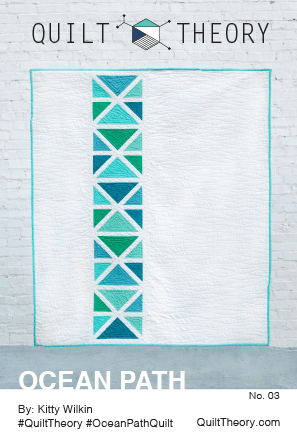
 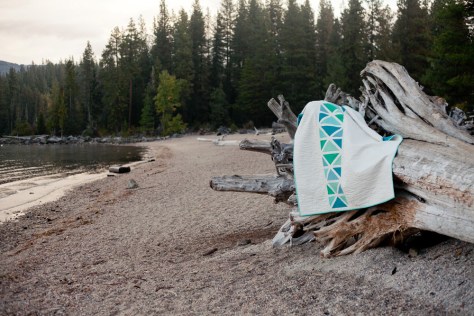 Living in midcoast Maine, an ocean path felt like the perfect inspiration for my quilt. I wanted to embrace the simple beauty of nature while providing a pattern that could be adapted to fit any color scheme, style, or decor.
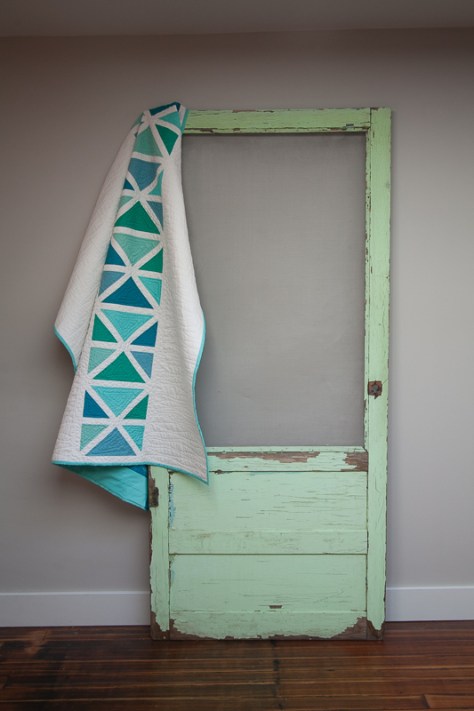 I should note here that the stunning photos included in this post were taken by
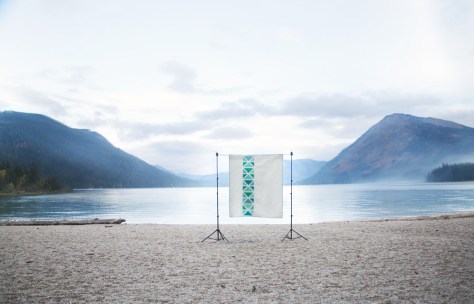
 Using simple construction from easily cut triangles and sashing, this quilt comes together in a breeze. Generous negative space provides room for intricate free motion quilting, or you could finish it with simple modern straight line quilting.
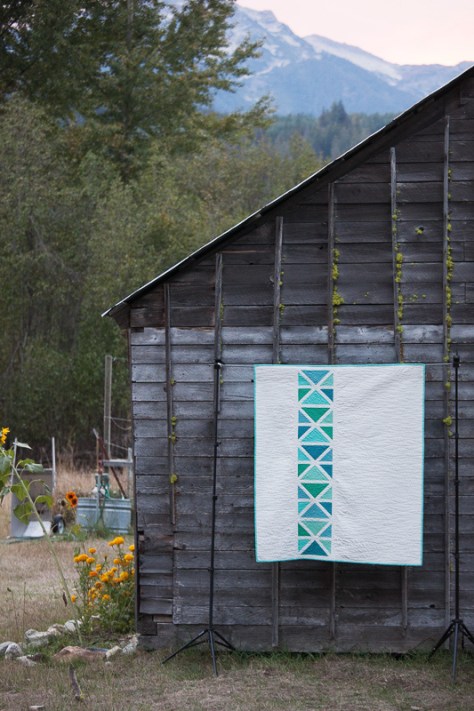 Many thanks to
 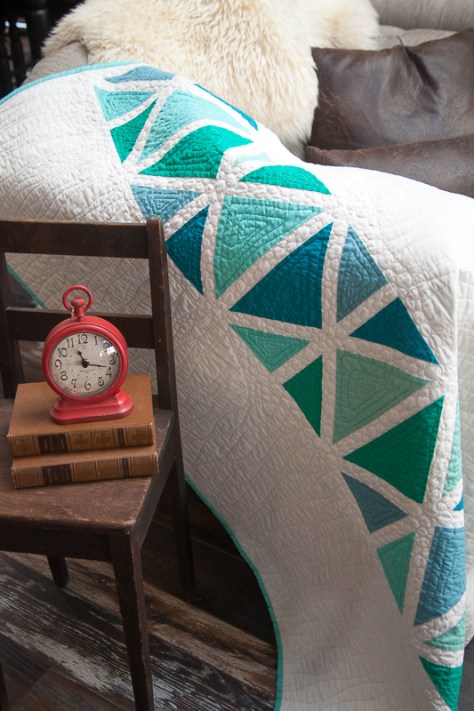 I quilted Ocean Path with echoing, organic triangles within each colored portion using 50wt
 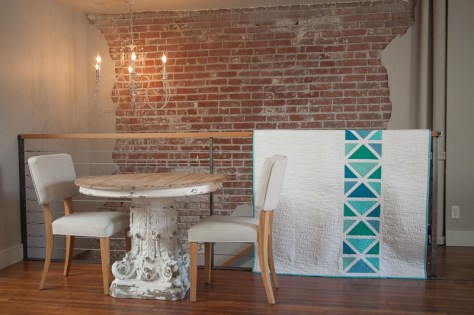 All of the Quilt Theory patterns are simple enough to be printed on 4″x6″ cards or a single page downloadable pdf. At only $3 each, they are perfect for gift giving or collecting, too!
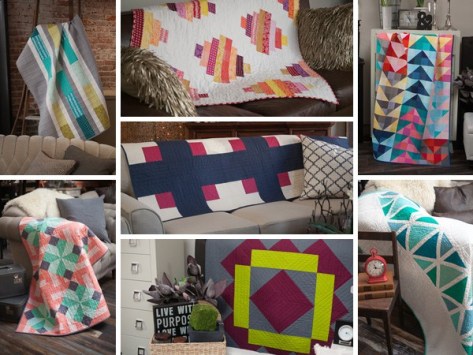

 To celebrate the launch of Quilt Theory, I am giving away a copy of my pattern, Ocean Path (printed or PDF, your choice!) along with a PDF of all of the Quilt Theory Coloring Pages. I’m also including
 Each of these Farmer’s Wife blocks manage to pack quite a punch in the little 6 1/2″ space. My method of attack when deciding how to piece each block has been consistent: how can I piece this with as little muss and fuss as possible? With Sylvia, at first I was thinking chain piecing would be the way to go, since it would help minimize the teeny tiny pieces in the inner borders I’d need to cut and sew. Looking at it more closely, I decided that with this block, even chain piecing would require piecing TINY bits, cutting, and then piecing again. Plus, sixteenths of an inch!? No thank you! Finally, I decided that foundation paper piecing was the way to go, since:
 Ready to get sewing? Make sure you have a grasp on how to foundation paper piece, and let’s make Sylvia!
 As soon as I saw this block, I knew that I wanted to meticulously cut the center square. I’m arranging my blocks on point, so be mindful of your own plans before meticulously cutting your fabric! (I call “fussy cutting” meticulous cutting, and you can read why
  Mark the specific piece you want to meticulously cut. I went a little overboard on marking mine for the sake of clarity here. I circled the number but also traced just outside the line of the particular piece, both with bright pink sharpie. Simply circling the number would probably suffice!
 Cut out the center of the piece, creating a window that is exactly the size of the piece you want.
 Draw a 3/8″ seam allowance around the window. I used a green micron pen for this example to ensure the line didn’t get confused with the printed lines on the paper.
 Cut along the line you drew.
 You should how have a planning template to help you cut your fabric for fussy cutting. Notice that I placed my planning template onto the fabric upside down. This is because in foundation paper piecing, we are sewing the block on the reverse side of the template. It did not matter too much for this particular piece, since it’s a square, but always be mindful of directionality of the fabric as well as wrong side-right side. If need be, mark your planning template with “right side up” or “wrong side up” so that your fabric is cut properly!
 Between sewing the fabric on the reverse side of the paper, having the block broken into sometimes odd sections before sewing, and the many pieces involved in most foundation paper piecing patterns, it is in your best interest to color code your paper template before beginning to sew. This way, you can be sure you sew each fabric in the proper place.
 Especially when first getting started with foundation paper piecing, one of the biggest tips I can offer is to be generous with your fabric pieces. It’s better to have to trim a bit more off than to be short and have to rip stitches! For my bright blue squares on Sylvia, I cut the fabric into 1 1/2″ squares, which as you can see includes ample overhang.
 This tip goes for bag-making as well: just because there is a template created for a perfectly rectangular piece, it doesn’t mean you can’t use your rotary cutter and ruler! The outer pieces of Sylvia can be easily cut using a rotary cutter and ruler, which will save time with paper removal at the end. Since these pieces are not easily measured (let’s avoid using sixteenths of an inch if we can help it!) simply cut out the foundation paper piece templates and use them as a guide when rotary cutting. Use the foundation paper piecing method to piece the center portion, then add the D, E, H, and I rectangles using traditional piecing methods. Easy peasy!
 And there you have it. Sylvia, in all her glory.
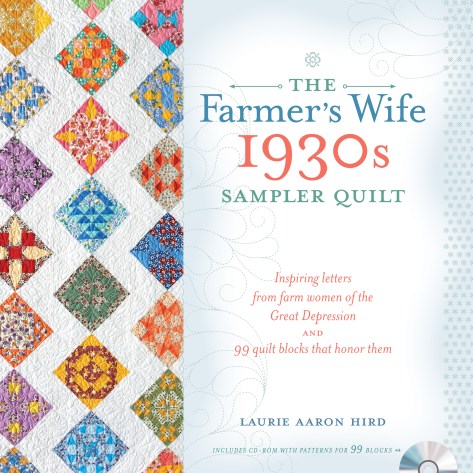

 *Spoiler alert* My tip for her was to know your limits. When every project is a priority with a quickly approaching deadline, it’s difficult to make a prioritized list and keep yourself organized. On normal weeks, the prioritized list I make in my


 I’m calling my block Steady On, which just seemed fitting for such a classic made-by-me block. Those of you who know me know that I cannot keep anything simple, and this is a perfect case in point. This block has double improv curves, twenty (20) tiny flying geese, an hourglass block, and quite a few points that should match *just* so, all in the 12 1/2″ unfinished square block. But fear not, this tutorial has detailed photos and instructions on how to make each component of the block, and breaking it down into manageable chunks makes this block come together quite smoothly (Spoiler: we can make some of the flying geese 4 at a time!). There’s something about the determined light colored geese headed bravely into the dark and improvy unknown that urges me to encourage them… Steady on, now! That same encouragement goes for you, since I would LOVE to see you tackle this block and come out victorious (tag

 For this step, you will need your 5 1/2″ squares of Iris, Amazon, and Sky, washable school glue and tip, a marking pen or pencil, scissors, and an iron and pressing surface. To make the double-curved quadrants for this block, follow my tutorial on easy curved piecing using a visual layering approach and glue basting
 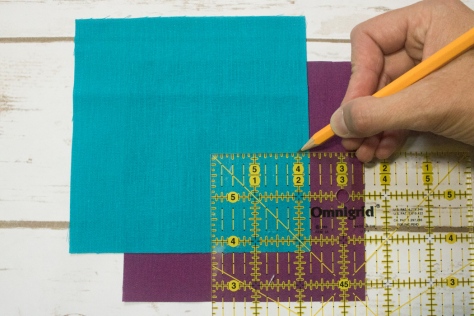 Since this method begins from the bottom up, start with Iris and Amazon. Mark the Amazon square 2 1/4″ up along both sides from the bottom right corner. Make sure your mark extends 1/4″ in from the edges before beginning the curve. This will be your sew line, not your cut line, so by measuring the 2 1/4″ we are ensuring our seams will match up, even though the flying geese are exact and the curves can be improv. (Note here that if you are using fabric with a right and wrong side, you want to be marking the wrong side of the fabric. With the Cloud9 Cirrus Solids that’s not important).
 Draw an improv curve from marked point to point, or trace a perfect curve using the edge of a small plate or glass. Make sure your curve begins and ends at your marked points 2 1/4″ up from the corner.
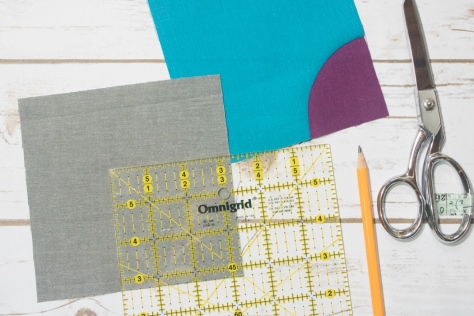 Next, grab your Shadow 5 1/2″ square and mark 3 1/4″ up both sides from the bottom right corner. Again, draw your curve as desired, connecting from marked point to marked point, and using that line as the sew line.
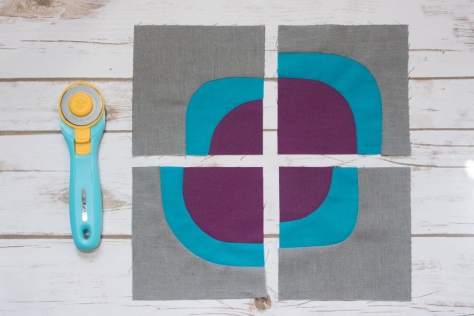 Make four quadrants, measuring 2 1/4″ up on the Amazon square and 3 1/4″ up on the Shadow square for two of them, and measuring 3 1/4″ up on the Amazon and 4 1/4″ up on the Shadow square for the other two. Admire your smooth curves, and set those blocks aside for later!
 Place two 1 7/8″ Iris squares in the top right and bottom left corners of a 3 1/4″ Sky square as shown. Using your fabric marking tool of choice, draw a diagonal line from the top right corner to the bottom left corner. I love my Hera marker since it doesn’t actually mark the fabric, but makes a clear guide line.
 Sew 1/4″ from either side of the drawn line. Press with a hot iron to set the seam (notice that I didn’t do this step? tsk tsk).
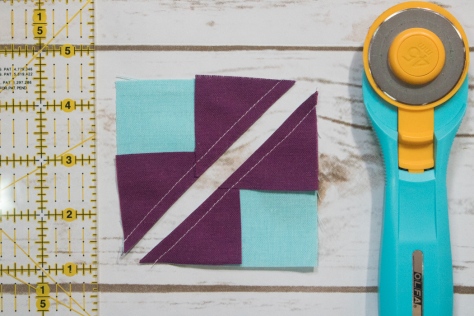 Cut along the drawn line.
 Press the small Iris triangles outward, with seams pressed toward the dark fabric. Then place another 1 7/8″ Iris square in the corner of each unit, and mark a diagonal line as shown above.
 Again, carefully sew 1/4″ from either side of the drawn line. Cut along drawn line.
 Press open, with seams toward darker fabric.
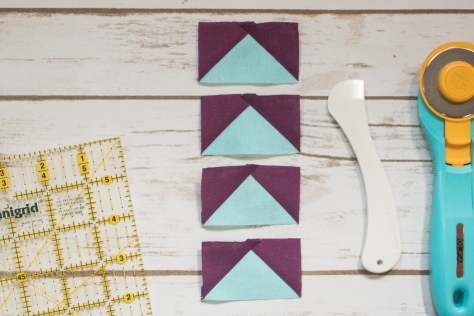 Trim to 1 1/2″ x 2 1/2″ and set aside.
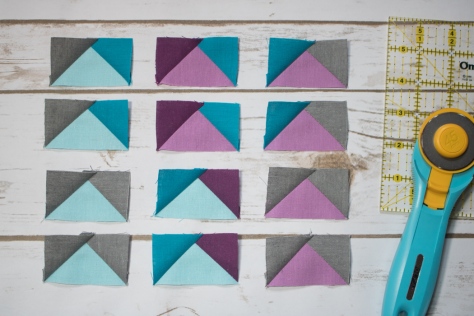 Grab your 1 1/2″ squares and 1 1/2″ x 2 1/2″ rectangles and lay them out to help plan which corners should be positioned on each rectangle. Use the finished flying geese above to help plan before you start sewing.
 To make a flying geese block (or would it be flying goose?), position a 1 1/2″ square right sides facing the right top corner of a 1 1/2″ x 2 1/2″ rectangle. Draw a diagonal line as shown above.
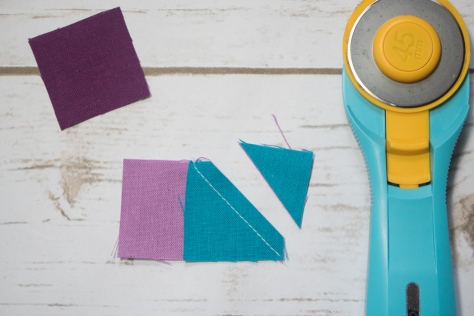 Sew along the line and then trim a 1/4″ seam allowance.
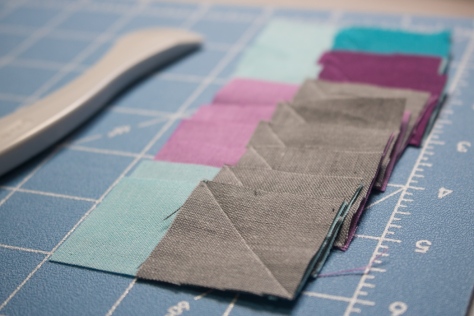 I like to get mine all paired and drawn so that I can chain piece each side.
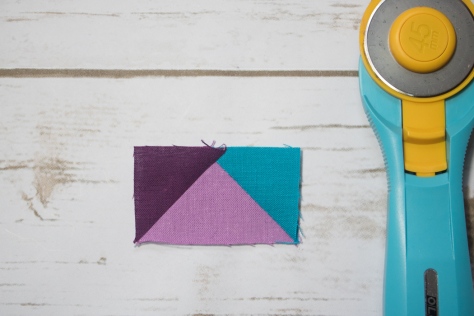 Repeat with the other 1 1/2″ square on the top left side of the block. Press seams open or up toward the corner.
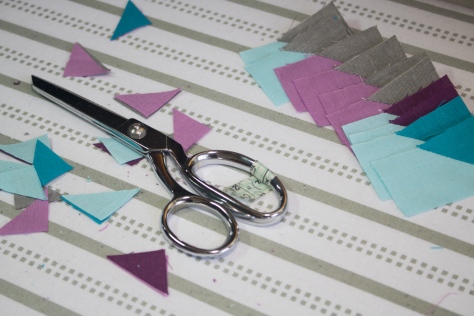 Time saving tip: I cut my 1/4″ seam allowances with scissors while pressing. As long as you are accurate with a pair of scissors, it takes much less time than rotary cutting, at least for me.
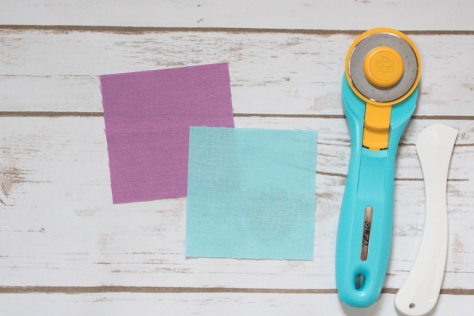 Finally, let’s make that center hourglass block. Grab your 3 1/4″ Lilac and Sky squares.
 Place right sides together and mark a diagonal line. I like to pin my pieces together since we are working with such a small scale. If you’d prefer some wiggle room, you can begin with 3 1/2″ squares and trim to size when you’re finished!
 Sew 1/4″ from either side of the drawn line. Cut along the drawn line.
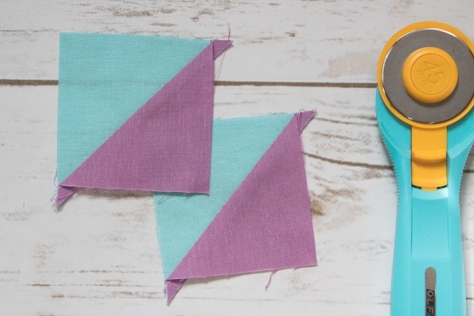 Press toward darker fabric. You will have two half square triangles (HST).
 Place HSTs right sides together, with the Lilac half of one facing the Sky half of the other, and nesting the seams.
 Draw a diagonal line perpendicular to the existing seam line, again pinning to keep the pieces in place while you sew.
 Sew 1/4″ on either side of the drawn line. Then, cut along drawn line.
 Press seams open. You will have two hourglass blocks, but will only need one for this block. Save the other one for your next Steady On block!
 Trim to 2 1/2″ square. Set aside.
 Now that you’ve made all of the components, it’s time to sew the block together! Arrange all of your pieces as shown above, paying careful attention the positioning of the flying geese in relation to the large and small curves on your curved quadrants. There should be two Iris flying geese corners next to small curves and three Iris flying geese corners next to large curves.
 Sew the top five and bottom five groupings of geese together, and sew the center horizontal strip of geese and center hourglass block together.
 Perfect points tip: When sewing the flying geese together, keep the piece with the goose point on top. As you’re sewing, make sure your sewing machine needle sews exactly through the “x” that marks the point of the goose, or if anything, slightly to the right (above) the point. This way you won’t lose any points!
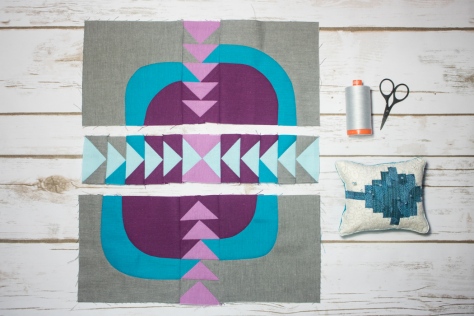
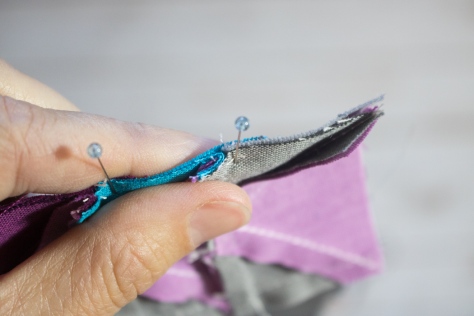 Next, sew the top left and top right curved quadrants to the top grouping of geese, pinning just after each seam that needs to match.
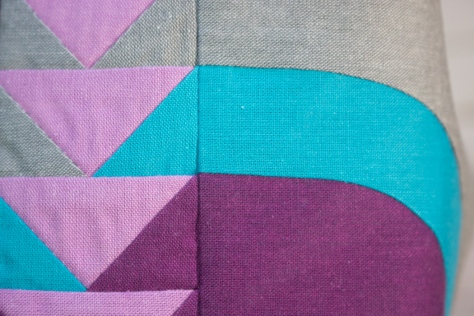 When aligned properly, the geese corners should flow into the curved piece perfectly–that’s why we so carefully marked our curve starting distances with our improv curves!
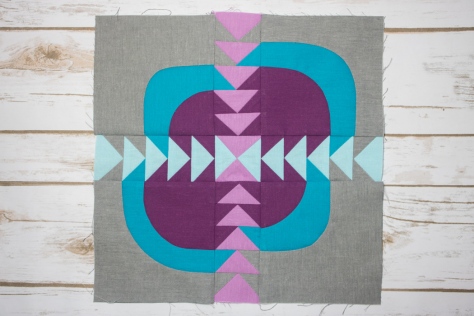 Finally, sew the top and bottom panels to the center horizontal strip, again pinning just after each important seam match. Press toward the less bulky sides (the curved quadrants), and viola! Steady on…
 I first saw this method being used by
 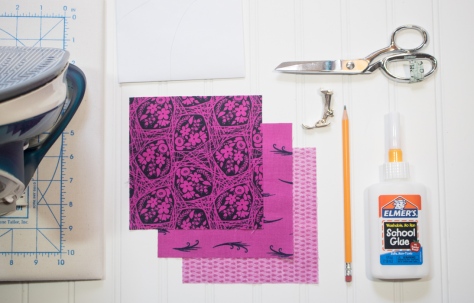 So let’s get started! First, gather your supplies. You will need:
 Before you begin, decide generally how you want your curves to look. I like to sketch mine out on paper more for a visual than for an exact plan. Think of your fabrics in terms of layers: the bottom is the inside of the curve, moving upward and outward. Keep in mind that if you want to have a convex curve next to a concave curve, simply switch the way you view your “top” and “bottom” layers. The inside of the curve is always the bottom, and work from the bottom up.
 Draw your curve on the wrong side of your top (or in this case, middle) fabric with a pencil or other light fabric marking pen. If you want your curve to be exact, you can trace the line from your paper sketch by holding the fabric and paper up to a window or other light source. Be sure that the right sides of both the paper and fabric are facing away from you, since you want the line drawn on the wrong side of your fabric, but also want the curve to go in the proper direction.
 Next, cut between 1/4″ and 3/8″ away from the inside edge of your drawn line. This is your seam allowance.
 Clip your curves to help make your curve smooth. Be sure to cut only halfway to the drawn line, not all the way to the drawn line.
 Next, carefully press the seam allowance along your drawn line. Take your time here to make sure your curve is pressed smoothly and exactly along your drawn curve.
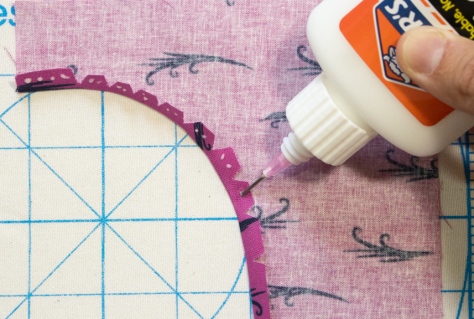 Now it’s time to glue baste this curve onto your bottom layer. Using a fine glue tip and washable school glue, create a small beaded line of glue along the seam allowance. Carefully lining up the outer corners of your squares, layer the middle fabric (with right side facing up and your cut, pressed, and glued seam allowance tucked under) on top of the bottom piece of fabric. This step is why I like to begin with three squares that are the same size. It makes positioning my curves as easy as pie!
 Press with your fingers, making sure the seam allowance is in the right spot and fully folded under. Press with a hot iron to set the glue. Admire your perfect curve… but it’s not sewn yet! Just one more step.
 Once the glue has been set and fabric cooled off, carefully lift up the top layer of fabric to expose the seam allowance. I use my zipper foot with my needle moved all the way to the left, since the narrow foot helps ease around tight turns. Carefully and slowly sew along your drawn line.
 As you sew around the curves, carefully move the top fabric out of the way, being sure not to allow folds or puckers to form under the needle. Backstitch a bit at the beginning and end of your sewn line to secure the stitches.
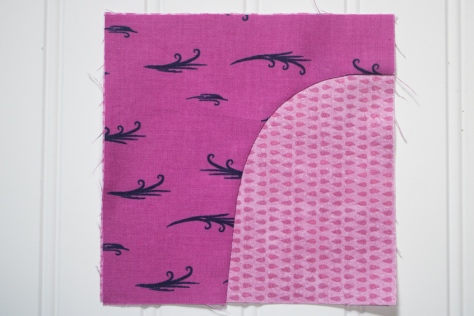 Viola! Press again and you have a perfectly sewn curve!
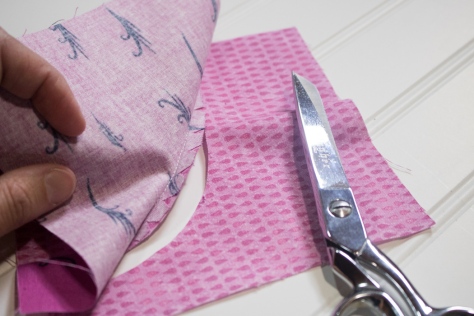 Trim away the bottom fabric that extends beyond the seam allowance, and save for your next scrappy project.
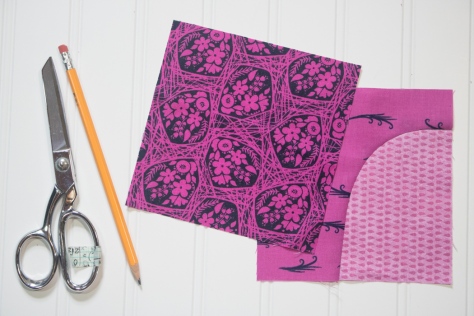 Repeat those five easy steps for your other layers: Draw, Cut, Press, Glue Baste, Sew.
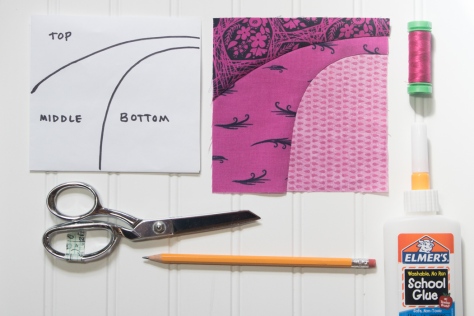 There you have it. Smooth curves, either traced and perfect, or free cut and improv.
 All of my quilt patterns are 20% off for one week only! Now is your chance to restock your pattern library so you’re sure not to run out of projects once the kids are in school. Sale prices are already reflected in my
  On top of that,
 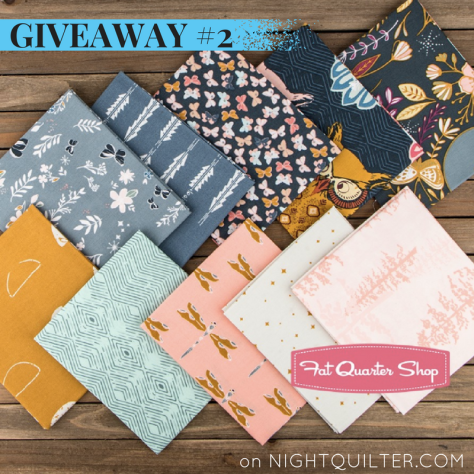 To enter the giveaway today, tell me which bundle would be your first choice: Moonrise (Giveaway #2) or Moonset (Giveaway #1). I will select two winners, and will be sure to give the first choice to the first winner! Leave a comment and make sure I’m able to get ahold of you if you win. For an additional entry, leave another comment telling me how you follow Night Quilter (
 Corresponding solids from left to right:
 Corresponding solids from left to right:
 Corresponding solids from left to right: