It’s been ages since my last color inspiration post, but I’m determined to get them going again. Maine has been thoroughly drab and colorless this winter, and not even with the pristine blanket of snow so common this far north. We finally experienced our first good snow a week or so ago, and I knew it was a great time to get out and take some photos. These color palettes were created using my photographs and Play Crafts’ Palette Builder 2.1.
Corresponding solids from left to right: Kona Silver, Kona Stone, Kona Medium Grey, Bella Glacier, Bella Cloud, Kona Cloud
Corresponding Aurifil thread from left to right: 2615 – Aluminum
2325 – Linen
2524 – Grey Violet
5008 – Sugar Paper
2612 – Arctic Sky
2560 – Iris
As much as my mind calls snowscapes white, when I look closely I discover that there actually are quite a few colors hidden in the soft scene. Blues, lavenders, and browns abound. This creeping thyme looks much different now than it did when it appeared in THIS color inspiration post a few months ago!
Corresponding solids from left to right: Kona Cloud, Kona Pewter, Bella Blush, Bella Tomato Soup, Bella Indigo, Bella Wisteria
Corresponding Aurifil thread from left to right: 2560 – Iris
2606 – Mist 2445 – Victorian Rose 2245 – Red Orange 2468 – Dk Wine 2524 – Grey Violet
Leave it to Mother Nature to provide some pops of color even during the bleakest season. Red berries paired with fresh snow create a quintessential winter scene and a color palette I’d surely use in a quilt!
Where have you found your latest color inspiration?
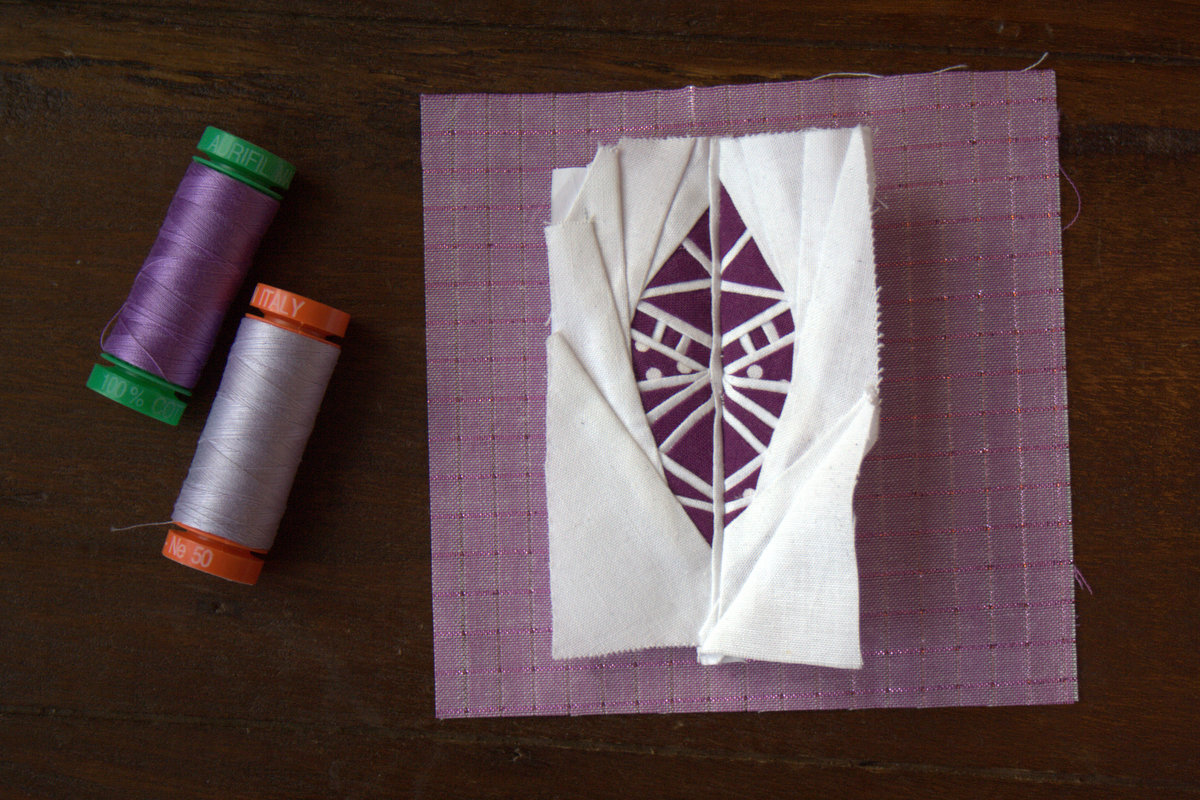
I’m certainly testing this question lately! I’ve written about the mini mini quilt swap craze, and while it seems to have died down a bit on Instagram, I’m still plugging along working to complete the many mini minis I have promised to swap. Such is life when sewing gets done 20 minutes at a time! One such mini mini has morphed into a true test of “how small can you go?”
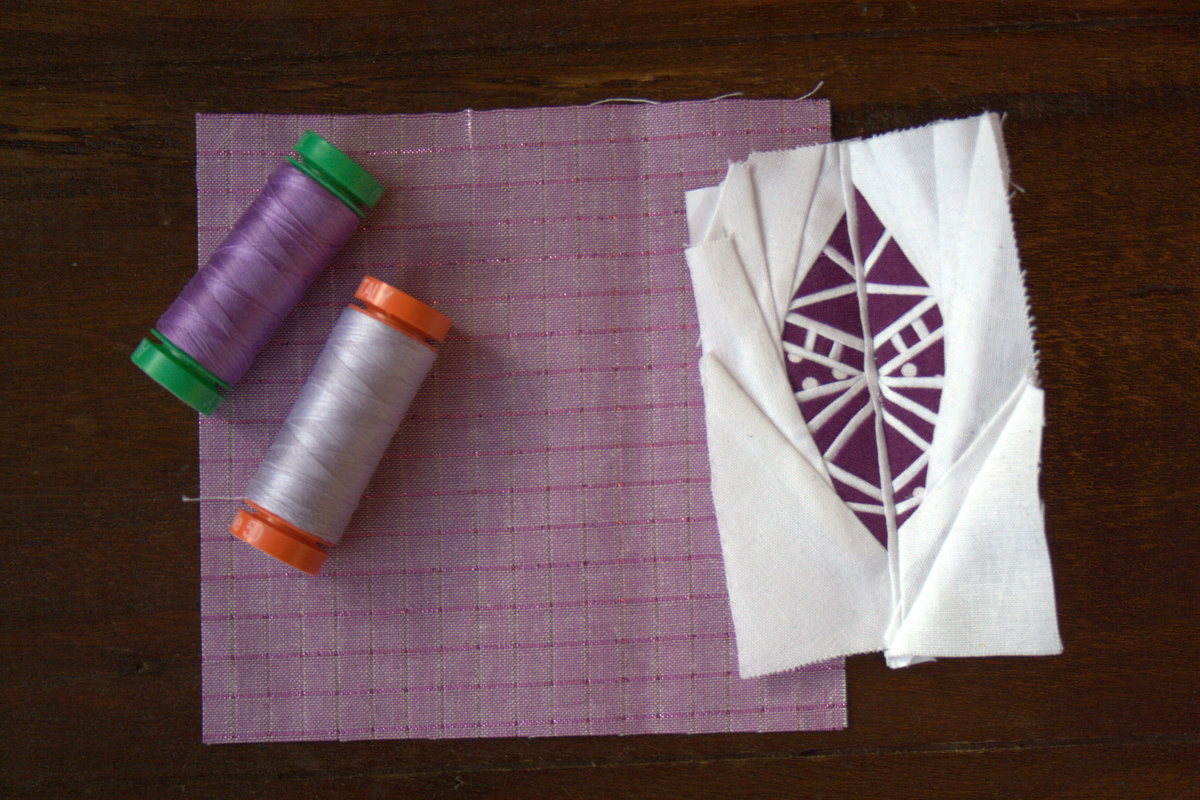
I designed a tiny foundation paper pieced geometric feather for the mini mini I’m making for Renee at Quilts of a Feather, since I wanted to create a purple feather (her favorite color is purple and feather is probably a clear choice), but I also wanted it to be unique. The tiny pattern crazy me developed has 60 foundation paper pieced pieces in block smaller than 3″x4″.
Believe it or not, the foundation paper piecing part went smoothly. That’s one of the wonders of foundation paper piecing–you can literally sew ANYthing.
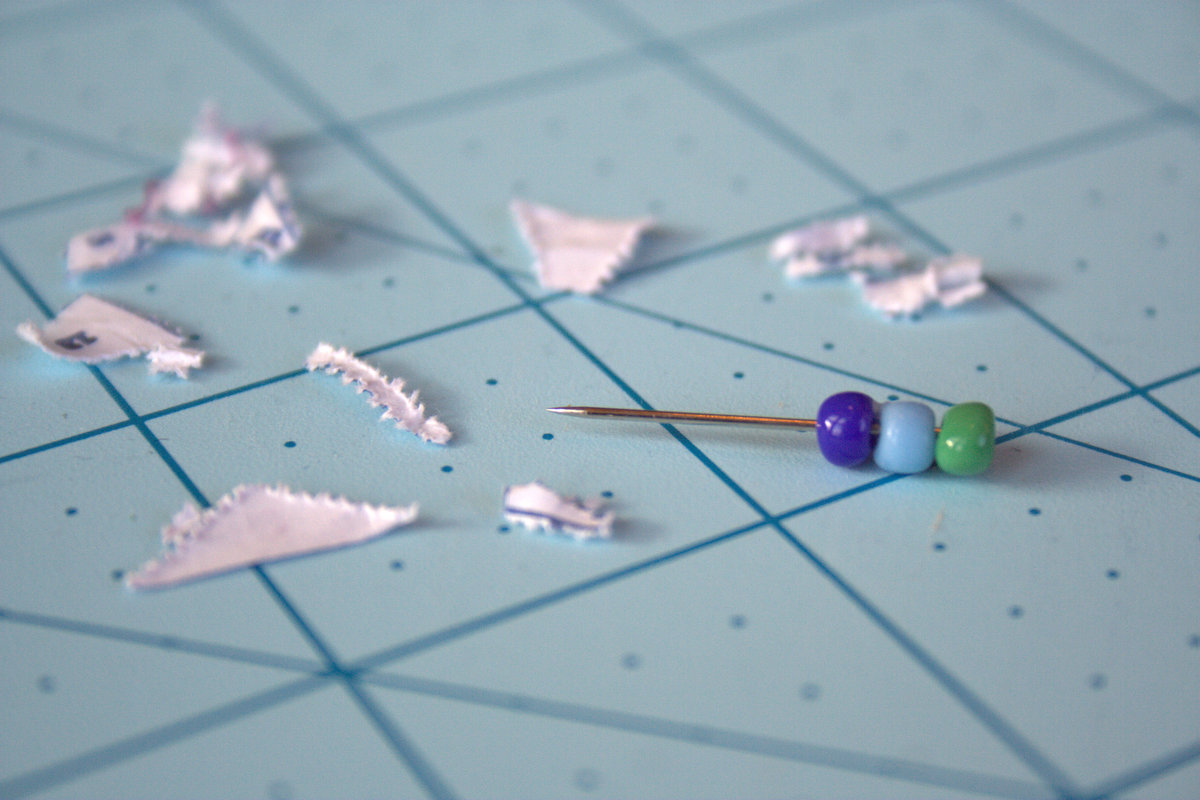
I’ve only removed the papers from half so far, but even that isn’t too bad. I quite enjoy it, actually. When foundation paper piecing, I set my stitch length to 1.2 so the paper basically melts off. I encouraged some of the teeny tiny smaller than 1/16″ bits to come off using a cute stiletto I received as part of a swap last year. (Aside–did you know that a stiletto in quilting is a skinny tool that is thicker and a bit more blunt than a pin, and is used to help feed your fabric through your sewing machine, hold down little corners while sewing, or any other task you can derive? I *just* learned what a stiletto was and so I’m trying to use it more!)
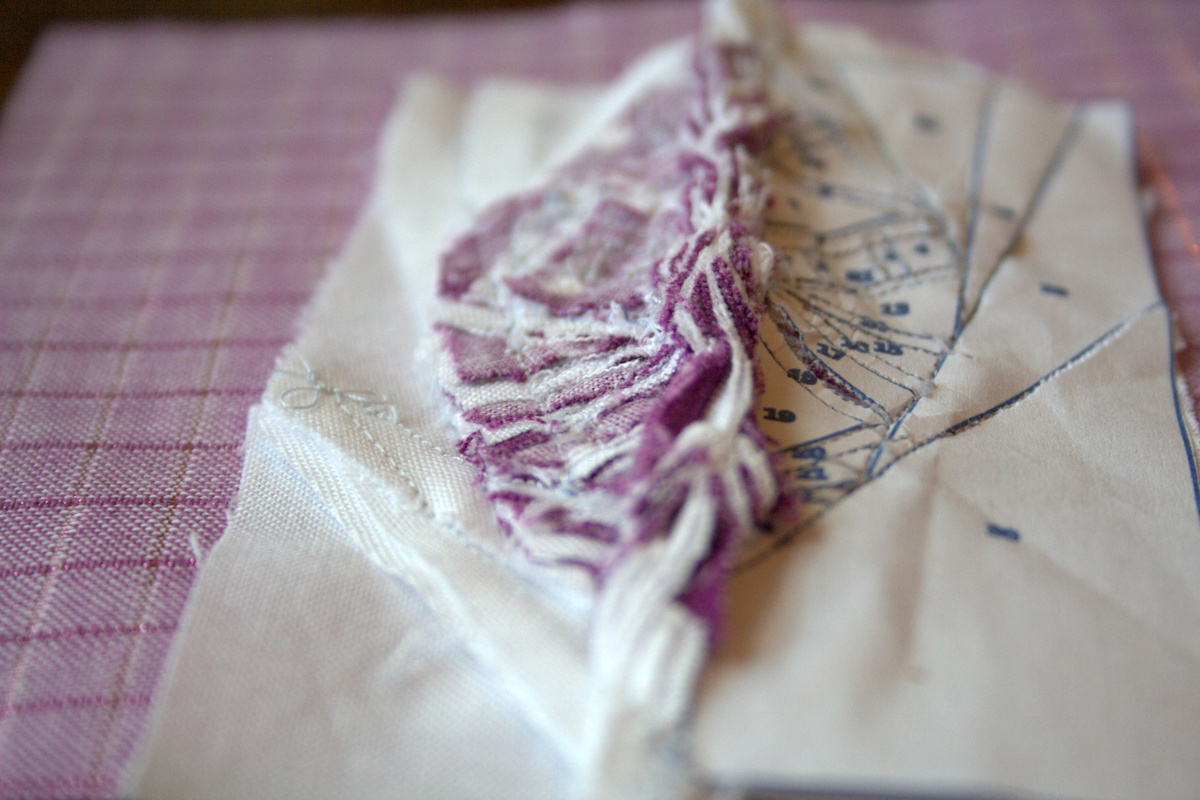
Joining the two halves, on the other hand, was where the challenge truly arose. I broke a needle trying to get through all of those layers, and eventually settled on hand cranking my machine through the thickest part.
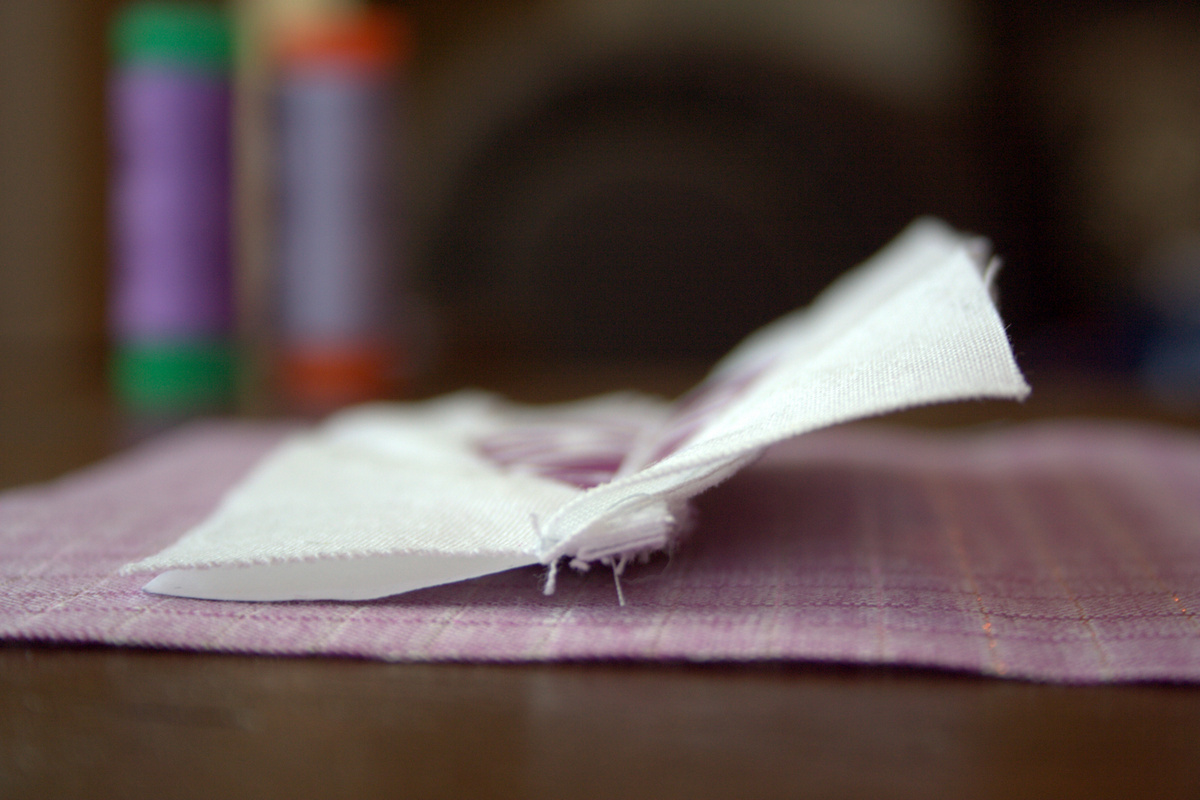
Needless to say, this baby does not lay flat, nor can I hope to press it flat no matter how much Flatter I use. But no worries! I plan to use a double layer of batting, perhaps only under the feather (I think it’s called trapunto) so that at least it won’t seem too out of place. But it appears I have my answer: this is as small as I can go, at least with this pattern!
I originally planned to trim the outer edge and needle turn appliqué the feather to the background fabric, a gorgeous glimmering square of Anna Maria Horner’s Loominous. After requesting some tips/advice from Carolyn Friedlander via email, I am approaching it in a different way per her advice; instead I’ll do reverse appliqué, where I’ll cut the hole in the background fabric, place it on top of the feather, and stitch it down around the feather’s edge. While it will be my first time trying reverse applique, I think I have a much better chance at success using this method. Thank you, Carolyn!
I’m leaning toward the lighter purple Aurifil for the stitching, so that it will blend in with the Loominous.
I’ll be sure to keep you posted on how this mini mini turns out!
I’m not one for making new year’s resolutions. Perhaps it’s the knowledge that there’s a really good chance I’d be setting myself up for failure, or perhaps it’s the fact that I make resolutions and goals for myself all year long, but I’ve never really jumped on the resolutions bandwagon. I do, however, love the reflection, reevaluation, and goal-making that comes with beginning a brand new year. Many have chosen a single word on which to focus; “one little word” to guide their year. As Ali Edwards explains on her blog:
“The premise is simple – choose a word to invite into your life for the coming year. You live with it. You let it speak to you. You might even follow where it leads. There are so many possibilities and no right or wrong way to approach the adventure.”
Last year, I chose “balance” as the word to guide my year. It’s hard for me to move my focus in another direction, since I know from the depths of my soul that balance is still very much at the top of my goals list, and most likely will always be there. In reflecting over the past year, I think I did a really great job of balancing quilting with family, friends, and the rest of life, at least up until the last couple of months. Toward the end of the year, I let my excitement at my success at making time to sew despite my full plate bubble over, and I bit off more than I could chew. I’m still floundering to get caught up so that I can feel that refreshed new year, new start feeling. I’ll get there.
With all of that in mind, I’ve finally settled on a word to guide my 2016: nurture.
Even beyond the obvious–the nurture of my three kids–this word is one that I hope will guide my year in a positive way on all levels. Yes, I will aim to care for and encourage the growth and development of my children first and foremost. That almost goes without saying. But I will also use this word to guide other areas of my life:
My relationship with my husband–so easy to let slide as our family grows
My family as a whole–family fun time all together!
Myself–making time for self-care IS essential
Relationships with friends–mommy playdates even when the kids are in school soothes my soul
My piecing skills–I want to master curves, and always keep learning
My quilting skills–more free motion quilting practice, hand quilting, stretching my quilting style
My handwork–I want to sew all the things! embroidery, visible mending, applique, sashiko…
My creativity–regularly sketching and developing new patterns helps exercise my creative mind
Quilting community–I love this community and want to continue to share inspiration, ideas, and creativity with you. YOU nurture me!
The business side of quilting–finding a balance of business commitments that nurtures my creativity while staying true to my ideals and working toward my goals
The garden–I let the garden go last year because of Finn’s birth, but this year I want to nourish our bodies with homegrown food again
I suppose it’s a good thing that my biggest problem is wanting to say yes to everything, and wanting to create even half of the ideas that inspire me. But balance is key. This year, I hope to let NURTURE guide my creative, personal, family, and business decisions and continue to let my creativity shine.
I’ve been letting my blogging slide a bit so far this year, but plan to get back into the rhythm of sharing inspiration here. As I mentioned above, I bit off more than I could chew at the end of last year, so I’m still working hard to catch up and meet some final deadlines. I miss you, and will share more soon! Thank you for following along with my creative process, and I look forward to many inspiring conversations in the year ahead! May this blog help nurture your creativity as well!
Time is not the only thing that has been flying by. Finn is already seven months old and is officially on the move! While he still moves primarily through his inching army crawl, he is getting a lot more adept at moving his body around from belly to sitting to up on all fours, *flop* to belly and across the floor!
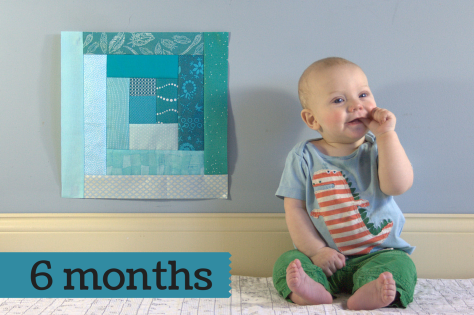
While I didn’t finish it before Christmas, I did finish Finn’s 7 month milestone quilt block. I’m on course to have 12 blocks by his first birthday. The photography part is definitely getting fun, since as soon as I sit Finn down, he wants to move. That squirmy wormy desire to *move* just shows his growth and personality, so I’m embracing it. It’s one more opportunity for creativity!
The biggest news this month is: teeth! Finn’s two bottom teeth are in and now big enough to see when he gives his gummy smile. Teething is never fun, but Finn (and mommy & daddy) have been handling it like champs. Between his big sister’s birthday, Christmas, and holiday travel, it has been a full and busy month!
Not much stands in Finn’s way these days. Trying to get him to stay on the quilt near his quilt block was tricky, so most of the photos this week are movement or snuggle photos. I’m sure you don’t mind. This was what I saw less than a minute after putting him down right next to the wall. “I want to play, Mommy!”…
…until he got distracted by a design in the carpet. He is also really working on his fine motor skills, trying to grab tiny bits off the carpet and floors. I love watching his little mind at work. Babies are amazing; they learn so much so quickly!
“I like this one, Mommy!”
Finn’s quilt is really taking shape! You can see my full layout plan here in case you missed it a few months ago. I’m tempted to begin sewing blocks together but I think I will wait until the end to be consistent with photos. Here’s a quick photo burst since who doesn’t want to see babies in front of gorgeous quilt blur?
He loves to stand while holding onto my knees, and was trying to eat my colorful knees.
This project is so much fun, and I love that even if I procrastinate, sewing up a block takes less than an hour; sometimes it comes together as quickly as a half hour. For a busy mom with a million things on her plate (Hi, that’s me!), this project is a breath of fresh air and a chance to see and make progress without a huge time commitment. Plus, it’s such a fun way to document Finn’s growth and milestones.
This time of year often sparks reflection as we prepare to start afresh in the new year. It always amazes me to look back on a year in full, as I realize just how full and rich my life is and how much I’ve accomplished (and what I thought I’d surely have accomplished by now but haven’t). One of the fun aspects of social media is ability to use analytics to take a concrete look at the past year’s blog posts and social media interactions. Cheryl at Meadow Mist Designs is hosting a fun linky party inviting quilty bloggers to highlight their “best” posts of 2015. I’ve put together a few Night Quilter “bests” in this post, and I invite you to reminisce along with me.
My Top Accomplishment
I could not possibly begin a “best of 2015” post with anything other than my most epic Friday Finish of all time: giving birth to my third baby, Finnian. While the blog post announcing his birth falls *just* outside the top five most viewed posts of the year, I’m including it first here. Family is always first. Plus… babies!
Most Viewed Blog Post (including giveaways)
Listing the most viewed blog post is a bit tricky, since typically posts that include a giveaway are viewed a lot more than those that don’t. Nearly all of my giveaways were accompanied by quilt or project finishes, though, so I’m including the tippy-top post here: the Doe Layers of Charm quilt I made early in the year. It has been viewed twice as many times as the next-most-viewed post, so it deserves a bit of spotlight. This was my first quilt made using all one fabric line, sewn for a Fat Quarter Shop short-cut pattern release, and what better fabric line to use than Doe by one of my favorite designers, Carolyn Friedlander.
Most Viewed Tutorial
This fun and easy tip revolutionized my perle cotton storage and use, and clearly was an all around favorite.
Most Viewed Blog Post (not including giveaways)
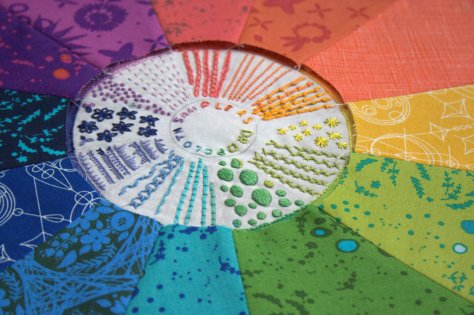
My dropcloth embroidery sampler color wheel is very high on my list of favorite projects, and I see that everyone else agrees. One of my goals for 2016 is to face my fear of sewing circles and finish this!!
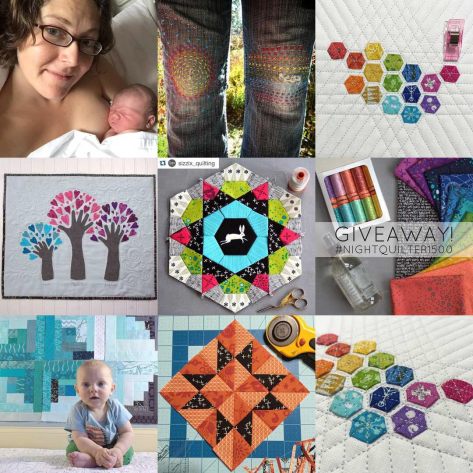
This may be old news for those of you who also follow me on Instagram, but there’s a rad analytic site called 2015bestnine.com (**Don’t visit this site right now. It appears to have been nefariously hacked since a “virus, ack!” pop up comes up on both my computer and phone when I go there now… but a few days ago it worked!**) where you type in your Instagram name and it generates a collage with your nine most viewed posts. Here’s my collage, which includes all sorts of fun–Finn’s birth stole the show on IG, accompanied by my visible mending foray (have I blogged about that?), modern hexies mini mini, growing tree mini quilt, the Rose Star EPP I made as my first big Sizzix tutorial, Finn’s milestone quilt project, and a Farmer’s Wife block. It really covers a large part of what I’ve been up to over the past 12 months, and of course includes rainbows.
I’ve had a great year, and feel so grateful for all of your participation, support, love, suggestions, inspiration, and friendship. Without readers, without comments, without reaction, this blog is just an endpoint for my thoughts. Add you, and it becomes a foundation for inspiration, a jumping-point for new projects, and a connection between like-minded makers. I’m filled with gratitude.
Thank you, too, to Cheryl, for giving me another reason to reflect and look back over the past year. It has truly been an amazing year, and I’m looking forward to a peaceful, productive, rainbow-filled 2016.
What was your favorite Night Quilter post or project from 2015?
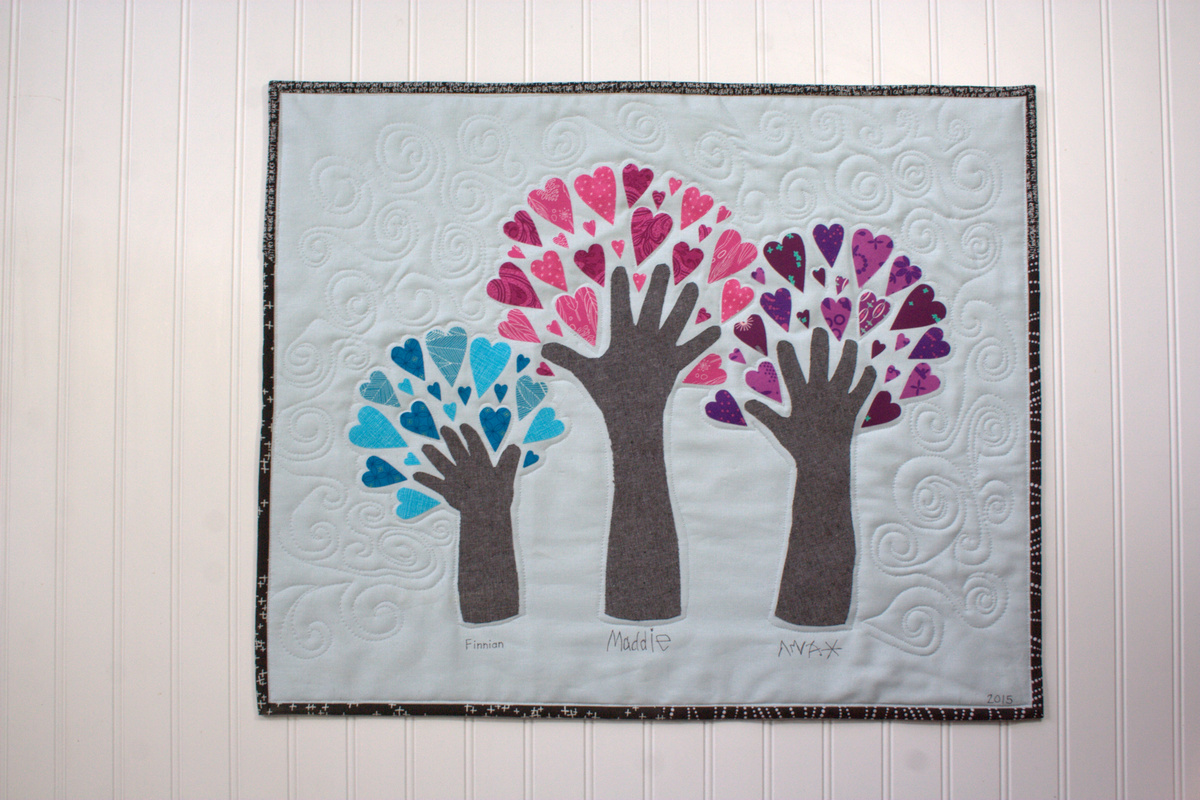
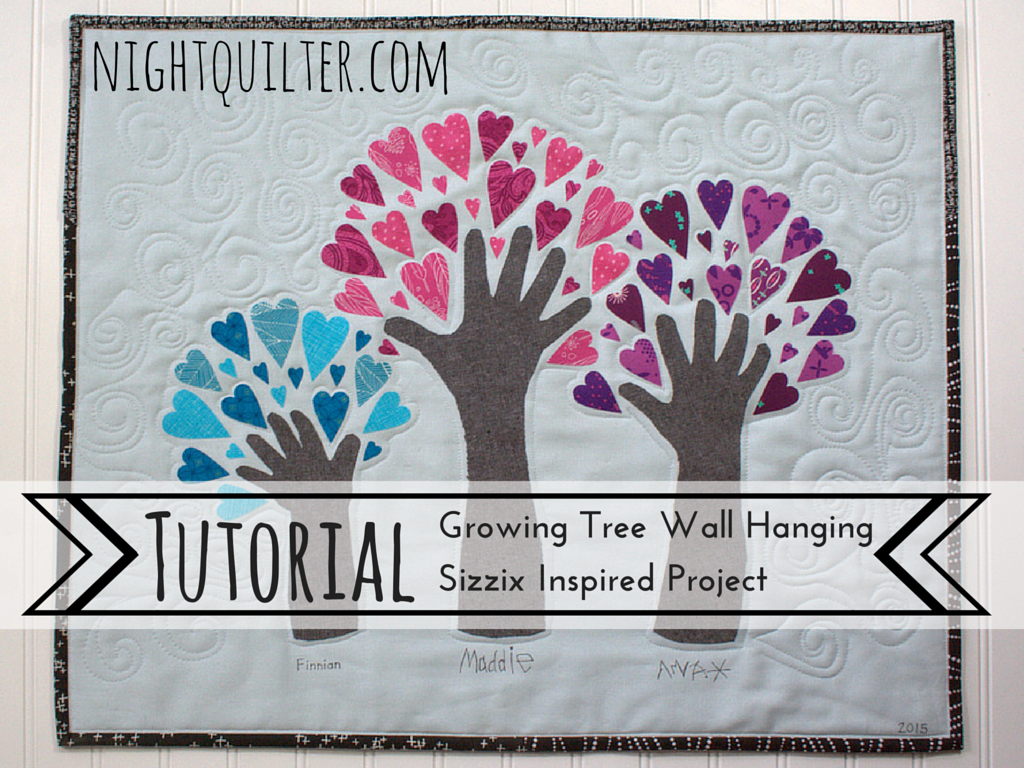
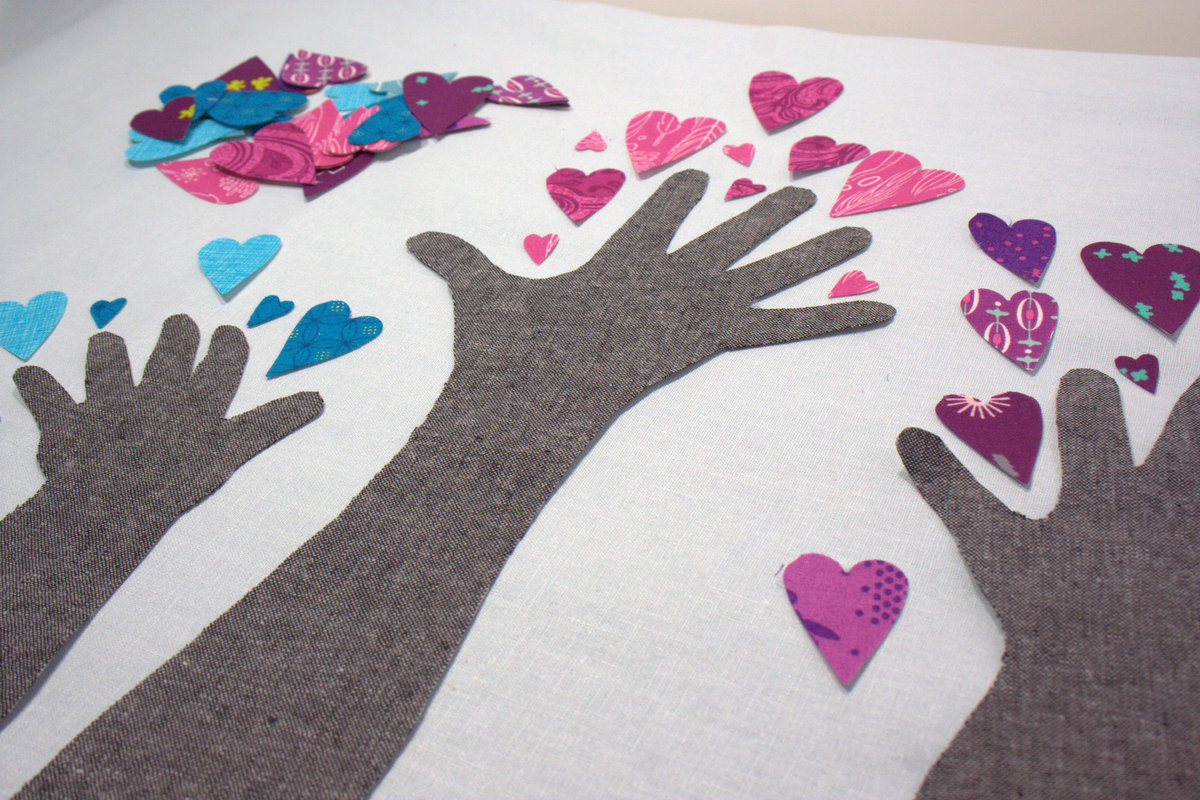
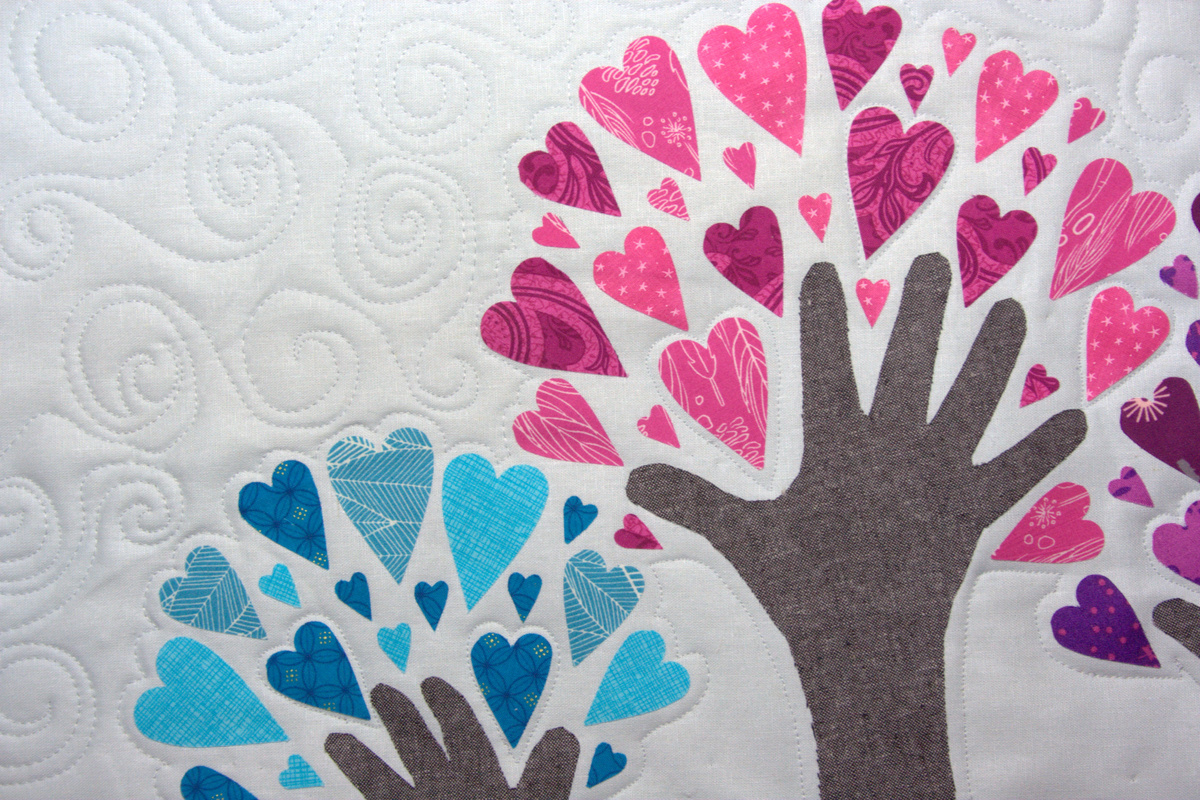
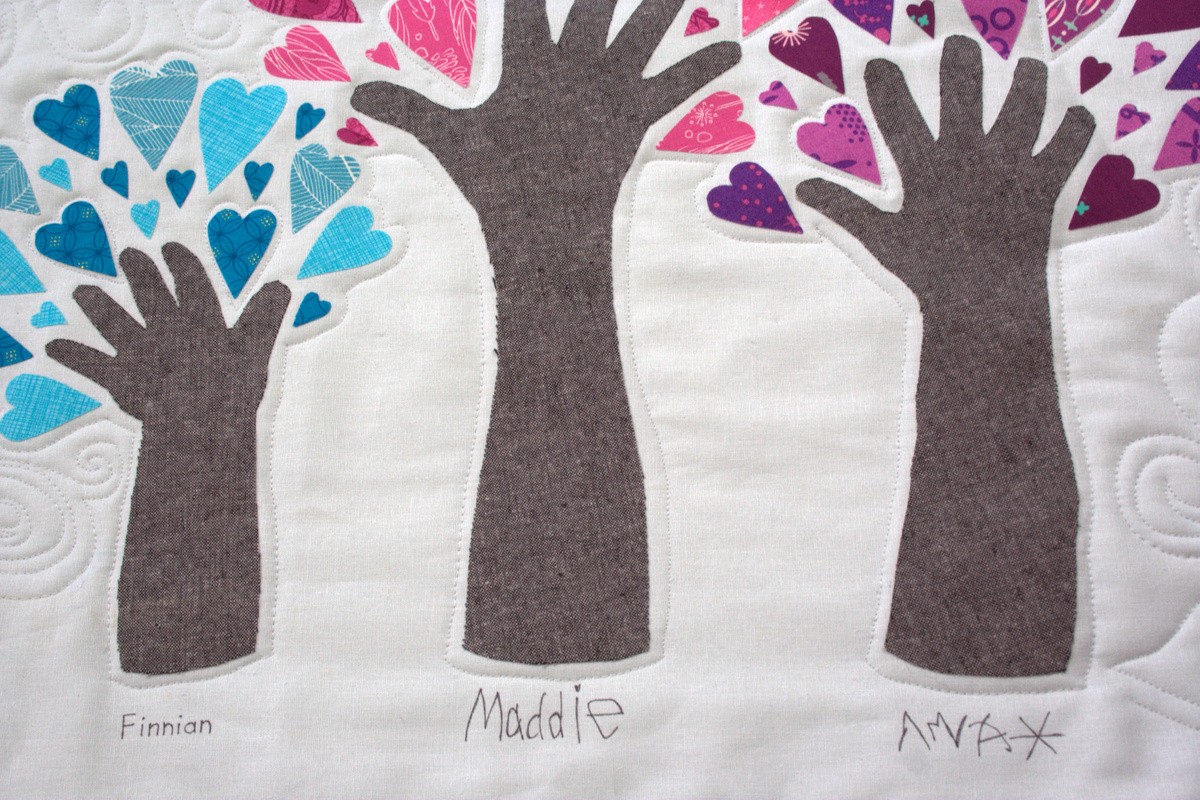
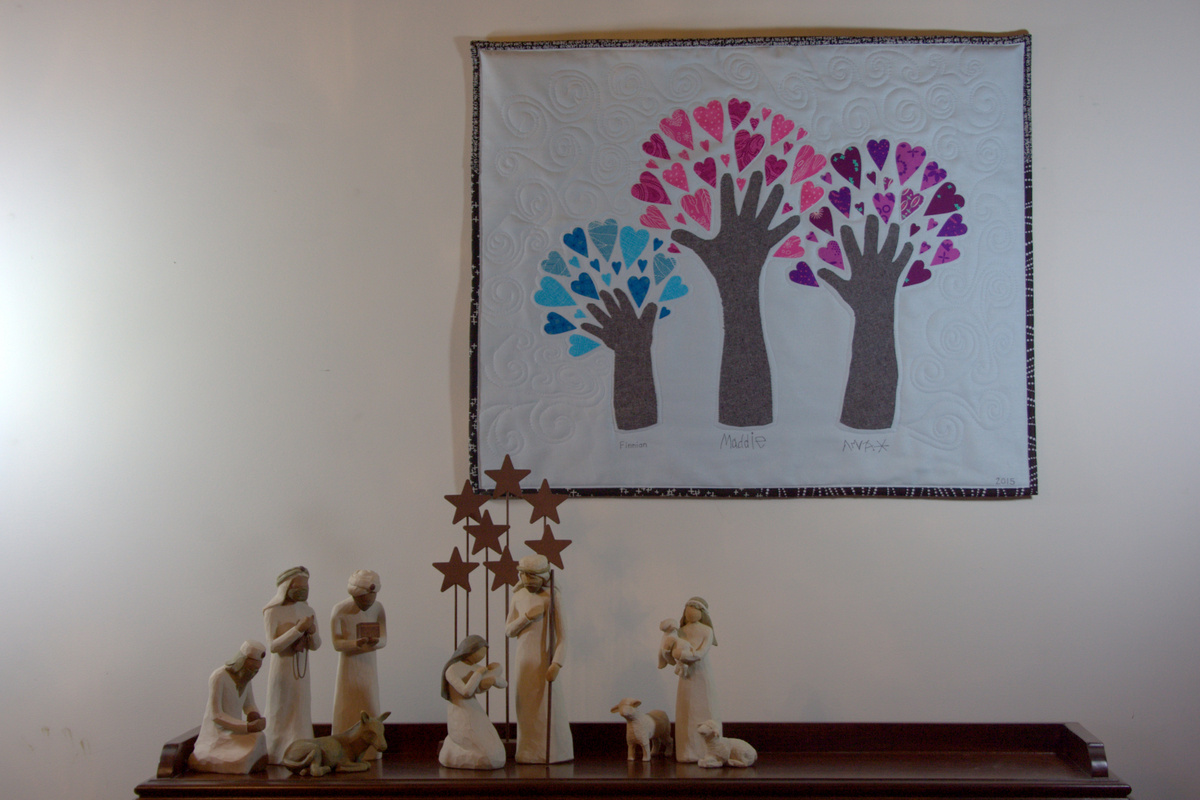
Today I’d like to share a tutorial for a great project that documents the growth of little ones while showing love in a beautiful way: the growing tree. In my case, it will be a growing grove of three trees, so feel free to adapt to fit your kiddos. I initially hoped to make four of these, one for each set of grandparents (we are blessed to have three sets!) and one for us to keep. Now that I’ve finally finished the first one, I’m accepting the fact that I may just stop at one, since I would like to cherish my little babies’ hands, too, and Christmas is less than three (3!?) days away. Since it involves hearts, this project would also be a fabulous Valentine’s Day gift for those doting grandparents.
From the moment I gave birth to my first child, my holiday gift giving style changed completely. Instead of trying to think of the “thing” each family member would like or need most and focusing all of my time on making handmade gifts of love for every family member possible, I acknowledge that presence is the best present if at all possible, and as a busy mom (of three lovely children, now), gift making time is much more rare. I am blessed to have a large family, and to have married into an even larger family, so potential gift recipients abound. But especially in recent years, my parents and in-laws–the grandparents–are usually the sole recipients of Christmas gifts, and such gifts nearly always involve their cherished grandchildren (our kids). This year, grandparents will get a whole lot of love, since time wasn’t on my side with this project. When I had the idea to make heart-filled trees out of my children’s hands, I did my typical google search to see if it had been done before. I found this post, about a creation inspired by another creation, and I knew that that inspiration would need to take one more step into the quilting world to become a quilted gift. Here’s how to make your own Growing Tree.
First, gather your materials. Note that material amounts will vary depending on the number of children you have and the size of the child. I’ve tried to include amounts for a single tree, but feel free to adjust as needed. I’ve also included affiliate links to products that I use and love. If you click through and purchase with these links, I will receive a small commission that will go toward funding all that goes into creating these tutorials and keeping my blog up and running.
Materials
1/2 yard background fabric – you may be able to use less if your child is small. A fat quarter should be sufficient for a baby’s growing tree. A half yard is playing it safe if your children are older. (I used Essex yarn dyed linen in light blue)
Children! and a pencil for tracing their forearms and hands!
*These items are not needed if you opt to frame your growing tree instead of quilting it, but you will also need a suitably sized picture frame, stiff acid-free cardboard if the frame doesn’t come with it, and a form of adhesive (glue or tape) to tightly wrap the fabric around the cardboard before insertion into the frame.
Let’s get started!
Gather your children! Have them spread fingers wide and put forearms down onto the Heat’n Bond. With their excited help, trace each child’s forearm and hand onto the non-textured side of the Heat’n Bond. You want to trace from just below the elbow, up around each finger, and then down the other side. If you are making more than one version of this Growing Tree, trace as many forearm-hand tree trunks as you will need. (Because I initially aimed to make four versions of my Growing Grove of Trees–oh my boundless ambition!– I traced each patient child’s arm four times, except Finn’s. With squirmy 6 month old Finn, I struggled and wiggled and waggled until I got a somewhat accurate tracing of his arm and hand, cut it out, and traced THAT three more times. He was not interested in sitting still!)
Carefully cut out each tree trunk, either enlisting the help of your children if they are older and proficient at cutting, or sending them off to play for the next few steps.
Fuse your tree trunks to the wrong side of the tree trunk fabric, following the manufacturer’s directions. Always be extra cautious if using a hot iron with small children around. Toddlers are inherently curious and can not yet physiologically control their curious explorations, despite fervent warnings from mommy–as I’m sure you know! I do my ironing upstairs without any kids underfoot to be safe.
Set the tree trunks aside to cool. Once cool, carefully cut around each forearm tree trunk and set aside.
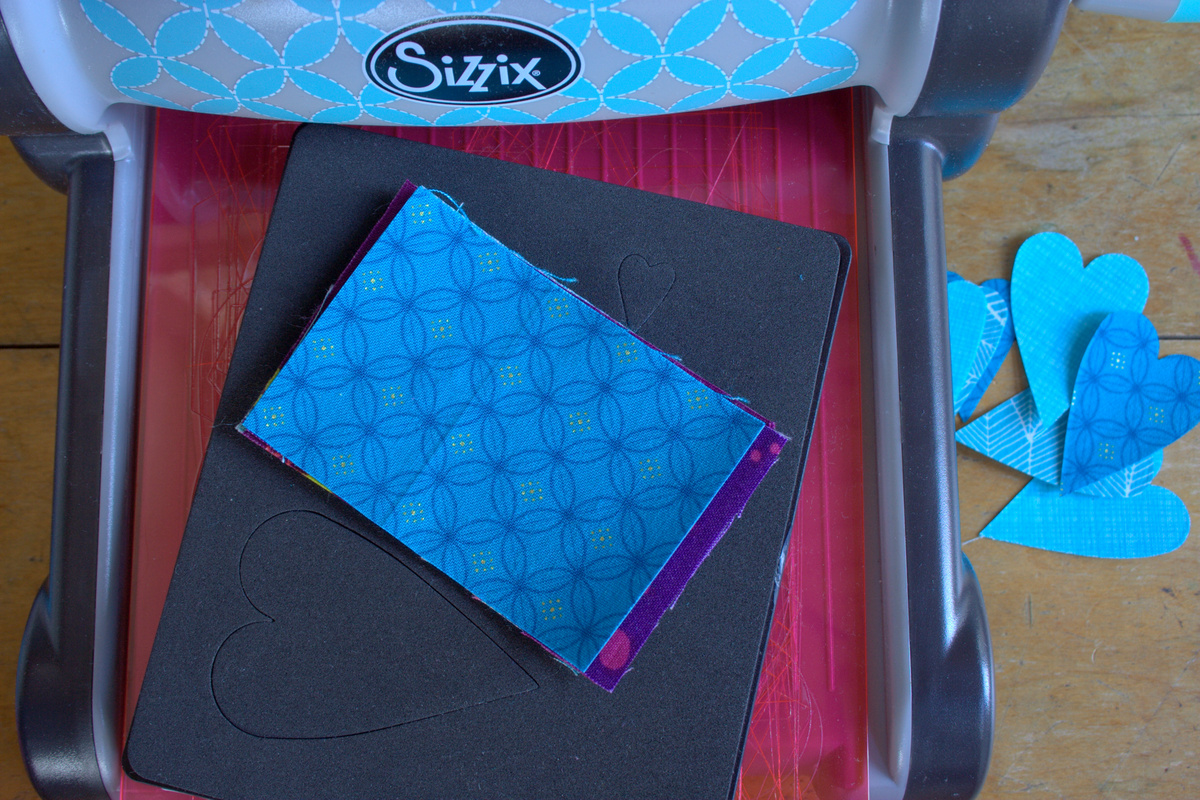
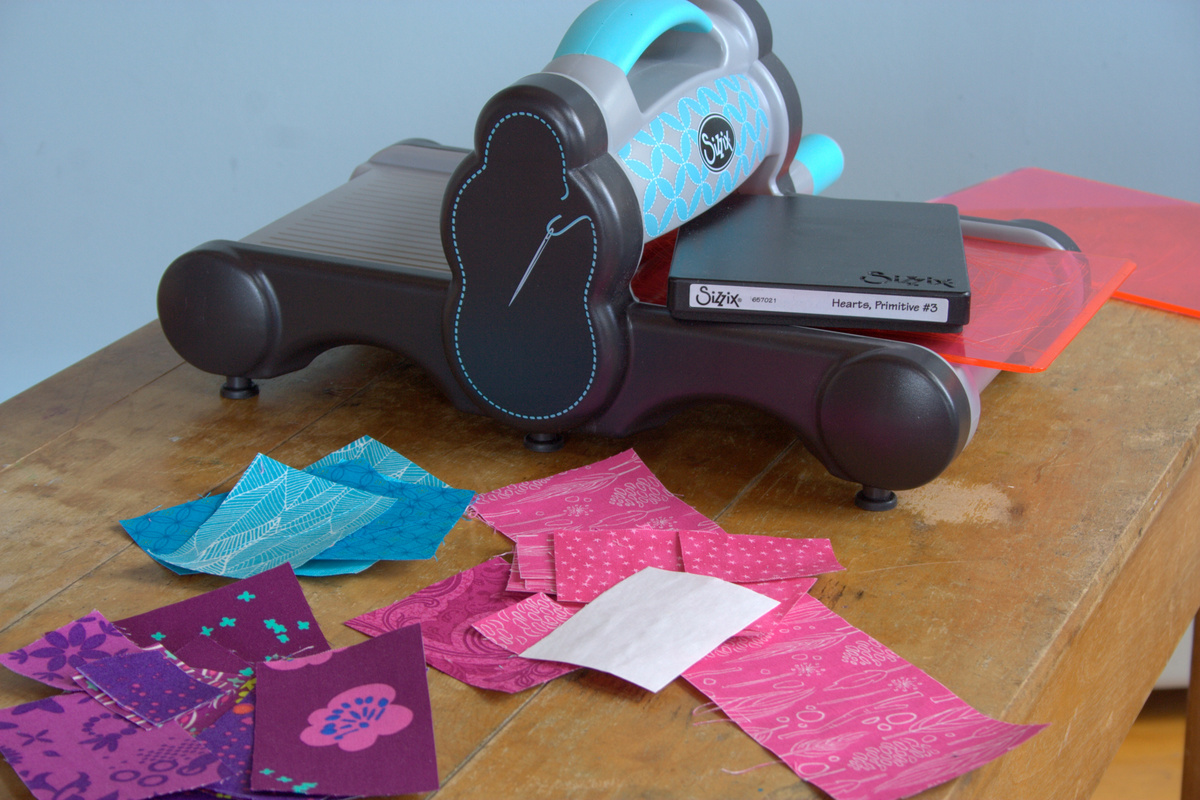
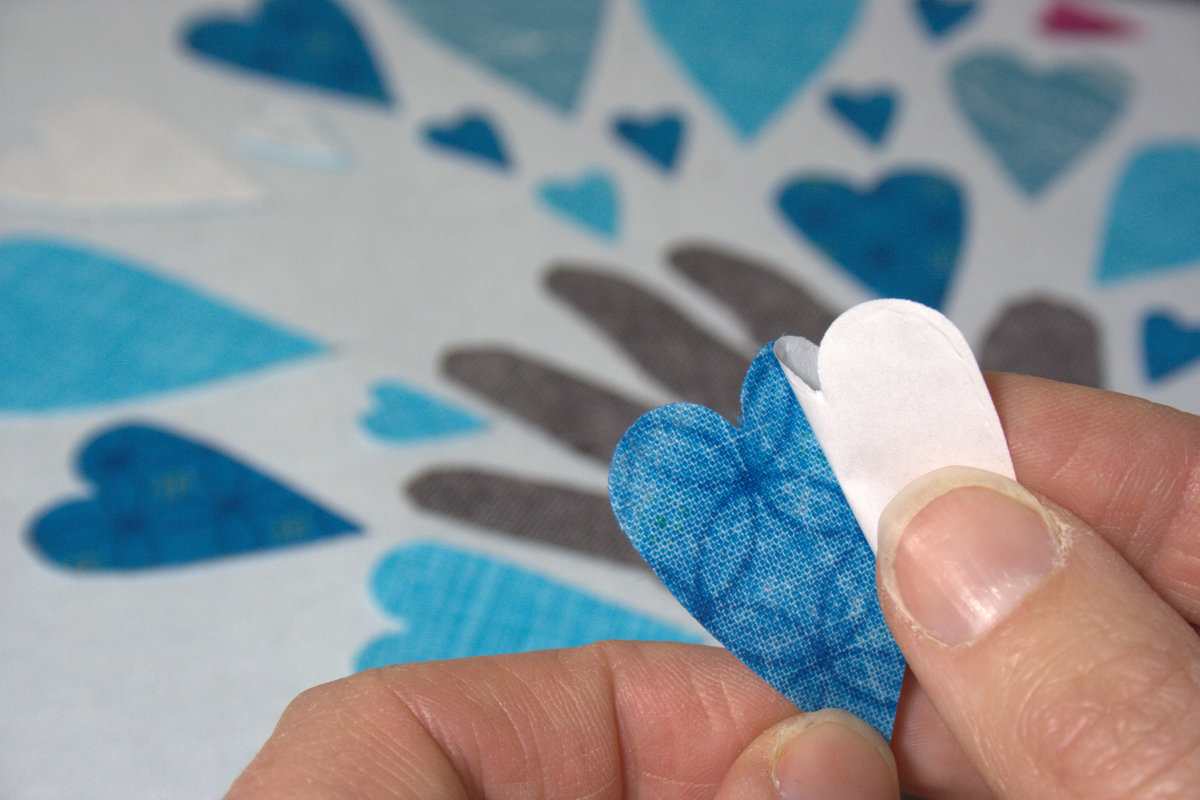
Fuse Heat’n Bond to the wrong sides of all of the fabric scraps that will become hearts. Remember to have the paper side of the Heat’n Bond facing up, and put a pressing cloth down to protect your ironing surface. Let cool completely.
Once the fused heart-intended fabric has cooled completely, with paper-friendly scissors or rotary cutter (NOT your fabric scissors!), cut your fabric into 2 1/4″ x 3 1/4″ rectangles for ease of quick cutting.. Note that I am using the three smallest heart sizes for my trees, and am not worrying about directionality of the fabric. If you have smaller scraps or want the directionality of the fabric to be level, you can cut 3/4″ x 3/4″ for the smallest heart, 1 1/4″ x 1 3/4″ rectangles for the medium heart or 1 1/2″ x 2 1/4″ rectangles for the large. (I did not use the extra large heart). I mostly cut the medium and large hearts from 2 1/4″ x 3 1/4″ rectangles and then used the scraps from those to cut small hearts.
Next, pull out your Sizzix fabi die cutting machine and Primitive hearts #3 die. Call those children back! Layer the pre-fused fabric rectangles over the desired sized hearts on the Primitive Hearts die, four (4) at a time. The Sizzix can cut up to nine (9) layers of fabric at once, but since the fusible is pre-fused, each rectangle counts as two layers. Make your Sizzix sandwich: bottom cutting pad, die with the blades facing up, fabric centered over the heart blades, and top cutting pad.
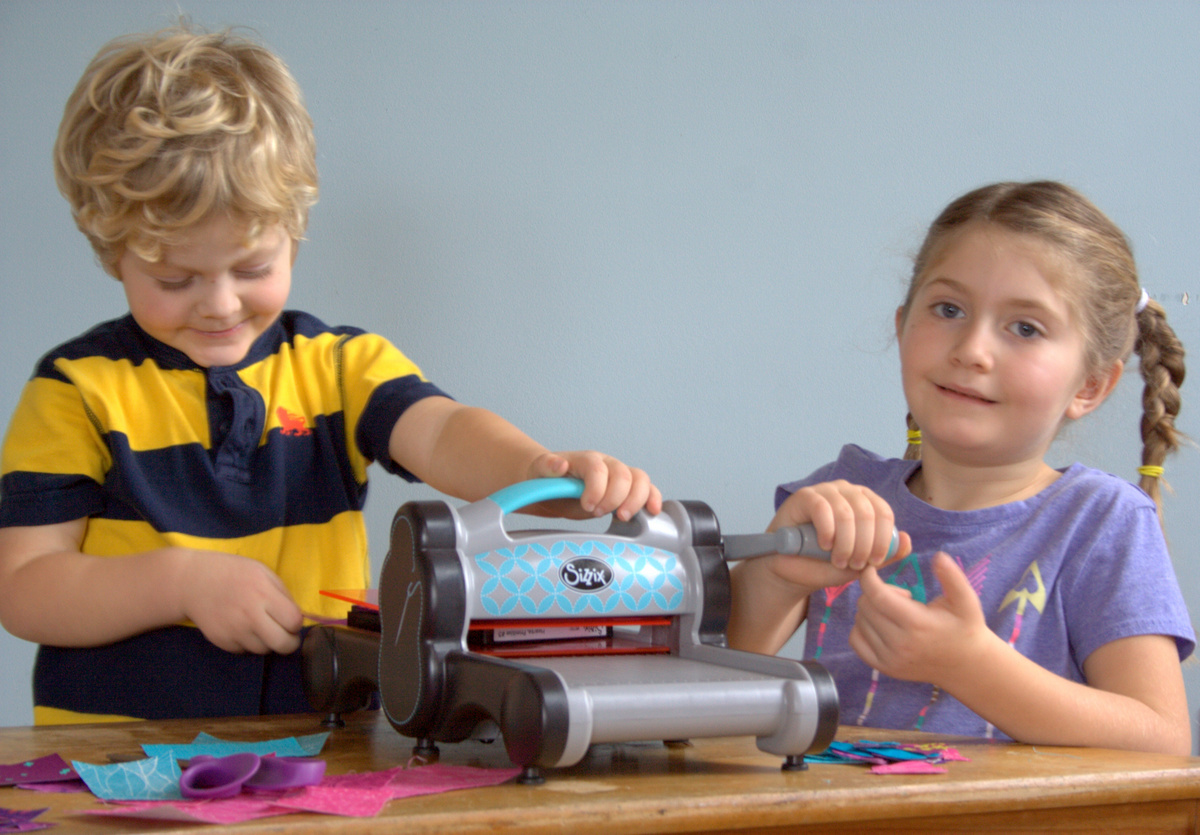
Let your kiddos carefully crank them through! If you don’t have a Sizzix, get the kids’ help and start cutting out hearts of different sizes, ranging from 1/2″ to 2″ in size. Depending on the ages of your children, you can either enlist their help or set them up with a different activity while you lay out the wall hanging once all of the hearts and trunks are cut.
Lay out a large piece of your background fabric. I suggest arranging your tree or grove of trees BEFORE cutting the background fabric to size, since every child’s arm is different. Layout your tree trunk(s), arranging the hearts around the top like the leaves of a tree.
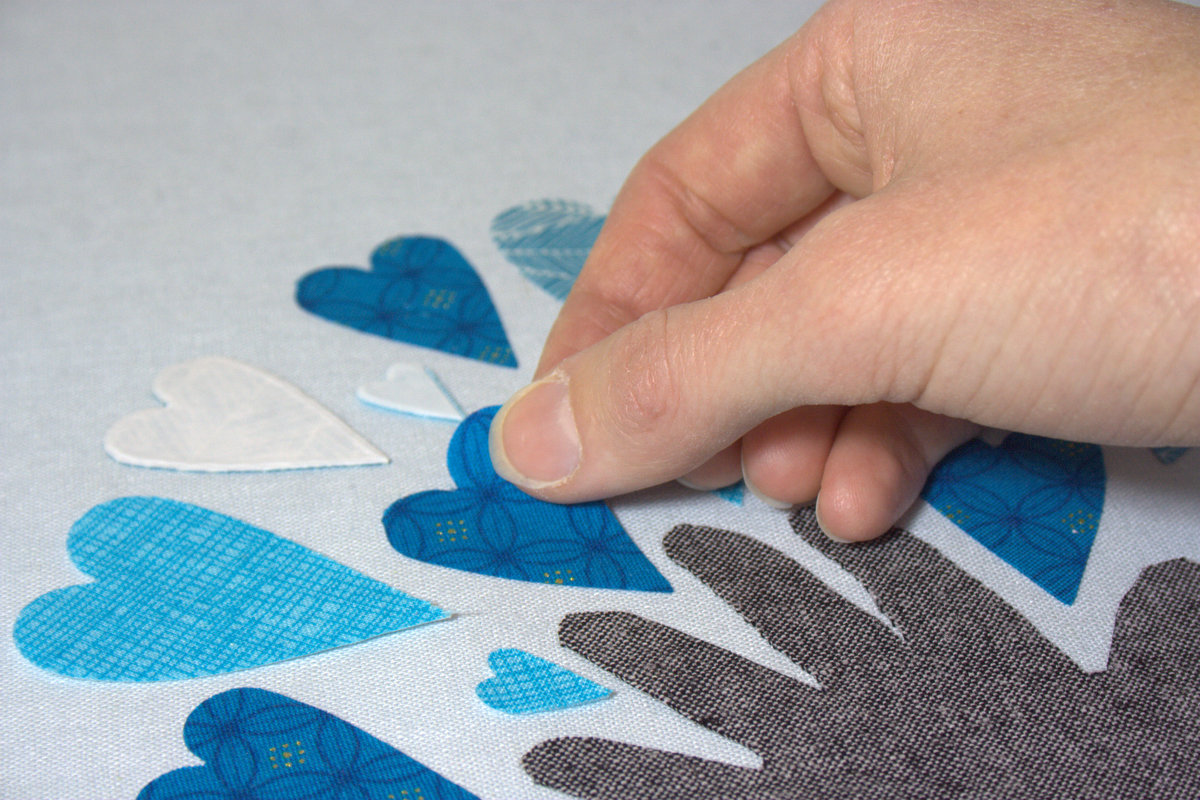
Once they are arranged the way you want them, carefully remove the adhesive paper from each component, placing it back in its proper place as you go.
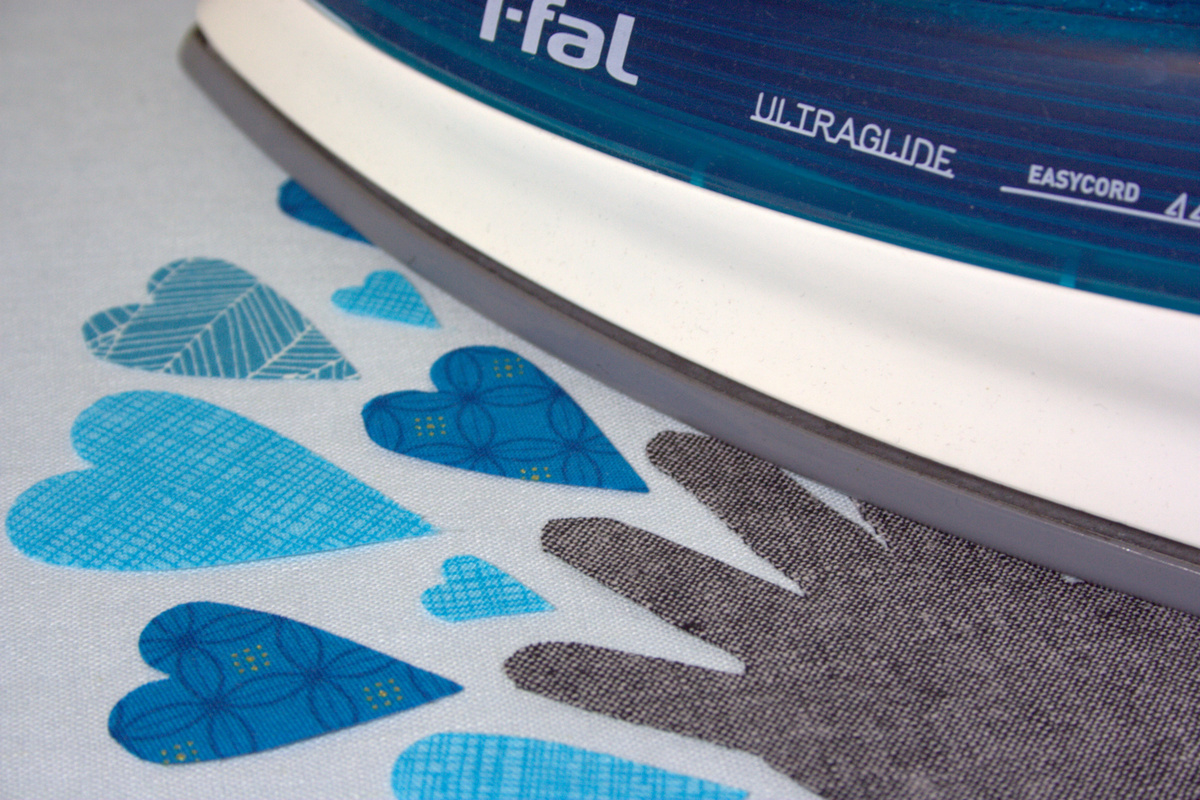
Once you have an iron-surface-sized batch with the paper backings removed, fuse them down. *Note: If possible, lay out your arrangement on your ironing surface so that once all of the papers are removed and pieces stuck, you can simply fuse them down. I used a large foam board beneath mine, and actually pressed onto the foam board since my ironing surface is tiny. Always follow the manufacturer’s instructions when using Heat’n Bond!
If you’re like me and are interrupted during this process, simply flip a row of hearts that haven’t been fused yet, so that you know where you are when you return.
Trim the background fabric approximately 3″ from each edge of your Growing Tree if you plan on quilting. Be sure to use the lines on your cutting mat to ensure your quilt is square as you cut.
Alternate ending
Alternatively, after fusing the hearts and tree trunks, you could wrap the fabric tightly around a thick acid free piece of cardboard and frame it in a picture frame. If you opt to frame yours, be sure to give yourself at least 2″ of overhang on all four sides, and plan your tree arrangement to fit into your desired frame.
Back to the quilting option…
Cut batting and backing fabric to extend about 1″ from each edge of your Growing Tree quilt top (For example, if your Growing Tree top measures 27″ x 22″ like mine does, cut your batting and backing 29″ x 24″)
Baste your quilt layers using your desired method (I used pins).
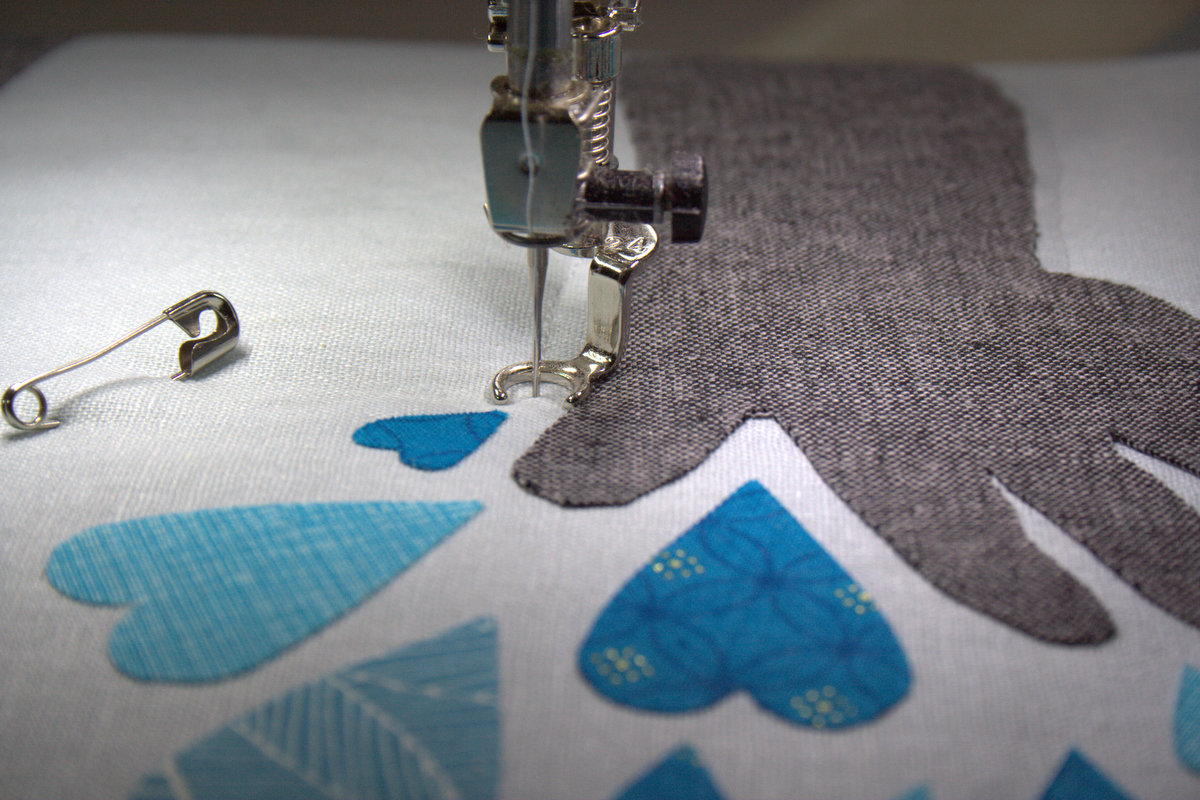
With a thread that coordinates with your background fabric, free motion quilt AROUND the edges of your tree trunk(s) and hearts. I also stitched around a few single hearts (you don’t need to sew around all of them) within the tree. Remember that the Heat’n Bond is NO SEW, so be sure not to sew on top of the fused pieces. Feel free to free motion quilt the background to help hold everything in place. I used a windy spiral design and was reminded at how much fun free motion quilting is! I need to do it more often!
Add each child’s name beneath each tree, either with embroidery or permanent fabric marker. I used fabric marker so that Maddie and Max could include their signatures. Don’t forget the date! (Confession: I copied Max’s signature from a recent art project since I didn’t dare let him and a permanent fabric marker near this finished project. Perhaps a 3 year old with a less impish nature might be able to sign right on the project, but use your judgement.)
Trim the batting and backing flush with the quilt top, square up, and bind as desired. I included corner hang tabs on the back of my Growing Tree Grove using THIS method, and bound the quilt using THIS great tutorial by Cluck Cluck Sew.
Hang this Growing Grove on your wall so that you can immortalize those precious little hands, or wrap & gift to those doting grandparents if you’re superwoman, or if you are already planning ahead for Valentine’s Day!
Enjoy, and happy holidays!
Outtakes
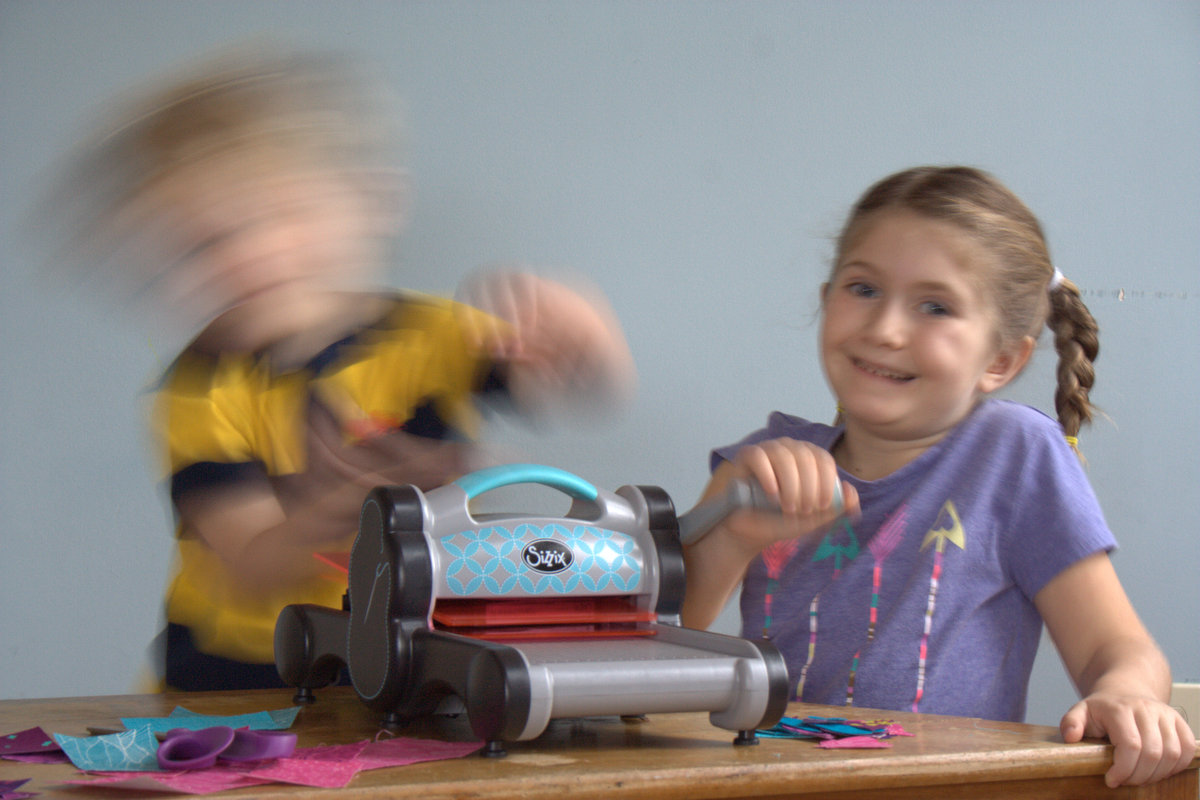
Just for fun, here’s what the vast majority of the photographs of my kiddos using the Sizzix looked like:
Max does not. stop. moving! Enjoy the blurry laugh, and enjoy your holidays!
This time of year is a busy one. Not only is there the often frenzied rush to feel prepared for the holidays and all of the hand-made, store-bought, or presence-centered gifts to arrange, but it’s also my daughter’s birthday month. I’m not sure when the last time you spoke with a nearly-six year old was, but birthdays are kind of a big deal to them. At least they are to my daughter. Maddie talks excitedly about her birthday, with game plans, craft project ideas, and guest list edits pretty much all year long. When December rolls around, it’s truly game on. Let the party planning commence!
My helpers as we began the pinata making process. Two balloons, ripped strips of newspaper, and a flour-water paper mache paste is all you need!
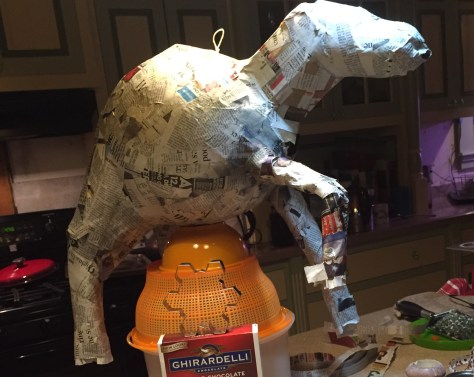
It has become a tradition for Maddie and me to make a piñata together for her birthday, although her requests have certainly become more detailed and elaborate. I introduced the idea for her fourth birthday, when we made a rainbow fish piñata. I love the old-school flour and water paper mâché over a balloon method, and paired with tiny balled up bits of rainbow colored tissue paper, I thought it was the perfect project for an excited child. Last year, for her fifth birthday party, she requested a Calvin and Hobbes-style snowman to go with her Calvin and Hobbes themed party. This year her request was for a rainbow unicorn. How could I say no to that!? But seriously… a rainbow unicorn made out of balloons and torn newspaper!?? Needless to say, I’ve been busy over the past two weeks, and it hasn’t been quilting.
A unicorn begins to take shape…Creating the rainbow mane and tail.
Little by little, and with many tips from my ever-talented puppet and model-making brother, we did it. We created a rainbow unicorn piñata, complete with diamond dust glitter body, glimmering uni-horn, and rainbow ribbon mane and tail. I have to say–it was a smashing success!
Maddie in her pajamas, posing with her rainbow unicorn pinata the morning of her 6th birthday party, right before she painted on the eyes, smile, and pink collar.The birthday girl painting on the eyes and smile the morning of the party while I held the pinata steady. Pardon the jammies.The gorgeous eye painted on by my daughter. This is as close as you can come to seeing the diamond dust glitter paint that covered the unicorn, and the shimmery horn.
The finishing touches were put on this morning, hours before the party. Maddie decided that she wanted to paint on the eyes, a smile, and a pink collar, so that’s what we did as soon as we woke up, pajama-clad and all.
Action!
I love craft projects like these, since although they literally take weeks to complete and I nearly always get to the “what was I thinking!?” phase at least once, they truly creating lasting memories with my children. I remember creating paper mâché piñatas with my mom during girl scout meetings, and the memories are fond indeed. It’s the little things in life, and sometimes a beautiful hand-made rainbow unicorn filled with candy and treats and begging to be smashed is the perfect touch for a birthday party.
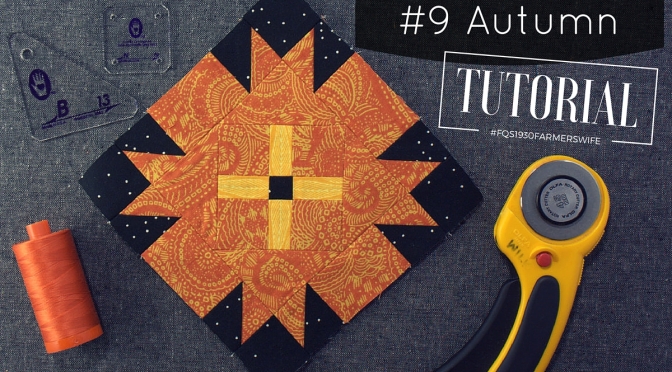
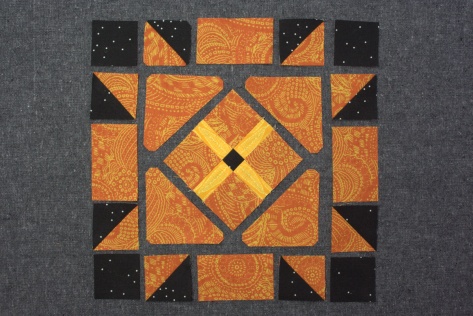
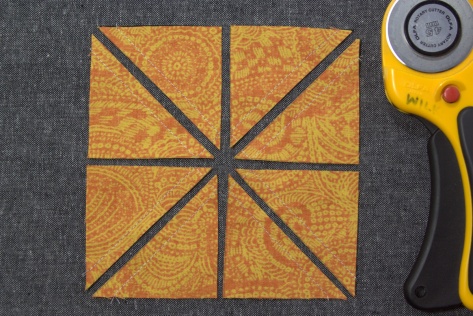
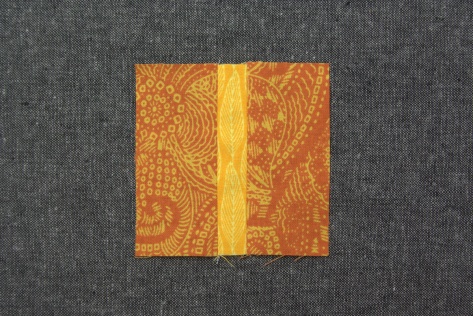
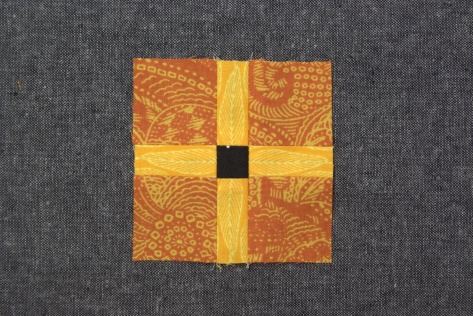
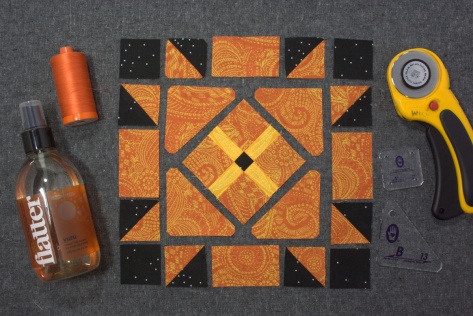
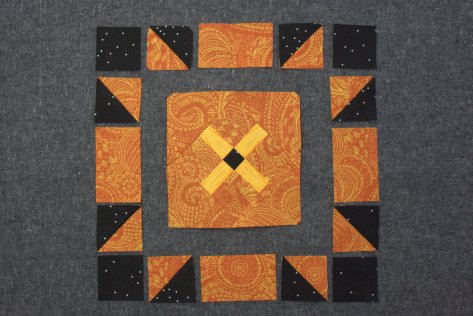
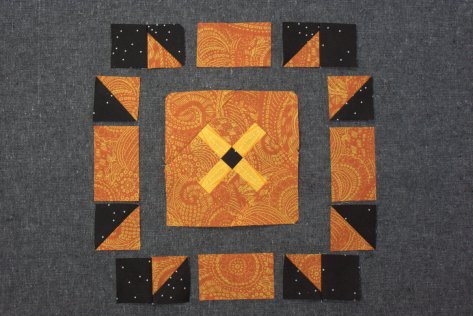
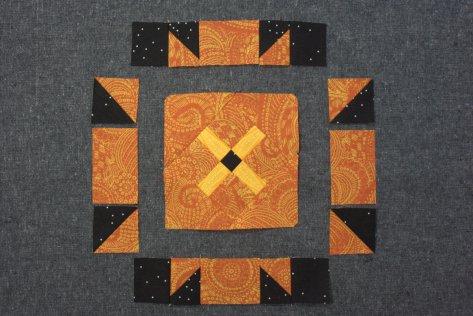
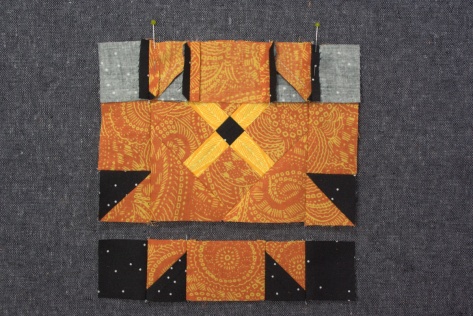
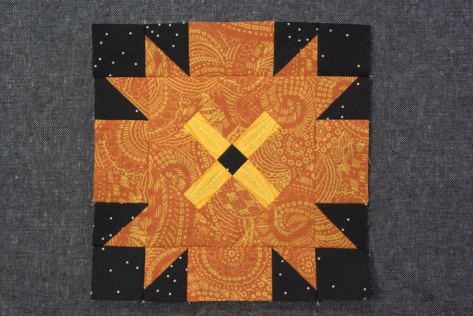
With a block like Autumn, it’s easy to get daunted before you even begin: 37 pieces in one 6″ block!? Ack! But wait! This is a perfect time to practice looking at each block’s construction creatively. If there’s one thing this sew along has taught me, it’s that there is nearly always a faster and easier way to approach block construction than purely cutting out all of the pieces and sewing them together. With a few shortcuts and piecing tricks, Autumn comes together quite smoothly. In this tutorial, I’ll show you how to make half square triangles (HST) 8 at a time (Yes, 8! We make all of the HST needed in this block at once), use strip piecing to save a bit of time, and fill in the gaps using Marti Michell templates (Set B and Set N are helpful with this block) or rotary cutting to help make putting Autumn together as easy as watching falling leaves.
As you may have noticed, I used different locations for the orange and black fabrics in the center square than those used in the book. I’d like to say it was intentional, but lo… it was not. I did not even realize my error until this entire tutorial was finished, photographed, and scheduled to post, as I was proudly admiring my block. When I realized my error, at first horror swept over me. Then, after Angie’s reassurance and another look at my block, I decided that Autumn was a good place for a design change. After all, it’s my quilt! I encourage you to remember that during this sew along, and don’t be afraid to make your quilt your own, with a hefty dose of gentleness toward yourself if when you discover an error after fully completing a block. Call it an unexpected design element. AND take this as an extra reminder to double check your fabric placement and choices BEFORE sewing your block together!
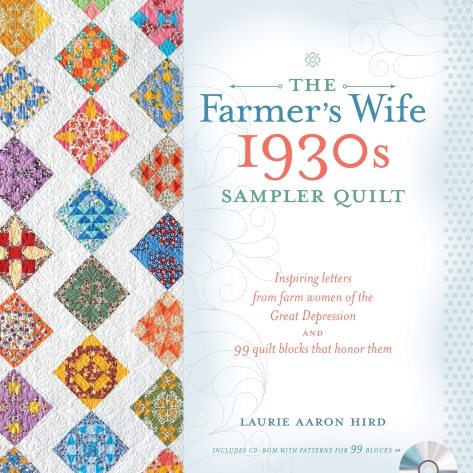
Note: Exact measurements for the pieces needed to construct this block will not be provided in this tutorial in order to protect copy write. It is a prerequisite of making this block that you have a copy of the book, The Farmer’s Wife 1930s Sampler Quilt: Inspiring Letters from Farm Women of the Great Depression and 99 Quilt Blocks That Honor Them. All measurements can be found in this book and its associated media. That said, even if you aren’t sewing along with us, I think you will find some really helpful tips in this tutorial that will help you look at all block construction more creatively!
Reflection on the Letter – A Precious Half-Hour
For those of you reading this who are not sewing along, one of my favorite aspects of this sew along is that each block in the book is inspired and accompanied by a letter written by an actual 1930 farmer’s wife. It has been inspiring to see how similar these farmer’s wives’ dreams, desires, troubles, and day-to-day struggles were to mine, and to hear their often uplifting takes on life. I can’t tell you how many times I’ve read the letter with tears in my eyes, nodding a resounding “yes!” as I relate my own life to the words on the page.
I know Angie said that blocks were allocated completely randomly, but this letter was meant for me. This woman is me! It was both surreal and somehow encouraging to read that even those hard working, ever-positive farmer’s wives embraced the NEED to make time for themselves. A few months ago, I created a hashtag (#sewtake20) in an attempt to encourage other busy moms (and myself!) to make time for themselves 20 minutes a day, no matter how crazy the day, how high the stack of dishes, and how all-engulfing the mountain of laundry. Wise L.O.L. from Iowa recognized the need to nourish body and soul back in 1939, despite her full plate. While she took a precious half hour and I’m striving for only 20 minutes, it still helps me to not feel so guilty doing the same here in 2015.
Tutorial
For this block, I specifically chose fabrics with small or nondirectional prints, so that I could quickly piece the components without worrying about fussy cutting or directionality. The #9C pieces are a small exception, since I gave a tiny bit of focus to fabric alignment. Note that I am arranging my final layout on-point, but for the purposes of being consistent with the diagram in the book, this tutorial pieces the block squared. If you plan to set your blocks on-point, be sure to account for that with any directional fabric placement.
This block is composed of 8 HSTs, 8 rectangles, 9 squares, and 4 triangles. I first cranked out the bits I could make quickly and efficiently, namely the HSTs and the center square. Let’s break it down.
Making 8 HSTs at Once
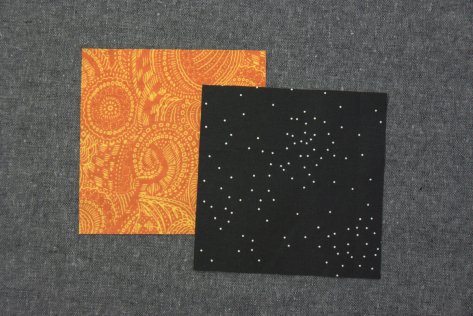
In the book, the print and coral fabrics were used to make the #9F HSTs. Choose your coordinating fabrics (I used black and orange).
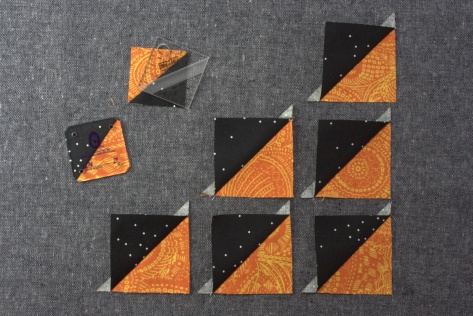
Cut one (1) 5″ square from each. Note: If your HST-making skills are on point and you want to conserve fabric, you can use 4 3/4″ squares. I prefer to play it safe and trim a bit more to ensure my HSTs are perfect.
Right sides together, draw diagonal lines from corner to corner, making an X. You only need to mark the wrong side of one of the squares.
Pin your squares together to keep them from shifting, and sew 1/4″ from the right and left of both lines. This is a good time to confirm the accuracy of your 1/4″ seams.
Carefully draw a line down the middle of the blocks in both directions. I used the 2 1/2″ line on my ruler to help make sure my line was square. You should now see a plus and an X.
Cut along the marked lines. Press open.
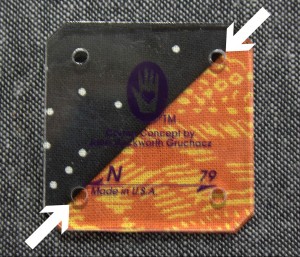
You now have 8 HSTs! I typically press all seams open, but with HSTs I press to the darker fabric since I use my Bloc Loc rulers to trim them to size. If you don’t have Bloc Loc rulers, feel free to press seams open, and align the 45 degree line on your ruler to help trim to the size indicated on the #9F template in the book.
You can also use Marti Michell template N79 to trim to square, too. Be sure to center your diagonal seam in the centers of the two holes in the template to trim evenly.
Do a little dance and set those 8 HSTs aside.
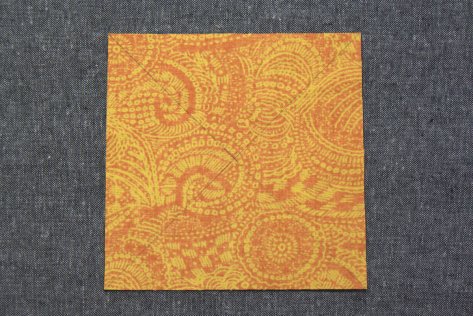
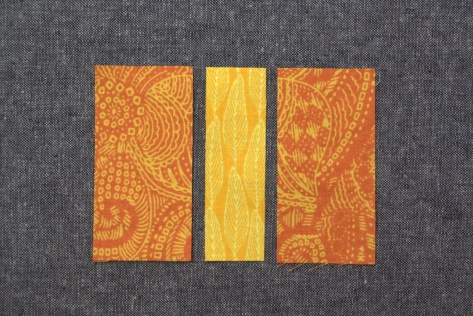
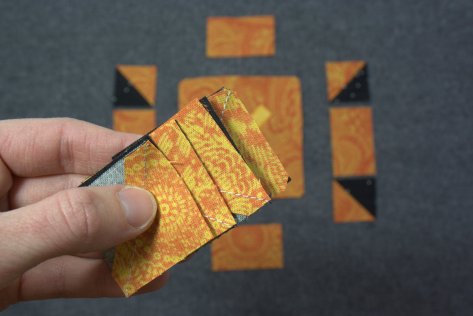
Strip Piecing the Center Square
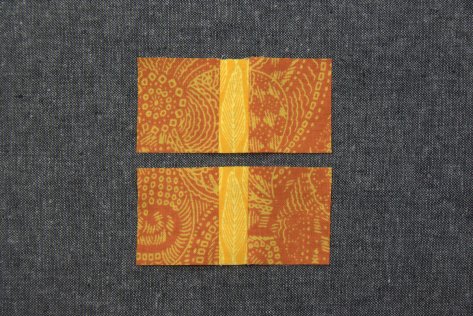
Because the center square is symmetrical, two of the outer edges can be strip pieced, saving you a bit of time and thread.
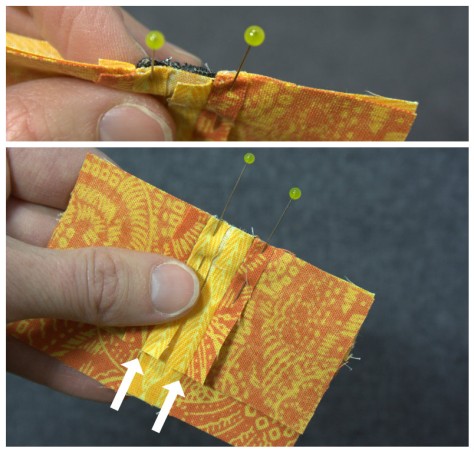
In the book, the coral (#9D) and yellow (#9G) fabrics with a tiny center square of print (#9E) were used. I should have used black, yellow-orange, and a tiny center square of orange, but as I noted above, I made an inadvertent design change and went with orange, yellow-orange, and a tiny center square of black. Wrap your brain around which of your fabrics belong where for your block, and here we go. **Really, take a moment and make doubly sure you have the right fabrics. Got it? Great! We will be strip piecing the two rectangles composed of #9G and #9D.
Cut two (2) 1 5/8″x 3 1/4″ rectangles of your #9D fabric and one (1) 1″ x 3 1/4″ rectangle of your #9G fabric. (Math aside: The 5/8ths” mark is the little line right after–aka a bit larger than–the 1/2″ mark on your ruler.)
Right sides facing, sew the #9D rectangles to the center #9G along each long side.
Cut in half as shown to create two (2) 1 5/8″ x 3 1/4″ rectangles. We will call these your #9DG units.
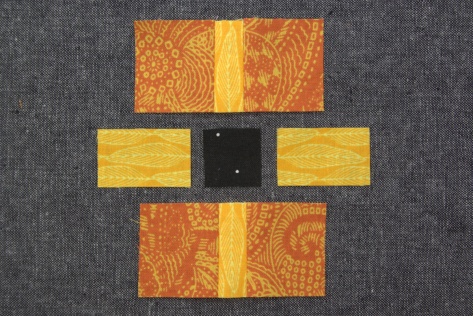
Using the rotary cutting measurements provided in the book’s cd, cut two (2) #9Gs and one (1) #9E.
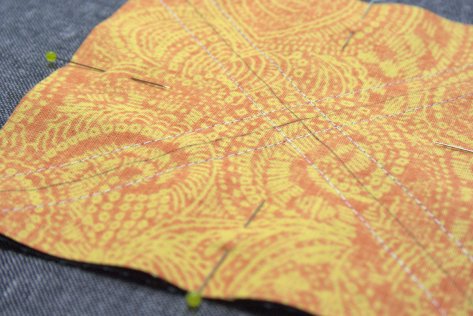
Assemble as shown. Note that I rotated the bottom row 180 degrees so that the direction of the yellow-orange fabric radiates outward from the center.
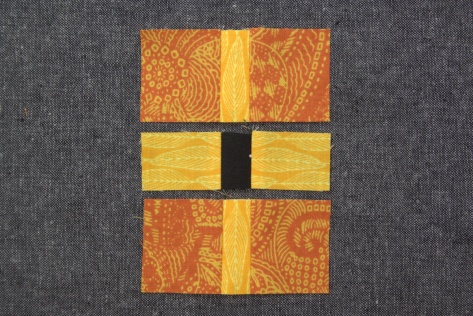
Sew your strip pieced #9GD units to the top and bottom of your center piece to create the center square.
Sewing Tip: When matching seams, pin directly after the seam join to prevent slipping. Also, take a moment to match up the seam lines on the opposite raw edges, too. While it is not a sewn edge, it will help keep the sewn edge level.
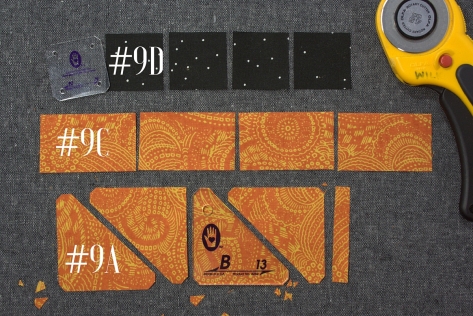
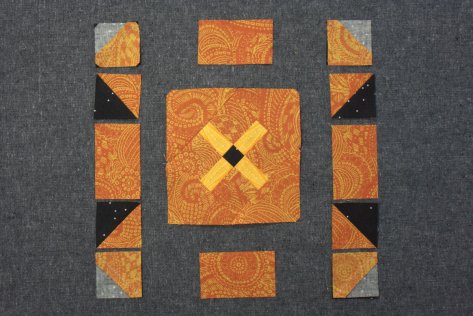
Cutting the Remaining Pieces
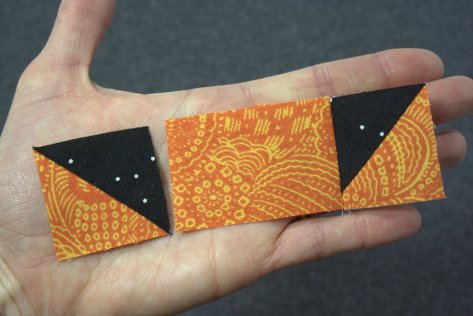
Now we need four (4) #9D squares, four (4) #9C rectangles, and four (4) #9A triangles. These remaining pieces can be cut in a very straightforward way, by using the rotary cutting instructions or paper templates included, or using Marti Michell templates. I’ve found that using the Marti Michell templates really help me line up different units accurately, so I opted to use those for the triangles and rotary cut the squares and rectangles. Here’s how:
Cut a 1 1/2″ x 6″ strip of your coral-equivalent fabric (I used black). Subcut the four #9D squares, per the measurements provided in the rotary cutting instructions or with Marti Michell template N79.
Cut a 1 1/2″ x 10″ strip of your print-equivalent fabric (I used orange). Subcut the four #9C rectangles, per the measurements provided in the rotary cutting instructions.
Cut a 2 1/2″ x 7″ strip of your print-equivalent fabric (I used orange). Using Marti Michell template B13, subcut four (4) #9A triangles. If you don’t have the Marti Michell templates, you can use the rotary cutting dimensions or paper templates provided on the book’s accompanying CD.
Assembling the Block
Here is a shout out to the essential tools used in creating this block: Flatter by Soak makes everything lay smoothly–even HSTs!–, Aurifil thread, Marti Michell templates, and my trusty Olfa rotary cutter. *Not shown but equally essential is the Bloc Loc ruler!*
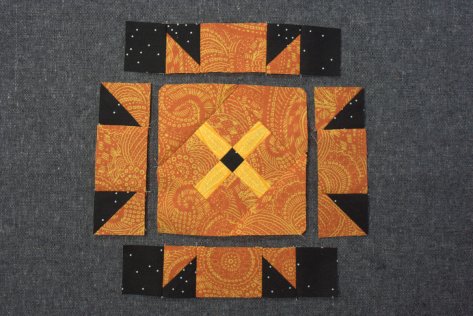
Now that you have all of the necessary components, lay them out to make sure you have all of the pieces aligned properly (pay particular attention to those sneaky HSTs). Tip: Take the time here to focus and be sure that all of the pieces are arranged properly, heavily referencing the picture in the book. The HSTs are particularly sneaky. Once your block is perfect, take a picture with your phone and reference it heavily throughout the piecing process. It takes less time to stop and lay out your pieces to check the arrangement than it does to seam rip once you’re finished!
First, sew the #9A triangles to the center square as shown. Begin with two opposite sides. Press seams open.
Sew on the remaining two triangles. Press seams open. Your center square should now measure 4 1/2″ including seam allowances.
Pair corner #9B squares with their neighboring HSTs and sew as shown.
I like to chain piece steps like this, and as I pick up my pairs of squares to sew, I align all of the to-be-sewn edges so that I don’t get mixed up between my cutting/arranging table and the sewing machine.
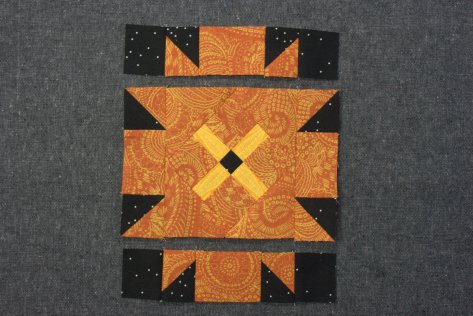
Sew HST-corner square units to center #9C rectangles to create the top and bottom rows.
Next we will sew the middle row together. Sew the HSTs to the side #9C rectangles as shown.
Again, pay close attention to the alignment of those HSTs! They like to do somersaults on the trip to the sewing machine if you’re not super careful!
Sew side HST-rectangle units to center square.
Sew top and bottom rows to the center row. Tip: This is another great place to match bottom seam lines as well as those right at the sewn raw edge. There are only two seams to match! I love this block! Press all seams open.
Gaze lovingly upon your Autumn block and think, “Gee, that wasn’t so bad! But it sure took me longer than a precious half-hour!” (and if you’re me, about 45 minutes later realize in horror that you botched the center square’s fabric placement, then decide that your Farmer’s Wife quilt deserved some individuality anyway, and let it go.)
Thank you so much for joining me today and I hope you found this tutorial helpful! This is the last tutorial before the Christmas break, which begins tomorrow and lasts through the first week in January. I know I am hoping to do some serious Farmer’s Wife catch-up amongst all of the festivities. Merry Christmas, happy holidays, and a very happy New Year to you all!
Despite all my best intentions, life has caused me to get a *bit* behind with the 1930 Farmer’s Wife Sew Along, hosted by Angie at Gnome Angel and sponsored by Fat Quarter Shop and Marti Michell. I’m not letting it get me down, though, and plan to keep on plodding. After all, not only have I allotted for skipping some blocks with my planned layout, I also know that every block made is one step closer to catching up. It’s all about patience, right?
Here are my latest three block additions.
It’s all about patience… see what I did there? If only patience were always so easy to come by!
I am really liking my color choices, and as more blocks are added, I’m starting to see how they might go together. I’m still toying with arranging each warm-cool grouping in color order, and very well might do so. I think after the next bout of blocks added, I’ll try laying it all out together and see what you think, too.
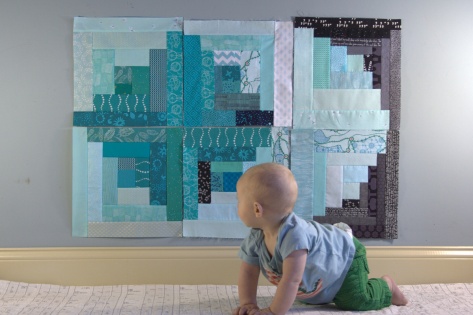
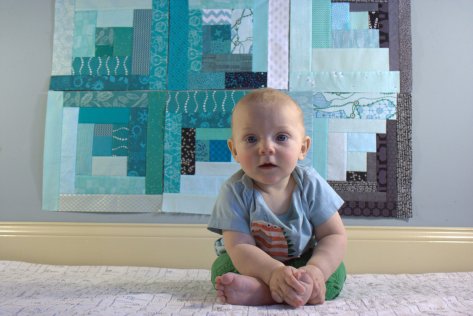
I’m proud to report that it took me six months before I “missed” a monthly milestone quilt block deadline for Finn’s baby quilt. Saturday marked six months since Finn’s birth; his half birthday! With a block still not sewn up, but a gorgeously warm and sunny day filled with family fun on the schedule (my husband’s company holiday party for kids at the bounce house, choosing and cutting our Christmas tree, getting it home and setting it up, stringing lights, and even decorating!), there was no way I was going to meet the deadline. But, here we are two three* whole days later and guess what? Finn is still six months old! This is both a good practice in being gentle with myself, and a reminder that perhaps waiting until the last minute isn’t working for me in this stage of life. (*He’s teething and has a bit of a cold, so repeated wakings last night meant this post did not get up before my bedtime as hoped. Life with a baby!)
This baby is sooooo big!
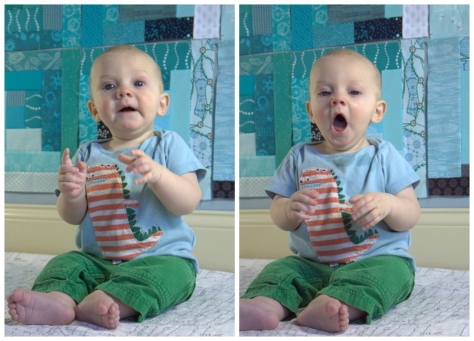
There’s always next month! Anyway, on to the fun! Finn is six months old already! He’s sitting a lot more sturdily, although still topples backward now and again. He still army crawls all over the house, but has begun to come up onto all fours and rock back and forth with a giant grin. He’s beginning to “complain” when he doesn’t like something–namely the carseat and riding in the car, but other than that he’s still a very agreeable, smiley, happy boy. Plus, I have no complaints about Finn being able to express his feelings.
Yummy flexible baby snack.
I had to get more creative with this photo shoot since when I put Finn down on his back, he immediately rolls to his belly. Painters tape to the wall for the win! I’m still working on figuring out lighting, but I’m sure you can enjoy these photos even with some shadows.
I love seeing the quilt come together and feel like we are really beginning to get a glimpse of the look of the finished quilt. I know that we have no idea what Finn will be like at one year, but at least the quilt is beginning to take real shape in my mind.
Shall I set a new goal? I hope to make his 7 month block before Christmas. We’ll see if I can meet it! But I do know that even if I don’t, it’s ok. Life is life, and I am trying to enjoy every moment, even if it means I blog less, quilt less, and snuggle more. Finn is growing before my eyes, as we can all see through this project. Baby snuggles still and will always trump all else.
Happy sewing! Happy snuggling.
I grab a needle and thread once the kids are in bed


 Corresponding solids from left to right:
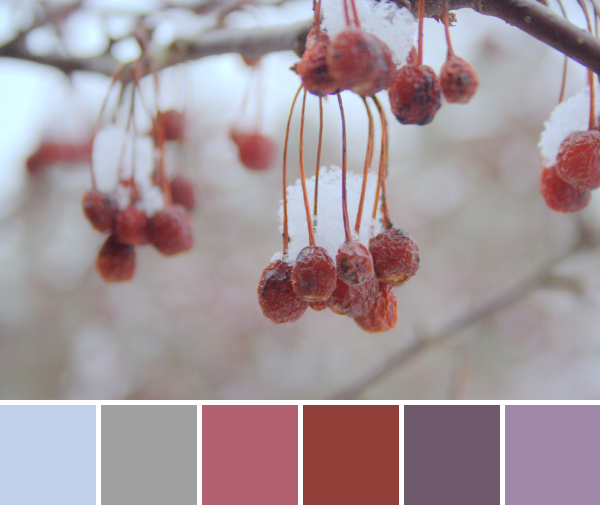 Corresponding solids from left to right: