Today’s the day! A few months back Giuseppe (aka@giucy_giuce on social media) from Andover Fabrics asked if I would like to do a guest post on their blog. For those of you who haven’t put it together, Andover Fabrics is the manufacturer who houses fabric lines by Alison Glass, Lizzy House, Libs Elliot… and more! You know how much Alison Glass fabric alone is include in my makes, so of course I said YES! I decided to share a tutorial for my favorite quilting technique that sadly often has a bad rep–foundation paper piecing. Today a revamped foundation paper piecing tutorial featuring my newest pattern, Constant Flux, which features Handcrafted Patchwork by Alison Glass, went live on the Andover blog.
This tutorial takes you through the basics of foundation paper piecing, but also includes some special hints, tips, and helpful cutting measurements for sewing together the Constant Flux pattern. You can read more about Constant Flux HERE, and be sure to visit the foundation paper piecing tutorial on the Andover blog HERE.
If you haven’t yet added Constant Flux to your pattern library, it’s still on sale for a few more days in my Craftsy shop (and Payhip for those of you in the EU). Get it now for only $5, since at the end of the week it will head back up to its usual $8.
Many thanks to Andover Fabrics for hosting me, and I hope all of you find my foundation paper piecing tutorial helpful! Happy stitching!
I recently had some fun playing with a new Sizzix die and a color/value gradient from dark purple to light pink. Today I’m sharing a tutorial over on the Sizzix blog so that you can make your own Geese Crossing mini quilt. Since the colors and the peonies from my garden are serendipitously paired, I created a color inspiration palette to share, too!
This mini quilt finishes at 24″ square, and its creation coincided with the fabulous bloom of peonies in our garden. It features a new die called Geese Crossing, designed by Victoria Findlay Wolfe and released at Quilt Market last month. It’s a very versatile die and allows for lots of design, color, and value play.
Tips for getting perfect points!
In my tutorial, I share information that will be helpful for all quilting projects, including:
– Tips for creating a successful value gradient in a fabric pull;
– How to get perfect points when sewing geese or other triangles; and,
– Tips to prevent bunching when sewing on an angle.
You can read the full tutorial and see more photos of my project process on the Sizzix blog, here.
The colors of the peonies and the colors in the quilt meld so beautifully together! I really could not help but take a million photos of this quilt with the gorgeous color gradient of peonies from my garden, but since it’s Thursday, I figured a combination of Color Inspiration Thursday and a heads-up about my Sizzix tutorial would be perfectly acceptable.
Ahhh peonies! Such an inspiration!
Corresponding solids from left to right: Kona Dusty Blue, Bella Pewter, Bella Petal Pink, Kona Plum, Kona Cerise, Kona Eggplant
Corresponding Aurifil thread from left to right: 2560 – Iris
2564 – Pale Lilac
2425 – Bright Pink
2479 – Med Orchid
4030 – Plum
2582 – Dk Violet
This color palette was created using Play Crafts’ Palette Builder 2.1 as per usual, and the matching Aurifil threads and Kona & Moda Bella solids are particularly useful! I will certainly be getting a few of those threads for quilting! We actually had dark magenta peonies that would have matched the darkest purple fabric, but they are the early variety that met their end during a thunderstorm a few weeks ago. Still, our garden provided a lovely fade from the palest pink to a bright magenta with the peonies blooming now.
I love the natural ombres and vibrant colors found in nature and thoroughly enjoy combining natural inspiration with quilty projects. It is so fun to try to stitch the beauty around me into the quilts in my hands!
Where in nature do you find the most inspiration? Flowers? Colors in general? Textures? or simply through the endless variety of growth and new life that appears before our eyes daily?
Today I’m excited to be a part of the Oakshott Lipari blog hop, your final stop for those of you who have been following along. So many fabulous projects have been made with the fat eighths bundle of the new Lipari line, so I encourage you to also check out the others along the hop, linked at the bottom of this post. Many thanks to Lynne and Michael at Oakshott for including me in the hop!
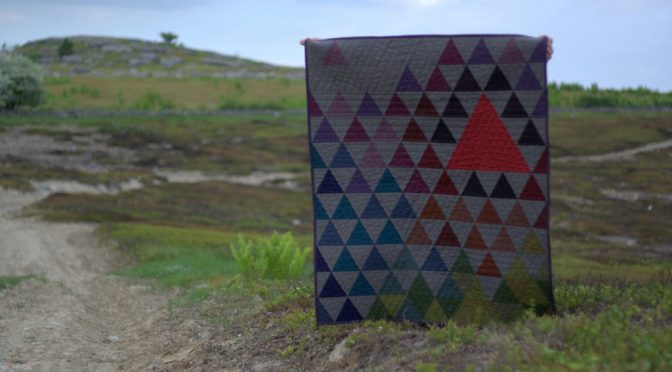
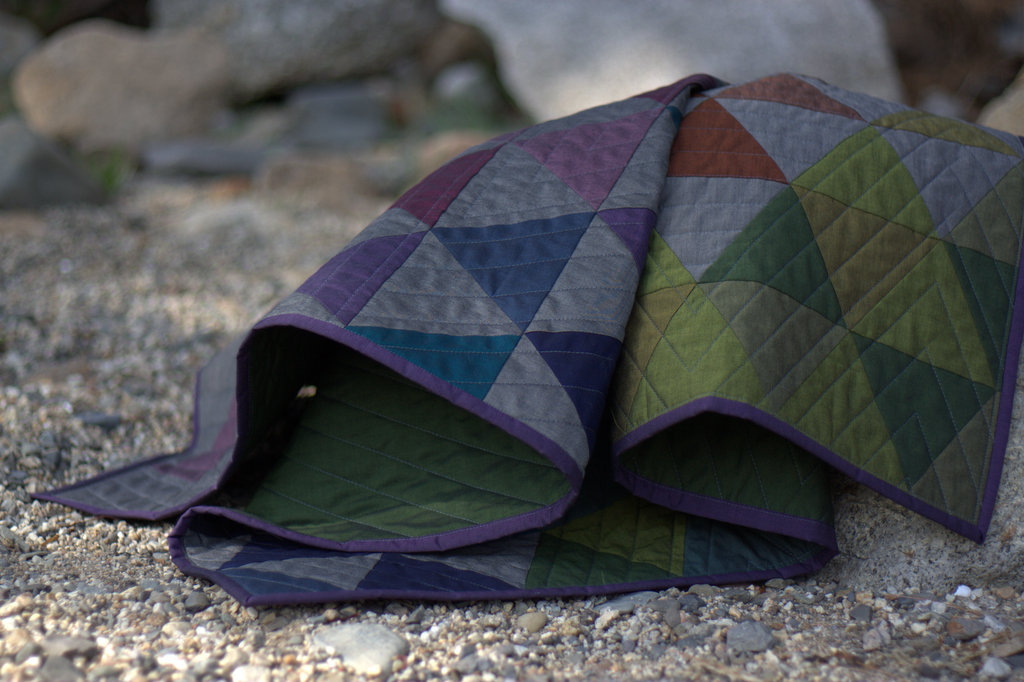
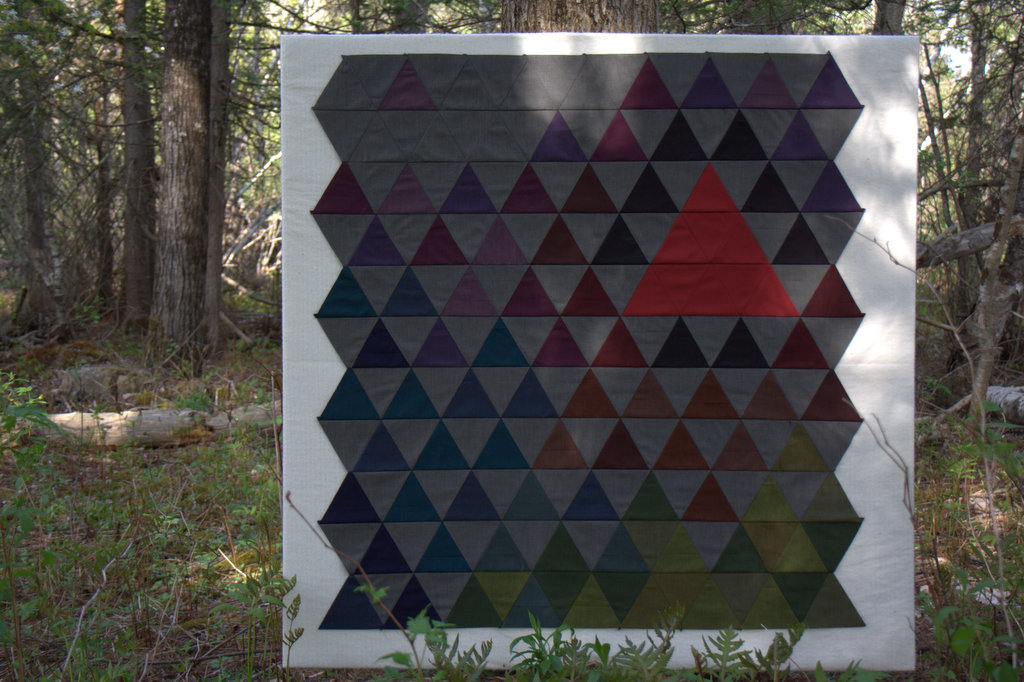
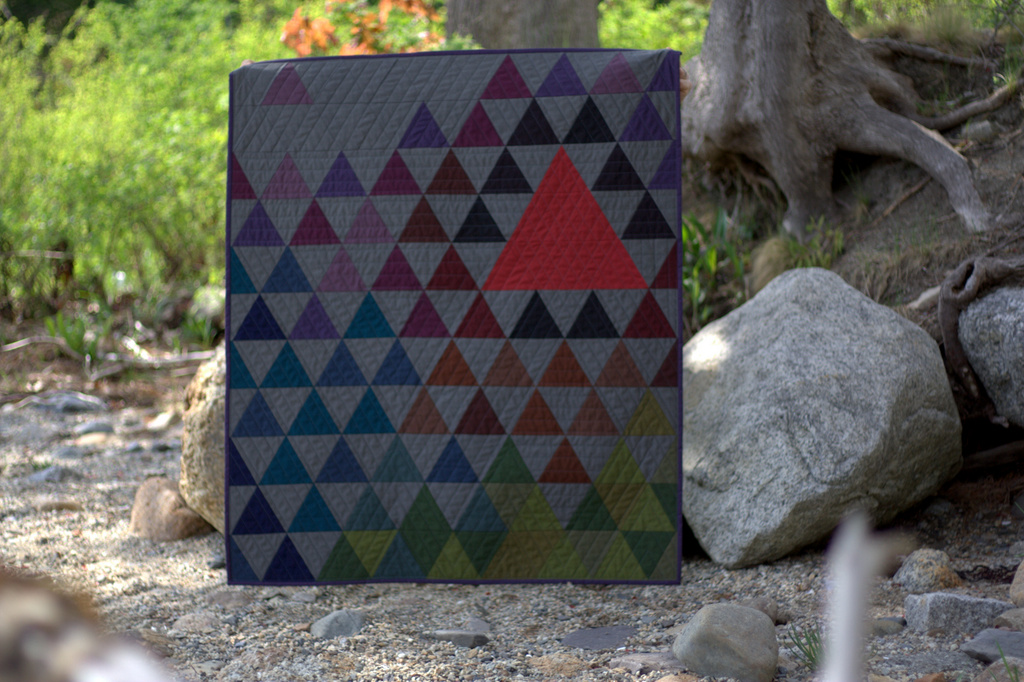
This was my first time working with Oakshott fabrics, and they are so luxurious! They are a woven fabric and feel almost silky to the touch. They feel more substantial than other shot cottons I’ve used, and the Lipari line looks iridescent since the warp is black and the weft is a bright jewel tone. These fabrics come to life when you see them in person–photos truly don’t do them justice. The Lipari line was inspired by volcanoes and the description from Oakshott says it best: “Lipari perfectly captures the primordial beauty of the Aeolian islands. Its luminous colours mirror cobalt seas, lush greenery, pink bougainvillea and shimmering sun; a beauty shot through with dark, fine-grained volcanic rock and black sand.” As soon as I read this description, I knew my quilt had to be a reflection of this volcanic inspiration. Thus, my Vesuvius quilt was born.
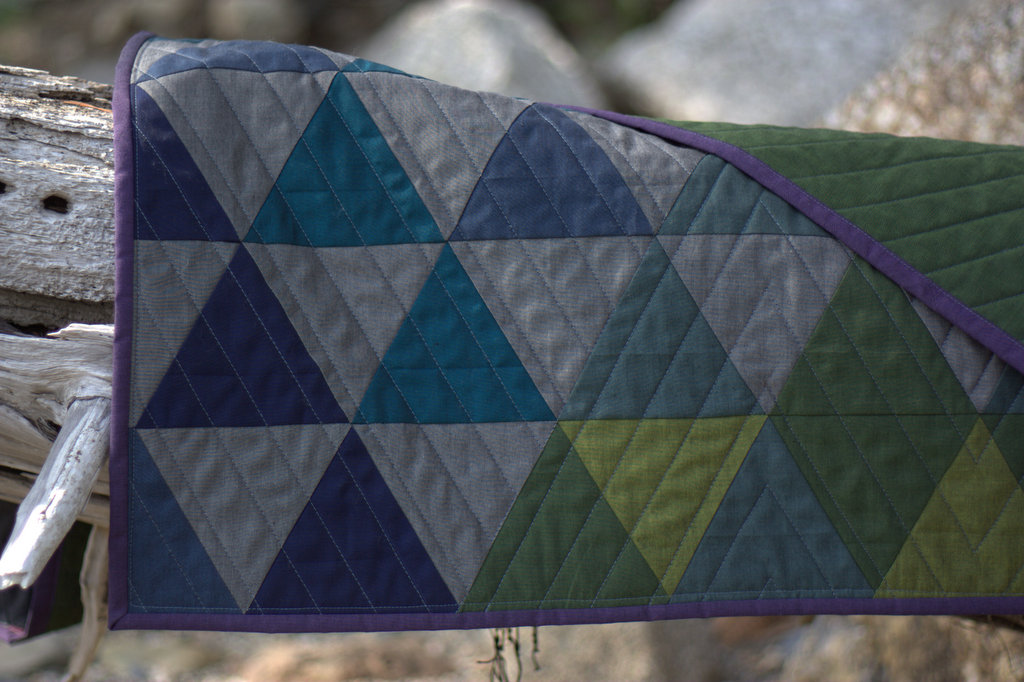
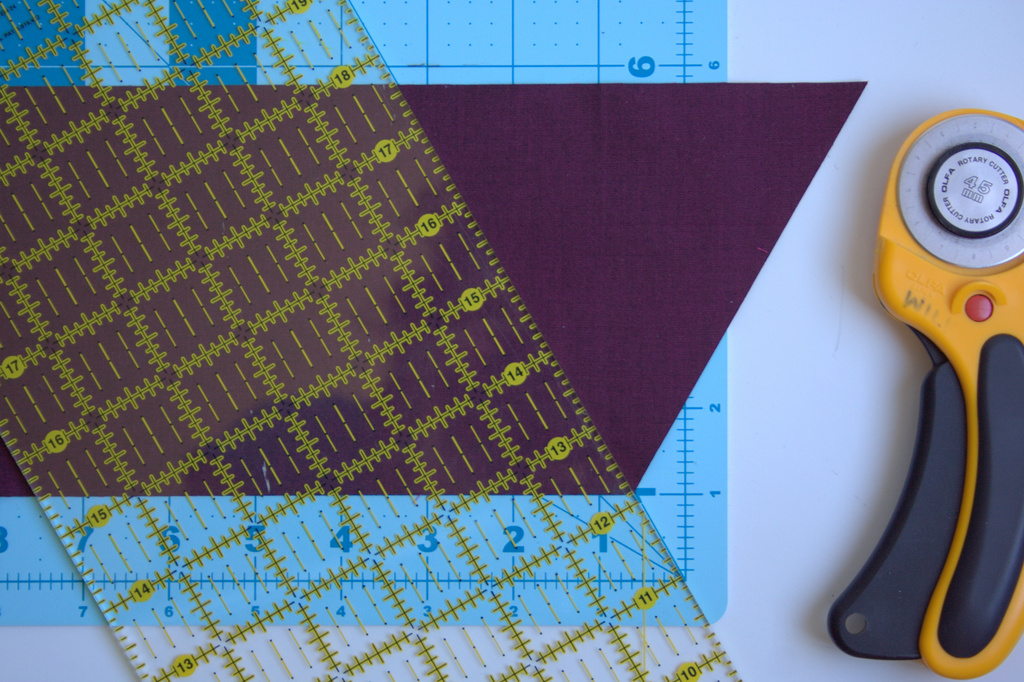
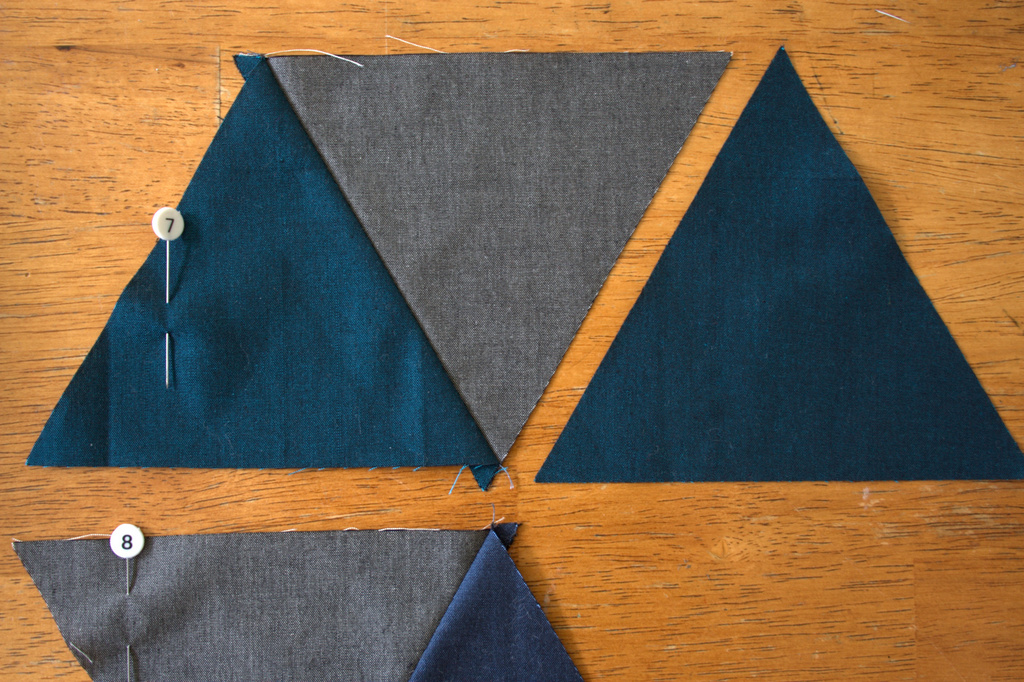
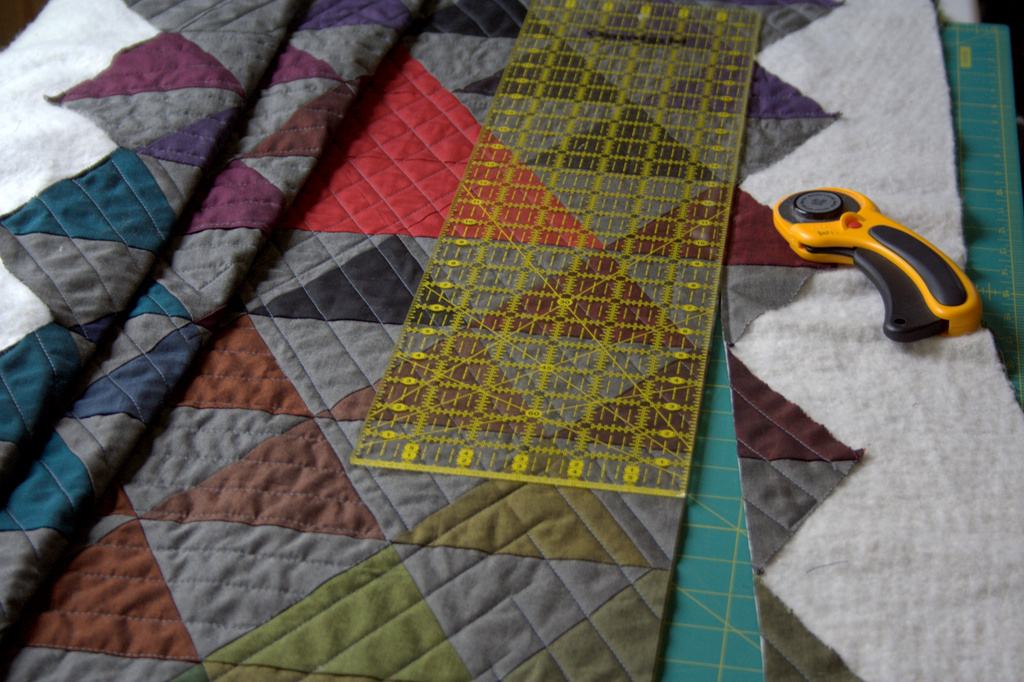
I made my Vesuvius quilt with 60 degree triangles, to elicit the sharp peaks of the mountainous volcanoes. I pulled in some Ruby Red – Toledo for the molten focal triangle, and let the Lipari steal the show. I used my Sizzix die cutting machine to speed up the cutting process. I really wanted to photograph this quilt next to a volcano, but I had to settle for some blueberry barrens and a Maine coast beach.
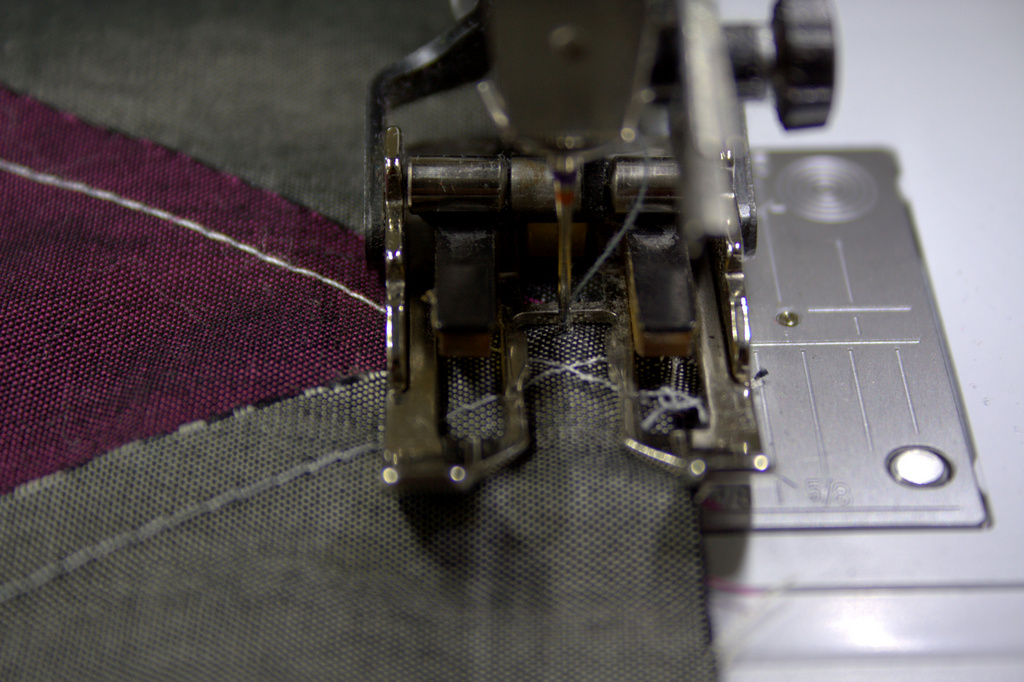
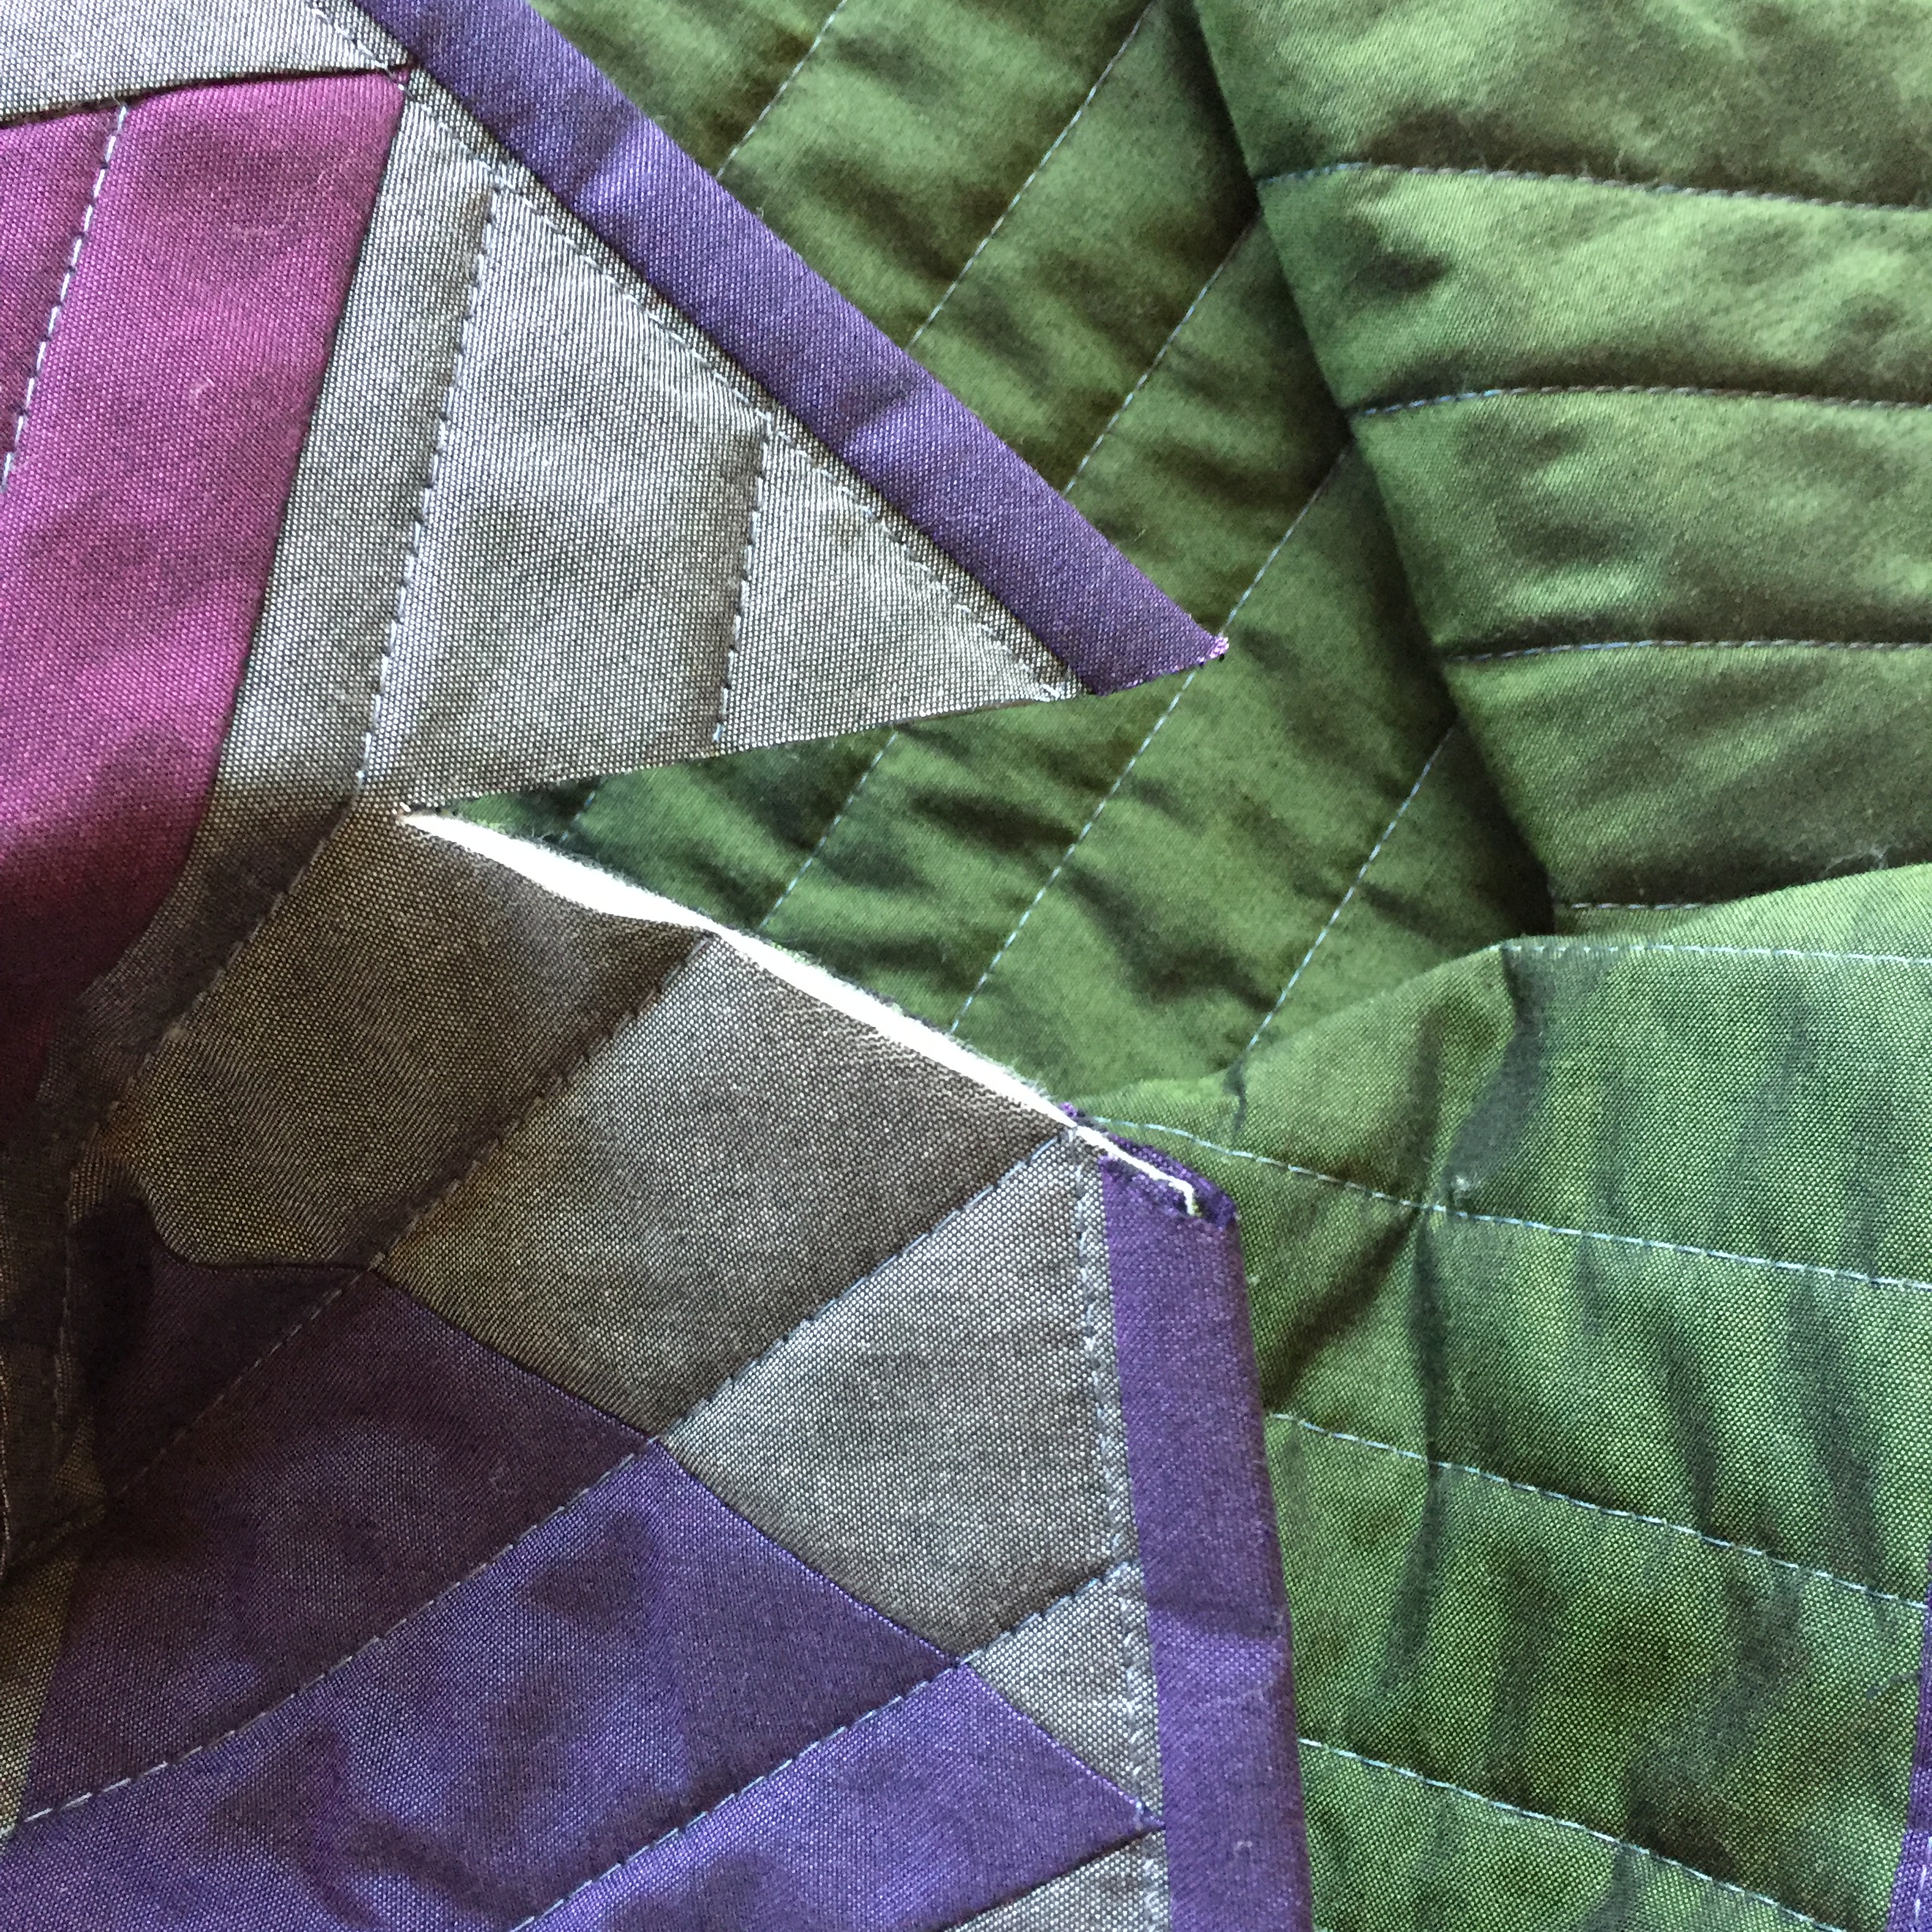
I quilted Vesuvius with 50 wt Aurifil thread 1246-Grey, which blended wonderfully with the Lipari Pollara (grey) I used as a background color. I used the walking foot on my domestic Bernina 560 to quilt straight lines 1″ apart, switching up directions in various sections of the quilt to provide movement and added interest. I LOVE how it turned out!
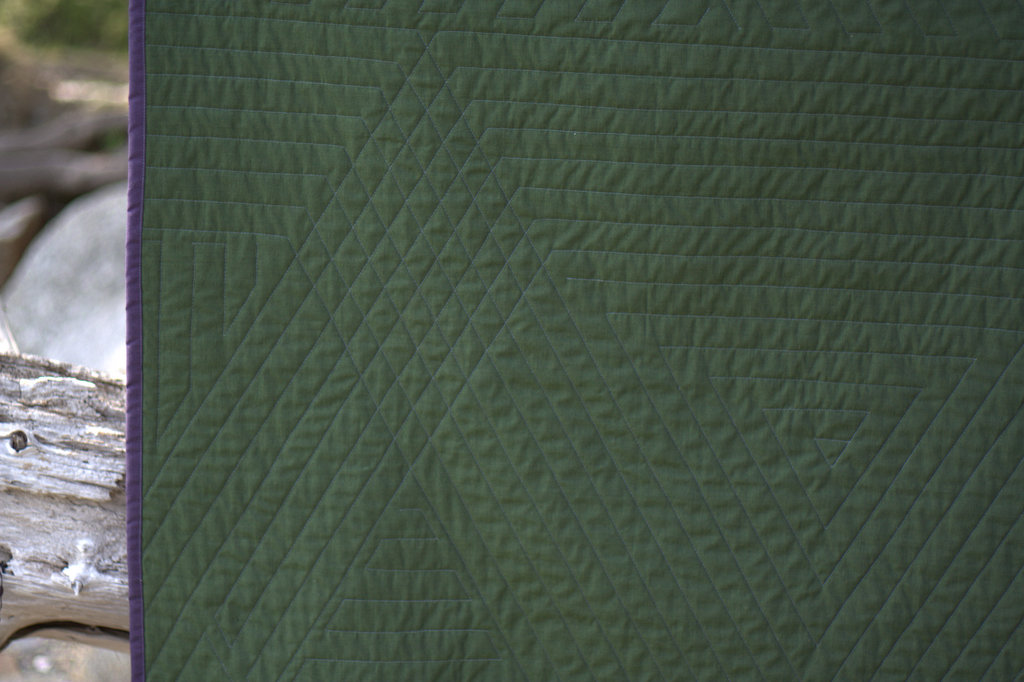
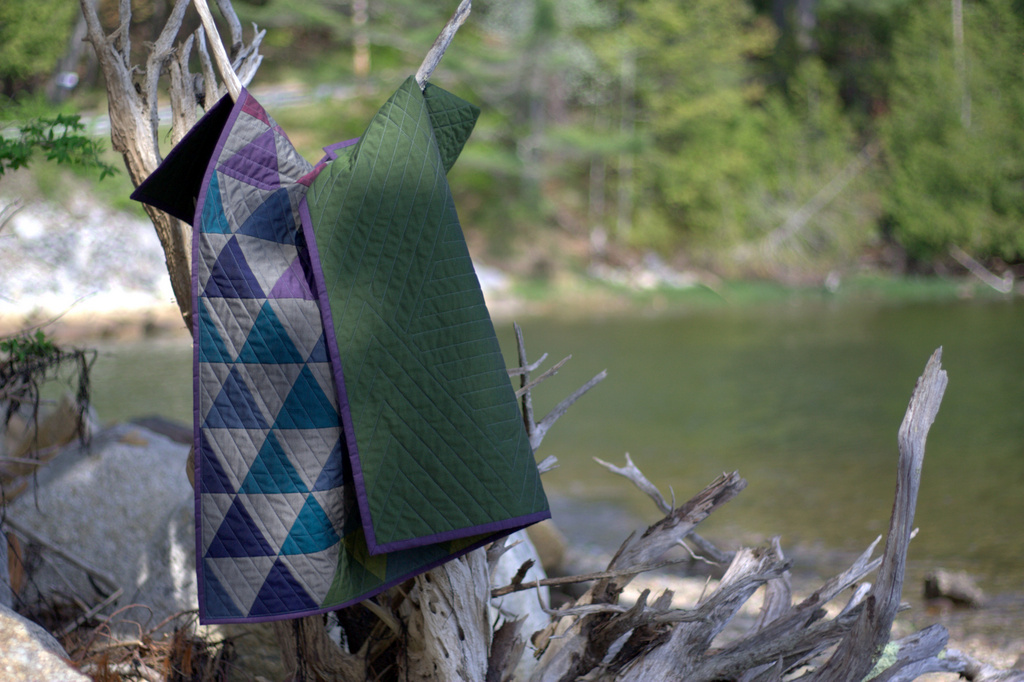
The Lipari Porticello (dark green) backing shows the quilting wonderfully, although it’s tough to get the full effect through photos!
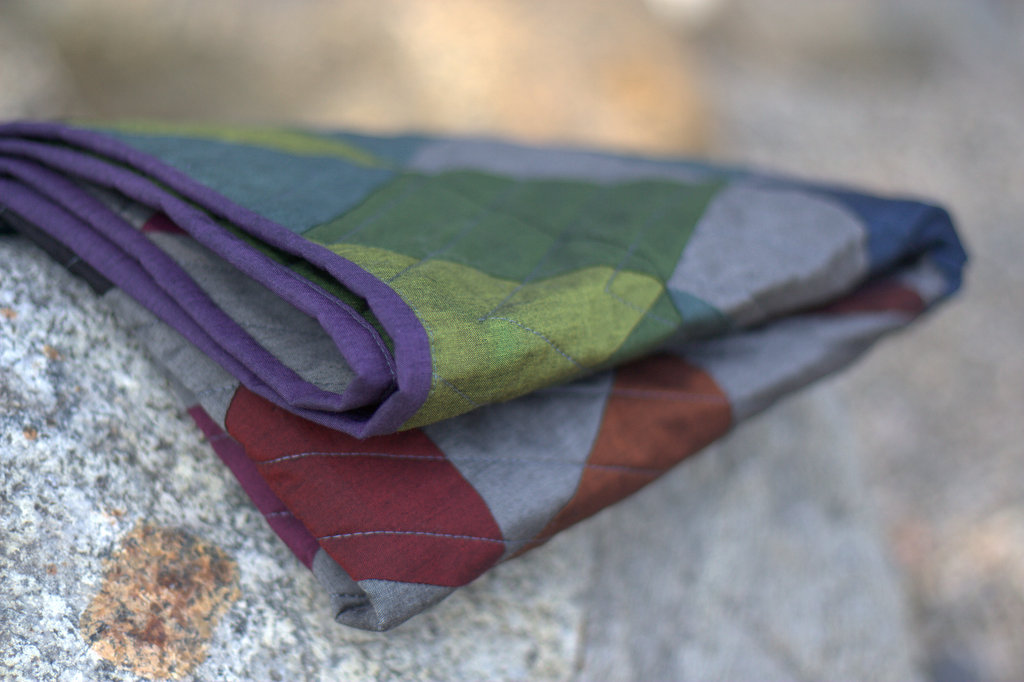
I was torn on what color to use as the binding, but decided that Lipari Gallina (purple) frames it nicely.
This quilt finishes at 36″x43″ so would make a wonderful wall hanging or sophisticated baby quilt. You could also add borders to make it larger.
Tutorial
Here’s how to make your very own Vesuvius quilt! (Note that Oakshott Lipari fabric is 54″ wide. Typical quilting cotton is approximately 42″ wide, so plan accordingly)
Materials
A fat eighths bundle of Oakshott Lipari
1/8 yard of Oakshott Ruby Red Toledo
3/4 yard additional Lipari Pollara (grey)-negative space
1 1/4 yards Lipari Porticello (dark green)-backing
1/3 yard Lipari Gallina (purple)-binding
42″ x 50″ piece of batting
Sizzix die cutting machine
Sizzix XL Triangle, Equilateral 4 3/4″ x 5 1/2″ unfinished die
–OR–
Rotary cutter, cutting mat with 60 degree lines, and ruler
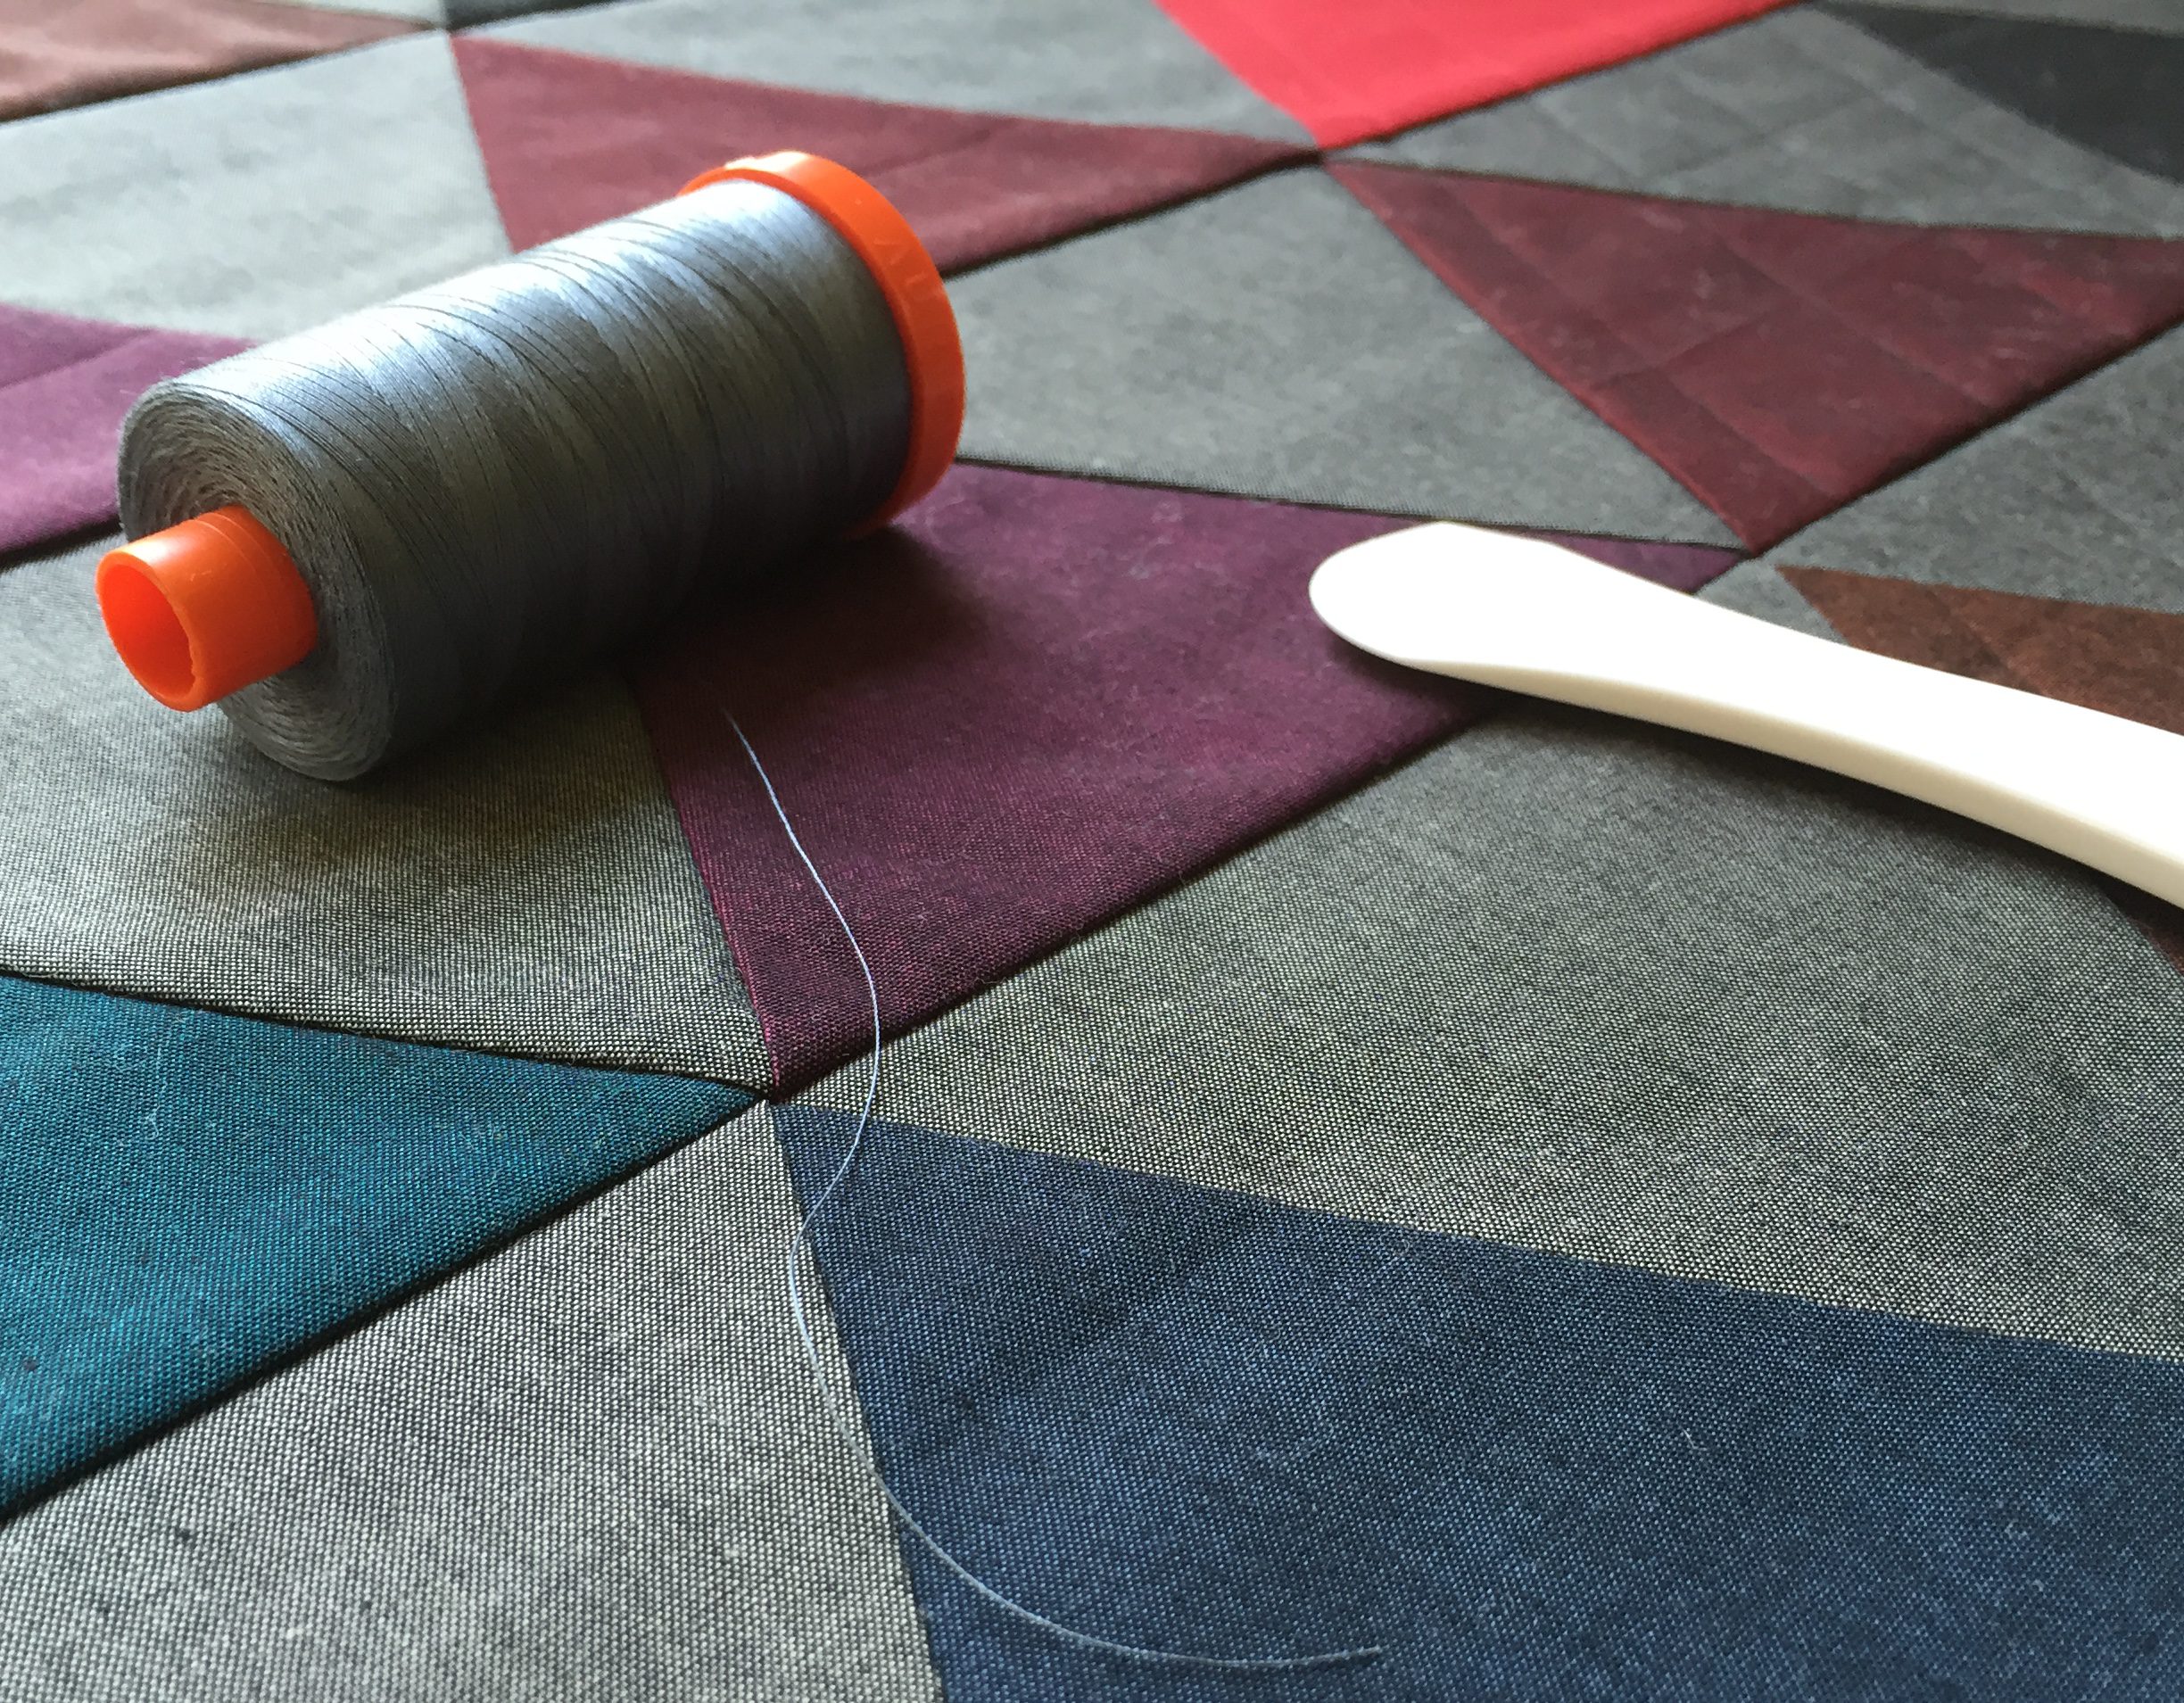
Thread (I used Aurifil 50wt 1246-Grey for both piecing and quilting)
Sewing machine with a walking foot (I use a Bernina 560)
Rotary cutter
Hera marker
Pins
Small thread snip scissors
Cutting
Using your method of choice (see below for instructions for each method), cut the following number of triangles from each fabric:
88 grey (Lipari Pollaro)
9 red (Ruby Red Toledo)
From fat eighth Lipari bundle:
20 purples
27 greens/yellows
12 browns
19 blues
4 black-red
8 black
Using a Sizzix die cutting machine
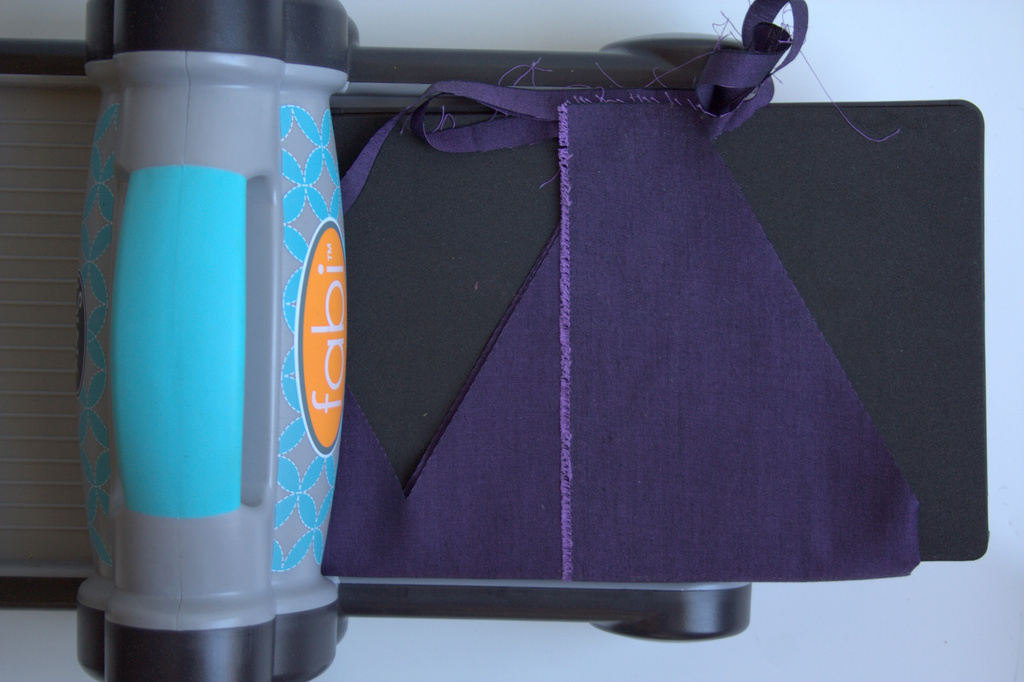
I used my Sizzix Fabi and BigZ Triangle, Equilateral 4 3/4″ x 5 1/2″ unfinished die to speed up the cutting process.
When using your sizzix, cut 5″ x width of fat eighth strips of fabric of each color, fold them over the die blade in the Sizzix cutting sandwich (bottom cutting pad, die with the blade face up, fabric, top cutting pad), and cut 9 triangles at a time. Note that the Oakshott fat eighths are 10″ x 27″, which are larger than a typical quilting cotton 9″ x 21″ fat eighth.
After passing each strip of fabric through the Fabi die cutting machine, you can reposition the remaining fabric and cut triangles from the “scraps”.
If you don’t have a Sizzix, read on to find out how to cut 60 degree triangles with your rotary cutter, using the lines on your cutting mat.
Using a rotary cutter and the lines on your cutting mat
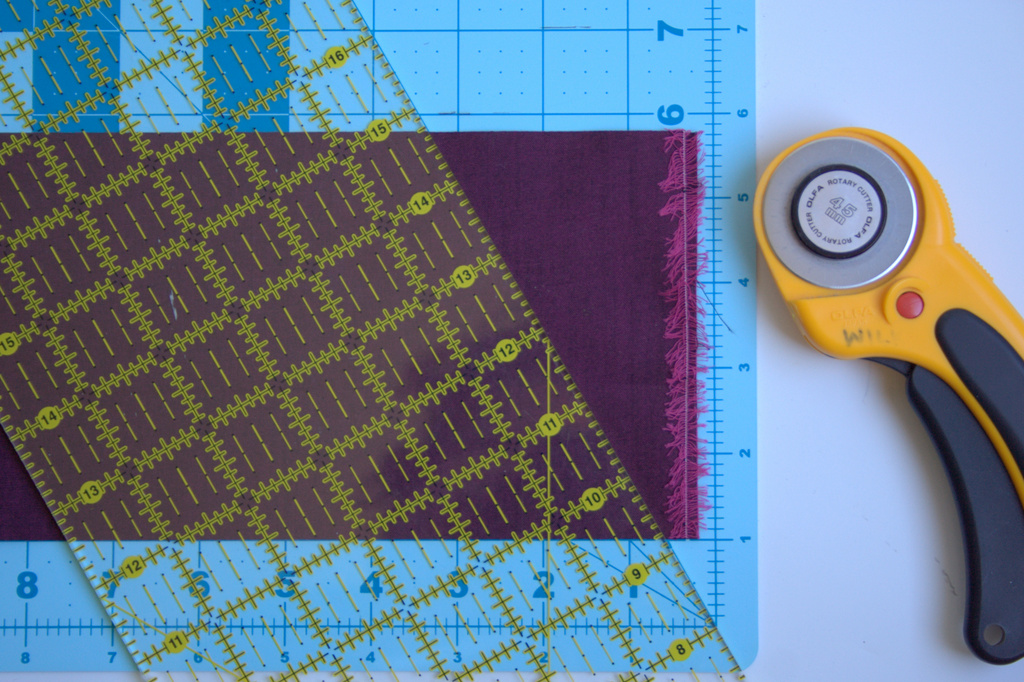
First, cut strips 4 3/4″ by width of fabric. *Note: You can leave the fabric strip folded in half or doubled up if you’re using the width of fat eighth strips, allowing you to cut two triangles at a time!
Find the 30 degree line on your cutting mat. Yes, we are making 60 degree triangles by cutting along the 30 degree line (You have a 90 degree square to begin, trim off 30 degrees, then you’re left with 60 degrees!)
Align the bottom of your fabric strip along the 1-inch line. I use the 1-inch line so that you can see where the 30 degree line extends above and below the fabric. Place the edge of your ruler along the 30 degree line.
Using your rotary cutter, cut your fabric on the ruler angle.
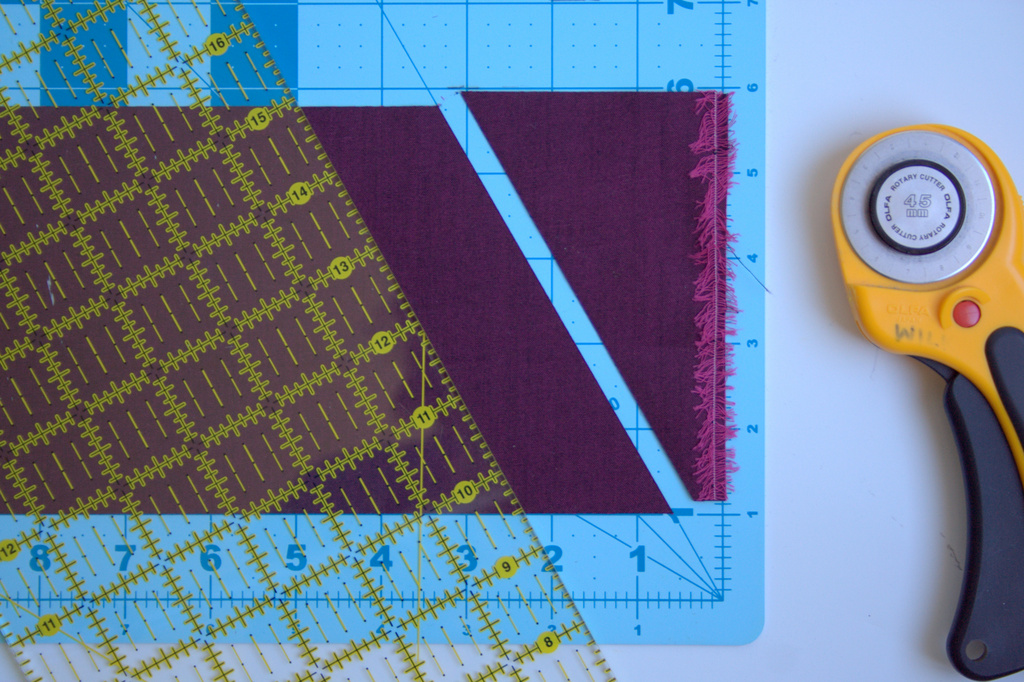
Flip your fabric strip over, then align the bottom edge with the 1-inch line on your mat, so that the bottom point of your cut is on the 30 degree line.
Again, place the edge of your ruler along the 30 degree line. Using your rotary cutter, cut your fabric on the ruler angle. You now have your 60 degree triangle, or two (2) if you kept your fabric strip folded in half. Cut as many as you need.
Piecing the Quilt Top
Once your pieces are cut, lay them out as shown. A piece of batting wrapped around a large wall board works well, but I have been often known to use my design floor to help with layout, too! (SizingNote: if you want a larger quilt, you could add a row of grey (Lipari Pollara) triangles to the right and left sides before sewing the rows together to maintain the outer triangle points when adding borders. Then, trim square and add rectangular borders to the desired size.)
Be sure to keep the grain of fabric running top to bottom (the woven texture of the Oakshott Lipari makes this easy to do since the grain is clearly visible when the fabric is held up to the light). Once your pieces are laid out as desired, it’s time to sew them together! Chain piecing helps the process go quickly and smoothly. Here’s how to set it up.
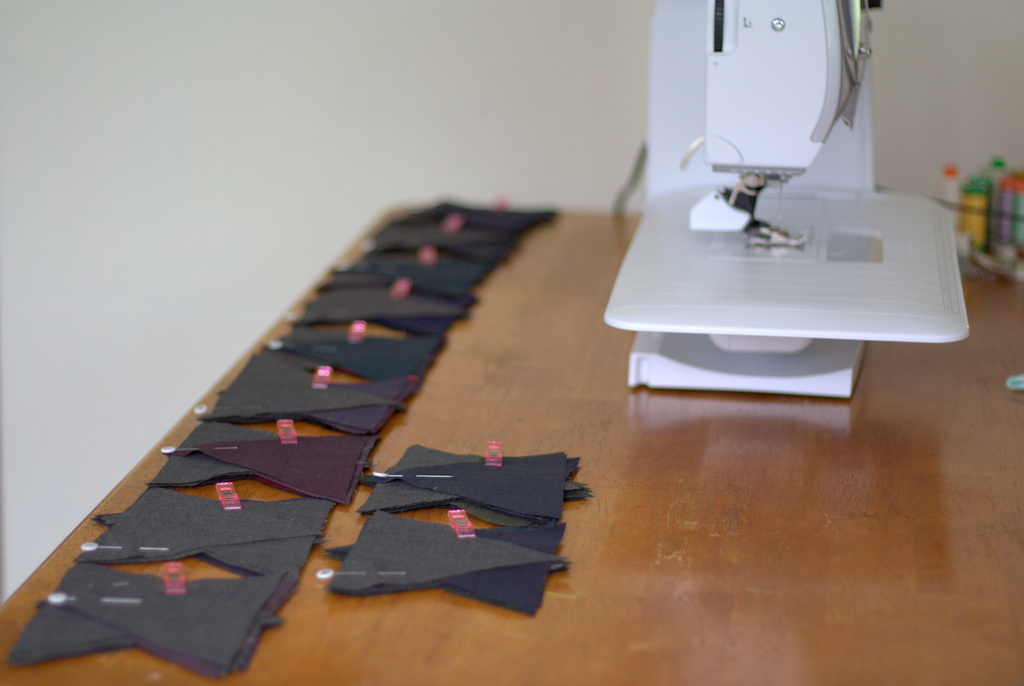
Label each horizontal row. I began with 1 on the top and ended with 11 on the bottom and used pins to label the first piece in each row (Note that I labeled each row after stacking, so the pins aren’t visible in these photos).
Carefully stack the triangles from each row, with the far left piece on top, and keeping the triangles facing the proper direction (this will help you keep them straight while piecing). For example, for row one, you will have the labeled first triangle piece from the far left on top, and carefully pick up each triangle across the row, adding it to the bottom of the stack.
Once you have your row stacked, use a clover clip or similar device to hold the stack together.
Gather all of your rows in this manner.
Lay them out in order, making a clear mental note of what row is located where. You could label a sticker on the table next to each stack to help, although simply keeping them in chronological order works well for me. Let’s sew! (Note that a table next to you works better than having the stacks this close to the sewing machine. As you add pieces, your strips will drag your stacks around if you keep them here as shown!)
To speed up the process, we will be chain piecing (sewing without stopping) the first piece to the second piece from every row. Note: Be sure to keep the pin labeling each row in the first block at all times!!
Once you have all of your first pieces sewn to your second pieces, trim the threads to separate, and press. All these bias edges means this is a great time to practice pressing, and NOT ironing. Press: up, down, up. Great!
Alternate which side you press your seam for each row. I pressed odd rows (1, 3, 5, etc.) to the left and even rows (2, 4, 6, etc.) to the right. Pressing open also works well!
Next, add the next triangle to each row, chain sewing again. You’ll be sewing the third triangle (which is now on top of each stack) to each row. Double check the number pin on the sewn row before adding the next triangle, since you want to be sure to keep your gorgeous layout intact.
Continue chain piecing, trimming, pressing, and chain piecing again until all of your rows are assembled. As you add each triangle, stack those corners and everything will be right in line!
Sew all of the rows together, pressing seams up toward the grey triangles. I like to pin about 1/8″ after each point where the triangle points will be matching up, and aim to sew *right* through the center of the seam-cross to make sure you don’t cut off any points when sewing the rows together.
Quilting & Finishing
Once your quilt top is pieced, baste as desired. I decided to quilt my quilt before squaring it up because of all of the bias edges. I used 505 basting spray and spray basted for the first time! I used Christa Watson’s design wall spray basting tutorial and can see why people love it.
I decided to quilt my quilt with straight lines 1″ apart using the walking foot on my Bernina 560. I used a hera marker and a long quilting ruler to mark lines 1/2″ from some seams, and then 1″ apart from there. I sectioned the quilting in a few different sections, using straight lines 1″ apart but changing directions in each section. Lines intersect in the Ruby Red triangle, “exploding” out to the sides (like a volcanic eruption!?). The quilting lines don’t intersect anywhere else in the quilt. I really love the finished effect.
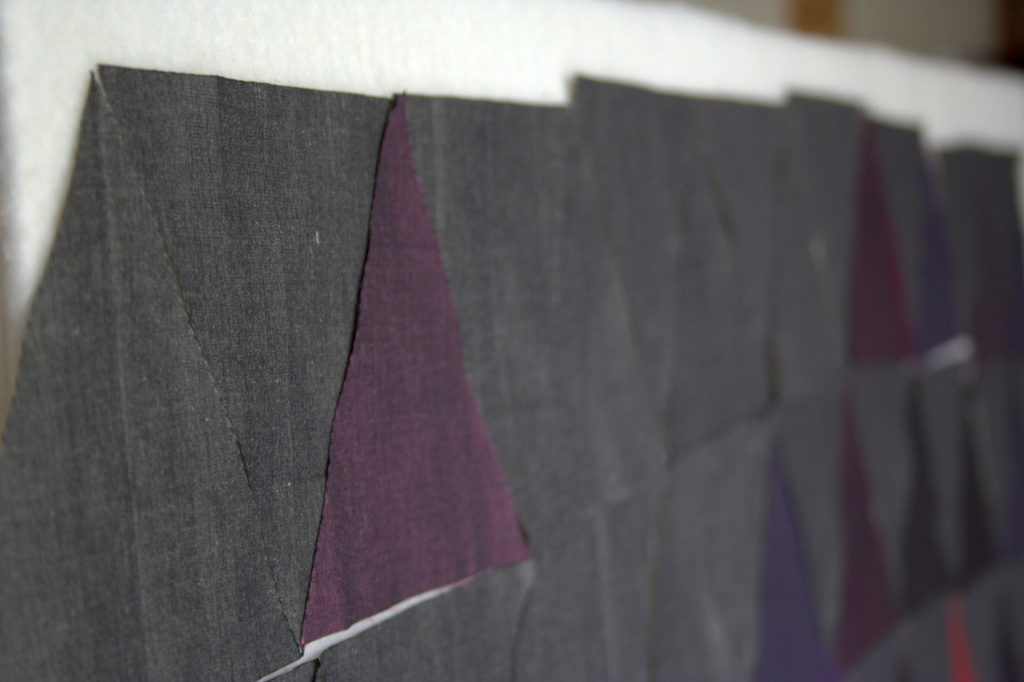
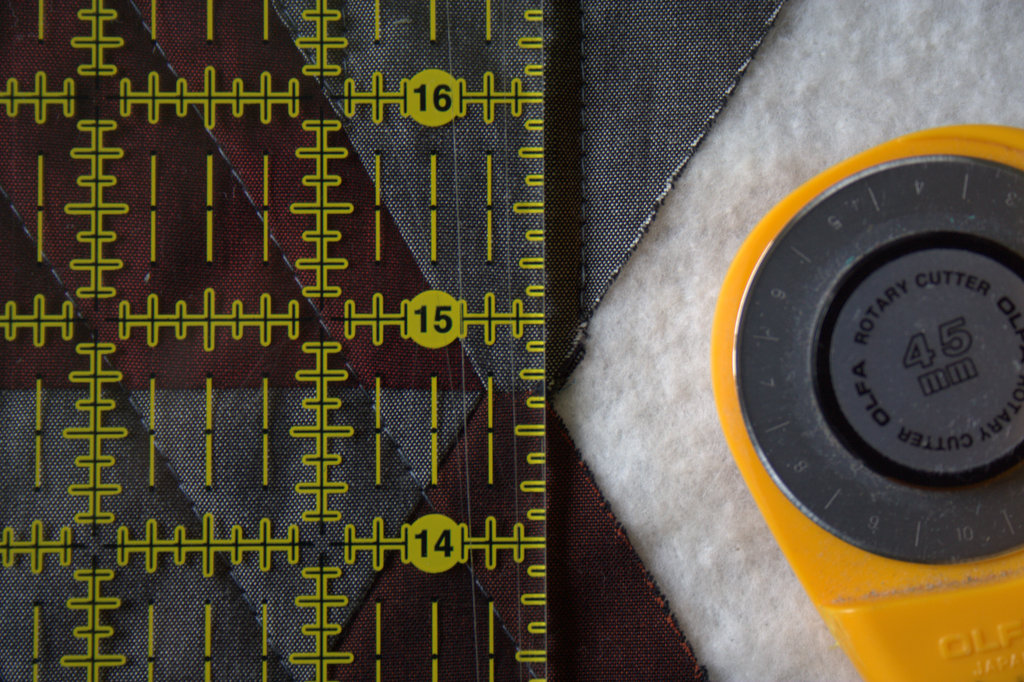
After quilting, it’s time to square up the quilt. Using a long, straight edge, trim 1/4″ away from the outer points so that you don’t lose any points when you sew on the binding. Use at least two sets of points to make sure your ruler is straight before cutting.
Square up your quilt, trimming off the excess, then bind!
Viola! Enjoy your Vesuvius Quilt, and please use #vesuviusquilt and tag me @nightquilter if you decide to make one.
Many thanks, again, to Oakshott for providing the fabrics for this project, and for including me in the hop. Make sure to check out the rest of the amazing Lipari projects:
*BREAKING NEWS* Volcanic action alert
For those of you who follow me on Instagram, you may have seen the heart-wrenching fate of this quilt, that I so unknowingly aptly named “Vesuvius”: my nearly-four year old son cut into it in three places (along with a trail of destruction that included my Machinger quilting gloves cut into pieces and cuts into a big chunk of fusible fleece). With the great outpouring of support, commiseration, and suggestions offered by the fantastic community on IG, I’ve decided to make the cuts an added design element, another chapter in the story of the quilt, and sew either black or red patches over the cuts, making them into “fault lines”.
One of three cuts, now called “fault lines”, made into the edge of this quilt by my nearly-four year old son.
For now, though, I will put the quilt aside until I can dive into the repair with chuckles and reminiscence instead of lingering tears and frustration. I know that my son did not cut into my quilt maliciously, but it still is a difficult experience. I have made it known that if he ever wants to cut fabric again, he can tell me and I will help him make a quilt. We’ll see where it goes. For now, my Vesuvius Quilt (aka Max’s Fault Lines) is smoking and being buried by ash for a bit. It will rise again some day in the future.
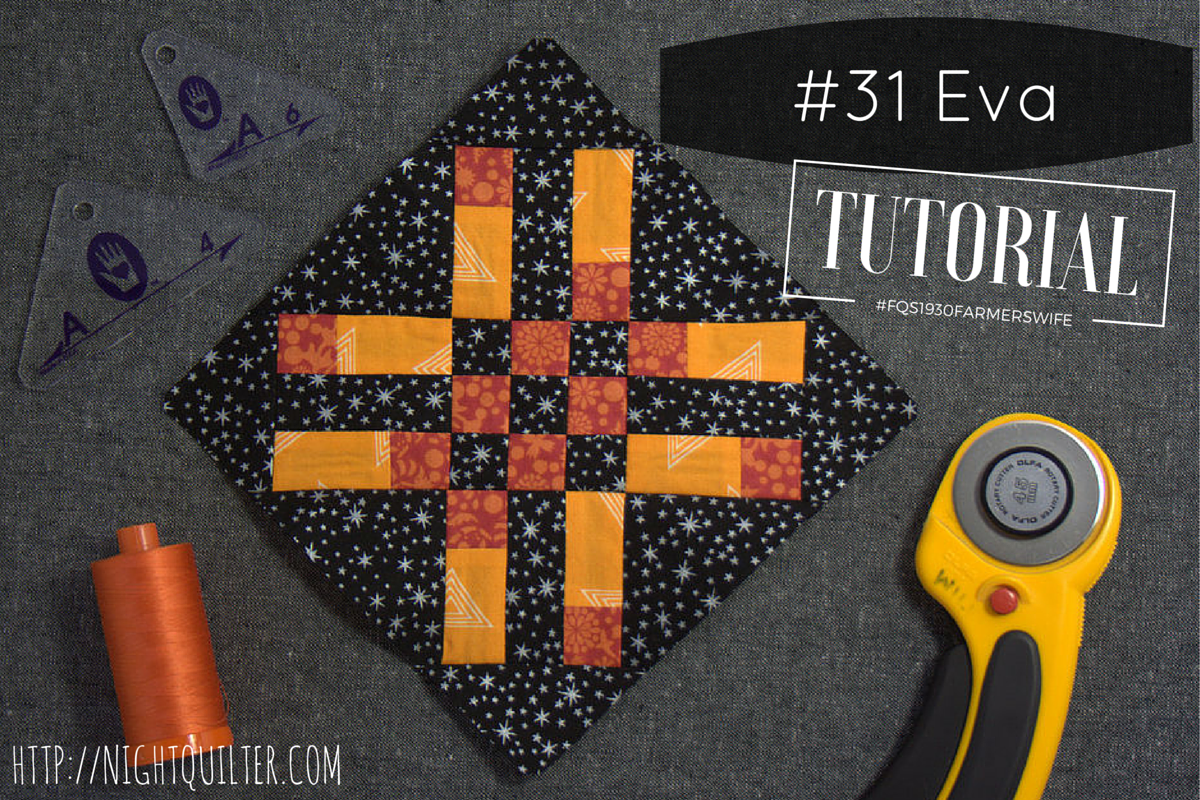
As with Autumn, a first look at block 31 Eva may cause you to balk: 37 pieces in one 6″ block, and many of them are tiny squares!? But with a creative look at the block construction, Eva can come together smoothly and without too many teeny pieces. This sew along continues to show me that there is nearly always a faster and easier way to approach block construction than purely cutting out all of the pieces and sewing them together. With a few shortcuts and piecing tricks, Eva comes together quite smoothly. In this tutorial, I’ll show you how to use strip piecing to save a bit of time and create larger, more manageable pieces, and fill in the gaps using Marti Michell templates (Set A) or rotary cutting to help make putting Eva together smooth and enjoyable.
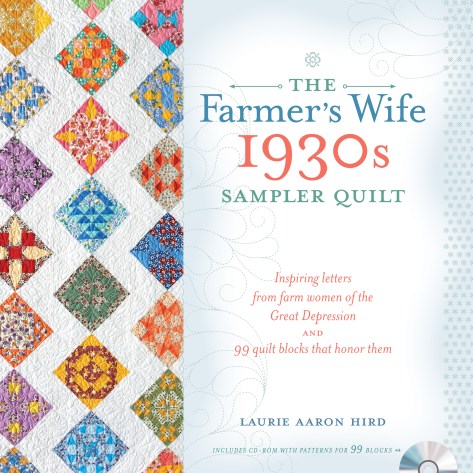
Note: Exact measurements for the pieces needed to construct this block will not be provided in this tutorial in order to protect copy write. It is a prerequisite of making this block that you have a copy of the book, The Farmer’s Wife 1930s Sampler Quilt: Inspiring Letters from Farm Women of the Great Depression and 99 Quilt Blocks That Honor Them. All measurements can be found in this book and its associated media. That said, even if you aren’t sewing along with us, I think you will find some really helpful tips in this tutorial that will help you look at all block construction more creatively!
Reflection on the Letter – Two Little Sparrows
The letters in this book continue to move me in their honesty and relevance in my life today. It’s amazing how similar the worries of today are to those of the farmer’s wives back in the 1930s. Losing sleep over financial stability seems to me to be part of the human condition. Especially at our current stage of life, growing a young family, recently having bought our first home, and working hard as a one-income family of five so that I may be a full time mom raising our children, my husband and I unfortunately do not escape the worries of making ends meet. Mrs. P. G.’s dream of two sparrows drawing nearer together when faced with the winds of adversity really resonated with me, and gives me renewed hope that “every little thing, is going to be alright” (thanks, Bob Marley, and Mrs. P. G.).
Tutorial
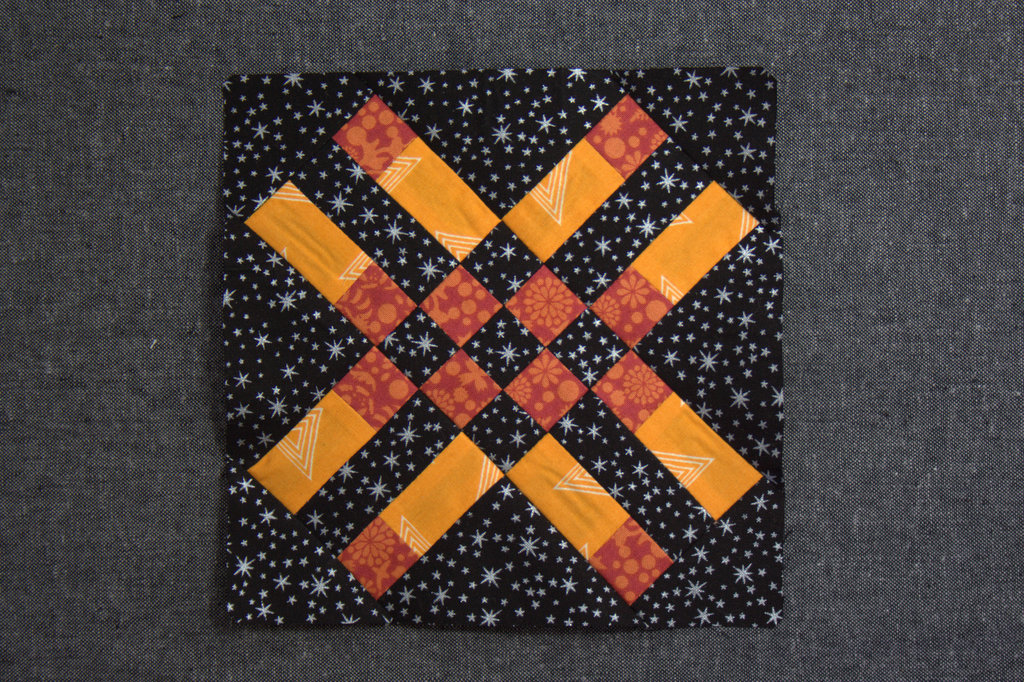
For this block, I specifically chose fabrics with small or nondirectional prints, so that I could quickly strip piece the components without worrying about fussy cutting or directionality. Note that I am arranging my final layout on-point, but for the purposes of being consistent with the diagram in the book, this tutorial pieces the block squared. If you plan to set your blocks on-point, be sure to account for that with any directional fabric placement.
When broken into more manageable pieces, this block is composed of the center 9-patch, two pairs of mirror image blocks, and 8 surrounding triangles, cut with templates and/or a rotary cutter. I first made the blocks using strip piecing to speed up the creation of the components, and then sewed them all together. Let’s break it down.
Making the Center 9-Patch
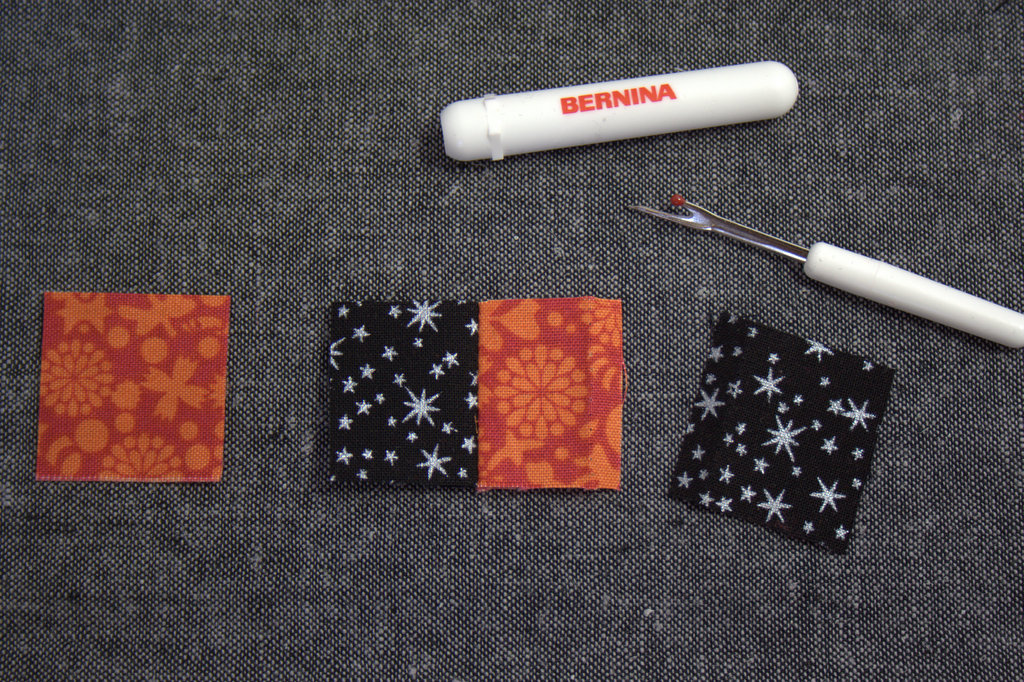
In the book, the cream and yellow fabrics were used to make the #31E 9-patch. Choose your coordinating fabrics (I used black and orange and will refer to the fabrics as black and orange throughout).
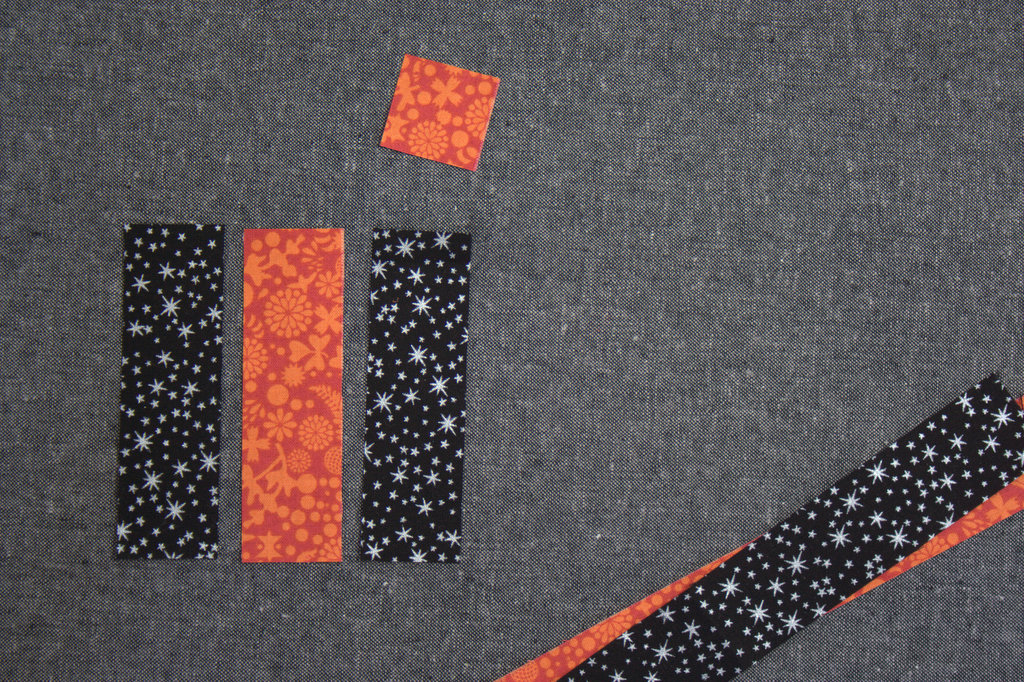
Cut one (1) 1 3/16″ x 19″ long strip of your cream equivalent fabric (I used black). Subcut two (2) 4″ long pieces. Set the remainder of the strip aside.
Cut one (1) 1 3/16″ x 16 1/2″ long strip of your yellow equivalent fabric (I used orange). Subcut one (1) 4″ long piece and one (1) 1 3/16″ square. Set the remainder of the strip aside.
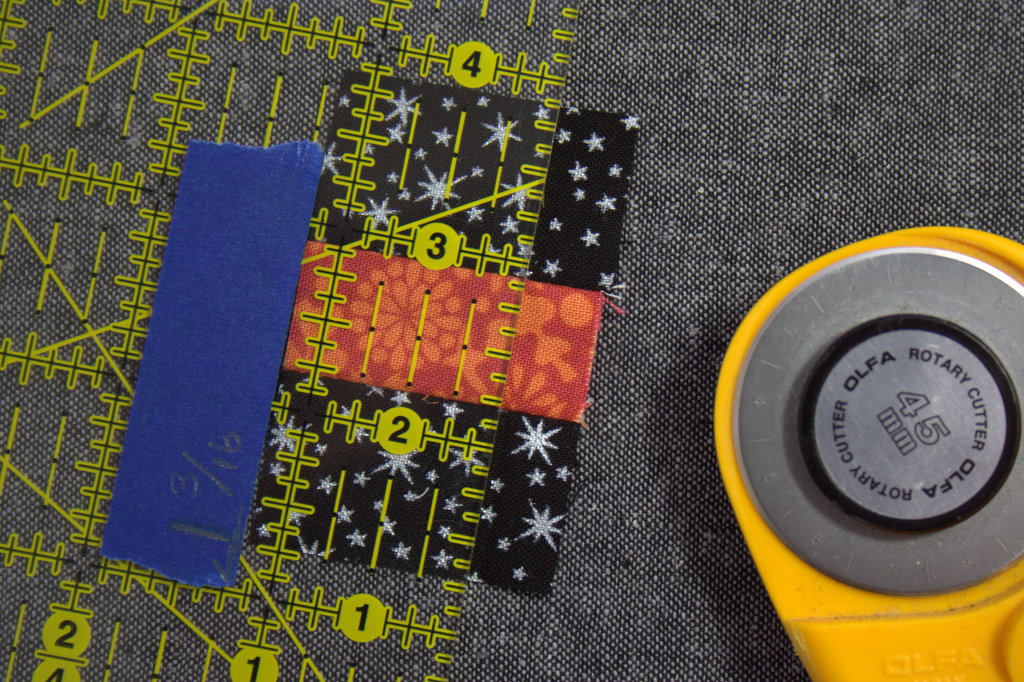
*Measurement tip: 3/16″ is halfway between 1/8″ and 1/4″. Since the 1 3/16″ measure was used so often in cutting for this block, I marked it with painter’s tape on my ruler to help avoid confusion.
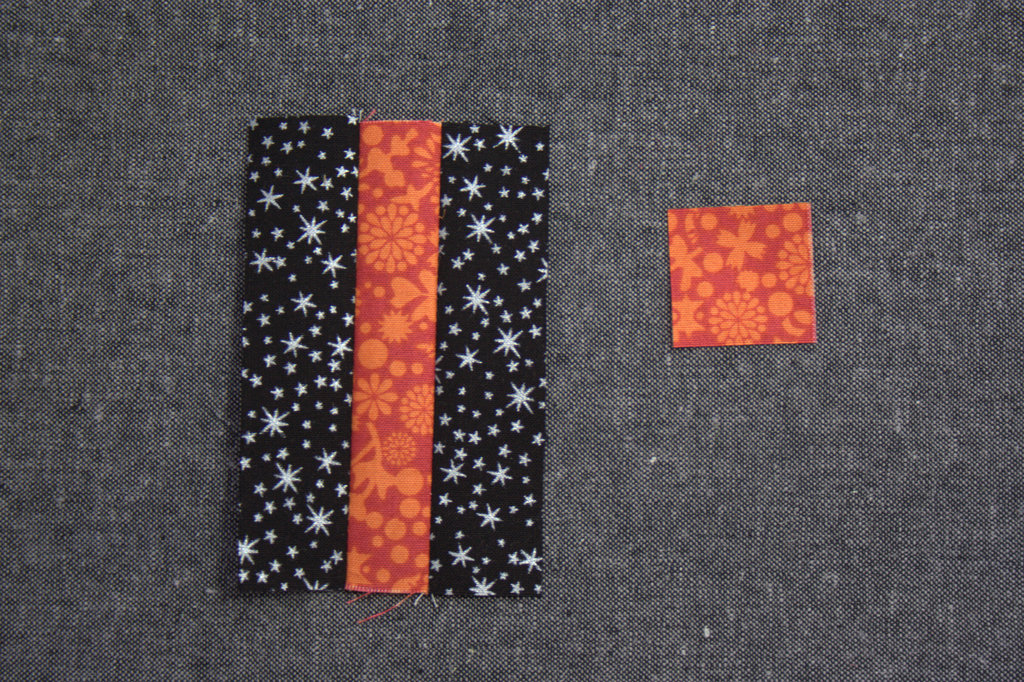
Sew black strips to orange center as shown. I prefer to press my seams open for ease of matching seams and reduction of bulk. Feel free to press open or toward the darker fabric.
Ruler marked with 1 3/16″ measure.
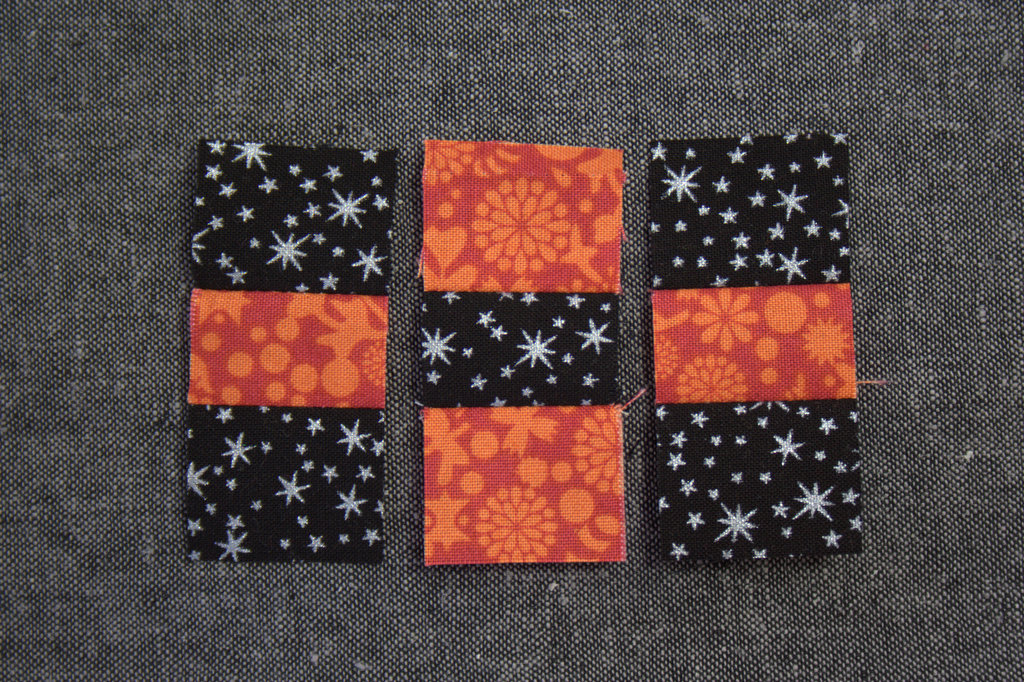
Cut into three (3) 1 3/16″ wide strips as shown.
Next, carefully unsew one of the black squares. Sew the orange 1 3/16″ square to the other side to make the center strip for the 9-patch.
This is a great time to use a leaders and enders project to help smoothly sew these tiny pieces without the fabric getting bunched in the machine. If you don’t have a leaders and enders project in progress, sew through a scrap piece of fabric before sewing the tiny squares together. This will help your stitches stay smooth despite the tiny fabric size!
You now will have your three strips for your 9-patch.
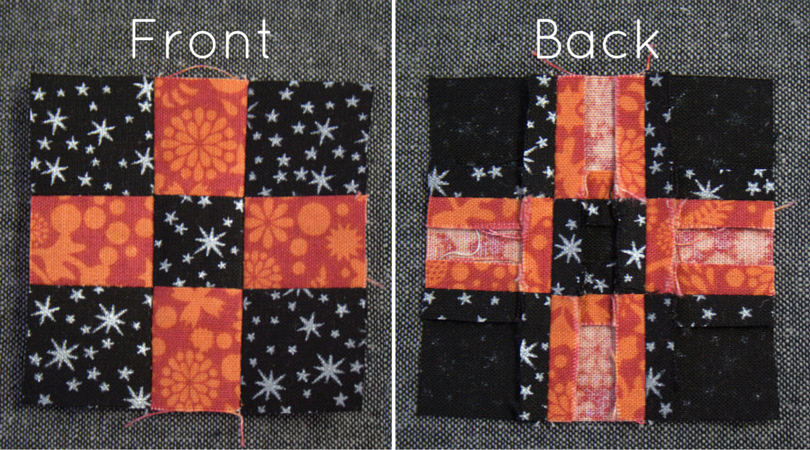
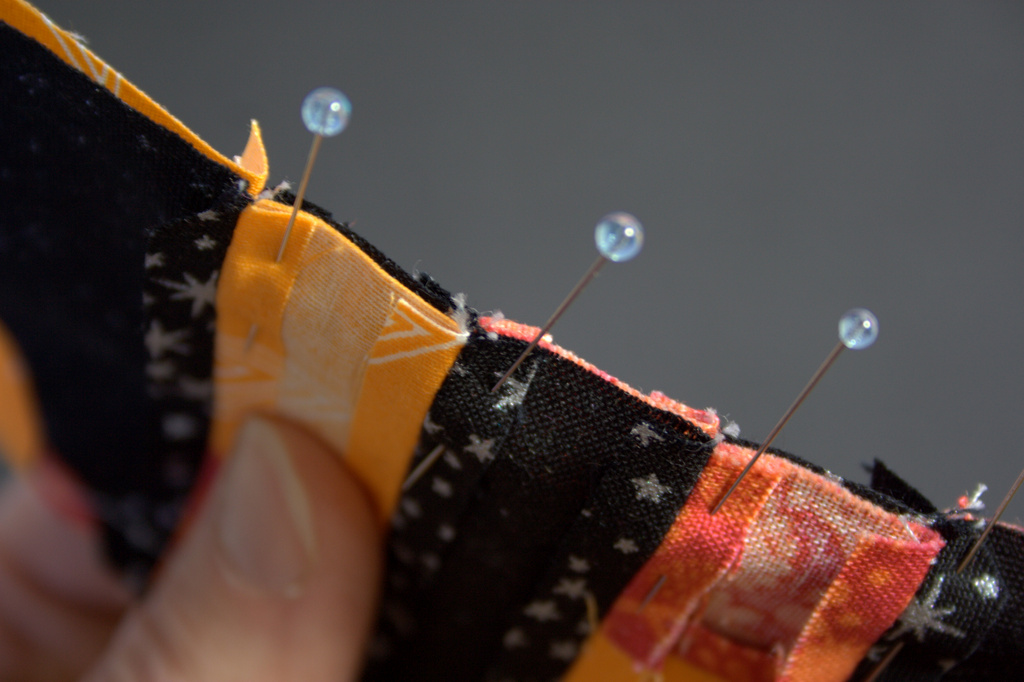
Carefully sew them together, pinning just after each seam join. Press seams open. Above shows my block, front and back. Note how nicely the pressed-open seams sit! Set your 9-patch aside.
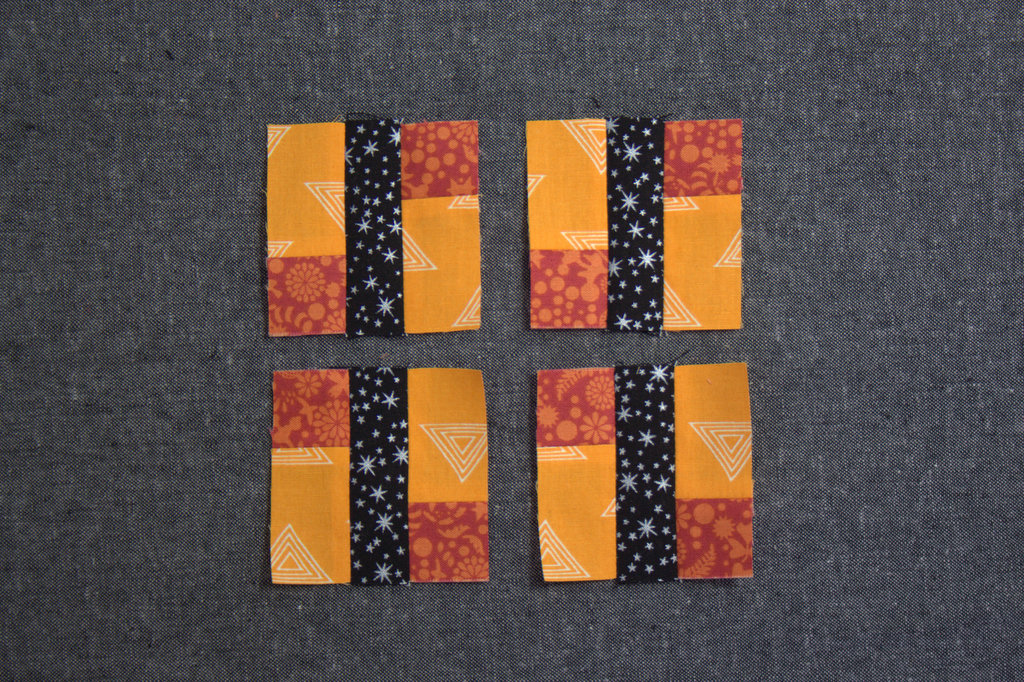
Making the Mirror Image Blocks
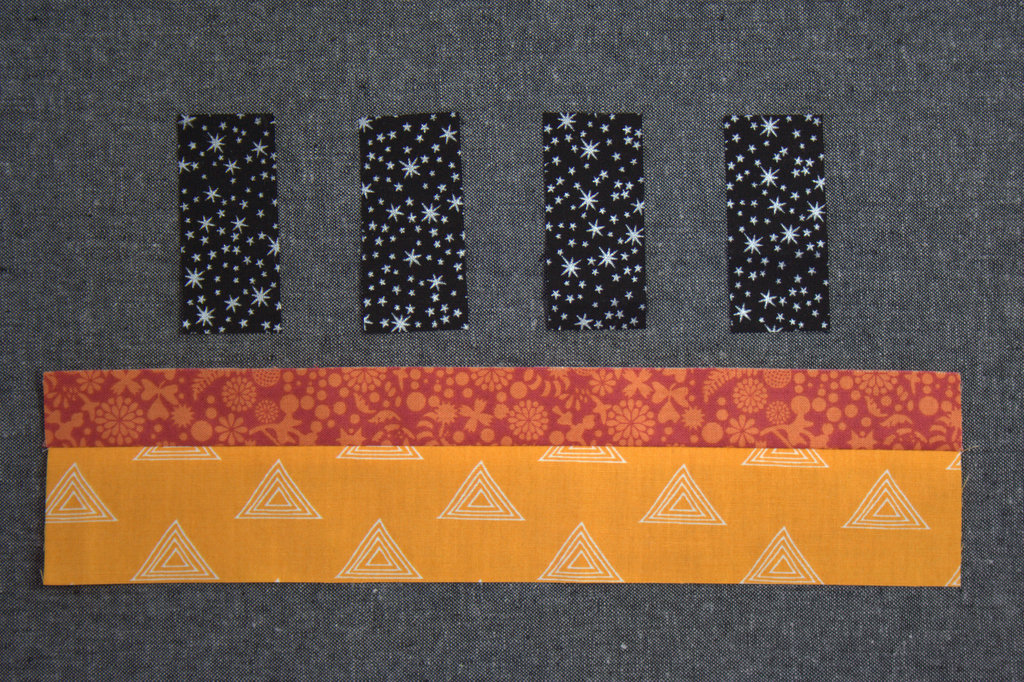
In the book, the cream, yellow, and blue fabrics were used to make the remaining blocks, each comprised of a #31C and two #31D-#31E units. (I used black, orange, and yellow-orange fabrics and will refer to them as such throughout).
Cut one (1) 1 7/8″ x 11″ piece from your blue-equivalent fabric (I used yellow-orange). Retrieve the fabric strips set aside during the 9-patch construction, and subcut one (1) 1 3/16″ x 11″ strip from the orange. From the black strip, subcut four (4) 1 3/16″x 2 5/16″ pieces. If you have the Marti Michell template set A, the A-3 template is exactly 2 5/16″ and can be used to easily cut the pieces.
Sew the orange to the light orange as shown. Press seams open. Subcut the strip set into eight (8) 1 3/16″ segments. Using a ruler marked with painter’s tape as shown previously in this tutorial will help this step go quickly.
**MIRROR IMAGE ALERT** At first glance the blocks above may look the same, but notice that they are actually mirror images. The two on top are mirror images of the two on the bottom. Carefully arrange your pieces as shown above, paying very close attention to the direction of the orange bits: orange bit facing down on the left and up on the right for the top two; orange bit facing up on the left and down on the right for the bottom two.
Very carefully sew the blocks together, pausing midway to double check the alignment before sewing the second strip onto each center. Press seams open. Set these four blocks aside.
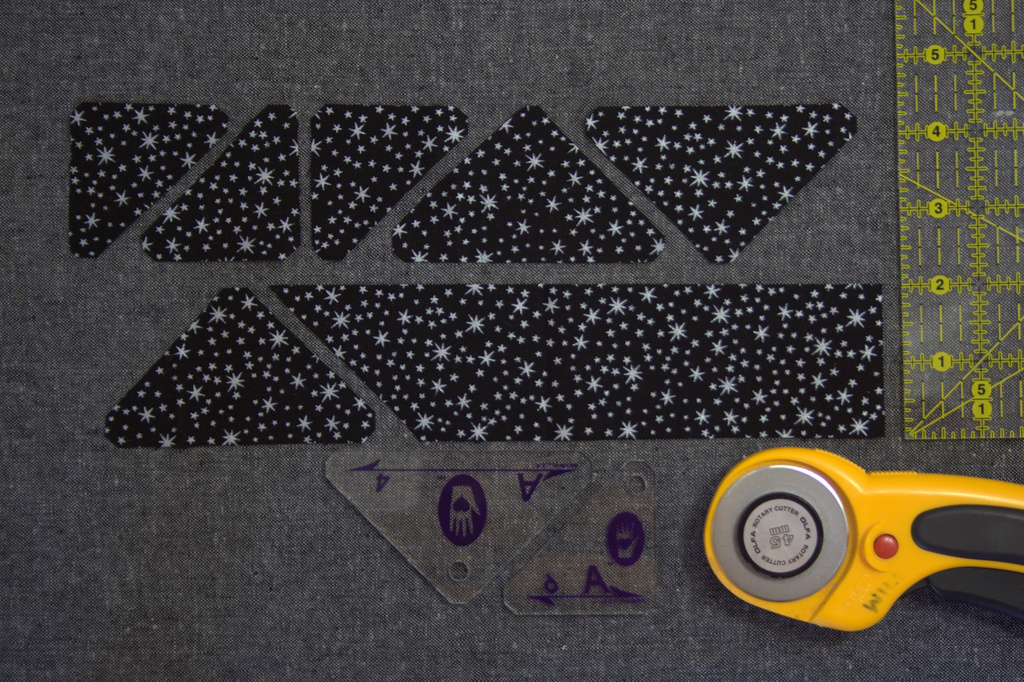
Cutting the Triangles
In the book, the cream fabric was used to make all of the triangles that comprise the background of this block. I used black fabric.
Cut a 2″ x 18″ strip of black fabric. Using Marti Michell templates A-4 and A-6 or the templates provided in the media associated with the book, cut four (4) #31A and four (4) #31B pieces. The photo above demonstrates how to efficiently cut the pieces from the 2″ strip. One more #31A (the large triangle) and one more #31B (the smaller right triangle) remain to be cut in the photo above.
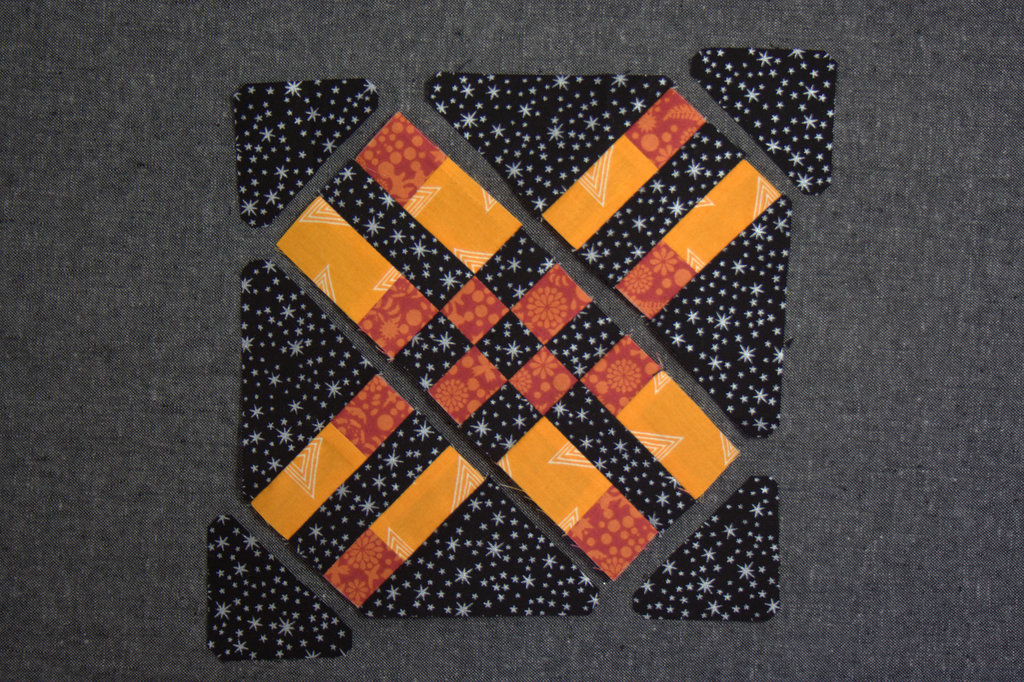
Assembling the Block
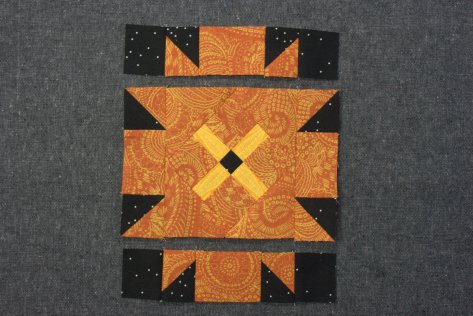
Now you have all of the components necessary for piecing Eva! Grab all of your blocks and triangles and let’s lay them out. Here is where the mirror image blocks can get easily mixed up. Take your time, cross referencing with the picture in the book or the photo above to make sure that all of your pieces are heading in the proper direction.
*Note:The orange squares all converge in a horizontal strip in the center of the block. If an oval is drawn horizontally across the center, it should contain all orange squares.
Once you are sure you have your layout correct, I suggest that you take a photo with your phone for reference. Refer to it before each step, since it’s much easier to take a second look than to rip stitches to resew (ask me how I know! I began assembling the block before realizing that two of my orange bits were facing the wrong direction. Hello, bff seam ripper!)
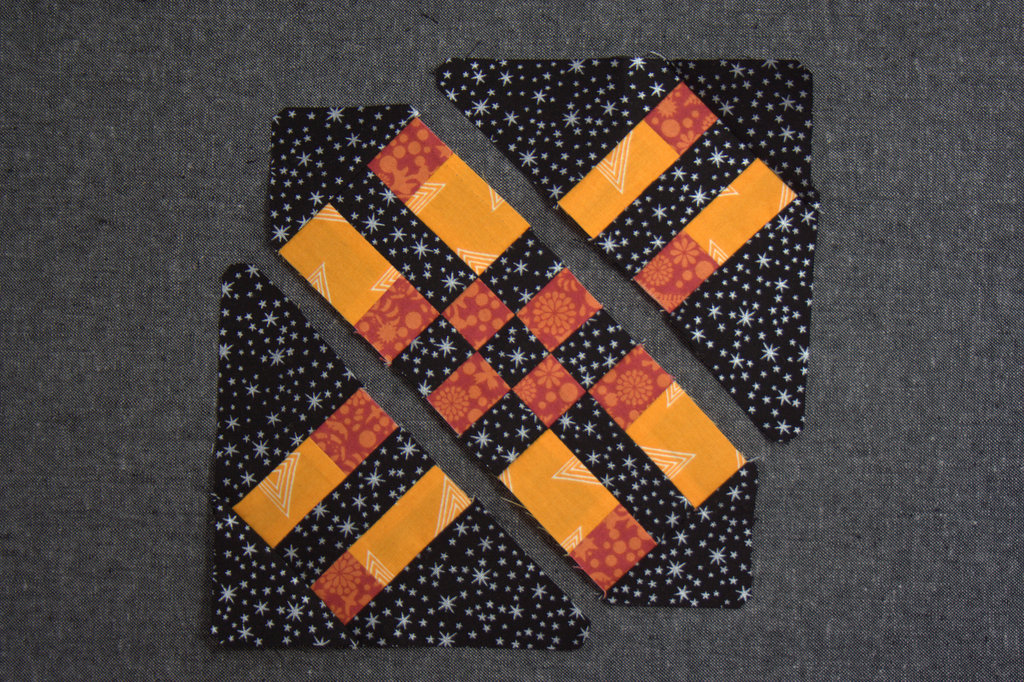
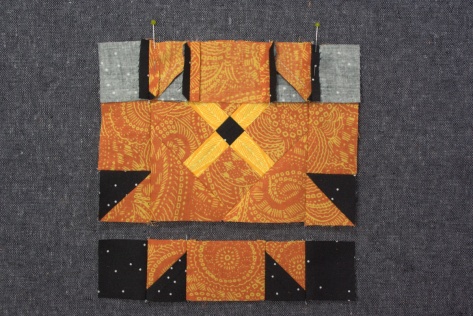
We will assemble this block in diagonal strips. Begin by sewing the large #31A triangles to either sides of the top right and bottom left mirror image blocks, and the top left and bottom right mirror image blocks to the center 9-patch. Press seams open.
Next, sew the #31B triangles onto each unit.
Finally, sew the top right and bottom left units to the center strip. I find it helpful to pin just after each seam match for perfectly matched seams. Between the pressed-open seams and the pin *just* after each seam, my block comes together just how I like it!
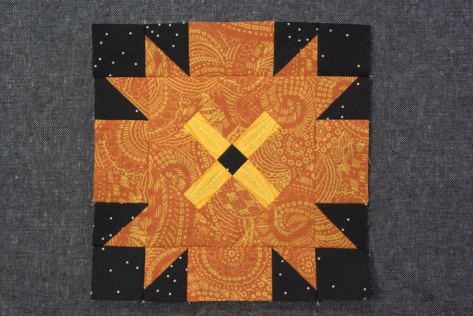
Viola! There you have Eva, easy peasy! I love the look of this block set squared, but since my quilt blocks will be set on point, I decided to have her orange strip head uphill, since optimism makes the world a brighter place, and the letter encourages sticking together in the face of the winds of adversity. Chin up, here we go!
Thank you so much for joining me today and I hope you found this tutorial helpful!
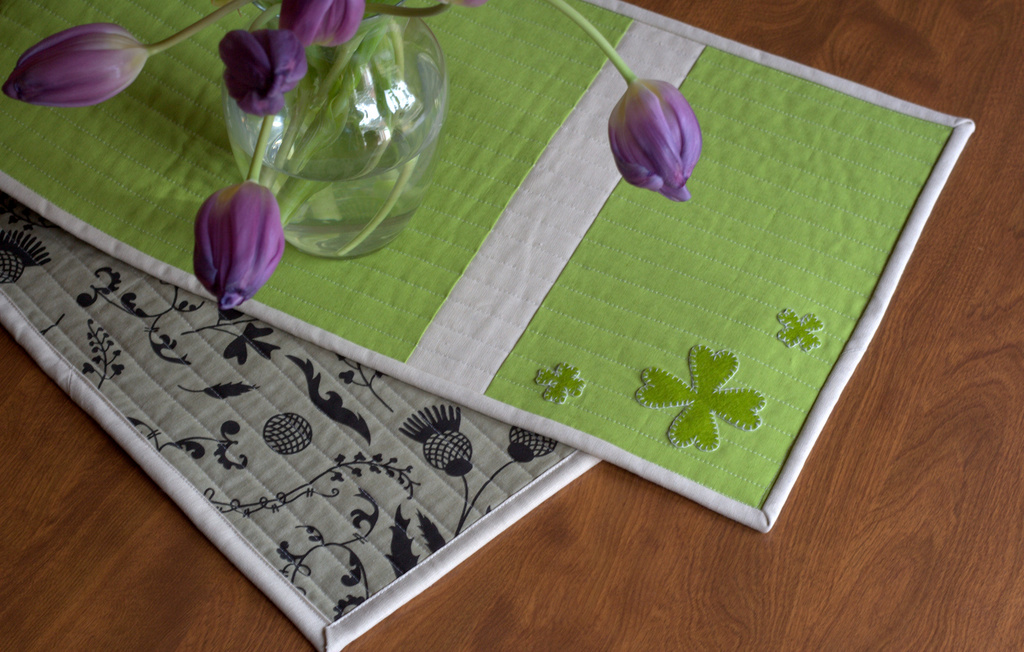
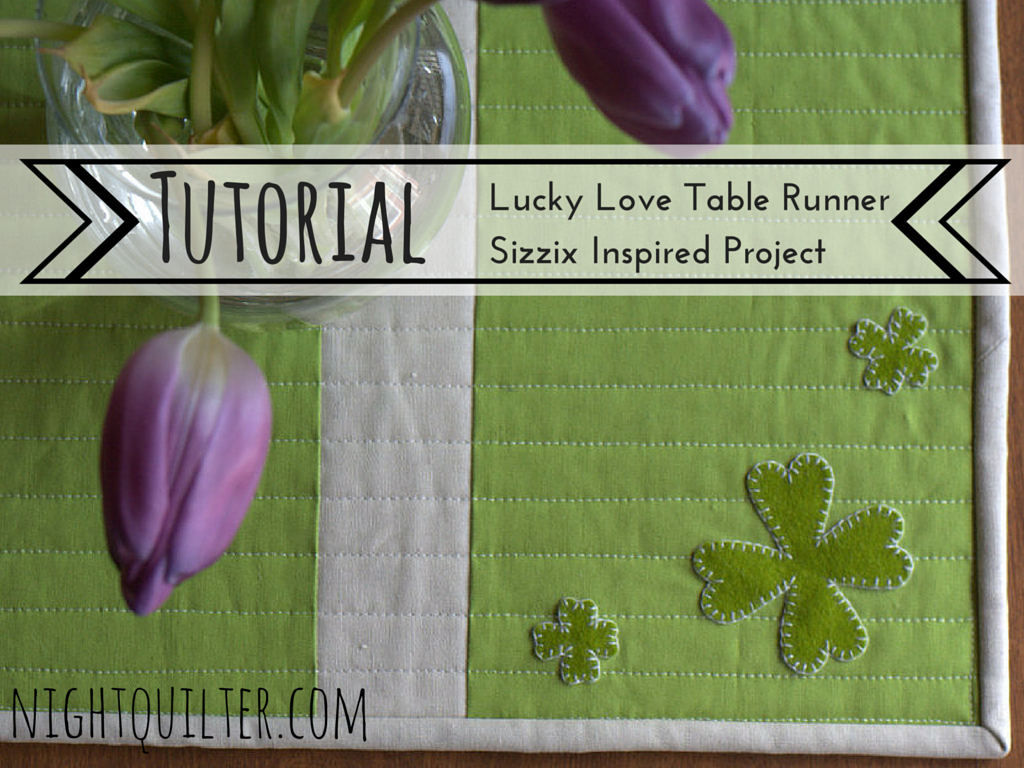
Today I’m excited to be sharing another tutorial on the Sizzix blog, this time for a really sharp-looking table runner (if I do say so myself)! I’m typically not one to make seasonal decor, since the seasons come and go so quickly, but this one is reversible so I can use it all year long. Ever since I first cut wool felt with the Sizzix, I’ve been wanting to do a wool felt applique project, and once I realized I could make four-leaf clovers using my Primitive hearts die, it was game on. I backed the table runner in one of my all time favorite Alison Glass neutrals, Botany in Taupe from Ex Libris, which I certainly won’t mind looking at for the non-St. Patrick’s Day part of the year!
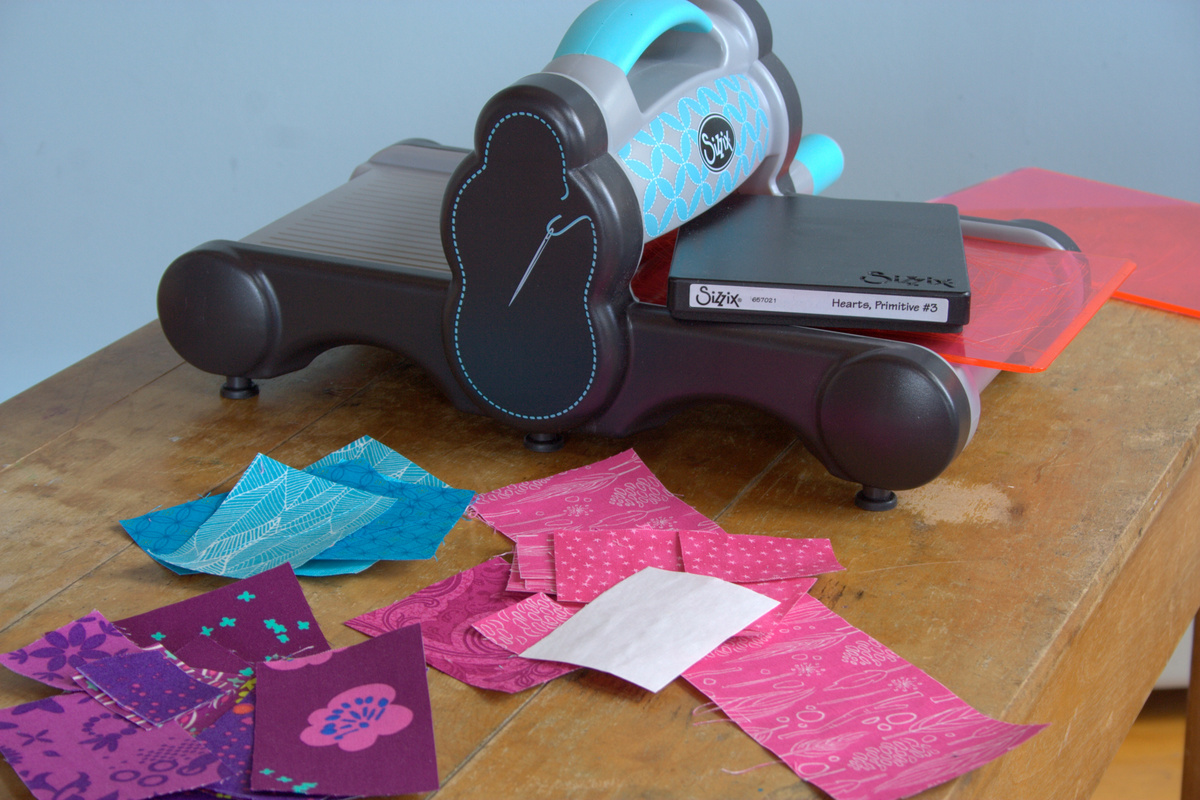
Since I love to make the most of the tools I have, this project is also exciting since it’s the third unique project I’ve made using the Primitive hearts #3 die from Sizzix. You may remember my Growing Tree Wall hanging and Valentine’s Day Garland tutorials, the first two projects I made using this die. You know it’s a winner when there seems to be an endless stream of projects that can be made out of a certain tool.
I try to make my tutorials helpful to the entire sewing and quilting world, even if you don’t yet have a Sizzix or other die cutting machine, and this one is no different.
In this tutorial, I share:
a neat trick for making four leaf clovers out a heart die (you could use it with a heart hole-punch, too, if you have that);
tips on accurate straight-line quilting without having to physically mark your quilt; and,
how to blanket stitch.
Head on over to the Sizzix blog to read the full tutorial, and I hope you enjoy!
Do you make seasonal projects? How and where do you store them when they are off season? I may need to take some notes if this keeps up!
With so many fabulous tutorials out there in this vast internet world, I try to avoid reinventing the wheel whenever possible. So far, when it comes to finishing my quilts and other stitched projects, I’ve had great luck in finding clear, well-written tutorials that help clarify exactly how to best finish a project. Today I thought it might be helpful for me to create a reference list of my top go-to finishing tutorials and tools to share with you.
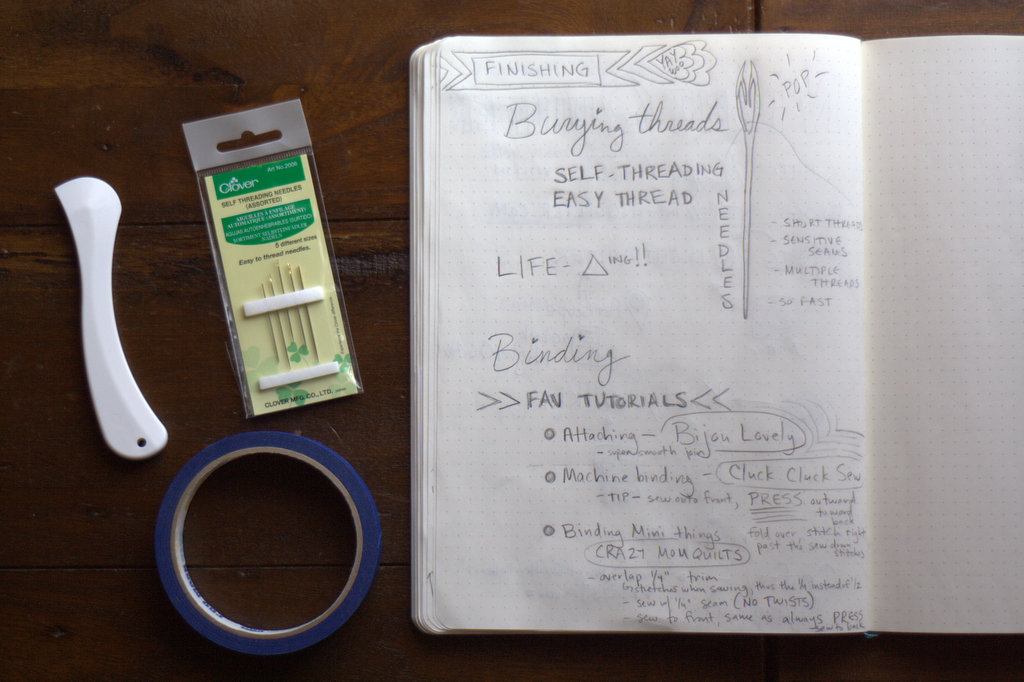
Here is a visual map I drew to help keep track of my favorite methods during an #Honestcraftroomies Periscope hop about this topic a few weeks ago, along with my top favorite finishing tools. (If you click the photo it should open in another tab a bit larger so that it’s easier to read. All of the information is in the blog post, too, though!)
I’ll begin by linking to each of my favorite finishing tutorials below with a brief explanation as to why it is a favorite (Each heading and photo link to the tutorial. Click and it will open in another tab. Peruse at leisure. Bookmark. Revel in sweet knowledge!)
Holly DeGroot at Bijou Lovely was one of the first quilters I started following regularly, and for good reason. Her photos are superb and eye candy abounds! This tutorial is super straight-forward and has clear photos for every step. It also shows you how to get the end of your binding ready for the next step: attaching it to the quilt, which is very helpful. When binding any large, rectangular quilt, either entirely by machine or hand-stitched to the back, this is how I make my binding.
This gets you set up for hand stitching your binding to the back of your quilt. The brilliance is in the overlap join where the beginning and end of your binding meet. For someone who initially struggled with getting that final binding seam sewn straight and in the proper place (hi, that’s me!), this tutorial was a lifesaver!
While I love hand stitching bindings to the backs of quilts, some quilts just warrant machine binding, either for durability or for the sake of saving yourself a bit of time. This tutorial is fabulous! I now machine bind all baby quilts and kid quilts, and I use this tutorial to help machine bind things like mug rugs and table runners, too!
This tutorial makes binding tiny things a breeze. Seriously! One tip I have to emphasize is the step where you press the binding away from the front of the quilt after sewing it on. This step makes all the difference in the accuracy of your final stitches and the overall perfection of your finished (finished! yay!) mini. If you are at all infected by the mini mini quilt bug, this tutorial is a must!
My Top 3 Finishing Tools
Finishing a quilt includes more than binding. To me, quilting and burying threads count within the ranks of “finishing steps”, too. I have three top tools that I couldn’t live without when it comes to actually quilting a quilt and burying all those threads. (Each tool name is linked to where you can buy it, but they are not affiliate links; they are just there for your convenience. I’ve heard rumors that Maine does not allow affiliate link payout, and I’m thinking they may be true. You probably will see a lot less affiliate links, but I will always link to products because I think it’s helpful to you!!)
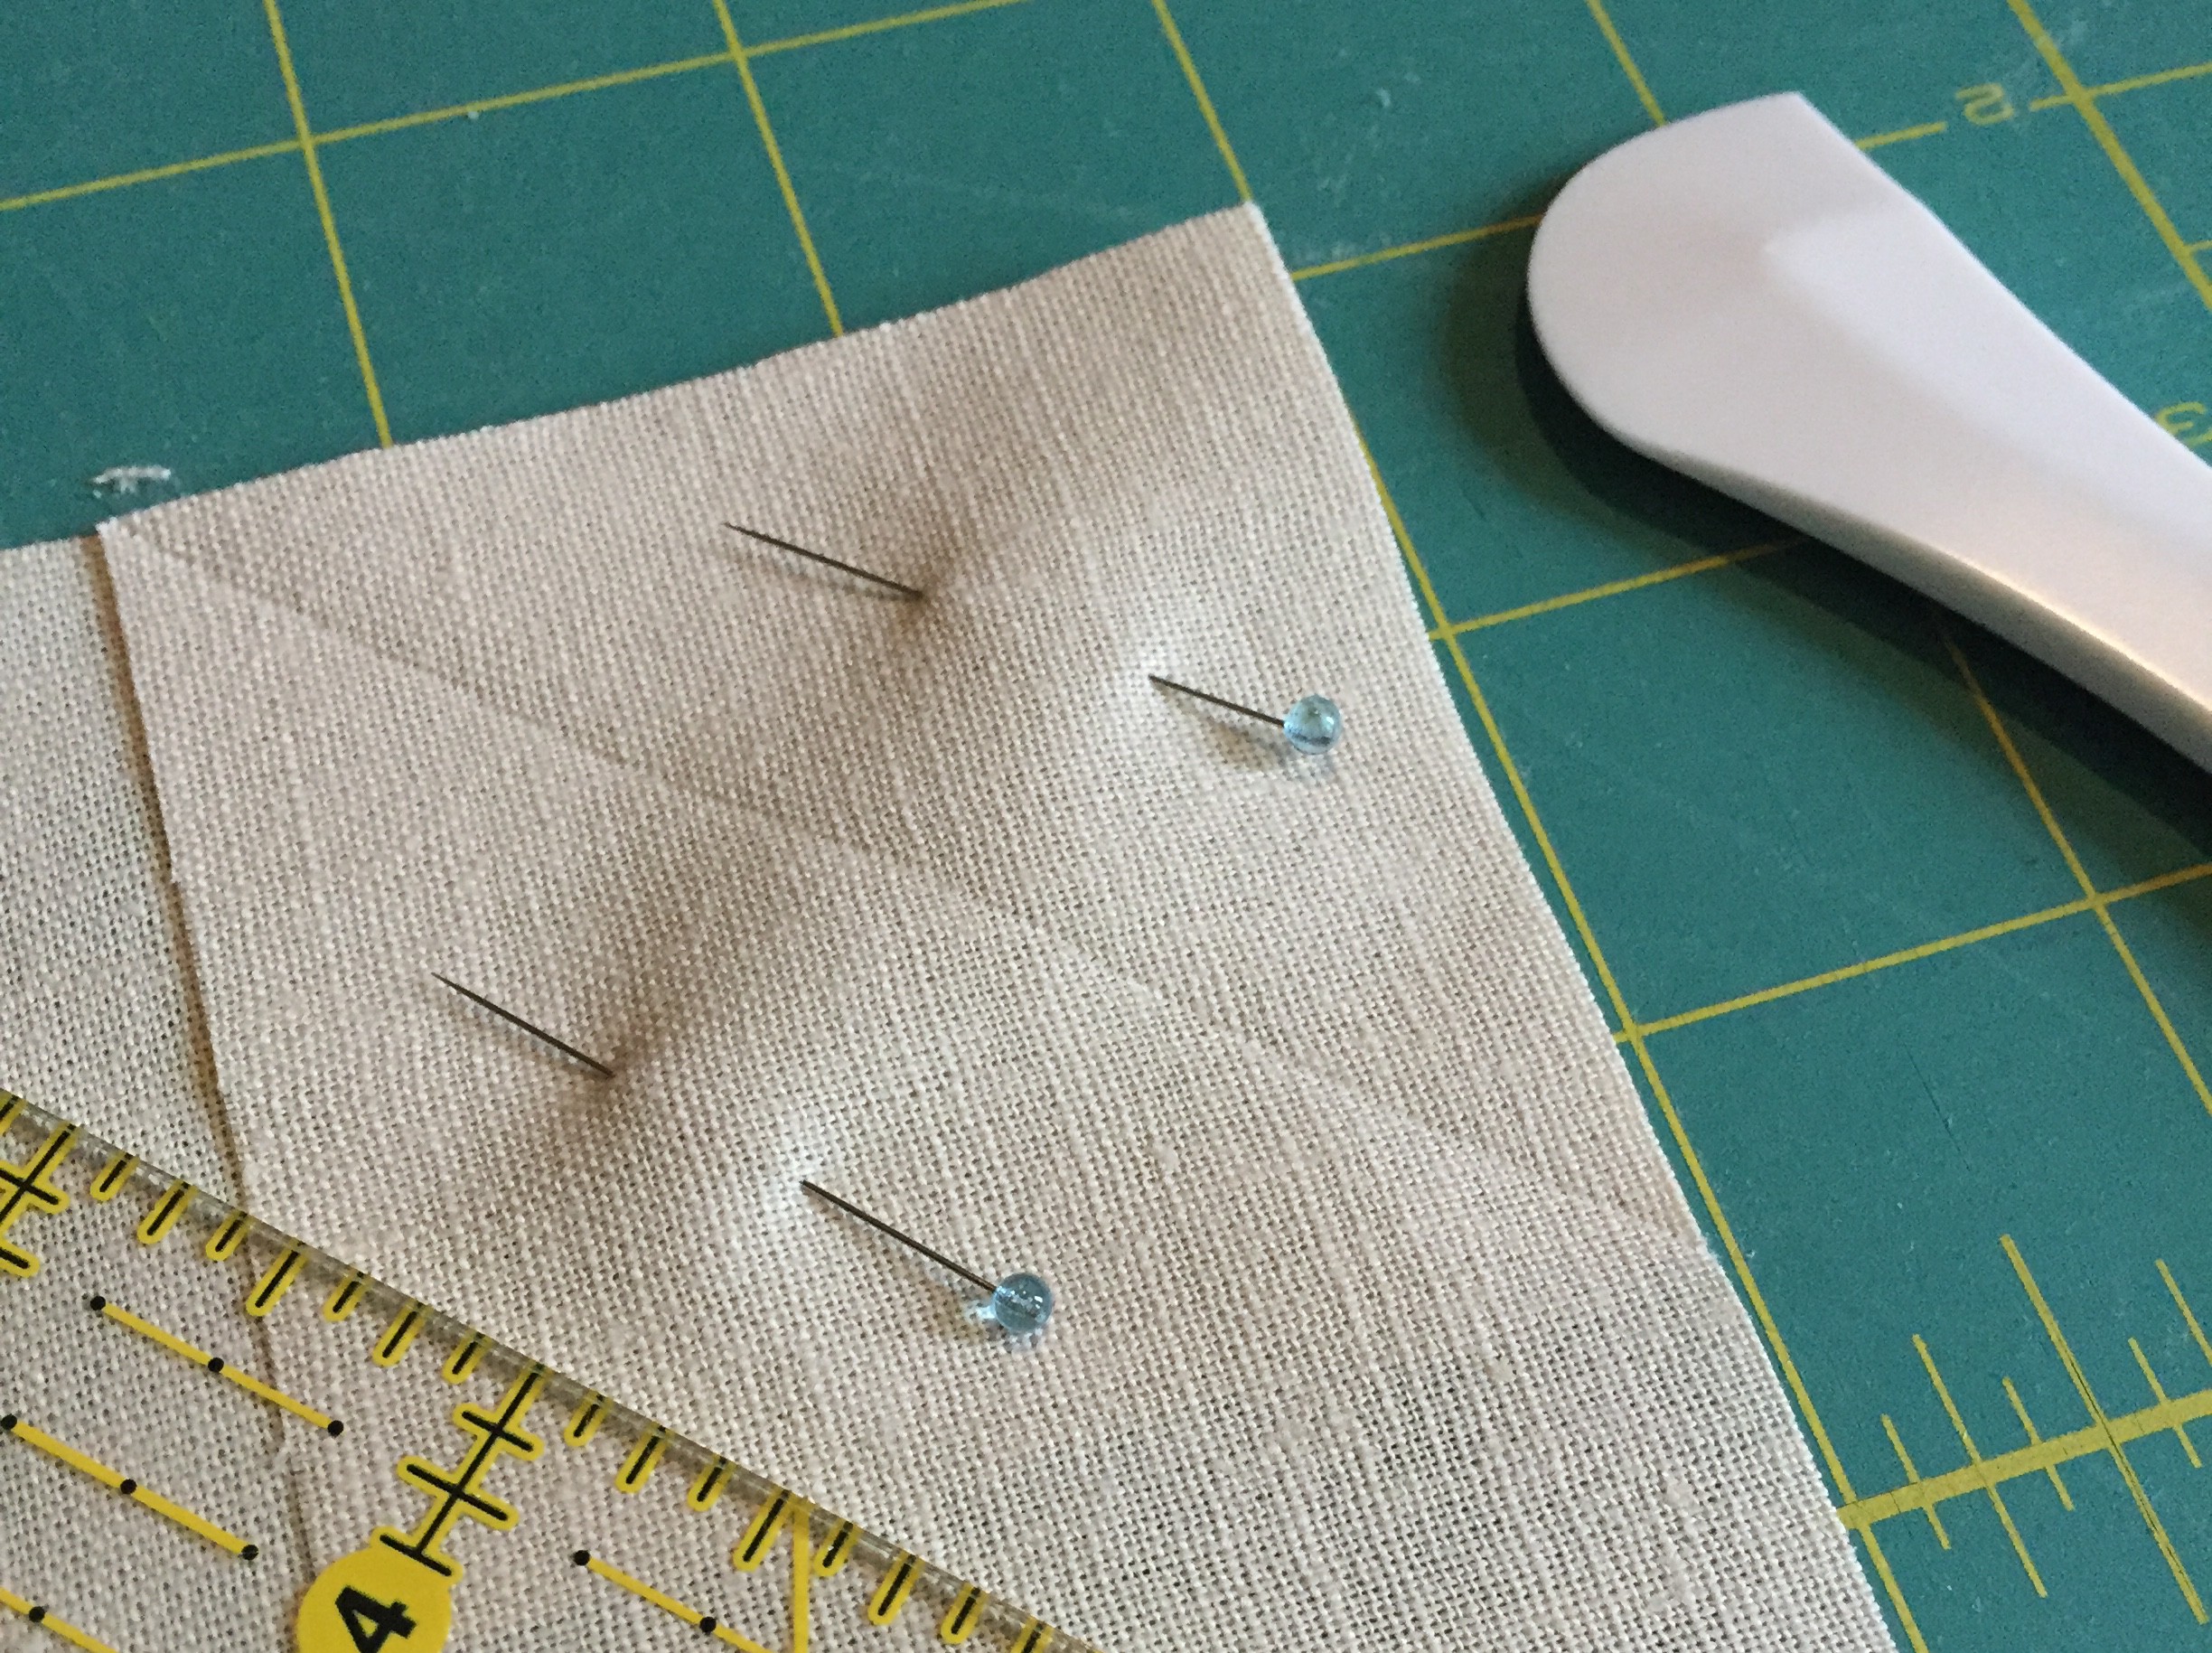
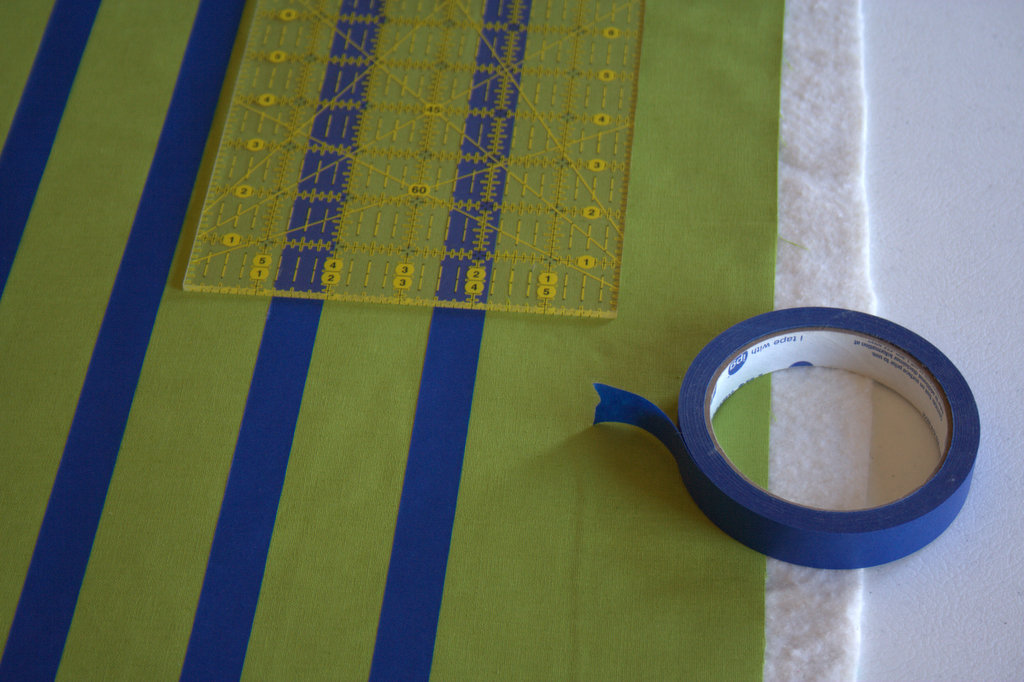
When I first heard of a Hera marker, I envisioned a special pen. The name is misleading a bit until you realize that it “marks” the quilt with creases, NOT with actual physical marks like a pen, pencil, or chalk would. (The white thing in the photo above is the Hera marker for those of you who have not yet heard of them). Hera markers are my go-to quilt marking tool, and I use one for marking straight lines for small quilting projects, marking increments before free motion quilting, marking seam lines when joining binding or sewing HSTs, and just about any other time I need to mark the fabric somehow.
Painter’s tape is another fantastic tool for those of us who shudder at the thought of actually writing on a quilt top. I use painter’s tape to help keep straight line quilting evenly spaced and as a visual guide when sectioning off areas of free motion quilting. It is easily repositionable, and paired with a ruler, can be placed exactly straight. You NEED some of this in your quilting arsenal. (I also use it to tape up quilt blocks for photos!)
These needles sound magical, and trust me–they are! When you have a gabillion threads to bury after epically quilting your quilt baby, the self-threading (also called easy-threading) needles are your bff (that stands for ‘best friend forever’, for those of you who aren’t savvy to teenage acronyms). The drawing I did of the self-threading needles shows how they work best (in my humble opinion) so I’ve included that above. Basically, they have an open top so that you can just pop your thread end right down into the eye of the needle, easily burying threads like a champ, again, and again, and again, and again…
I hope this collection of resources is helpful to you. There’s nothing like finishing a quilt, and these tutorials have helped those final steps be as smooth as possible for me. You know me; I love to share the love!
I’m sure there are more great tips and techniques that haven’t yet crossed my quilting path, and I’d love to learn about them. What are some of your favorite finishing techniques or tutorials that I haven’t included here? Thank you in advance for sharing!
Today I’m sharing the tutorial for how to make the outer panel of a Zippy Quilter’s Planner Cover like the one I made. I’m calling it Riot of Color and it’s a tribute to Alison Glass and her consistently bold and beautiful fabrics. A full color pdf of this tutorial is available on the Quilter’s Planner website, so head on over there to download it!
This tutorial is for creating the outerpanel for the Zippy Quilter’s PlannerCover pattern customized by Stephanie (Late Night Quilter) and Amanda (What the Bobbin) for the Quilter’s Planner. This tutorial will provide cutting and piecing instructions for the outer panel (11”x19 1/2”). From there, follow the instructions in the Quilter’s Planner cover pattern found at http://quiltersplanner.com to make the full zippy planner cover, using this 11”x19 1/2” panel as the “exterior fabric”.
The secret to this cover’s creation is the fabric choices. The dark grey of the Essex linen in Charcoal (Robert Kaufman Fabrics) lets the bright bold colors of Alison Glass’s Sun Prints 2016 and Art Theory panel in Charcoal (from Ex Libris – Andover Fabrics) shine. This could also be made using a favorite large scale print for the feature fabric and fussy cut bits for the squares, but be sure to use a contrasting solid or reads-as-solid background fabric so that the construction shines.
General Notes:Seam allowances are 1/4” throughout unless indicated otherwise. I like to press seams open, but in some cases I pressed to the side for this project. I will note those places in this tutorial.
Cutting
First, cut all of your fabric pieces according to the Cutting Requirements chart and diagram above.
A Note About the E Pieces
Here’s where I’m going to be real with you. The DE strips have a lot of seams. This means that if your 1/4” seam allowance is off by even a little bit, your strip may be slightly the wrong size. In the cutting chart above, I’ve accounted for this human error. (You’re welcome!)
*IF* your seams are an absolute perfect 1/4” and your cutting is precise, the top and bottom E pieces on both strips (four E pieces total) only need to measure 1 1/2” x 3/4”.
This tutorial allows you to trim the excess at the end so that you don’t have to worry as much about the precision of your 1/4” seam. That said, focus on straight, consistent seams and we will adjust for scant or generous seams during the process!If you feel like you want to be a Perfect Seams Superhero and save yourself some math and cutting, use 1 1/2” x 3/4” E pieces on the top and bottom of each strip. Go ahead and cut your pieces.
Ready? Lay it all out how you want it and then start assembling!
Assembly
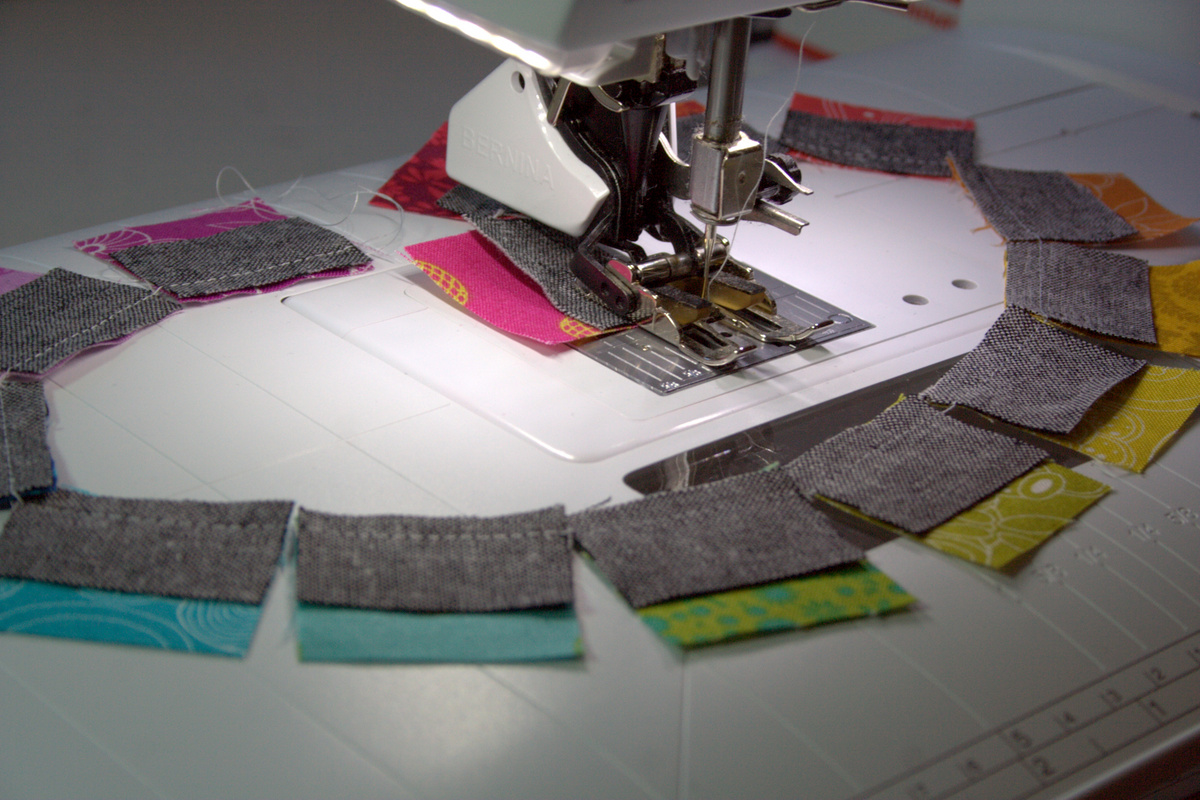
Pair each D piece right sides together with an E piece and sew with a 1/4” seam allowance.
I like to get them all ready and then chain piece to save time.
Organization Tip Be sure to take a photo of your layout before sewing so that you have a visual reference along the way!
Set seams and press open. Lay them out again and check your reference photo. There should be one E that has not yet been paired and sewn. Pair and sew components of the DE strips until they are completely assembled. Press seams open.
If you are being a Perfect Seams Superhero today and used 1 1/2” x 3/4” E pieces on the tops and bottoms of your strips, confirm that your fully assembled strip now measures 1 1/2” x 11”, pat yourself on the back and skip ahead to the full panel piecing.
If you are being merely human today, give your strips a good press and lay them on your cutting mat. It’s time to measure how much excess you have and take care of it.
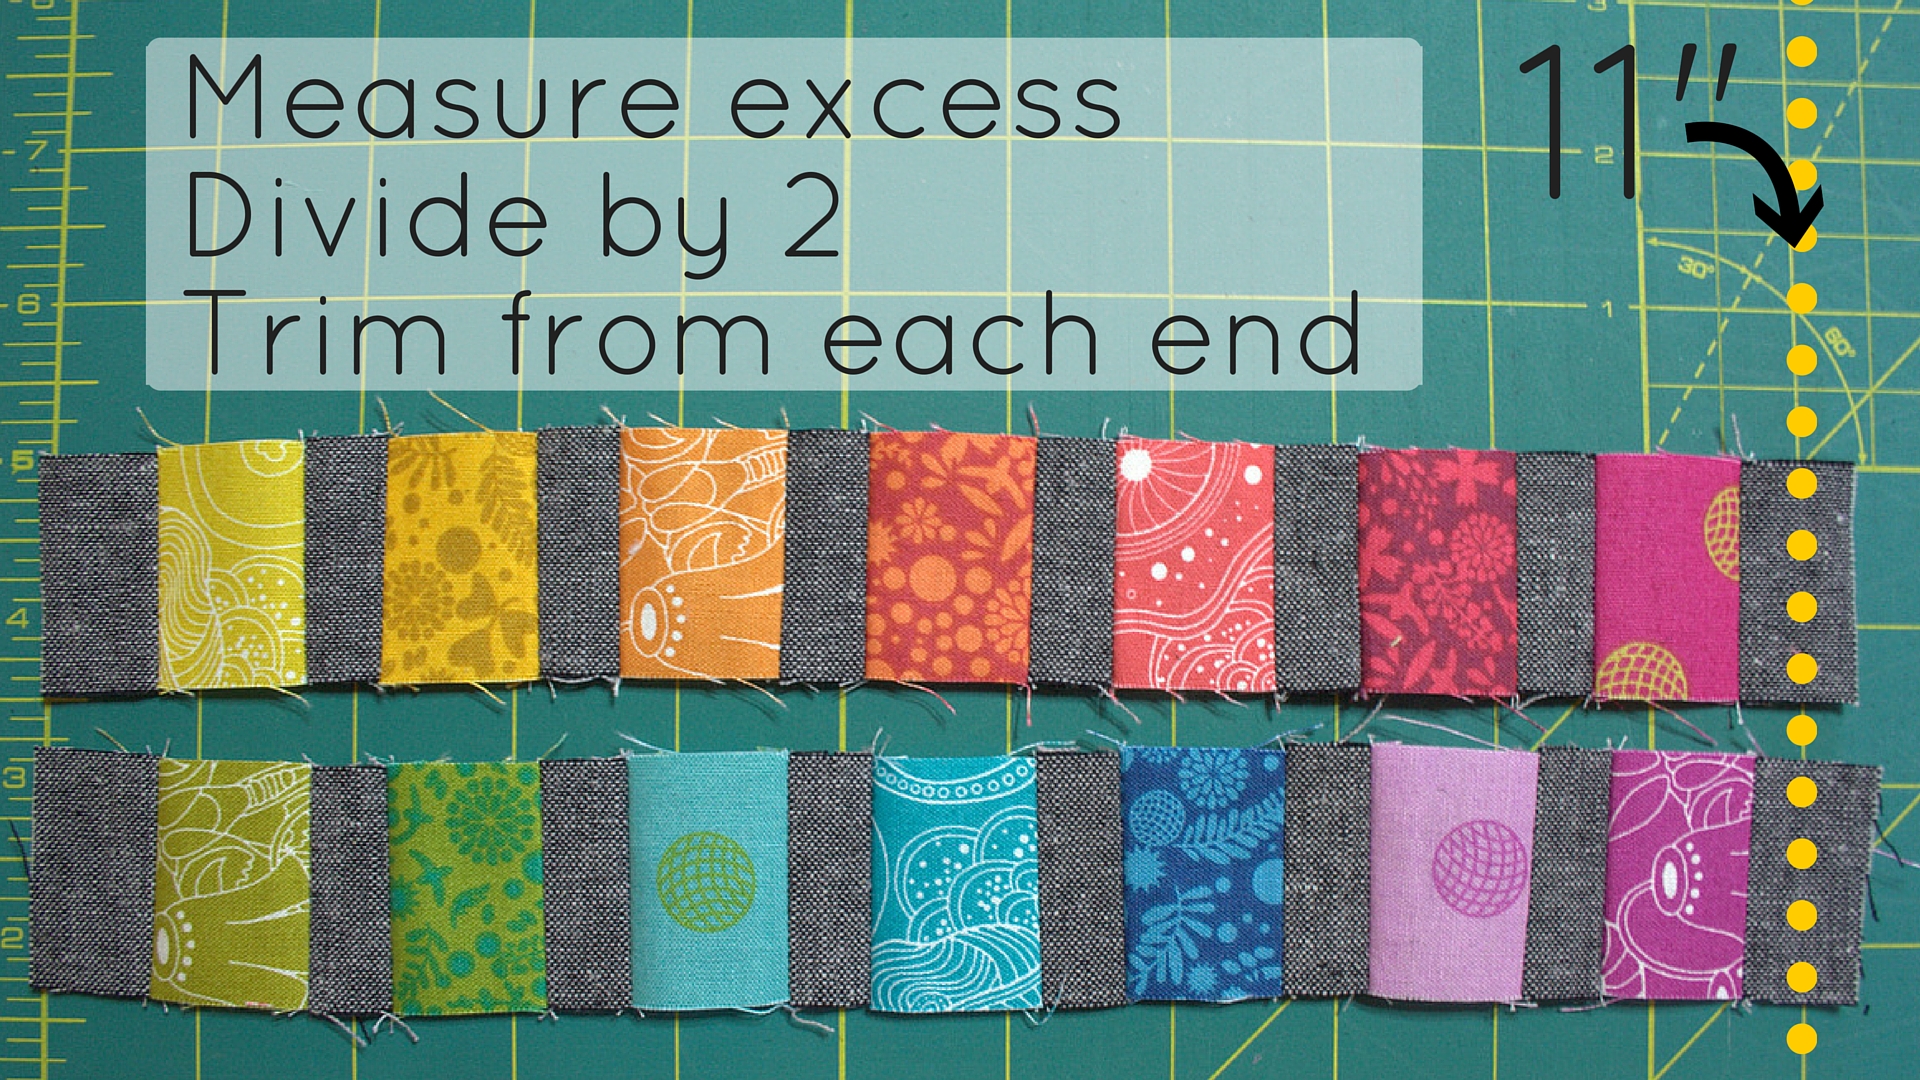
We want the finished strips to measure 11” long, but we want to be sure our colorful bitsstay centered. To do this, take the following steps (the example shown is in parenthesis):
Measure each strip to the nearest 1/8” being sure to press it flat so that it extends to its full length. (My strips shown measured 11 1/2” when I held them flat.)
Take the difference of 11” from the length of your strip. (11 1/2 – 11 = 1/2”)
Divide the difference by 2.(1/2” / 2 = 1/4”)
That’s how much you should trim from each end of your strip. (I trimmed 1/4” from each end)
Now, measure your strips again. Each strip should measure 1 1/2” x 11”. Don’t worry about a little wobble or wonk at this point. Everything will be smoothed out during the final assembly!
Next, we will piece the rest of the panel.
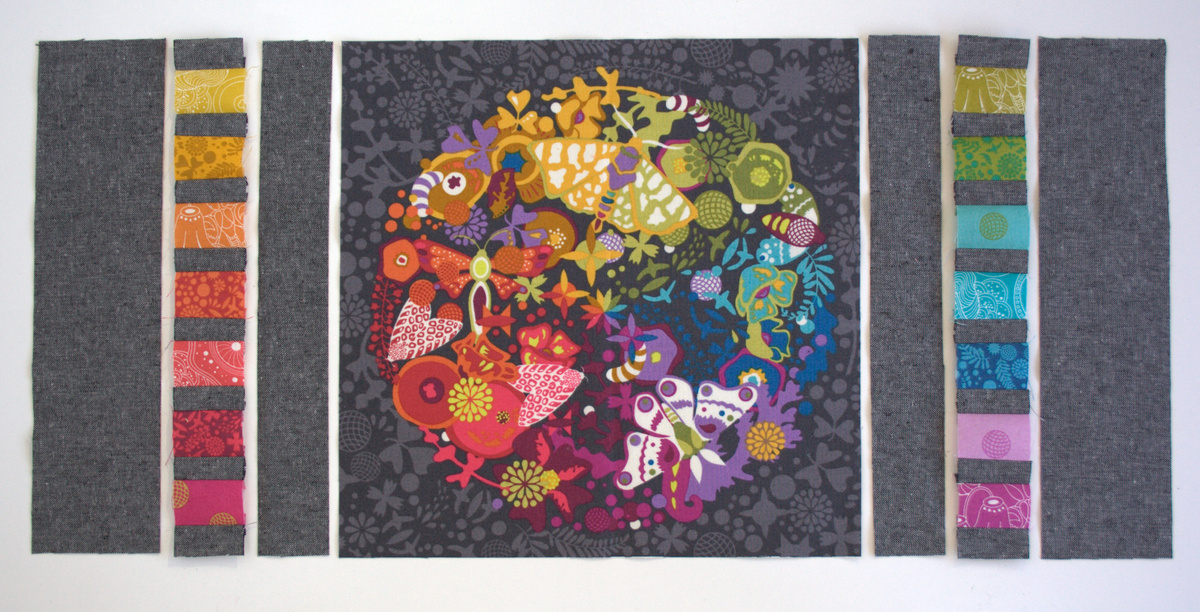
Lay out all of your pieces again as shown (left to right): C,DE strip, B, A, B, DE strip, C.
Sew them together!
Here’s the order in which I assembled it, but do what works logically for you.
Right sides together, sew B pieces to A. Press seams open. This is the BAB unit.
Right sides together and double-checking the orientation of the DE strips, sew C outer pieces to DE strips. Press toward C. These are your DEC units.
Sew DEC units to the BAB unit, pressing seams toward BAB.
Give your panel a good press, check that it measures 11” x 19 1/2” and trim if needed.
Have fun creating your own versions of this cover, and please tag me @nightquilter if you post pictures on social media. I always love to see what you create!
February is here! For the next month it will be impossible to buy candy that isn’t pink, red, or at least heart-shaped, and ubiquitous hearts are sure to have permeated every commercial establishment. While I’m not a fan of Hallmark holidays, I am very much a fan of love. In our house, February is a month of extra baking, hearts in everything, and of course, arts and crafts.
Today I’m going to share a tutorial for how to make a simple yet festive garland. I used my Sizzix fabi die cutting machine to cut the shapes, but you could also cut them with scissors. We hang our garlands from the beams in our kitchen, but you could hang them from a tree branch, along a mantle, or just along a wall for a fun and festive pop of color. I’ve also included affiliate links to products that I use and love. If you click through and purchase with these links, I will receive a small commission that will go toward funding all that goes into creating these tutorials and keeping my blog up and running.
Materials needed:
4-8 sheets of felt in coordinating colors (I used 100% wool felt from Fiddlehead Artisan Supply and it was sooooo dreamy to work with!)
Chocolate!! (okay, you don’t REALLY need this I suppose)
Once you have all of your materials gathered, go ahead and have a chocolate. Now, let’s get started!
First, we will cut the shapes. I like to precut the felt into squares and rectangles so that I can layer it smoothly. Especially with the thickness of felt, the cut squares made cutting super smooth. I was in awe with how perfectly these felt shapes came out of the Sizzix. It gives me renewed desire to try some wool felt applique (but that is a project for another day!)
I found that layering five (5) layers of felt was the ideal number with this 100% wool felt. Note that the top photo shows six (6) layers, and that I did successfully pass the 6 layers through the machine; however, 5 went through much more smoothly so I decided to stick with 5. Either way, you’ll be cutting 5-10 shapes at a time with each pass!
Make your Sizzix sandwich: bottom cutting pad, die with the blades facing up, felt centered over the proper blades, and top cutting pad. I used the largest heart on the Primitive Hearts die and the 2″ and 3″ circles on the Circle die. Pass it through your Sizzix die cutting machine and admire your smooth, perfect shapes.
If you are cutting by hand, you can use the bottom of a glass, bottle lid, or any other small approx 2″-3″ item to trace a circle before cutting. For this project, I used two different sized circles for some visual interest. Either by hand or by Sizzix, once you have a good pile of shapes, it’s time to sew them together! I ended up using 33x 2″ circles, 16x 3″ circles, and 6 hearts but depending on how many garlands you want and your desired aesthetic, those numbers may vary.
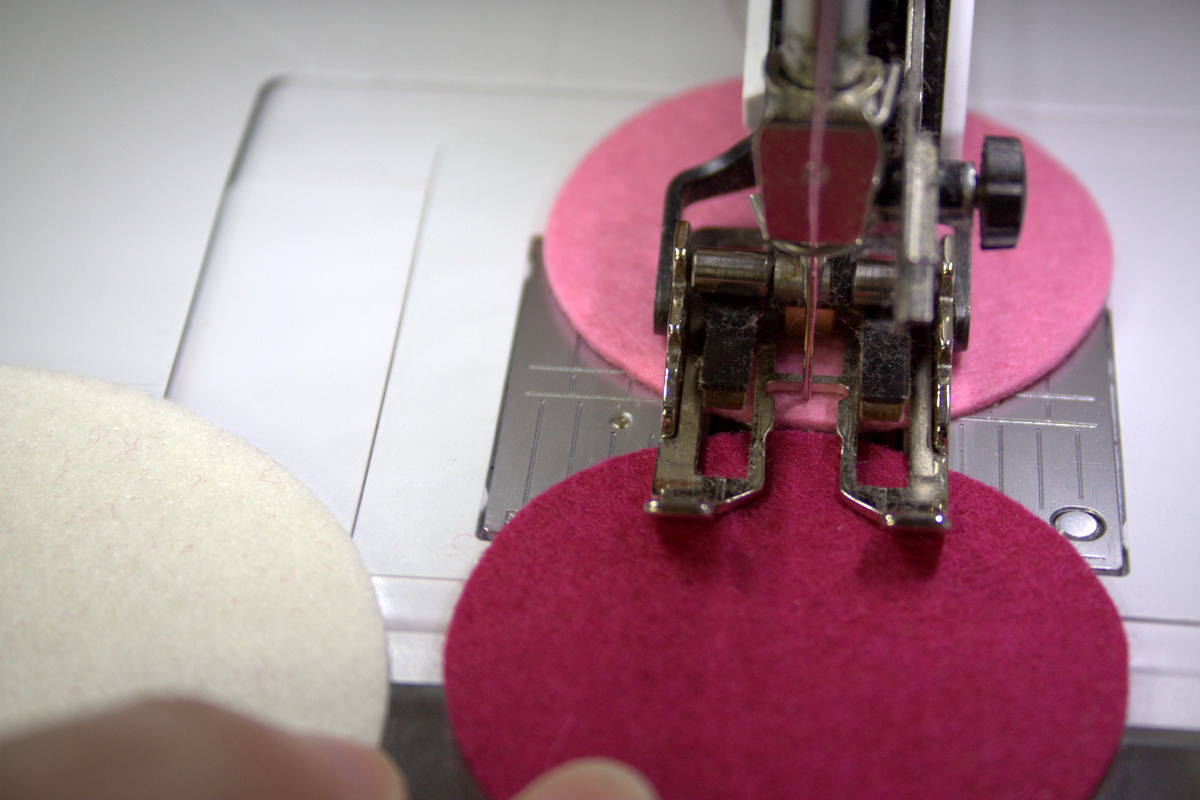
Sewing these together is *really* easy. Thread your machine with a coordinating color thread. I used some Aurifil 50wt variegated 3660-Bubblegum that I had left over from a previous project, and it was perfect! Pull out the top thread and bobbin thread so that you have 3-4″ of excess thread held off to the side before you begin sewing (shown above). This excess thread will be simply knotted and used to hang the garlands when they are finished!
Now, just start sewing! Sew right down the center of each shape, backstitching at the beginning of first piece and alternating colors and sizes until you have a garland approximately 18″-24″ long.
I made each garland different by making a point to vary the shapes by size, shape, and color as I added them to the machine. Once you get to the last shape in your garland strand, sew about 1/2″ into the shape, then backstitch to secure your stitches. Simply trim the threads and you’re finished!
I used the hearts only on the bottom of each strand, but you are welcome to include them in the centers, too. I made two “feature” strands with a heart overlaid on a contrasting 3″ circle at the end. This resulted in a fun organic set of garlands that cheer up our kitchen tremendously! Since our kitchen is so dark, I am sparing you photos of the garlands hanging from the beams, but I just attach them with a little piece of coordinating washi tape or painter’s tape. Tie the thread ends at the top of each strand in a knot about 1-2″ above the top felt circle. Put the washi tape through the loop made and hang wherever you want! (Of course, as is the case with any adhesive, always test a bit in an inconspicuous place to be sure no residue or damage is done when the tape is removed.)
If you have little helpers, be sure to guard your snacks!
My little helper absolutely delighted in snatching a snack here and there during my project photo shoot. Gotta love him!
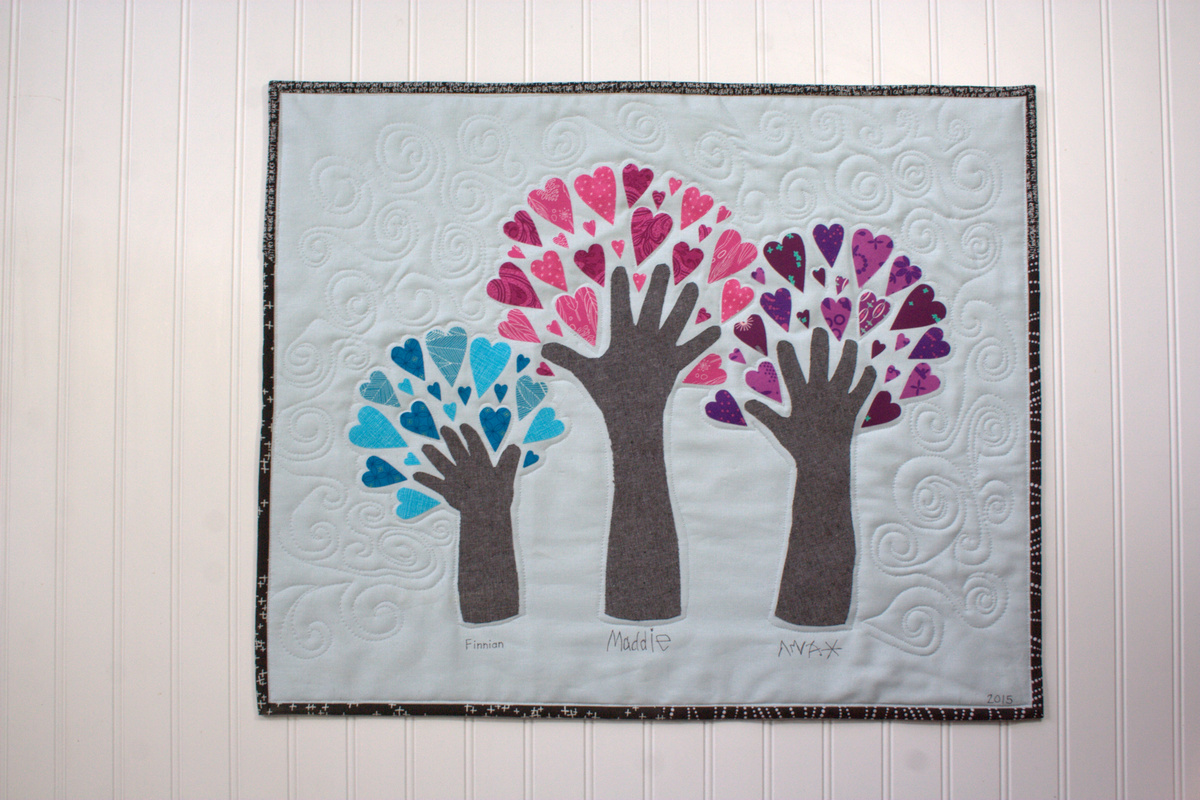
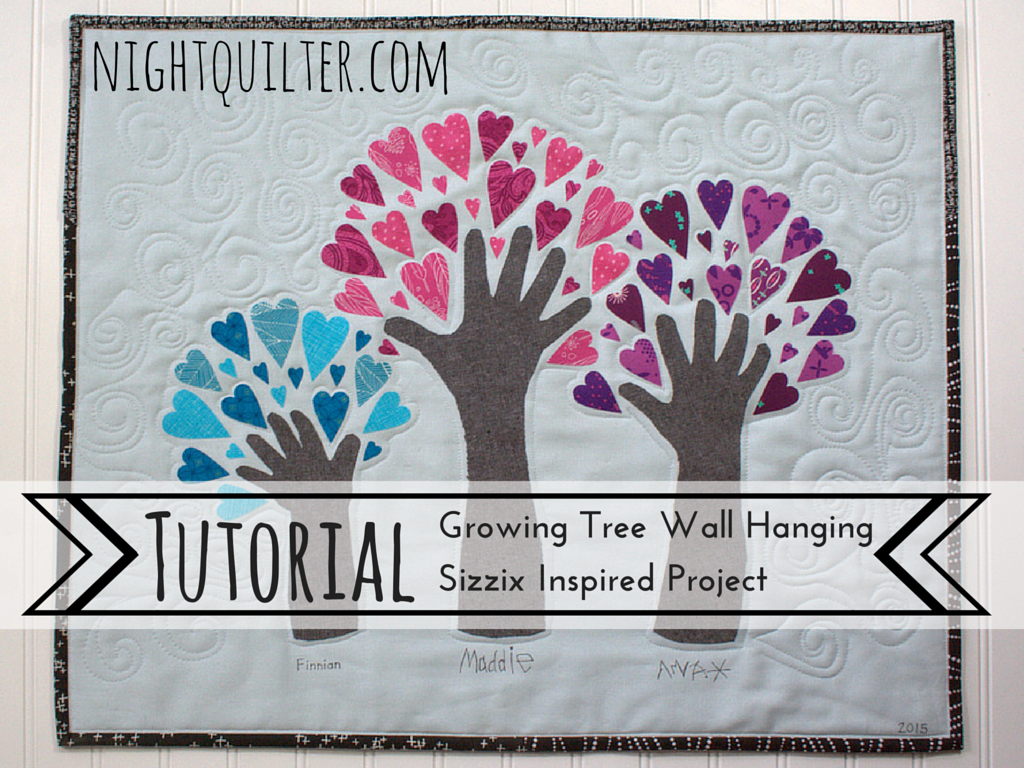
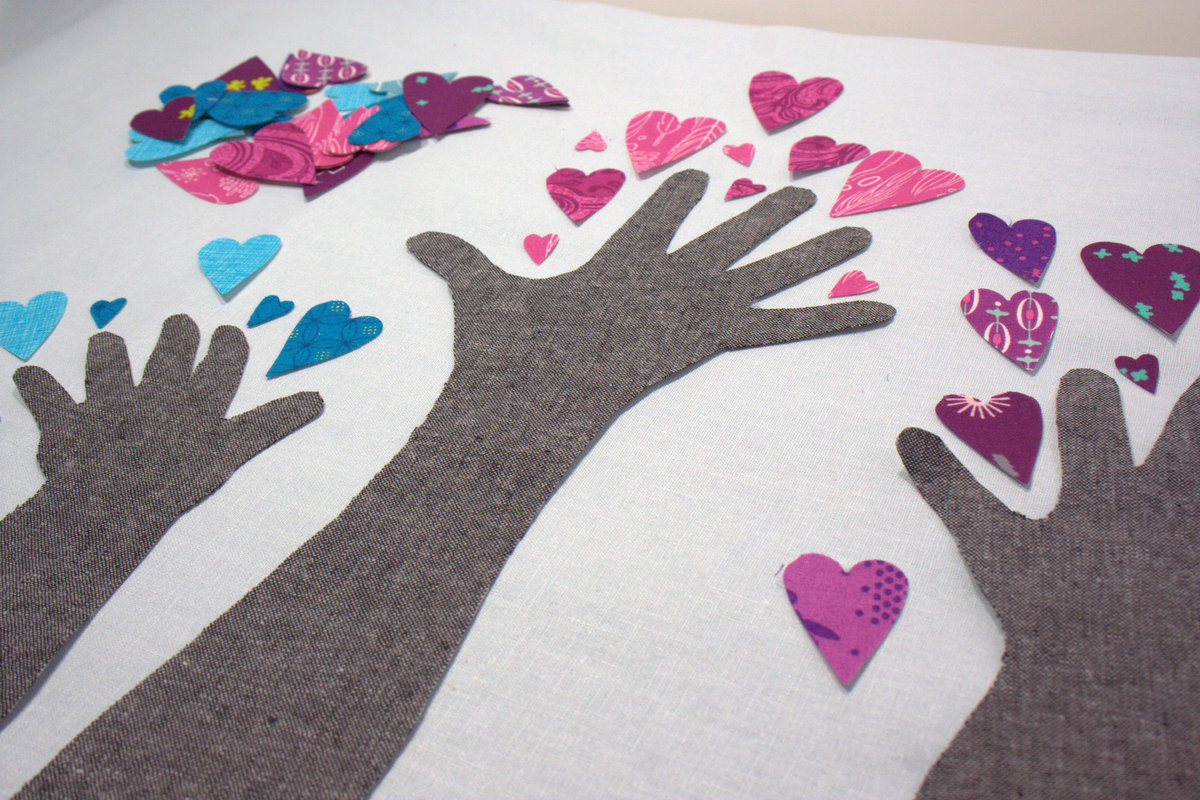
Today I’d like to share a tutorial for a great project that documents the growth of little ones while showing love in a beautiful way: the growing tree. In my case, it will be a growing grove of three trees, so feel free to adapt to fit your kiddos. I initially hoped to make four of these, one for each set of grandparents (we are blessed to have three sets!) and one for us to keep. Now that I’ve finally finished the first one, I’m accepting the fact that I may just stop at one, since I would like to cherish my little babies’ hands, too, and Christmas is less than three (3!?) days away. Since it involves hearts, this project would also be a fabulous Valentine’s Day gift for those doting grandparents.
From the moment I gave birth to my first child, my holiday gift giving style changed completely. Instead of trying to think of the “thing” each family member would like or need most and focusing all of my time on making handmade gifts of love for every family member possible, I acknowledge that presence is the best present if at all possible, and as a busy mom (of three lovely children, now), gift making time is much more rare. I am blessed to have a large family, and to have married into an even larger family, so potential gift recipients abound. But especially in recent years, my parents and in-laws–the grandparents–are usually the sole recipients of Christmas gifts, and such gifts nearly always involve their cherished grandchildren (our kids). This year, grandparents will get a whole lot of love, since time wasn’t on my side with this project. When I had the idea to make heart-filled trees out of my children’s hands, I did my typical google search to see if it had been done before. I found this post, about a creation inspired by another creation, and I knew that that inspiration would need to take one more step into the quilting world to become a quilted gift. Here’s how to make your own Growing Tree.
First, gather your materials. Note that material amounts will vary depending on the number of children you have and the size of the child. I’ve tried to include amounts for a single tree, but feel free to adjust as needed. I’ve also included affiliate links to products that I use and love. If you click through and purchase with these links, I will receive a small commission that will go toward funding all that goes into creating these tutorials and keeping my blog up and running.
Materials
1/2 yard background fabric – you may be able to use less if your child is small. A fat quarter should be sufficient for a baby’s growing tree. A half yard is playing it safe if your children are older. (I used Essex yarn dyed linen in light blue)
Children! and a pencil for tracing their forearms and hands!
*These items are not needed if you opt to frame your growing tree instead of quilting it, but you will also need a suitably sized picture frame, stiff acid-free cardboard if the frame doesn’t come with it, and a form of adhesive (glue or tape) to tightly wrap the fabric around the cardboard before insertion into the frame.
Let’s get started!
Gather your children! Have them spread fingers wide and put forearms down onto the Heat’n Bond. With their excited help, trace each child’s forearm and hand onto the non-textured side of the Heat’n Bond. You want to trace from just below the elbow, up around each finger, and then down the other side. If you are making more than one version of this Growing Tree, trace as many forearm-hand tree trunks as you will need. (Because I initially aimed to make four versions of my Growing Grove of Trees–oh my boundless ambition!– I traced each patient child’s arm four times, except Finn’s. With squirmy 6 month old Finn, I struggled and wiggled and waggled until I got a somewhat accurate tracing of his arm and hand, cut it out, and traced THAT three more times. He was not interested in sitting still!)
Carefully cut out each tree trunk, either enlisting the help of your children if they are older and proficient at cutting, or sending them off to play for the next few steps.
Fuse your tree trunks to the wrong side of the tree trunk fabric, following the manufacturer’s directions. Always be extra cautious if using a hot iron with small children around. Toddlers are inherently curious and can not yet physiologically control their curious explorations, despite fervent warnings from mommy–as I’m sure you know! I do my ironing upstairs without any kids underfoot to be safe.
Set the tree trunks aside to cool. Once cool, carefully cut around each forearm tree trunk and set aside.
Fuse Heat’n Bond to the wrong sides of all of the fabric scraps that will become hearts. Remember to have the paper side of the Heat’n Bond facing up, and put a pressing cloth down to protect your ironing surface. Let cool completely.
Once the fused heart-intended fabric has cooled completely, with paper-friendly scissors or rotary cutter (NOT your fabric scissors!), cut your fabric into 2 1/4″ x 3 1/4″ rectangles for ease of quick cutting.. Note that I am using the three smallest heart sizes for my trees, and am not worrying about directionality of the fabric. If you have smaller scraps or want the directionality of the fabric to be level, you can cut 3/4″ x 3/4″ for the smallest heart, 1 1/4″ x 1 3/4″ rectangles for the medium heart or 1 1/2″ x 2 1/4″ rectangles for the large. (I did not use the extra large heart). I mostly cut the medium and large hearts from 2 1/4″ x 3 1/4″ rectangles and then used the scraps from those to cut small hearts.
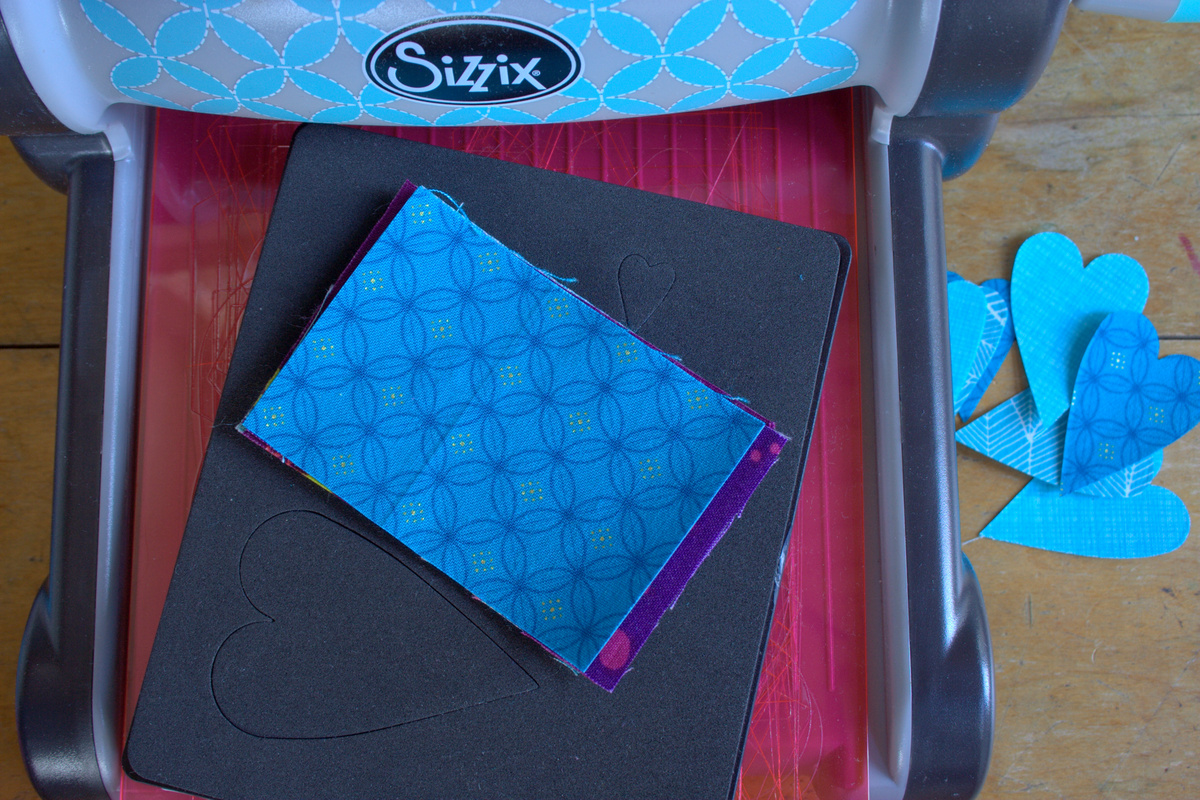
Next, pull out your Sizzix fabi die cutting machine and Primitive hearts #3 die. Call those children back! Layer the pre-fused fabric rectangles over the desired sized hearts on the Primitive Hearts die, four (4) at a time. The Sizzix can cut up to nine (9) layers of fabric at once, but since the fusible is pre-fused, each rectangle counts as two layers. Make your Sizzix sandwich: bottom cutting pad, die with the blades facing up, fabric centered over the heart blades, and top cutting pad.
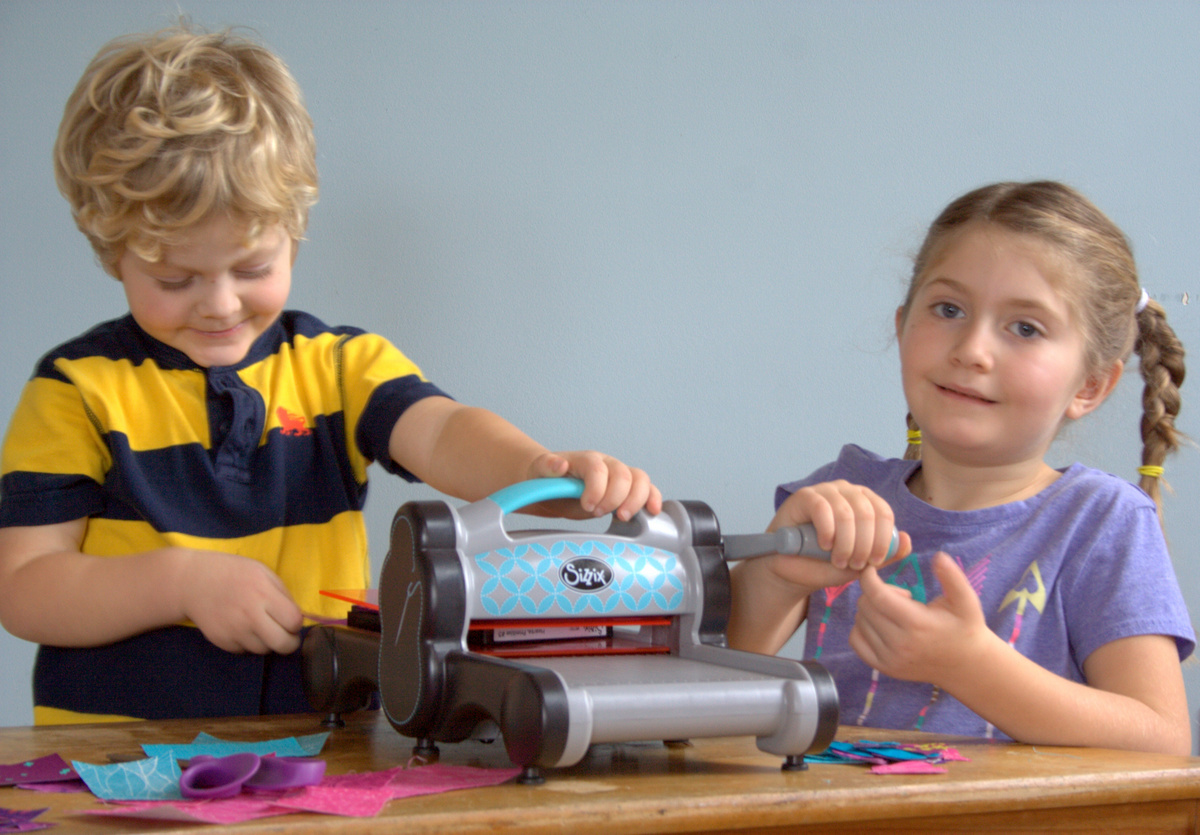
Let your kiddos carefully crank them through! If you don’t have a Sizzix, get the kids’ help and start cutting out hearts of different sizes, ranging from 1/2″ to 2″ in size. Depending on the ages of your children, you can either enlist their help or set them up with a different activity while you lay out the wall hanging once all of the hearts and trunks are cut.
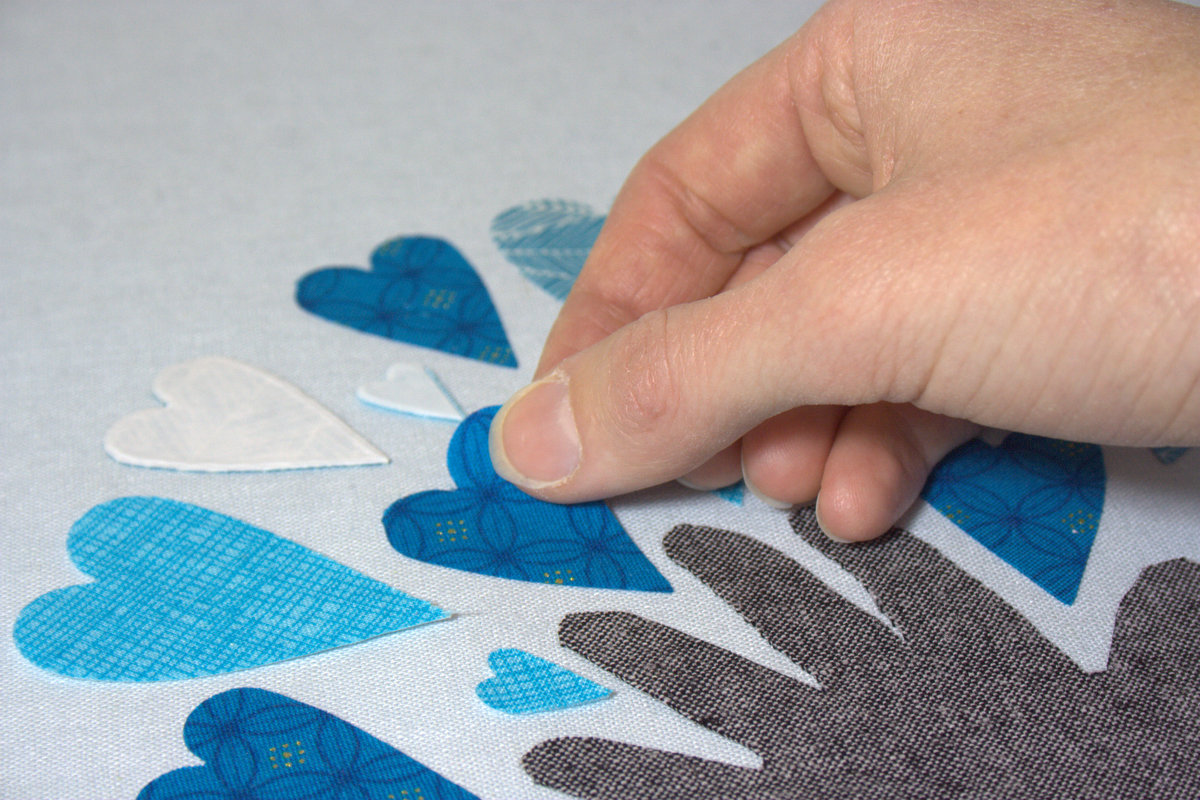
Lay out a large piece of your background fabric. I suggest arranging your tree or grove of trees BEFORE cutting the background fabric to size, since every child’s arm is different. Layout your tree trunk(s), arranging the hearts around the top like the leaves of a tree.
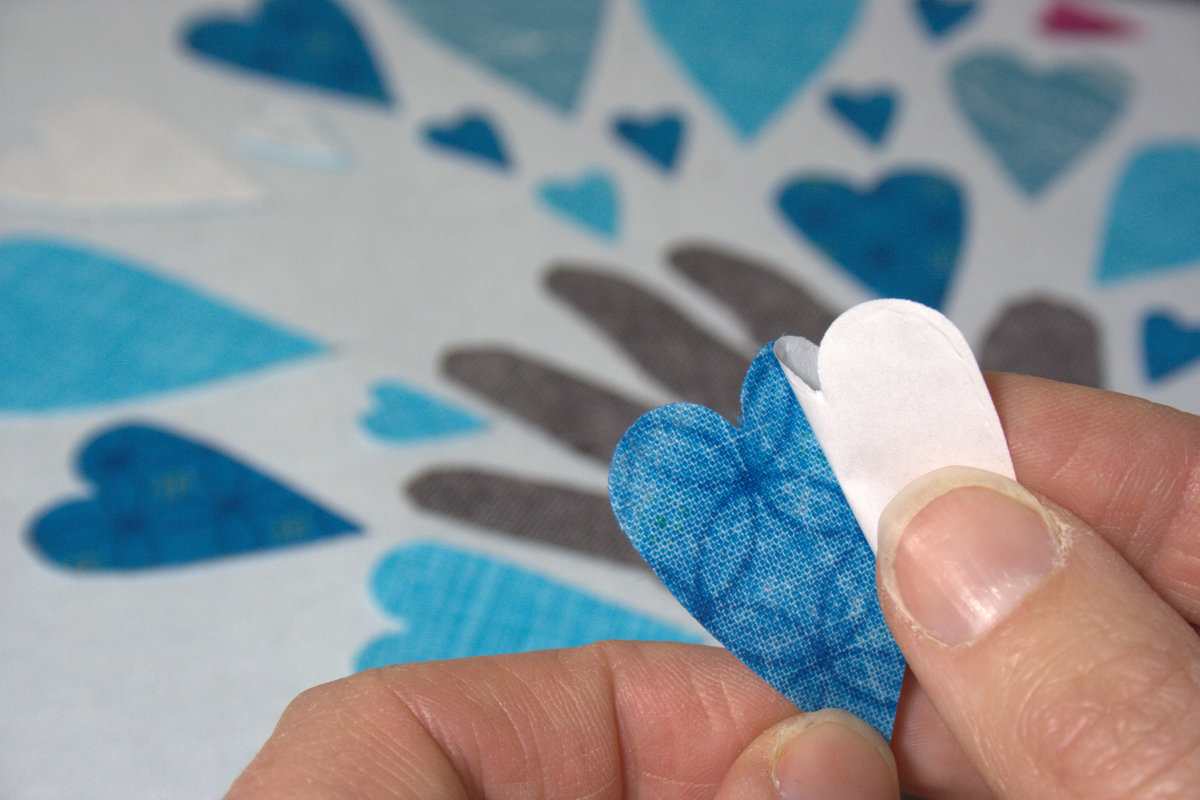
Once they are arranged the way you want them, carefully remove the adhesive paper from each component, placing it back in its proper place as you go.
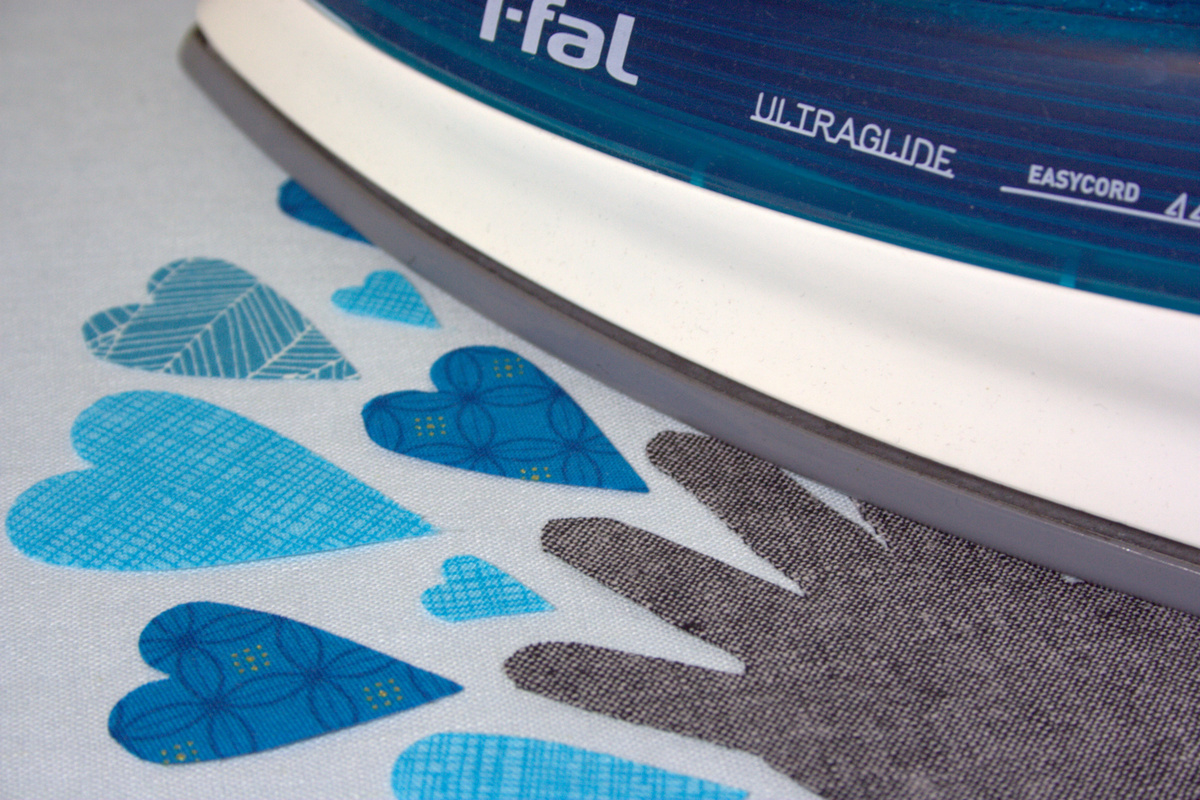
Once you have an iron-surface-sized batch with the paper backings removed, fuse them down. *Note: If possible, lay out your arrangement on your ironing surface so that once all of the papers are removed and pieces stuck, you can simply fuse them down. I used a large foam board beneath mine, and actually pressed onto the foam board since my ironing surface is tiny. Always follow the manufacturer’s instructions when using Heat’n Bond!
If you’re like me and are interrupted during this process, simply flip a row of hearts that haven’t been fused yet, so that you know where you are when you return.
Trim the background fabric approximately 3″ from each edge of your Growing Tree if you plan on quilting. Be sure to use the lines on your cutting mat to ensure your quilt is square as you cut.
Alternate ending
Alternatively, after fusing the hearts and tree trunks, you could wrap the fabric tightly around a thick acid free piece of cardboard and frame it in a picture frame. If you opt to frame yours, be sure to give yourself at least 2″ of overhang on all four sides, and plan your tree arrangement to fit into your desired frame.
Back to the quilting option…
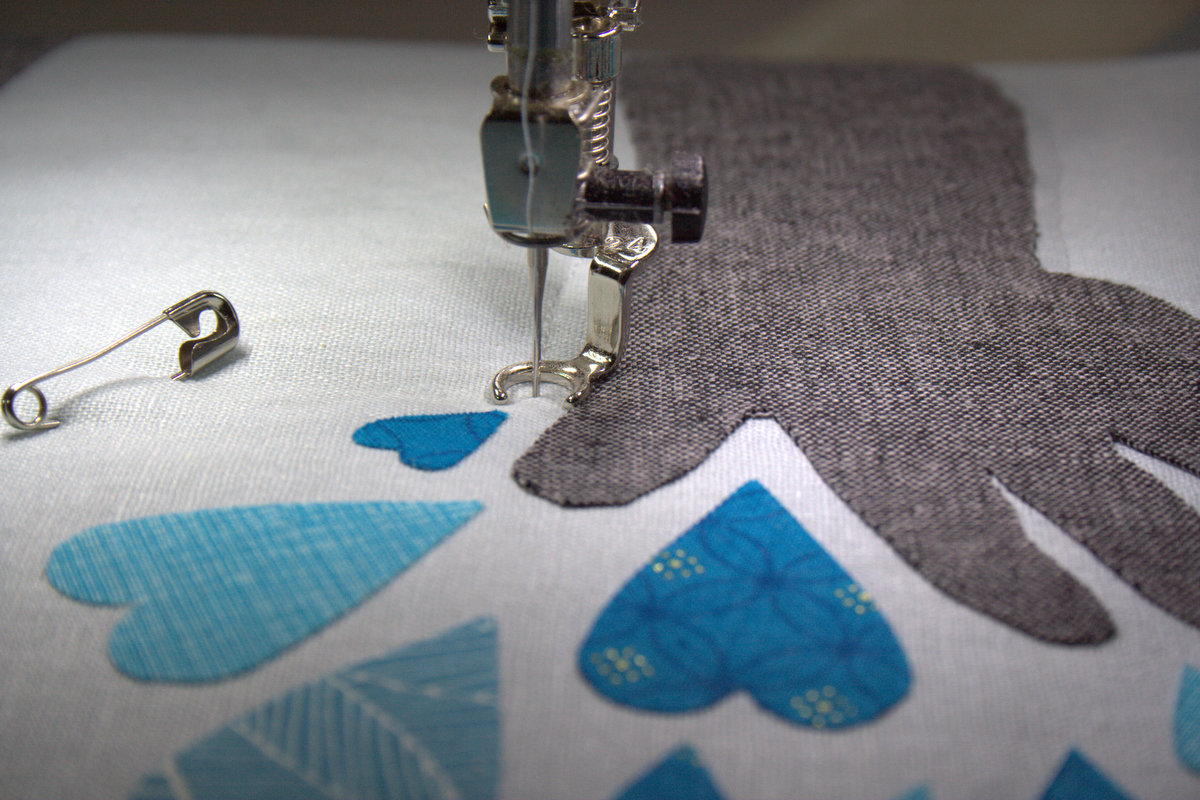
Cut batting and backing fabric to extend about 1″ from each edge of your Growing Tree quilt top (For example, if your Growing Tree top measures 27″ x 22″ like mine does, cut your batting and backing 29″ x 24″)
Baste your quilt layers using your desired method (I used pins).
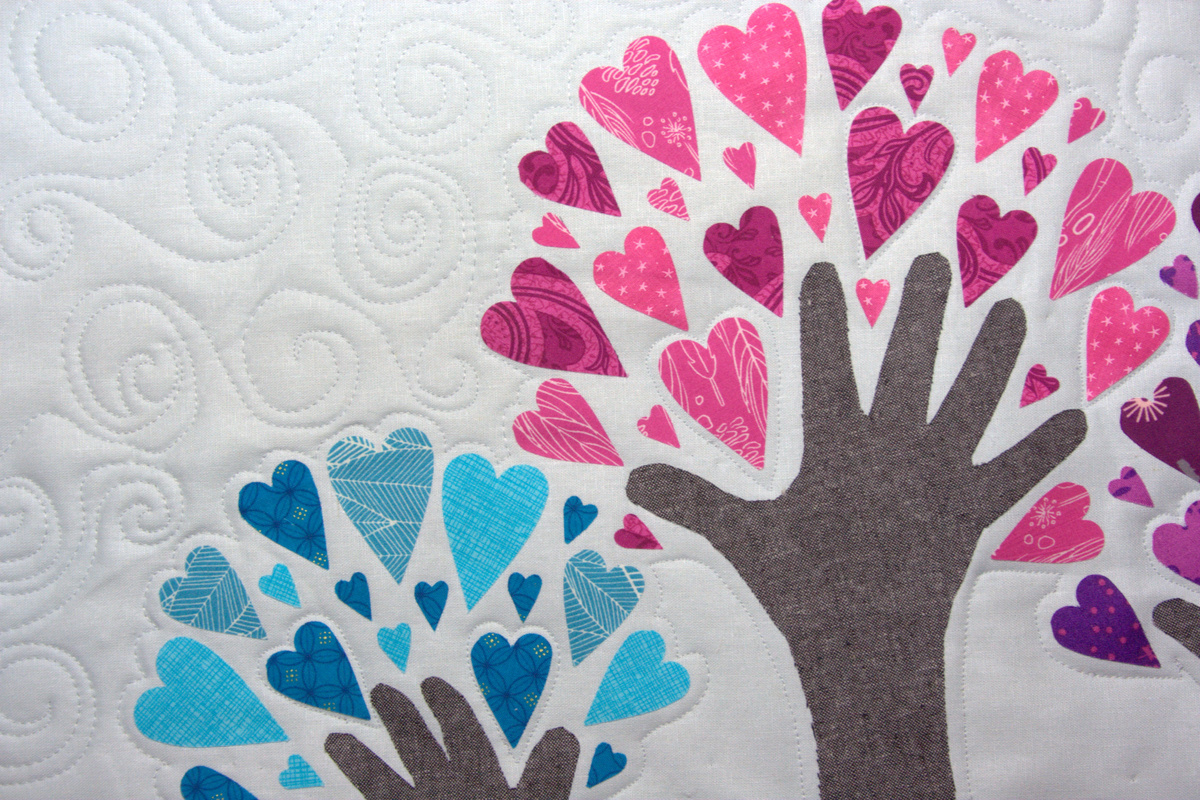
With a thread that coordinates with your background fabric, free motion quilt AROUND the edges of your tree trunk(s) and hearts. I also stitched around a few single hearts (you don’t need to sew around all of them) within the tree. Remember that the Heat’n Bond is NO SEW, so be sure not to sew on top of the fused pieces. Feel free to free motion quilt the background to help hold everything in place. I used a windy spiral design and was reminded at how much fun free motion quilting is! I need to do it more often!
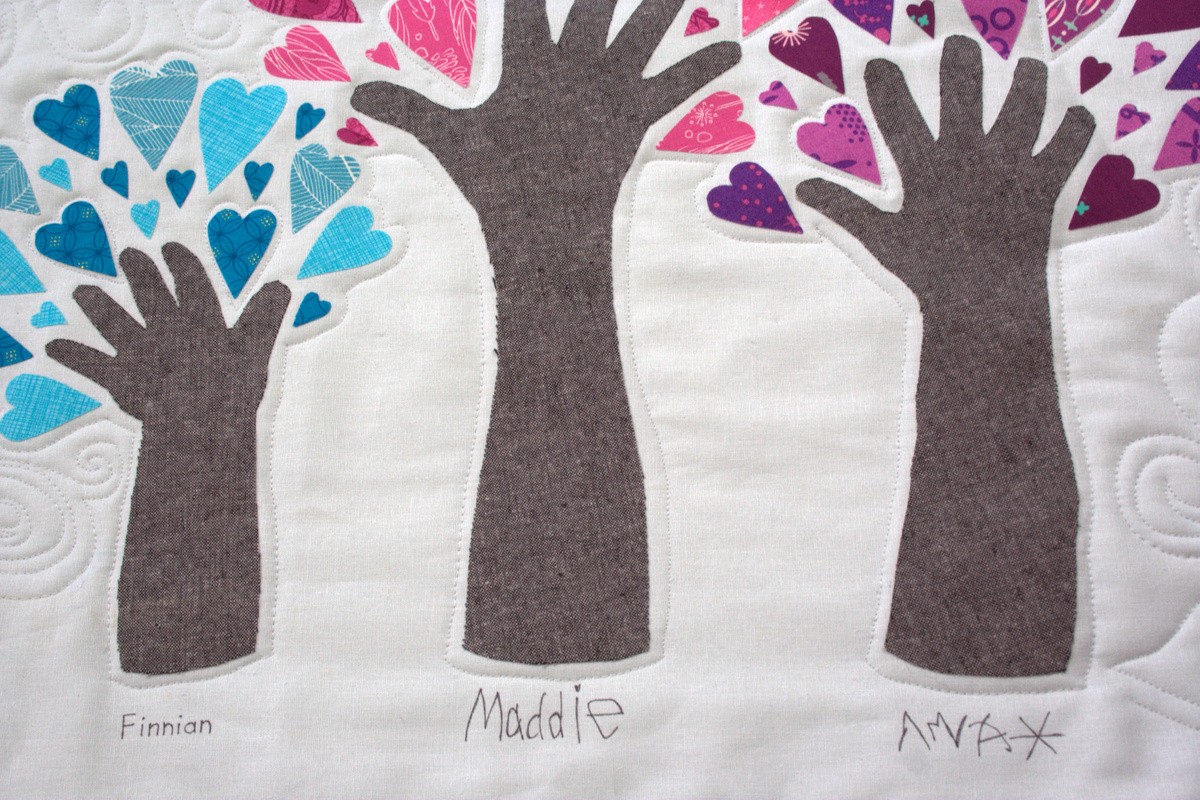
Add each child’s name beneath each tree, either with embroidery or permanent fabric marker. I used fabric marker so that Maddie and Max could include their signatures. Don’t forget the date! (Confession: I copied Max’s signature from a recent art project since I didn’t dare let him and a permanent fabric marker near this finished project. Perhaps a 3 year old with a less impish nature might be able to sign right on the project, but use your judgement.)
Trim the batting and backing flush with the quilt top, square up, and bind as desired. I included corner hang tabs on the back of my Growing Tree Grove using THIS method, and bound the quilt using THIS great tutorial by Cluck Cluck Sew.
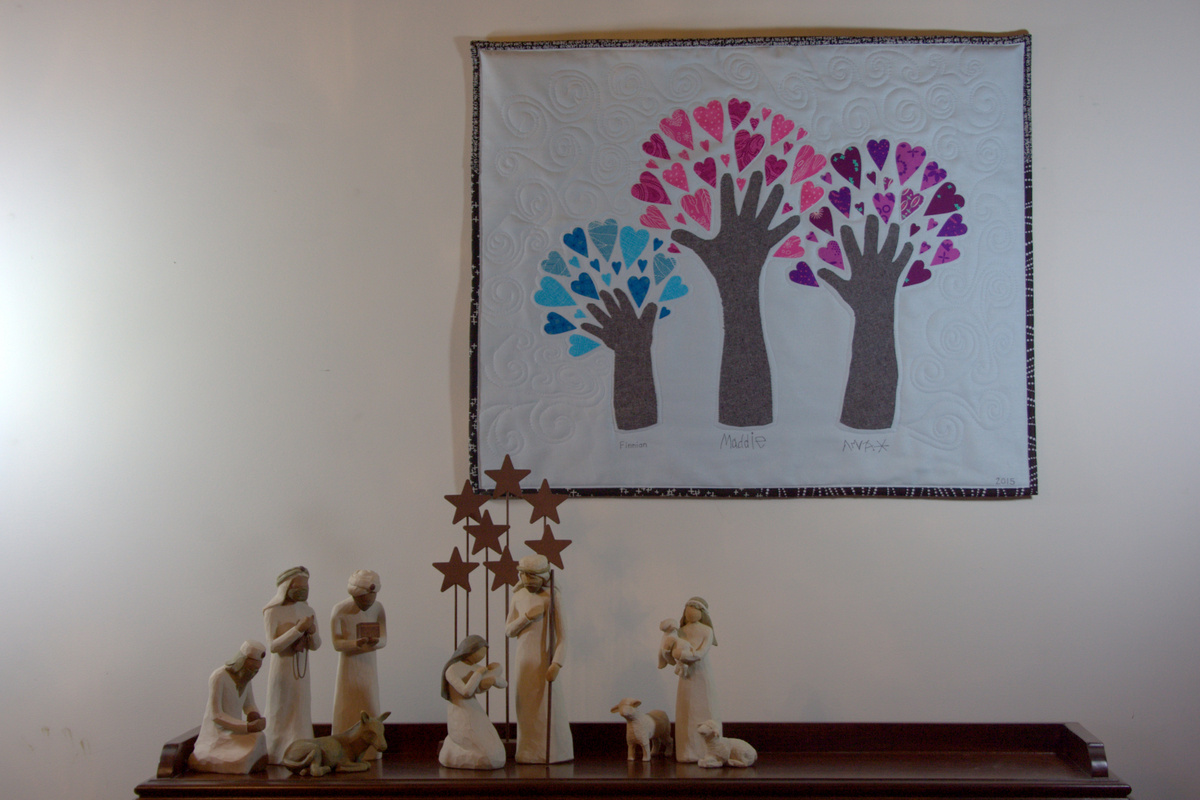
Hang this Growing Grove on your wall so that you can immortalize those precious little hands, or wrap & gift to those doting grandparents if you’re superwoman, or if you are already planning ahead for Valentine’s Day!
Enjoy, and happy holidays!
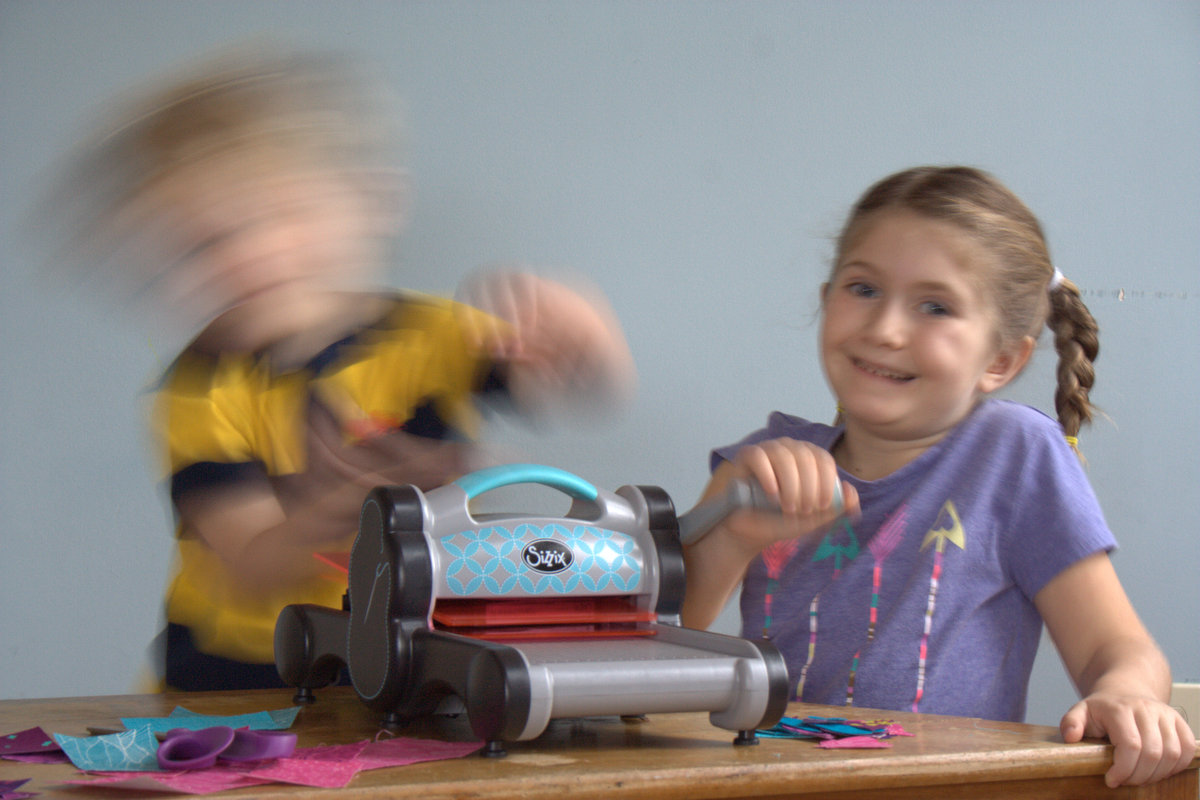
Outtakes
Just for fun, here’s what the vast majority of the photographs of my kiddos using the Sizzix looked like:
Max does not. stop. moving! Enjoy the blurry laugh, and enjoy your holidays!
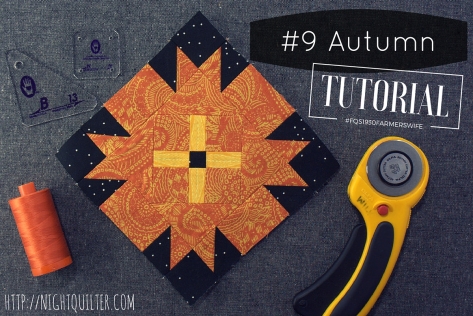
With a block like Autumn, it’s easy to get daunted before you even begin: 37 pieces in one 6″ block!? Ack! But wait! This is a perfect time to practice looking at each block’s construction creatively. If there’s one thing this sew along has taught me, it’s that there is nearly always a faster and easier way to approach block construction than purely cutting out all of the pieces and sewing them together. With a few shortcuts and piecing tricks, Autumn comes together quite smoothly. In this tutorial, I’ll show you how to make half square triangles (HST) 8 at a time (Yes, 8! We make all of the HST needed in this block at once), use strip piecing to save a bit of time, and fill in the gaps using Marti Michell templates (Set B and Set N are helpful with this block) or rotary cutting to help make putting Autumn together as easy as watching falling leaves.
As you may have noticed, I used different locations for the orange and black fabrics in the center square than those used in the book. I’d like to say it was intentional, but lo… it was not. I did not even realize my error until this entire tutorial was finished, photographed, and scheduled to post, as I was proudly admiring my block. When I realized my error, at first horror swept over me. Then, after Angie’s reassurance and another look at my block, I decided that Autumn was a good place for a design change. After all, it’s my quilt! I encourage you to remember that during this sew along, and don’t be afraid to make your quilt your own, with a hefty dose of gentleness toward yourself if when you discover an error after fully completing a block. Call it an unexpected design element. AND take this as an extra reminder to double check your fabric placement and choices BEFORE sewing your block together!
Note: Exact measurements for the pieces needed to construct this block will not be provided in this tutorial in order to protect copy write. It is a prerequisite of making this block that you have a copy of the book, The Farmer’s Wife 1930s Sampler Quilt: Inspiring Letters from Farm Women of the Great Depression and 99 Quilt Blocks That Honor Them. All measurements can be found in this book and its associated media. That said, even if you aren’t sewing along with us, I think you will find some really helpful tips in this tutorial that will help you look at all block construction more creatively!
Reflection on the Letter – A Precious Half-Hour
For those of you reading this who are not sewing along, one of my favorite aspects of this sew along is that each block in the book is inspired and accompanied by a letter written by an actual 1930 farmer’s wife. It has been inspiring to see how similar these farmer’s wives’ dreams, desires, troubles, and day-to-day struggles were to mine, and to hear their often uplifting takes on life. I can’t tell you how many times I’ve read the letter with tears in my eyes, nodding a resounding “yes!” as I relate my own life to the words on the page.
I know Angie said that blocks were allocated completely randomly, but this letter was meant for me. This woman is me! It was both surreal and somehow encouraging to read that even those hard working, ever-positive farmer’s wives embraced the NEED to make time for themselves. A few months ago, I created a hashtag (#sewtake20) in an attempt to encourage other busy moms (and myself!) to make time for themselves 20 minutes a day, no matter how crazy the day, how high the stack of dishes, and how all-engulfing the mountain of laundry. Wise L.O.L. from Iowa recognized the need to nourish body and soul back in 1939, despite her full plate. While she took a precious half hour and I’m striving for only 20 minutes, it still helps me to not feel so guilty doing the same here in 2015.
Tutorial
For this block, I specifically chose fabrics with small or nondirectional prints, so that I could quickly piece the components without worrying about fussy cutting or directionality. The #9C pieces are a small exception, since I gave a tiny bit of focus to fabric alignment. Note that I am arranging my final layout on-point, but for the purposes of being consistent with the diagram in the book, this tutorial pieces the block squared. If you plan to set your blocks on-point, be sure to account for that with any directional fabric placement.
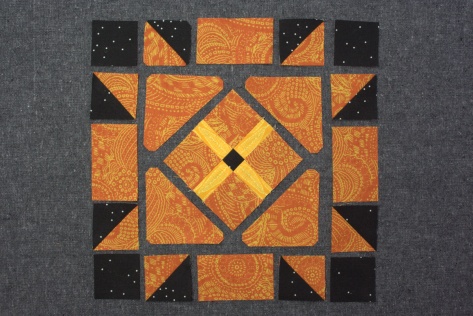
This block is composed of 8 HSTs, 8 rectangles, 9 squares, and 4 triangles. I first cranked out the bits I could make quickly and efficiently, namely the HSTs and the center square. Let’s break it down.
Making 8 HSTs at Once
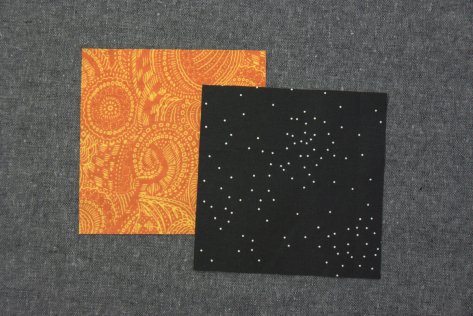
In the book, the print and coral fabrics were used to make the #9F HSTs. Choose your coordinating fabrics (I used black and orange).
Cut one (1) 5″ square from each. Note: If your HST-making skills are on point and you want to conserve fabric, you can use 4 3/4″ squares. I prefer to play it safe and trim a bit more to ensure my HSTs are perfect.
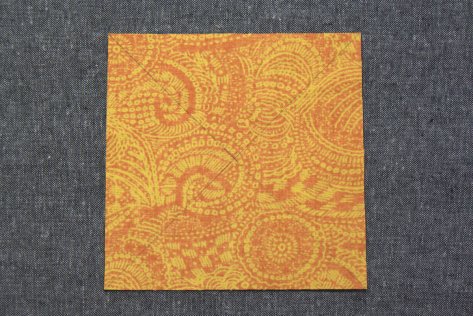
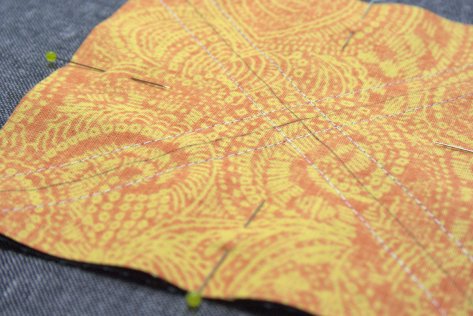
Right sides together, draw diagonal lines from corner to corner, making an X. You only need to mark the wrong side of one of the squares.
Pin your squares together to keep them from shifting, and sew 1/4″ from the right and left of both lines. This is a good time to confirm the accuracy of your 1/4″ seams.
Carefully draw a line down the middle of the blocks in both directions. I used the 2 1/2″ line on my ruler to help make sure my line was square. You should now see a plus and an X.
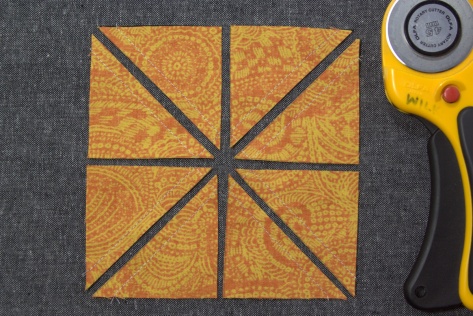
Cut along the marked lines. Press open.
You now have 8 HSTs! I typically press all seams open, but with HSTs I press to the darker fabric since I use my Bloc Loc rulers to trim them to size. If you don’t have Bloc Loc rulers, feel free to press seams open, and align the 45 degree line on your ruler to help trim to the size indicated on the #9F template in the book.
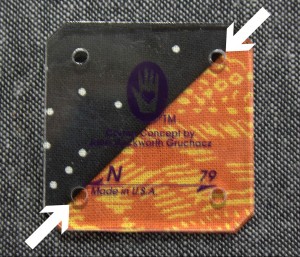
You can also use Marti Michell template N79 to trim to square, too. Be sure to center your diagonal seam in the centers of the two holes in the template to trim evenly.
Do a little dance and set those 8 HSTs aside.
Strip Piecing the Center Square
Because the center square is symmetrical, two of the outer edges can be strip pieced, saving you a bit of time and thread.
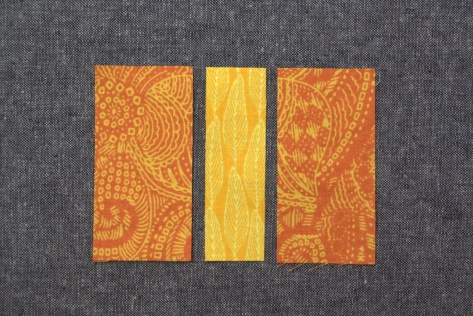
In the book, the coral (#9D) and yellow (#9G) fabrics with a tiny center square of print (#9E) were used. I should have used black, yellow-orange, and a tiny center square of orange, but as I noted above, I made an inadvertent design change and went with orange, yellow-orange, and a tiny center square of black. Wrap your brain around which of your fabrics belong where for your block, and here we go. **Really, take a moment and make doubly sure you have the right fabrics. Got it? Great! We will be strip piecing the two rectangles composed of #9G and #9D.
Cut two (2) 1 5/8″x 3 1/4″ rectangles of your #9D fabric and one (1) 1″ x 3 1/4″ rectangle of your #9G fabric. (Math aside: The 5/8ths” mark is the little line right after–aka a bit larger than–the 1/2″ mark on your ruler.)
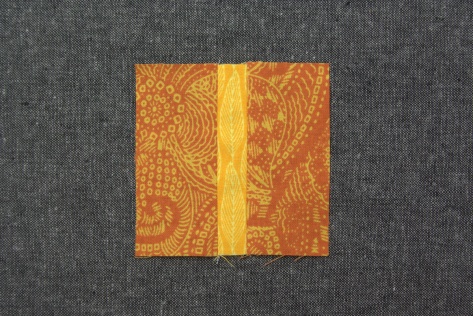
Right sides facing, sew the #9D rectangles to the center #9G along each long side.
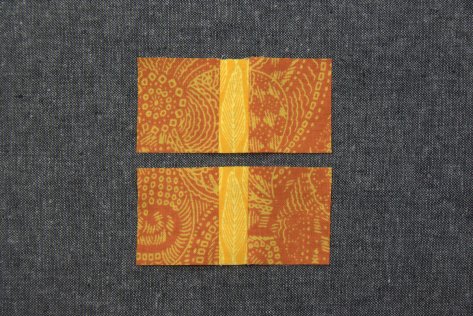
Cut in half as shown to create two (2) 1 5/8″ x 3 1/4″ rectangles. We will call these your #9DG units.
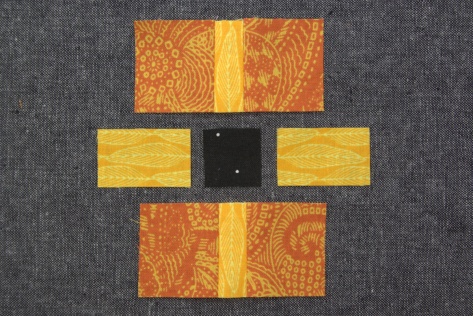
Using the rotary cutting measurements provided in the book’s cd, cut two (2) #9Gs and one (1) #9E.
Assemble as shown. Note that I rotated the bottom row 180 degrees so that the direction of the yellow-orange fabric radiates outward from the center.
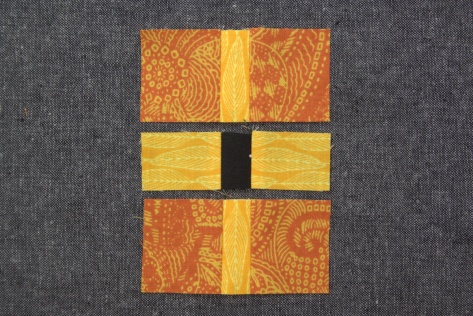
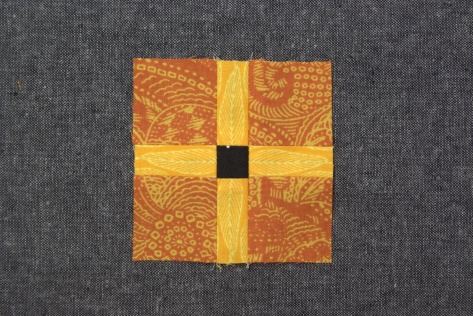
Sew your strip pieced #9GD units to the top and bottom of your center piece to create the center square.
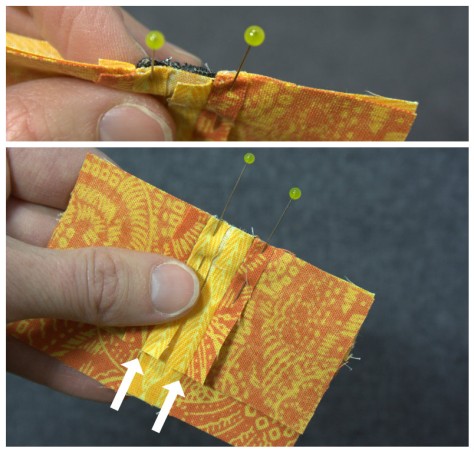
Sewing Tip: When matching seams, pin directly after the seam join to prevent slipping. Also, take a moment to match up the seam lines on the opposite raw edges, too. While it is not a sewn edge, it will help keep the sewn edge level.
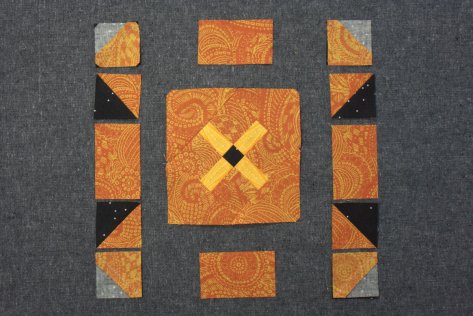
Cutting the Remaining Pieces
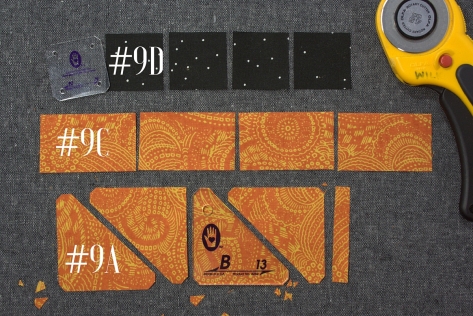
Now we need four (4) #9D squares, four (4) #9C rectangles, and four (4) #9A triangles. These remaining pieces can be cut in a very straightforward way, by using the rotary cutting instructions or paper templates included, or using Marti Michell templates. I’ve found that using the Marti Michell templates really help me line up different units accurately, so I opted to use those for the triangles and rotary cut the squares and rectangles. Here’s how:
Cut a 1 1/2″ x 6″ strip of your coral-equivalent fabric (I used black). Subcut the four #9D squares, per the measurements provided in the rotary cutting instructions or with Marti Michell template N79.
Cut a 1 1/2″ x 10″ strip of your print-equivalent fabric (I used orange). Subcut the four #9C rectangles, per the measurements provided in the rotary cutting instructions.
Cut a 2 1/2″ x 7″ strip of your print-equivalent fabric (I used orange). Using Marti Michell template B13, subcut four (4) #9A triangles. If you don’t have the Marti Michell templates, you can use the rotary cutting dimensions or paper templates provided on the book’s accompanying CD.
Assembling the Block
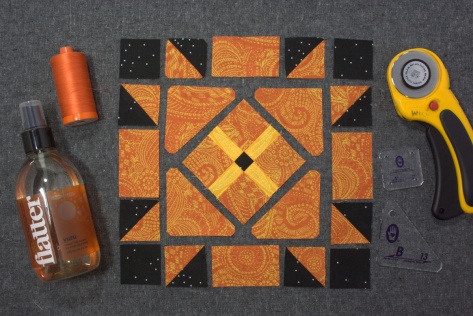
Here is a shout out to the essential tools used in creating this block: Flatter by Soak makes everything lay smoothly–even HSTs!–, Aurifil thread, Marti Michell templates, and my trusty Olfa rotary cutter. *Not shown but equally essential is the Bloc Loc ruler!*
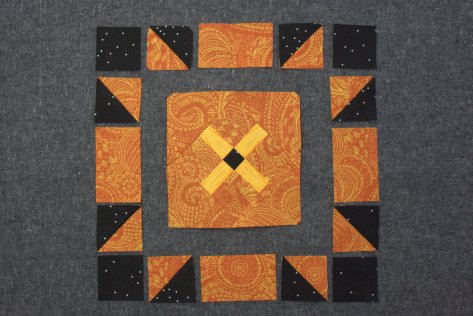
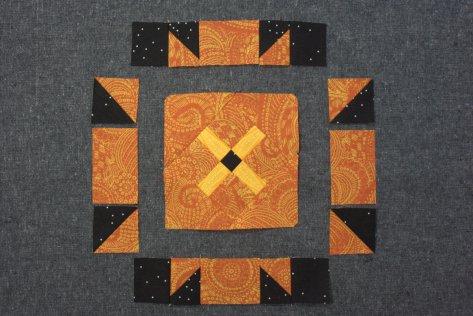
Now that you have all of the necessary components, lay them out to make sure you have all of the pieces aligned properly (pay particular attention to those sneaky HSTs). Tip: Take the time here to focus and be sure that all of the pieces are arranged properly, heavily referencing the picture in the book. The HSTs are particularly sneaky. Once your block is perfect, take a picture with your phone and reference it heavily throughout the piecing process. It takes less time to stop and lay out your pieces to check the arrangement than it does to seam rip once you’re finished!
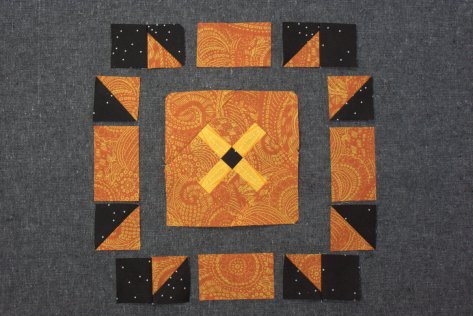
First, sew the #9A triangles to the center square as shown. Begin with two opposite sides. Press seams open.
Sew on the remaining two triangles. Press seams open. Your center square should now measure 4 1/2″ including seam allowances.
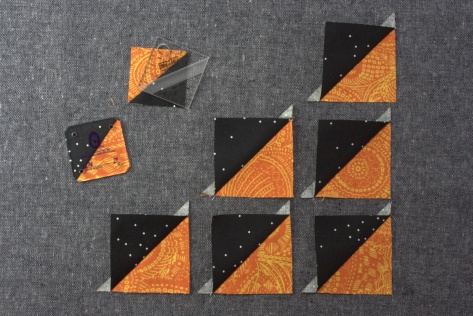
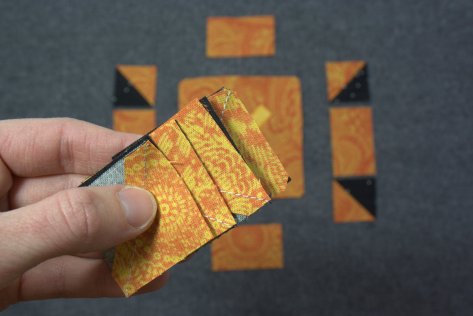
Pair corner #9B squares with their neighboring HSTs and sew as shown.
I like to chain piece steps like this, and as I pick up my pairs of squares to sew, I align all of the to-be-sewn edges so that I don’t get mixed up between my cutting/arranging table and the sewing machine.
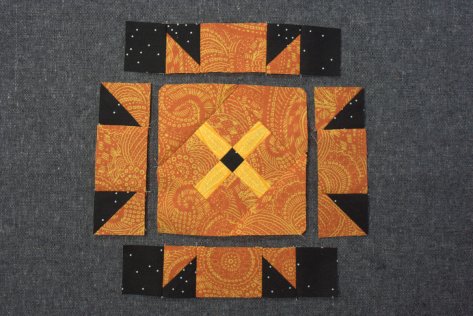
Sew HST-corner square units to center #9C rectangles to create the top and bottom rows.
Next we will sew the middle row together. Sew the HSTs to the side #9C rectangles as shown.
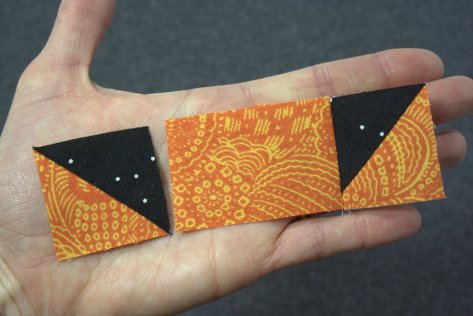
Again, pay close attention to the alignment of those HSTs! They like to do somersaults on the trip to the sewing machine if you’re not super careful!
Sew side HST-rectangle units to center square.
Sew top and bottom rows to the center row. Tip: This is another great place to match bottom seam lines as well as those right at the sewn raw edge. There are only two seams to match! I love this block! Press all seams open.
Gaze lovingly upon your Autumn block and think, “Gee, that wasn’t so bad! But it sure took me longer than a precious half-hour!” (and if you’re me, about 45 minutes later realize in horror that you botched the center square’s fabric placement, then decide that your Farmer’s Wife quilt deserved some individuality anyway, and let it go.)
Thank you so much for joining me today and I hope you found this tutorial helpful! This is the last tutorial before the Christmas break, which begins tomorrow and lasts through the first week in January. I know I am hoping to do some serious Farmer’s Wife catch-up amongst all of the festivities. Merry Christmas, happy holidays, and a very happy New Year to you all!


 This tutorial takes you through the basics of foundation paper piecing, but also includes some special hints, tips, and helpful cutting measurements for sewing together the Constant Flux pattern. You can read more about Constant Flux HERE, and be sure to visit the foundation paper piecing tutorial on the Andover blog HERE.
 If you haven’t yet added Constant Flux to your pattern library, it’s still on sale for a few more days in my Craftsy shop (and Payhip for those of you in the EU). Get it now for only $5, since at the end of the week it will head back up to its usual $8.
 This mini quilt finishes at 24″ square, and its creation coincided with the fabulous bloom of peonies in our garden. It features a new die called
 The colors of the peonies and the colors in the quilt meld so beautifully together! I really could not help but take a million photos of this quilt with the gorgeous color gradient of peonies from my garden, but since it’s Thursday, I figured a combination of Color Inspiration Thursday and a heads-up about my Sizzix tutorial would be perfectly acceptable.
 Ahhh peonies! Such an inspiration!
 Corresponding solids from left to right:
 I love the natural ombres and vibrant colors found in nature and thoroughly enjoy combining natural inspiration with quilty projects. It is so fun to try to stitch the beauty around me into the quilts in my hands!