Remember that full plate I have for the month of May? Well it has all been pushed way back to the back-burner since my last post, as a nasty stomach bug made its way through our family like a tidal wave. My daughter and I got it first, 48 hours later my youngest two children got it, and as a nasty sneak attack after we all thought we were in the clear, 72 hours later, my husband got it. All creating, sewing, blogging time has been fully replaced by sickness, recovery, tending sick beloveds, and cleaning/laundry catch up. My husband is still recovering today, and the deep cleaning continues. Needless to say, I don’t have much to show!
Since May is flying by, though, and I wanted to check in, I thought now would be a perfect time to share the patterns I’ve been purchasing for the May is for Makers initiative started by Lindsey at LR Stitched.
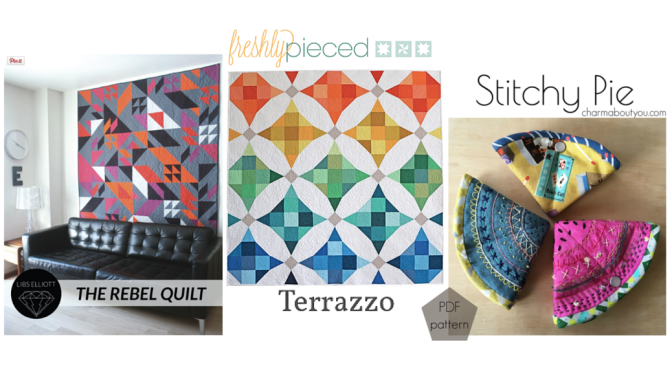
I kicked off the month by buying the Rebel Quilt pattern by Libs Elliott. Ever since my husband first started “following” my quilting and getting more into the quilting world, Libs Elliott has been his favorite designer. I can’t even tell you how many times he has tagged me on Instagram on a post (that I had already liked, by the way) just to make sure I saw the awesomeness. Since I have yet to make a quilt for him, we decided that the Rebel Quilt would be perfect. He selected a color palette of red, black, grey, white, and a bit of turquoise (yay!), and I’m itching to get started. This is going to be SO much fun to see come together! All in good time, of course.
The second week I bought the Terrazzo Quilt pattern by Lee Heinrich of Freshly Pieced. This is one of those quilts I loved the moment I saw it, but have not yet had the right opportunity to make one. Recently Fat Quarter Shop asked if I would want to make a quilt using both of their Alison Glass Sun Prints bundles and blog about it if they sent me the fabric, and this quilt pattern popped to mind. Yes and yes!! I plan to create this quilt in the coming months; an all time favorite pattern with my all time favorite fabrics–I’m in love already and I haven’t even cut the first piece!
For the third week, I’m sharing a pattern I bought *just* before May began, but I’m counting it anyway. Stitchy Pie is a sweet needle organizer pattern recently released by Lucy at Charm About You. I had just been thinking about how I needed some system for keeping all of my hand stitching needles organized and in one place (it’s never fun when I can’t find my self-threading needles and it’s thread burying time), and this pattern popped up in my Instagram feed. I plan to make mine…. wait, can you guess?…. out of an Alison Glass Art Theory panel! I will never tire of Alison Glass fabric projects! I don’t know when the time will present itself, but when it does, I’m excited to make this handy little project.
I have not yet decided what patterns I’ll be purchasing for the last two weeks of May. Do you have any suggestions? Any innovative projects that you find yourself returning to again and again? I’m soooo close to crossing into the black hole (so it feels) of garment sewing, and I want to begin with a simple cotton tank. Do any of you garment sewists have suggestions? Thank you in advance, and I hope you’ve been having fun with May is for Makers, too!
Back to cleaning up and possibly sewing for just a tiny bit, since Finn is napping. Here’s to good health, sunny skies, and speedy and efficient catch-up!
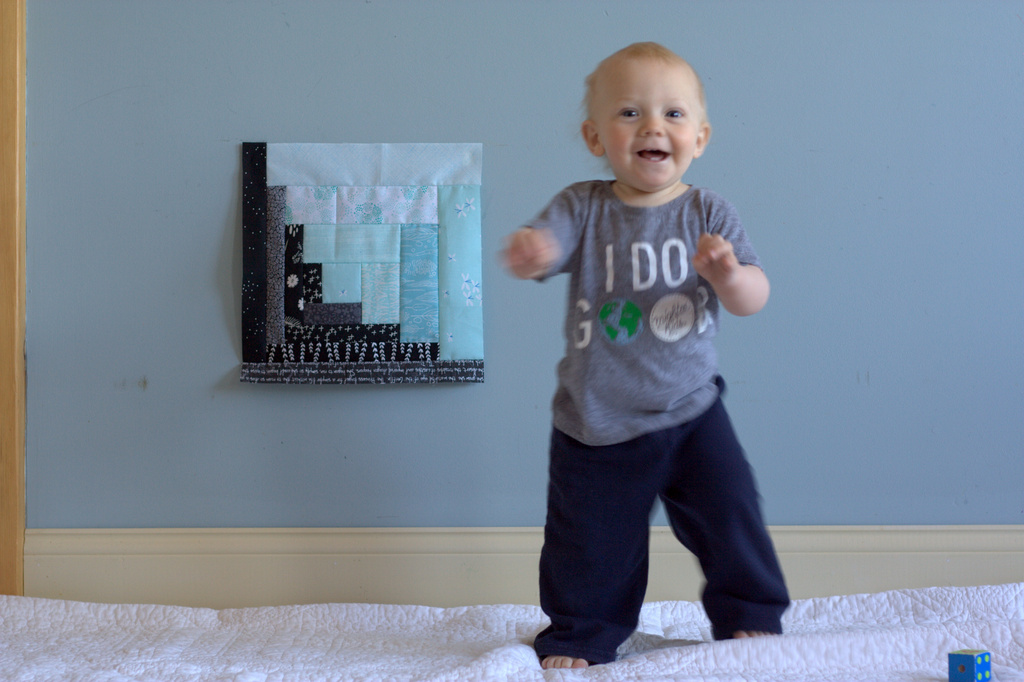
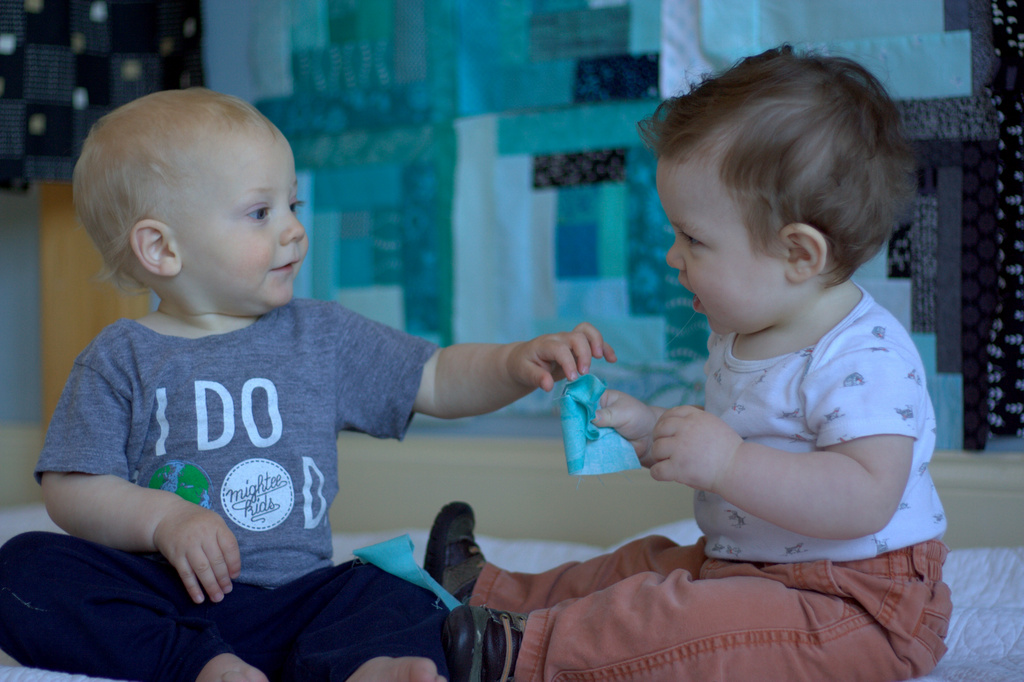
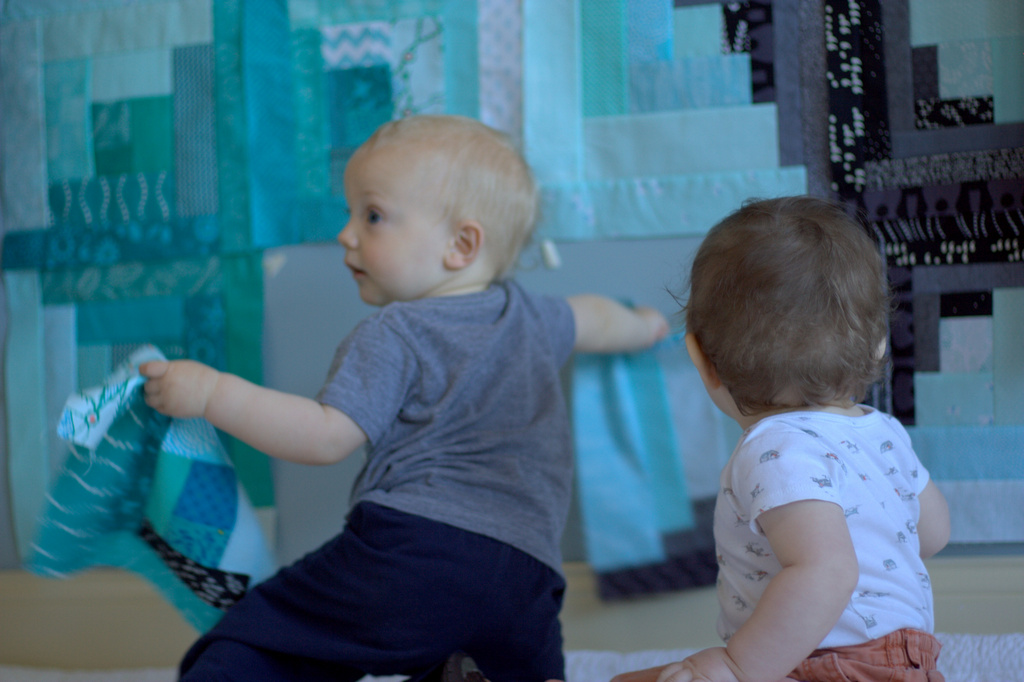
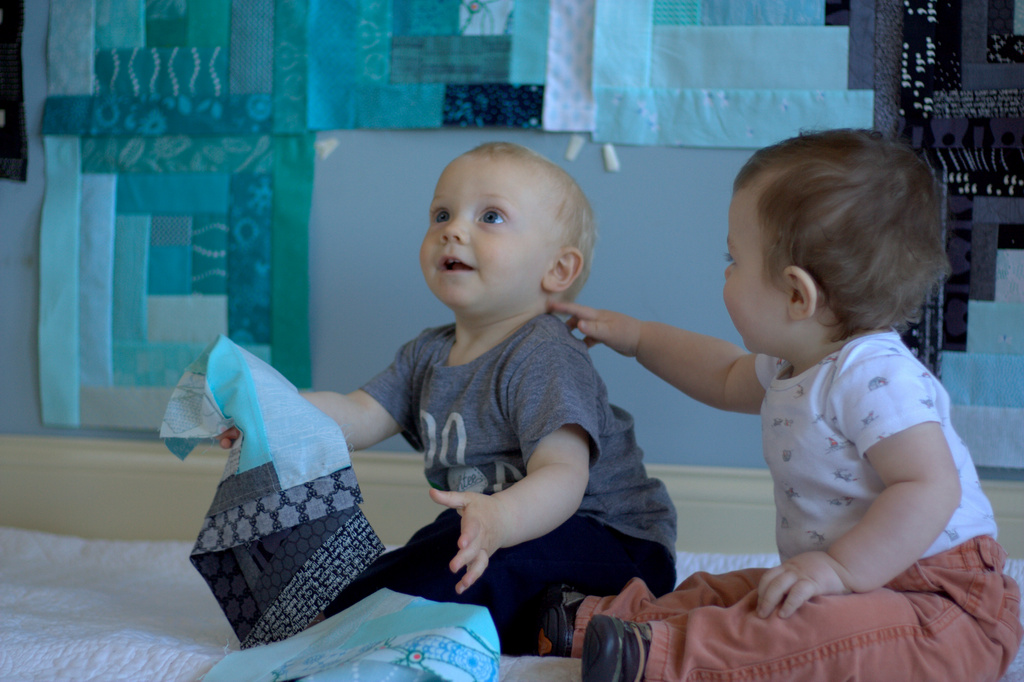
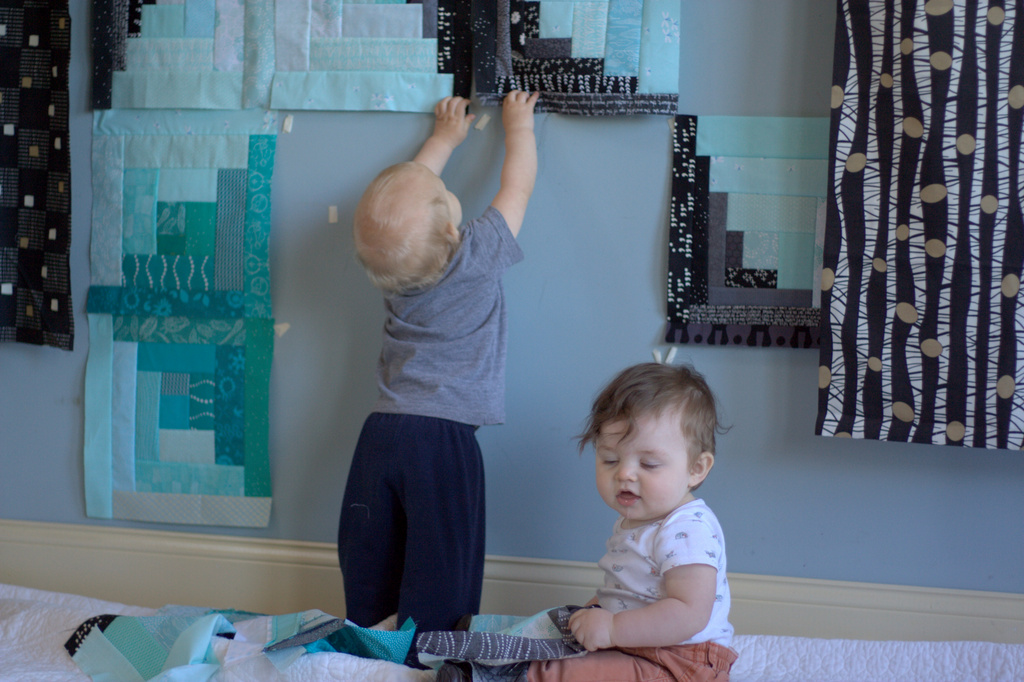
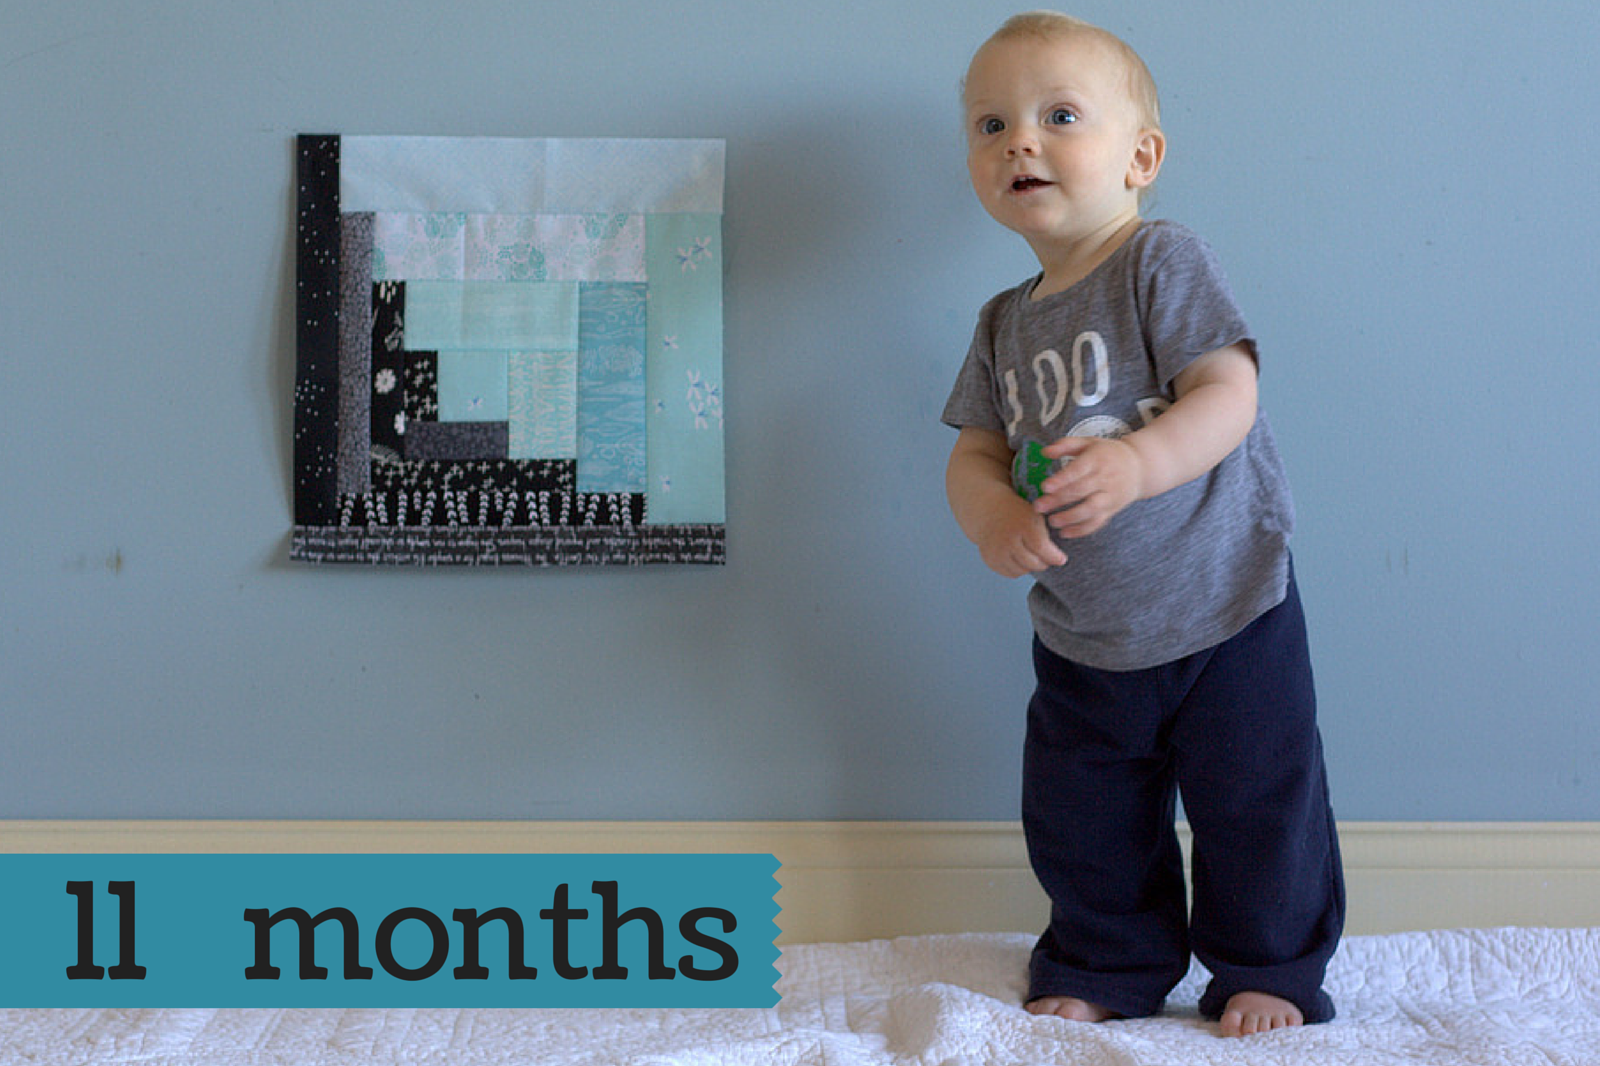
I’ve been here every day, experiencing every moment, yet still it’s hard to believe my baby is nearly a year old. Finn is walking more and more, beginning to talk a bit (he clear as day said “yes” when I asked him if he wanted more milk last night, and “mama” is a regular), he’s learned how to tell me when he doesn’t like something, and his wonder of the world around him only grows. I know that he has a lot more growing and developing to do, but his milestone quilt is nearly finished. I had to laugh to myself a bit a few weeks ago when Finn threw his first fit. You know the kind, where he gets his hands on something he really shouldn’t have (in this case, a pony bead that he surely would try to eat), you take it away, trying to distract him with something else, but still he whines, arches his back and makes it known that he is NOT happy. My first thought was, “Awww cute! Finn learned how to throw a fit!” True tale sign he’s my third child. While it’s still a bit cute when he throws a fit, I’m sure it will get old long before he outgrows it. But still, he’s such a blessing. Looking at these photos, you’d never think he’d be capable of throwing a fit. Now that walking and moving is old hat for Finn, this photo shoot was quite a feat. Just about as soon as I set him down standing, he’d start to walk toward me. Adorably cute, yes, but jolting movement doesn’t bode well for clear photos. Still I managed to get a few good ones, and of course I’ll be sharing them here. This month, we had some friends over during his photo shoot (which actually happened this morning!), so his friend Ronin joined him for the photos. Ronin is a few months younger than Finn, but it was fun to see them interact. Here I was asking and signing to Finn, “Where’s your friend?” I’m trying to sign all the time to Finn and it’s slowly starting to show. He finally signed “more” while eating eggs the other morning, and I think is beginning to sign “milk” and perhaps “all done”. He seems much more interested in verbal communication, and it sounds to me like he says: mama, milk, more, Maddie, Max, water, yes, and perhaps a few more. The development of a human brain blows my mind. Once again, the highlight of the day was ripping the blocks off the wall. Here Ronin looks on as Finn takes the first block down, and turns to check with Emily (Ronin’s mom) to make sure it’s ok.
How happy do they look!?
Once I gave them the go ahead, it was a quilt block grabbing, tasting, throwing free-for-all. Ronin especially enjoyed the tactile-oral quality control job. Such adorable kids.
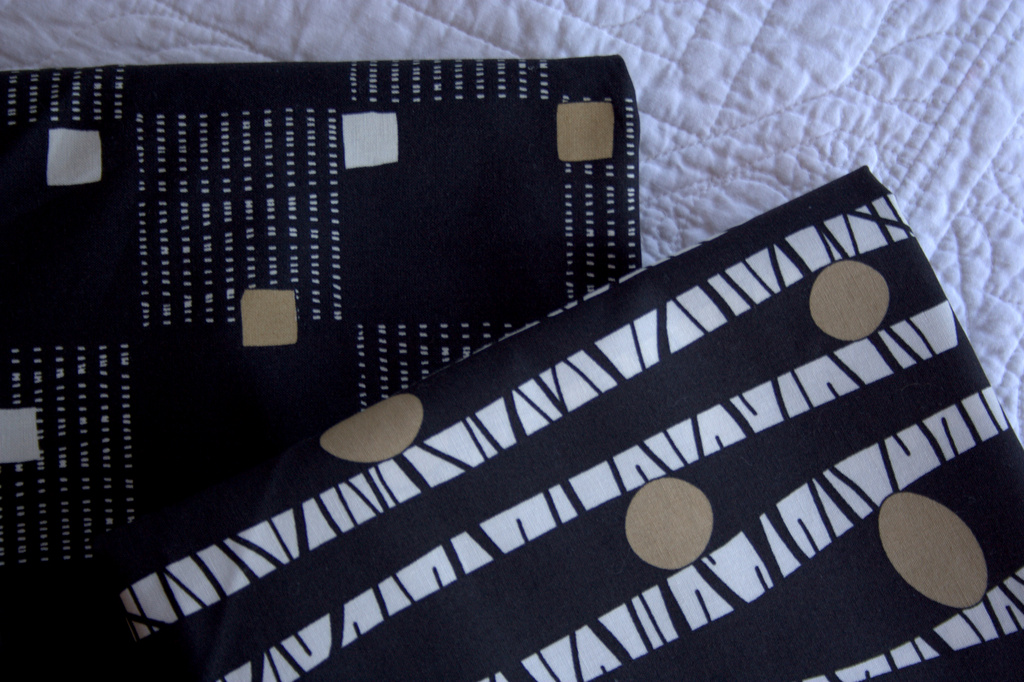
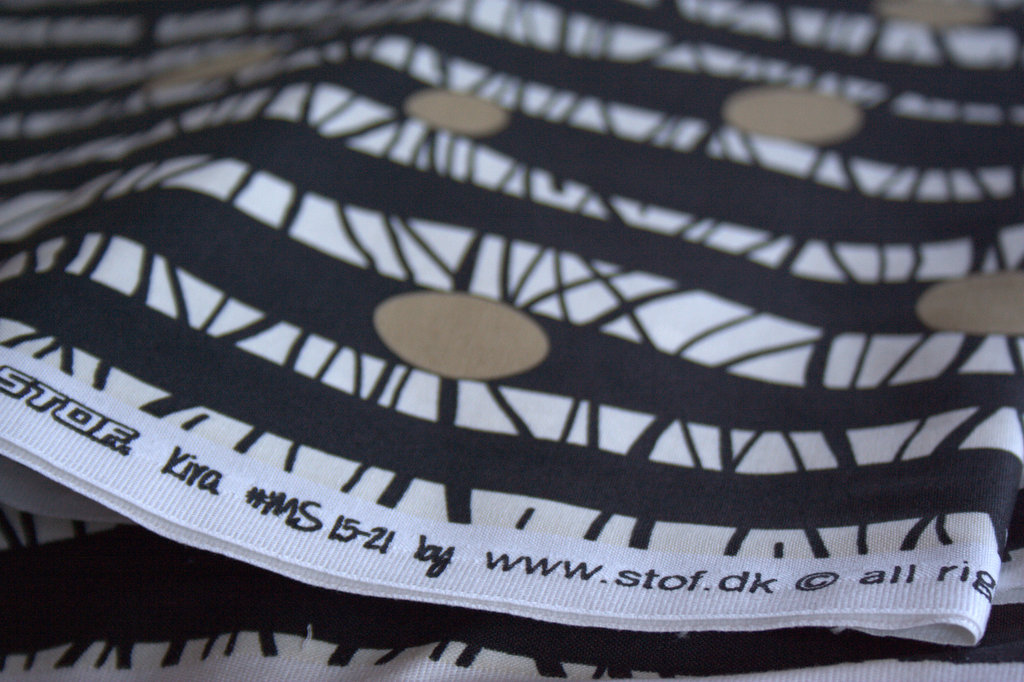
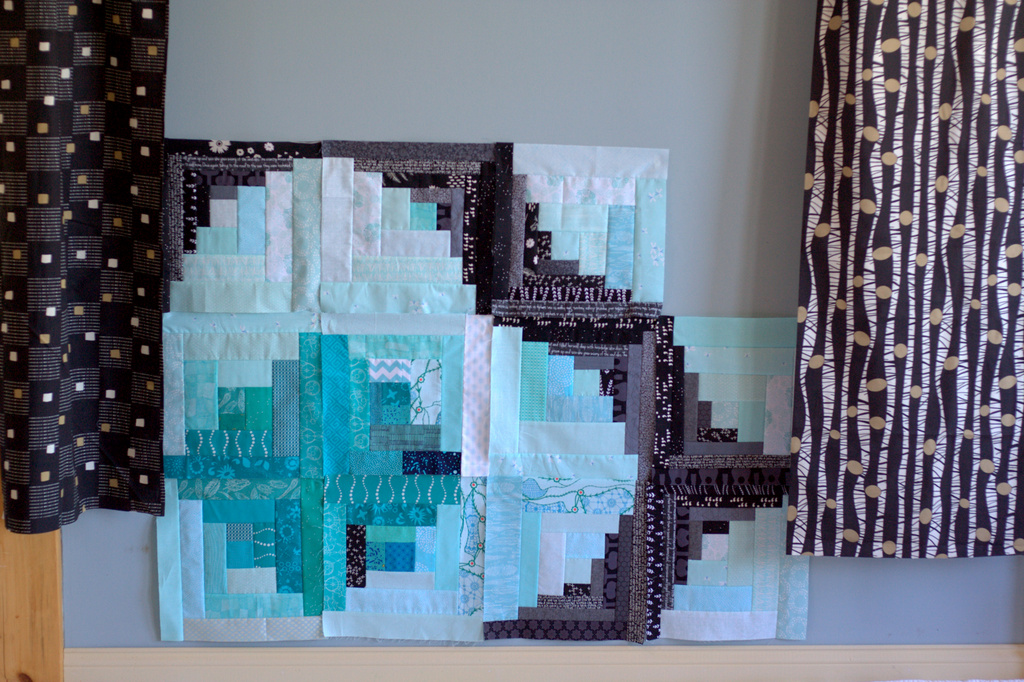
As you may have noticed in some of the photos above, I recently found potential backings for Finn’s milestone quilt. While doing a bit of quilt shop hopping during Maine’s April quilt shop hop, I spotted two prints that stuck with me at Mainely Sewing. After walking through the shop, I found myself coming back to these two.
They are by Stof Fabrics, which is a fabric company unfamiliar to me before now. The fabric feels sturdy and smooth, and based in Denmark, I anticipate high quality. After much deliberation, I bought a couple yards of each print, just in case. I haven’t seen them elsewhere, so I thought it was a wise purchase.
To be honest, the print that looks like birch trees was the one I thought I’d use for the backing, until seeing them hanging next to the quilt. Looking at the photo above, I’m leaning strongly toward the print on the left. I love the pops of gold in both of them, since some of the fabrics I used in the quilt blocks for the front have gold details, and the square geometric pattern reflects the log cabin structure. I can see this quilt coming together, and it’s such a fun sight!
I deliberated over which photo of Finn to use for his 11 month block photo, since this one of him carefully standing is pretty adorable, but I ultimately chose the one with him leaning over, peeking out into the kitchen where Emily and Max were talking.
This photo seems relevant to his stage of life right now–wanting to get into the mix, discover everything, and communicate and run with the big kids. He’s getting awfully tall, too! One more month before he’s a one-year-old! I’ll check in again next month to share the celebration.
For those of you new to this project, you can see the full quilt layout plan, HERE in the 3 month post. You can see the full progression of Finn and his quilt’s growth so far HERE or by clicking the “Milestone Quilt” tab at the top of my blog. Thank you for joining me on this journey!
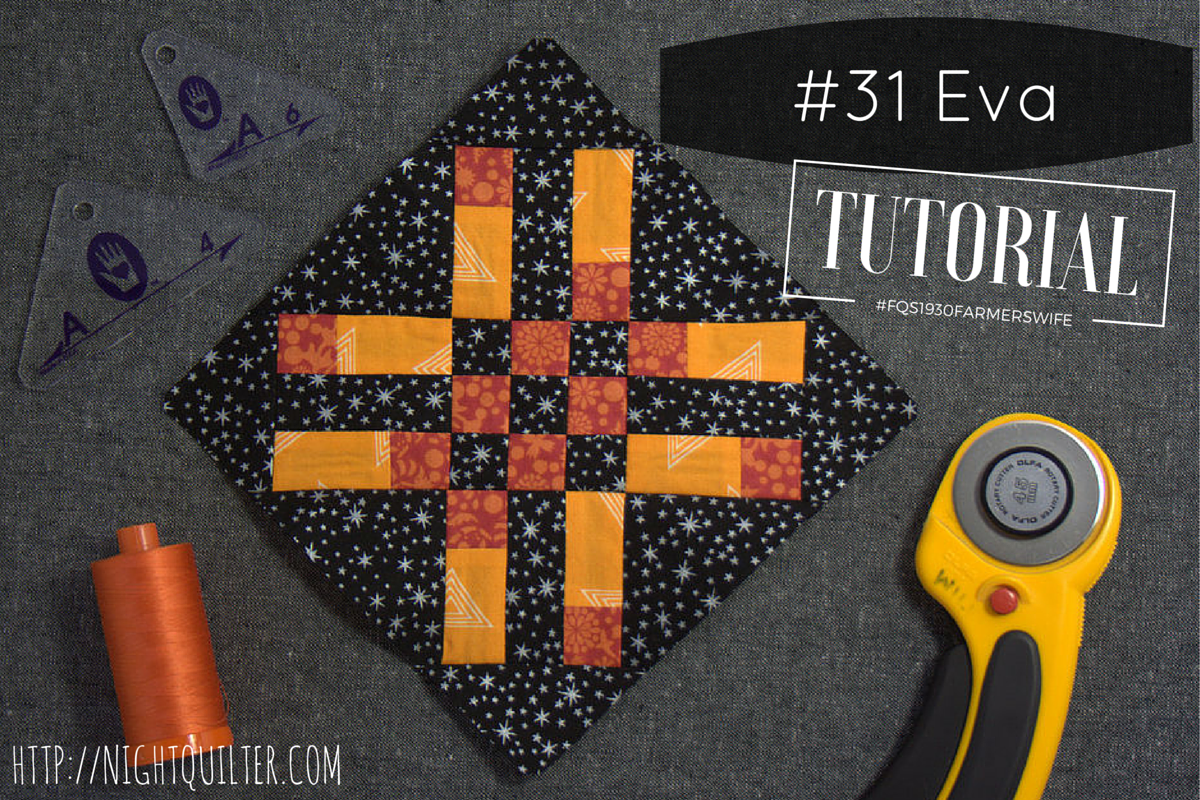
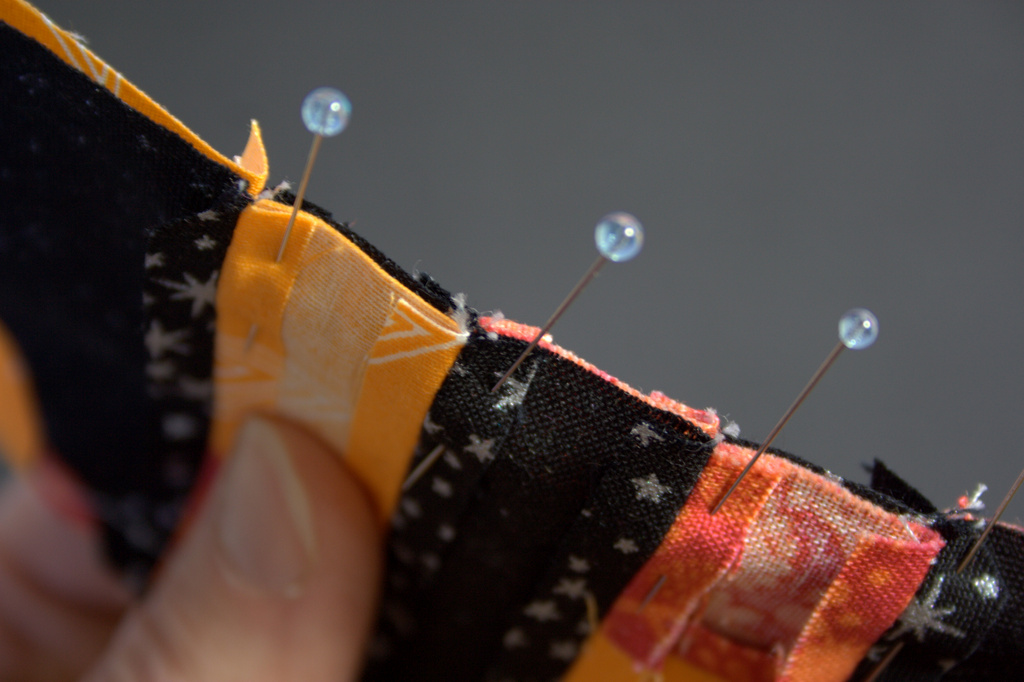
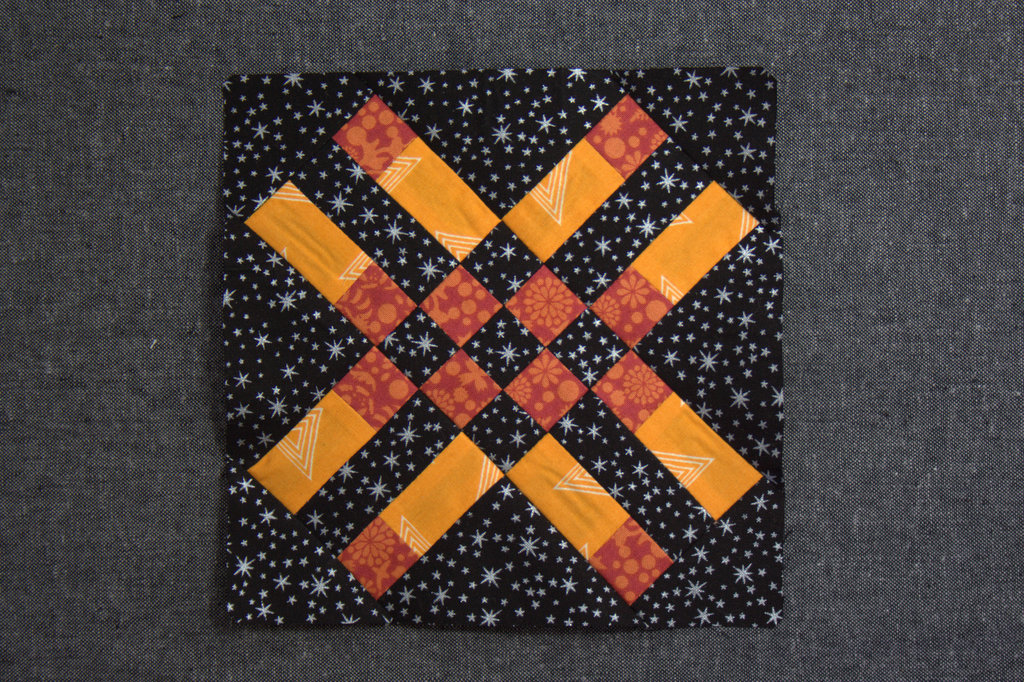
As with Autumn, a first look at block 31 Eva may cause you to balk: 37 pieces in one 6″ block, and many of them are tiny squares!? But with a creative look at the block construction, Eva can come together smoothly and without too many teeny pieces. This sew along continues to show me that there is nearly always a faster and easier way to approach block construction than purely cutting out all of the pieces and sewing them together. With a few shortcuts and piecing tricks, Eva comes together quite smoothly. In this tutorial, I’ll show you how to use strip piecing to save a bit of time and create larger, more manageable pieces, and fill in the gaps using Marti Michell templates (Set A) or rotary cutting to help make putting Eva together smooth and enjoyable.
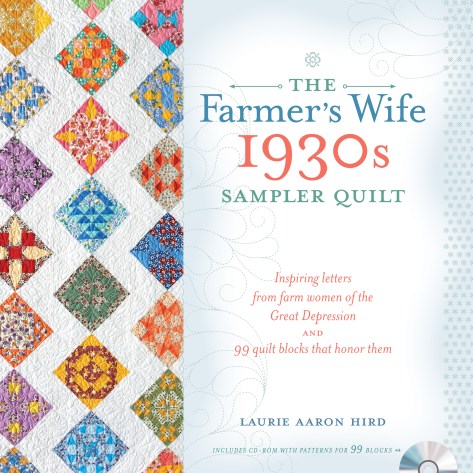
Note: Exact measurements for the pieces needed to construct this block will not be provided in this tutorial in order to protect copy write. It is a prerequisite of making this block that you have a copy of the book, The Farmer’s Wife 1930s Sampler Quilt: Inspiring Letters from Farm Women of the Great Depression and 99 Quilt Blocks That Honor Them. All measurements can be found in this book and its associated media. That said, even if you aren’t sewing along with us, I think you will find some really helpful tips in this tutorial that will help you look at all block construction more creatively!
Reflection on the Letter – Two Little Sparrows
The letters in this book continue to move me in their honesty and relevance in my life today. It’s amazing how similar the worries of today are to those of the farmer’s wives back in the 1930s. Losing sleep over financial stability seems to me to be part of the human condition. Especially at our current stage of life, growing a young family, recently having bought our first home, and working hard as a one-income family of five so that I may be a full time mom raising our children, my husband and I unfortunately do not escape the worries of making ends meet. Mrs. P. G.’s dream of two sparrows drawing nearer together when faced with the winds of adversity really resonated with me, and gives me renewed hope that “every little thing, is going to be alright” (thanks, Bob Marley, and Mrs. P. G.).
Tutorial
For this block, I specifically chose fabrics with small or nondirectional prints, so that I could quickly strip piece the components without worrying about fussy cutting or directionality. Note that I am arranging my final layout on-point, but for the purposes of being consistent with the diagram in the book, this tutorial pieces the block squared. If you plan to set your blocks on-point, be sure to account for that with any directional fabric placement.
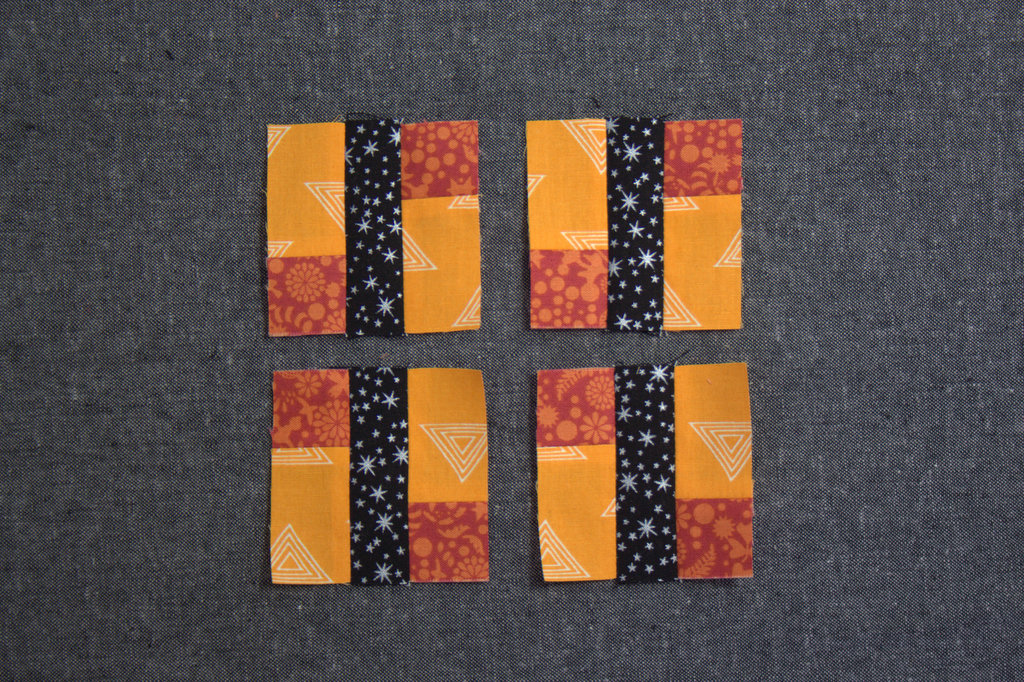
When broken into more manageable pieces, this block is composed of the center 9-patch, two pairs of mirror image blocks, and 8 surrounding triangles, cut with templates and/or a rotary cutter. I first made the blocks using strip piecing to speed up the creation of the components, and then sewed them all together. Let’s break it down.
Making the Center 9-Patch
In the book, the cream and yellow fabrics were used to make the #31E 9-patch. Choose your coordinating fabrics (I used black and orange and will refer to the fabrics as black and orange throughout).
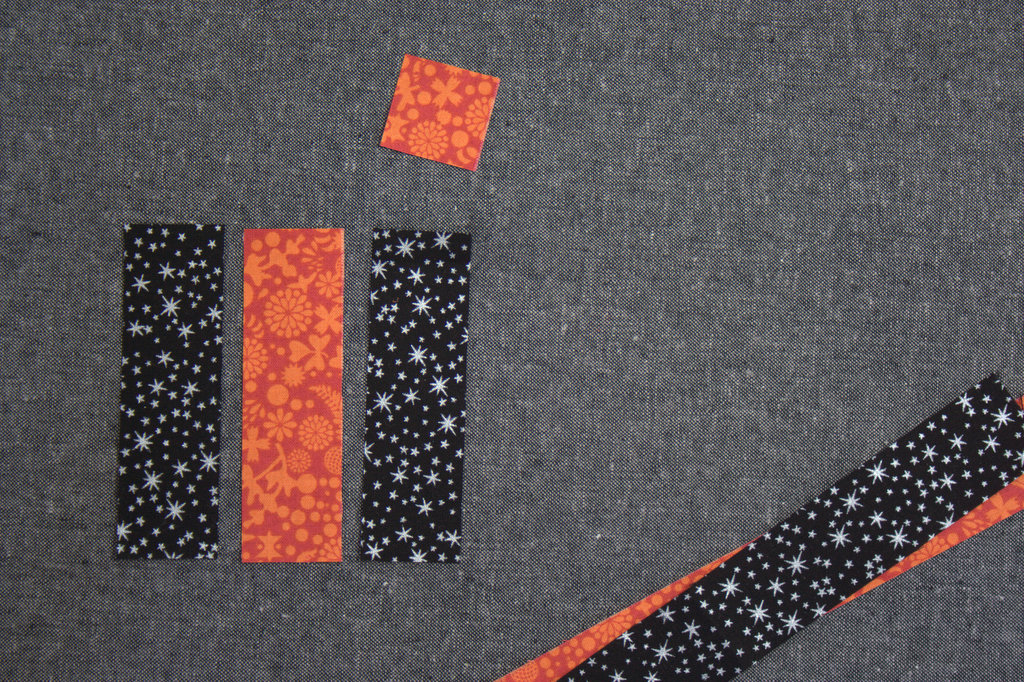
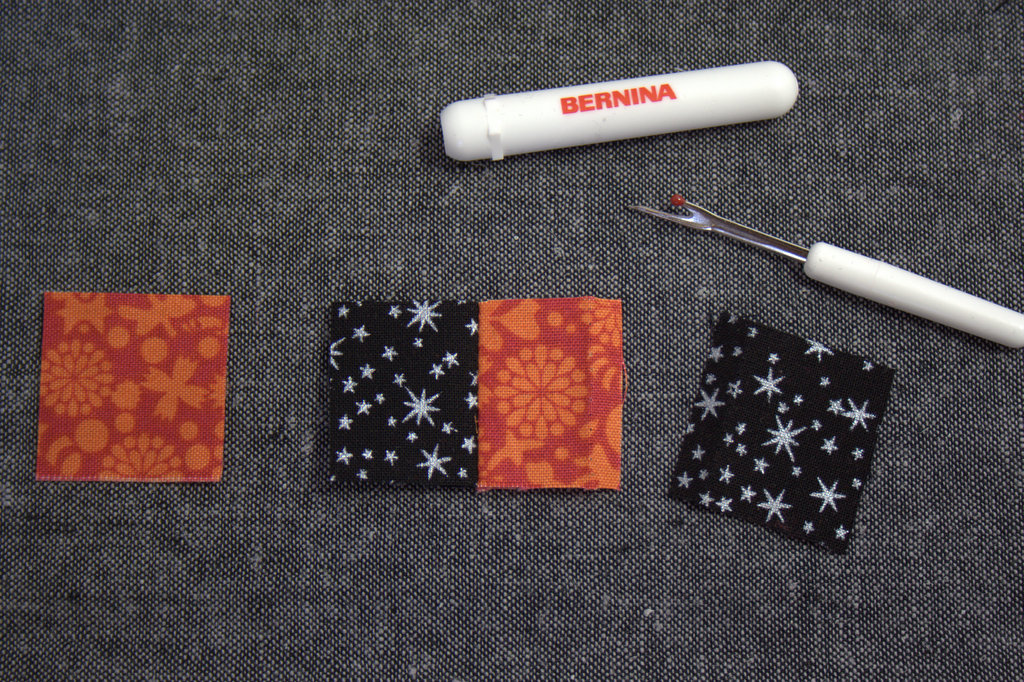
Cut one (1) 1 3/16″ x 19″ long strip of your cream equivalent fabric (I used black). Subcut two (2) 4″ long pieces. Set the remainder of the strip aside.
Cut one (1) 1 3/16″ x 16 1/2″ long strip of your yellow equivalent fabric (I used orange). Subcut one (1) 4″ long piece and one (1) 1 3/16″ square. Set the remainder of the strip aside.
*Measurement tip: 3/16″ is halfway between 1/8″ and 1/4″. Since the 1 3/16″ measure was used so often in cutting for this block, I marked it with painter’s tape on my ruler to help avoid confusion.
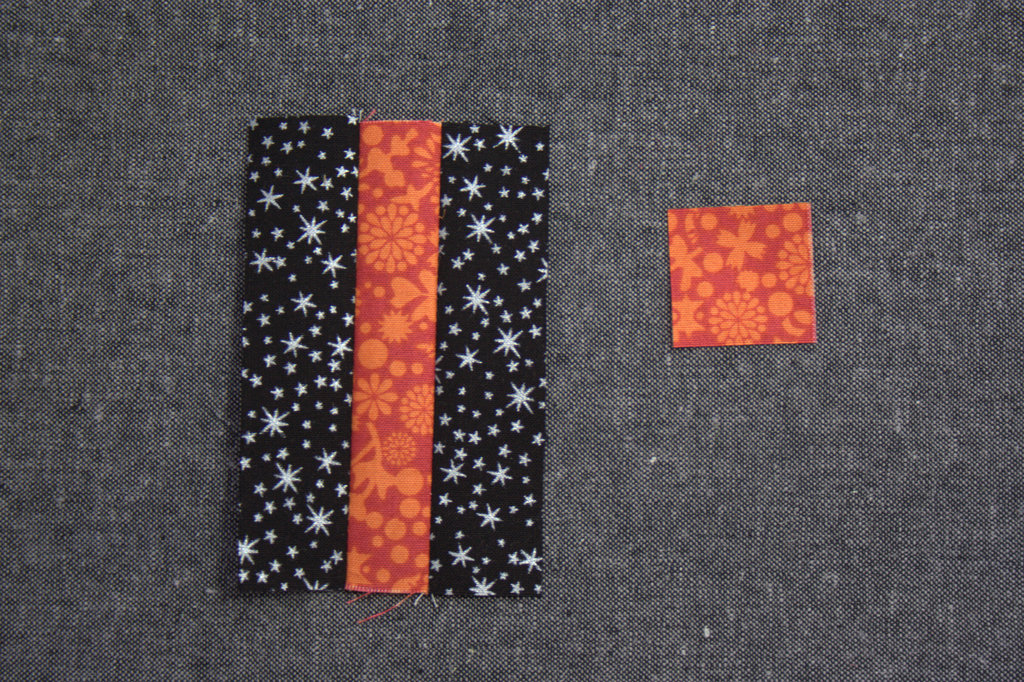
Sew black strips to orange center as shown. I prefer to press my seams open for ease of matching seams and reduction of bulk. Feel free to press open or toward the darker fabric.
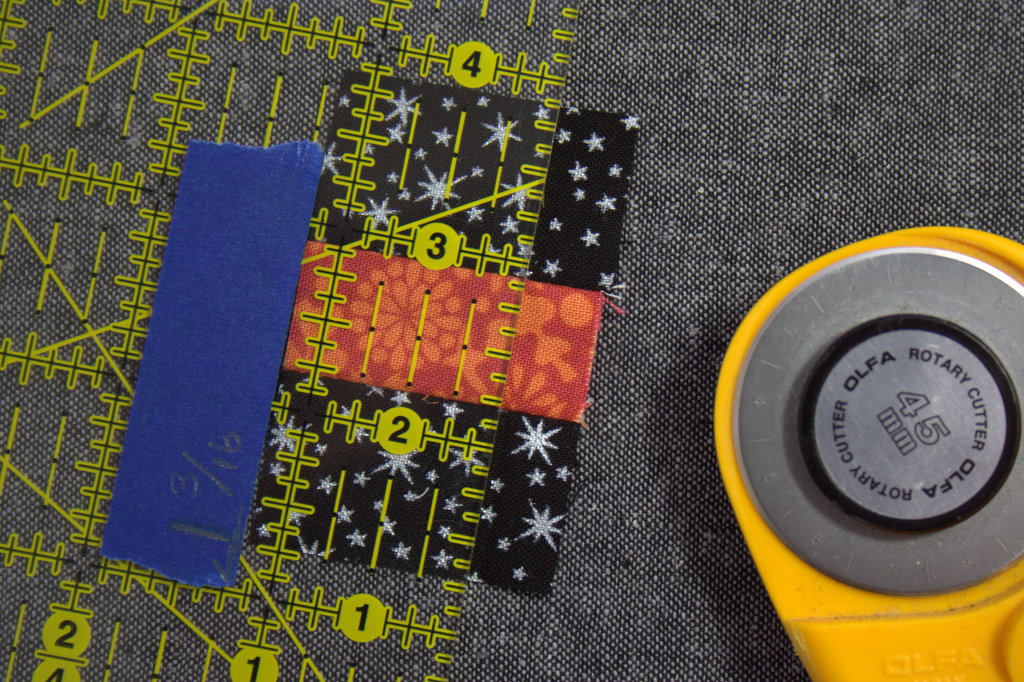
Ruler marked with 1 3/16″ measure.
Cut into three (3) 1 3/16″ wide strips as shown.
Next, carefully unsew one of the black squares. Sew the orange 1 3/16″ square to the other side to make the center strip for the 9-patch.
This is a great time to use a leaders and enders project to help smoothly sew these tiny pieces without the fabric getting bunched in the machine. If you don’t have a leaders and enders project in progress, sew through a scrap piece of fabric before sewing the tiny squares together. This will help your stitches stay smooth despite the tiny fabric size!
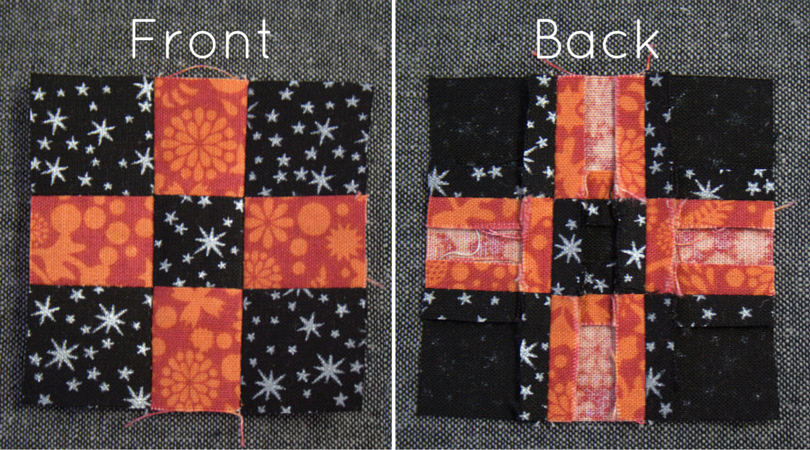
You now will have your three strips for your 9-patch.
Carefully sew them together, pinning just after each seam join. Press seams open. Above shows my block, front and back. Note how nicely the pressed-open seams sit! Set your 9-patch aside.
Making the Mirror Image Blocks
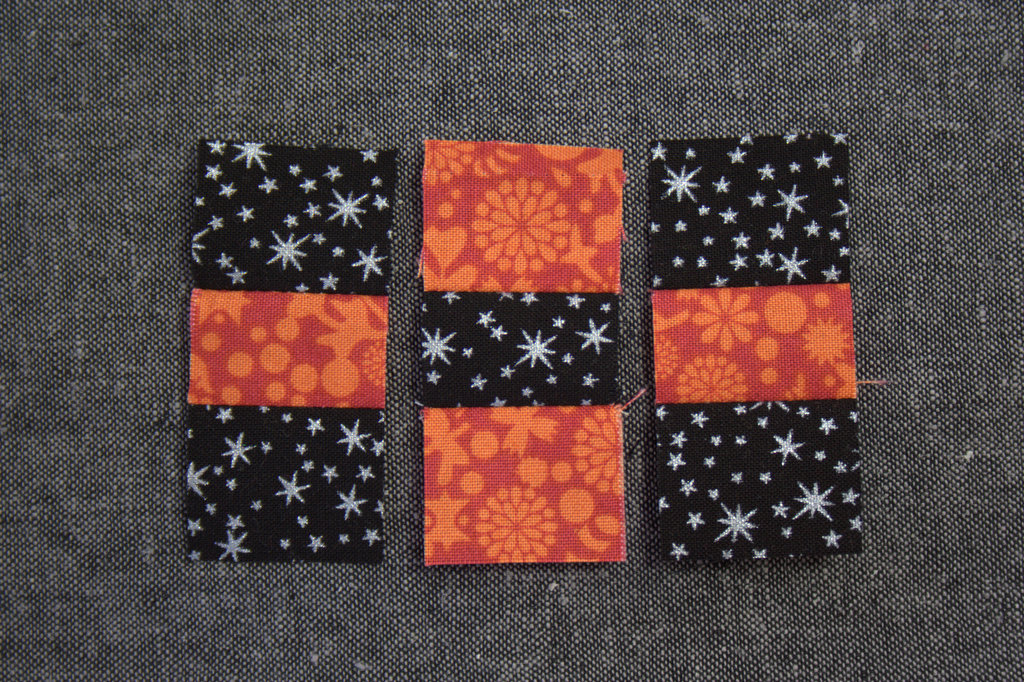
In the book, the cream, yellow, and blue fabrics were used to make the remaining blocks, each comprised of a #31C and two #31D-#31E units. (I used black, orange, and yellow-orange fabrics and will refer to them as such throughout).
Cut one (1) 1 7/8″ x 11″ piece from your blue-equivalent fabric (I used yellow-orange). Retrieve the fabric strips set aside during the 9-patch construction, and subcut one (1) 1 3/16″ x 11″ strip from the orange. From the black strip, subcut four (4) 1 3/16″x 2 5/16″ pieces. If you have the Marti Michell template set A, the A-3 template is exactly 2 5/16″ and can be used to easily cut the pieces.
Sew the orange to the light orange as shown. Press seams open. Subcut the strip set into eight (8) 1 3/16″ segments. Using a ruler marked with painter’s tape as shown previously in this tutorial will help this step go quickly.
**MIRROR IMAGE ALERT** At first glance the blocks above may look the same, but notice that they are actually mirror images. The two on top are mirror images of the two on the bottom. Carefully arrange your pieces as shown above, paying very close attention to the direction of the orange bits: orange bit facing down on the left and up on the right for the top two; orange bit facing up on the left and down on the right for the bottom two.
Very carefully sew the blocks together, pausing midway to double check the alignment before sewing the second strip onto each center. Press seams open. Set these four blocks aside.
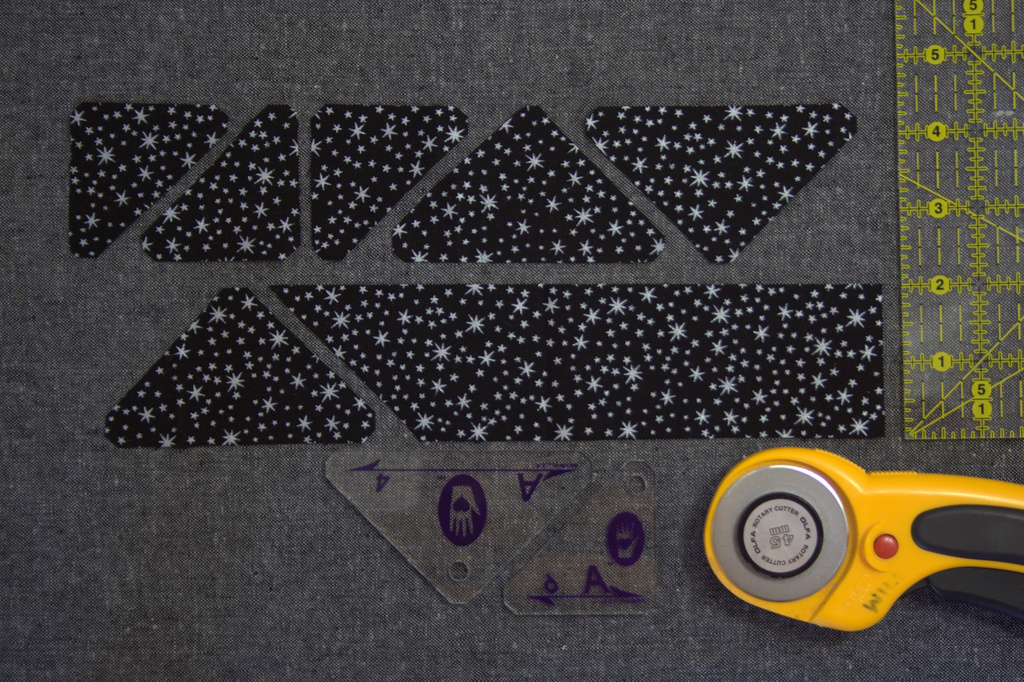
Cutting the Triangles
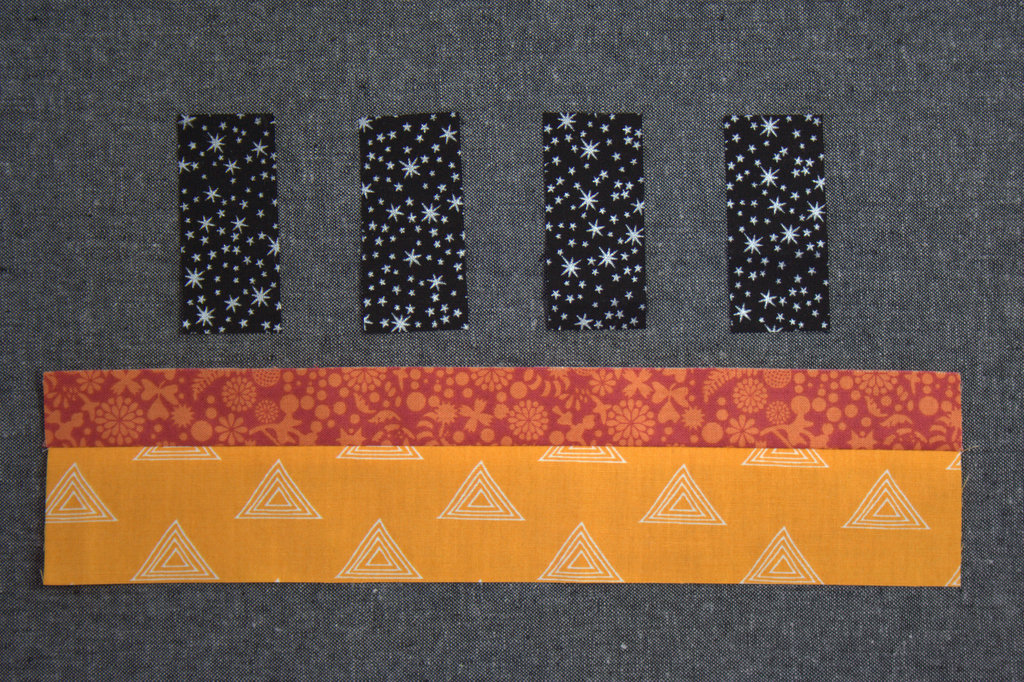
In the book, the cream fabric was used to make all of the triangles that comprise the background of this block. I used black fabric.
Cut a 2″ x 18″ strip of black fabric. Using Marti Michell templates A-4 and A-6 or the templates provided in the media associated with the book, cut four (4) #31A and four (4) #31B pieces. The photo above demonstrates how to efficiently cut the pieces from the 2″ strip. One more #31A (the large triangle) and one more #31B (the smaller right triangle) remain to be cut in the photo above.
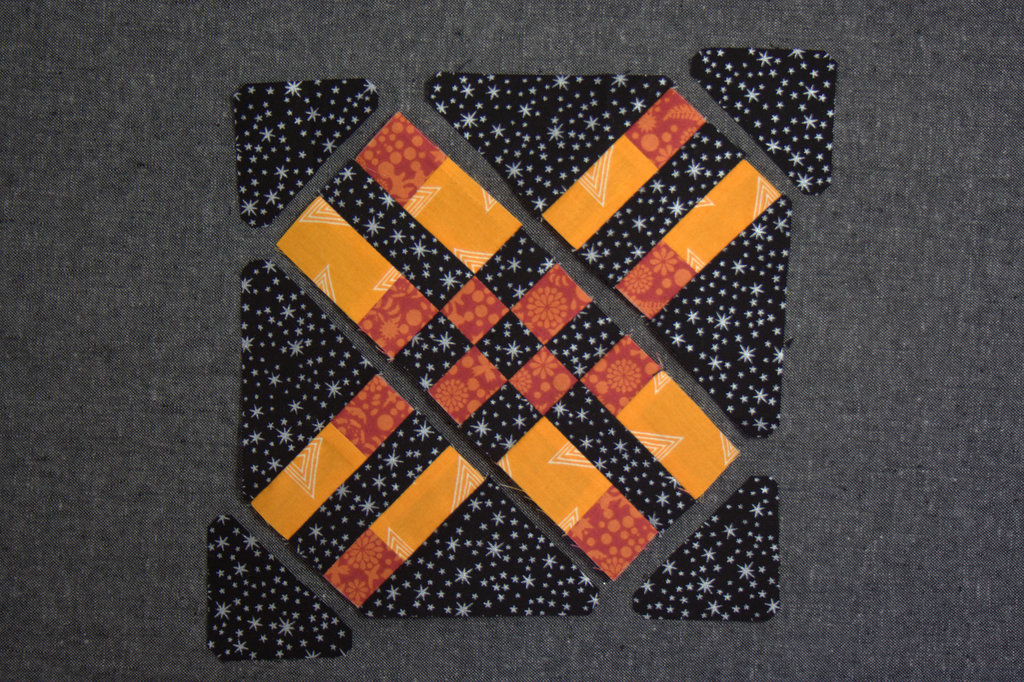
Assembling the Block
Now you have all of the components necessary for piecing Eva! Grab all of your blocks and triangles and let’s lay them out. Here is where the mirror image blocks can get easily mixed up. Take your time, cross referencing with the picture in the book or the photo above to make sure that all of your pieces are heading in the proper direction.
*Note:The orange squares all converge in a horizontal strip in the center of the block. If an oval is drawn horizontally across the center, it should contain all orange squares.
Once you are sure you have your layout correct, I suggest that you take a photo with your phone for reference. Refer to it before each step, since it’s much easier to take a second look than to rip stitches to resew (ask me how I know! I began assembling the block before realizing that two of my orange bits were facing the wrong direction. Hello, bff seam ripper!)
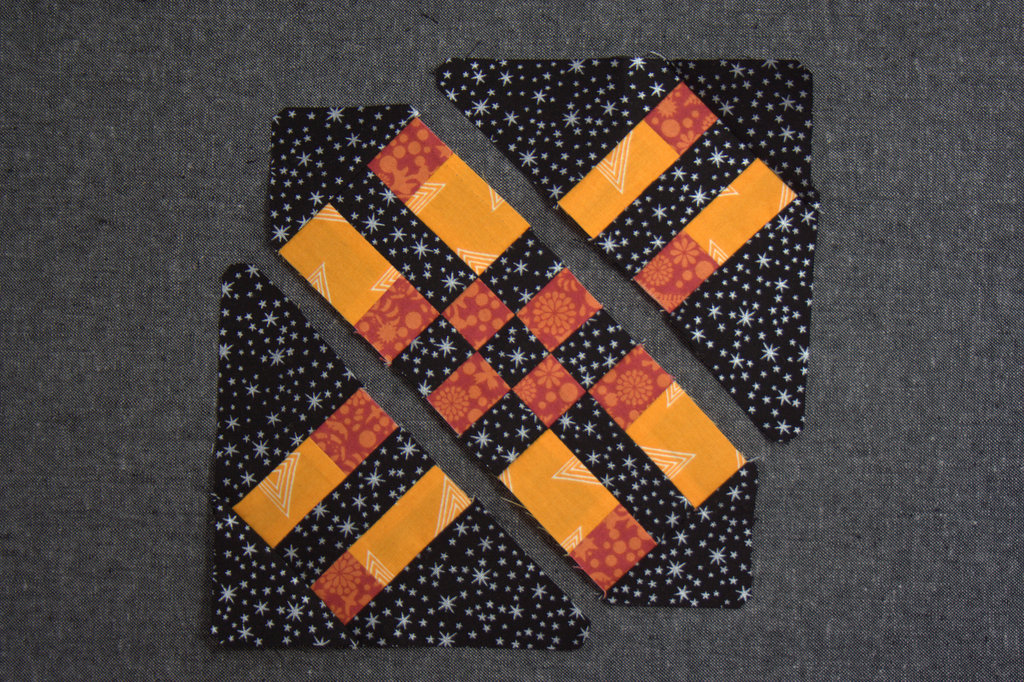
We will assemble this block in diagonal strips. Begin by sewing the large #31A triangles to either sides of the top right and bottom left mirror image blocks, and the top left and bottom right mirror image blocks to the center 9-patch. Press seams open.
Next, sew the #31B triangles onto each unit.
Finally, sew the top right and bottom left units to the center strip. I find it helpful to pin just after each seam match for perfectly matched seams. Between the pressed-open seams and the pin *just* after each seam, my block comes together just how I like it!
Viola! There you have Eva, easy peasy! I love the look of this block set squared, but since my quilt blocks will be set on point, I decided to have her orange strip head uphill, since optimism makes the world a brighter place, and the letter encourages sticking together in the face of the winds of adversity. Chin up, here we go!
Thank you so much for joining me today and I hope you found this tutorial helpful!
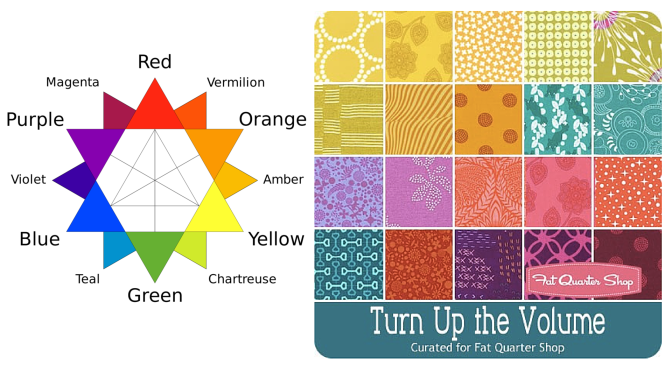
Many makers have a signature style, a color palette they visit again and again, or perhaps an aesthetic that just makes their heart sing and their makes shine. We all know how much I love a rainbow, but recently I’ve felt the need to dive into other color combinations and experiment elsewhere. I’ve tried color combinations that have felt way out of my comfort zone, played with more monochromatic palettes, and have experimented with predetermined colors (paired with improv, no less!). While I do love the makes I’ve created through these experiments, I’ve realized that I truly love a rainbow gradient, but more specifically, I’m drawn strongly to tertiary colors.
As a refresher, the tertiary colors are the ones that fall between the primary and secondary colors, namely: Vermillion (red-orange), Amber (orange-yellow), Chartreuse (yellow-green, or lime), Teal (green-blue), Violet (blue-purple), and Magenta (purple-red). Thank you, Wikipedia for the great graphic! Even when a project isn’t a full rainbow spectrum, if it consists of tertiary colors it still makes my heart sing. Primaries? Not so much. Secondaries? Meh. Tertiaries? Oh, yesssss! All the colors? Even better!
I’ve decided that once a few last non-rainbow projects are completed, I am going to let go of my hesitancy to creating rainbow-everything. I will embrace my rainbow-loving self and create a rainbow-filled world! I have some really fun projects on the horizon and I can’t wait to share them with you! Do you have a specific color combination that makes your heart sing and your eyes turn into hearts? Tell me about it in the comments and enter to win a great bundle of some of MY favorites!
Giveaway Time!
Today’s giveaway is generously sponsored by the Fat Quarter Shop. When it was time to select the giveaway bundle for the month, this lovely Turn Up the Volume bundle curated by Rebecca Mae Designs caught my eye. Can you tell why? Tertiary colors!! It’s jam packed with vibrant, stash building tertiary colors. Now you have a chance to build your tertiary color stash in a big way (20 fat quarters-big… that’s 5 yards of fabric!).
To enter the giveaway today, let me know what colors you find yourself using again and again. Leave a comment and make sure I’m able to get ahold of you if you win. If you’re a follower of Night Quilter, leave a second comment telling me how you follow for a second entry. Tell me how you follow Fat Quarter Shop (facebook, twitter, Instagram, their blog Jolly Jabber, etc.) for a third entry.
This giveaway is open to US and international participants. The giveaway will be open until Tuesday 5/10 at 8pm EST when I’ll select the winner randomly with random.org. Good luck!This giveaway is now closed. Congratulations to Delaine!!
Thanks again to the Fat Quarter Shop! Blog sponsors help me to keep this blog going by helping cover the costs of hosting, photography equipment, supplies, and of course time. Sweet, precious time. Many many thanks to all who support me!
I don’t often post two blog posts in a day, but this topic warrants a double since it’s an idea that really hits home. I’m joining in on a month-long campaign started by Lindsey over at LR Stitched, and I encourage you to consider doing so as well. It’s called May is for Makers and it’s all about supporting indie designers (like me).
Lindsey’s reflection and description is great, so I suggest you visit her blog to read the details here. Basically, her pledge for May is:
I will purchase 5 patterns over the course of the 5 weeks and with each purchase I make, I will tell a pattern maker that their work matters. My purchase will tell them that I am grateful for the time, effort and passion they put into their brand. Validation.
Lindsey reflects on how “…the balance between what we expect for free and what we are willing to purchase is way out of whack.” This made me stop and reflect for a minute, since while I’m a “starving artist” myself, trying to find a foothold in this industry so that I can help contribute to my family’s bottom line, I don’t always jump at buying patterns. Sure, I support my peers through friendship, collaboration, and sometimes commiseration, but as I know all too well, every penny helps. Selling patterns is often one of the few sources of actual monetary income for independent designers. So I’m pledging this month to buy one less special treat during an errands day, and instead will buy a pattern from a fellow designer each week.
I will share my pattern purchases on social media using #mayisformakers, and will give recaps here. I can’t promise a blog post every week, since I have an overflowing plate with many tutorials coming your way in May, but I will definitely write an update post or two sharing the patterns I’ve added to my library.
I am looking forward to being part of the wave of love sent to the makers of our community, since I know well how much time, artistry, and love goes into making, creating, designing, and of course sharing it all! If you would like to join in, go ahead over to Lindsey’s post, grab the button for your blog, and support away!
Many thanks to all of you for your continued support, both through pattern purchases, blog comments and kind words, and spreading the inspiration!
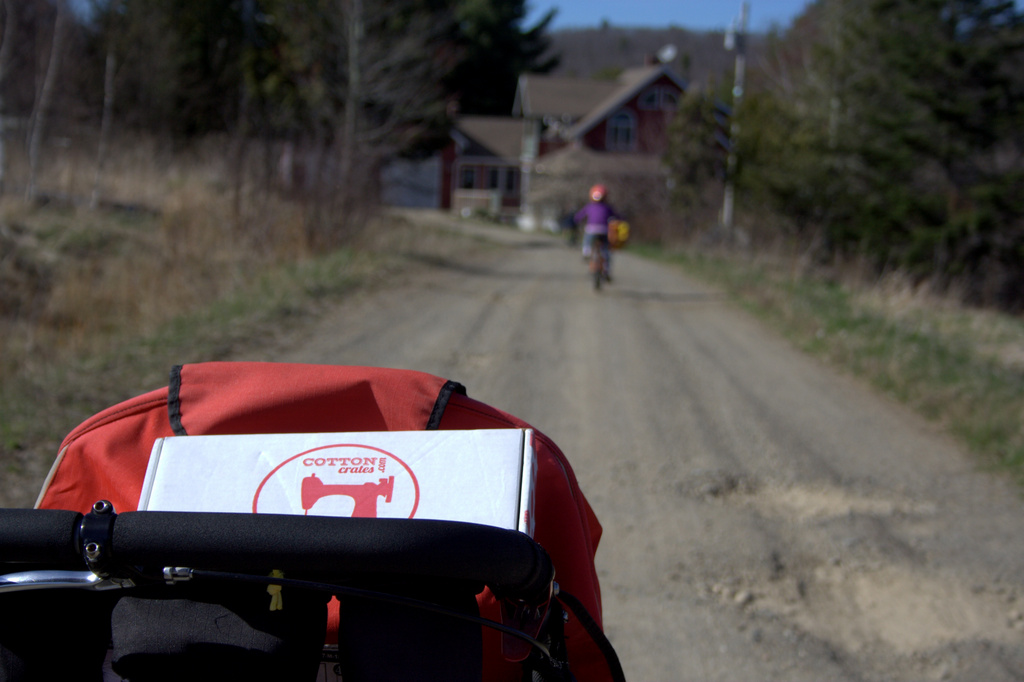
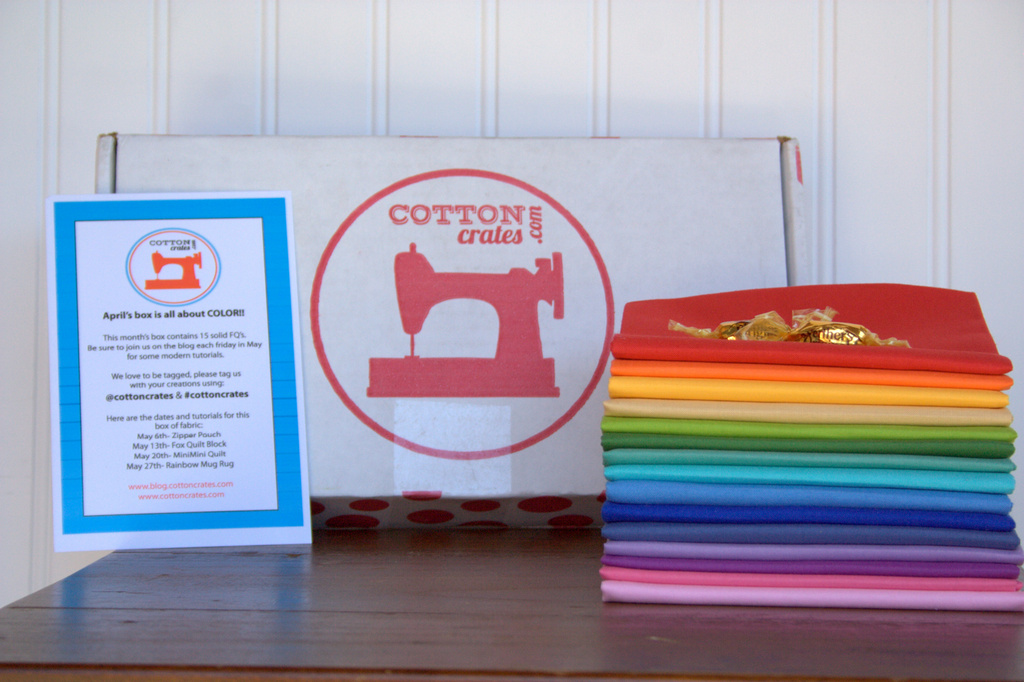
Subscription services are all the rage these days, and who doesn’t love to receive packages in the mail? You can get boxes of stylish clothing in just your size (StitchFix), food ready to prepare healthy meals (Hello Fresh), science experiments ready for parents and kids to build together (TinkerCrate), wine curated to your tastes (Club W), and now fabric and sewing supplies, all mailed to your doorstep each month (Note, I’m not affiliates of any of these subscription boxes, simply stating one of many examples in each case). In the recent months, I’ve seen more and more fabric and sewing notions subscription boxes arise, so when Cotton Crates contacted me asking if I was interested in trying out a box in exchange for writing an honest review on my blog, I was intrigued. When they mentioned that the month’s box would contain 15 fat quarters of bright Riley Blake solids, I was sold. Full disclosure: Cotton Crates provided compensation in the form of product, a subscription box with fabric. All opinions expressed are my own. My excitement and heart eyes are also my own.
Let me tell you about my Cotton Crates experience. There’s something that comes from having a mystery box arriving in the mail that has a different feel than when fabric you specifically selected and purchased is delivered. Yes, any online fabric purchases arrive in your mailbox, but the cotton crates box held a bit of mystery that made the whole experience more exciting. My kids take turns getting the mail, and on this particular day it was my son Max’s turn. As soon as he opened the mailbox and saw the package he excitedly said, “Is it for me!?” I had to contain my glee when I said, “No, this one is for Mommy.”
During the walk back to the house along our driveway, I was excitedly anticipating what I might see inside the box. Sure, I knew pretty specifically what it would contain, but still that excitement was there–specifically what colors would be included? What would it look like? Cotton Crates gives clues on social media (Instagram | Facebook) during the month to give you an idea of what types of fabric are included each month, but once you order it, it’s easy to keep it a surprise. Solids are such a versatile stash builder, since projects using all solids shine, and solids can also be a great compliment to the right print. In my humble opinion, one can never have too many solids in a stash.
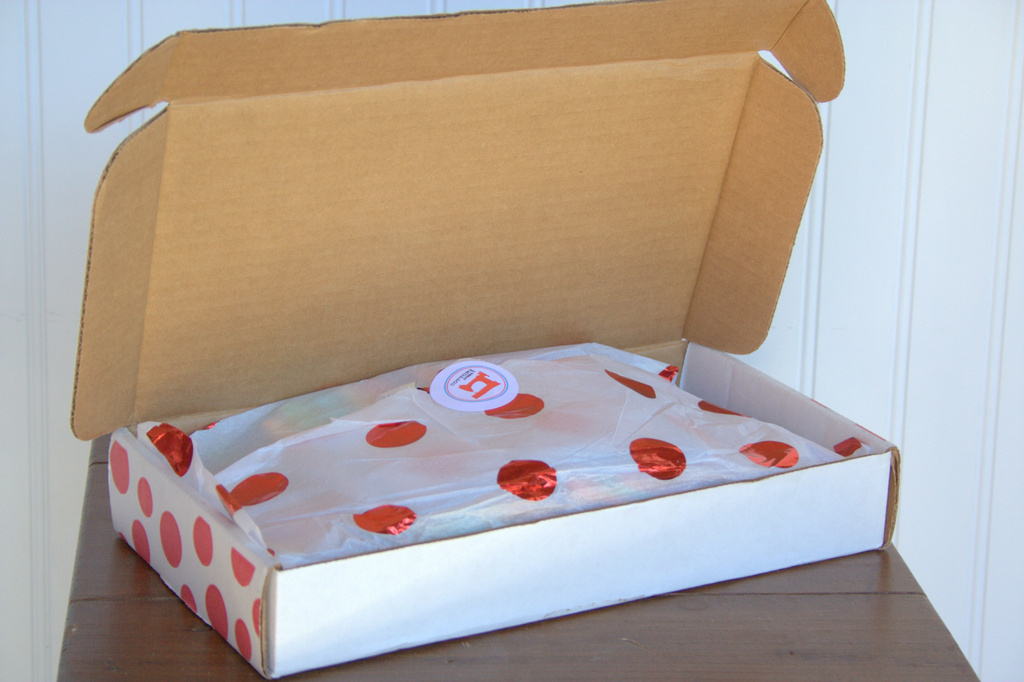
Opening the box was like opening a present, tissue paper, sticker, candy, and all.
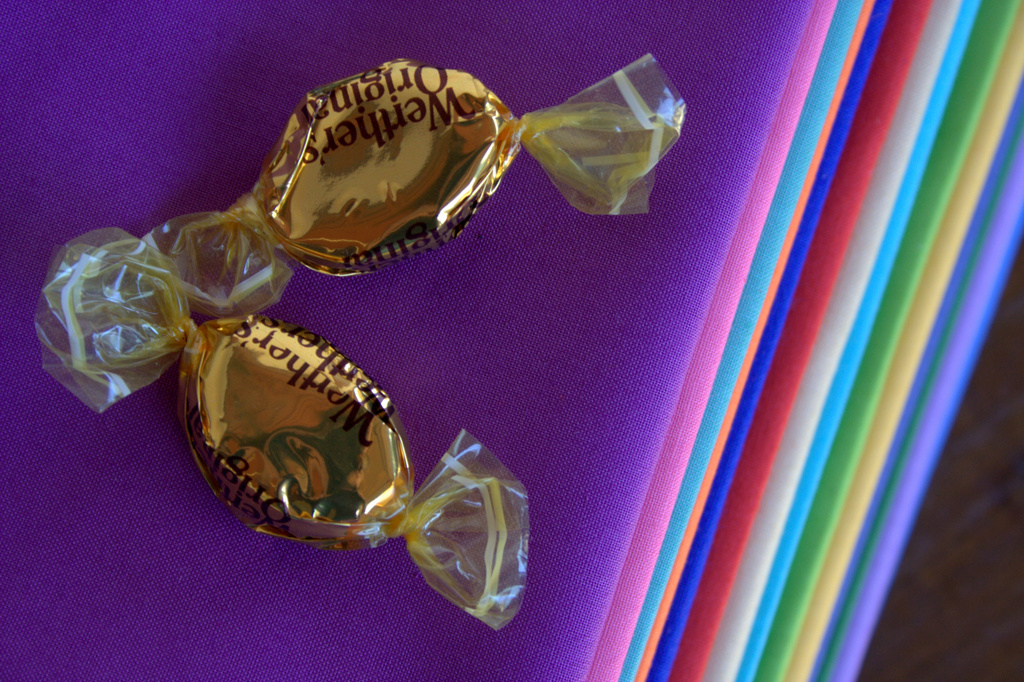
I love that Cotton Crates includes a card with a schedule of inspiration blog posts with projects you can make using the month’s box. You essentially have fabric and projects all in one box, with some candies, too, unless your kids grab them first!
I captured the beauty of the fabrics, and then, true to my style, immediately put them into rainbow order.
Sigh… ahh, much better!
I do have a thing for rainbows.
Now, how about some details? You can head over the the Cotton Crates website to read all about the subscription process, see or order previous boxes, and visit the blog for project ideas. Basically, the longer the time you subscribe, the cheaper the price you pay per box. For example, if you subscribe for one month, you pay $38 for the 12 (or in this case 15 solids) fat quarters, but if you subscribe for a full year, you only pay $34, which is a bit over $2.80 per fat quarter. I can definitely see the fun in fabric subscription services, and it is a great option for building a stash.
Many thanks to Cotton Crates for the opportunity to try out their subscription box!
I’m linking up with Molli’s Sunday Stash since my solids rainbow grew in a beautiful way this week.
Today I am excited to release my newest foundation paper pieced (FPP) pattern, Bean Sprout. Today is arbor day, so for now I’m thinking of it as more of a tree sprout, but regardless of which species you’re growing, this block pattern is ready to roll!
To me, the bean sprout is the epitome of spring, new life, and the wonder of discovery. I have watched my children’s excitement over the first sprout of newly planted seeds, and wanted to capture that fresh promise. This block is perfect for the gardeners among you, and I can see it as a focal block in a quilt, or even turned into pillows, tote bags, wall hangings, or table runners.
You may remember my first iteration of this Bean Sprout block, which I turned into a pillow and donated to my daughter’s school for their annual fundraiser auction/raffle. Since then, I made a few tiny tweaks to the pattern to make it a bit more versatile, easier to piece, and clearer to follow. The block finishes at 8″x12″, but can easily be made into a 12″x12″ finished block by adding two side strips, which is explained in the pattern.
The pattern includes clear piecing diagrams, sewing tips, and templates for the 8″x12″ finished block, with various shading to help with accurate fabric placement. Quarter inch seam allowances are included on all pattern pieces to help ensure easy piecing, and a 1″ reference square is on every printable page so that scale can be confirmed. Full foundation paper piecing instructions are not included in the pattern, but I have a thorough paper piecing tutorial HERE. Lee Heinrich from Freshly Pieced also has a fabulous tutorial on the Bernina We All Sew blog HERE, which will ensure you will never miss corners again. Knowing all of the information in these two tutorials will help demystify FPP, or at the very least will GREATLY reduce seam ripping.
Sew up the bean sprout block to bring spring no matter the weather!!
Bean Sprout is available for sale in my Payhip shop, at an introductory price of $2.50 through the weekend. Tuesday morning EST, it will go up to its standard price of $5.00.
I pushed spring into summer with my latest version of the block, using Cotton + Steel teals and coral that remind me of watermelon. I wanted to show the versatility of the color possibilities with this true-to-life block. While my brain initially goes to the greens and blues true to real life bean sprouts and summer sky, there are many other combinations that could work well to make the block shine! (For the avid gardeners among you, yes, I know the seedling shown is a brussel sprout plant, not a bean!)
There’s not much more exciting than seeing what others create with my patterns, so if you make this block, please use the tag #beansproutblock on social media and tag me @nightquilter. Sending an email would also work! Enjoy, spread the word, and go grow some quilts!
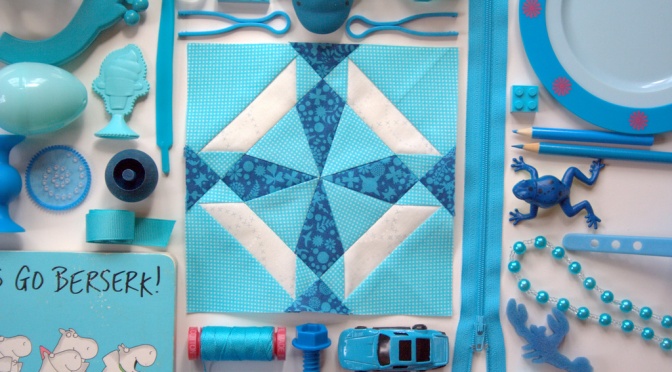
Those who know me know I love color, the brighter and bolder the better! I also love quilt photography and fun styling of process photos, and continuously aim to improve the clarity and aesthetic pull of my photographs. So when Angie at Gnome Angel announced a fun little challenge called the Colour Block Challenge (yes, colour with a ‘u’!) that includes bright color and fun photo styling, I immediately wanted to play. With a to-do list a mile long and only wee bits of time in which to complete it, I wasn’t sure I’d be able to squeeze in making a block for it though. Then, Angie gave me just the gentle nudge I needed–she tagged me on Instagram saying she was personally challenging me, since she knew how much I would LOVE to play. Then and there, I knew I was going to make time to play and participate no matter what–don’t you love when quilting friends really know you and help encourage you to have some extra fun!?
I read through Angie’s fabulous tutorial on how to make awesome color (er,… colour) flat lay photos, selected fabrics that I felt complimented the block well but also would lend themselves to some fun color scavenger hunts around the house, and went wild.
I took a full Finn nap-time (a serendipitously long one at that!) to make a new Farmer’s Wife block with the colour challenge in mind. This was doubly great, since I’ve been wanting to make more Farmer’s Wife blocks, but they always seem to drop to the bottom of my list. This project has jump-started my desire to catch up with some blocks, AND has reminded me how much I love foundation paper piecing (FPP)! I plan to FPP more of my future Farmer’s Wife blocks, since I was able to make the entire block during the span of one nap time. Knowing that I can accomplish something like making an entire block during one nap helps me feel like I’m set up for success and ready to dive in. Everyone loves a finish, even if it’s a single block!
Once my block was complete, I wandered the house in search of colorfully turquoise objects. As Angie suggests, I gathered a lot and generally laid them out around the block on a big white foam board.
I think I spent more time rearranging the items than making the block, and remembering where they all went when I was done was another interesting challenge. I honestly had such a fun time laying this out. I already have another idea I want to try, which almost ALWAYS happens when I divert from my project to-do list to play, but I have to get one deadlined tutorial finished before I play more with this idea. I have a feeling my kids will love helping me with these photo flat lays, too. I made this one while the big kids were away on their grand adventure with my parents, so they didn’t get to help this time around. Just one more reason to make the time to play juuuuuust one more time *wink* (we all know I’m not finished with these color block flat lays!)
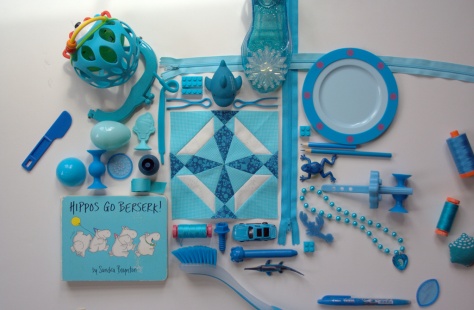
The challenge is being held on Instagram, so here was my final entry (above). Looking at it again, my camera photos look brighter than the one I took with my phone. Note taken for next time! You have two more days to post your entries, so if you are on Instagram, I definitely recommend you play, or at least check out the hashtag #colourblockchallenge to feast your eyes upon a gorgeous world of quilty color (you can view the tag online, even if you don’t have a smart phone or an Instagram account).
Since I love close up detail photos, here is a little tour of the silly items I found for this challenge. Who knew that we had so many turquoise bits and bobs around the house!?
Zippers and frogs, and pencils, oh my!
Checking the kids’ bookshelf was a great tip by Angie. Sandra Boyton’s Hippos Go Berserk is a must read, especially when you love turquoise, math, and silliness (like I do!).
This smiley shark had as much fun as I did, I think! Legos are an immediate win, and the little bobbin minders that Sarah from Sarah Goer Quilts sent me a few months ago kicked off my color hunt. No turquoise lay would be complete without an Elsa shoe, too, glittering in the background.
So much fun! Thank you, Angie, for the push to play. I had SO much fun with this!
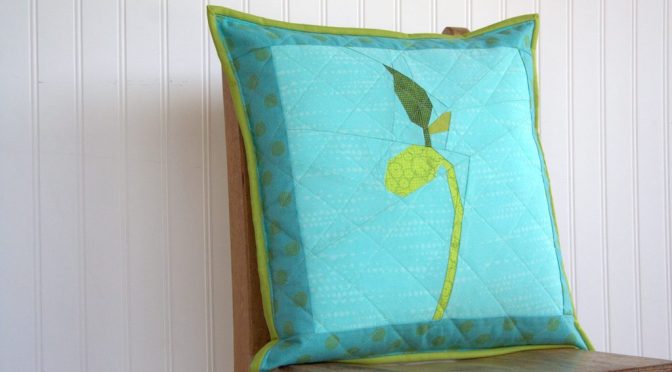
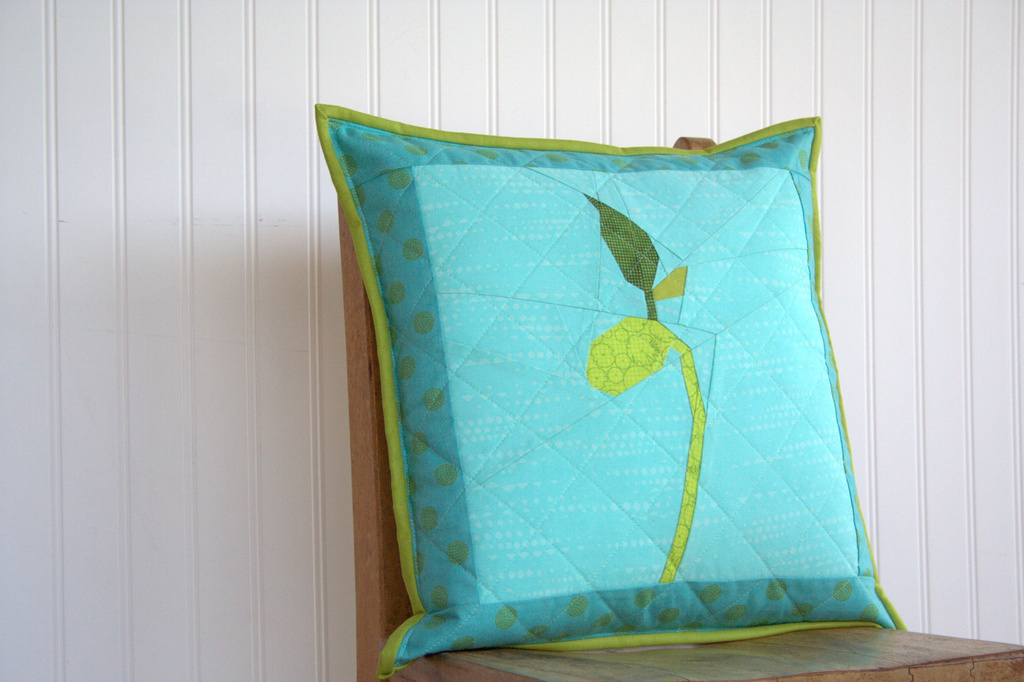
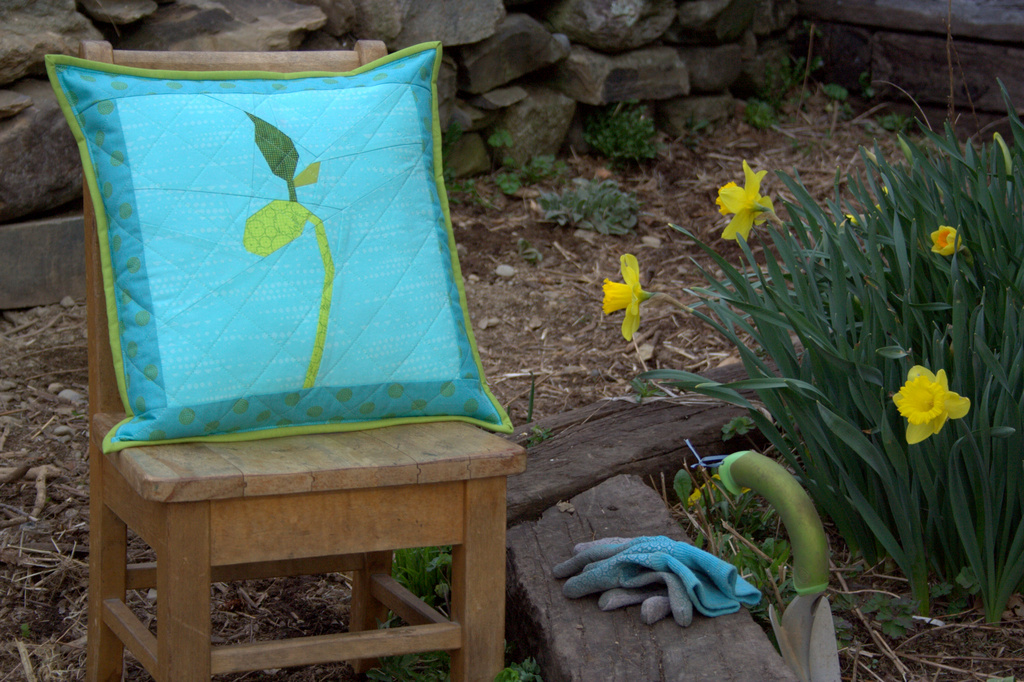
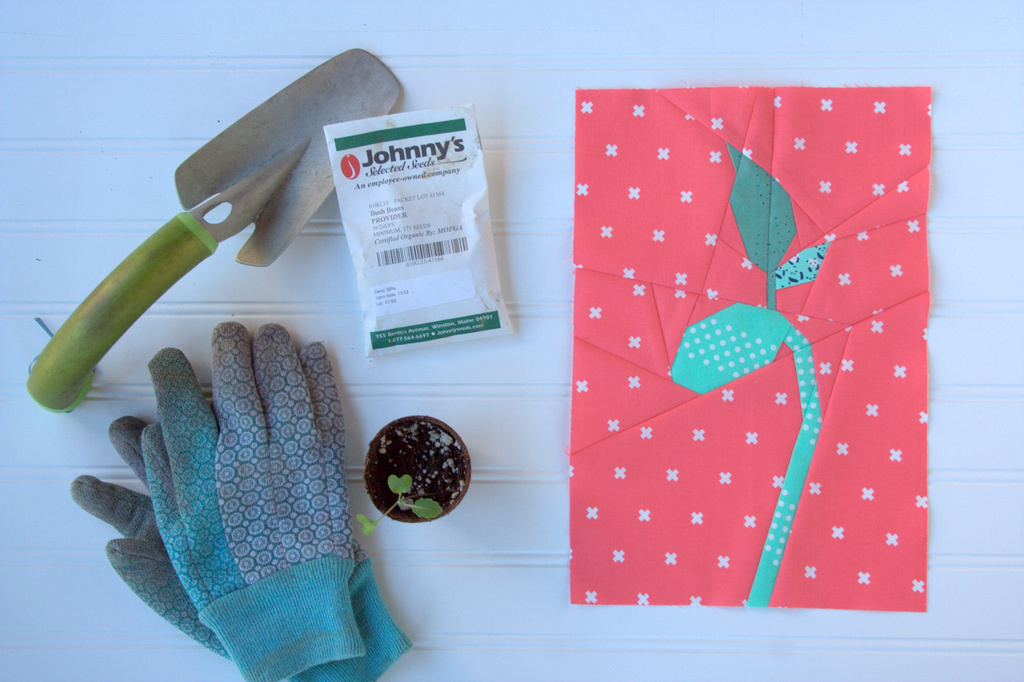
Earth Day has always been one of my favorites days. I strive to fully embody the “Earth Day is Every Day” ideal with my day to day life, from adopting a whale in third grade and frequent stream clean ups as a child, to majoring in environmental science in college, to aiming to instill a love and respect for the earth and all its creatures and functions in my children. The earth is our home, and it is our responsibility to help nurture and care for it. Today seemed like the perfect day to share my newly finished pillow featuring my bean sprout foundation paper pieced pattern.
I’m calling this pillow “Grow” and it will be donated to a fundraiser auction/raffle at our local school. The theme for the fundraiser is “Growth & Gardening” so it fits perfectly!
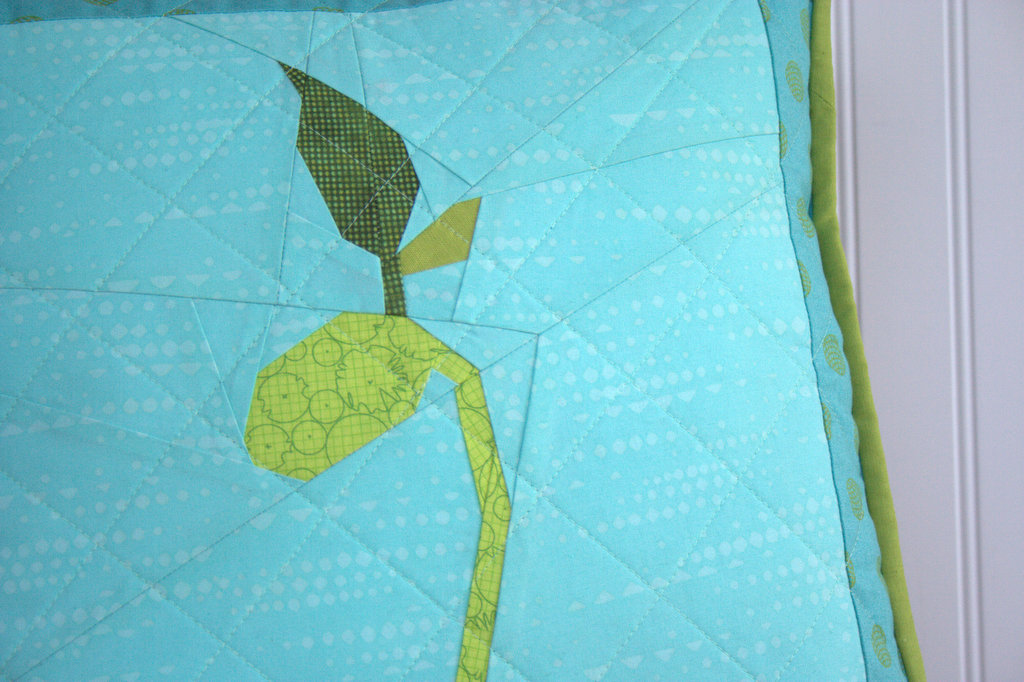
I used my coveted Carolyn Friedlander bright green Architextures fabric (Robert Kaufman) for the sprout, with little leaves of lime linen leftover from a previous project and a dotty dark green that was in my stash, but has no selvedge. A light turquoise modern Indah batik by Me + You (Hoffman Fabrics) makes a perfect summer sky for the background. Alison Glass Sun Prints 2016 Sphere (Andover) as the border rounded out the pillow nicely. It’s bound in the remainder of the lime linen blend and backed in that same mystery, beautiful dark green fabric. I quilted the pillow front with coordinating 50wt Aurifil thread in 2800-Mint Ice, since it blends right in with both the background and the green bean sprout.
I was hoping to release the Bean Sprout Pattern today, too, but lo… life got in the way and it’s not quite ready yet. Soon, hopefully. The pattern finishes at 12″ square so I added 2″ borders all around to bring the pillow to 16″ square.
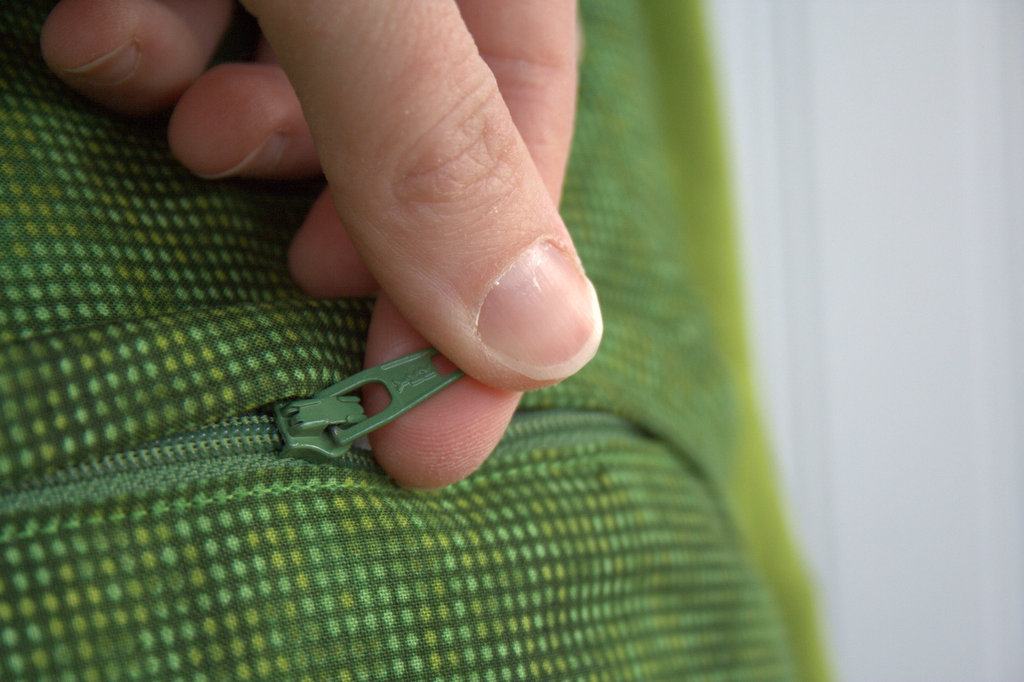
I also inserted my very first hidden zipper in the back of this pillow, which is SO exciting! I used a fabulous tutorial by S.O.T.A.K. handmade and it worked like a charm. I am definitely installing hidden zippers in the backs of all of my pillows from now on.
Now that this pillow is finished and photographed, it will be delivered to my daughter’s school for their annual fundraising auction/raffle. Last year’s donated project taught me a lot about the art of giving, and this year’s gift seems no less serendipitous. A quilted item was needed for a growth-themed fundraiser, right as I had tested my bean sprout pattern–perfect! I’m curious to see what next year brings, and I hope this pillow is able to raise some money for our local school!
I’m linking up with Crazy Mom Quilts, Needle and Thread Thursday, and TGIFF, since a finish ALWAYS warrants celebration! Now, off I go on a hike to celebrate this gorgeous Earth Day! Head on outside and love your mama!
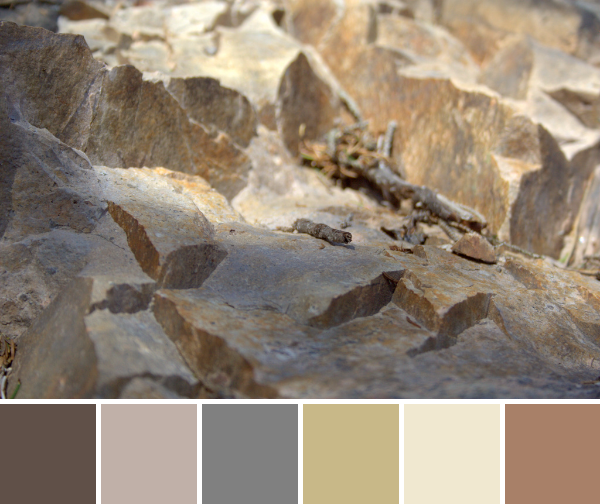
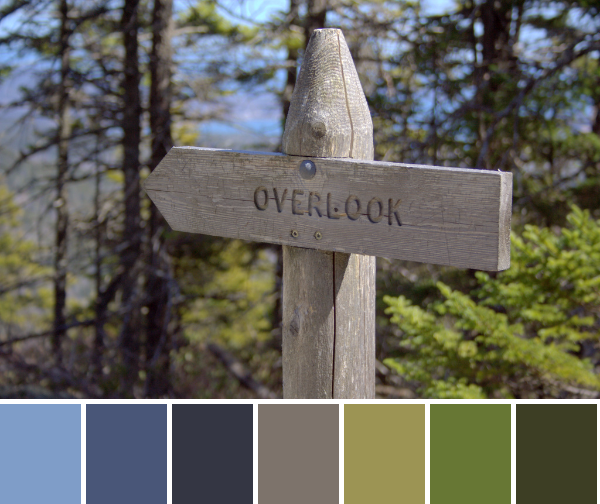
This past weekend, my husband and I sought out a new trail to hike, and aimed to find one that we would not be able to tackle with a 3 and 6 year old in tow. Our big kids had just left for a grand adventure–a week in NJ with Grandma & Pop Pop, flying solo for the first time ever. With Finn in a carrier, we were aiming to hike up a mountain and get some much desired fresh air, burning muscles, and a view. We found exactly what we were seeking in the Mansell Mountain Trail in Southwest Harbor, Maine. We found it by watching 1 Minute Hikes with Aislinn, and you can watch her video of the hike here (watching it again, I’m realizing we hiked the trail backwards). It’s a pretty neat tool for those looking for new hikes in Maine (although I don’t really know why it’s called “1 minute hikes” since the hike certainly didn’t take us one minute, and the video is longer than a minute… but still, a useful tool!) This week’s color inspiration hails from photos I took along the hike. Color palettes were made using Play Crafts’ Palette Builder 2.1, and the matching Kona cotton and Moda Bella solids and Aurifil threads are my favorite perk of using the Palette Builder.
Corresponding solids from left to right: Bella Chocolate, Bella Stone, Bella Etchings Slate, Kona Scone, Bella Snow, Bella Paper Bag
Corresponding Aurifil thread from left to right: 1140 – Bark
5011 – Rope Beige 2625 – Arctic Ice 5010 – Beige 2311 – Muslin 2335 – Lt Cinnamon
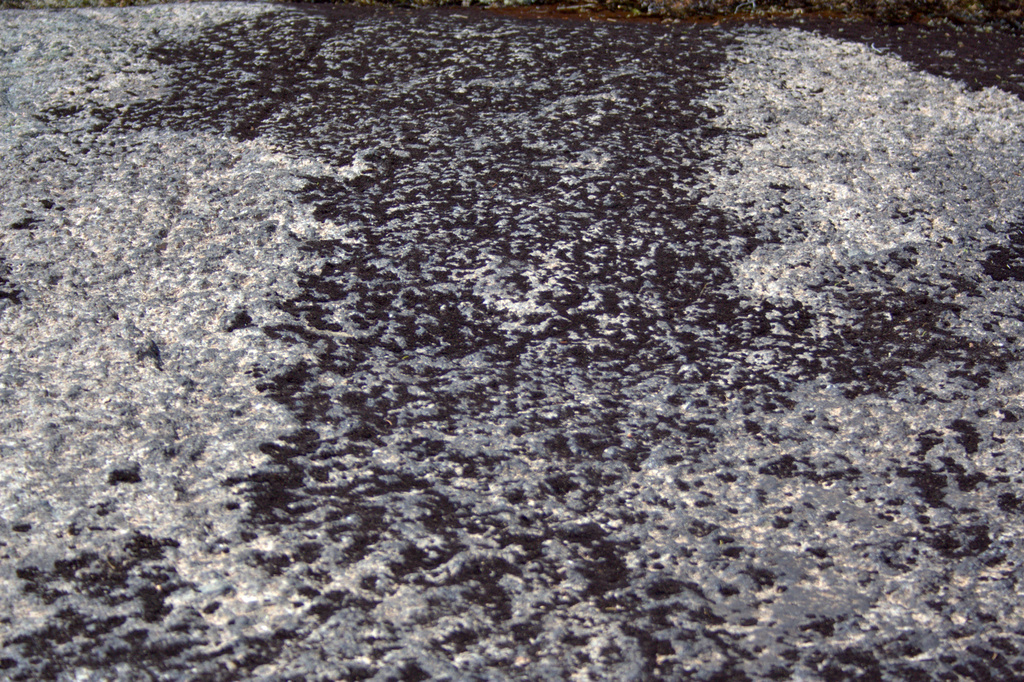
The climb up Mansell Mountain was very steep, so my gaze was often on the ground right in front of my face, finding hand-holds in some cases. I marveled in the variations of texture and color as we climbed up the mountain, and this one spot in particular caught my eye. I love the play of shadow in the crevasses, and could even see this transcribed into a full quilt. It reminds me of barren desert cliffs, and without the tiny twig for perspective, I’d almost think I were overlooking some barren landscape.
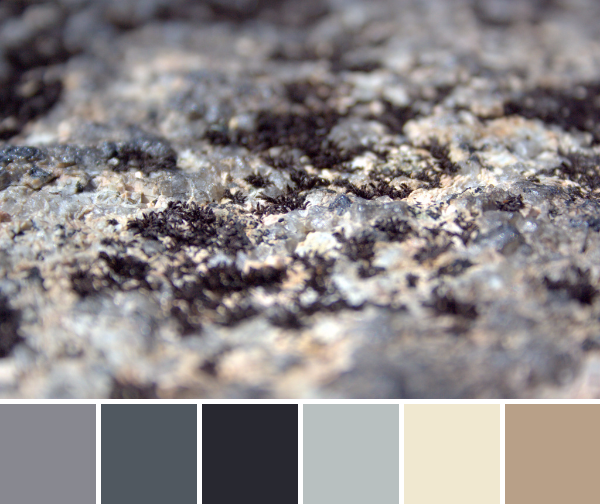
Corresponding solids from left to right: Bella Graphite, Kona Coal, Kona Charcoal, Bella Zen Grey, Bella Snow, Kona Cobblestone
Corresponding Aurifil thread from left to right: 5004 – Grey Smoke
1158 – Med Grey
2785 – V Dk Navy
2600 – Dove
2311 – Muslin 2375 – Antique Blush
I love this photo and palette since it’s a perfect example of the benefit of taking a *really* close look at the world around you. These tiny almost crystalline bits of lichen could have easily been tromped over without a second glance. Looking closely, though, you see it’s a beautiful little varied world full of greys, beige, and a hint of peach. Call me weird, but I think it’s quite beautiful.
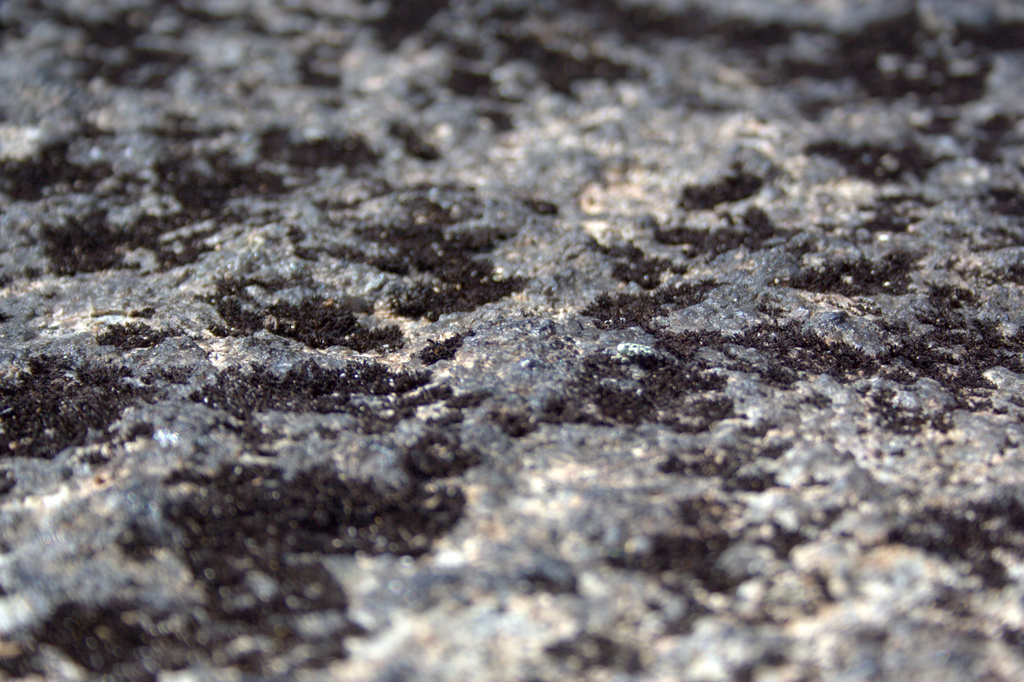
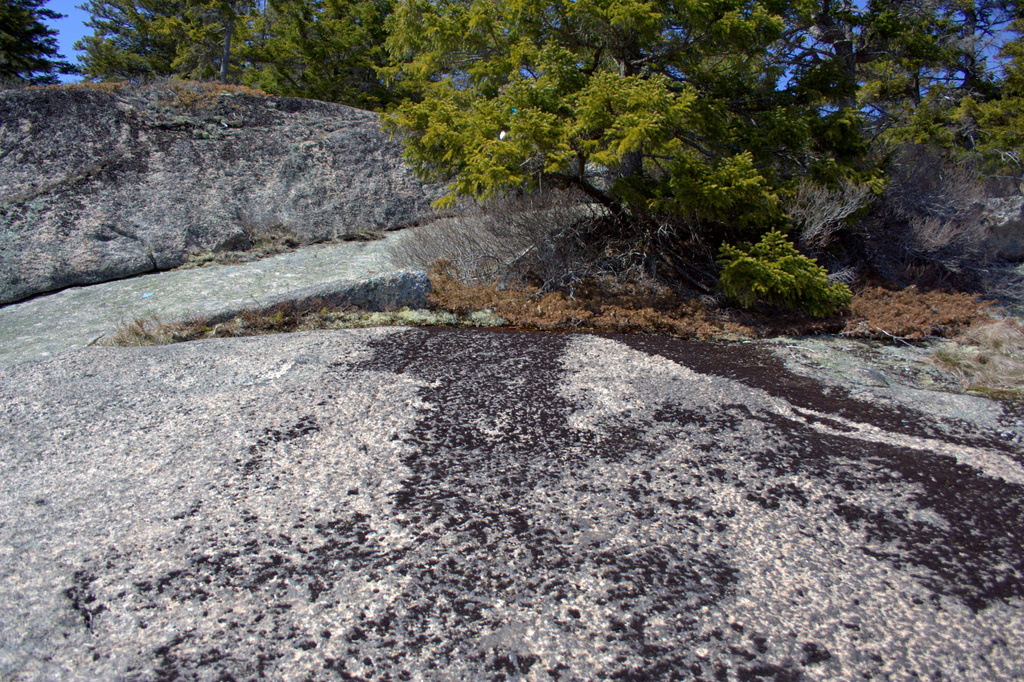
To give you some perspective, here is a series of photos showing you a lengthening view of what you see in the color palette above. If you take a step backward, you see this:
Take one step back…
Take another step back and you see:
Take two steps back….
With one more step back, here’s what you would see as you’re hiking along the trail:
Three steps back…
It’s amazing how the appearance of the world changes as you take a closer look! This “dirty rock” is actually a tiny world of beauty. Amazing!
Corresponding solids from left to right: Kona Cotton Candy Blue, Bella Admiral Blue, Bella Washed Black, Bella Etchings Slate, Bella Fig Tree Olive, Bella Evergreen, Kona Moss
Corresponding Aurifil thread from left to right: 2770 – V Lt Delft
1310 – Med Blue Grey
2630 – Pewter
2325 – Linen
5010 – Beige
2887 – Olive
2905 – Army Green
We were seeking great views, and we found them indeed. Photos don’t do the hike justice at all, but I’ll include some more below. A mountain face of stone stairs, wooden slats across wet areas, pristine babbling streams winding along next to the path, sun on our backs, and a view that just cannot be portrayed. It was a lovely day!
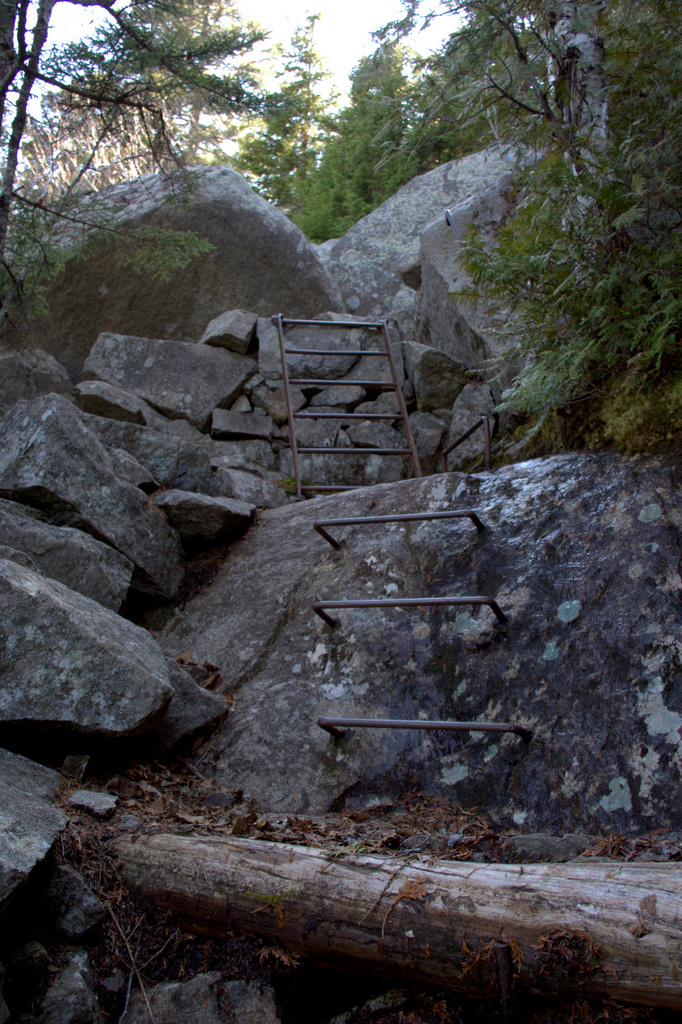
Climbing up Mansell Mountain with a baby on his back. He’s a keep-ah!The view from one of the lookouts on Mansell Mountain.It was THIS gorgeous!I love trails with actual metal ladders!Pretty much the entire trail down the mountain consisted of these gorgeously crafted stone stairs. 900+ foot elevation traversed on stairs!My sweet and handsome hiking buddies!
I grab a needle and thread once the kids are in bed

 I kicked off the month by buying the Rebel Quilt pattern by Libs Elliott. Ever since my husband first started “following” my quilting and getting more into the quilting world, Libs Elliott has been his favorite designer. I can’t even tell you how many times he has tagged me on Instagram on a post (that I had already liked, by the way) just to make sure I saw the awesomeness. Since I have yet to make a quilt for him, we decided that the Rebel Quilt would be perfect. He selected a color palette of red, black, grey, white, and a bit of turquoise (yay!), and I’m itching to get started. This is going to be SO much fun to see come together! All in good time, of course.
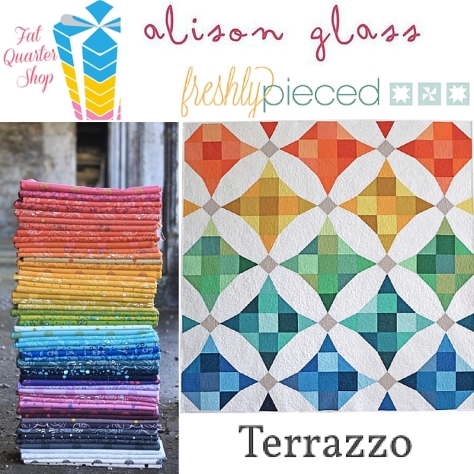 The second week I bought the Terrazzo Quilt pattern by Lee Heinrich of Freshly Pieced. This is one of those quilts I loved the moment I saw it, but have not yet had the right opportunity to make one. Recently Fat Quarter Shop asked if I would want to make a quilt using both of their Alison Glass Sun Prints bundles and blog about it if they sent me the fabric, and this quilt pattern popped to mind. Yes and yes!! I plan to create this quilt in the coming months; an all time favorite pattern with my all time favorite fabrics–I’m in love already and I haven’t even cut the first piece!
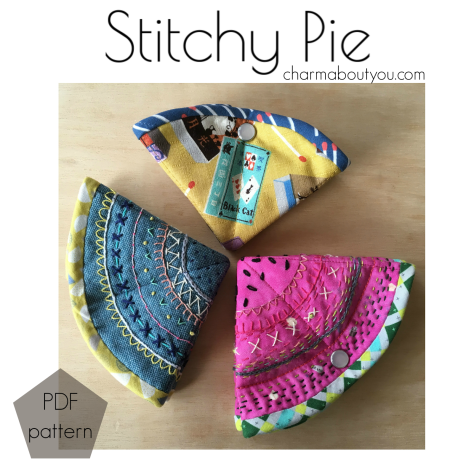 For the third week, I’m sharing a pattern I bought *just* before May began, but I’m counting it anyway. Stitchy Pie is a sweet needle organizer pattern recently released by Lucy at Charm About You. I had just been thinking about how I needed some system for keeping all of my hand stitching needles organized and in one place (it’s never fun when I can’t find my self-threading needles and it’s thread burying time), and this pattern popped up in my Instagram feed. I plan to make mine…. wait, can you guess?…. out of an Alison Glass Art Theory panel! I will never tire of Alison Glass fabric projects! I don’t know when the time will present itself, but when it does, I’m excited to make this handy little project.


 The pattern includes clear piecing diagrams, sewing tips, and templates for the 8″x12″ finished block, with various shading to help with accurate fabric placement. Quarter inch seam allowances are included on all pattern pieces to help ensure easy piecing, and a 1″ reference square is on every printable page so that scale can be confirmed. Full foundation paper piecing instructions are not included in the pattern, but I have a thorough paper piecing tutorial
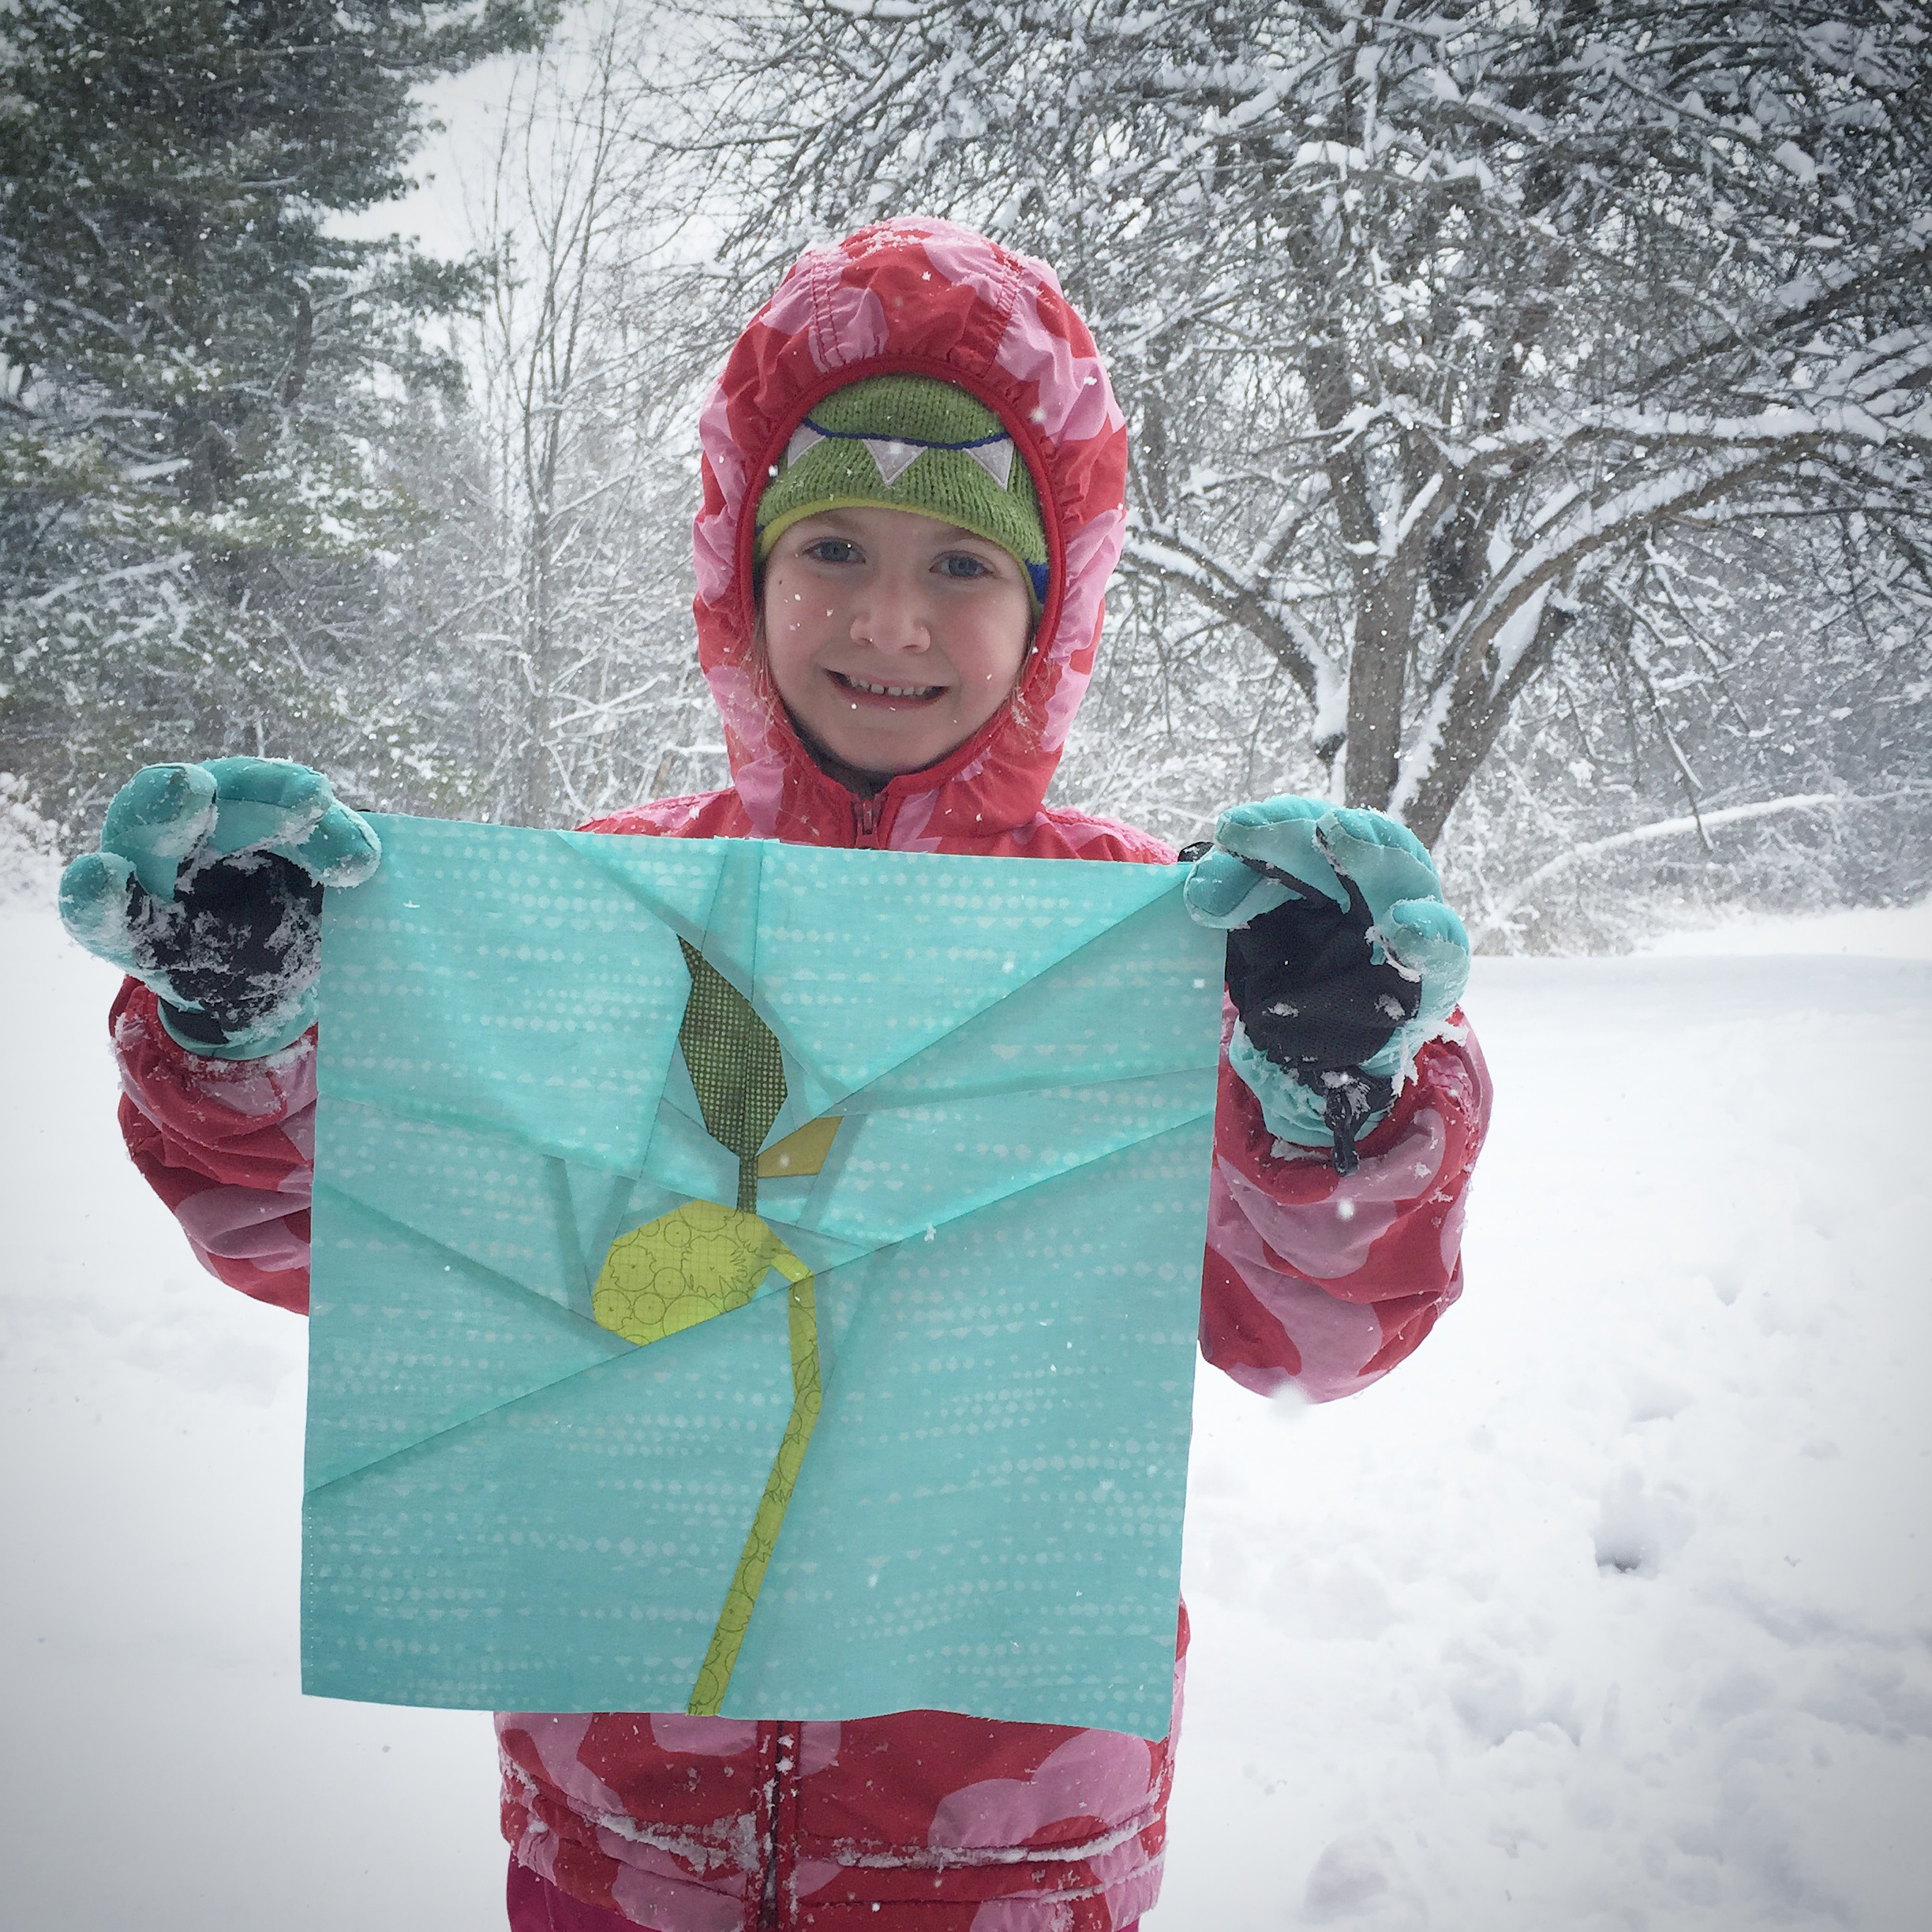
 Once my block was complete, I wandered the house in search of colorfully turquoise objects. As Angie suggests, I gathered a lot and generally laid them out around the block on a big white foam board.
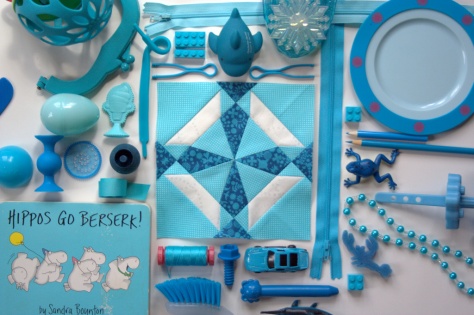 I arranged and rearranged, and rearranged some more. Without sharing all her secrets (
 I think I spent more time rearranging the items than making the block, and remembering where they all went when I was done was another interesting challenge. I honestly had such a fun time laying this out. I already have another idea I want to try, which almost ALWAYS happens when I divert from my project to-do list to play, but I have to get one deadlined tutorial finished before I play more with this idea. I have a feeling my kids will love helping me with these photo flat lays, too. I made this one while the big kids were away on their grand adventure with my parents, so they didn’t get to help this time around. Just one more reason to make the time to play juuuuuust one more time *wink* (we all know I’m not finished with these color block flat lays!)
 The challenge is being held on Instagram, so
 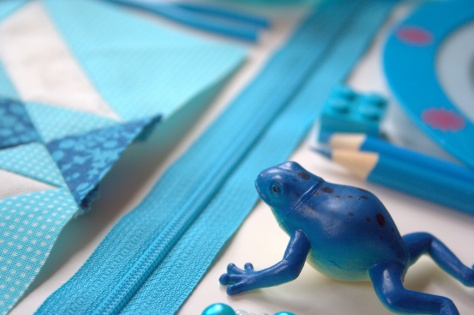 Zippers and frogs, and pencils, oh my!
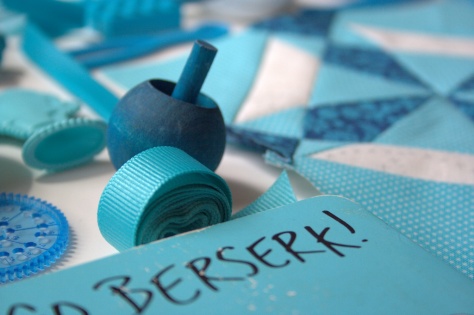 Checking the kids’ bookshelf was a great tip by Angie. Sandra Boyton’s Hippos Go Berserk is a must read, especially when you love turquoise, math, and silliness (like I do!).
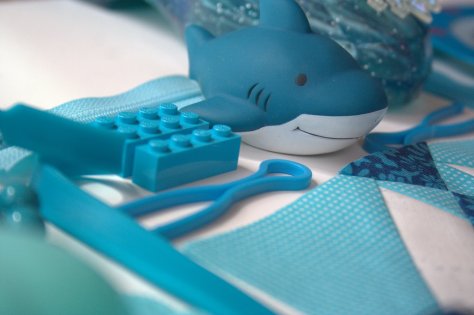 This smiley shark had as much fun as I did, I think! Legos are an immediate win, and the little bobbin minders that